Image data augmentation is a technique that can be used to artificially expand the size of a training dataset by creating modified versions of images in the dataset.
Training deep learning neural network models on more data can result in more skillful models, and the augmentation techniques can create variations of the images that can improve the ability of the fit models to generalize what they have learned to new images.
The Keras deep learning neural network library provides the capability to fit models using image data augmentation via the ImageDataGenerator class.
In this tutorial, you will discover how to use image data augmentation when training deep learning neural networks.
After completing this tutorial, you will know:
Image data augmentation is used to expand the training dataset in order to improve the performance and ability of the model to generalize.
Image data augmentation is supported in the Keras deep learning library via the ImageDataGenerator class.
How to use shift, flip, brightness, and zoom image data augmentation.
Kick-start your project with my new book Deep Learning for Computer Vision, including step-by-step tutorials and the Python source code files for all examples.
Let’s get started.
Update May/2019: Fixed data type for pixel values when plotting.
Update Jun/2019: Fixed small typo in API example (thanks Georgios).
Tutorial Overview
This tutorial is divided into eight parts; they are:
Image Data Augmentation
Sample Image
Image Augmentation With ImageDataGenerator
Horizontal and Vertical Shift Augmentation
Horizontal and Vertical Flip Augmentation
Random Rotation Augmentation
Random Brightness Augmentation
Random Zoom Augmentation
Image Data Augmentation
The performance of deep learning neural networks often improves with the amount of data available.
Data augmentation is a technique to artificially create new training data from existing training data. This is done by applying domain-specific techniques to examples from the training data that create new and different training examples.
Image data augmentation is perhaps the most well-known type of data augmentation and involves creating transformed versions of images in the training dataset that belong to the same class as the original image.
Transforms include a range of operations from the field of image manipulation, such as shifts, flips, zooms, and much more.
The intent is to expand the training dataset with new, plausible examples. This means, variations of the training set images that are likely to be seen by the model. For example, a horizontal flip of a picture of a cat may make sense, because the photo could have been taken from the left or right. A vertical flip of the photo of a cat does not make sense and would probably not be appropriate given that the model is very unlikely to see a photo of an upside down cat.
As such, it is clear that the choice of the specific data augmentation techniques used for a training dataset must be chosen carefully and within the context of the training dataset and knowledge of the problem domain. In addition, it can be useful to experiment with data augmentation methods in isolation and in concert to see if they result in a measurable improvement to model performance, perhaps with a small prototype dataset, model, and training run.
Modern deep learning algorithms, such as the convolutional neural network, or CNN, can learn features that are invariant to their location in the image. Nevertheless, augmentation can further aid in this transform invariant approach to learning and can aid the model in learning features that are also invariant to transforms such as left-to-right to top-to-bottom ordering, light levels in photographs, and more.
Image data augmentation is typically only applied to the training dataset, and not to the validation or test dataset. This is different from data preparation such as image resizing and pixel scaling; they must be performed consistently across all datasets that interact with the model.
Want Results with Deep Learning for Computer Vision?
Take my free 7-day email crash course now (with sample code).
Click to sign-up and also get a free PDF Ebook version of the course.
Sample Image
We need a sample image to demonstrate standard data augmentation techniques.
In this tutorial, we will use a photograph of a bird titled “Feathered Friend” by AndYaDontStop, released under a permissive license.
Download the image and save it in your current working directory with the filename ‘bird.jpg‘.
Feathered Friend, taken by AndYaDontStop. Some rights reserved.
First, the class may be instantiated and the configuration for the types of data augmentation are specified by arguments to the class constructor.
A range of techniques are supported, as well as pixel scaling methods. We will focus on five main types of data augmentation techniques for image data; specifically:
Image shifts via the width_shift_range and height_shift_range arguments.
Image flips via the horizontal_flip and vertical_flip arguments.
Image rotations via the rotation_range argument
Image brightness via the brightness_range argument.
Image zoom via the zoom_range argument.
For example, an instance of the ImageDataGenerator class can be constructed.
1
2
3
...
# create data generator
datagen=ImageDataGenerator()
Once constructed, an iterator can be created for an image dataset.
The iterator will return one batch of augmented images for each iteration.
An iterator can be created from an image dataset loaded in memory via the flow() function; for example:
1
2
3
4
5
...
# load image dataset
X,y=...
# create iterator
it=datagen.flow(X,y)
Alternately, an iterator can be created for an image dataset located on disk in a specified directory, where images in that directory are organized into subdirectories according to their class.
1
2
3
...
# create iterator
it=datagen.flow_from_directory(X,y,...)
Once the iterator is created, it can be used to train a neural network model by calling the fit_generator() function.
The steps_per_epoch argument must specify the number of batches of samples comprising one epoch. For example, if your original dataset has 10,000 images and your batch size is 32, then a reasonable value for steps_per_epoch when fitting a model on the augmented data might be ceil(10,000/32), or 313 batches.
1
2
3
4
# define model
model=...
# fit model on the augmented dataset
model.fit_generator(it,steps_per_epoch=313,...)
The images in the dataset are not used directly. Instead, only augmented images are provided to the model. Because the augmentations are performed randomly, this allows both modified images and close facsimiles of the original images (e.g. almost no augmentation) to be generated and used during training.
A data generator can also be used to specify the validation dataset and the test dataset. Often, a separate ImageDataGenerator instance is used that may have the same pixel scaling configuration (not covered in this tutorial) as the ImageDataGenerator instance used for the training dataset, but would not use data augmentation. This is because data augmentation is only used as a technique for artificially extending the training dataset in order to improve model performance on an unaugmented dataset.
Now that we are familiar with how to use the ImageDataGenerator, let’s look at some specific data augmentation techniques for image data.
We will demonstrate each technique standalone by reviewing examples of images after they have been augmented. This is a good practice and is recommended when configuring your data augmentation. It is also common to use a range of augmentation techniques at the same time when training. We have isolated the techniques to one per section for demonstration purposes only.
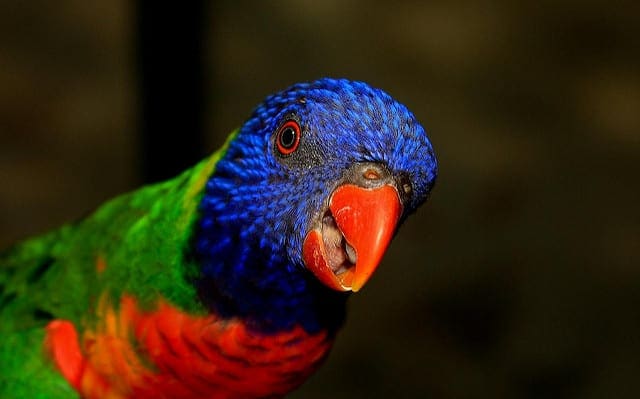
Horizontal and Vertical Shift Augmentation
A shift to an image means moving all pixels of the image in one direction, such as horizontally or vertically, while keeping the image dimensions the same.
This means that some of the pixels will be clipped off the image and there will be a region of the image where new pixel values will have to be specified.
The width_shift_range and height_shift_range arguments to the ImageDataGenerator constructor control the amount of horizontal and vertical shift respectively.
These arguments can specify a floating point value that indicates the percentage (between 0 and 1) of the width or height of the image to shift. Alternately, a number of pixels can be specified to shift the image.
Specifically, a value in the range between no shift and the percentage or pixel value will be sampled for each image and the shift performed, e.g. [0, value]. Alternately, you can specify a tuple or array of the min and max range from which the shift will be sampled; for example: [-100, 100] or [-0.5, 0.5].
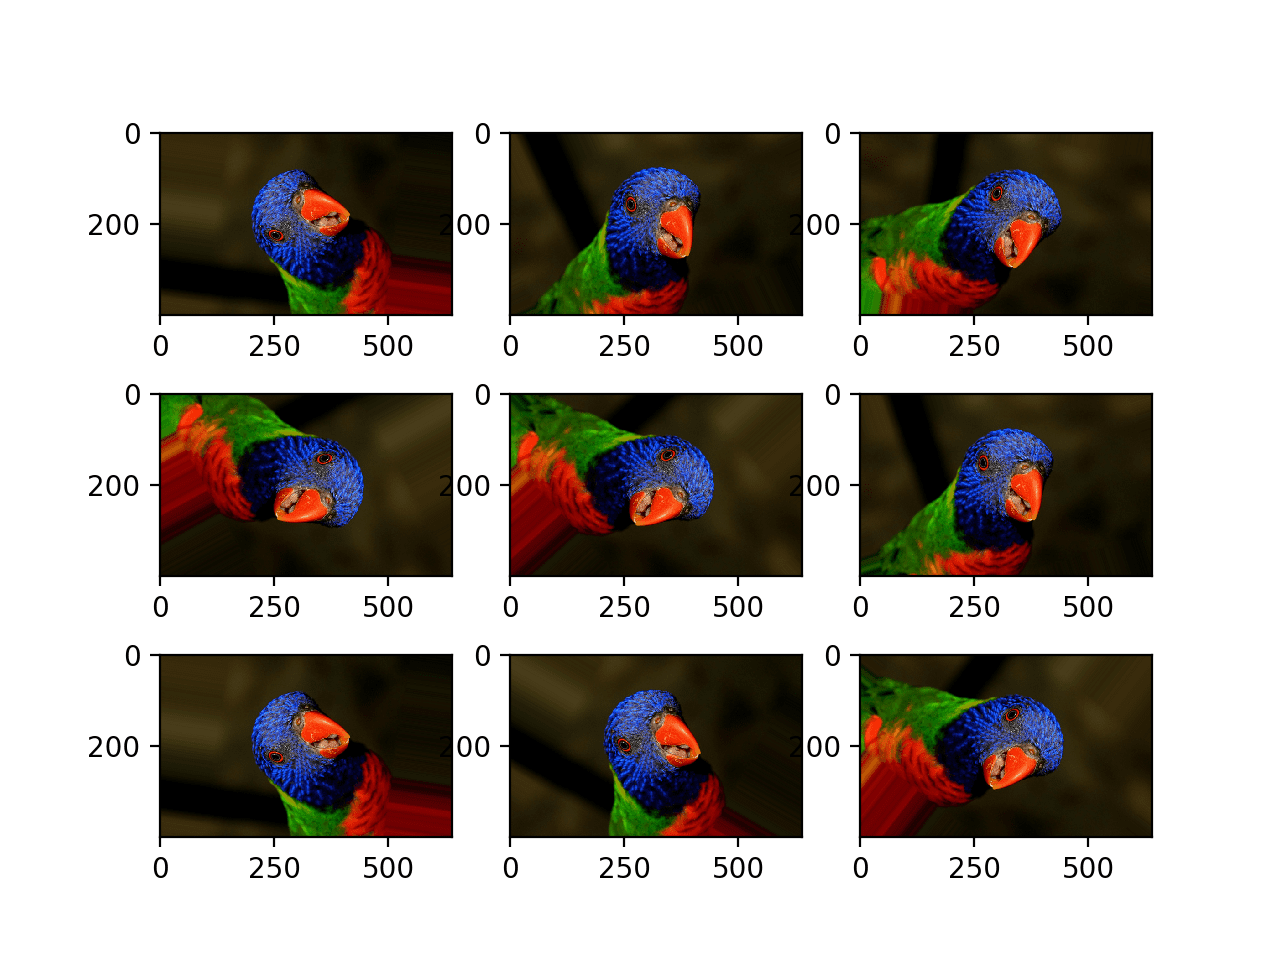
The example below demonstrates a horizontal shift with the width_shift_range argument between [-200,200] pixels and generates a plot of generated images to demonstrate the effect.
1
2
3
4
5
6
7
8
9
10
11
12
13
14
15
16
17
18
19
20
21
22
23
24
25
26
27
28
# example of horizontal shift image augmentation
from numpy import expand_dims
from keras.preprocessing.image import load_img
from keras.preprocessing.image import img_to_array
from keras.preprocessing.image import ImageDataGenerator
Running the example creates the instance of ImageDataGenerator configured for image augmentation, then creates the iterator. The iterator is then called nine times in a loop and each augmented image is plotted.
We can see in the plot of the result that a range of different randomly selected positive and negative horizontal shifts was performed and the pixel values at the edge of the image are duplicated to fill in the empty part of the image created by the shift.
Plot of Augmented Generated With a Random Horizontal Shift
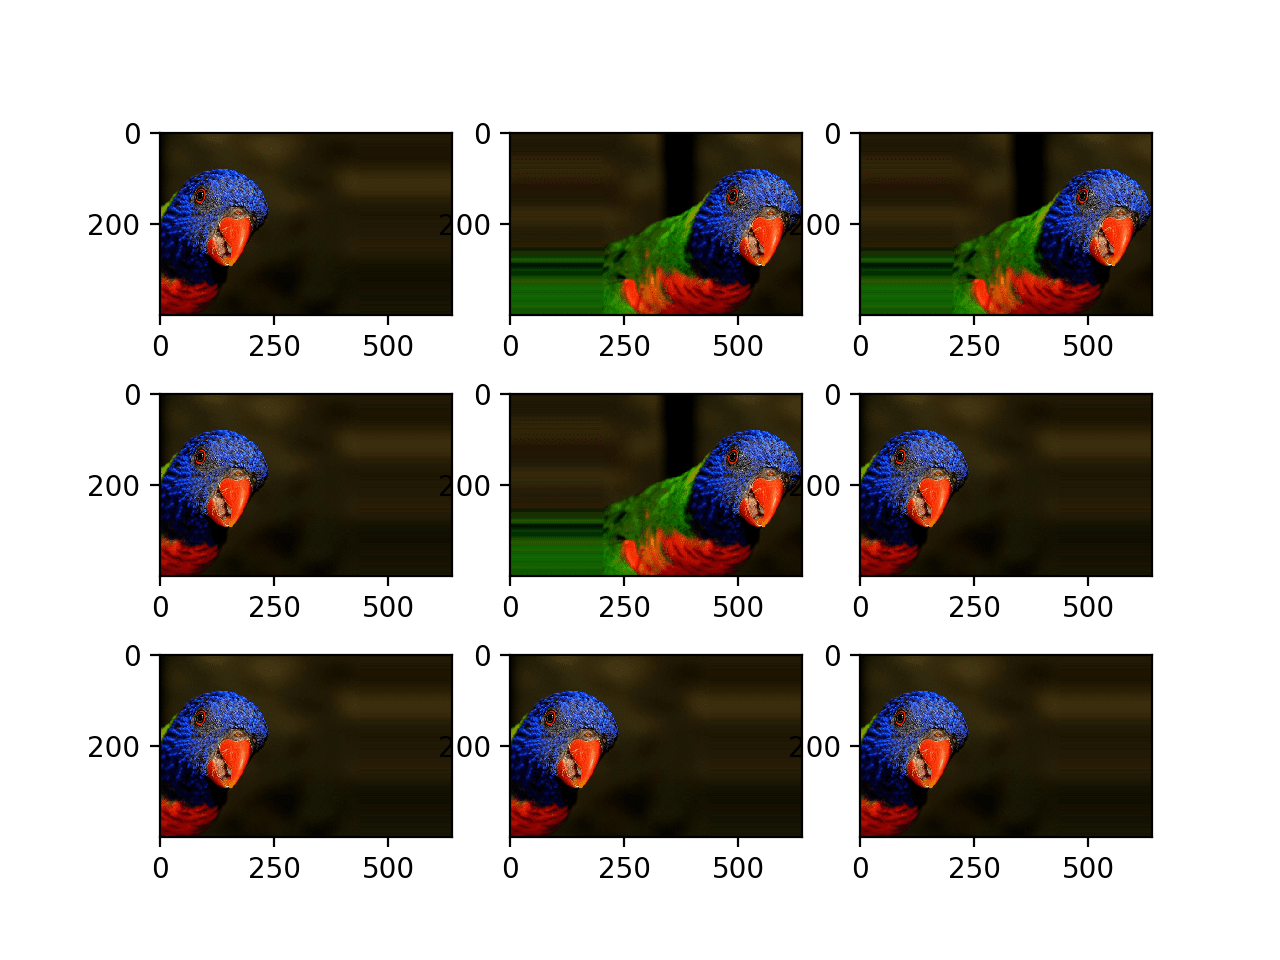
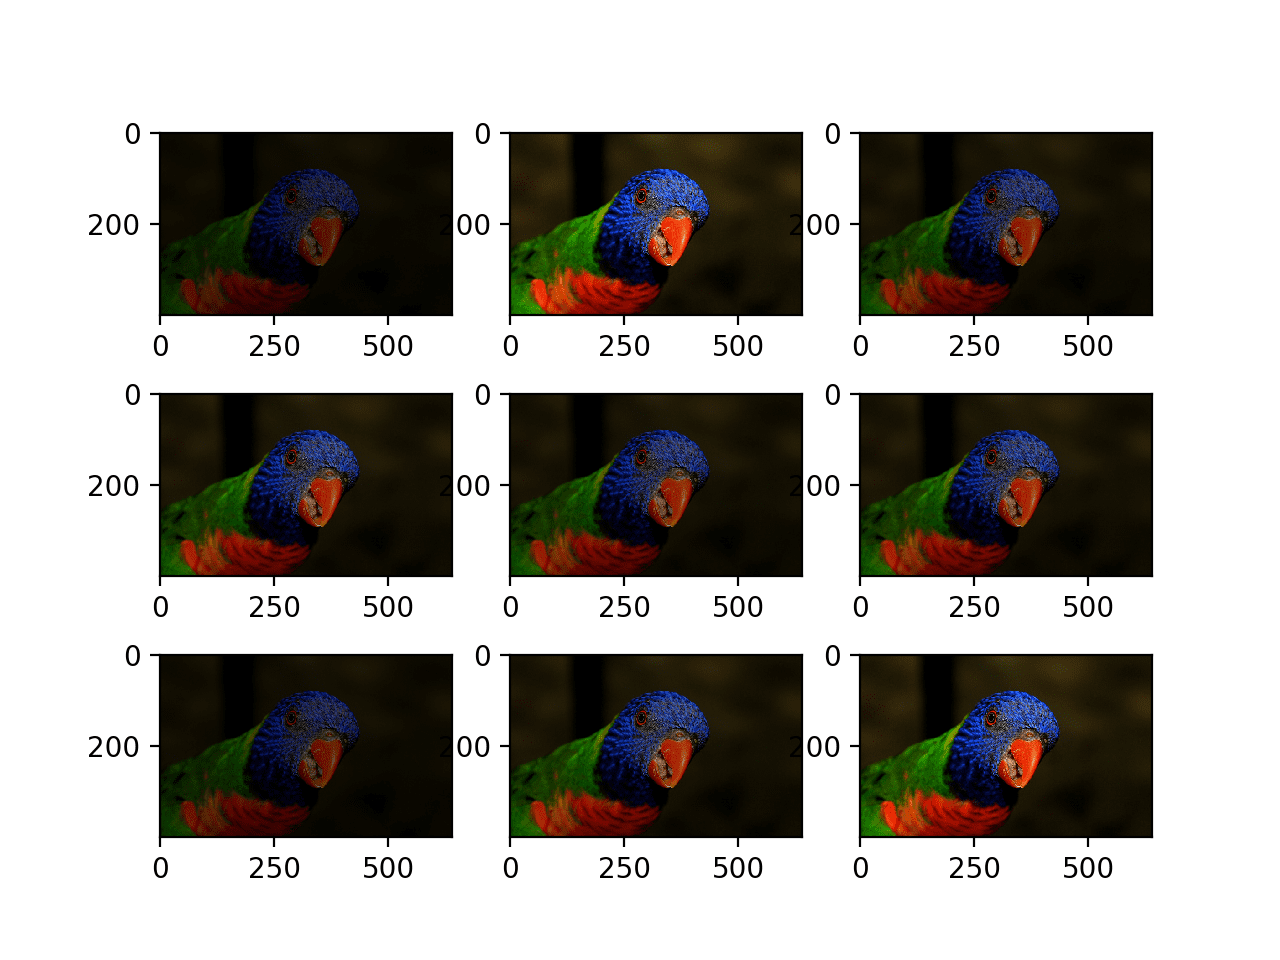
Below is the same example updated to perform vertical shifts of the image via the height_shift_range argument, in this case specifying the percentage of the image to shift as 0.5 the height of the image.
1
2
3
4
5
6
7
8
9
10
11
12
13
14
15
16
17
18
19
20
21
22
23
24
25
26
27
28
# example of vertical shift image augmentation
from numpy import expand_dims
from keras.preprocessing.image import load_img
from keras.preprocessing.image import img_to_array
from keras.preprocessing.image import ImageDataGenerator
Running the example creates a plot of images augmented with random positive and negative vertical shifts.
We can see that both horizontal and vertical positive and negative shifts probably make sense for the chosen photograph, but in some cases, the replicated pixels at the edge of the image may not make sense to a model.
Note that other fill modes can be specified via “fill_mode” argument.
Plot of Augmented Images With a Random Vertical Shift
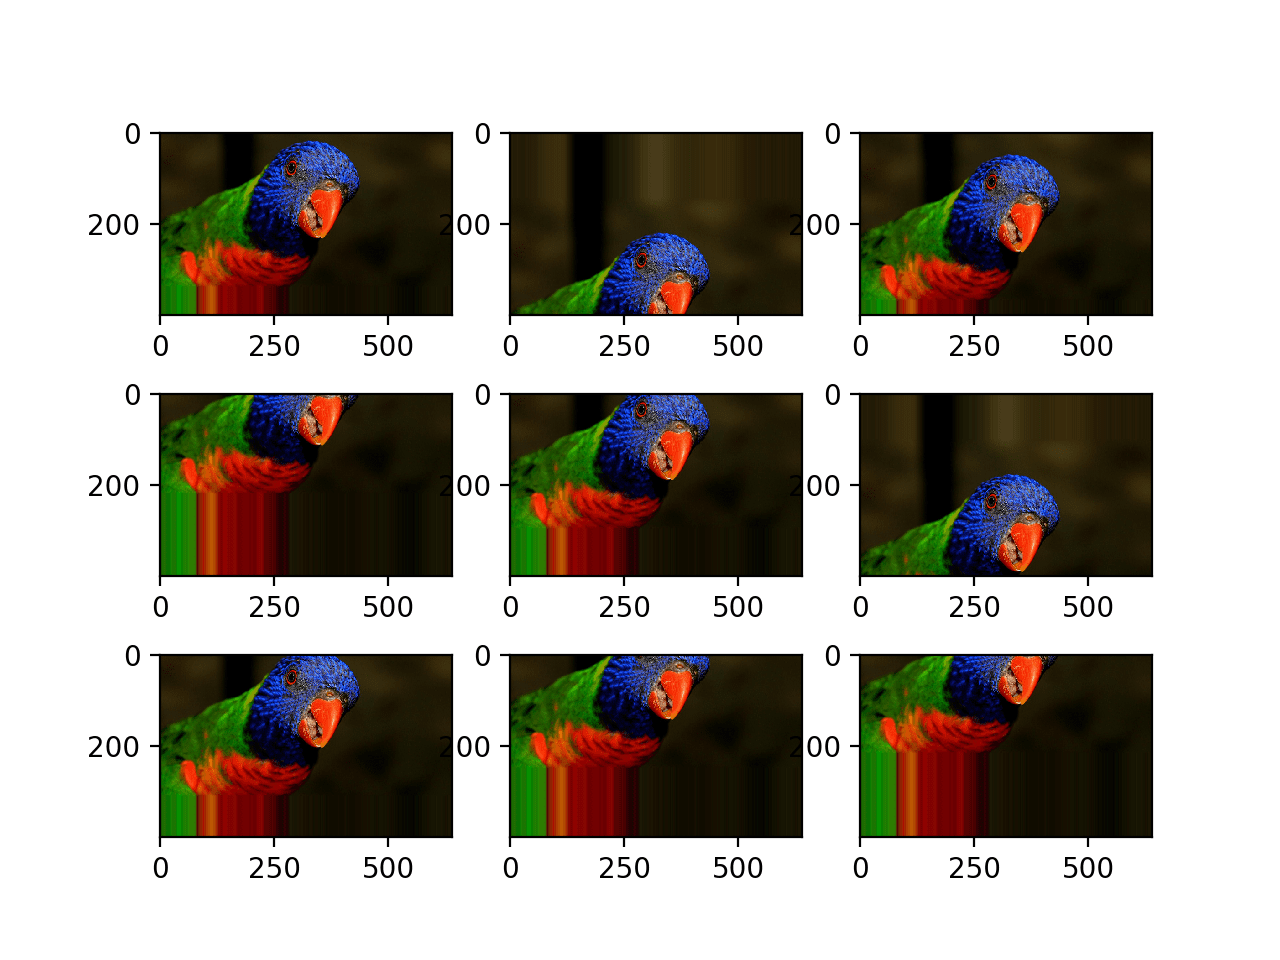
Horizontal and Vertical Flip Augmentation
An image flip means reversing the rows or columns of pixels in the case of a vertical or horizontal flip respectively.
The flip augmentation is specified by a boolean horizontal_flip or vertical_flip argument to the ImageDataGenerator class constructor. For photographs like the bird photograph used in this tutorial, horizontal flips may make sense, but vertical flips would not.
For other types of images, such as aerial photographs, cosmology photographs, and microscopic photographs, perhaps vertical flips make sense.
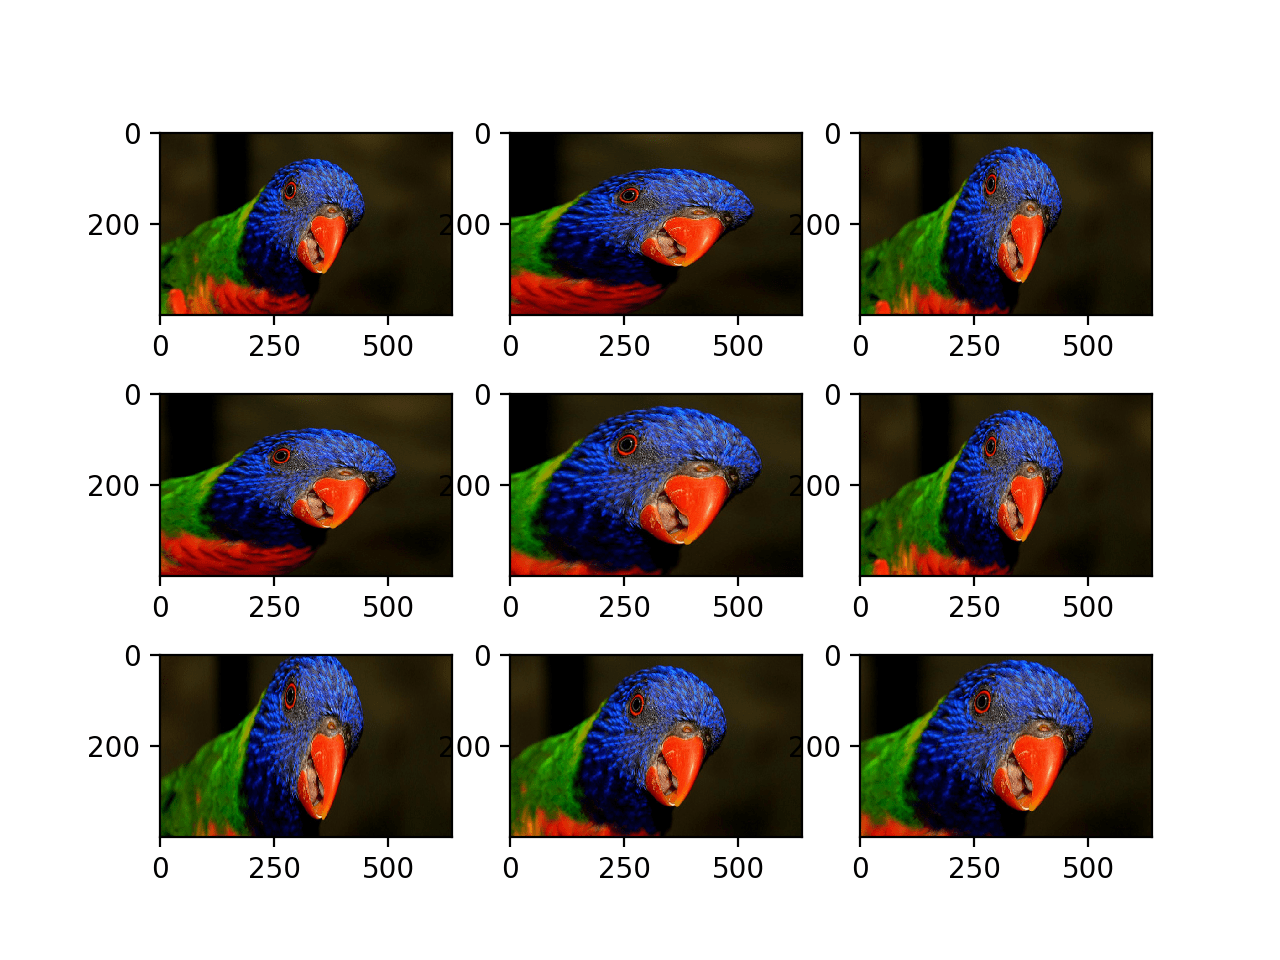
The example below demonstrates augmenting the chosen photograph with horizontal flips via the horizontal_flip argument.
1
2
3
4
5
6
7
8
9
10
11
12
13
14
15
16
17
18
19
20
21
22
23
24
25
26
27
28
# example of horizontal flip image augmentation
from numpy import expand_dims
from keras.preprocessing.image import load_img
from keras.preprocessing.image import img_to_array
from keras.preprocessing.image import ImageDataGenerator
from matplotlib import pyplot
# load the image
img=load_img('bird.jpg')
# convert to numpy array
data=img_to_array(img)
# expand dimension to one sample
samples=expand_dims(data,0)
# create image data augmentation generator
datagen=ImageDataGenerator(horizontal_flip=True)
# prepare iterator
it=datagen.flow(samples,batch_size=1)
# generate samples and plot
foriinrange(9):
# define subplot
pyplot.subplot(330+1+i)
# generate batch of images
batch=it.next()
# convert to unsigned integers for viewing
image=batch[0].astype('uint8')
# plot raw pixel data
pyplot.imshow(image)
# show the figure
pyplot.show()
Running the example creates a plot of nine augmented images.
We can see that the horizontal flip is applied randomly to some images and not others.
Plot of Augmented Images With a Random Horizontal Flip
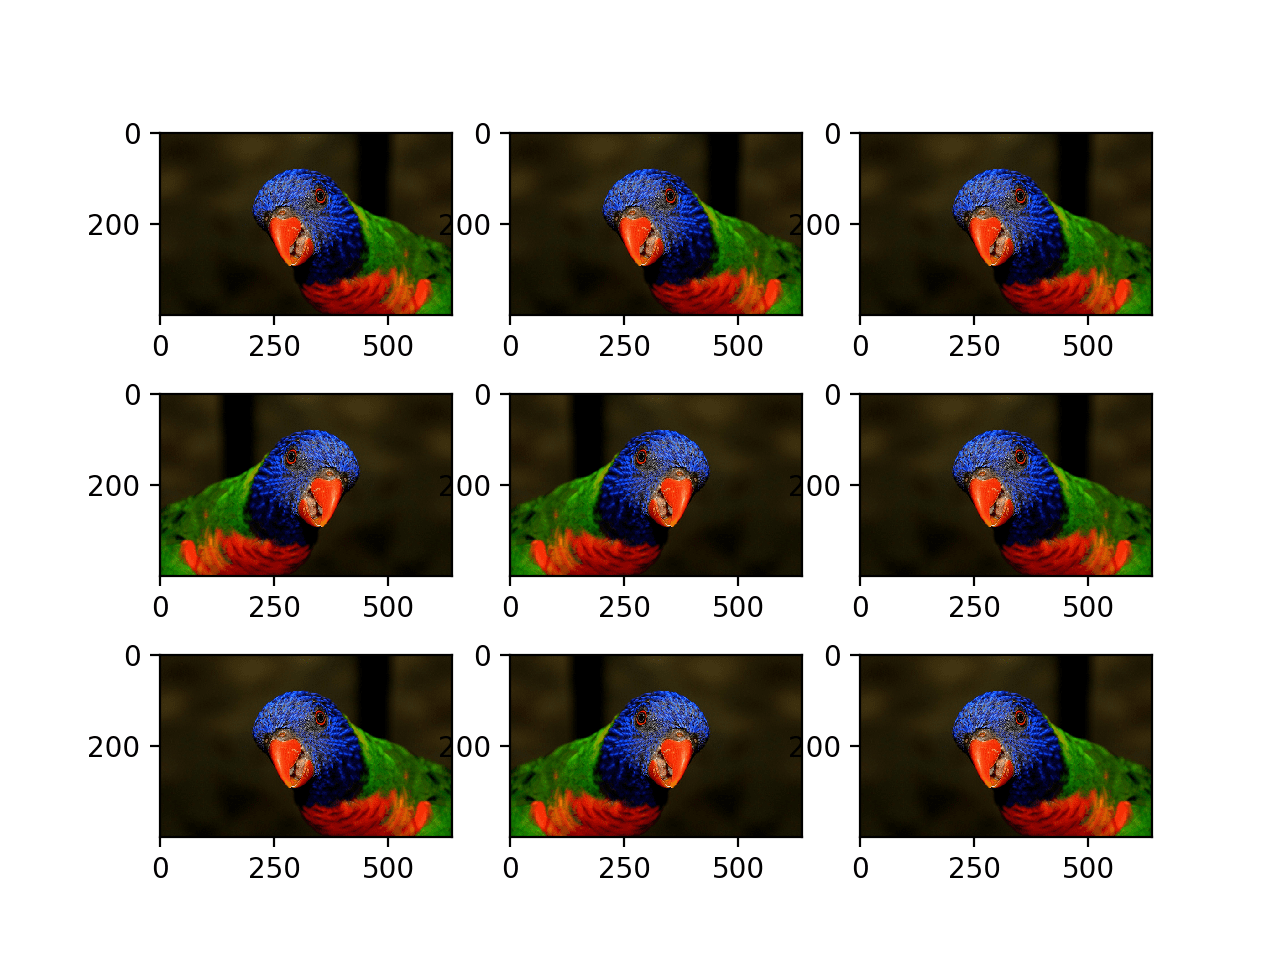
Random Rotation Augmentation
A rotation augmentation randomly rotates the image clockwise by a given number of degrees from 0 to 360.
The rotation will likely rotate pixels out of the image frame and leave areas of the frame with no pixel data that must be filled in.
The example below demonstrates random rotations via the rotation_range argument, with rotations to the image between 0 and 90 degrees.
1
2
3
4
5
6
7
8
9
10
11
12
13
14
15
16
17
18
19
20
21
22
23
24
25
26
27
28
# example of random rotation image augmentation
from numpy import expand_dims
from keras.preprocessing.image import load_img
from keras.preprocessing.image import img_to_array
from keras.preprocessing.image import ImageDataGenerator
from matplotlib import pyplot
# load the image
img=load_img('bird.jpg')
# convert to numpy array
data=img_to_array(img)
# expand dimension to one sample
samples=expand_dims(data,0)
# create image data augmentation generator
datagen=ImageDataGenerator(rotation_range=90)
# prepare iterator
it=datagen.flow(samples,batch_size=1)
# generate samples and plot
foriinrange(9):
# define subplot
pyplot.subplot(330+1+i)
# generate batch of images
batch=it.next()
# convert to unsigned integers for viewing
image=batch[0].astype('uint8')
# plot raw pixel data
pyplot.imshow(image)
# show the figure
pyplot.show()
Running the example generates examples of the rotated image, showing in some cases pixels rotated out of the frame and the nearest-neighbor fill.
Plot of Images Generated With a Random Rotation Augmentation
Random Brightness Augmentation
The brightness of the image can be augmented by either randomly darkening images, brightening images, or both.
The intent is to allow a model to generalize across images trained on different lighting levels.
This can be achieved by specifying the brightness_range argument to the ImageDataGenerator() constructor that specifies min and max range as a float representing a percentage for selecting a brightening amount.
Values less than 1.0 darken the image, e.g. [0.5, 1.0], whereas values larger than 1.0 brighten the image, e.g. [1.0, 1.5], where 1.0 has no effect on brightness.
The example below demonstrates a brightness image augmentation, allowing the generator to randomly darken the image between 1.0 (no change) and 0.2 or 20%.
1
2
3
4
5
6
7
8
9
10
11
12
13
14
15
16
17
18
19
20
21
22
23
24
25
26
27
28
# example of brighting image augmentation
from numpy import expand_dims
from keras.preprocessing.image import load_img
from keras.preprocessing.image import img_to_array
from keras.preprocessing.image import ImageDataGenerator
Running the example shows the augmented images with varying amounts of darkening applied.
Plot of Images Generated With a Random Brightness Augmentation
Random Zoom Augmentation
A zoom augmentation randomly zooms the image in and either adds new pixel values around the image or interpolates pixel values respectively.
Image zooming can be configured by the zoom_range argument to the ImageDataGenerator constructor. You can specify the percentage of the zoom as a single float or a range as an array or tuple.
If a float is specified, then the range for the zoom will be [1-value, 1+value]. For example, if you specify 0.3, then the range will be [0.7, 1.3], or between 70% (zoom in) and 130% (zoom out).
The zoom amount is uniformly randomly sampled from the zoom region for each dimension (width, height) separately.
The zoom may not feel intuitive. Note that zoom values less than 1.0 will zoom the image in, e.g. [0.5,0.5] makes the object in the image 50% larger or closer, and values larger than 1.0 will zoom the image out by 50%, e.g. [1.5, 1.5] makes the object in the image smaller or further away. A zoom of [1.0,1.0] has no effect.
The example below demonstrates zooming the image in, e.g. making the object in the photograph larger.
1
2
3
4
5
6
7
8
9
10
11
12
13
14
15
16
17
18
19
20
21
22
23
24
25
26
27
28
# example of zoom image augmentation
from numpy import expand_dims
from keras.preprocessing.image import load_img
from keras.preprocessing.image import img_to_array
from keras.preprocessing.image import ImageDataGenerator
from matplotlib import pyplot
# load the image
img=load_img('bird.jpg')
# convert to numpy array
data=img_to_array(img)
# expand dimension to one sample
samples=expand_dims(data,0)
# create image data augmentation generator
datagen=ImageDataGenerator(zoom_range=[0.5,1.0])
# prepare iterator
it=datagen.flow(samples,batch_size=1)
# generate samples and plot
foriinrange(9):
# define subplot
pyplot.subplot(330+1+i)
# generate batch of images
batch=it.next()
# convert to unsigned integers for viewing
image=batch[0].astype('uint8')
# plot raw pixel data
pyplot.imshow(image)
# show the figure
pyplot.show()
Running the example generates examples of the zoomed image, showing a random zoom in that is different on both the width and height dimensions that also randomly changes the aspect ratio of the object in the image.
Plot of Images Generated With a Random Zoom Augmentation
Further Reading
This section provides more resources on the topic if you are looking to go deeper.
It provides self-study tutorials on topics like: classification, object detection (yolo and rcnn), face recognition (vggface and facenet), data preparation and much more...
Finally Bring Deep Learning to your Vision Projects
Thank you very much for the nice tutorial. But I have a question which is:
Can we summarize all the techniques in one object call ? I mean all data augmentation that you used in one data generatir object, because i saw some people do that, but i didn’t get the whole idea.
Hi Jason, excellent explanation. Really I love your blog. I have a question…is the augmentation technique will reduce necessity of supplying the number of training images to CNN model ? I mean if I want to generate a CNN model for identifying my face, how many training image samples do I need?
Will augmentation helps in reducing number of training images?
Hi Jason
Thanks for your excellent tutorials and books.
Am working on recognizing animals that frequents my farm at night using Raspberry PI. ImageNet dataset does not have monochromatic images.kindly advice me where I can get such datasets Or cheap but good night vision cameras for building my own datasets. will try data argumentation approach
Line 22 in the first example (horizontal shift image augmentation) brings the following error”
Traceback (most recent call last):
File “horizontal_shift_img_gen.py”, line 40, in
batch = it.next()
File “C:\Anaconda3\envs\python\lib\site-packages\keras\preprocessing\image.py”, line 809, in next
x = self.image_data_generator.random_transform(x.astype(K.floatx()))
File “C:\Anaconda3\envs\python\lib\site-packages\keras\preprocessing\image.py”, line 556, in random_transform
ty = np.random.uniform(-self.width_shift_range, self.width_shift_range) * x.shape[img_col_axis]
TypeError: bad operand type for unary -: ‘list’
Hello,
Thank you for this tutorial! I am currently developping a CNN for images segmentation but I don’t have a lot of data that why I want to to data augmentation. However I am a bit confuse about on which data the augmentatin has to be done. Only on training set ? or on training and validation set ?
In your post you said it should be done only on the training set but could you explain why ?
Could data augmentation on the validation set impact negatively the accuracy ?
I am however, having a difficulty in understanding how images should generally be to start with. I am doing my undergraduate project where I am training a model to identify 3 types of guns i.e. AK-47, fn scar and pistols. They are like pure images i.e. without people holding the guns and not a lot of backgrounds on the images. My model trained properly and got acc – 96&% and val_acc – 94% (keras and tensorflow). It is from scratch, as expected by my supervisor. However, my model is unable to classify properly images of people holding the specific type of gun. Like in 2300 images, it wrongly classifies around 2000. Now I tried to train a model for cats and dogs using the kaggle cats and dogs images and it too was not able to classify properly if cat was like in a tree or dog was in a beach with people around. So how exactly should training and validation images be like because I thought the kaggle images were the perfect example of how images should be like??
I am trying to save my augmented images using the .flow(save_to_dir=””) but it is not working and I do not see any images in the folder. Is there a different way to specify a folder on my desktop to be receiving folder?
I have an issue with Brightening image augmentation i.e when i’m trying to save the image in my directory it displaying as it is with out any changes,where as it is working as expected when displaying using “pyplot.imshow()”.
Great article as usual. I have a question about this statement:
“Alternately, an iterator can be created for an image dataset located on disk in a specified directory, where images in that directory are organized into subdirectories according to their class.”
For the sake of simplicity let’s say that there are 52 subdirectories and each directory has an image of a playing card in it. I want to created augmented training images of each card.
1. Is this subdirectory structure the best way to go about this?
2. If so, how can you automate processing images in each subdirectory?
Perfect. I understand the loading of images from directories now. I guess I might be stuck on the image augmentation piece then. Using my example above I only have a single image for each of the 52 classes. In this case it is the original artwork for each playing card. Finding additional images of these cards is hard because they are rare. As a result the idea is to generate my own for the training set and even the validation set. For the test set I am envisioning using my phone camera or a webcam. A couple things I am not understanding. Or maybe it is just one thing.
1. It appears these images are generated on the fly. Is there a way to store them or should they even be stored for future use?
2. How do you save the model once it has been trained?
What about random cropping which is usually cited in the papers (4+1)? Should this be part of data preparation stage? Can horizontal/vertical shift be replacement for random crop?
This is a bit perplexing to this newb. I get a plot that shows the augmentation correctly but when I had arguments to datagen.flow() to save to a directory I only get copies of the image. In some cases a rotation is applied but never any of the other transformations like brightness_range or shear_range. Any ideas?
Jason, could you please explain how to generate more number of images with subtle variations? Subtlety, I see can be achieved by making minor shifts in parameters of width, height etc. However, I am not sure how the count (in the example, it is 9) be increased to higher number. Thank you again.
Did a little more testing and it turns out that all the positioning arguments output correct images (shear_range, zoom_range, rotation_range….etc). I thought it might just be channel transformations that were the problem since brightness_range produced the correct plot but the same image when saved but I just tried channel_shift_range and that seems to work fine. Thoughts?
Yes, that makes sense, but since we have now more training images, can’t we include them all together and increase the size of training data per epoch?
Thank You so much for your quick response. I am still sorry to bother to you, but I will still ask you this.
Say for example I have 3000 Images initially as training data. I find that model performance is not that good because lack of data. Now, If I find another new data set with 6000 images, then I will put that in training and will have all of then run through each epoch. I won’t perform any random pick here.
Now, in the case with data augmentation what we do is we pick images randomly form augmented set per epoch to maintain the count of data to be 3000.
So, my question is why not included all augmented images in training set and increase the size of training data?
Why to have random picks every epoch?
I hope you get me.
Also, please correct me if I am misunderstanding something here.
We use data augmentation because we don’t have enough data.
Data augmentation works by creating a copy of an image and changing it in some way.
Because of this, we no longer need the original images in our training dataset, as we will have many different modified copies of the original images. The content of the original images is contributing to the training dataset already many times over.
Jason! First of all thanks for the tutorial. There are a couple of things to notice though.
1. I believe ‘it = dataset.flow(X, y)’ should be ‘it = datagen.flow(X, y).
2. Don’t we have to fit the data first with ‘datagen.fit(X_train)’? If I dont do that it throws an error that the image generator has not been fit on any training data…
Thanks for your code and valuable information of image Augmentation.But I have save image is nine images in one image.how to seperate that nine images one by one.
“The steps_per_epoch argument must specify the number of batches of samples comprising one epoch. For example, if your original dataset has 10,000 images and your batch size is 32, then a reasonable value for steps_per_epoch when fitting a model on the augmented data might be ceil(10,000/32), or 313 batches”
you set the steps_per epoch to 313. Wouldn’t that mean that in each epoch we are training on the same amount of data (10,000) as we would do if we hadn’t applied data augmentation?
I would find more reasonable to fix the step_per_epoch to, for example, 64 as that would mean that now we have 19200 images in our data set (considering a batch_size of 32)
I wish to train a FCNN, ie. a network that predicts a mask given an image. Is there a way to easily generate training data so that the same augmentations are applied to both the input mage and the target mask?
Is there a general rule on how much of your data should be/can be augmented before generalization starts to suffer? If you apply a random effect to every ‘real’ image in your data set to get 5 – 6 new photos per image, are you losing performance on your real world test cases?
Thank you for the tutorial.
What line of code would the model need if we wanted to include both the original, unaugmented images for training, as well as the augmented images?
Nice writeup showing particulars of some keras image augmentations!
Question: Can you show the associated learning curve improvement due to image augmentations?
Unfortunately, some of these augmentations are so distorting to the parrot that it looks less like a parrot, in some cases.
Question: Are some of these particular automatic parrot image augmentations actually counterproductive and damaging to the model’s parrot detection, as measured by the actual evaluation performance?
Some (actually all) tests I have run so far have shown keras image augmentation to be strongly hurting the validation score not improving it, versus same exact code otherwise.
You might want to test your code, as I did, to see if it actually works as hoped during predictions on validation sets.
I am currently investigating whether increasing the value of the generator option
steps_per_epoch=8 vs. steps_per_epoch=80 (for example)
actually has a beneficial effect when augmentation is used, as was theorized by others.
If it doesn’t, then I am out of ideas, and the keras image augmentation has to be abandoned for something that actually works right, such as doing all the image preprocessing myself outside of keras.
Training takes a lot longer with 80 steps, like 5 hours on a training set that used to take 5 minutes on a GPU.
First, thanks for reviewing the literature and summarized the image augmentations that were used on the famous and successful deep learning projects. Emphatically, none of those studies used keras image augmentation, it seems to me. (If I’m wrong let me know.) They were before keras was published. The point here is: Will you accept a gentleman’s challenge to show us just one example of reproducible dataset and code, where we can both directly run with and without keras image augmentation, and the with-augmentation demonstrably improves the validation performance? To be clear: The point is not embarrassment of anyone. The point is not to prove something is bad. The point is to constructively identify a way to get keras image augmentation to work as intended, demonstrably and reproducibly. It has to actually work in terms of validation performance, beyond mere visualizing or looking at the picture augmentations, in a reproducible project, or else we need to adopt a different toolset or do it manually during preprocessing ourselves. I haven’t had the chance to read absolutely all of your publications yet so it’s possible you’ve done exactly this already, and I would not be sure except by asking. Thanks for your many publications.
As for Keras code for some of the best practices, I think only crop is missing and I have seen third party functions that plug into the ImageDataGenerator to do it, perhaps try a few searches and see what looks reliable?
Hey Jason! One question: I have a model which inputs an image and outputs 5 arrays (heatmaps). Is there a way to adapt the outputs accordingly with the transformation each input image received? Thanks and great work!!
Perhaps if you are performing shifts/zooms/etc. then you can apply the same transform to inputs and outputs. I believe you will have to do this manually though.
I didn’t get the meaning of sentence mentioned below.
” The steps_per_epoch argument must specify the number of batches of samples comprising one epoch. For example, if your original dataset has 10,000 images and your batch size is 32, then a reasonable value for steps_per_epoch when fitting a model on the augmented data might be ceil(10,000/32), or 313 batches. “
What I interpret is that “ImageDataGenerator” is ‘returning’ each time a “new image” with the aleatory transformation on the image given by the parameters rotation, zoom_range etc
If you start with let’s say 10,000 images and a batch size = 32 with the parameter steps_per_epoch = 10.000/32 you will ‘visit’ the 10,000 images per epoch.
In the first epoch the images will have a transformation and in the second epoch the same images will have another transformation.
Therefore, in each epoch you are dealing with a slightly set of different images.
If you increase the number of epochs you will be processing a new 10,0000 slighlty “different” samples.
Am I right ?
I am still not getting one thing! How we can hyperparameter tune this or default configuration is fine? I have a neural network model that is using the convolution layer mostly there I am using this image generator but still every time it is overfitting. any idea what might be the reason? I am experimenting to avoid the usage of dropouts.
Can we train our dataset for satellite image classification with coordinates? If yes, how many coordinates do we need for machine learning and deep learning classification respectively?
The satellite image classification example works with image, and presumably you can define the tiles/images based on their lat/lon prior to cutting them up?
I’m working on a image segmentation project and so I need the argumentation to be applied also on the masks. I mean when rotating/flipping/shifting/zooming the image, the the same transformation should be applied on corresponding mask too, right? But when I try
it = datagen.flow(X, y, batch_size=1), I see that the transformation is applied only on X, but not on the masks from y.
What solution would you suggest?
btw, notice that not all types of argumentations are applicable on the masks. For example, in case of brightness argumentation, changing the brightness of the mask doesn’t make sense.
I use below code for saving the generated augmented image in the directory,
———-
i = 0
for batch in train_generator:
i += 1
if i > k: #k=1,2,3…
break
———–
based on different values of k, different number of images are generated and saved in the directory. But, I could not find its sequence, I mean, given k and batch size, what would be the number of augmented images? Is it deterministic or that is kind of random?
Sorry if my question was not clear.
Please let me know how can I set the number of generated augmented image in directory? You mentioned that we can generate augmented image and save it in a directory, Well, how can I set the number of image that will be save in the directory.
And second, let say I have 1000 training image samples, by doing data augmentation, how many images would be used in training process? I expect 1000 original images and X augmented images, what is the value of X. Let me know if I am wrong.
They can be saved automatically as part of the training process when fitting a model.
If you want to pre-generate the augmented images, you could write your own loop and yield enough batches of examples until you are satisfied.
For training, augmented images are generated for each training step. You will have enough augmented images for the amount of training you require. You do not need to pre-generate them – they are generated as-needed for the training process. Is that more clear?
Thanks for your reply,
I understand your point, but I wanna know in each step, how many augmented image would be involved in training process?
As you mentioned, ”.. as-needed for the training process…” , but based on what factor the model defines in a given step either it needs data augmentation or not?
Interested in using augmentation to mix the zoom and rotation operators. I need to zoom in several times taking snapshots as I go and rotating them all a full cycle. Can these two methods of orientation manipulation be mixed? If so, could you give some pointers?
Hello Sir,
I am currently developing a CNN for multiclassification (3 classes) but I don’t have a lot of data (each class have 100 images). I had split the data to 70% training 30% validation (total 210 training data, 90 validation data). I have tried out ImageDataGenerator to augment the training data. Eventually, I still get low validation accuracy (0.30). Any suggestion that might increase the validation accuracy? If need more validation data, how many validation data would you recommend?
Thank you for your tutorial. I studied your another tutorial regarding oversampling like SMOTE , and I knew it couldn’t be used at image data. According to your mention, I can use data augmentation at image data to solve imbalanced data problem. Because I’ve recognized data augmentation technique as one method to solve small data set, I usually used data augmentation for all data class. Then, can I use data augmentation for specific class to resolve imbalanced data problem? If it is possible, how can i do that?
Thank you very much sincerely. Your tutorial and answers help me largely.
Yes, I believe you can use image augmentation much like SMOTE to oversample a given class.
I don’t have an example, but perhaps you can use the image generator to generate many images, save them to file, then use a subset along with your training data to fit your model. Or experiment with similar approaches.
Thanks for the answer. Suppose I create a batch with batch_size=2, it means now each batch will have two images, what if I want to display both the images of each batch?
For example
iter=datagen.flow(samples,batch_size=2)
Let us just create 1 batch of 2 images as following;
for i in range(1):
plt.subplot(120+i+1)
batch=iter.next()
plt.imshow(batch[0].astype(‘uint8’))
When I check batch.shape, it says that there is only 1 image. Please explain as I am a beginner..
I want to classify 9 different objects and my training data is imbalanced (some classes do not have enough data), So I decided to resample my dataset. I want to use only resampling for the classes that have less number of data.
What I did is to create a simple code to read images in those classes and then apply a horizontal flip and Gaussian filter to them and then I save them in my directory.
I am only using a simple script like the following code to generate and save image files which allow me to triple my data. I do not use any ImageDataGenerator which is provided by Keras. Do you think I am on the right track? Is it ok to generate images the way I am doing?
directory = ”
for file in os.listdir(directory):
img = cv2.imread(directory + file)
Flip_Horizontal = cv2.flip(img, 1) # 1 means Horizontal Flip
#saving now
cv2.imwrite(file + ‘_flip’ + ‘.jpg’, Flip_Horizontal)
I’m wokring on the traffic signs detection and recognition and I have very very unbalanced dataset (from 20000 examples to only 1).
1. I did not find information can I apply different types of augmentation to each class?
2. Is it possible to provide shaffling of all examples for training after augmentation? If not, then we will get in one batch only examples generated by transformations over just a few origanal pictures?
3. In detection I have coordinate labeles – bounding boxes. Are coordinates recalculated after transformations or I should do this with hands?
Great suggestion, hopefully I can get to it in the future.
Shuffling is performed as part of augmentation.
That is a tough question. I think you might need data-aware augmentation. E.g. an augmentation procedure just for object recognition instead of the more general image classification.
I have images of cars and my goal is to extend my training dataset, I would like to combine the newly generated images and original images and train a deep neural network based on them to perform a classification task.
“the Keras ImageDataGenerator class is not an “additive” operation. It’s not taking the original data, randomly transforming it, and then returning both the original data and transformed data.”
What method would you suggest for extending the dataset?
by augmentation you mean:
method 1: Dataset generation and expanding an existing dataset or
method 2: on-the-fly image augmentation or ex
Basically we can use on-the-fly image augmentation when we want to make ensures that our network, sees new variations of our data at each epoch during training.
I do not think that helps with balancing our dataset. I might be able to balance our dataset using method#1. Dataset generation and expanding an existing dataset.
This way our fake images will form an augmented training set to be used along with our real-world data.
Please take a look at data set part of this website, they also did something similar for my data set https://www.aicitychallenge.org/2020-data-and-evaluation/
what do you think? is method #1 is a good approach? I have rarely seen someone doing this.
hello sir
how can we save the augmented images before training?
I am working on image classification problem and i have different number of images for each class.
I want to produce some augmented images so that the number of images per class is same and then i will train my CNN model on that original plus aigmented bigger dataset.
You can configure your image augmentation and set it to save images to a file, then enumerate the generator manually in a loop. Then later load those images and use them to train a model.
Please can you explain how to enumerate the generator manually in a loop. And in this situation, how do we train using both the new dataset and the old. Do we train separately, I mean train first with the original dataset, and again with the new augmented dataset. Or have all both datasets in a folder and train.
Can you please provide guidance on how to use all these augmentation methods with the custom data generator. In my project I’m not using the inbuilt class-ImageDataGenerator.Instead I’ve created Custom data generator by inheriting the keras.utils.sequence class. I don’t want to make code lengthy by writing all these methods in the code and then applying them to the batch. Can you please suggest any better way to access these pre-existing methods from keras directly to my use.
@Jason Brownie
what are data augmentation techniques for datasets , other than images. Like i have 134 instances dataset for disease. how can i augment dataset and synthetically increase instances???
I have a confusion regarding the augmentation.If I use the augmentation techniques all together in the ImageDataGenerator of Keras, then are the techniques applied altogether in an image or applied separately to the image?
For example, if I use 5 techniques to an image, after doing augmentation, will 5 images be generated?
There is lot of information even in the comments section. Thanks for constantly answering to all the questions in comments also.
I am bit confused in this case
If i am applying 5 different techniques for image augmentation like rotate,width-shift,height-shift,shear,horizontal-flip
then for every image all these 5 techniques are applied ?
if yes, wont the images be distorted when we apply more techniques at a time to the image ?
I want to do some image augmentation with my dataset. Its just 800 images so I need more. However, I will like to also create a new target (labels) for this new dataset generated, how do I do it.
Thank you for the prompt response Jason. One last question.
I have some images with bad quality. What pre-processing method would you advise to use to counter the bad quality of the images (noise removal, color saturation or image augmentation)?
If more than one is advised, which should be done first? I mean in which order should they be implemented on the images.
I try to do data augmentation on my target label and I got this error. ”
ValueError: x (images tensor) and y (labels) should have the same length. Found: x.shape = (1, 192, 192, 3), y.shape = (560,)”
My target label is not an image, just a numpy array of my classes. How then do I make it a 4 dimensional array so that it will have same length with my images in order to do the augmentation.
Once I’ve augmented the image, is there a way to separate the images into 9 individual images to be used in image training? Not a python expert and really don’t want to copy and paste images hundreds of times.
This is a great article that has helped me implement data augmentation in my own project. However, is there any to use gaussian blur as a preprocessing technique using Keras or TensorFlow2.0? Would I have to implement the gaussian blur in the ImageDataGenerator or create a depthwiseconv2D layer just for the blurring technique?
Can you explain to me why you chose subplot with number (330 + 1 + i)?
I tried with others number, but not clearly understand why 330 work well.
Thank you!
Hi Jason, thanks for your detailed example and explanation but have you got any in R? At least those of us that uses R should be able to benefit from your expertise.
I want to specify a rotation angle of specific angle that I want the image to be rotated – [15, 30, 45, 60, 75, 90] rather than let it randomly pick from -90 to 90. How can I do that?
Also, can I make it possible that horizontal or vertical flip will flip ALL images that is passed to it rather than randomly choosing to flip it or not?
Thank you for your post. I wanted to ask if you know about any resources regarding the use of cnn when you have subclasses and their super classes. For instance cat vs dog with their species.
Thank you Dr. Brownlee – great stuff. It appears that keras ImageDataGenerator (IDG) is pulling and applying values at random from within the range specified, be that brightness or rotation, etc. Is that indeed the case and is it, from you experience, yield a better dataset?
Thank you. Yes, I will try it. I also see that the 9 imshow images are not the same as the ones I save_to_dir. Anyway – having it be random is rather nice – you only have to set the bounds and you’re done!!! Great stuff – truly.
I used ImageDataGenerator for data augmentation on my dataset and I wanna save the augmented images, I select the name of dir to save them in the flow_from_directory method but when I checked the folder there is nothing saving there.
I just wanna make sure the data augmentation works well with me or not.
Please, do you have an idea about the reason for that and why it does not save the images?
Hi jason,
Please i have a question regarding pre-processing. I know image augmentation is regarded as a pre-processing technique and from your code i can see you used the Keras function called ImageDataGenerator which randomly rotates, flips and shifts the dataset images but does it extract features and what features are extracted and why.
Please am sorry if my question might sound stupid am a newbie to this.
Sir,if we are augmenting dataset images(flipping,rotating) etc which are used for object detection,does that mean we need to create new xml file(for annotation) for each of the new image created by Data Augmentation process or will the xml files be generated by itself?
I am working on Augmentation technique for object detection but I am wondering which more efficient to apply augmentation before being used as input to the model or during training
Hello Sir, the article was really helpful. Right now I’m working on an x-ray image classifier. I am using 6 different classes in total and as I’ve fewer x-ray data, I used 6 different “image augmentation” techniques. Initially, in my training folder, I’ve 13,000 images. So my question is, can I know how many images are there or the total images in each class after I performed my “image augmentation” techniques?
It’ll be a really big help if you can answer me this, thanks 🙂
Thank your for your response. Dividing image pixel datas by 255.0 to get into range [0,1] is same as min max normalization but different name? am i right?
If I use train_datagen = ImageDataGenerator() this way without any preprocessing and augmentation, then my model converges faster and give higher accuracy than train_datagen = ImageDataGenerator(rescale=1./255). Is it normal ? or am i doing something wrong. But without rescaling images, when i try to show images then it shows all images in white box, no content is visible. What am i doing wrong?
Thank you very much for your excellent tutorial and your book.
I have a question sir, I want to do adaptive threshold (with opencv) on preprocessing_function(datagenerator) but don’t function, how can I apply methods as adaptive threshold, bluredimage… on imagae.datagenerator.
Thank you very much for the tutorial.
I have a question, if I have one bounding box per image, how can I modify this bouding box according to the changes made to the image?
For example, with a rotation, how can I get the rotation matrix to change my bounding box?
Thank you sir.
Thank you so much for your tutorial. Is shear is a traslation transformation. As we named zoom as scaling. Can we call shear a translation transformation? If Shear is a translation tranformation then what are the height and width shifts?
Really good post Mr. Browniee!! .. I have a small query, it’s about Deep Learning ToolKit (DLTK)…. Can we use the Data Augmentation and Data Normalization techniques from DLTK in Image Data Generator?
# example of brighting image augmentation
from numpy import expand_dims
from keras.preprocessing.image import load_img
from keras.preprocessing.image import img_to_array
from keras.preprocessing.image import ImageDataGenerator
from matplotlib import pyplot
# load the image
img = load_img(‘bird.jpg’)
# convert to numpy array
data = img_to_array(img)
# expand dimension to one sample
samples = expand_dims(data, 0)
# create image data augmentation generator
datagen = ImageDataGenerator(brightness_range=[0.2,1.0])
# prepare iterator
it = datagen.flow(samples, batch_size=1)
# generate samples and plot
for i in range(9):
# define subplot
pyplot.subplot(330 + 1 + i)
# generate batch of images
batch = it.next()
# convert to unsigned integers for viewing
image = batch[0].astype(‘uint8’)
# plot raw pixel data
pyplot.imshow(image)
# show the figure
pyplot.show()
and it say “IndentationError: expected an indented block”
I just stepped through your tutorial today using google colabs and ran into no problems. Excellent tutorial, very well explained. Thank you for posting. Your THE MAN!!
Hi,
This was what I am searching, However how to train the final classification CNN with both original and augmented data combined. This leads to have train x = 2.Train Y ( exmple: train x = 2000 and train y = 1000) And CNN cant accept input variables with inconsistent numbers
If you mean to have the image side-by-side, then you’re correct. A model cannot be used if your input shape is changed. If you mean to make more input data (i.e., images) by augmentation, you have not change the input variables, but just get more samples in the dataset.
Hi,
We know that input data samples have to be combined for the classification. What about adding features to? I mean appending the original and augmented data among the feature axe ( pixels , (fo+fa) ) with fo is originl feature and fa is augmented feature. does this make sense?
Not sure why you want to do that. Augmentation is to skew the image a bit so the machine learning model can identify the slightly-modified image equally.
That makes sense. I can see one example, where fo is the original image and fa is the one after Sobel edge detection. But doing this is like a preprocessing of the input. Then you finish a model like that, you need to do the same preprocessing for all input you use in prediction steps too.
for example when we want to use CNN in image Classification and we have let’s say 10 classes, but there is big difference in number of samples in every class.
for example some classes contains 1000 sample and others 200, as we know in this case the algorithm would be biased because of this difference, so the question is: does data augmentation is applied on these small classes (small number of samples) Only so will make kind of balance or augmentation will be applied on whole classes and equally increases classes samples
I did data augmentation to a database in order to get balanced data. Because the original Database have unbalanced data (example ::: class 1: 60 images , class 2: 2999 …).
Then I build a classifier to evaluate the performance with balanced and unbalanced data. When I use unbalanced data I get high accuracy (98%), but in the confusion matrix, classes with low data don’t have good performance. However, using balanced data, the model accuracy is lower (about 80%) but confusion matrix gives performances nearly equals for all classes.
I don’t know how to compare these results and which to consider best classifier for my database ?? What do you think ?


Thanks Mr. Jason,
Excellent, crisp and distilled tutorials.
Got your latest book(Deep Learning for Computer Vision). kindly requesting you to do a CNN + LSTM blog.
Thanks for your support!
I have a few on CNN LSTMs, perhaps start here:
https://machinelearningmastery.com/cnn-long-short-term-memory-networks/
And here:
https://machinelearningmastery.com/how-to-develop-lstm-models-for-time-series-forecasting/
Thank you very much for the nice tutorial. But I have a question which is:
Can we summarize all the techniques in one object call ? I mean all data augmentation that you used in one data generatir object, because i saw some people do that, but i didn’t get the whole idea.
Best.
Great question!
Yes, you can use any techniques in the one augmentation configuration.
Hi Jason, excellent explanation. Really I love your blog. I have a question…is the augmentation technique will reduce necessity of supplying the number of training images to CNN model ? I mean if I want to generate a CNN model for identifying my face, how many training image samples do I need?
Will augmentation helps in reducing number of training images?
Thanks!
Yes, I expect you can train a good or better model with fewer real examples.
Is there a technique or solution to increase the amount of my data whene it’s numerique and not images ,thanks ?
Yes, it’s called oversampling. For example:
https://machinelearningmastery.com/smote-oversampling-for-imbalanced-classification/
Dear Sir,
Do we need to save all the images generated with image augmentation technique in training set data?
No.
How we can save results ??
Specify the save location when calling flow(), more details here:
https://keras.io/api/preprocessing/image/
Hi Jason
Thanks for your excellent tutorials and books.
Am working on recognizing animals that frequents my farm at night using Raspberry PI. ImageNet dataset does not have monochromatic images.kindly advice me where I can get such datasets Or cheap but good night vision cameras for building my own datasets. will try data argumentation approach
The imagenet models will still be great at extracting features.
Perhaps start with transfer learning, and tune some of the output layers on images specific to your domain.
Jason,
Line 22 in the first example (horizontal shift image augmentation) brings the following error”
Traceback (most recent call last):
File “horizontal_shift_img_gen.py”, line 40, in
batch = it.next()
File “C:\Anaconda3\envs\python\lib\site-packages\keras\preprocessing\image.py”, line 809, in next
x = self.image_data_generator.random_transform(x.astype(K.floatx()))
File “C:\Anaconda3\envs\python\lib\site-packages\keras\preprocessing\image.py”, line 556, in random_transform
ty = np.random.uniform(-self.width_shift_range, self.width_shift_range) * x.shape[img_col_axis]
TypeError: bad operand type for unary -: ‘list’
Sorry to hear that, are you able to confirm that your version of Keras is up to date?
E.g. 2.2.4 or higher?
Thank you for this post!!
I have a question if we pass multiple methods to ImageDataGenerator like say
ImageDataGenerator(rotation_range=60,vertical_flip=True).
Does the order matter?
No. I believe the order is fixed and defined internally.
Hello,
Thank you for this tutorial! I am currently developping a CNN for images segmentation but I don’t have a lot of data that why I want to to data augmentation. However I am a bit confuse about on which data the augmentatin has to be done. Only on training set ? or on training and validation set ?
In your post you said it should be done only on the training set but could you explain why ?
Could data augmentation on the validation set impact negatively the accuracy ?
Thank you for your help,
Alexandra
Only on training dataset because you are providing more data to train the model, not evaluate it.
Data augmentation for a test set may result in a biased evaluation of model skill.
Dear Jason
Excellent post as usual.
Just a question could we use these technics to increase train set of timeserie?
and if yes how?
Br
Perhaps. I don’t have an example sorry, I recommend researching to see what is common in the domain.
Excellent tutorial Jason.
I am however, having a difficulty in understanding how images should generally be to start with. I am doing my undergraduate project where I am training a model to identify 3 types of guns i.e. AK-47, fn scar and pistols. They are like pure images i.e. without people holding the guns and not a lot of backgrounds on the images. My model trained properly and got acc – 96&% and val_acc – 94% (keras and tensorflow). It is from scratch, as expected by my supervisor. However, my model is unable to classify properly images of people holding the specific type of gun. Like in 2300 images, it wrongly classifies around 2000. Now I tried to train a model for cats and dogs using the kaggle cats and dogs images and it too was not able to classify properly if cat was like in a tree or dog was in a beach with people around. So how exactly should training and validation images be like because I thought the kaggle images were the perfect example of how images should be like??
This might help:
https://machinelearningmastery.com/much-training-data-required-machine-learning/
Is it ok to save the augmented images in train dataset and then use for training?
Yes.
I am trying to save my augmented images using the .flow(save_to_dir=””) but it is not working and I do not see any images in the folder. Is there a different way to specify a folder on my desktop to be receiving folder?
Sorry to hear you’re having trouble, perhaps some of these tips will help:
https://machinelearningmastery.com/faq/single-faq/why-does-the-code-in-the-tutorial-not-work-for-me
Try to specify all these parameters and see if the images are getting saved
save_to_dir=”/content/gdrive/MyDrive/StanfordCarsDataset/ResnetAugmented”,
save_prefix=’ResnetAugmented’,
save_format=’jpg’,
Hi Jason ,
I have an issue with Brightening image augmentation i.e when i’m trying to save the image in my directory it displaying as it is with out any changes,where as it is working as expected when displaying using “pyplot.imshow()”.
Thanks in anticipation of a favorable reply.
Perhaps double check that you are saving the correct image?
hello i seem to have the same problem did you ever solve it?
Great article as usual. I have a question about this statement:
“Alternately, an iterator can be created for an image dataset located on disk in a specified directory, where images in that directory are organized into subdirectories according to their class.”
For the sake of simplicity let’s say that there are 52 subdirectories and each directory has an image of a playing card in it. I want to created augmented training images of each card.
1. Is this subdirectory structure the best way to go about this?
2. If so, how can you automate processing images in each subdirectory?
Great question, I show how in this post:
https://machinelearningmastery.com/how-to-load-large-datasets-from-directories-for-deep-learning-with-keras/
Perfect. I understand the loading of images from directories now. I guess I might be stuck on the image augmentation piece then. Using my example above I only have a single image for each of the 52 classes. In this case it is the original artwork for each playing card. Finding additional images of these cards is hard because they are rare. As a result the idea is to generate my own for the training set and even the validation set. For the test set I am envisioning using my phone camera or a webcam. A couple things I am not understanding. Or maybe it is just one thing.
1. It appears these images are generated on the fly. Is there a way to store them or should they even be stored for future use?
2. How do you save the model once it has been trained?
Yes, you can store the generated images. See the save_to_dir argument on flow().
You can save a trained model by calling model.save(), more here:
https://machinelearningmastery.com/save-load-keras-deep-learning-models/
Thanks! Do you think using a camera or webcam makes sense for test or should I use generated images for this as well?
Perhaps prototype both approaches and see what works best or makes sense for your project.
Use data to guide decisions.
What about random cropping which is usually cited in the papers (4+1)? Should this be part of data preparation stage? Can horizontal/vertical shift be replacement for random crop?
Yes, random cropping is a great approach.
The shifting can simulate it, kind of.
Hi Jason,
How we can use this method for gray scale images? ( shape: 124,95) When I try, I have an error:
raise TypeError(“Invalid dimensions for image data”)
TypeError: Invalid dimensions for image data
You must change the 2d matrix of each grayscale image to be 3d with 1 channel.
You can use expand_dims() numpy function.
Hello Jason, Can I save this images as array or dataframe for deep learning?
Yes, there is a configuration option to save the augmented images to file.
Jason, could you please explain how to use configuration to save images?
Best,
Yunus
No problem, see the arguments to the flow() function listed here:
https://keras.io/preprocessing/image/
Ah. Part of what I need! Thanks!
This is a bit perplexing to this newb. I get a plot that shows the augmentation correctly but when I had arguments to datagen.flow() to save to a directory I only get copies of the image. In some cases a rotation is applied but never any of the other transformations like brightness_range or shear_range. Any ideas?
That is surprising, the saved images should be identical to those returned from flow() – it’s the same pixel data.
If this is not the case, perhaps there’s a bug in the way you are reviewing the case, or in Keras?
A resource here might help:
https://machinelearningmastery.com/get-help-with-keras/
Jason, could you please explain how to generate more number of images with subtle variations? Subtlety, I see can be achieved by making minor shifts in parameters of width, height etc. However, I am not sure how the count (in the example, it is 9) be increased to higher number. Thank you again.
Best
Samanna
You can plot as many subplots as you like, perhaps review the API here:
https://matplotlib.org/3.1.0/api/_as_gen/matplotlib.pyplot.subplot.html
Did a little more testing and it turns out that all the positioning arguments output correct images (shear_range, zoom_range, rotation_range….etc). I thought it might just be channel transformations that were the problem since brightness_range produced the correct plot but the same image when saved but I just tried channel_shift_range and that seems to work fine. Thoughts?
No idea sorry, perhaps try posting to the Keras user group?
I have a confusion. After augmenting data why don’t we use all of them together in a single epoch of training and rather pick them randomly.
Please help.
If we select random samples and perturb them, the idea is that all images will be covered during the training process.
Does that help?
Yes, that makes sense, but since we have now more training images, can’t we include them all together and increase the size of training data per epoch?
This is essentially what is happening.
Thank You so much for your quick response. I am still sorry to bother to you, but I will still ask you this.
Say for example I have 3000 Images initially as training data. I find that model performance is not that good because lack of data. Now, If I find another new data set with 6000 images, then I will put that in training and will have all of then run through each epoch. I won’t perform any random pick here.
Now, in the case with data augmentation what we do is we pick images randomly form augmented set per epoch to maintain the count of data to be 3000.
So, my question is why not included all augmented images in training set and increase the size of training data?
Why to have random picks every epoch?
I hope you get me.
Also, please correct me if I am misunderstanding something here.
We use data augmentation because we don’t have enough data.
Data augmentation works by creating a copy of an image and changing it in some way.
Because of this, we no longer need the original images in our training dataset, as we will have many different modified copies of the original images. The content of the original images is contributing to the training dataset already many times over.
Does that help?
You can achieve this by setting steps_per_epoch > num_of_samples/batch_size. But whether this would improve results, I’m not so sure!
Great tip!
Jason! First of all thanks for the tutorial. There are a couple of things to notice though.
1. I believe ‘it = dataset.flow(X, y)’ should be ‘it = datagen.flow(X, y).
2. Don’t we have to fit the data first with ‘datagen.fit(X_train)’? If I dont do that it throws an error that the image generator has not been fit on any training data…
Thanks again, keep it up.
Thanks for the typo.
You only need to fit the data generator if statistics are to be calculated, e.g. like mean/stdev for scaling pixels.
Dear Sir
Thanks for your code and valuable information of image Augmentation.But I have save image is nine images in one image.how to seperate that nine images one by one.
The ImageDataGenerator can do this for you, see the save_to_directory argument:
https://keras.io/preprocessing/image/
Hello Jason!
I don’t understand why when you say:
“The steps_per_epoch argument must specify the number of batches of samples comprising one epoch. For example, if your original dataset has 10,000 images and your batch size is 32, then a reasonable value for steps_per_epoch when fitting a model on the augmented data might be ceil(10,000/32), or 313 batches”
you set the steps_per epoch to 313. Wouldn’t that mean that in each epoch we are training on the same amount of data (10,000) as we would do if we hadn’t applied data augmentation?
I would find more reasonable to fix the step_per_epoch to, for example, 64 as that would mean that now we have 19200 images in our data set (considering a batch_size of 32)
Thank you very much for your work!
Yes, correct. Not sure why this is a problem?
If more training is required, increase epochs.
I mean, why is it necessary to do data augmentation in your example if in the end we are using the same amount of images in each epoch?
I would have expected that data augmentation would be useful to use more data in each epoch.
I see. Good point.
Because the images are different every single time, it means we can increase the epochs and have “more data”.
Hi, and Thank you very much for the post – it is just great and helped better understand how augmentation works!!!
One question though – I am not sure, but don’t we should use floor instead of ceil?
I thoght that by specifying steps_per_epoch, we want to skip last odd batch. If that is the case, than we should take 312, not 313. My math is:
10,000/32 = 312.5, so we have 312 full batches which we should take into fit and throw away the remainig.
ceil(312.5) -> 313
floor(312.5) -> 312
Thank you again!
Yes, you can do that too!
In the last paragraph I meant: 600 steps_per_epoch instead of 64
I wish to train a FCNN, ie. a network that predicts a mask given an image. Is there a way to easily generate training data so that the same augmentations are applied to both the input mage and the target mask?
Why not use a CNN to achieve this?
Dear Jason,
Really excellent tutorial.
What do you think about augmentation for object detection?
And is there any realization?
Thanks.
It would be a great idea. I don’t have a tutorial on the topic, sorry.
Great tutorial! Do you have any idea how to add random noise with Keras?
A possible Approach:
keras.layers.GaussianNoise(stddev)
Yes, see this post:
https://machinelearningmastery.com/how-to-improve-deep-learning-model-robustness-by-adding-noise/
Is there a general rule on how much of your data should be/can be augmented before generalization starts to suffer? If you apply a random effect to every ‘real’ image in your data set to get 5 – 6 new photos per image, are you losing performance on your real world test cases?
Not that I’m aware of.
Perhaps perform a sensitivity analysis on your project to discover the limits?
Hi Jason,
Thank you for the tutorial.
What line of code would the model need if we wanted to include both the original, unaugmented images for training, as well as the augmented images?
Thanks.
The unaugmented images will be covered by the augmented images – e.g. it is a super set of the data.
Doesn’t the augmentation replace the original images? What if we wanted to include these original images as well as the augmented images?
No, they are used instead of the original.
Nice writeup showing particulars of some keras image augmentations!
Question: Can you show the associated learning curve improvement due to image augmentations?
Unfortunately, some of these augmentations are so distorting to the parrot that it looks less like a parrot, in some cases.
Question: Are some of these particular automatic parrot image augmentations actually counterproductive and damaging to the model’s parrot detection, as measured by the actual evaluation performance?
Good question, it really depends on the choice of model.
Yes, some will not help model performance. You must review the augmentation and chose those that you believe will improve performance, or test.
Or see best practices:
https://machinelearningmastery.com/best-practices-for-preparing-and-augmenting-image-data-for-convolutional-neural-networks/
Some (actually all) tests I have run so far have shown keras image augmentation to be strongly hurting the validation score not improving it, versus same exact code otherwise.
You might want to test your code, as I did, to see if it actually works as hoped during predictions on validation sets.
I am currently investigating whether increasing the value of the generator option
steps_per_epoch=8 vs. steps_per_epoch=80 (for example)
actually has a beneficial effect when augmentation is used, as was theorized by others.
If it doesn’t, then I am out of ideas, and the keras image augmentation has to be abandoned for something that actually works right, such as doing all the image preprocessing myself outside of keras.
Training takes a lot longer with 80 steps, like 5 hours on a training set that used to take 5 minutes on a GPU.
The choice of data augmentations is problem specific, e.g. your image data.
Perhaps the best practices here will give you ideas of what might be appropriate for your dataset:
https://machinelearningmastery.com/best-practices-for-preparing-and-augmenting-image-data-for-convolutional-neural-networks/
First, thanks for reviewing the literature and summarized the image augmentations that were used on the famous and successful deep learning projects. Emphatically, none of those studies used keras image augmentation, it seems to me. (If I’m wrong let me know.) They were before keras was published. The point here is: Will you accept a gentleman’s challenge to show us just one example of reproducible dataset and code, where we can both directly run with and without keras image augmentation, and the with-augmentation demonstrably improves the validation performance? To be clear: The point is not embarrassment of anyone. The point is not to prove something is bad. The point is to constructively identify a way to get keras image augmentation to work as intended, demonstrably and reproducibly. It has to actually work in terms of validation performance, beyond mere visualizing or looking at the picture augmentations, in a reproducible project, or else we need to adopt a different toolset or do it manually during preprocessing ourselves. I haven’t had the chance to read absolutely all of your publications yet so it’s possible you’ve done exactly this already, and I would not be sure except by asking. Thanks for your many publications.
Thanks for the feedback Geoffrey. I’m knee deep in a project right now, but I may prepare some custom examples in the future.
I give a number of examples of data augmentation on image classification projects, perhaps start here:
https://machinelearningmastery.com/how-to-develop-a-convolutional-neural-network-to-classify-satellite-photos-of-the-amazon-rainforest/
Or here:
https://machinelearningmastery.com/how-to-develop-a-cnn-from-scratch-for-cifar-10-photo-classification/
As for Keras code for some of the best practices, I think only crop is missing and I have seen third party functions that plug into the ImageDataGenerator to do it, perhaps try a few searches and see what looks reliable?
Thanks for the awesome guide! Are the augmentations applied before or after the images are resized? Thanks again.
Images should be resized first, then augmented.
Is there a specific reason why?
It is not required, it is an efficiency optimization. It is better to perform transforms on fewer pixels.
would you please help me sir how can customize image in deep learning
What problem are you having exactly?
Hey Jason! One question: I have a model which inputs an image and outputs 5 arrays (heatmaps). Is there a way to adapt the outputs accordingly with the transformation each input image received? Thanks and great work!!
Great question!
Perhaps if you are performing shifts/zooms/etc. then you can apply the same transform to inputs and outputs. I believe you will have to do this manually though.
I didn’t get the meaning of sentence mentioned below.
” The steps_per_epoch argument must specify the number of batches of samples comprising one epoch. For example, if your original dataset has 10,000 images and your batch size is 32, then a reasonable value for steps_per_epoch when fitting a model on the augmented data might be ceil(10,000/32), or 313 batches. “
More on batches and epochs here:
https://machinelearningmastery.com/difference-between-a-batch-and-an-epoch/
Hello Suraj,
What I interpret is that “ImageDataGenerator” is ‘returning’ each time a “new image” with the aleatory transformation on the image given by the parameters rotation, zoom_range etc
If you start with let’s say 10,000 images and a batch size = 32 with the parameter steps_per_epoch = 10.000/32 you will ‘visit’ the 10,000 images per epoch.
In the first epoch the images will have a transformation and in the second epoch the same images will have another transformation.
Therefore, in each epoch you are dealing with a slightly set of different images.
If you increase the number of epochs you will be processing a new 10,0000 slighlty “different” samples.
Am I right ?
Sounds right to me.
I am still not getting one thing! How we can hyperparameter tune this or default configuration is fine? I have a neural network model that is using the convolution layer mostly there I am using this image generator but still every time it is overfitting. any idea what might be the reason? I am experimenting to avoid the usage of dropouts.
I have some suggestions for reducing overfitting here:
https://machinelearningmastery.com/introduction-to-regularization-to-reduce-overfitting-and-improve-generalization-error/
Can we train our dataset for satellite image classification with coordinates? If yes, how many coordinates do we need for machine learning and deep learning classification respectively?
What do you mean coordinates exactly?
The satellite image classification example works with image, and presumably you can define the tiles/images based on their lat/lon prior to cutting them up?
Hi Jason,
I’m working on a image segmentation project and so I need the argumentation to be applied also on the masks. I mean when rotating/flipping/shifting/zooming the image, the the same transformation should be applied on corresponding mask too, right? But when I try
it = datagen.flow(X, y, batch_size=1), I see that the transformation is applied only on X, but not on the masks from y.
What solution would you suggest?
btw, notice that not all types of argumentations are applicable on the masks. For example, in case of brightness argumentation, changing the brightness of the mask doesn’t make sense.
Thanks!
Great question. Sorry, I don’t have examples of keeping masks inline with the augmentations.
Perhaps there are some specialized libs for this? I have not seen them, sorry.
I use below code for saving the generated augmented image in the directory,
———-
i = 0
for batch in train_generator:
i += 1
if i > k: #k=1,2,3…
break
———–
based on different values of k, different number of images are generated and saved in the directory. But, I could not find its sequence, I mean, given k and batch size, what would be the number of augmented images? Is it deterministic or that is kind of random?
Sorry, I don’t follow. Perhaps you can elaborate?
Sorry if my question was not clear.
Please let me know how can I set the number of generated augmented image in directory? You mentioned that we can generate augmented image and save it in a directory, Well, how can I set the number of image that will be save in the directory.
And second, let say I have 1000 training image samples, by doing data augmentation, how many images would be used in training process? I expect 1000 original images and X augmented images, what is the value of X. Let me know if I am wrong.
They can be saved automatically as part of the training process when fitting a model.
If you want to pre-generate the augmented images, you could write your own loop and yield enough batches of examples until you are satisfied.
For training, augmented images are generated for each training step. You will have enough augmented images for the amount of training you require. You do not need to pre-generate them – they are generated as-needed for the training process. Is that more clear?
Thanks for your reply,
I understand your point, but I wanna know in each step, how many augmented image would be involved in training process?
As you mentioned, ”.. as-needed for the training process…” , but based on what factor the model defines in a given step either it needs data augmentation or not?
All images are augmented.
Each image in each batch will be augmented. You can multiply the batch size by the number of epochs to determine the number of augmented images used.
Interested in using augmentation to mix the zoom and rotation operators. I need to zoom in several times taking snapshots as I go and rotating them all a full cycle. Can these two methods of orientation manipulation be mixed? If so, could you give some pointers?
Yes, you can combine augmentations, simply the arguments for each augmentation you wish to use.
hello sir,
i have question
first, can we use imagedatagenerator for testing set? or can we use augmentation data for testing set? if it cant why?
Second, how many times imagedatagenerator make augmentation image every transformations?
thankyou
Typically we don’t augment the test set, only the training set.
This is because we are trying to create more training data in order to better fit the model.
Augmentations are applied randomly to each image generated.
What if I have other format data(like text) in the meantime? How can I do the image augmentation?
You could try text augmentation methods, if such methods exist.
As the bird image is rgb and has 3 channels, why did you use “expand_dims”?
To add a “samples” dimension required by the API.
Hello Sir,
I am currently developing a CNN for multiclassification (3 classes) but I don’t have a lot of data (each class have 100 images). I had split the data to 70% training 30% validation (total 210 training data, 90 validation data). I have tried out ImageDataGenerator to augment the training data. Eventually, I still get low validation accuracy (0.30). Any suggestion that might increase the validation accuracy? If need more validation data, how many validation data would you recommend?
Yes, see the suggestions here:
https://machinelearningmastery.com/start-here/#better
And here:
https://machinelearningmastery.com/best-practices-for-preparing-and-augmenting-image-data-for-convolutional-neural-networks/
after augmented the image into 3 by 3, how can I save the image in the disk individually?
helpful tutorial though.
You can configure the imagedatagenerator to save the augmented images directly. Perhaps review the API.
Thank you for your tutorial. I studied your another tutorial regarding oversampling like SMOTE , and I knew it couldn’t be used at image data. According to your mention, I can use data augmentation at image data to solve imbalanced data problem. Because I’ve recognized data augmentation technique as one method to solve small data set, I usually used data augmentation for all data class. Then, can I use data augmentation for specific class to resolve imbalanced data problem? If it is possible, how can i do that?
Thank you very much sincerely. Your tutorial and answers help me largely.
Yes, I believe you can use image augmentation much like SMOTE to oversample a given class.
I don’t have an example, but perhaps you can use the image generator to generate many images, save them to file, then use a subset along with your training data to fit your model. Or experiment with similar approaches.
Sir can be use data augmentation with pretrained cnn
Sure.
First of all thanks for sharing such a nice article. I have a query. What will be the output if make batch_size=2 in the following statement;
it = datagen.flow(samples, batch_size=1)
How can we see the difference between when we set batch_size=1 and batch_size=2. Please help.
Batch size controls the number of images returned from the generator each call/yield.
Thanks for the answer. Suppose I create a batch with batch_size=2, it means now each batch will have two images, what if I want to display both the images of each batch?
For example
iter=datagen.flow(samples,batch_size=2)
Let us just create 1 batch of 2 images as following;
for i in range(1):
plt.subplot(120+i+1)
batch=iter.next()
plt.imshow(batch[0].astype(‘uint8’))
When I check batch.shape, it says that there is only 1 image. Please explain as I am a beginner..
I don’t know, you may have to debug your code or post to stackoverflow.
My guess is that you have one image because your iteration is only 1 – range(1). Increase the value in range and increase the size of subplot too.
Hi Jason,
Thank you for such a nice article.
I want to classify 9 different objects and my training data is imbalanced (some classes do not have enough data), So I decided to resample my dataset. I want to use only resampling for the classes that have less number of data.
What I did is to create a simple code to read images in those classes and then apply a horizontal flip and Gaussian filter to them and then I save them in my directory.
I am only using a simple script like the following code to generate and save image files which allow me to triple my data. I do not use any ImageDataGenerator which is provided by Keras. Do you think I am on the right track? Is it ok to generate images the way I am doing?
directory = ”
for file in os.listdir(directory):
img = cv2.imread(directory + file)
Flip_Horizontal = cv2.flip(img, 1) # 1 means Horizontal Flip
#saving now
cv2.imwrite(file + ‘_flip’ + ‘.jpg’, Flip_Horizontal)
You’re welcome.
That sounds like a great approach, well done!
Hi Jason,
Many thanks for interesting article.
I’m wokring on the traffic signs detection and recognition and I have very very unbalanced dataset (from 20000 examples to only 1).
1. I did not find information can I apply different types of augmentation to each class?
2. Is it possible to provide shaffling of all examples for training after augmentation? If not, then we will get in one batch only examples generated by transformations over just a few origanal pictures?
3. In detection I have coordinate labeles – bounding boxes. Are coordinates recalculated after transformations or I should do this with hands?
Thank you!
Great suggestion, hopefully I can get to it in the future.
Shuffling is performed as part of augmentation.
That is a tough question. I think you might need data-aware augmentation. E.g. an augmentation procedure just for object recognition instead of the more general image classification.
Hi Jason,
Thank you for the tutorial.
I’m training a deep neural network and using data augmentation.
There are square shape medical images.
Do you know what is the best idea to avoid pixel lost when we are rotating the images?
What is the safe zone for rotation?
By the way, I tried to fill with “nearest-neighbor”, but I wanted to know if there exist any other ways.
Good question.
Perhaps test a few different approaches and evaluate the impact on model performance.
I have images of cars and my goal is to extend my training dataset, I would like to combine the newly generated images and original images and train a deep neural network based on them to perform a classification task.
From this blog post: https://www.pyimagesearch.com/2019/07/08/keras-imagedatagenerator-and-data-augmentation/
“the Keras ImageDataGenerator class is not an “additive” operation. It’s not taking the original data, randomly transforming it, and then returning both the original data and transformed data.”
What method would you suggest for extending the dataset?
Start with augmentation and see how far it takes you.
by augmentation you mean:
method 1: Dataset generation and expanding an existing dataset or
method 2: on-the-fly image augmentation or ex
Basically we can use on-the-fly image augmentation when we want to make ensures that our network, sees new variations of our data at each epoch during training.
I do not think that helps with balancing our dataset. I might be able to balance our dataset using method#1. Dataset generation and expanding an existing dataset.
This way our fake images will form an augmented training set to be used along with our real-world data.
Please take a look at data set part of this website, they also did something similar for my data set
https://www.aicitychallenge.org/2020-data-and-evaluation/
what do you think? is method #1 is a good approach? I have rarely seen someone doing this.
You may be able to use augmentation to balance the dataset if the augmentations are aggressive.
Sorry, I don’t have the capacity to read and review your link.
How can I know what the size of the dataset is after image augmentation?
Thanks
It is infinitely large.
The focus shifts to train for as long as the model continues to improve.
hello sir
how can we save the augmented images before training?
I am working on image classification problem and i have different number of images for each class.
I want to produce some augmented images so that the number of images per class is same and then i will train my CNN model on that original plus aigmented bigger dataset.
Good question.
You can configure your image augmentation and set it to save images to a file, then enumerate the generator manually in a loop. Then later load those images and use them to train a model.
Please can you explain how to enumerate the generator manually in a loop. And in this situation, how do we train using both the new dataset and the old. Do we train separately, I mean train first with the original dataset, and again with the new augmented dataset. Or have all both datasets in a folder and train.
Thanks in anticipation
We don’t train on the old and new dataset, only the augmented dataset as it is a superset of the original dataset.
Yes, there are tons of examples on the blog, use the blog search to see examples of using augmentation for deep learning.
Hi Jason
Thank you for knowledge share.
Can you please provide guidance on how to use all these augmentation methods with the custom data generator. In my project I’m not using the inbuilt class-ImageDataGenerator.Instead I’ve created Custom data generator by inheriting the keras.utils.sequence class. I don’t want to make code lengthy by writing all these methods in the code and then applying them to the batch. Can you please suggest any better way to access these pre-existing methods from keras directly to my use.
Thanks,
You’re welcome.
Perhaps check the keras source code directly to see how the methods are implemented?
@Jason Brownie
what are data augmentation techniques for datasets , other than images. Like i have 134 instances dataset for disease. how can i augment dataset and synthetically increase instances???
You can use smote for tabular data:
https://machinelearningmastery.com/smote-oversampling-for-imbalanced-classification/
I have a confusion regarding the augmentation.If I use the augmentation techniques all together in the ImageDataGenerator of Keras, then are the techniques applied altogether in an image or applied separately to the image?
For example, if I use 5 techniques to an image, after doing augmentation, will 5 images be generated?
They are all applied to each image.
There is lot of information even in the comments section. Thanks for constantly answering to all the questions in comments also.
I am bit confused in this case
If i am applying 5 different techniques for image augmentation like rotate,width-shift,height-shift,shear,horizontal-flip
then for every image all these 5 techniques are applied ?
if yes, wont the images be distorted when we apply more techniques at a time to the image ?
You’re welcome.
Correct.
Yes, it is possible. Augmentation is an art.
Always review the effects of your augmentation before using it in modeling to make sure it makes sense.
Thank for your tutorial!
You’re welcome!
Is there any criteria for the flip,rotation and sheer factors for medical images such as Xray images and CT scan data? thanks
There may be, perhaps check the literature.
Hello, thanks for this.Been quite helpful.
I want to do some image augmentation with my dataset. Its just 800 images so I need more. However, I will like to also create a new target (labels) for this new dataset generated, how do I do it.
Thanks!
The modified versions of the input images will have the same target as the original image. The imagedatagenerator will do this for you.
Thank you for the prompt response Jason. One last question.
I have some images with bad quality. What pre-processing method would you advise to use to counter the bad quality of the images (noise removal, color saturation or image augmentation)?
If more than one is advised, which should be done first? I mean in which order should they be implemented on the images.
And what are trade-offs in CNN?
Thanks so much.
Good question, perhaps try a few approaches, e.g. standardize, normalize, whiten, scale size, etc. see what works well/best.
Hi Jason, please can you help me solve this.
I try to do data augmentation on my target label and I got this error. ”
ValueError:
x(images tensor) andy(labels) should have the same length. Found: x.shape = (1, 192, 192, 3), y.shape = (560,)”My target label is not an image, just a numpy array of my classes. How then do I make it a 4 dimensional array so that it will have same length with my images in order to do the augmentation.
Thanks in anticipation
Sorry, the cause is not obvious. Perhaps try posting your code and error on stackoverflow.
Wonderful Tutorial!
Once I’ve augmented the image, is there a way to separate the images into 9 individual images to be used in image training? Not a python expert and really don’t want to copy and paste images hundreds of times.
What do you mean exactly Branden?
E.g. there’s no need as you can use the imagedatagenerator directly to train your model.
Ah, I’m trying to take the images and feed them into Azure Computer Vision which requires individual images.
You can run the augmentation procedure manually and configure it to save images to file.
Thanks for the detailed information. I also liked the article [Brightness_range Keras : Data Augmentation with ImageDataGenerator][1]
[1]: https://www.datasciencelearner.com/python-zip_longest-function-implementation/
Thanks for sharing.
This is a great article that has helped me implement data augmentation in my own project. However, is there any to use gaussian blur as a preprocessing technique using Keras or TensorFlow2.0? Would I have to implement the gaussian blur in the ImageDataGenerator or create a depthwiseconv2D layer just for the blurring technique?
Thanks!
I’m not sure off the cuff, sorry.
Can you explain to me why you chose subplot with number (330 + 1 + i)?
I tried with others number, but not clearly understand why 330 work well.
Thank you!
It was the old format for subplot() to do with rows and cols.
The API has changed now and it’s a lot simpler, e.g. subplot(rows, cols, current_index)
https://matplotlib.org/3.3.2/api/_as_gen/matplotlib.pyplot.subplot.html
Hi Jason, thanks for your detailed example and explanation but have you got any in R? At least those of us that uses R should be able to benefit from your expertise.
Sorry, I do not have examples of deep learning in R.
how can we do data augmentation for 3d images [ input size: 128,144,128 ] , it is giving error ” “unsupported channels 128”
Sorry, I don’t have experience with “3d images”.
Hello Jason,
I want to specify a rotation angle of specific angle that I want the image to be rotated – [15, 30, 45, 60, 75, 90] rather than let it randomly pick from -90 to 90. How can I do that?
Also, can I make it possible that horizontal or vertical flip will flip ALL images that is passed to it rather than randomly choosing to flip it or not?
You can do it manually prior to using augmentation.
Perhaps use the standard image prep tools:
https://machinelearningmastery.com/how-to-load-and-manipulate-images-for-deep-learning-in-python-with-pil-pillow/
Thank you for your post. I wanted to ask if you know about any resources regarding the use of cnn when you have subclasses and their super classes. For instance cat vs dog with their species.
Perhaps use a hierarchy of models, one for the top level and one for each sub-level.
Thank you. Do you know a sample code for implementing such models or any book?
I do not, sorry.
Great suggestion, thanks. Perhaps I will prepare a tutorial on this in the future.
Thank you Dr. Brownlee – great stuff. It appears that keras ImageDataGenerator (IDG) is pulling and applying values at random from within the range specified, be that brightness or rotation, etc. Is that indeed the case and is it, from you experience, yield a better dataset?
You’re welcome.
Correct.
It can be helpful on some problems, perhaps try it and see for your prediction problem.
Thank you. Yes, I will try it. I also see that the 9 imshow images are not the same as the ones I save_to_dir. Anyway – having it be random is rather nice – you only have to set the bounds and you’re done!!! Great stuff – truly.
Thanks.
Hi Jason,
I used ImageDataGenerator for data augmentation on my dataset and I wanna save the augmented images, I select the name of dir to save them in the flow_from_directory method but when I checked the folder there is nothing saving there.
I just wanna make sure the data augmentation works well with me or not.
Please, do you have an idea about the reason for that and why it does not save the images?
Thank you
Sorry, I don’t know why you’re images are not being saved, perhaps check the API to confirm you configured it correctly.
Hi jason,
Please i have a question regarding pre-processing. I know image augmentation is regarded as a pre-processing technique and from your code i can see you used the Keras function called ImageDataGenerator which randomly rotates, flips and shifts the dataset images but does it extract features and what features are extracted and why.
Please am sorry if my question might sound stupid am a newbie to this.
Thank you
Dat augmentation does not extract features. It just creates more images like the images in the training set so we can better train our models.
Sir,if we are augmenting dataset images(flipping,rotating) etc which are used for object detection,does that mean we need to create new xml file(for annotation) for each of the new image created by Data Augmentation process or will the xml files be generated by itself?
Yes, if the image is changed, then the annotation may also require change – if the position of the object in the image is moved.
I am working on Augmentation technique for object detection but I am wondering which more efficient to apply augmentation before being used as input to the model or during training
They are the same thing – same effect. Use the approach that you’re most comfortable with.
Hello Sir, the article was really helpful. Right now I’m working on an x-ray image classifier. I am using 6 different classes in total and as I’ve fewer x-ray data, I used 6 different “image augmentation” techniques. Initially, in my training folder, I’ve 13,000 images. So my question is, can I know how many images are there or the total images in each class after I performed my “image augmentation” techniques?
It’ll be a really big help if you can answer me this, thanks 🙂
There will be an infinite number of images during augmentation. Perhaps I don’t understand your question?
Hi Jason,
Thank you for a nice article. I have question regarding image preprocessing.
I have image data in pixels, and I am augmenting pixel data through ImageGenerator function.
Should I rescale and normalize data before augmentation or after? does it have any affect on performance and what is best approach?
thank you!
You’re welcome.
You can scale pixel data as part of augmentation (beforehand). It can help the model and will not impact the augmentation process.
Hi Jason,
Thank your for your response. Dividing image pixel datas by 255.0 to get into range [0,1] is same as min max normalization but different name? am i right?
Thank you!
Same thing, same name. We are normalizing (scaling) the pixel values.
Hi Jason,
If I use train_datagen = ImageDataGenerator() this way without any preprocessing and augmentation, then my model converges faster and give higher accuracy than train_datagen = ImageDataGenerator(rescale=1./255). Is it normal ? or am i doing something wrong. But without rescaling images, when i try to show images then it shows all images in white box, no content is visible. What am i doing wrong?
Thank you!
Sure, sometimes data augmentation does not help.
Thank you very much for your excellent tutorial and your book.
I have a question sir, I want to do adaptive threshold (with opencv) on preprocessing_function(datagenerator) but don’t function, how can I apply methods as adaptive threshold, bluredimage… on imagae.datagenerator.
Thank you sir
You may have to write custom code.
Thank you very much for the tutorial.
I have a question, if I have one bounding box per image, how can I modify this bouding box according to the changes made to the image?
For example, with a rotation, how can I get the rotation matrix to change my bounding box?
Thank you sir.
You’re welcome.
Good question, you might need to use a data augmentation implementation/library that is aware of your bounding boxes.
Hi Jason,
Thank you so much for your tutorial. Is shear is a traslation transformation. As we named zoom as scaling. Can we call shear a translation transformation? If Shear is a translation tranformation then what are the height and width shifts?
It would be a great help!!
Thank you!
I guess so.
Really good post Mr. Browniee!! .. I have a small query, it’s about Deep Learning ToolKit (DLTK)…. Can we use the Data Augmentation and Data Normalization techniques from DLTK in Image Data Generator?
Sorry, I am not familiar with “DLTK”.
Hey it’s fine. Thank you for trying!
Hello sir, i run this on colab google
# example of brighting image augmentation
from numpy import expand_dims
from keras.preprocessing.image import load_img
from keras.preprocessing.image import img_to_array
from keras.preprocessing.image import ImageDataGenerator
from matplotlib import pyplot
# load the image
img = load_img(‘bird.jpg’)
# convert to numpy array
data = img_to_array(img)
# expand dimension to one sample
samples = expand_dims(data, 0)
# create image data augmentation generator
datagen = ImageDataGenerator(brightness_range=[0.2,1.0])
# prepare iterator
it = datagen.flow(samples, batch_size=1)
# generate samples and plot
for i in range(9):
# define subplot
pyplot.subplot(330 + 1 + i)
# generate batch of images
batch = it.next()
# convert to unsigned integers for viewing
image = batch[0].astype(‘uint8’)
# plot raw pixel data
pyplot.imshow(image)
# show the figure
pyplot.show()
and it say “IndentationError: expected an indented block”
im new cnn deep learning, how to fix it sir?
This will help you copy code correctly:
https://machinelearningmastery.com/faq/single-faq/how-do-i-copy-code-from-a-tutorial
thank sir, it solved
Well done!
Hi Jason,
I just stepped through your tutorial today using google colabs and ran into no problems. Excellent tutorial, very well explained. Thank you for posting. Your THE MAN!!
Thanks!
Hi,
This was what I am searching, However how to train the final classification CNN with both original and augmented data combined. This leads to have train x = 2.Train Y ( exmple: train x = 2000 and train y = 1000) And CNN cant accept input variables with inconsistent numbers
If you mean to have the image side-by-side, then you’re correct. A model cannot be used if your input shape is changed. If you mean to make more input data (i.e., images) by augmentation, you have not change the input variables, but just get more samples in the dataset.
Hi,
We know that input data samples have to be combined for the classification. What about adding features to? I mean appending the original and augmented data among the feature axe ( pixels , (fo+fa) ) with fo is originl feature and fa is augmented feature. does this make sense?
Not sure why you want to do that. Augmentation is to skew the image a bit so the machine learning model can identify the slightly-modified image equally.
That makes sense. I can see one example, where fo is the original image and fa is the one after Sobel edge detection. But doing this is like a preprocessing of the input. Then you finish a model like that, you need to do the same preprocessing for all input you use in prediction steps too.
Hello,
for example when we want to use CNN in image Classification and we have let’s say 10 classes, but there is big difference in number of samples in every class.
for example some classes contains 1000 sample and others 200, as we know in this case the algorithm would be biased because of this difference, so the question is: does data augmentation is applied on these small classes (small number of samples) Only so will make kind of balance or augmentation will be applied on whole classes and equally increases classes samples
Thank you
Yes. Or, 200 samples are enough, then you can undersample the 1000-sample class to 200 (i.e., pick 200 from that 1000) and then apply augmentation.
Hi Jason
thanks for the wonderful post, I have an imbalanced dataset comprising of images as
class 0 724
class 1 1084
class 2 492
class 3 818
class 4 352
the CNN trained classifies everything as class 1 what approach should I use?
Hi Akshenndra…The following may help you in terms of improving the classification model accuracy:
https://machinelearningmastery.com/failure-of-accuracy-for-imbalanced-class-distributions/
Hello,
I did data augmentation to a database in order to get balanced data. Because the original Database have unbalanced data (example ::: class 1: 60 images , class 2: 2999 …).
Then I build a classifier to evaluate the performance with balanced and unbalanced data. When I use unbalanced data I get high accuracy (98%), but in the confusion matrix, classes with low data don’t have good performance. However, using balanced data, the model accuracy is lower (about 80%) but confusion matrix gives performances nearly equals for all classes.
I don’t know how to compare these results and which to consider best classifier for my database ?? What do you think ?
Hello, how can I add multiple preprocessing_functions to ImageDataGenerator ?