Before you can develop predictive models for image data, you must learn how to load and manipulate images and photographs.
The most popular and de facto standard library in Python for loading and working with image data is Pillow. Pillow is an updated version of the Python Image Library, or PIL, and supports a range of simple and sophisticated image manipulation functionality. It is also the basis for simple image support in other Python libraries such as SciPy and Matplotlib.
In this tutorial, you will discover how to load and manipulate image data using the Pillow Python library.
After completing this tutorial, you will know:
How to install the Pillow library and confirm it is working correctly.
How to load images from file, convert loaded images to NumPy arrays, and save images in new formats.
How to perform basic transforms to image data such as resize, flips, rotations, and cropping.
Kick-start your project with my new book Deep Learning for Computer Vision, including step-by-step tutorials and the Python source code files for all examples.
Let’s get started.
Updated Sep/2019: Updated to reflect minor changes to Pillow API.
Tutorial Overview
This tutorial is divided into six parts; they are:
How to Install Pillow
How to Load and Display Images
How to Convert Images to NumPy Arrays and Back
How to Save Images to File
How to Resize Images
How to Flip, Rotate, and Crop Images
How to Install Pillow
The Python Imaging Library, or PIL for short, is an open source library for loading and manipulating images.
It was developed and made available more than 25 years ago and has become a de facto standard API for working with images in Python. The library is now defunct and no longer updated and does not support Python 3.
Pillow is a PIL library that supports Python 3 and is the preferred modern library for image manipulation in Python. It is even required for simple image loading and saving in other Python scientific libraries such as SciPy and Matplotlib.
The Pillow library is installed as a part of most SciPy installations; for example, if you are using Anaconda.
For help setting up your SciPy environment, see the step-by-step tutorial:
Pillow is built on top of the older PIL and you can confirm that the library was installed correctly by printing the version number; for example:
1
2
3
# check Pillow version number
import PIL
print('Pillow Version:',PIL.__version__)
Running the example will print the version number for Pillow; your version number should be the same or higher.
1
Pillow Version: 6.1.0
Now that your environment is set up, let’s look at how to load an image.
Want Results with Deep Learning for Computer Vision?
Take my free 7-day email crash course now (with sample code).
Click to sign-up and also get a free PDF Ebook version of the course.
How to Load and Display Images
We need a test image to demonstrate some important features of using the Pillow library.
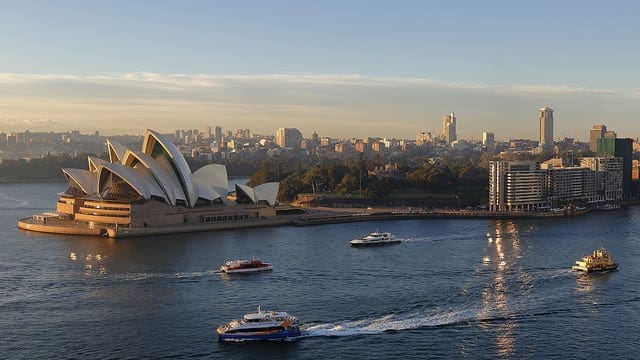
In this tutorial, we will use a photograph of the Sydney Opera House, taken by Ed Dunens and made available on Flickr under a creative commons license, some rights reserved.
Download the photograph and save it in your current working directory with the file name “opera_house.jpg“.
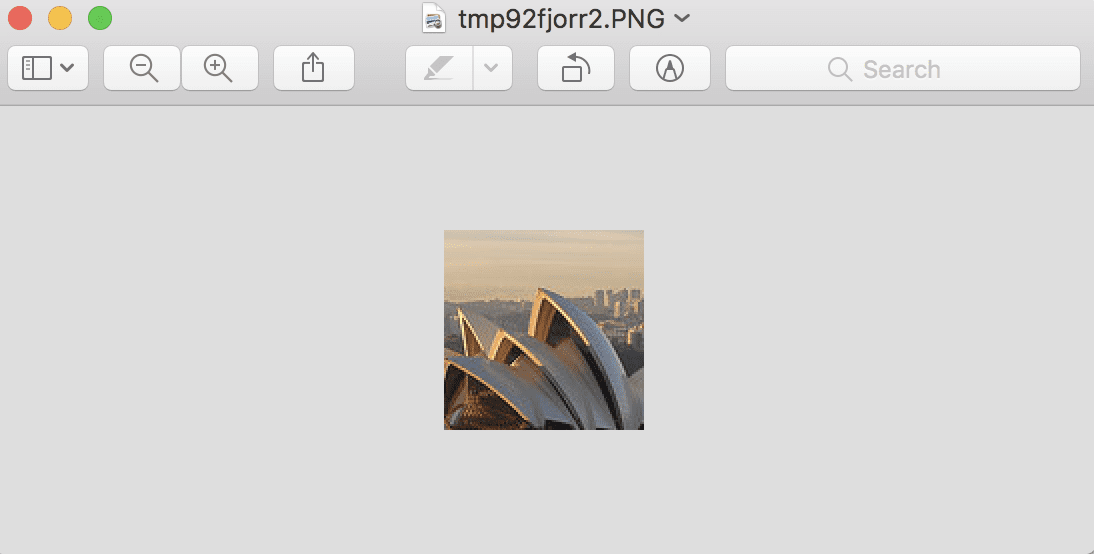
Images are typically in PNG or JPEG format and can be loaded directly using the open() function on Image class. This returns an Image object that contains the pixel data for the image as well as details about the image. The Image class is the main workhorse for the Pillow library and provides a ton of properties about the image as well as functions that allow you to manipulate the pixels and format of the image.
The ‘format‘ property on the image will report the image format (e.g. JPEG), the ‘mode‘ will report the pixel channel format (e.g. RGB or CMYK), and the ‘size‘ will report the dimensions of the image in pixels (e.g. 640×480).
The show() function will display the image using your operating systems default application.
The example below demonstrates how to load and show an image using the Image class in the Pillow library.
1
2
3
4
5
6
7
8
9
10
# load and show an image with Pillow
from PIL import Image
# load the image
image=Image.open('opera_house.jpg')
# summarize some details about the image
print(image.format)
print(image.mode)
print(image.size)
# show the image
image.show()
Running the example will first load the image, report the format, mode, and size, then show the image on your desktop.
1
2
3
JPEG
RGB
(640, 360)
The image is shown using the default image preview application for your operating system, such as Preview on MacOS.
Sydney Opera House Displayed Using the Default Image Preview Application
Now that you know how to load an image, let’s look at how you can access the pixel data of images.
How to Convert Images to NumPy Arrays and Back
Often in machine learning, we want to work with images as NumPy arrays of pixel data.
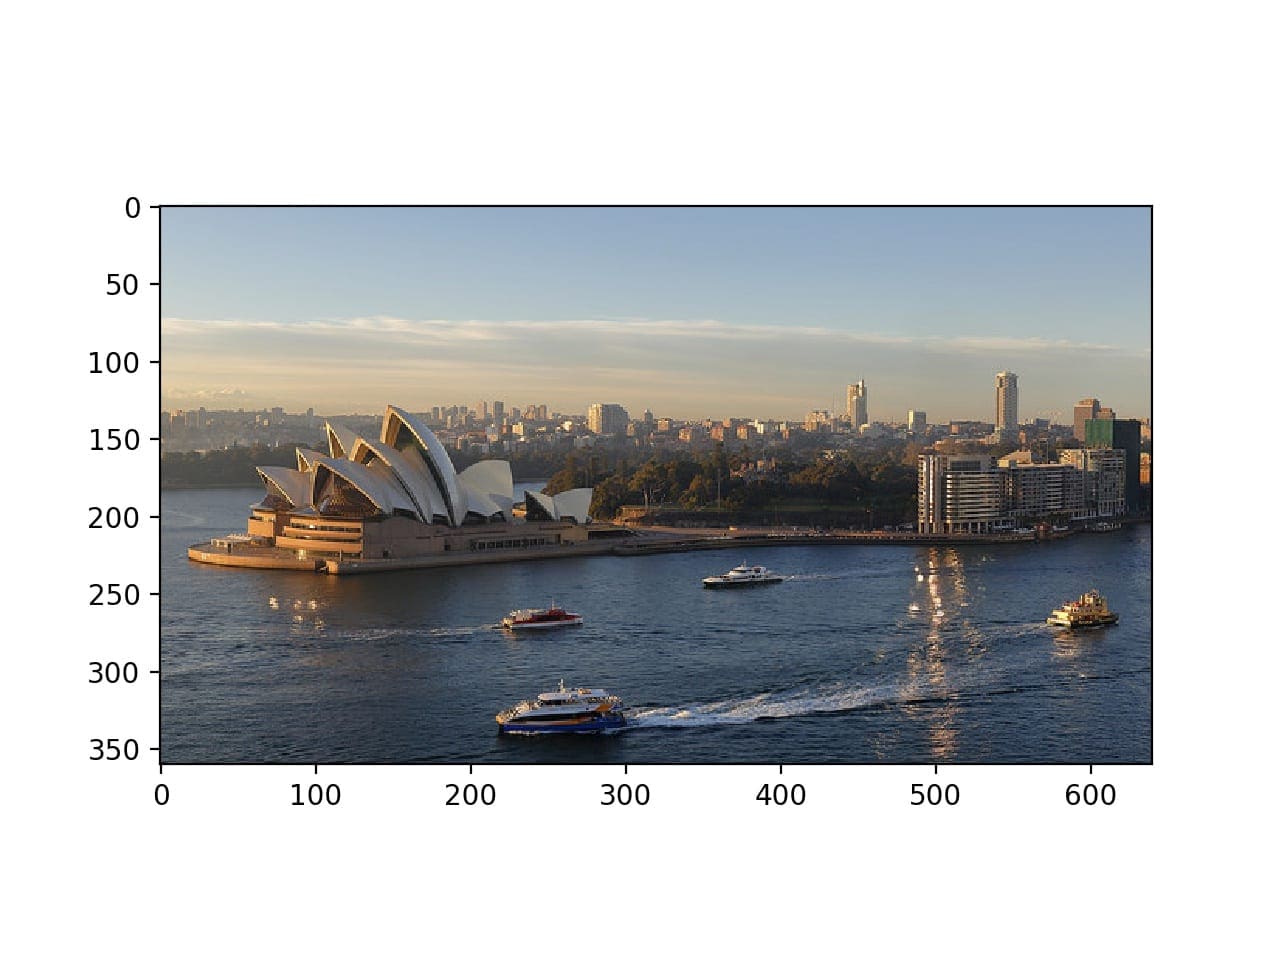
With Pillow installed, you can also use the Matplotlib library to load the image and display it within a Matplotlib frame.
This can be achieved using the imread() function that loads the image an array of pixels directly and the imshow() function that will display an array of pixels as an image.
The example below loads and displays the same image using Matplotlib that, in turn, will use Pillow under the covers.
1
2
3
4
5
6
7
8
9
10
11
# load and display an image with Matplotlib
from matplotlib import image
from matplotlib import pyplot
# load image as pixel array
data=image.imread('opera_house.jpg')
# summarize shape of the pixel array
print(data.dtype)
print(data.shape)
# display the array of pixels as an image
pyplot.imshow(data)
pyplot.show()
Running the example first loads the image and then reports the data type of the array, in this case, 8-bit unsigned integers, then reports the shape of the array, in this case, 360 pixels wide by 640 pixels high and three channels for red, green, and blue.
1
2
uint8
(360, 640, 3)
Finally, the image is displayed using Matplotlib.
Sydney Opera House Displayed Using Matplotlib
The Matplotlib wrapper functions can be more effective than using Pillow directly.
Nevertheless, you can access the pixel data from a Pillow Image. Perhaps the simplest way is to construct a NumPy array and pass in the Image object. The process can be reversed converting a given array of pixel data into a Pillow Image object using the Image.fromarray() function. This can be useful if image data is manipulated as a NumPy array and you then want to save it later as a PNG or JPEG file.
The example below loads the photo as a Pillow Image object and converts it to a NumPy array, then converts it back to an Image object again.
1
2
3
4
5
6
7
8
9
10
11
12
13
14
15
# load image and convert to and from NumPy array
from PIL import Image
from numpy import asarray
# load the image
image=Image.open('opera_house.jpg')
# convert image to numpy array
data=asarray(image)
# summarize shape
print(data.shape)
# create Pillow image
image2=Image.fromarray(data)
# summarize image details
print(image2.format)
print(image2.mode)
print(image2.size)
Running the example first loads the photo as a Pillow image then converts it to a NumPy array and reports the shape of the array. Finally, the array is converted back into a Pillow image and the details are reported.
1
2
3
4
(360, 640, 3)
JPEG
RGB
(640, 360)
Both approaches are effective for loading image data into NumPy arrays, although the Matplotlib imread() function uses fewer lines of code than loading and converting a Pillow Image object and may be preferred.
For example, you could easily load all images in a directory as a list as follows:
1
2
3
4
5
6
7
8
9
10
11
# load all images in a directory
from os import listdir
from matplotlib import image
# load all images in a directory
loaded_images=list()
forfilename inlistdir('images'):
# load image
img_data=image.imread('images/'+filename)
# store loaded image
loaded_images.append(img_data)
print('> loaded %s %s'%(filename,img_data.shape))
Now that we know how to load images as NumPy arrays, let’s look at how to save images to file.
How to Save Images to File
An image object can be saved by calling the save() function.
This can be useful if you want to save an image in a different format, in which case the ‘format‘ argument can be specified, such as PNG, GIF, or PEG.
For example, the code listing below loads the photograph in JPEG format and saves it in PNG format.
1
2
3
4
5
6
7
8
9
# example of saving an image in another format
from PIL import Image
# load the image
image=Image.open('opera_house.jpg')
# save as PNG format
image.save('opera_house.png',format='PNG')
# load the image again and inspect the format
image2=Image.open('opera_house.png')
print(image2.format)
Running the example loads the JPEG image, saves it in PNG format, then loads the newly saved image again, and confirms that the format is indeed PNG.
1
PNG
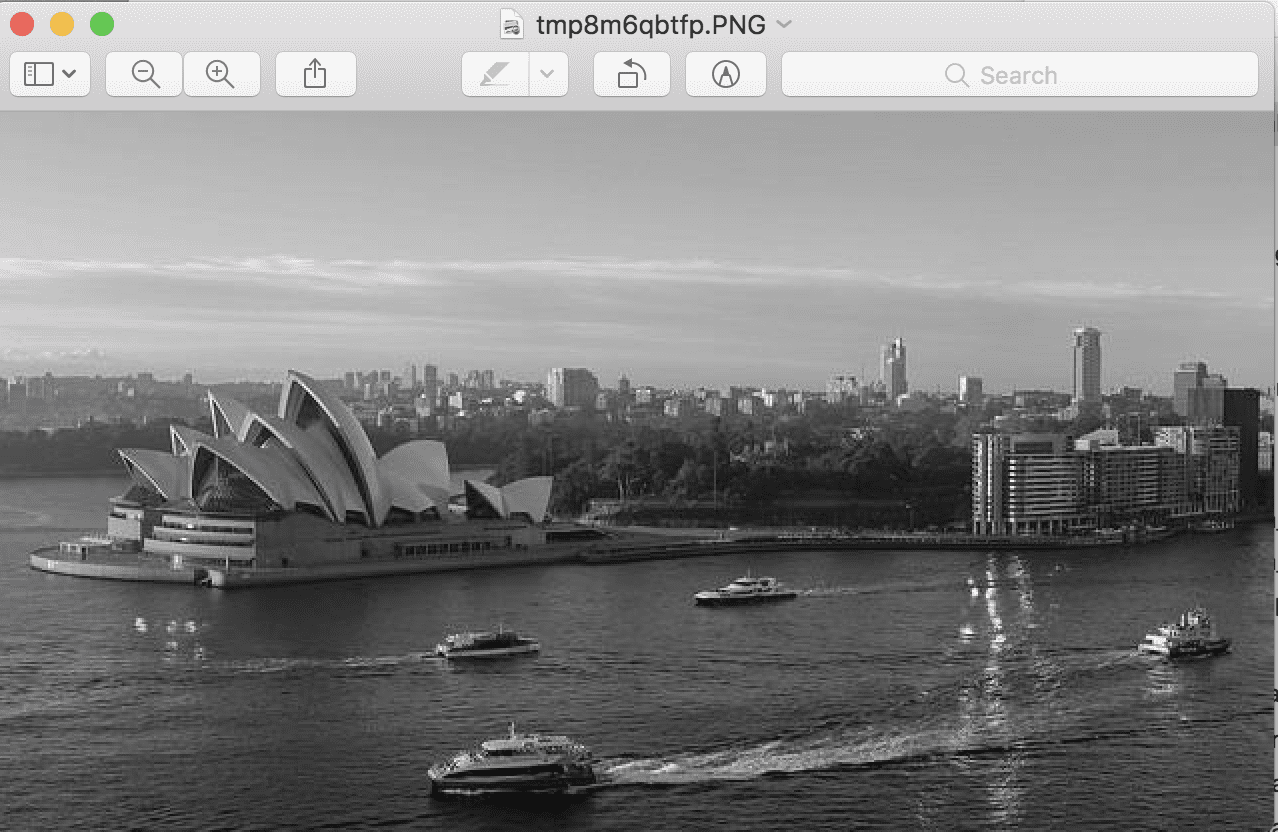
Saving images is useful if you perform some data preparation on the image before modeling. One example is converting color images (RGB channels) to grayscale (1 channel).
There are a number of ways to convert an image to grayscale, but Pillow provides the convert() function and the mode ‘L‘ will convert an image to grayscale.
1
2
3
4
5
6
7
8
9
10
11
12
# example of saving a grayscale version of a loaded image
from PIL import Image
# load the image
image=Image.open('opera_house.jpg')
# convert the image to grayscale
gs_image=image.convert(mode='L')
# save in jpeg format
gs_image.save('opera_house_grayscale.jpg')
# load the image again and show it
image2=Image.open('opera_house_grayscale.jpg')
# show the image
image2.show()
Running the example loads the photograph, converts it to grayscale, saves the image in a new file, then loads it again and shows it to confirm that the photo is now grayscale instead of color.
Example of Grayscale Version of Photograph
How to Resize Images
It is important to be able to resize images before modeling.
Sometimes it is desirable to thumbnail all images to have the same width or height. This can be achieved with Pillow using the thumbnail() function. The function takes a tuple with the width and height and the image will be resized so that the width and height of the image are equal or smaller than the specified shape.
For example, the test photograph we have been working with has the width and height of (640, 360). We can resize it to (100, 100), in which case the largest dimension, in this case, the width, will be reduced to 100, and the height will be scaled in order to retain the aspect ratio of the image.
The example below will load the photograph and create a smaller thumbnail with a width and height of 100 pixels.
1
2
3
4
5
6
7
8
9
10
# create a thumbnail of an image
from PIL import Image
# load the image
image=Image.open('opera_house.jpg')
# report the size of the image
print(image.size)
# create a thumbnail and preserve aspect ratio
image.thumbnail((100,100))
# report the size of the thumbnail
print(image.size)
Running the example first loads the photograph and reports the width and height. The image is then resized, in this case, the width is reduced to 100 pixels and the height is reduced to 56 pixels, maintaining the aspect ratio of the original image.
1
2
(640, 360)
(100, 56)
We may not want to preserve the aspect ratio, and instead, we may want to force the pixels into a new shape.
This can be achieved using the resize() function that allows you to specify the width and height in pixels and the image will be reduced or stretched to fit the new shape.
The example below demonstrates how to resize a new image and ignore the original aspect ratio.
1
2
3
4
5
6
7
8
9
10
# resize image and force a new shape
from PIL import Image
# load the image
image=Image.open('opera_house.jpg')
# report the size of the image
print(image.size)
# resize image and ignore original aspect ratio
img_resized=image.resize((200,200))
# report the size of the thumbnail
print(img_resized.size)
Running the example loads the image, reports the shape of the image, then resizes it to have a width and height of 200 pixels.
1
2
(640, 360)
(200, 200)
The sized of the image is shown and we can see that the wide photograph has been compressed into a square, although all of the features are still quite visible and obvious.
Standard resampling algorithms are used to invent or remove pixels when resizing, and you can specify a technique, although default is a bicubic resampling algorithm that suits most general applications.
Resized Photograph That Does Not Preserve the Original Aspect Ratio
How to Flip, Rotate, and Crop Images
Simple image manipulation can be used to create new versions of images that, in turn, can provide a richer training dataset when modeling.
Generally, this is referred to as data augmentation and may involve creating flipped, rotated, cropped, or other modified versions of the original images with the hope that the algorithm will learn to extract the same features from the image data regardless of where they might appear.
You may want to implement your own data augmentation schemes, in which case you need to know how to perform basic manipulations of your image data.
Flip Image
An image can be flipped by calling the flip() function and passing in a method such as FLIP_LEFT_RIGHT for a horizontal flip or FLIP_TOP_BOTTOM for a vertical flip. Other flips are also available
The example below creates both horizontal and vertical flipped versions of the image.
1
2
3
4
5
6
7
8
9
10
11
12
13
14
15
16
17
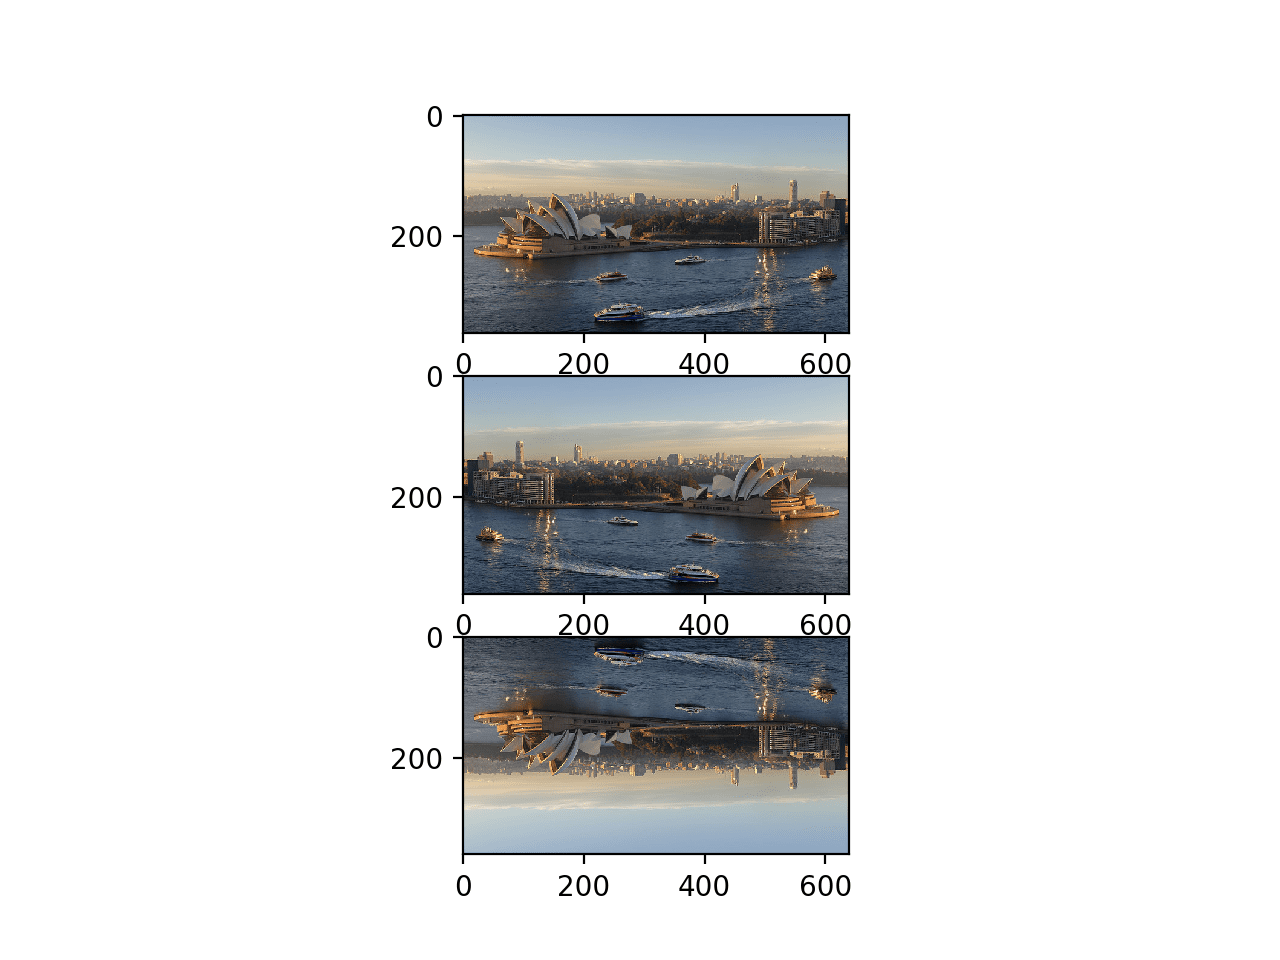
# create flipped versions of an image
from PIL import Image
from matplotlib import pyplot
# load image
image=Image.open('opera_house.jpg')
# horizontal flip
hoz_flip=image.transpose(Image.FLIP_LEFT_RIGHT)
# vertical flip
ver_flip=image.transpose(Image.FLIP_TOP_BOTTOM)
# plot all three images using matplotlib
pyplot.subplot(311)
pyplot.imshow(image)
pyplot.subplot(312)
pyplot.imshow(hoz_flip)
pyplot.subplot(313)
pyplot.imshow(ver_flip)
pyplot.show()
Running the example loads the photograph and creates horizontal and vertical flipped versions of the photograph, then plots all three versions as subplots using Matplotlib.
You will note that the imshow() function can plot the Image object directly without having to convert it to a NumPy array.
Plot of Original, Horizontal, and Vertical Flipped Versions of a Photograph
Rotate Image
An image can be rotated using the rotate() function and passing in the angle for the rotation.
The function offers additional control such as whether or not to expand the dimensions of the image to fit the rotated pixel values (default is to clip to the same size), where to center the rotation the image (default is the center), and the fill color for pixels outside of the image (default is black).
The example below creates a few rotated versions of the image.
1
2
3
4
5
6
7
8
9
10
11
12
13
14
15
# create rotated versions of an image
from PIL import Image
from matplotlib import pyplot
# load image
image=Image.open('opera_house.jpg')
# plot original image
pyplot.subplot(311)
pyplot.imshow(image)
# rotate 45 degrees
pyplot.subplot(312)
pyplot.imshow(image.rotate(45))
# rotate 90 degrees
pyplot.subplot(313)
pyplot.imshow(image.rotate(90))
pyplot.show()
Running the example plots the original photograph, then a version of the photograph rotated 45 degrees, and another rotated 90 degrees.
You can see that in both rotations, the pixels are clipped to the original dimensions of the image and that the empty pixels are filled with black color.
Plot of Original and Rotated Version of a Photograph
Cropped Image
An image can be cropped: that is, a piece can be cut out to create a new image, using the crop() function.
The crop function takes a tuple argument that defines the two x/y coordinates of the box to crop out of the image. For example, if the image is 2,000 by 2,000 pixels, we can clip out a 100 by 100 box in the middle of the image by defining a tuple with the top-left and bottom-right points of (950, 950, 1050, 1050).
The example below demonstrates how to create a new image as a crop from a loaded image.
1
2
3
4
5
6
7
8
# example of cropping an image
from PIL import Image
# load image
image=Image.open('opera_house.jpg')
# create a cropped image
cropped=image.crop((100,100,200,200))
# show cropped image
cropped.show()
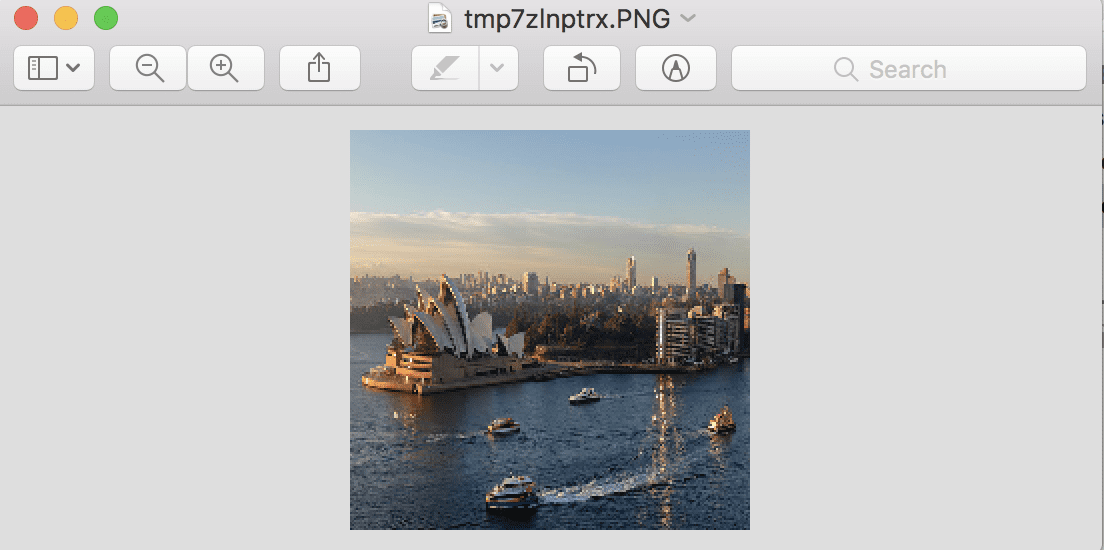
Running the example creates a cropped square image of 100 pixels starting at 100,100 and extending down and left to 200,200. The cropped square is then displayed.
Example of a Cropped Version of a Photograph
Extensions
This section lists some ideas for extending the tutorial that you may wish to explore.
Your Own Images. Experiment with Pillow functions for reading and manipulating images with your own image data.
More Transforms. Review the Pillow API documentation and experiment with additional image manipulation functions.
Image Pre-processing. Write a function to create augmented versions of an image ready for use with a deep learning neural network.
If you explore any of these extensions, I’d love to know.
Further Reading
This section provides more resources on the topic if you are looking to go deeper.
It provides self-study tutorials on topics like: classification, object detection (yolo and rcnn), face recognition (vggface and facenet), data preparation and much more...
Finally Bring Deep Learning to your Vision Projects
Thanks a lot for making all of us very accessible all this material.
Computer vision has a lot of potential for you to apply all your previous work about deep learning.
SIR i am working computer vision field .I have purchase your book on machine learning algorithms.I have gone through some selected topics.I am working on person re-identification.I have gone through some review paper and well as some other papers using deep learning.I want to write my own review on person reid but till now I could not able to write my own texonomy. Pls help to design my own taxonomy
Another great article.
Just so you know: your blog, ebooks and tutorials enabled me to get into machine learning. After two years I am now at a point where I am able to create commercial applications and am a certified professional.
I don’t visit here as much as before as my projects mostly consist of stuff thats not your focus, but I still recommend your site to anyone asking for tutorials and guides on the subject.
Great post. Thanks for making it accessible to all of us.
A quick question, if there is any text content written on the image, would it be possible to extract the text ?
I’m on board with text extraction as well. Taking raw format and extracting pixel data arrays as text would be key in multifunction program manipulation.
Nice and valuable image tutorial as usual from Mr. Brownlee. Thanks!
Because you can manipulate images with different libraries such as PIL (and PILLOW) and MATPLOTLIB, at the beginning you can get confused how to read, manipulate, save, show, etc. Images.
In addition you have now Keras equivalent functions and methods such as load_image, image_to_array, array_to_image, preprocessing images such as ImageDataGenerator for data_augmentation, etc….so decided which one to use having so many parallels or equivalents ways to do it it is some time confused. Anyway, I think, Keras is now the more comprehensible, once you are working in Machine/Deep Learning.
Something remarkable of imaging, at least was for me, is that when you read a image into a numpy array, that is you convert some .jpg format into a numpy array (later on you can save the np array in a “.npy” numpy format) , the volume of the file get multiply by 40 times in general. For example a 15 KB .jpg image get converted into 0.6 MB in np …so the only explanation it is the capacity of JPEG format to compress this digital numpy array !
Thanks for the useful post. I want to crop a part of an image, say for instance draw a rectangle at a desired angle over a small portion in a large image and then crop that part.
Can you please suggest how i can crop it. I have the center point of the rectangle , height , width and angle at which it is tilted
Dear Sir,
I am wondering to slice an image into two triangles with diagonal. How to do that? I am wondering about it. I need to slice an image with diagonals. Thanks
You can perform a mix of rotation and cropping in order to end up with a triangular image with a background, or you can use the mask feature. If you search “How can I cut custom shape from an Image with PIL” in Stack Overflow you can find an example.
i need that how to load and manipulate LIST images for deep learning. You have worked just one image, but i need multiple images process. multiple images load, manipulate etc.
Hi,
I am working with RGB dataset, However now I want to extract the RGB values and convert one image to 3 new grayscale images based on values of R, G and B. i.e 1 RGB image = 3 new images with R, G, and B values separately. Can you guide me, please?
dear sir how to give my labelled data or how to load it in to the model to train
(i am having ground image as label ) and i converted my original image and converted to numpy array(by your tutorial pillow) and fed into my x_train ,,, soo for x_label what next
Sir, i have a graph an image form. I want to read points and the generate he co-efficient using Polynomial Regression Model. The second part is not an issue. But reading the 200 graphs manually is not accurate. Can you please help?
Is there any way to save all the preprocessed images as numpy array? Because whenever my virtual machine stops, I need to do all the preprocessing again.
So if I save all the processed data permanently, i can reuse it later.
Hi,
I have converted the images into grayscale and 48*48 dimensioned jpg format, after that I extracted image pixels and made a csv file just like the FER13 dataset. Then, when I am converting the the csv file into numpy files, it is showing that “cannot reshape array of size 6912 into shape (48,48).” Can you tell me why it is showing? Where all the images are converted into (48,48) already. N.B: I have made a small dataset before from those images previously through same procedure and it worked fine then.
I have dataset of images in jpg format with each image having different size, How can i convert them in numeric form so that they can be fit in the model.
I have list of N images( black and white images with handwrite symbols). Now, I have a image with a symbol and I need to know if there is any image in the list like my image.
A example of black and white images:
– circle
– square
Now, i draw a new imagen with a symbol like square(but not the samw square). I need to know if there is in the list of images, a symbol like the symbol i draw in the new image.
I have done preprocessing of my dicom images and extracted patches out of them. How can I store those patches in my new folder using python.
Do you have idea about it? Can you give some example
please answer my question:
I want to use image compression to minimize training time of model. I search on net on algorithm that permits to me to compress images in different ratio, I found Save command but it use quality argument, but I don’t know what quality argument exactly mean. I want algorithm to make compress with ratio that I specified.
Thank you very much for this rticle.
Hi Sir, please help me if you could. I want to calculate the total green pixel in a given folder fill with 10-20 pictures. I found a way to to calculate it but I have issues finding how to group them all together at once to produce the results. I’m new to coding and any feedback/advice is highly needed.
When we use thumbnail , do we loose feature also? I have a dataset of image where size of image can be anything between (30,30) to (500,500). As gap between minimum image size and maximum image size is really big , is it ok to thumbnail all image to (30,30) size or it can impact performance of model?
Thanks for very useful information. And how is possible to get labels from picture names and make a train set and labels for classification? I need its sample code for a alrge dataset like fonts.
Hello, please I’ve taken pictures of cars to detect number plates using CNN. How do I clean and preprocess these images. I urgently need help with this. Thank you


Hello Jason,
Thanks a lot for making all of us very accessible all this material.
Computer vision has a lot of potential for you to apply all your previous work about deep learning.
Thanks again,
Carlos.
I agree, thanks.
SIR i am working computer vision field .I have purchase your book on machine learning algorithms.I have gone through some selected topics.I am working on person re-identification.I have gone through some review paper and well as some other papers using deep learning.I want to write my own review on person reid but till now I could not able to write my own texonomy. Pls help to design my own taxonomy
I cannot help you write a taxonomy, sorry.
Perhaps this review paper will give you some ideas:
https://arxiv.org/abs/1804.06655
Another great article.
Just so you know: your blog, ebooks and tutorials enabled me to get into machine learning. After two years I am now at a point where I am able to create commercial applications and am a certified professional.
I don’t visit here as much as before as my projects mostly consist of stuff thats not your focus, but I still recommend your site to anyone asking for tutorials and guides on the subject.
Great work. Thank you!
Well done Mike!
Thanks, a appreciate your support.
If you ever want to share some of your story, I’d love to interview you. Contact me any time:
https://machinelearningmastery.com/contact/
Great post. Thanks for making it accessible to all of us.
A quick question, if there is any text content written on the image, would it be possible to extract the text ?
Thank you
Great suggestion, thanks.
I hope to cover the topic in the future.
I’m on board with text extraction as well. Taking raw format and extracting pixel data arrays as text would be key in multifunction program manipulation.
Nice and valuable image tutorial as usual from Mr. Brownlee. Thanks!
Because you can manipulate images with different libraries such as PIL (and PILLOW) and MATPLOTLIB, at the beginning you can get confused how to read, manipulate, save, show, etc. Images.
In addition you have now Keras equivalent functions and methods such as load_image, image_to_array, array_to_image, preprocessing images such as ImageDataGenerator for data_augmentation, etc….so decided which one to use having so many parallels or equivalents ways to do it it is some time confused. Anyway, I think, Keras is now the more comprehensible, once you are working in Machine/Deep Learning.
Something remarkable of imaging, at least was for me, is that when you read a image into a numpy array, that is you convert some .jpg format into a numpy array (later on you can save the np array in a “.npy” numpy format) , the volume of the file get multiply by 40 times in general. For example a 15 KB .jpg image get converted into 0.6 MB in np …so the only explanation it is the capacity of JPEG format to compress this digital numpy array !
Thanks, nearly of them build on and require PIL/Pillow.
Nevertheless, I will be demonstrating each API in coming tutorials.
Yes, I have this too. You must carefully choose precision (e.g. 1632 bit floats) and save using compressed numpy arrays.
Easy, practical to the point. Thanks!
Thanks, I’m glad it helped!
Hi there,
Thanks for the useful post. I want to crop a part of an image, say for instance draw a rectangle at a desired angle over a small portion in a large image and then crop that part.
Can you please suggest how i can crop it. I have the center point of the rectangle , height , width and angle at which it is tilted
If you have the pixel data in an array and know the pixel coordinates you can use array indexes to crop directly.
Or you can use the crop() function:
https://pillow.readthedocs.io/en/3.1.x/reference/Image.html#PIL.Image.Image.crop
I have the four coordinates of the rectangle. How to use this to crop the image. Can you please provide me code example to do them
Thanks
I recommend referring to the example of using the crop() function in the above tutorial.
Dear Sir,
I am wondering to slice an image into two triangles with diagonal. How to do that? I am wondering about it. I need to slice an image with diagonals. Thanks
Good question. Sorry, I don’t have an example of this.
Hi – Did you manage to figure it out? I’m looking for something similar.
You can perform a mix of rotation and cropping in order to end up with a triangular image with a background, or you can use the mask feature. If you search “How can I cut custom shape from an Image with PIL” in Stack Overflow you can find an example.
Thanks for sharing.
hey,
i need that how to load and manipulate LIST images for deep learning. You have worked just one image, but i need multiple images process. multiple images load, manipulate etc.
please help me will you?
by the way, thank you so much!
You’re welcome.
Perhaps this will help:
https://machinelearningmastery.com/how-to-load-large-datasets-from-directories-for-deep-learning-with-keras/
This is very useful article, thank you very much for machine learning
thanks, I’m glad it helped.
sir, i am working on image comparison can you please help to how to compare two images in python and modules to be installed.
What type of comparison exactly?
sir,is it possible to determine the speed of a object using pixel value ?
Perhaps. I don’t know about this topic, sorry.
I want to give the labels to the images read from the folder, for example reading images from 4 folders and give labels for each folder.
Yes, the examples in this tutorial will provide an excellent starting point.
Thank your, really helpfull for beginners,
i have questions
1. How can we divede equal parts(for example 8 or 9) with this ways
2.While i am managing images i am encountring error that image sizes are string 🙂
What do you want to divide into equal parts exactly?
Sorry to hear that you are having troubles, I have some suggestions here:
https://machinelearningmastery.com/faq/single-faq/why-does-the-code-in-the-tutorial-not-work-for-me
Hi,
I am working with RGB dataset, However now I want to extract the RGB values and convert one image to 3 new grayscale images based on values of R, G and B. i.e 1 RGB image = 3 new images with R, G, and B values separately. Can you guide me, please?
Sounds straightforward. What problem are you having exactly?
dear sir how to give my labelled data or how to load it in to the model to train
(i am having ground image as label ) and i converted my original image and converted to numpy array(by your tutorial pillow) and fed into my x_train ,,, soo for x_label what next
Perhaps this will help:
https://machinelearningmastery.com/how-to-load-large-datasets-from-directories-for-deep-learning-with-keras/
This has been super super helpful for me thank you sooooooo much! ♥
I’m very happy to hear that!
Sir, i have a graph an image form. I want to read points and the generate he co-efficient using Polynomial Regression Model. The second part is not an issue. But reading the 200 graphs manually is not accurate. Can you please help?
Perhaps load the graph as an image?
Sir Ihave a small image dataset in pgm format and I will to use ImageDatatGenerator but it
use pgm and png…Can you help me please
I have not heard of pgm format, sorry.
Is there any way to save all the preprocessed images as numpy array? Because whenever my virtual machine stops, I need to do all the preprocessing again.
So if I save all the processed data permanently, i can reuse it later.
I am very new to ML.
Yes, you can save images as numpy arrays to file:
https://machinelearningmastery.com/how-to-save-a-numpy-array-to-file-for-machine-learning/
Hi,
How can I reduce the Face Prediction Processing Time?
It takes up to 4 seconds to predict (The extracted face takes up to 1.8 seconds)
Smaller model.
Faster computer.
Smaller images.
Hi,
I have converted the images into grayscale and 48*48 dimensioned jpg format, after that I extracted image pixels and made a csv file just like the FER13 dataset. Then, when I am converting the the csv file into numpy files, it is showing that “cannot reshape array of size 6912 into shape (48,48).” Can you tell me why it is showing? Where all the images are converted into (48,48) already. N.B: I have made a small dataset before from those images previously through same procedure and it worked fine then.
Sorry, I don’t know the cause of your fault. Perhaps post your code and error to stackoverflow?
Hi Mr Brownlee,
I have dataset of images in jpg format with each image having different size, How can i convert them in numeric form so that they can be fit in the model.
Load them as numpy arrays as shown in the tutorial.
hello sir
how can i resize the training data of labelled images
Load the image, set the preferred size, save the image or use the image.
not single image i want to resize the whole dataset at once
Typically, I do this as I load each image. Perhaps theres a better.
There is method to know if any image is like a imagen in a list of images. Like percentage
100 equal
A list of images that are like a image.
Thanks
Sorry, not sure I follow. Can you elaborate?
I have list of N images( black and white images with handwrite symbols). Now, I have a image with a symbol and I need to know if there is any image in the list like my image.
A example of black and white images:
– circle
– square
Now, i draw a new imagen with a symbol like square(but not the samw square). I need to know if there is in the list of images, a symbol like the symbol i draw in the new image.
How do you check it?
I see, thanks. This sounds like an image search or image similarity type problem.
Sorry, I don’t have tutorials on this topic – I cannot give you good off the cuff advice.
I think this is way faster
# pip install ThreadedFileLoader
from ThreadedFileLoader.ThreadedFileLoader import *
instance = ThreadedImageLoader(“path_to_images/*.jpg”)
instance.start_loading()
images = instance.loaded_objects
Thanks for the tip.
Hello,
I have done preprocessing of my dicom images and extracted patches out of them. How can I store those patches in my new folder using python.
Do you have idea about it? Can you give some example
Perhaps save each as a separate image.
Or perhaps store them in a numpy array and store the whole array to file.
how to convert .mat dataset to .jpeg dataset
Sorry, I don’t know about .mat files.
please answer my question:
I want to use image compression to minimize training time of model. I search on net on algorithm that permits to me to compress images in different ratio, I found Save command but it use quality argument, but I don’t know what quality argument exactly mean. I want algorithm to make compress with ratio that I specified.
Thank you very much for this rticle.
Perhaps run a sensitivity analysis to see how quality of compression impacts learning. Then choose accordingly.
i am working on plant identification i am finding it difficult to load about 15,500 images at once and i am stuck, please help
What is the specific problem?
Hi Sir, please help me if you could. I want to calculate the total green pixel in a given folder fill with 10-20 pictures. I found a way to to calculate it but I have issues finding how to group them all together at once to produce the results. I’m new to coding and any feedback/advice is highly needed.
Sorry, I don’t have a tutorial on this topic.
Perhaps opencv has tools you can use to address this problem.
Hi Jason,
Thanks for wonderful tutorial , I had a doubt:
When we use thumbnail , do we loose feature also? I have a dataset of image where size of image can be anything between (30,30) to (500,500). As gap between minimum image size and maximum image size is really big , is it ok to thumbnail all image to (30,30) size or it can impact performance of model?
Thanks.
Pankaj
Yes. Smaller images have less data.
test dataset can we upload bulk … i mean not in sub folders . all pic should be in a single folder(test)
You can structure your data any way you like.
This is very useful article, thank you very much for machine learning
Thanks!
Thanks for very useful information. And how is possible to get labels from picture names and make a train set and labels for classification? I need its sample code for a alrge dataset like fonts.
I don’t think I have a tutorial on that topic, sorry.
Perhaps this would be a good place to start:
https://machinelearningmastery.com/start-here/#dlfcv
How to load depth images for processing in deep learning?
What do you mean by depth images?
you mean by depth images?
Hello…Please clarify your question so that I may better assist you.
James Hello Thanks For Your Sharing. How can we run this code on the web, can you help me?
Hello Tohum…By “web”, are you referring to something like Google Colab?
https://colab.research.google.com/
Hello, please I’ve taken pictures of cars to detect number plates using CNN. How do I clean and preprocess these images. I urgently need help with this. Thank you
Hi Fischer…You may find the following of interest:
https://medium.com/illuin/cleaning-up-dirty-scanned-documents-with-deep-learning-2e8e6de6cfa6
https://machinelearningmastery.com/best-practices-for-preparing-and-augmenting-image-data-for-convolutional-neural-networks/