Object detection is a challenging computer vision task that involves predicting both where the objects are in the image and what type of objects were detected.
The Mask Region-based Convolutional Neural Network, or Mask R-CNN, model is one of the state-of-the-art approaches for object recognition tasks. The Matterport Mask R-CNN project provides a library that allows you to develop and train Mask R-CNN Keras models for your own object detection tasks. Using the library can be tricky for beginners and requires the careful preparation of the dataset, although it allows fast training via transfer learning with top performing models trained on challenging object detection tasks, such as MS COCO.
In this tutorial, you will discover how to develop a Mask R-CNN model for kangaroo object detection in photographs.
After completing this tutorial, you will know:
How to prepare an object detection dataset ready for modeling with an R-CNN.
How to use transfer learning to train an object detection model on a new dataset.
How to evaluate a fit Mask R-CNN model on a test dataset and make predictions on new photos.
Kick-start your project with my new book Deep Learning for Computer Vision, including step-by-step tutorials and the Python source code files for all examples.
Let’s get started.
How to Train an Object Detection Model to Find Kangaroos in Photographs (R-CNN with Keras) Photo by Ronnie Robertson, some rights reserved.
Tutorial Overview
This tutorial is divided into five parts; they are:
How to Install Mask R-CNN for Keras
How to Prepare a Dataset for Object Detection
How to a Train Mask R-CNN Model for Kangaroo Detection
How to Evaluate a Mask R-CNN Model
How to Detect Kangaroos in New Photos
Note: This tutorial requires TensorFlow version 1.15.3 and Keras 2.2.4. It does not work with TensorFlow 2.0+ or Keras 2.2.5+ because a third-party library has not been updated at the time of writing.
You can install these specific versions of the libraries as follows:
1
2
sudo pip install --no-deps tensorflow==1.15.3
sudo pip install --no-deps keras==2.2.4
How to Install Mask R-CNN for Keras
Object detection is a task in computer vision that involves identifying the presence, location, and type of one or more objects in a given image.
It is a challenging problem that involves building upon methods for object recognition (e.g. where are they), object localization (e.g. what are their extent), and object classification (e.g. what are they).
The Region-Based Convolutional Neural Network, or R-CNN, is a family of convolutional neural network models designed for object detection, developed by Ross Girshick, et al. There are perhaps four main variations of the approach, resulting in the current pinnacle called Mask R-CNN. The Mask R-CNN introduced in the 2018 paper titled “Mask R-CNN” is the most recent variation of the family of models and supports both object detection and object segmentation. Object segmentation not only involves localizing objects in the image but also specifies a mask for the image, indicating exactly which pixels in the image belong to the object.
Mask R-CNN is a sophisticated model to implement, especially as compared to a simple or even state-of-the-art deep convolutional neural network model. Instead of developing an implementation of the R-CNN or Mask R-CNN model from scratch, we can use a reliable third-party implementation built on top of the Keras deep learning framework.
The best-of-breed third-party implementations of Mask R-CNN is the Mask R-CNN Project developed by Matterport. The project is open source released under a permissive license (e.g. MIT license) and the code has been widely used on a variety of projects and Kaggle competitions.
The first step is to install the library.
At the time of writing, there is no distributed version of the library, so we have to install it manually. The good news is that this is very easy.
Installation involves cloning the GitHub repository and running the installation script on your workstation. If you are having trouble, see the installation instructions buried in the library’s readme file.
Want Results with Deep Learning for Computer Vision?
Take my free 7-day email crash course now (with sample code).
Click to sign-up and also get a free PDF Ebook version of the course.
Step 1. Clone the Mask R-CNN GitHub Repository
This is as simple as running the following command from your command line:
This will create a new local directory with the name Mask_RCNN that looks as follows:
1
2
3
4
5
6
7
8
9
10
11
12
13
14
15
Mask_RCNN
├── assets
├── build
│ ├── bdist.macosx-10.13-x86_64
│ └── lib
│ └── mrcnn
├── dist
├── images
├── mask_rcnn.egg-info
├── mrcnn
└── samples
├── balloon
├── coco
├── nucleus
└── shapes
Step 2. Install the Mask R-CNN Library
The library can be installed directly via pip.
Change directory into the Mask_RCNN directory and run the installation script.
From the command line, type the following:
1
2
cd Mask_RCNN
python setup.py install
On Linux or MacOS, you may need to install the software with sudo permissions; for example, you may see an error such as:
1
error: can't create or remove files in install directory
In that case, install the software with sudo:
1
sudo python setup.py install
If you are using a Python virtual environment (virtualenv), such as on an EC2 Deep Learning AMI instance (recommended for this tutorial), you can install Mask_RCNN into your environment as follows:
In this tutorial, we will use the kangaroo dataset, made available by Huynh Ngoc Anh (experiencor). The dataset is comprised of 183 photographs that contain kangaroos, and XML annotation files that provide bounding boxes for the kangaroos in each photograph.
The Mask R-CNN is designed to learn to predict both bounding boxes for objects as well as masks for those detected objects, and the kangaroo dataset does not provide masks. As such, we will use the dataset to learn a kangaroo object detection task, and ignore the masks and not focus on the image segmentation capabilities of the model.
There are a few steps required in order to prepare this dataset for modeling and we will work through each in turn in this section, including downloading the dataset, parsing the annotations file, developing a KangarooDataset object that can be used by the Mask_RCNN library, then testing the dataset object to confirm that we are loading images and annotations correctly.
Install Dataset
The first step is to download the dataset into your current working directory.
This can be achieved by cloning the GitHub repository directly, as follows:
This will create a new directory called “kangaroo” with a subdirectory called ‘images/‘ that contains all of the JPEG photos of kangaroos and a subdirectory called ‘annotes/‘ that contains all of the XML files that describe the locations of kangaroos in each photo.
1
2
3
kangaroo
├── annots
└── images
Looking in each subdirectory, you can see that the photos and annotation files use a consistent naming convention, with filenames using a 5-digit zero-padded numbering system; for example:
1
2
3
4
5
6
7
8
images/00001.jpg
images/00002.jpg
images/00003.jpg
...
annots/00001.xml
annots/00002.xml
annots/00003.xml
...
This makes matching photographs and annotation files together very easy.
We can also see that the numbering system is not contiguous, that there are some photos missing, e.g. there is no ‘00007‘ JPG or XML.
This means that we should focus on loading the list of actual files in the directory rather than using a numbering system.
Parse Annotation File
The next step is to figure out how to load the annotation files.
First, open the first annotation file (annots/00001.xml) and take a look; you should see:
1
2
3
4
5
6
7
8
9
10
11
12
13
14
15
16
17
18
19
20
21
22
23
24
25
26
27
28
29
30
31
32
33
34
35
36
37
38
<annotation>
<folder>Kangaroo</folder>
<filename>00001.jpg</filename>
<path>...</path>
<source>
<database>Unknown</database>
</source>
<size>
<width>450</width>
<height>319</height>
<depth>3</depth>
</size>
<segmented>0</segmented>
<object>
<name>kangaroo</name>
<pose>Unspecified</pose>
<truncated>0</truncated>
<difficult>0</difficult>
<bndbox>
<xmin>233</xmin>
<ymin>89</ymin>
<xmax>386</xmax>
<ymax>262</ymax>
</bndbox>
</object>
<object>
<name>kangaroo</name>
<pose>Unspecified</pose>
<truncated>0</truncated>
<difficult>0</difficult>
<bndbox>
<xmin>134</xmin>
<ymin>105</ymin>
<xmax>341</xmax>
<ymax>253</ymax>
</bndbox>
</object>
</annotation>
We can see that the annotation file contains a “size” element that describes the shape of the photograph, and one or more “object” elements that describe the bounding boxes for the kangaroo objects in the photograph.
The size and the bounding boxes are the minimum information that we require from each annotation file. We could write some careful XML parsing code to process these annotation files, and that would be a good idea for a production system. Instead, we will short-cut development and use XPath queries to directly extract the data that we need from each file, e.g. a //size query to extract the size element and a //object or a //bndbox query to extract the bounding box elements.
Python provides the ElementTree API that can be used to load and parse an XML file and we can use the find() and findall() functions to perform the XPath queries on a loaded document.
First, the annotation file must be loaded and parsed as an ElementTree object.
1
2
# load and parse the file
tree=ElementTree.parse(filename)
Once loaded, we can retrieve the root element of the document from which we can perform our XPath queries.
1
2
# get the root of the document
root=tree.getroot()
We can use the findall() function with a query for ‘.//bndbox‘ to find all ‘bndbox‘ elements, then enumerate each to extract the x and y,min and max values that define each bounding box.
The element text can also be parsed to integer values.
1
2
3
4
5
6
7
# extract each bounding box
forbox inroot.findall('.//bndbox'):
xmin=int(box.find('xmin').text)
ymin=int(box.find('ymin').text)
xmax=int(box.find('xmax').text)
ymax=int(box.find('ymax').text)
coors=[xmin,ymin,xmax,ymax]
We can then collect the definition of each bounding box into a list.
The dimensions of the image may also be helpful, which can be queried directly.
1
2
3
# extract image dimensions
width=int(root.find('.//size/width').text)
height=int(root.find('.//size/height').text)
We can tie all of this together into a function that will take the annotation filename as an argument, extract the bounding box and image dimension details, and return them for use.
The extract_boxes() function below implements this behavior.
1
2
3
4
5
6
7
8
9
10
11
12
13
14
15
16
17
18
19
# function to extract bounding boxes from an annotation file
def extract_boxes(filename):
# load and parse the file
tree=ElementTree.parse(filename)
# get the root of the document
root=tree.getroot()
# extract each bounding box
boxes=list()
forbox inroot.findall('.//bndbox'):
xmin=int(box.find('xmin').text)
ymin=int(box.find('ymin').text)
xmax=int(box.find('xmax').text)
ymax=int(box.find('ymax').text)
coors=[xmin,ymin,xmax,ymax]
boxes.append(coors)
# extract image dimensions
width=int(root.find('.//size/width').text)
height=int(root.find('.//size/height').text)
returnboxes,width,height
We can test out this function on our annotation files, for example, on the first annotation file in the directory.
The complete example is listed below.
1
2
3
4
5
6
7
8
9
10
11
12
13
14
15
16
17
18
19
20
21
22
23
24
25
26
27
# example of extracting bounding boxes from an annotation file
from xml.etree import ElementTree
# function to extract bounding boxes from an annotation file
Running the example returns a list that contains the details of each bounding box in the annotation file, as well as two integers for the width and height of the photograph.
Now that we know how to load the annotation file, we can look at using this functionality to develop a Dataset object.
Develop KangarooDataset Object
The mask-rcnn library requires that train, validation, and test datasets be managed by a mrcnn.utils.Dataset object.
This means that a new class must be defined that extends the mrcnn.utils.Dataset class and defines a function to load the dataset, with any name you like such as load_dataset(), and override two functions, one for loading a mask called load_mask() and one for loading an image reference (path or URL) called image_reference().
1
2
3
4
5
6
7
8
9
10
11
12
13
# class that defines and loads the kangaroo dataset
classKangarooDataset(Dataset):
# load the dataset definitions
def load_dataset(self,dataset_dir,is_train=True):
# ...
# load the masks for an image
def load_mask(self,image_id):
# ...
# load an image reference
def image_reference(self,image_id):
# ...
To use a Dataset object, it is instantiated, then your custom load function must be called, then finally the built-in prepare() function is called.
For example, we will create a new class called KangarooDataset that will be used as follows:
1
2
3
4
# prepare the dataset
train_set=KangarooDataset()
train_set.load_dataset(...)
train_set.prepare()
The custom load function, e.g. load_dataset() is responsible for both defining the classes and for defining the images in the dataset.
Classes are defined by calling the built-in add_class() function and specifying the ‘source‘ (the name of the dataset), the ‘class_id‘ or integer for the class (e.g. 1 for the first lass as 0 is reserved for the background class), and the ‘class_name‘ (e.g. ‘kangaroo‘).
1
2
# define one class
self.add_class("dataset",1,"kangaroo")
Objects are defined by a call to the built-in add_image() function and specifying the ‘source‘ (the name of the dataset), a unique ‘image_id‘ (e.g. the filename without the file extension like ‘00001‘), and the path for where the image can be loaded (e.g. ‘kangaroo/images/00001.jpg‘).
This will define an “image info” dictionary for the image that can be retrieved later via the index or order in which the image was added to the dataset. You can also specify other arguments that will be added to the image info dictionary, such as an ‘annotation‘ to define the annotation path.
We can go one step further and add one more argument to the function to define whether the Dataset instance is for training or test/validation. We have about 160 photos, so we can use about 20%, or the last 32 photos, as a test or validation dataset and the first 131, or 80%, as the training dataset.
This division can be made using the integer in the filename, where all photos before photo number 150 will be train and equal or after 150 used for test. The updated load_dataset() with support for train and test datasets is provided below.
1
2
3
4
5
6
7
8
9
10
11
12
13
14
15
16
17
18
19
20
21
22
23
24
# load the dataset definitions
def load_dataset(self,dataset_dir,is_train=True):
# define one class
self.add_class("dataset",1,"kangaroo")
# define data locations
images_dir=dataset_dir+'/images/'
annotations_dir=dataset_dir+'/annots/'
# find all images
forfilename inlistdir(images_dir):
# extract image id
image_id=filename[:-4]
# skip bad images
ifimage_id in['00090']:
continue
# skip all images after 150 if we are building the train set
ifis_train andint(image_id)>=150:
continue
# skip all images before 150 if we are building the test/val set
Next, we need to define the load_mask() function for loading the mask for a given ‘image_id‘.
In this case, the ‘image_id‘ is the integer index for an image in the dataset, assigned based on the order that the image was added via a call to add_image() when loading the dataset. The function must return an array of one or more masks for the photo associated with the image_id, and the classes for each mask.
We don’t have masks, but we do have bounding boxes. We can load the bounding boxes for a given photo and return them as masks. The library will then infer bounding boxes from our “masks” which will be the same size.
First, we must load the annotation file for the image_id. This involves first retrieving the ‘image info‘ dict for the image_id, then retrieving the annotations path that we stored for the image via our prior call to add_image(). We can then use the path in our call to extract_boxes() developed in the previous section to get the list of bounding boxes and the dimensions of the image.
1
2
3
4
5
6
# get details of image
info=self.image_info[image_id]
# define box file location
path=info['annotation']
# load XML
boxes,w,h=self.extract_boxes(path)
We can now define a mask for each bounding box, and an associated class.
A mask is a two-dimensional array with the same dimensions as the photograph with all zero values where the object isn’t and all one values where the object is in the photograph.
We can achieve this by creating a NumPy array with all zero values for the known size of the image and one channel for each bounding box.
1
2
# create one array for all masks, each on a different channel
masks=zeros([h,w,len(boxes)],dtype='uint8')
Each bounding box is defined as min and max, x and y coordinates of the box.
These can be used directly to define row and column ranges in the array that can then be marked as 1.
1
2
3
4
5
6
# create masks
foriinrange(len(boxes)):
box=boxes[i]
row_s,row_e=box[1],box[3]
col_s,col_e=box[0],box[2]
masks[row_s:row_e,col_s:col_e,i]=1
All objects have the same class in this dataset. We can retrieve the class index via the ‘class_names‘ dictionary, then add it to a list to be returned alongside the masks.
1
self.class_names.index('kangaroo')
Tying this together, the complete load_mask() function is listed below.
1
2
3
4
5
6
7
8
9
10
11
12
13
14
15
16
17
18
19
# load the masks for an image
def load_mask(self,image_id):
# get details of image
info=self.image_info[image_id]
# define box file location
path=info['annotation']
# load XML
boxes,w,h=self.extract_boxes(path)
# create one array for all masks, each on a different channel
Running the example successfully loads and prepares the train and test dataset and prints the number of images in each.
1
2
Train: 131
Test: 32
Now that we have defined the dataset, let’s confirm that the images, masks, and bounding boxes are handled correctly.
Test KangarooDataset Object
The first useful test is to confirm that the images and masks can be loaded correctly.
We can test this by creating a dataset and loading an image via a call to the load_image() function with an image_id, then load the mask for the image via a call to the load_mask() function with the same image_id.
1
2
3
4
5
6
7
# load an image
image_id=0
image=train_set.load_image(image_id)
print(image.shape)
# load image mask
mask,class_ids=train_set.load_mask(image_id)
print(mask.shape)
Next, we can plot the photograph using the Matplotlib API, then plot the first mask over the top with an alpha value so that the photograph underneath can still be seen
1
2
3
4
5
# plot image
pyplot.imshow(image)
# plot mask
pyplot.imshow(mask[:,:,0],cmap='gray',alpha=0.5)
pyplot.show()
The complete example is listed below.
1
2
3
4
5
6
7
8
9
10
11
12
13
14
15
16
17
18
19
20
21
22
23
24
25
26
27
28
29
30
31
32
33
34
35
36
37
38
39
40
41
42
43
44
45
46
47
48
49
50
51
52
53
54
55
56
57
58
59
60
61
62
63
64
65
66
67
68
69
70
71
72
73
74
75
76
77
78
79
80
81
82
83
84
85
86
87
88
89
90
91
92
93
94
95
96
# plot one photograph and mask
from os import listdir
from xml.etree import ElementTree
from numpy import zeros
from numpy import asarray
from mrcnn.utils import Dataset
from matplotlib import pyplot
# class that defines and loads the kangaroo dataset
classKangarooDataset(Dataset):
# load the dataset definitions
def load_dataset(self,dataset_dir,is_train=True):
# define one class
self.add_class("dataset",1,"kangaroo")
# define data locations
images_dir=dataset_dir+'/images/'
annotations_dir=dataset_dir+'/annots/'
# find all images
forfilename inlistdir(images_dir):
# extract image id
image_id=filename[:-4]
# skip bad images
ifimage_id in['00090']:
continue
# skip all images after 150 if we are building the train set
ifis_train andint(image_id)>=150:
continue
# skip all images before 150 if we are building the test/val set
Running the example first prints the shape of the photograph and mask NumPy arrays.
We can confirm that both arrays have the same width and height and only differ in terms of the number of channels. We can also see that the first photograph (e.g. image_id=0) in this case only has one mask.
1
2
(626, 899, 3)
(626, 899, 1)
A plot of the photograph is also created with the first mask overlaid.
In this case, we can see that one kangaroo is present in the photo and that the mask correctly bounds the kangaroo.
Photograph of Kangaroo With Object Detection Mask Overlaid
We could repeat this for the first nine photos in the dataset, plotting each photo in one figure as a subplot and plotting all masks for each photo.
1
2
3
4
5
6
7
8
9
10
11
12
13
# plot first few images
foriinrange(9):
# define subplot
pyplot.subplot(330+1+i)
# plot raw pixel data
image=train_set.load_image(i)
pyplot.imshow(image)
# plot all masks
mask,_=train_set.load_mask(i)
forjinrange(mask.shape[2]):
pyplot.imshow(mask[:,:,j],cmap='gray',alpha=0.3)
# show the figure
pyplot.show()
Running the example shows that photos are loaded correctly and that those photos with multiple objects correctly have separate masks defined.
Plot of First Nine Photos of Kangaroos in the Training Dataset With Object Detection Masks
Another useful debugging step might be to load all of the ‘image info‘ objects in the dataset and print them to the console.
This can help to confirm that all of the calls to the add_image() function in the load_dataset() function worked as expected.
1
2
3
4
5
6
# enumerate all images in the dataset
forimage_id intrain_set.image_ids:
# load image info
info=train_set.image_info[image_id]
# display on the console
print(info)
Running this code on the loaded training dataset will then show all of the ‘image info‘ dictionaries, showing the paths and ids for each image in the dataset.
Finally, the mask-rcnn library provides utilities for displaying images and masks. We can use some of these built-in functions to confirm that the Dataset is operating correctly.
For example, the mask-rcnn library provides the mrcnn.visualize.display_instances() function that will show a photograph with bounding boxes, masks, and class labels. This requires that the bounding boxes are extracted from the masks via the extract_bboxes() function.
Running the example creates a plot showing the photograph with the mask for each object in a separate color.
The bounding boxes match the masks exactly, by design, and are shown with dotted outlines. Finally, each object is marked with the class label, which in this case is ‘kangaroo‘.
Photograph Showing Object Detection Masks, Bounding Boxes, and Class Labels
Now that we are confident that our dataset is being loaded correctly, we can use it to fit a Mask R-CNN model.
How to Train Mask R-CNN Model for Kangaroo Detection
A Mask R-CNN model can be fit from scratch, although like other computer vision applications, time can be saved and performance can be improved by using transfer learning.
The Mask R-CNN model pre-fit on the MS COCO object detection dataset can be used as a starting point and then tailored to the specific dataset, in this case, the kangaroo dataset.
The first step is to download the model file (architecture and weights) for the pre-fit Mask R-CNN model. The weights are available from the GitHub project and the file is about 250 megabytes.
Download the model weights to a file with the name ‘mask_rcnn_coco.h5‘ in your current working directory.
Next, a configuration object for the model must be defined.
This is a new class that extends the mrcnn.config.Config class and defines properties of both the prediction problem (such as name and the number of classes) and the algorithm for training the model (such as the learning rate).
The configuration must define the name of the configuration via the ‘NAME‘ attribute, e.g. ‘kangaroo_cfg‘, that will be used to save details and models to file during the run. The configuration must also define the number of classes in the prediction problem via the ‘NUM_CLASSES‘ attribute. In this case, we only have one object type of kangaroo, although there is always an additional class for the background.
Finally, we must define the number of samples (photos) used in each training epoch. This will be the number of photos in the training dataset, in this case, 131.
Tying this together, our custom KangarooConfig class is defined below.
1
2
3
4
5
6
7
8
9
10
11
# define a configuration for the model
classKangarooConfig(Config):
# Give the configuration a recognizable name
NAME="kangaroo_cfg"
# Number of classes (background + kangaroo)
NUM_CLASSES=1+1
# Number of training steps per epoch
STEPS_PER_EPOCH=131
# prepare config
config=KangarooConfig()
Next, we can define our model.
This is achieved by creating an instance of the mrcnn.model.MaskRCNN class and specifying the model will be used for training via setting the ‘mode‘ argument to ‘training‘.
The ‘config‘ argument must also be specified with an instance of our KangarooConfig class.
Finally, a directory is needed where configuration files can be saved and where checkpoint models can be saved at the end of each epoch. We will use the current working directory.
Next, the pre-defined model architecture and weights can be loaded. This can be achieved by calling the load_weights() function on the model and specifying the path to the downloaded ‘mask_rcnn_coco.h5‘ file.
The model will be used as-is, although the class-specific output layers will be removed so that new output layers can be defined and trained. This can be done by specifying the ‘exclude‘ argument and listing all of the output layers to exclude or remove from the model after it is loaded. This includes the output layers for the classification label, bounding boxes, and masks.
Next, the model can be fit on the training dataset by calling the train() function and passing in both the training dataset and the validation dataset. We can also specify the learning rate as the default learning rate in the configuration (0.001).
We can also specify what layers to train. In this case, we will only train the heads, that is the output layers of the model.
We could follow this training with further epochs that fine-tune all of the weights in the model. This could be achieved by using a smaller learning rate and changing the ‘layer’ argument from ‘heads’ to ‘all’.
The complete example of training a Mask R-CNN on the kangaroo dataset is listed below.
This may take some time to execute on the CPU, even with modern hardware. I recommend running the code with a GPU, such as on Amazon EC2, where it will finish in about five minutes on a P3 type hardware.
1
2
3
4
5
6
7
8
9
10
11
12
13
14
15
16
17
18
19
20
21
22
23
24
25
26
27
28
29
30
31
32
33
34
35
36
37
38
39
40
41
42
43
44
45
46
47
48
49
50
51
52
53
54
55
56
57
58
59
60
61
62
63
64
65
66
67
68
69
70
71
72
73
74
75
76
77
78
79
80
81
82
83
84
85
86
87
88
89
90
91
92
93
94
95
96
97
98
99
100
101
102
103
104
105
106
107
108
109
# fit a mask rcnn on the kangaroo dataset
from os import listdir
from xml.etree import ElementTree
from numpy import zeros
from numpy import asarray
from mrcnn.utils import Dataset
from mrcnn.config import Config
from mrcnn.model import MaskRCNN
# class that defines and loads the kangaroo dataset
classKangarooDataset(Dataset):
# load the dataset definitions
def load_dataset(self,dataset_dir,is_train=True):
# define one class
self.add_class("dataset",1,"kangaroo")
# define data locations
images_dir=dataset_dir+'/images/'
annotations_dir=dataset_dir+'/annots/'
# find all images
forfilename inlistdir(images_dir):
# extract image id
image_id=filename[:-4]
# skip bad images
ifimage_id in['00090']:
continue
# skip all images after 150 if we are building the train set
ifis_train andint(image_id)>=150:
continue
# skip all images before 150 if we are building the test/val set
Running the example will report progress using the standard Keras progress bars.
Note: Your results may vary given the stochastic nature of the algorithm or evaluation procedure, or differences in numerical precision. Consider running the example a few times and compare the average outcome.
We can see that there are many different train and test loss scores reported for each of the output heads of the network. It can be quite confusing as to which loss to pay attention to.
In this example where we are interested in object detection instead of object segmentation, I recommend paying attention to the loss for the classification output on the train and validation datasets (e.g. mrcnn_class_loss and val_mrcnn_class_loss), as well as the loss for the bounding box output for the train and validation datasets (mrcnn_bbox_loss and val_mrcnn_bbox_loss).
A model file is created and saved at the end of each epoch in a subdirectory that starts with ‘kangaroo_cfg‘ followed by random characters.
A model must be selected for use; in this case, the loss continues to decrease for the bounding boxes on each epoch, so we will use the final model at the end of the run (‘mask_rcnn_kangaroo_cfg_0005.h5‘).
Copy the model file from the config directory into your current working directory. We will use it in the following sections to evaluate the model and make predictions.
The results suggest that perhaps more training epochs could be useful, perhaps fine-tuning all of the layers in the model; this might make an interesting extension to the tutorial.
Next, let’s look at evaluating the performance of this model.
How to Evaluate a Mask R-CNN Model
The performance of a model for an object recognition task is often evaluated using the mean absolute precision, or mAP.
We are predicting bounding boxes so we can determine whether a bounding box prediction is good or not based on how well the predicted and actual bounding boxes overlap. This can be calculated by dividing the area of the overlap by the total area of both bounding boxes, or the intersection divided by the union, referred to as “intersection over union,” or IoU. A perfect bounding box prediction will have an IoU of 1.
It is standard to assume a positive prediction of a bounding box if the IoU is greater than 0.5, e.g. they overlap by 50% or more.
Precision refers to the percentage of the correctly predicted bounding boxes (IoU > 0.5) out of all bounding boxes predicted. Recall is the percentage of the correctly predicted bounding boxes (IoU > 0.5) out of all objects in the photo.
As we make more predictions, the recall percentage will increase, but precision will drop or become erratic as we start making false positive predictions. The recall (x) can be plotted against the precision (y) for each number of predictions to create a curve or line. We can maximize the value of each point on this line and calculate the average value of the precision or AP for each value of recall.
Note: there are variations on how AP is calculated, e.g. the way it is calculated for the widely used PASCAL VOC dataset and the MS COCO dataset differ.
The average or mean of the average precision (AP) across all of the images in a dataset is called the mean average precision, or mAP.
The mask-rcnn library provides a mrcnn.utils.compute_ap to calculate the AP and other metrics for a given images. These AP scores can be collected across a dataset and the mean calculated to give an idea at how good the model is at detecting objects in a dataset.
First, we must define a new Config object to use for making predictions, instead of training. We can extend our previously defined KangarooConfig to reuse the parameters. Instead, we will define a new object with the same values to keep the code compact. The config must change some of the defaults around using the GPU for inference that are different from how they are set for training a model (regardless of whether you are running on the GPU or CPU).
1
2
3
4
5
6
7
8
9
# define the prediction configuration
classPredictionConfig(Config):
# define the name of the configuration
NAME="kangaroo_cfg"
# number of classes (background + kangaroo)
NUM_CLASSES=1+1
# simplify GPU config
GPU_COUNT=1
IMAGES_PER_GPU=1
Next, we can define the model with the config and set the ‘mode‘ argument to ‘inference‘ instead of ‘training‘.
Next, we can load the weights from our saved model.
We can do that by specifying the path to the model file. In this case, the model file is ‘mask_rcnn_kangaroo_cfg_0005.h5‘ in the current working directory.
Next, we can evaluate the model. This involves enumerating the images in a dataset, making a prediction, and calculating the AP for the prediction before predicting a mean AP across all images.
First, the image and ground truth mask can be loaded from the dataset for a given image_id. This can be achieved using the load_image_gt() convenience function.
1
2
# load image, bounding boxes and masks for the image id
Next, the pixel values of the loaded image must be scaled in the same way as was performed on the training data, e.g. centered. This can be achieved using the mold_image() convenience function.
1
2
# convert pixel values (e.g. center)
scaled_image=mold_image(image,cfg)
The dimensions of the image then need to be expanded one sample in a dataset and used as input to make a prediction with the model.
1
2
3
4
5
sample=expand_dims(scaled_image,0)
# make prediction
yhat=model.detect(sample,verbose=0)
# extract results for first sample
r=yhat[0]
Next, the prediction can be compared to the ground truth and metrics calculated using the compute_ap() function.
Running the example will make a prediction for each image in the train and test datasets and calculate the mAP for each.
Note: Your results may vary given the stochastic nature of the algorithm or evaluation procedure, or differences in numerical precision. Consider running the example a few times and compare the average outcome.
A mAP above 90% or 95% is a good score. We can see that the mAP score is good on both datasets, and perhaps slightly better on the test dataset, instead of the train dataset.
This may be because the dataset is very small, and/or because the model could benefit from further training.
1
2
Train mAP: 0.929
Test mAP: 0.958
Now that we have some confidence that the model is sensible, we can use it to make some predictions.
How to Detect Kangaroos in New Photos
We can use the trained model to detect kangaroos in new photographs, specifically, in photos that we expect to have kangaroos.
First, we need a new photo of a kangaroo.
We could go to Flickr and find a random photo of a kangaroo. Alternately, we can use any of the photos in the test dataset that were not used to train the model.
We have already seen in the previous section how to make a prediction with an image. Specifically, scaling the pixel values and calling model.detect(). For example:
1
2
3
4
5
6
7
8
9
10
11
# example of making a prediction
...
# load image
image=...
# convert pixel values (e.g. center)
scaled_image=mold_image(image,cfg)
# convert image into one sample
sample=expand_dims(scaled_image,0)
# make prediction
yhat=model.detect(sample,verbose=0)
...
Let’s take it one step further and make predictions for a number of images in a dataset, then plot the photo with bounding boxes side-by-side with the photo and the predicted bounding boxes. This will provide a visual guide to how good the model is at making predictions.
The first step is to load the image and mask from the dataset.
1
2
3
# load the image and mask
image=dataset.load_image(image_id)
mask,_=dataset.load_mask(image_id)
Next, we can make a prediction for the image.
1
2
3
4
5
6
# convert pixel values (e.g. center)
scaled_image=mold_image(image,cfg)
# convert image into one sample
sample=expand_dims(scaled_image,0)
# make prediction
yhat=model.detect(sample,verbose=0)[0]
Next, we can create a subplot for the ground truth and plot the image with the known bounding boxes.
1
2
3
4
5
6
7
8
# define subplot
pyplot.subplot(n_images,2,i*2+1)
# plot raw pixel data
pyplot.imshow(image)
pyplot.title('Actual')
# plot masks
forjinrange(mask.shape[2]):
pyplot.imshow(mask[:,:,j],cmap='gray',alpha=0.3)
We can then create a second subplot beside the first and plot the first, plot the photo again, and this time draw the predicted bounding boxes in red.
We can tie all of this together into a function that takes a dataset, model, and config and creates a plot of the first five photos in the dataset with ground truth and predicted bound boxes.
1
2
3
4
5
6
7
8
9
10
11
12
13
14
15
16
17
18
19
20
21
22
23
24
25
26
27
28
29
30
31
32
33
34
35
36
37
38
39
# plot a number of photos with ground truth and predictions
Running the example first creates a figure showing five photos from the training dataset with the ground truth bounding boxes, with the same photo and the predicted bounding boxes alongside.
Note: Your results may vary given the stochastic nature of the algorithm or evaluation procedure, or differences in numerical precision. Consider running the example a few times and compare the average outcome.
We can see that the model has done well on these examples, finding all of the kangaroos, even in the case where there are two or three in one photo. The second photo down (in the right column) does show a slip-up where the model has predicted a bounding box around the same kangaroo twice.
Plot of Photos of Kangaroos From the Training Dataset With Ground Truth and Predicted Bounding Boxes
A second figure is created showing five photos from the test dataset with ground truth bounding boxes and predicted bounding boxes.
These are images not seen during training, and again, in each photo, the model has detected the kangaroo. We can see that in the case of the second last photo that a minor mistake was made. Specifically, the same kangaroo was detected multiple times.
No doubt these differences can be ironed out with more training, perhaps with a larger dataset and/or data augmentation, to encourage the model to detect people as background and to detect a given kangaroo once only.
Plot of Photos of Kangaroos From the Training Dataset With Ground Truth and Predicted Bounding Boxes
Further Reading
This section provides more resources on the topic if you are looking to go deeper.
It provides self-study tutorials on topics like: classification, object detection (yolo and rcnn), face recognition (vggface and facenet), data preparation and much more...
Finally Bring Deep Learning to your Vision Projects
Great tutorial !
Could you give us advice how to annotate images, please ?
What is the best practice ?
How many images per object is enough ?
How to annotate when there are several objects in the same image and they overlap ?
Thank you.
I am a student from China. I am dealing with a problem related to scene classification and wondering if you could provide some good methods and materials.
best, looking forward to hearing from you, Thank you for your time.
HEY JASON I need help in my satellite building images dataset I have labels in JSON format in which image coordinates in polygon shapes more than 4 points so mask rcnn is suitable for this kind of dataset because RPN needs 4 points to make a box but I have more than 4 points in my labels and annotated images as well so how it works for polygon? please help is there any method to convert polygon to 4 coordinates or any function which can help.
yes!thanks for your guide !and now , it works well on Win10 plateform although still running for much much more time waiting .
The issue is focused on the MKL lib .
hi,Jason, thank for your kind tutorials , and for this case-study,
what is the function of train_set.prepare()?
Please provide much more of HowTo about it ? thanks !
Hi Jason,
Thank you very much for the precious tutorial. I face a problem in people counting project when I am going to track people though detecting them is not hard.
would you please give me a tutorial about the best tracking methods such as “deep tracking” or other else?
Best
Maryam
Hi jason, i am trying to train multiple object, how can i change the code to import multiple classes?
Do i use multiple lines of:
self.add_class(“dataset”, 1, “kangaroo”)
self.add_class(“dataset”, 2, “tiger”)?
ValueError: Dimension 1 in both shapes must be equal, but are 8 and 16. Shapes are [1024,8] and [1024,16]. for ‘Assign_682’ (op: ‘Assign’) with input shapes: [1024,8], [1024,16].
hello,Jason,How to solve this error when calculating the mAP value?
I want to inquire about this file ~~mask_rcnn_kangaroo_cfg_0005.h5 ,
how i can find it also why you seprate the training and predicting
,I mean at the last version of file it contains only the predicting with out the training ,how the model have saved the new weights after training so it can be used on the predicting step
ya but my question befor train on dataset kangaroo i load weights to model
# load weights (mscoco) and exclude the output layers
model.load_weights(‘mask_rcnn_coco.h5’, by_name=True, exclude=[“mrcnn_class_logits”, “mrcnn_bbox_fc”, “mrcnn_bbox”, “mrcnn_mask”])
then after training
# load model weights
model.load_weights(‘mask_rcnn_kangaroo_cfg_0005.h5’, by_name=True)
why we load the weights again
i have the file mask_rcnn_coco.h5, i think it have any initial weights ,but i do not know what is the file mask_rcnn_kangaroo_cfg_0005.h5 contains and where i can find this problem
Jeremy Immanuel Putra TandjungJuly 16, 2019 at 2:25 pm#
Hello Jason,
First of all, nice tutorial! Having the overall code at the end of each step really helped keep track of where I am in the code! Keep up the good job!
I have a question, I notice that it took you on average a minute per epoch to train. However, I tried doing this with a different dataset and right now i’m on my first epoch and it’s ETA 3.5 hours. My desktop is fairly fast with a ryzen 7 cpu and a nvidia 1050Ti gpu.
So is there something that I’m missing? My training dataset consist of 296 pictures of playing cards in different situations with a total file size of 30.4 MB (I’m trying to train a model to detect playing cards)
Or is that a normal? Or is there some setting I’m missing?
Hi Jason.
This post is so helpful to me to learn R-CNN training!
As I do my work, I encounter some problems now.
First I train the model based on ‘mask_rcnn_coco.h5’ weight first.
So i got the model weight : ‘mask_rcnn_carpk_cfg_0010.h5’ file
how can i append more training images and train based on above file?
I just tried to append more images by load_images function, and next I trained the model by load_weights(‘mask_rcnn_carpk_cfg_0010.h5’, by_name=True, exclude=[“mrcnn_class_logits”, “mrcnn_bbox_fc”, “mrcnn_bbox”, “mrcnn_mask”])
But it did not work..
Great tutorial. However, I am bit confused as to why you used Mask RCNN instead of Faster RCNN? Mask RCNN is essentially Faster RCNN except with segmentation added. Here in this example you basically converted the segmentation into bounding boxes so it seems to me that it would have saved you quite a bit of effort and manual labor to just use Faster RCNN model instead?
Great Tutorial Sir,
I really learned a lot.
I have a doubt regarding multiclass detection. I have 2 classes: person with a helmet, person without a helmet. what changes should I make in the program? Like adding classes through add_class function.
Huge Respect and Love.
Satyam Sareen
You have attached the link to the same blog. Can you suggest the changes to be made in your code so that it runs smoothly for multiclass object detection?
Check out the code below, I have changed it to your requirement. If any query comment it down. Keep it up!
Code:
class KangarooDataset(Dataset):
# load the dataset definitions
def load_dataset(self, dataset_dir, is_train=True):
# define two class
self.add_class(“dataset”, 1, “personWithHelmet”) #Change required
self.add_class(“dataset”, 2, “personWithoutHelmet”) #Change required
# define data locations
images_dir = dataset_dir + ‘/images/’
annotations_dir = dataset_dir + ‘/annots/’
# find all images
for filename in listdir(images_dir):
# extract image id
image_id = filename[:-4]
#print(‘IMAGE ID: ‘,image_id)
# skip all images after 90 if we are building the train set
if is_train and int(image_id) >= 90: #set limit for your train and test set
continue
# skip all images before 90 if we are building the test/val set
if not is_train and int(image_id) < 90:
continue
img_path = images_dir + filename
ann_path = annotations_dir + image_id + '.xml'
# add to dataset
self.add_image('dataset', image_id=image_id, path=img_path, annotation=ann_path, class_ids = [0,1,2]) # for your case it is 0:BG, 1:PerWithHel.., 2:PersonWithoutHel… #Change required
# extract bounding boxes from an annotation file
def extract_boxes(self, filename):
# load and parse the file
tree = ElementTree.parse(filename)
# get the root of the document
root = tree.getroot()
# extract each bounding box
boxes = list()
#for box in root.findall('.//bndbox'):
for box in root.findall('.//object'): #Change required
name = box.find('name').text #Change required
xmin = int(box.find('./bndbox/xmin').text)
ymin = int(box.find('./bndbox/ymin').text)
xmax = int(box.find('./bndbox/xmax').text)
ymax = int(box.find('./bndbox/ymax').text)
#coors = [xmin, ymin, xmax, ymax, name]
coors = [xmin, ymin, xmax, ymax, name] #Change required
boxes.append(coors)
# extract image dimensions
width = int(root.find('.//size/width').text)
height = int(root.find('.//size/height').text)
return boxes, width, height
# load the masks for an image
def load_mask(self, image_id):
# get details of image
info = self.image_info[image_id]
# define box file location
path = info['annotation']
# load XML
boxes, w, h = self.extract_boxes(path)
# create one array for all masks, each on a different channel
masks = zeros([h, w, len(boxes)], dtype='uint8')
# create masks
class_ids = list()
for i in range(len(boxes)):
box = boxes[i]
row_s, row_e = box[1], box[3]
col_s, col_e = box[0], box[2]
if (box[4] == 'personWithHelmet'): #Change required #change this to your .XML file
masks[row_s:row_e, col_s:col_e, i] = 2 #Change required #assign number to your class_id
class_ids.append(self.class_names.index('personWithHelmet')) #Change required
else:
masks[row_s:row_e, col_s:col_e, i] = 1 #Change required
class_ids.append(self.class_names.index('personWithoutHelmet')) #Change required
return masks, asarray(class_ids, dtype='int32')
# load an image reference
def image_reference(self, image_id):
info = self.image_info[image_id]
return info['path']
# define a configuration for the model
class KangarooConfig(Config):
# define the name of the configuration
NAME = "kangaroo_cfg"
# number of classes (background + personWithoutHelmet + personWithHelmet)
NUM_CLASSES = 1 + 2 #Change required
# number of training steps per epoch
STEPS_PER_EPOCH = 90
Thank you so much for sharing these changes.
However, after I followed all of them and adjusted the whole thing to fit my dataset, I keep getting this error:
RuntimeError: generator raised StopIteration
from that training line:
model.train(train_set, test_set, learning_rate=config.LEARNING_RATE, epochs=5, layers=’heads’)
hey i was using your code for the training.
can you please show us your prediction code? i was trying to use Jason’s but it came with a lot of errors which i cannot solve.
when i try to test image with multiple kangaroos ,it failed to detect them is there are two kangaroos interference it detect them as only one ?? any advice
thanks for your response, another question is there a new version of Mask RCNN avilable on github .
also what i need to have mask on my model how i can provide the model and make my model learn it also
thanks for your response i confused about some thing ,now we train model without mask ,so what is the mask loss on this case,and how it is calculated??
I am getting this error. Please help
OSError Traceback (most recent call last)
in ()
—-> 1 model.load_weights(‘mask_rcnn_kangaroo_cfg_0005.h5’, by_name=True)
h5py/_objects.pyx in h5py._objects.with_phil.wrapper()
h5py/_objects.pyx in h5py._objects.with_phil.wrapper()
h5py/h5f.pyx in h5py.h5f.open()
OSError: Unable to open file (unable to open file: name = ‘mask_rcnn_kangaroo_cfg_0005.h5’, errno = 2, error message = ‘No such file or directory’, flags = 0, o_flags = 0)
Thanks for the suggestion. The problem was resolved.
How do we resolve the problem with the multiclass label? If we have to identify numbers and characters given in the same image and want to label all the characters and images, then how do we apply the multiclass label.
Hi there, when I copied the example exactly, I am getting a train mAP of 0.000 and a test mAP of 0.000 also. Clearly something is wrong, I was wondering if anyone knew what the issue could be and how to resolve it. Thank you.
Thanks for that I’ll have a look through the code and see if I’ve made a mistake somewhere when copying.
Is there a file which has the complete code written so that i can just copy and past the whole lot rather than bits at a time?
File “”, line 21
self.add_class(“dataset”, 2, “1”)
^
IndentationError: unindent does not match any outer indentation level
Hi
I am getting this error when I added just two new lines, in the code.
def load_dataset(self, dataset_dir, is_train=True):
# define one class
self.add_class(“dataset”, 1, “N”)
self.add_class(“dataset”, 2, “1”) //Added this new line
# define data locations
images_dir = dataset_dir + ‘/images/’
annotations_dir = dataset_dir + ‘/annots/’
for i in range(len(boxes)):
box = boxes[i]
row_s, row_e = box[1], box[3]
col_s, col_e = box[0], box[2]
masks[row_s:row_e, col_s:col_e, i] = 1
class_ids.append(self.class_names.index(‘N’))
class_ids.append(self.class_names.index(‘1′)) //Added this new line.
return masks, asarray(class_ids, dtype=’int32’)
Hi Sir,
Could you please give some insight where do I need to make changes for the multi-class label in the code so that I could identify the different characters and numbers in a single image?
Please give some insight with examples so that it is easier to understand.
Thanks so much for helping.
Thank you very much for this great and clear tutorial!
If I may ask:
Is there a way to evaluate the model while training? For example at the end of each epoch?
I have a problem. My dataset contains only 872 training images and 15 classes. Meanwhile, my images are rather bigger than kangroo or pascal voc files. They are around 1500 pixel wide and 1000 pixel tall. I have changed the python codes in order to apply multi-class classification. My equipment is 1050 ti on a 24 GB memory system. I have run your code for kangroo data, it was ok. But whenever I have done it for my custom data, the memory requirement is getting higher than 20 GB and makes the ubuntu run on slow swap memory yielding a dead situation.
What is the problem? is it normal? What about the ram consumption in your case. I did not check it for kangroo data. But I remember that, on 5th epoch it activated the swap memory.
What could be a walk-around about this problem?
Well, for a fair scientfic study, i would not reduce it but, the only way I found is to reduce IMAGE_MIN_DIM =400 and IMAGE_MAX_DIM= 512. However, it is interesting that, for each epoch, the total memory consumption is getting higher.
Moreover, I need to say that, the training procedure always starts with giving warnings such as “UserWarning: Converting sparse IndexedSlices to a dense Tensor of unknown shape. This may consume a large amount of memory.”
This is the problem actually. Is it possible to solve this? I have googled it but the solutions did not come so clear to me (or it sound so technical).
Currently, I can train the model for only 4 epochs. More needs more memory. This is for me, a certain bug since, the advancing epochs should not increase the memory consumption.
Btw, I really thank for your reply.
As I told, this memory issue really made me sad. Is this normal?
Thanks so much for your advice. Here, I would like to share my experience with you and others. The only solution I have found so far is that setting
the use_multiprocessing=False in model.py and reducing the number of workers to 1. This has helped me. Btw, I am now using 384×384 images by reducing the IMAGE_MAX_DIM = 384 and IMAGE_MIN_DIM =384 . Now I can train it with 20 epochs. This has really helped me.
I hope this information may help others whom lived the same problems.
We have used this model to detect bounding boxes and masks for id cards.
We provided annotations in .csv files as quadrilaterals and modified ‘load_mask’ function accordingly. We are looking for quadrilateral shaped masks.
We are able to detect bounding boxes correctly. We are not able to detect masks correctly. Although incorrect masks do show up.
We have used the exact code. Learning rate is 0.00001. We have used 800 images and 65 epochs for training. A higher learning rate gives NaN loss. We have checked the entire dataset for any discrepancy.
Can you guide where we are going wrong ? Can we use this exact code with exactly the same config with four vertices to generate masks ?
That was nice Tutorial, i have some errors on trying with multiclass.
IndexError: boolean index did not match indexed array along dimension 0; dimension is 2 but corresponding boolean dimension is 1
I have two class ( full glass and empty glass) and have made NUM_CLASSES = 1 + 2 in config along with self.add_class(“dataset”, 1, “Full Glass”) and self.add_class(“dataset”, 2, “Not Full Glass”) also made changes class_ids.append(self.class_names.index(‘Full’))
class_ids.append(self.class_names.index(‘Not Full’)).
Please help me out, i am unable to resolve the error since many attempts.
I hope its not a repeated question. I wonder if you have tutorial on training a model for custom multi-object detection ? basically, an image taken where we would like to recognize multiple images in an image. There is no pre-trained model on these objects, and we have labeled a few set of images. (again each image, is labeled with multiple rectangular which are covering each object).
Good day sir, I am a Machine Learning Engineer. I am currently working on logo detection system. I have tried MobileNet SSD, Faster RCNN and their seemed to be a higher number of false positives when I try the model out. It seems its not too good for logo that is very small in size. I have also created Haar and LBP cascade model and it seemed to perform better than the deep learning model, false positive wise. My question: is there any other technique that can do very well with small logos with different contrast, orientations? Thank you.
You’ve made a great work again. Thank you for this post!
What if I want to train an add not jus one object to my model? For example, I want to add 100 new class. If I have 100 class, and every class has 500 images, how can I train the model? Impossible to load 50.000 image into the memory! It is possible to make it with loop, and add a new class to the modell with every iteration?
The notebook is very helpful and full of knowledge but I am having problems while training the model on a different dataset(fruits -apple, banana, orange).
After loading the images,annots and masks when I try to train the model i am getting the following error:
RemoteTraceback Traceback (most recent call last)
RemoteTraceback:
“””
Traceback (most recent call last):
File “/usr/lib/python3.6/multiprocessing/pool.py”, line 119, in worker
result = (True, func(*args, **kwds))
File “/usr/local/lib/python3.6/dist-packages/keras/utils/data_utils.py”, line 641, in next_sample
return six.next(_SHARED_SEQUENCES[uid])
File “/content/Mask_RCNN/mrcnn/model.py”, line 1709, in data_generator
use_mini_mask=config.USE_MINI_MASK)
File “/content/Mask_RCNN/mrcnn/model.py”, line 1265, in load_image_gt
class_ids = class_ids[_idx]
IndexError: boolean index did not match indexed array along dimension 0; dimension is 6 but corresponding boolean dimension is 2
“””
The above exception was the direct cause of the following exception:
I do train model on my won dataset but the prediction of model is not getting right. can you pls help me ?
Actually i have train for kangaroo class name but in prediction i am getting person class tag
Thank You i solved it ….But i have total of 125 images of id card and aim is to get id card from images but i am not getting correct output after training of model object detection is results is not good at all …..i have done 50 epochs at 25 steps…Can you pls help me?
Hello. I found some issues regarding accuracy of model. I dont know what issue is there which effect accuracy of model. Same cnfiguration as described above is used in my model but accuracy is no good. The ROI getting from prediction of model is not correct. Can some one Please help me out
Great tutorial for object detection. This is the first time, I visited this site and I loved the way to document your post. I have walk-through each line of code and successfully implemented kangaroo detection. You have developed well documented code guide for us. Based on your tutorial, I have managed to run this model on Weed detection problem. And yes, I am able detect weed with these. Thanks a lot for your post.
———————————————————————
By the way, I have one question:
–> How to save full keras model (architecture + weights)? I want to convert it to TensorRT for that I need full model.
How can I create the annotated xml file? The VGG tool only creates a csv file or json file. Could you please assist in the way of creating the xml file or the conversion from csv/json to xml?
Thanks for the very nice tutorial. I was able to train the model and get mask_rcnn_kangaroo_cfg_0005.h5 created. However, when I ran the model evaluation code, I got the following error. Could you help me resolve this?
AssertionError: Create model in inference mode, and it is complaining on line yhat=model.detect(sample, verbose=0) saying that len(images) must be equal to BATCH_SIZE.
Add BATCH_SIZE = 1 to PredictionConfig as below:
# define the prediction configuration
class PredictionConfig(Config):
# define the name of the configuration
NAME = “id_card_cfg”
# number of classes (background + kangaroo)
NUM_CLASSES = 1 + 1
# simplify GPU config
GPU_COUNT = 1
IMAGES_PER_GPU = 1
BATCH_SIZE = 1
I have my own data set ….Thank you for general suggestions this is helpful for me but i don’t understand that why accuracy of model is not good even using same structure and configuration of model as suggested above.
And I have also tried on different data set for all issues is same by that I conclude that there is some minor issue in the script which is not detected by me so please help me out ….
While trying to train the model I got the following message.
File “C:\Users\userid\AppData\Local\Continuum\anaconda3\lib\site-packages\tensorflow_core\python\framework\ops.py”, line 523, in _disallow_in_graph_mode
” this function with @tf.function.”.format(task))
OperatorNotAllowedInGraphError: using a tf.Tensor as a Python bool is not allowed in Graph execution. Use Eager execution or decorate this function with @tf.function.
This example will not work with TF 2.0. You must use TF 1.14. I believe I mention this right at the top of the page:
Note: This tutorial requires TensorFlow version 1.14 or higher. It currently does not work with TensorFlow 2 because some third-party libraries have not been updated at the time of writing.
hello jason,
i just wanted to know how much time it takes to make a prediction on a new image.
so basically how long does it take to run
yhat = model.detect(sample, verbose=0)[0]
well i need to know how many times it can be run in 1 second.if run on your computer can you give me an estimate of how many times it would run in 1 second. (5,10,20,30,40, 50, 60, 60+)
yep! from a photo. Assuming i took a pix of a kangaroo and test it on your model . definitely your model will recognize it as kangaroo. what i’m opt is, the dimension of kangaroo, i’m sure you have technique on how to determine its size using the model that you had created.
Hi.
I found out, that we can’t assign image id randomly (not from 0). Perhaps class Dataset creates list, not a numpy array. I checked myself and realized that I can’t access image with id, for example, 317 while i have only 100 images.
Thus, I don’t know why this field “image id” exists, when it numbered anyway from 0, increasing by 1.
WARNING:tensorflow:From C:\Users\Juan\AppData\Local\Programs\Python\Python36\lib\site-packages\keras\callbacks.py:708: The name tf.summary.FileWriter is deprecated. Please use tf.compat.v1.summary.FileWriter instead.
Hi Jason,
it was a very great article and thoroughly explained code.
I have a question for you regarding this tutorial. I am trying out this tutorial on my laptop and I have limited processing power.When I tried with the full data set of kangaroos the first epoch took around 8 hrs approx.I stopped it in between then I tried to reduce the data set to about 10 images and started training process but it still showed 7 hours as the ETA and each epoch had 131 steps.
As per my thinking if I reduce the number of images in the data set the training time should reduce and instead of 131 steps it should have 10 steps in each epoch as the data set has only 10 images.I am currently willing to have a lower accuracy.
I tried using less no. of images but i cannot complete the training process as i am getting the following message
2019-11-01 18:37:31.547297: W T:\src\github\tensorflow\tensorflow\core\framework\allocator.cc:108] Allocation of 603979776 exceeds 10% of system memory.
Hi Jason, I plan on following this tutorial for skin segmentation on compaq dataset. The labels are in PBM(Portable Bitmap) format. Is it fine or do I need to do somethings differently ?
Regards
Hi Jason,
thanks a lot for this great tutorial! Could you please give me a quick hint how one can extract the total number of detected objects in each image?
Thanks a lot, osteocyte
class_ids.append(self.class_names.index(‘kangaroo’))
class_ids.append(self.class_names.index(‘tiger’))
class_ids.append(self.class_names.index(‘dog’))
for multi class classification is this changes are enough anything more needded?
Take a look on your xml file and then and then modify the parsing.Goal is: to get the right boundig boxes to the right class name. Then create your mask with the right boundig box classname corelation
Thanks for these tutorials, I’m making good progress on my projects.
Can I please ask: Is it solely tagged content that contributes to the training/prediction, or is it the whole image?
If I create a dataset of 100 photos (as an example), and tag the easiest elements (say people) in these photos, will untagged people in these photos work to “untrain” the model? Would I be better off creating a smaller dataset that is more thoroughly tagged, or do untagged elements not matter? Thanks.
i have done object detection to detect gloves.
the gloves are white in colour.
but if the person where white colour shirt then also it is detecting as gloves
Thanks for a great tutorial. My trained model gives many bbox predictions of different sizes for the same kangaroo, and also for random background objects. This was after training for 2 epochs. After training for further epochs, the losses all flatlined to NaN or 0. Just wondering if you’ve ever experienced this.
This is a very great tutorial. For the training, I am stuck with this line model = MaskRCNN(mode=’training’, model_dir=’./’, config = config)
The error is: ‘NoneType’ object has no attribute ‘lower’. How can I fix this?
I am trying to predict hand gloves and spects using mask rcnn. I am facing the following issues:
1.the people who are not wearing gloves also it is taking as glove.i think it is taking hand structure
2.It is complety getting baised on colur.where ever it find’s white color it is predicting as gloves.
Please help me. I have 1000 images as by training .I have done for nearly 50 epochs
Hello there, I am trying to execute this code using my own GPU, however, i have this error
ResourceExhaustedError: 2 root error(s) found.
(0) Resource exhausted: OOM when allocating tensor with shape[2,512,128,128] and type float on /job:localhost/replica:0/task:0/device:GPU:0 by allocator GPU_0_bfc
[[{{node rpn_model_11/rpn_class_raw/convolution-0-TransposeNHWCToNCHW-LayoutOptimizer}}]]
Hint: If you want to see a list of allocated tensors when OOM happens, add report_tensor_allocations_upon_oom to RunOptions for current allocation info.
[[Mean_23/_13623]]
Hint: If you want to see a list of allocated tensors when OOM happens, add report_tensor_allocations_upon_oom to RunOptions for current allocation info.
(1) Resource exhausted: OOM when allocating tensor with shape[2,512,128,128] and type float on /job:localhost/replica:0/task:0/device:GPU:0 by allocator GPU_0_bfc
[[{{node rpn_model_11/rpn_class_raw/convolution-0-TransposeNHWCToNCHW-LayoutOptimizer}}]]
Hint: If you want to see a list of allocated tensors when OOM happens, add report_tensor_allocations_upon_oom to RunOptions for current allocation info.
Hi Jason, I used your tutorial to prepare a Pistol detector. The data is properly loaded and when I try to train the epochs are frozen. It sometimes freezes on images randomly. Here is output
It stops on different images. I checked all images and annexes are oke. I followed the suggestions here : https://github.com/matterport/Mask_RCNN/issues/287 (Made modifications in the model.py under mrcnn )
My tensorflow is 1.15
and keras : 2.2.4
Any suggestions? I am working on different approachs for pistol detection and mrcnn is one of them. It is critical for my thesis. So I will appreciate any suggestions. Maybe a working combination of keras – tensorflow with mrcnn.
Jason Hi,
I have a set of grayscale images of shape(192,384,3) with none/one/multiple masks in each of size (5,5).
I’m able to train my model, but unable to receive any result – the tuple from the detect() appears to be empty. In rare cases there is a prediction, which is not good enough.
Please help, thanks!
if the masks = zeros([h, w, len(boxes)], dtype=’uint8′),
in my case each mask is (h = 5,w = 5, i) and the bounding box, for example, is (5, 5, 10, 10).
How masks[row_s:row_e, col_s:col_e, i] = 1, where the indexes are not in the original mask range is (5,5), are affected by the bounding box indexes?
Hello Jason,
I am running this code on my mac and I get this error the running epoch 1 and the program gets stuck here.
Epoch 1/5
/Library/Frameworks/Python.framework/Versions/3.6/lib/python3.6/site-packages/keras/utils/data_utils.py:709: UserWarning: An input could not be retrieved. It could be because a worker has died.We do not have any information on the lost sample.
Any idea about this?
Also, should this code be run only on GPU machines?
Perhaps try re-installing your development environment?
Perhaps try running either on the cpu or gpu?
Perhaps try posting/searching on stackoverflow?
Perhaps try running other examples and see if they work on your workstation?
I’ve seen this error before and I fixed it by lowering my tensorflow version from 2.1 to 1.12 and by installing the appropriate keras-gpu libraries for that.
Hi Jason, what an amazing post..well done on your hard work!
For my application, in addition to the predicted bounding box+mask+class, I also need to extract the last fully-connected layer of the mask_rcnn model (that is, the feature vector representation of the input image).
In keras, we can save a model’s json and weight files. And then load them again. And extract the output of any intermediate layer as:
Hey Jason, When I plot the graph “Actual” vs “Predicted”, the “actual” photos all appear so dark. Is there a way to tweak it so it appears similar to the “Predicted Photo” with red boxes on a transparent photo. Thank you,
6 frames
/usr/local/lib/python3.6/dist-packages/imageio/core/request.py in _parse_uri(self, uri)
271 # Reading: check that the file exists (but is allowed a dir)
272 if not os.path.exists(fn):
–> 273 raise FileNotFoundError(“No such file: ‘%s'” % fn)
274 else:
275 # Writing: check that the directory to write to does exist
FileNotFoundError: No such file: ‘/content/Mask_RCNN/Amine/imagessacdf21.JPG’
have you dealt with the problem? got the same issue – in utils.py, the load_mask doesn not add ‘/’ to the path – which results the /images to be concatenated to the image’s name.
Hi Jason, please confirm for mask RCNN model do we need to mask new images also (i.e need to create .xml file) ? If no, then please suggest changes in function ‘def plot_actual_vs_predicted’ for me to get better output the way we got after using ‘display_instances(image, bbox, mask, class_ids, dataset.class_names)’ under evaluate_model function.
AttributeError: module ‘tensorflow’ has no attribute ‘random_shuffle’
I am unsure of how to debug this. I tried changing random_shuffle to random.shuffle in model.py but it does not work. Or have I downloaded the wrong MaskRCNN? What is the link to download the MaskRCNN? Thank you for your help.
I really like your detailed tutorial. Excellent work, thanks.
I am able to run the example without a problem. However, when working with my own images, I got this kind of error when calculating the mAP.
“ValueError: shapes (7,1048576) and (1104896,1) not aligned: 1048576 (dim 1) != 1104896 (dim 0)”.
I was able to train the model and make predictions with other images. But I just cannot evaluate the model’s performance in terms of mAP via compute_ap().
I checked this issue online for some days and didn’t find any solutions. Are you able to show any guidance?
Thanks for your comments. Yes, some of the input data were not working well for some reason (I will double-check it). I really appreciated your help!
I have one more question about this model: in addition to calculating the mAP, precision, and recall, how to plot accuracy and loss during training to monitor overfit or determine the number of epochs to stop training?
I have a data set of liver CT which is grayscale.
Is it possible for me to apply the same model (also transfer learning) for grayscale images . Since the pretained models are for RGB images, I am curious about whether I can convert them for my application purpose?
Hi Jason, thanks for the tutorial. Following your instruction I fitted a custom dataset of 200 photos with one label. I got a Train mAP of 0.986 and a Test mAP of 1.000. The detection results are great and even see things I would miss if I do labeling. My question is that: is 1.000 too good to be true?
in load_dataset(self, dataset_dir, is_train)
22 continue
23 # skip all images after 150 if we are building the train set
—> 24 if is_train and int(image_id) >= 10:
25 continue
26 # skip all images before 150 if we are building the test/val set
ValueError: invalid literal for int() with base 10: ‘sacdf21’
gratefuly yours
absolutely , the tutorial just did awsome but the crafting part keeps bugging over and over again is there any other way to skip this bug, it’s just the splitting part train/test datasets that does not work, I m running on collab if helps?
please I m stuck for hours now
very grateful
WARNING:tensorflow:From C:\Users\João Vitor\AppData\Local\Programs\Python\Python36\lib\site-packages\keras\backend\tensorflow_backend.py:492: The name tf.placeholder is deprecated. Please use tf.compat.v1.placeholder instead.
WARNING:tensorflow:From C:\Users\João Vitor\AppData\Local\Programs\Python\Python36\lib\site-packages\keras\backend\tensorflow_backend.py:63: The name tf.get_default_graph is deprecated. Please use tf.compat.v1.get_default_graph instead.
WARNING:tensorflow:From C:\Users\João Vitor\AppData\Local\Programs\Python\Python36\lib\site-packages\keras\backend\tensorflow_backend.py:3630: The name tf.random_uniform is deprecated. Please use tf.random.uniform instead.
WARNING:tensorflow:From C:\Users\João Vitor\AppData\Local\Programs\Python\Python36\lib\site-packages\keras\backend\tensorflow_backend.py:3458: The name tf.nn.max_pool is deprecated. Please use tf.nn.max_pool2d instead.
WARNING:tensorflow:From C:\Users\João Vitor\AppData\Local\Programs\Python\Python36\lib\site-packages\keras\backend\tensorflow_backend.py:1822: The name tf.image.resize_nearest_neighbor is deprecated. Please use tf.compat.v1.image.resize_nearest_neighbor instead.
WARNING:tensorflow:From C:\Users\João Vitor\AppData\Local\Programs\Python\Python36\lib\site-packages\keras\backend\tensorflow_backend.py:1208: calling reduce_max_v1 (from tensorflow.python.ops.math_ops) with keep_dims is deprecated and will be removed in a future version.
Instructions for updating:
keep_dims is deprecated, use keepdims instead
WARNING:tensorflow:From C:\Users\João Vitor\AppData\Local\Programs\Python\Python36\lib\site-packages\keras\backend\tensorflow_backend.py:1242: calling reduce_sum_v1 (from tensorflow.python.ops.math_ops) with keep_dims is deprecated and will be removed in a future version.
Instructions for updating:
keep_dims is deprecated, use keepdims instead
WARNING:tensorflow:From C:\Users\João Vitor\AppData\Local\Programs\Python\Python36\lib\site-packages\tensorflow\python\ops\array_ops.py:1354: add_dispatch_support..wrapper (from tensorflow.python.ops.array_ops) is deprecated and will be removed in a future version.
Instructions for updating:
Use tf.where in 2.0, which has the same broadcast rule as np.where
WARNING:tensorflow:From C:\Users\João Vitor\AppData\Local\Programs\Python\Python36\lib\site-packages\mask_rcnn-2.1-py3.6.egg\mrcnn\model.py:553: The name tf.random_shuffle is deprecated. Please use tf.random.shuffle instead.
WARNING:tensorflow:From C:\Users\João Vitor\AppData\Local\Programs\Python\Python36\lib\site-packages\mask_rcnn-2.1-py3.6.egg\mrcnn\utils.py:202: The name tf.log is deprecated. Please use tf.math.log instead.
WARNING:tensorflow:From C:\Users\João Vitor\AppData\Local\Programs\Python\Python36\lib\site-packages\mask_rcnn-2.1-py3.6.egg\mrcnn\model.py:600: calling crop_and_resize_v1 (from tensorflow.python.ops.image_ops_impl) with box_ind is deprecated and will be removed in a future version.
Instructions for updating:
box_ind is deprecated, use box_indices instead
2019-12-23 13:45:34.251579: I tensorflow/core/platform/cpu_feature_guard.cc:142] Your CPU supports instructions that this TensorFlow binary was not compiled to use: AVX2
C:\Users\João Vitor\AppData\Local\Programs\Python\Python36\lib\site-packages\tensorflow\python\ops\gradients_util.py:93: UserWarning: Converting sparse IndexedSlices to a dense Tensor of unknown shape. This may consume a large amount of memory.
“Converting sparse IndexedSlices to a dense Tensor of unknown shape. ”
WARNING:tensorflow:From C:\Users\João Vitor\AppData\Local\Programs\Python\Python36\lib\site-packages\keras\backend\tensorflow_backend.py:675: calling Constant.__init__ (from tensorflow.python.ops.init_ops) with dtype is deprecated and will be removed in a future version.
Instructions for updating:
Call initializer instance with the dtype argument instead of passing it to the constructor
WARNING:tensorflow:From C:\Users\João Vitor\AppData\Local\Programs\Python\Python36\lib\site-packages\keras\callbacks.py:705: The name tf.summary.merge_all is deprecated. Please use tf.compat.v1.summary.merge_all instead.
WARNING:tensorflow:From C:\Users\João Vitor\AppData\Local\Programs\Python\Python36\lib\site-packages\keras\callbacks.py:708: The name tf.summary.FileWriter is deprecated. Please use tf.compat.v1.summary.FileWriter instead.
Epoch 1/5
Traceback (most recent call last):
File “object_detection.py”, line 109, in
model.train(train_set, test_set, learning_rate=config.LEARNING_RATE, epochs=5, layers=’heads’)
File “C:\Users\João Vitor\AppData\Local\Programs\Python\Python36\lib\site-packages\mask_rcnn-2.1-py3.6.egg\mrcnn\model.py”, line 2374, in train
File “C:\Users\João Vitor\AppData\Local\Programs\Python\Python36\lib\site-packages\keras\legacy\interfaces.py”, line 87, in wrapper
return func(*args, **kwargs)
File “C:\Users\João Vitor\AppData\Local\Programs\Python\Python36\lib\site-packages\keras\engine\training.py”, line 2065, in fit_generator
generator_output = next(output_generator)
File “C:\Users\João Vitor\AppData\Local\Programs\Python\Python36\lib\site-packages\keras\utils\data_utils.py”, line 710, in get
raise StopIteration()
StopIteration
I can’t figure out what’s wrong. I am very interested in Mask R-CNN and would like to see it working. Can you help me plz ?? Thank you for your attention and greetings from Brazil
My project is on GOOGLE COLAB. Even though the version of my libraries are “Tensorflow: 1.15.0” and “Keras: 2.2.5”, it still appears these several lines, so how can fix this out
hi i tried to subset my data to train and val files , the way data is slit in balloon dataset
here is the error
FileNotFoundError Traceback (most recent call last)
in ()
85 # train set
86 train_set = KangarooDataset()
—> 87 train_set.load_dataset(‘Amine’,”train”, is_train=True)
88 train_set.prepare()
89 print(‘train: %d’ % len(train_set.image_ids))
in load_dataset(self, dataset_dir, subset, is_train)
26 #annotations_dir = dataset_dir + ‘/Amine/’
27 # find all images
—> 28 for filename in listdir(images_dir):
29 # extract image id
30 image_id = filename[:-4]
FileNotFoundError: [Errno 2] No such file or directory: ‘Amine/train’
Hi, how could I select the dataset by names rather than I split them by index before and after your breakup point,(150), it seems to me that could be a better fixer for this bug without having to manipulate files?
What would be your code to change the splitting key?.
hi,
i figuered out how to split the data to train and val with in each file others sub file (annots and images) to respect your data structure
her is the result
train: 8
test: 4 # seems ok but
—————————————————————————
NameError Traceback (most recent call last)
in ()
103 mask, class_ids = train_set.load_mask(image_id)
104 # extract bounding boxes from the masks
–> 105 bbox = extract_bboxes(mask)
106 # display image with masks and bounding boxes
107 display_instances(image, bbox, mask, class_ids, train_set.class_names)
hi, I tried all clues without any success , I know this would not take few minutes to get solved with a professional like you, all I m asking for is some compassion
thanks
(raj) ➜ Mask_RCNN git:(master) ✗ python start.py
Using TensorFlow backend.
Train: 131
Test: 32
WARNING:tensorflow:From /home/debu/.virtualenvs/raj/lib/python3.6/site-packages/keras/backend/tensorflow_backend.py:514: The name tf.placeholder is deprecated. Please use tf.compat.v1.placeholder instead.
WARNING:tensorflow:From /home/debu/.virtualenvs/raj/lib/python3.6/site-packages/keras/backend/tensorflow_backend.py:71: The name tf.get_default_graph is deprecated. Please use tf.compat.v1.get_default_graph instead.
WARNING:tensorflow:From /home/debu/.virtualenvs/raj/lib/python3.6/site-packages/keras/backend/tensorflow_backend.py:4076: The name tf.random_uniform is deprecated. Please use tf.random.uniform instead.
WARNING:tensorflow:From /home/debu/.virtualenvs/raj/lib/python3.6/site-packages/keras/backend/tensorflow_backend.py:3900: The name tf.nn.max_pool is deprecated. Please use tf.nn.max_pool2d instead.
WARNING:tensorflow:From /home/debu/.virtualenvs/raj/lib/python3.6/site-packages/keras/backend/tensorflow_backend.py:1982: The name tf.image.resize_nearest_neighbor is deprecated. Please use tf.compat.v1.image.resize_nearest_neighbor instead.
WARNING:tensorflow:From /home/debu/raj/Mask_RCNN/mrcnn/model.py:341: The name tf.log is deprecated. Please use tf.math.log instead.
WARNING:tensorflow:From /home/debu/raj/Mask_RCNN/mrcnn/model.py:399: add_dispatch_support..wrapper (from tensorflow.python.ops.array_ops) is deprecated and will be removed in a future version.
Instructions for updating:
Use tf.where in 2.0, which has the same broadcast rule as np.where
WARNING:tensorflow:From /home/debu/raj/Mask_RCNN/mrcnn/model.py:423: calling crop_and_resize_v1 (from tensorflow.python.ops.image_ops_impl) with box_ind is deprecated and will be removed in a future version.
Instructions for updating:
box_ind is deprecated, use box_indices instead
WARNING:tensorflow:From /home/debu/raj/Mask_RCNN/mrcnn/model.py:720: The name tf.sets.set_intersection is deprecated. Please use tf.sets.intersection instead.
WARNING:tensorflow:From /home/debu/raj/Mask_RCNN/mrcnn/model.py:722: The name tf.sparse_tensor_to_dense is deprecated. Please use tf.sparse.to_dense instead.
WARNING:tensorflow:From /home/debu/raj/Mask_RCNN/mrcnn/model.py:772: to_float (from tensorflow.python.ops.math_ops) is deprecated and will be removed in a future version.
Instructions for updating:
Use tf.cast instead.
Traceback (most recent call last):
File “start.py”, line 150, in
model.load_weights(model_path, by_name=True)
File “/home/debu/raj/Mask_RCNN/mrcnn/model.py”, line 2130, in load_weights
saving.load_weights_from_hdf5_group_by_name(f, layers)
File “/home/debu/.virtualenvs/raj/lib/python3.6/site-packages/keras/engine/saving.py”, line 1018, in load_weights_from_hdf5_group_by_name
str(weight_values[i].shape) + ‘.’)
ValueError: Layer #389 (named “mrcnn_bbox_fc”), weight has shape (1024, 8), but the saved weight has shape (1024, 324).
(raj) ➜ Mask_RCNN git:(master) ✗
First of all Happy New Year 2020 and looking forward for more exciting blogs from you.
I have one question regarding labelimg tool. As I looked into labelimg tool but there is no way to rotate bounding box. In custom dataset, object is not straight and I can’t rotate images.
Could you please suggest me any other labeling tool which allows to rotate even bounding box?
*Also: The output of the tool does not resemble the xml file structure that is often used in object detection, but the tool produces enough so that you can generate a xml conversion script in python.
*I remember having some difficulties installing the package in Mac initially (something to do with icy-widgets, but I think its fixable), hopefully this was mitigated.
Great tutorial for beginners like me, thanks.
Here the mask-rcnn is saving weights, but i want to save the model along with the weights like model.save(‘xxxx.h5) . But this function is not working here. Please reply me as soon as possible.
Thanks for the great tutorial, very helpful in getting started with this kind of work and was able to apply it to a custom dataset.
My question is, suppose I also have binary mask annotations for each image (png files), how would I load them into the model instead of the xml annotations so that the model prediction is a mask rather than a bounding box?
After training, in the prediction, the displayed image is showing with a bounding box but the label is not there. Please reply to me. Thanks in advance
Hi
Does Mask-R-cnn only work in annotated image only, can i use normal image? And which annotation approach (automatic,manual or semi automatic) could gives better results?
hi Jason,thanks for your illustration
i run the MaskRCNN on my dataset and it gives me horrible result
Train mAP: 0.818
Test mAP: 0.549
can you advice me why it can result in such this a big difference on the Train and Test set ???
how i can face this problem.
Hi, i was trying to use Mask_RCNN and i don’t know how to first train the feature map (Backbone) before i return the model to pressed to the next level (Region Proposal Network) because i wanted to see the accuracy of convolution layer.
Thank you very much for a great tutorial. It’s a great resource for anyone trying to get started with object detection and for people who need to check their configurations.
I am retraining just the “heads” layer of a resnet101 backbone, on a 3d synthetic dataset generated using Unreal Engine and python. I have 7 object classes + 1 background, and a total of 591 training images and 60 real images for validation.
Using default training config from the maskrcnn official repo, I suspect there is a case of over-fitting, as the val loss decreases while the training loss decreases.
I also constructed a training curve of my own, by calculating the AP50 (Average Precision at 50% Intersection Over Union) for all the epochs from epoch 1 to epoch 100. It seems like the network is not improving a lot. The curve can be found below. https://imgur.com/MWzvWZz
How should I adjust my learning rates, weight decays? What kind of heuristics/rules of thumb to use based on the size of the dataset, number of classes etc? My config can be found below.
class aerial_trains_Config(Config):
“””Configuration for training on the toy shapes dataset.
Derives from the base Config class and overrides values specific
to the toy shapes dataset.
“””
# Give the configuration a recognizable name
NAME = “Baldonnell_from_scratch_from9m”
# Train on 1 GPU and 8 images per GPU. We can put multiple images on each
# GPU because the images are small. Batch size is 8 (GPUs * images/GPU).
GPU_COUNT = 1
IMAGES_PER_GPU = 2
# Number of classes (including background)
NUM_CLASSES = 1 + 7 # background + 80 default classes
# Use small images for faster training. Set the limits of the small side
# the large side, and that determines the image shape.
IMAGE_MIN_DIM = 256
IMAGE_MAX_DIM = 2048
# Use smaller anchors because our image and objects are small
RPN_ANCHOR_SCALES = (64, 128, 256, 512, 1024) # anchor side in pixels
# Reduce training ROIs per image because the images are small and have
# few objects. Aim to allow ROI sampling to pick 33% positive ROIs.
TRAIN_ROIS_PER_IMAGE = 32
# Use a small epoch since the data is simple
STEPS_PER_EPOCH = 600
This is really a great article. I am trying to solve my multi-object detection problem following your approach, i think there will be a need of just a little tweak into this code but i am stuck.
I have added multiple classes in load_dataset function:
self.add_class(“dataset”, 1, “list”)
self.add_class(“dataset”, 2, “Menu”)
self.add_class(“dataset”, 3, “Home”)
but here in load_mask function you are appending class_ids statically as 1 “kangaroos”,
i want to add classes w.r.t objects found.
Kindly check and help.
Could you please share your views on “How to label overlapping objects?” What is the best practice with reference to overlapping objects? The problem is most of the labeling tools don’t support oriented bounding boxes.
How can I inform my object detector that it should look at only certain part of images without cropping images? Can I edit images and put white/black (constant) color so that object detector will ignore such areas?
Hello Dr. Brownlee!
I’m running this matterport/mrcnn code on my custom dataset (to detect comic characters). I’m using a total of 6500 images. My training model saturates with a loss of 0.873 (Steps: 2500, Batch: 2, Epoch(at which saturation happens):9th-10th) and it breaks my heart. What are the ways I could tweak my code to lower the loss? (Rest of the config is default)
Hi again Dr. Brownlee!
Is there a way to know if my code will perform well/worse in the first epoch (or some time sooner) rather than waiting for 6 long hours to get a loss value?
Every time I make some changes, I have to run it through the whole cycle till I see the saturation (in loss) after which, I have to manually perform a ‘Keyboard Interrupt’
Hi Jason! This is a great tutorial.This is the exact solution to the problem I’m trying to solve.
One quick question. My model gets trained fine but it is not creating the checkpoint models at any point during the training or at the end. So I’m basically left with a trained model object.
I’ve searched my whole system in the case it was cached at some other location. Could not find it though.
Could you please tell me if you’ve come across this kind of a problem before and how to solve it?
I am on windows 10
With keras==2.2.5
tensorflow==1.15
mask-rcnn-12rics==0.2.3
Hi Jason, i build a single/multi-class classification poc project on different object using your tutorials. Thanks for the neat explanation above.
Now as a part of complete project I require your’s suggestion on below points:
1. Ideally in which case model accuracy will be high i.e in single class model or multi-class model (I did single and multi-class on different object) and accuracy on new data seems to be low on traning epoch-100 and learning_rate = 0.0001
2. What are the different hyper-parameters I can tune apart from the learning_rate and epoch for getting better accuracy using Mask RCNN
3. I’m working on architecture project, how can i detect the line connecting different object like A———B, how can i detect the line between A & B
Hey Jason, is it worth it to pass the images through an edge detector like Sobel, prewitt, canny as a pre-processing step before sending them off to Mask RCNN ?
In an attempt to make it “Easier” to increase accuracy ? Any literature or references you recommend reading ?
The code give me a lot of warning such as “Allocator (GPU_0_bfc) ran out of memory trying to allocate 1.15GiB with freed_by_count=0. The caller indicates that this is not a failure, but may mean that there could be performance gains if more memory were available.”
May be I should change a better comptuer.But is there a cheap method?
Hello Mr. Jason, thank you for the very beneficial and informative tutorials you are making. I appreciate your great effort. I would like to suggest having a similar tutorial in multiple classes object detection not only a one, if possible. Thanks again.
When I’m trying to evaluate the PredictionConfig in a case study with marine litter images
cfg = PredictionConfig()
# define the model
model = MaskRCNN(mode=’inference’, model_dir=’./’, config=cfg)
# load model weights
model.load_weights(‘mask_rcnn_train_config_0005.h5’, by_name=True)
# evaluate model on training dataset
train_mAP = evaluate_model(train_set, model, cfg)
I get as a message:
“re-start from epoch 5 ” and the run stucks there.
I successfully run your prejct on my cpu.
Now i want to do this on my gpu.
I installed the latest versions of all libaries.
TF-gpu : 2.1.0
keras-gpu: 2.3.1
cudnn: 7.6.5
cudatoolkit: 10.1.243
the problem is, that model.py thorws many Errors like renaming tf.log(x) to tf.math.log(x)…
the question is:
1. Can you publish a project for latest libary versions?
2. Can you say wich libary versions i have to install for using your project on gpu?
Like I said it works fine in an environment without gpu usage. But with is never happened.
Perhaps there is something going no with your workstation.
Perhaps try running other code to confirm your libraries can fit a basic model.
Perhaps try running the code on another machine to confirm you have everything you need?
I have a question!
Why is it that when training the model, the loss for the classification output on the train set is usually lower than that of the validation datasets (e.g. mrcnn_class_loss and val_mrcnn_class_loss), as well as why is the loss for the bounding box output for the train lower than that of the validation datasets (mrcnn_bbox_loss and val_mrcnn_bbox_loss)?
Hey Jason,
is it possible that my training on gpu (8GB gpu) not work because the net is to big for this problem?
is tried to use resnet50 but ist got Allocation problems.
i’m not sure if i can train pictures with the size 1024×1024 with resnet50 on my gpu
I ‘ve got a GeForce RTX 2070 and i can’t run it on gpu.
I don’t have any Exceptions. The commandpromt just hanging.
Over a monitor for gpu i see that it want to use all, but i think it’s not enough.
Can you help me?
Another question is, how can i manipulate the resnet50 to a smaller net (if it’s the solution for my problem)
I am working with Faster rcnn for defects detection and i would like that you help me how to detect objects from scratch with my own dataset with of course a pretrained cnn like vgg16 or resnet. How to prepare the data and insert it in Jupyter notebook or even in anaconda virtual environment. I will be very thankful
João Vitor Granzotti MachadoMarch 24, 2020 at 2:55 am#
Hi Jason, I’m trying to make a traffic light detector, I have a very large dataset of images known as DTLD and I would like to use it in this tutorial.
The images of the dataseet have dimensions 2048X1024 and the objects to be detected are very small. When performing the training and validation for the first time, the result obtained was very bad. I imagine it is due to the resizing performed on the images.
If I change the IMAGE_RESIZE_MODE parameter from “square” to “none” can I continue using transfer learning normally? Or would it be necessary to train the network from scratch?
In the config.py file the following information is provided, however I don’t know if I can change this parameter according to my will.
# Input image resizing
# Generally, use the “square” resizing mode for training and predicting
# and it should work well in most cases. In this mode, images are scaled
# up such that the small side is = IMAGE_MIN_DIM, but ensuring that the
# scaling doesn’t make the long side> IMAGE_MAX_DIM. Then the image is
# padded with zeros to make it a square so multiple images can be put
# in one batch.
# Available resizing modes:
# none: No resizing or padding. Return the image unchanged.
# square: Resize and pad with zeros to get a square image
# of size [max_dim, max_dim].
# pad64: Pads width and height with zeros to make them multiples of 64.
# If IMAGE_MIN_DIM or IMAGE_MIN_SCALE are not None, then it scales
# up before padding. IMAGE_MAX_DIM is ignored in this mode.
# The multiple of 64 is needed to ensure smooth scaling of feature
# maps up and down the 6 levels of the FPN pyramid (2 ** 6 = 64).
# crop: Picks random crops from the image. First, scales the image based
# on IMAGE_MIN_DIM and IMAGE_MIN_SCALE, then picks a random crop of
# size IMAGE_MIN_DIM x IMAGE_MIN_DIM. Can be used in training only.
# IMAGE_MAX_DIM is not used in this mode.
IMAGE_RESIZE_MODE = “square”
IMAGE_MIN_DIM = 800
IMAGE_MAX_DIM = 1024
João Vitor Granzotti MachadoMarch 24, 2020 at 9:38 am#
In this case an interesting processing would be to change the size of the 2048×1024 to 2048×512 images, cutting the lower half of the image, as it is a known fact that there are no traffic lights below the horizon line.
Using the default values for maximum and minimum size of images (IMAGE_MIN_DIM = 800, IMAGE_MAX_DIM = 1024) I didn’t get a good result, I was wondering if it would be possible to increase the values IMAGE_MIN_DIM and IMAGE_MAX_DIM and continue using transfer learning.
João Vitor Granzotti MachadoMarch 25, 2020 at 3:27 am#
anging the values of IMAGE_MIN_DIM and IMAGE_MAX_DIM I get the following error:
OSError: [Errno 12] Cannot allocate memory
I’m running the code on Google Colab, as I don’t have the processing power necessary to train the base in a reasonable time on my computer.
Therefore, there are two possibilities for this error, either it is related to excess size of the images or it is not possible to carry out transfer learning by changing the mentioned parameters.
Hey this is a great tutorial it is very helpful could you please tell what are all the changes required if we want to train multiple classes. I tried on my own iam getting some errors in load_mask() function
Hi Great tutorial, How about the images that no Kangaroo? it seems that all the images have Kangaroo. How to set the model for images don’t have Kangaroo or have in train data and test data?
thanks for your answer, How to input the data that have no kangaroo? I mean that the xml and images file that have no kangaroo to be the model input? Could you give details how to deal with this. Thanks in advance!
Hi I am building a model for image recognition.
The model should able to identify which image is provided by user.
I have two (2) sets of images.
Passport images and Driving Liscence images.
I am building a model using these images.
I am having only 119 images of passport for train.
I am training on passport images
After completion of model when i test the model it gives more probability on Driving liscence images than on passport images.
Whaty can the issue will be?
How i do it with adding a bounding Box for on training images
i have a model for image recognition.
i am using passport images for training.
when i test it using liscence images it gives more probability on liscence images.
What can be the issue will be?
Collab has no issue. I have trained and achieved results using tensorflow 1.15.0 and Keras 2.2.4. However, I want to detect in the video after training on images. How should I achieve it?
Hi, I’m a Brazilian student!
I am replicating your tutorial for my own dataset. I’m also using Mask-RCNN for object detection only. During training, only two metrics are presented: loss and val_loss. The metrics you talked about (e.g. mrcnn_class_loss and val_mrcnn_class_loss, mrcnn_bbox_loss and val_mrcnn_bbox_loss), are not displayed during the training, do you know why this happens? I’m using verbose = 1.
When I execute the above complete code the error “module ‘dask.dataframe’ has no attribute ‘Series'” is taken. and I can not solve the problem
What happened
Hi Jason, I have searched for text detection and recognition on your blog and I haven’t found anything and can I use RCNN for text detection and what about faster RCNN.
Hi when I input an image without Kangaroo, the model outputs y_hat as empty arrays, I think it should be 0’s (no kangaroo then it should see as background class).
yhat[0][‘class_ids’]
>> array([], dtype=int32)
is it true that I’m supposed to have an image dataset without kangaroo so that the model can learn to detect background class?
Hi, I am trying to use my custom images for training with 1 class. When the object isnt there in any image, then I do not generate the xml. Due to this training ‘model.train’ is throwing error ‘No such file or directory’ How to handle this situation.
(Particularly i m trying to solve the kaggle competition for table detection in document images).
Maybe. Perhaps prototype a model on your dataset and see how it goes. Also, perhaps check the literature for other solutions to the type of problem you are working on and see what types of models they use.
Could you please explain to me how to calculate mAR from the “utils.compute_recall” function, I understand that it returns the AR, but how should I calculate the mAR? Please help me!!
Hey Jason, thank you for the tutorial! I have two questions:
1) I’m getting a terrible train and test mAP. Is the only way to improve this via more data, or do you have any other ideas? (Dataset includes 95 photos for training, and 26 photos for testing)
Train mAP: 0.423
Test mAP: 0.546
2) How could I use this for video multi-object recognition/tracking? Should I just run the video frame by frame? Is there a way I can use my segmentation data to show objects moving across the screen, for example?
Sorry one more question: In relation to the question above about using this for a frame by frame video, I’m wondering if you have any tutorials or ideas on doing a “total object count” for a video. For example, if you were tracking kangaroos across the screen in a video, how could you assign a unique identifier to a newly recognized kangaroo and then report the total number of kangaroos in the video at the end, even if some appeared and left during the video?
Thanks for the amazing tutorial. I’ve got some brief questions.
Firstly, just to confirm, the masks are passed to the model in the form of an array of shape (H, W, num_masks), correct? This appears to be what’s going on in the load_masks method.
Secondly, I can’t quite identify where the sizes of the training images comes into play. For example, you haven’t specified a specific image size that the model should expect. So, does the model expect a particular input size (i.e. H x W x num. channels) – if so, what is it?
hi Jason ,
i have trained my model successfully based by your tutorial(My model is for motorbike detection). And then, how i can get the output file of this trained? Are .h is the output? I mean, i want to just call the output trained model if i want use to other source code for motorbike detection. So, i don’t need to train it from the beginning again if i want detect the motorbike.
Hi Jason, thank you for the tutorial. I’d like to ask something about anchor boxes. If i have anchor_box_scales = [32, 64, 128], what does these values mean exactly? Are they square pixels (area), or are they scalar values? If i have very small objects that range between 20×20 pixels to 40×40 what should i put as values? Can I only put two? I would love some guidance and insight if possible, of course.
Thank you again.
In this tutorial, use 32 last file for test, right? But, How should i do if i want to get randoms data test? so the data test is not the 32 last file but random file. Thank You
Hello Jason,
Thanks a lot for such a great tutorial.
Firstly, how long does it take to calculate mAP scores?? its been half an hour its still processing. i think I am in a loop!!
I just had a doubt. Why do u need to use the scaled image for evaluation during prediction as per your code?
def evaluate_model(dataset, model, cfg):
APs = list()
for image_id in dataset.image_ids:
# load image, bounding boxes and masks for the image id
image, image_meta, gt_class_id, gt_bbox, gt_mask = load_image_gt(dataset, cfg, image_id, use_mini_mask=False)
# convert pixel values (e.g. center)
scaled_image = mold_image(image, cfg)
# convert image into one sample
sample = expand_dims(scaled_image, 0)
# make prediction
yhat = model.detect(sample, verbose=0)
# extract results for first sample
r = yhat[0]
# calculate statistics, including AP
AP, _, _, _ = compute_ap(gt_bbox, gt_class_id, gt_mask, r[“rois”], r[“class_ids”], r[“scores”], r[‘masks’])
# store
APs.append(AP)
# calculate the mean AP across all images
mAP = mean(APs)
return mAP
Also, I didn’t get your following statements:
1.the pixel values of the loaded image must be scaled in the same way as was performed on the training data, e.g. centered. This can be achieved using the mold_image() convenience function.
2. The dimensions of the image then need to be expanded one sample in a dataset and used as input to make a prediction with the model.
That sounds too long. Perhaps try running on a faster machine or double check your code.
Yes, any data prep applied to the training data must be also be applied to new data, like test data. This often means scaling the pixels in the same way.
Yes, the model expects one or more samples as input, in this case images. We need to ensure the input has appropriate dimension to meet the expectations of the model.
Hello Jason,
How can I improve my mAP scores? I’ve been getting scores as follows
Train mAP: 0.760
Test mAP: 0.657
don’t know why such low score b’cause prediction its predicting each and every defined object i.e. gun, knife, and sword in my case very accurately.
Thanks in advance!!
Also, I guess something with this particular webpage. This page is working too slowly and getting lagged while other pages of machinelearningmastery or other websites are working perfectly fine
Hello. I Have this error. I dont know how to solve it:
Traceback (most recent call last):
File “”, line 47, in
train_mAP = evaluate_model(train_set, model, cfg)
File “”, line 32, in evaluate_model
AP, _, _, _ = compute_ap(gt_bbox, gt_class_id, gt_mask, r[“rois”], r[“class_ids”], r[“scores”], r[‘masks’])
File “C:\Users\lenovo\Anaconda3\envs\tensorflow\lib\site-packages\mrcnn\utils.py”, line 739, in compute_ap
iou_threshold)
File “C:\Users\lenovo\Anaconda3\envs\tensorflow\lib\site-packages\mrcnn\utils.py”, line 691, in compute_matches
overlaps = compute_overlaps_masks(pred_masks, gt_masks)
File “C:\Users\lenovo\Anaconda3\envs\tensorflow\lib\site-packages\mrcnn\utils.py”, line 107, in compute_overlaps_masks
masks1 = np.reshape(masks1 > .5, (-1, masks1.shape[-1])).astype(np.float32)
File “C:\Users\lenovo\Anaconda3\envs\tensorflow\lib\site-packages\numpy\core\fromnumeric.py”, line 257, in reshape
return _wrapfunc(a, ‘reshape’, newshape, order=order)
File “C:\Users\lenovo\Anaconda3\envs\tensorflow\lib\site-packages\numpy\core\fromnumeric.py”, line 52, in _wrapfunc
return getattr(obj, method)(*args, **kwds)
ValueError: cannot reshape array of size 0 into shape (0)
First of all, wanted so thank you for this tutorial. So far, it has been really thorough, especially in helping a ML beginner like me to grasp relatively complex ideas.
I have been following the tutorial step-by-step so far with code on Google Colab and python v 3.6 installed as well. I am using this to work on a school project that uses object detection to recognize traffic lights in images.
When train the model, it gives me an error that others have experienced before i.e. AttributeError: ‘Model’ object has no attribute ‘metrics_tensors’
Not exactly sure what is incorrect here, have looked at the model.py file and there only seems to be that single instance of metrics_tensors when we add metrics to the losses. Were you or the others (who might have faced similar errors) able to identify the source of the error?
model = MaskRCNN(mode=’training’, model_dir=’./’, config=config)
error
The following Variables were created within a Lambda layer (anchors)
but are not tracked by said layer:
The layer cannot safely ensure proper Variable reuse across multiple
calls, and consquently this behavior is disallowed for safety. Lambda
layers are not well suited to stateful computation; instead, writing a
subclassed Layer is the recommend way to define layers with
Variables.
Matterport’s Mask R-CNN code is incompatible with the latest versions of tensorflow and keras. I eliminated such errors by installing TensorFlow 1.5.1 and Keras 2.0.8
I have data that consists of images and their corresponding annotation files. I have to detect two classes. I intend to use my own neural network. Can you explain to me how to load data into the network.
Great tutorial..!
I used this to make a multi-class model (face mask and without mask) I trained it and got the output.
But it is not differentiating Between both classes as this code is for single class..
How can I get it to classify the classes seperately to detect faces without masks..help.
Good question, you can prepare and load the data to have two classes instead of one. Note the location where we define the classes when loading and defining the dataset.
Yes, I did that. I updated the code for 2 classes and trained it. but for the predictions(output) how to differentiate between both classes. its showing boxes on all faces(with mask and without) I want to know which face is without mask or with a mask.
So that I can write a script to detect face mask in a photograph.
Hi i am also trying to build a multi class model(Bicycle and car) but I cant seem to get it to work, what changes did you make to the code? my epoch just run forever without exiting
Hi Jason, I’m facing issue while trying to run the Mask-RCNN over the google-COLAB environment where first epoch run not getting completed. I tried to solve it by following multiple steps mention by people on various forum but still facing issue. Including trying on various version of tensorflow from version 1.14 to 1.5.1 and keras from 2.0.8 to 2.1.0.
Will it be please possible for you to run the code again at your end with multiple epoch run and then share the requirement.txt file.
output:
ImportError: Keras requires TensorFlow 2.2 or higher. Install TensorFlow via pip install tensorflow
The issue is that MaskRCNN seems incompatible with the latest version of tf. I have been installing tensorflow 1.5 to avoid issues with model_dir not recognized.
I have the same problem, but following my error im unable to download an earlier version of tf.
ERROR: Could not find a version that satisfies the requirement tensorflow==1.15 (from versions: 2.2.0rc1, 2.2.0rc2, 2.2.0rc3, 2.2.0rc4, 2.2.0, 2.3.0rc0, 2.3.0rc1, 2.3.0rc2, 2.3.0)
ERROR: No matching distribution found for tensorflow-gpu==1.15
Hi Jason and thanks a million for the tutorial. I implemented it and it is fully functional.
It’s been 24 hours since I started to learn ML, bear in mind.
I want to adapt your code to detect certain photos of items in scanned images, so it is not kangaroos. I need to train the model on a completely new type of object.
I can create the training set folders with images and annotations as you defined them, no problem.
But what would I have to change in the code in order to train it on a completely new type of object? I started by eliminating the load_weights instruction.
Good question. Load the weights as before. The change is focused on how you load your custom dataset – to ensure that the class, image, and mask are represented correctly using the Mask RCNN API – use the existing code as a guide.
thanks for the help Jason. I now understand some more about the topic.
When I try to train the model with your code it always gives me this error at the end. Have you noticed this before? I changed the number of epochs to run the program faster and trigger the error sooner for debugging. The error appears with the kangaroo dataset as well as with my dataset.
5/6 [========================>…..] – ETA: 49s – loss: 3.1602 – rpn_class_loss: 0.0097 – rpn_bbox_loss: 0.5310 – mrcnn_class_loss: 0.2470 – mrcnn_bbox_loss: 1.4792 – mrcnn_mask_loss: 0.8933 C:\Python\lib\site-packages\skimage\transform\_warps.py:830: FutureWarning: Input image dtype is bool. Interpolation is not defined with bool data type. Please set order to 0 or explicitely cast input image to another data type. Starting from version 0.19 a ValueError will be raised instead of this warning.
order = _validate_interpolation_order(image.dtype, order)
C:\Python\lib\site-packages\skimage\transform\_warps.py:830: FutureWarning: Input image dtype is bool. Interpolation is not defined with bool data type. Please set order to 0 or explicitely cast input image to another data type. Starting from version 0.19 a ValueError will be raised instead of this warning.
order = _validate_interpolation_order(image.dtype, order)
Traceback (most recent call last):
File “C:\Python\lib\site-packages\mask_rcnn-2.1-py3.6.egg\mrcnn\model.py”, line 1692, in data_generator
ZeroDivisionError: integer division or modulo by zero
During handling of the above exception, another exception occurred:
Traceback (most recent call last):
File “C:/Users/GABI/PycharmProjects/Object_Recognition/main.py”, line 109, in
model.train(train_set, test_set, learning_rate=config.LEARNING_RATE, epochs=5, layers=’heads’)
File “C:\Python\lib\site-packages\mask_rcnn-2.1-py3.6.egg\mrcnn\model.py”, line 2374, in train
File “C:\Python\lib\site-packages\keras\legacy\interfaces.py”, line 91, in wrapper
return func(*args, **kwargs)
File “C:\Python\lib\site-packages\keras\engine\training.py”, line 1418, in fit_generator
initial_epoch=initial_epoch)
File “C:\Python\lib\site-packages\keras\engine\training_generator.py”, line 234, in fit_generator
workers=0)
File “C:\Python\lib\site-packages\keras\legacy\interfaces.py”, line 91, in wrapper
return func(*args, **kwargs)
File “C:\Python\lib\site-packages\keras\engine\training.py”, line 1472, in evaluate_generator
verbose=verbose)
File “C:\Python\lib\site-packages\keras\engine\training_generator.py”, line 330, in evaluate_generator
generator_output = next(output_generator)
File “C:\Python\lib\site-packages\mask_rcnn-2.1-py3.6.egg\mrcnn\model.py”, line 1810, in data_generator
UnboundLocalError: local variable ‘image_id’ referenced before assignment
Do your Keras and TF versions match the expected versions listed at the top of the tutorial?
Did you copy all of the code?
Are you running from the command line?
Similar to the last question, I want to train on a new dataset in which the objects that I want to detect are not even closely related to the objects the pre-trained model has seen. Is this actually possible or do we have to have images that are similar to the pre-trained model? I guess the root of my question is – how flexible is transfer learning? Can I really take a pretrained model trained on kangaroos and get it to learn to detect random shapes in a new image?
Hello and thank you for such a great tutorial! I am stuck on a certain part though. I can’t seem to find the mask_rcnn_kangaroo_cfg files that are supposed to be generated. It’s supposed to be saved in your working directory right? Is there another place the .h5 files could be saved?
thanks for this great tutorial. how to have the class_name i.e ‘kangaroo’ displayed on the picture? more importantly, how to extract it and save it in some list ?
Thank you, found that can use Tensorboard for the graphic view. I have another question/problem. With my custom dataset around 1000 images and128x128 pixels, and I somehow manage to run out of memory, is there a fix for that?
Hi, is it possible to predict in real time? Or would it be possible to get each image shown right after it predicts, so I dont have to wait for the whole batch to finish?
For people facing memory problems when running the code in the training part, add IMAGES_PER_GPU = 1 in the “#define a configuration for the model” section.
Based on this link “mAP (mean Average Precision) for Object Detection, 2018” i cannot really figure out what kind of method is used to calculate the mAP and where i can find it. Is the Pascal Voc used or MS coco. If MS coco is used the interpolation of 101 points is ment by it right? Where could i find it myself next time?
Thanks for the great writeup. Was able to successfully implement this. Question:
If training on new images—I assume we have to come up with an xml file to classify “where in an image an object is”. What is the best way to generate that file?
Also—I did this in tensorflow 2.0. Must be an update. That said, I used your recommended keras. Perhaps you want it add this information to your article.
Can you be a bit more clear about why mold_image is required ?
I can see in source code that mold_image does normalization of the image, but I haven’t seen the same normalization done for Kangaroo Dataset which is used for training the model.
So, why are we doing normalization while predicting ?
If I recall, it is because the data prep is performed automatically when training the model, and when predicting/evaluating we are loading new data and must perform data prep manually.
Hello, thanks for the tutorial, I managed to run realtime recognition through opencv.
But I have a problem and I am hoping I can get it resolved.
When I call model.predict() it takes 0.54 seconds until it finishes, that is very very slow like 2 frames pre second, how can I speed it up?
Thanks, but I dont have problem with training, but the prediction rate is too slow, I would like to get it atleast to 0.1s per image. Is there a way to reduce the time it takes to compute where the bnd box is? Thank you.
Hi Jason, Did you get a chance to write on image annotation?
Though I am aware of a couple of tools like makesense.ai but they all work on a single image at a time. This is cumbersome when there are thousands of images.
Are you aware of any platform where we upload a list of images and their corresponding labels to generate annotations for all in one go?
A question is bothering me for a while and that is about the limitation of Neural Networks in general ( CNNs, RNNs, or other structures) for detecting small objects. I know small object detection is itself a challenging topic. However, is there any limitation in the size of the object that these models can detect as the smallest kernel size can be used is 3 by 3? Please correct me if I am looking at this issue from the wrong point of view (relating kernel size and object size).
Yes, really small or really large objects can be missed and may require specalized handling of the data or custom models that can operate at multiple scales in parallel.
In the code above, at the time of model evaluation or running prediction on a single image, function: mold_image(..) is used to perform pixel centering, This step wasn’t explicit in model training. Is it that this step is taken care off by MaskRCNN model training behind the scenes?
Thanks Jason for a quick response, I have a follow-up question.
My dataset is images of emergency and non-emergency vehicles. After model training and evaluation, when running it on test set images, model couldn’t detect vehicle in one image. And when I commented the step of mold_image(…), it could successfully detect the vehicle.
So, is it right to say that pre-processing step – centering of image should not be done on this dataset? If so, how do I turn that off during model training.
While training the model I am receiving the the following errors:
1. File “/usr/local/lib/python3.7/dist-packages/tensorflow_core/python/util/module_wrapper.py”, line 193, in __getattr__
attr = getattr(self._tfmw_wrapped_module, name)
AttributeError: module ‘tensorflow’ has no attribute ‘name_scope’
2. File “/usr/local/lib/python3.7/dist-packages/tensorflow_core/python/keras/applications/__init__.py”, line 22, in
import keras_applications
ModuleNotFoundError: No module named ‘keras_applications’
AttributeError Traceback (most recent call last)
in ()
6 from mrcnn.utils import Dataset
7 from mrcnn.config import Config
—-> 8 from mrcnn.model import MaskRCNN
9
10
/content/Mask-Rcnn/mrcnn/model.py in ()
253
254
–> 255 class ProposalLayer(KE.Layer):
256 “””Receives anchor scores and selects a subset to pass as proposals
257 to the second stage. Filtering is done based on anchor scores and
AttributeError: module ‘keras.engine’ has no attribute ‘Layer’
Hello Jason ,
Thank you for this comprehensive tutorial !
Issues encountered :
(1)AttributeError: module ‘keras.engine’ has no attribute ‘Layer’ : This issue (also reported by somebedy else in the comments section ) gets resolved (as you have suggested above in another comment)after installing the tensor flow version and keras version that you have mentioned
However , after having resolved the above issue, there is another error :
AttributeError: module ‘tensorflow’ has no attribute ‘name_scope’
I have a question for the output.
We get a single class output with a confidence score for this class.
Is it possible to get a class vector for each box?
Example: 2 Classes (Dog, Cat)
Box[x, y , width, height, class:[0.3, 0.7]
So is it possible to say this box is 30% Dog and 70% Cat or something like that?
Even better would be that each class could be 0%-100% for itself. So 65%/100% its a dog and 80%/100% its a cat.
Yes, a given prediction gives a vector of probabilities across all known classes I believe. You can sorry by probability and report the top 5. I think I have an example of this for pre-trained image classification models on the blog.
Ciao a tutti, sono alle prime armi con il deep learning…ho addestrato un modello tramite una CNN con Keras ed ho salvato il modello.h5 – Da questo come posso fare object detection per rilevare gli oggetti nelle immagini ? Chi mi aiuta ad eseguire questo prox step? GRAZIE mille
Hello Jason,
I have a different dataset from this. It is a CSV annotation file and it has more than one class in the dataset such as person, car, cat, etc. The bounding box coordinates are in x_min, y_min, x_max, y_max format, where x_min, y_min is the top-left coordinate whereas x_max, y_max is the bottom right coordinate. The class names are text files and I need to change them into integer representation, I think. I have seen in some datasets that they arranged based on classes, but in this dataset, all the images are in one folder. I want to parse the CSV file and preprocess it before loading it to the object detection model. Each image contains more than one object. How can I parse my dataset? I used the pandas read_csv () file function, but I ended up with an error saying that the length of the input image and the images in the annotation file are not equal. This is because the image names are repeated for each bounding box in the annotation.
I really appreciate your suggestion and help
Simeon.
I have reused above code, but I got below error. Is there any one got the same issue and how to solve it ? Thanks.
Traceback (most recent call last):
File “.\kangaroo_detection2.py”, line 124, in
model = MaskRCNN(mode=’training’, model_dir=’./’, config=config)
File “C:\Users\HP\Documents\000_DATA\100_TECH\100_CODE\100_TRAIN\300_ComputerVision\envWinComputerVision_python37\lib\site-packages\mask_rcnn-2.1-py3.7.egg\mrcnn\model.py”, line 1849, in __init__
File “C:\Users\HP\Documents\000_DATA\100_TECH\100_CODE\100_TRAIN\300_ComputerVision\envWinComputerVision_python37\lib\site-packages\mask_rcnn-2.1-py3.7.egg\mrcnn\model.py”, line 1978, in build
File “C:\Users\HP\Documents\000_DATA\100_TECH\100_CODE\100_TRAIN\300_ComputerVision\envWinComputerVision_python37\lib\site-packages\keras\engine\base_layer.py”, line 457, in __call__
output = self.call(inputs, **kwargs)
File “C:\Users\HP\Documents\000_DATA\100_TECH\100_CODE\100_TRAIN\300_ComputerVision\envWinComputerVision_python37\lib\site-packages\mask_rcnn-2.1-py3.7.egg\mrcnn\model.py”, line 323, in call
File “C:\Users\HP\Documents\000_DATA\100_TECH\100_CODE\100_TRAIN\300_ComputerVision\envWinComputerVision_python37\lib\site-packages\mask_rcnn-2.1-py3.7.egg\mrcnn\utils.py”, line 820, in batch_slice
File “C:\Users\HP\Documents\000_DATA\100_TECH\100_CODE\100_TRAIN\300_ComputerVision\envWinComputerVision_python37\lib\site-packages\mask_rcnn-2.1-py3.7.egg\mrcnn\model.py”, line 321, in
File “C:\Users\HP\Documents\000_DATA\100_TECH\100_CODE\100_TRAIN\300_ComputerVision\envWinComputerVision_python37\lib\site-packages\mask_rcnn-2.1-py3.7.egg\mrcnn\model.py”, line 263, in clip_boxes_graph
File “C:\Users\HP\Documents\000_DATA\100_TECH\100_CODE\100_TRAIN\300_ComputerVision\envWinComputerVision_python37\lib\site-packages\tensorflow_core\python\framework\ops.py”, line 645, in set_shape
raise ValueError(str(e))
ValueError: Shapes must be equal rank, but are 3 and 2
Hi! Firstly, thank you so much for this guide! It has been insanely helpful and I really appreciate it!
I was wondering if I could get your help on something. I’m currently trying to train the RCNN to detect insects in my backyard and the network is picking up other things like chairs, vases, and people and classifying it as insect. I believe this is from the base network that has 80 objects trained.
Is there anyway I can separate these 80 objects from the network and prevent it from detecting other things and only detect the new insect classes I want?
Hi Jason,
I love this tutorial, very detailed explanation.
I’m using Keras 2.2.4 , TF 1.15, and h5py 3.3.0, My problem is that I’m stuck at ‘model.load_weights’, error message says:
ImportError: dlopen(/Users/fancy/opt/anaconda3/envs/myenv/lib/python3.7/site-packages/h5py/defs.cpython-37m-darwin.so, 2): Symbol not found: _H5Pget_fapl_ros3
Referenced from: /Users/fancy/opt/anaconda3/envs/myenv/lib/python3.7/site-packages/h5py/defs.cpython-37m-darwin.so
Expected in: /Users/fancy/opt/anaconda3/envs/myenv/lib/libhdf5.103.dylib
in /Users/fancy/opt/anaconda3/envs/myenv/lib/python3.7/site-packages/h5py/defs.cpython-37m-darwin.so
I searched a lot but can’t figure out the solution, could you help?
Thank you for this informative tutorial
I have a question about image size
I am having this error
IndexError: index 2048 is out of bounds for axis 0 with size 2048
because my image height is 2048
What to do with large-size images?
Thanks in advance.
There can be a lot of things to do with large images but your error seems to be accessing outside of the array. It sounds to me like some coding mistake more than anything else.
Thank you for your reply
I have already annotated the large size images using VIA tool
the largest image is 2322*4096 and the smallest one is 720 *1280
Should the image resize mode be “square” with max_size=1024 and min_size=800 as default values?
Or I should modify them according to my dataset image size?
Can you kindly tell me what should be the optimum value for max_size and min_size?
I would refer to rescale the image rather than modify the model. The reason is that, modifying the model means retraining, which is very time consuming.
I have already annotated the dataset which was a time-consuming task. I think I will have to re annotate them for the new resized images
I have three questions now:
1.Should I set image_resize_Mode to “square” or “crop”?
2.Do you think that setting max_size and min_size to larger values like 2048 or 4096 rather than 1024 will give better results?
3.Are there any parameters needs to be modified if I change min_size and max_size?
Thanks in advance
I don’t think re-annotate is necessary. There should be a tool to resize/crop image together with the annotation. For square or crop, I would prefer whatever to keep the aspect ratio. And for the size, I would prefer to make it as small as possible while you can still identify the object. You shouldn’t be greedy here, but rather, keep the minimum information for the model so it will not learn from the noise and converge faster.
Thank you for your reply
I would be grateful for you if you tell me tool name to crop the image with annotation
I have used vgg image annotator (VIA)
Thanks in advance
Hi Jason
TNX for sharing such a great article!!
Well described part by part of it
Personally, I faced some debugging errors.
I’m using colab. Installed the Tensroflow and Keras with the specific version mentioned in the begining of the article.
First, after running the cell(in which the trainng starts), I got the Error
ModuleNotFoundError: No module named ‘keras_applications’
in which is described in one of above comments(Back to April 28th).
By a little search, I supposed that all of it is because of h5py version. So, I tried installing h5py v2.8.0. However, the funny thing is I got a new completely different error which is:(The last traceback)
Traceback (most recent call last):
File “/usr/local/lib/python3.7/dist-packages/IPython/core/ultratb.py”, line 1132, in get_records
return _fixed_getinnerframes(etb, number_of_lines_of_context, tb_offset)
File “/usr/local/lib/python3.7/dist-packages/IPython/core/ultratb.py”, line 313, in wrapped
return f(*args, **kwargs)
File “/usr/local/lib/python3.7/dist-packages/IPython/core/ultratb.py”, line 358, in _fixed_getinnerframes
records = fix_frame_records_filenames(inspect.getinnerframes(etb, context))
File “/usr/lib/python3.7/inspect.py”, line 1502, in getinnerframes
frameinfo = (tb.tb_frame,) + getframeinfo(tb, context)
File “/usr/lib/python3.7/inspect.py”, line 1460, in getframeinfo
filename = getsourcefile(frame) or getfile(frame)
File “/usr/lib/python3.7/inspect.py”, line 696, in getsourcefile
if getattr(getmodule(object, filename), ‘__loader__’, None) is not None:
File “/usr/lib/python3.7/inspect.py”, line 733, in getmodule
if ismodule(module) and hasattr(module, ‘__file__’):
File “/usr/local/lib/python3.7/dist-packages/tensorflow/__init__.py”, line 50, in __getattr__
module = self._load()
File “/usr/local/lib/python3.7/dist-packages/tensorflow/__init__.py”, line 44, in _load
module = _importlib.import_module(self.__name__)
File “/usr/lib/python3.7/importlib/__init__.py”, line 127, in import_module
return _bootstrap._gcd_import(name[level:], package, level)
File “”, line 1006, in _gcd_import
File “”, line 983, in _find_and_load
File “”, line 965, in _find_and_load_unlocked
ModuleNotFoundError: No module named ‘tensorflow_core.estimator’
Have you got any ideas for dealing with this?
I appreciate your response
Hey Jason, thanks so much for all the great tutorials. I’m having an issue with an “AttributeError: ‘str’ object has no attribute ‘decode'” error when trying to execute the “model.load_weights” block. The error line reads “original_keras_version = f.attrs[‘keras_version’].decode(‘utf8’). Google suggests dropping the “.decode(‘utf8) because it’s no longer necessary after python 3 but that’s not possible due to it being source code. I’m using python 3.6 and force installed tensorflow 1.15.3 and keras 2.2.4 as you directed at the beginning of the tutorial. Any advice is greatly appreciated, thank you.
Hi James I am facing an issue when trying out the codes.
When using functions like .image_reference(), and .load_image() where inside the functions it will call the self.image_info[image_id] function
~\AppData\Local\Temp/ipykernel_15376/2509526515.py in image_reference(self, image_id)
116 def image_reference(self, image_id):
117 “””Return the path of the image.”””
–> 118 info = self.image_info[image_id]
119 if info[“source”] == “object”:
120 return info[“path”]
TypeError: list indices must be integers or slices, not str
the keras version im using is 2.2.5 and tensorflow version is 1.13.1
I did tried out with the verions mentiond in your article but I’m still having the same error too.
Hello, great tutorial! I ran the 1st part of the code you have at the beginning of the tutorial. How can I modify this line of code: “display_instances(image, bbox, mask, class_ids, train_set.class_names)” in order to print the image in original dimensions? Because I use very big UAV images and the squares seem very small.
Great work!!!
One of the greatest tutorial on the internet!! Very understandable!!! What modifications should I do in the above code to make it train and work with my custom dataset? Once again, THANKS for the great tutorial and the information…You are awesome!
Thanks for providing this article… it might be a start for me. I just got started into object detection and I’m working on a project that detect bank cheques from images. Can I use this procedures in training with my datasets for my project.
I would be very grateful for response
Best regards
Hi Jeffrey…Yes, but understand that all code and material on my site and in my books was developed and provided for educational purposes only.
I take no responsibility for the code, what it might do, or how you might use it.
If you use my code or material in your own project, please reference the source, including:
The Name of the author, e.g. “Jason Brownlee”.
The Title of the tutorial or book.
The Name of the website, e.g. “Machine Learning Mastery”.
The URL of the tutorial or book.
The Date you accessed or copied the code.
For example:
Jason Brownlee, Machine Learning Algorithms in Python, Machine Learning Mastery, Available from https://machinelearningmastery.com/machine-learning-with-python/, accessed April 15th, 2018.
Also, if your work is public, contact me, I’d love to see it out of general interest.
Hi Jason,
Thanks for the great tutorial, with excellent explaination.
While using example, I am facing following issue (mentioned above by others too).
Thanks James!
Finally I got around version problems by
1. using 2.x compatible version @ (https://github.com/ahmedfgad/Mask-RCNN-TF2.git)
2. Following versions worked for me
tensorflow==2.2.0
keras==2.3.1
Hi Guys,
Thanks for the fantastic blog .
A quick question please : Lets suppose I’v trained another Data Set in exactly this way on this model and lets assume I’ve done everything right . Inspite of that ,If I am not getting good results , how should I deal with this ?
How can I tune this model(this particular matter port implementation) if need be ?Is there an option to tune it ?
Do I have the option of training more than just the top layers ?Do I have the option to change hyper params ?
If yes ,would I need to modify the Matter port source code for all of the above or is there anyway around this ?
Please ignore /delete this comment , I missed the section where you have already mentioned in the blog that we can finetune more layers , looks like this is a configuration that is available . Thanks !
Hi Anil…You are very welcome! We have not experienced that issue. Perhaps you could try an experiment with executing your code in Google Colab with the GPU option or AWS. Let us know what you find out!
Hi, I’m trying to get this up and running with my daughter for a science fair project, I will admit to having spent most of my development career in Java, so not needing to worry as much about hardware.
We are finding ourselves locked in loop, we are trying to get working Tensorflow and Keras versions (recommended above) that both work with this code, each other and the M1 chip. When I checkout Tensorflow GitHub, they only have a Mac x86 version of the older version of TensorFlow. Anyone tackled this one?
Also, just a shout out to the commenters and writers, this has been a really great tutorial and community, so thank you all!
Fine-tuning an object detector involves several key steps, and it’s a process used to adapt a pre-trained model to your specific task, improving its accuracy on your particular dataset. Here’s a step-by-step guide on how to fine-tune an object detection model:
### 1. Choose a Pre-trained Model
Start with a pre-trained object detection model that has been trained on a large and general dataset like COCO, Pascal VOC, or ImageNet. Popular architectures include YOLO (You Only Look Once), SSD (Single Shot MultiDetector), and Faster R-CNN.
### 2. Collect and Prepare Your Dataset
– **Collect a dataset** that is relevant to your specific task. Your dataset should include images that represent the kind of objects you want to detect.
– **Annotate your images** by drawing bounding boxes around the objects of interest and labeling them. There are various annotation tools available, such as LabelImg or CVAT.
– **Split your dataset** into training, validation, and test sets. A common split ratio is 70% for training, 15% for validation, and 15% for testing.
### 3. Configure the Model for Your Dataset
– **Modify the model’s head** if necessary, to match the number of classes in your dataset. For instance, if you’re detecting three types of objects, the final layer should output three classes.
– **Adjust the configuration settings** of the model, such as the learning rate, batch size, and the number of epochs. You might start with the configuration of the pre-trained model and adjust based on your dataset size and complexity.
### 4. Augment Your Data (Optional)
Data augmentation involves artificially increasing the size and diversity of your training dataset by applying various transformations like flipping, scaling, cropping, and color variation. This can help improve the robustness of your model.
### 5. Fine-Tune the Model
– **Load the pre-trained model** and modify it for your dataset.
– **Freeze the early layers** of the model to retain learned features that are generally applicable to most visual tasks. Only train the latter layers that are more specific to the detection task.
– **Train the model** on your dataset. Use the training set to train the model and the validation set to tune the hyperparameters and avoid overfitting.
### 6. Evaluate the Model
– **Use the test set** to evaluate the model’s performance. Common metrics for object detection include Precision, Recall, and the mean Average Precision (mAP).
– **Iterate** on your training process by adjusting model configurations, augmenting your data differently, or even collecting more data based on the performance on the test set.
### 7. Deploy the Model
Once satisfied with the model’s performance, deploy it for real-world usage or further testing.
### Tools and Libraries
You can use deep learning frameworks like TensorFlow (with its object detection API), PyTorch (with libraries like Detectron2 or Torchvision), or even higher-level APIs like Keras for fine-tuning object detection models.
Fine-tuning is an iterative process. It might take several rounds of adjustment and training to get the desired accuracy and performance from your object detector.

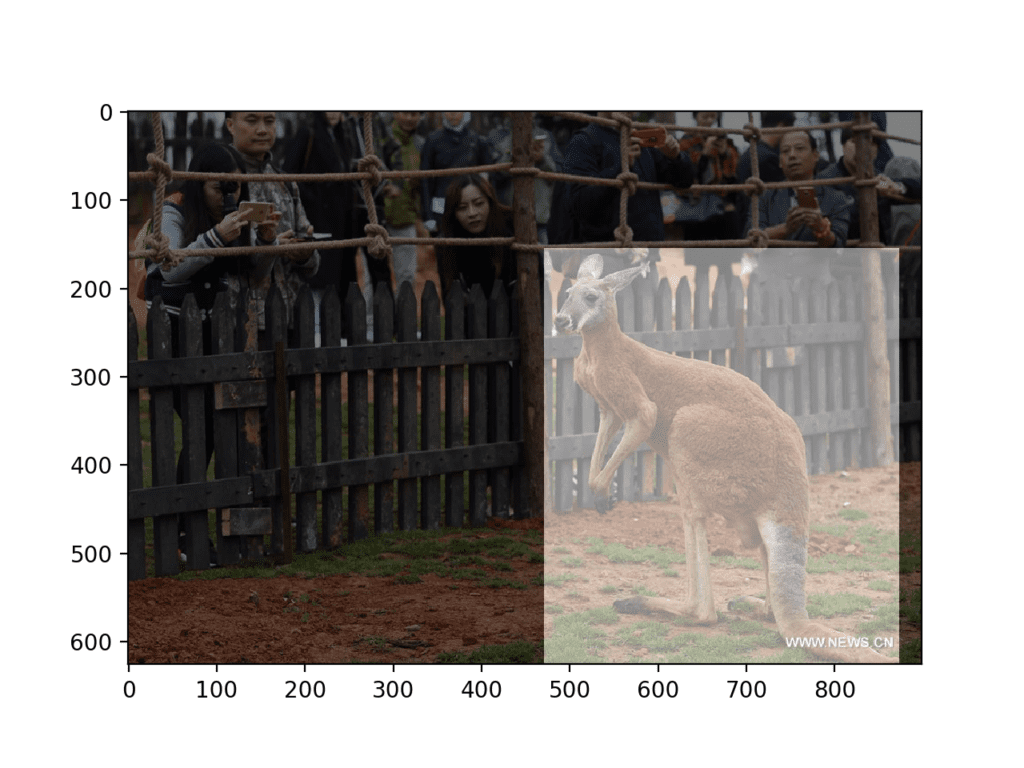
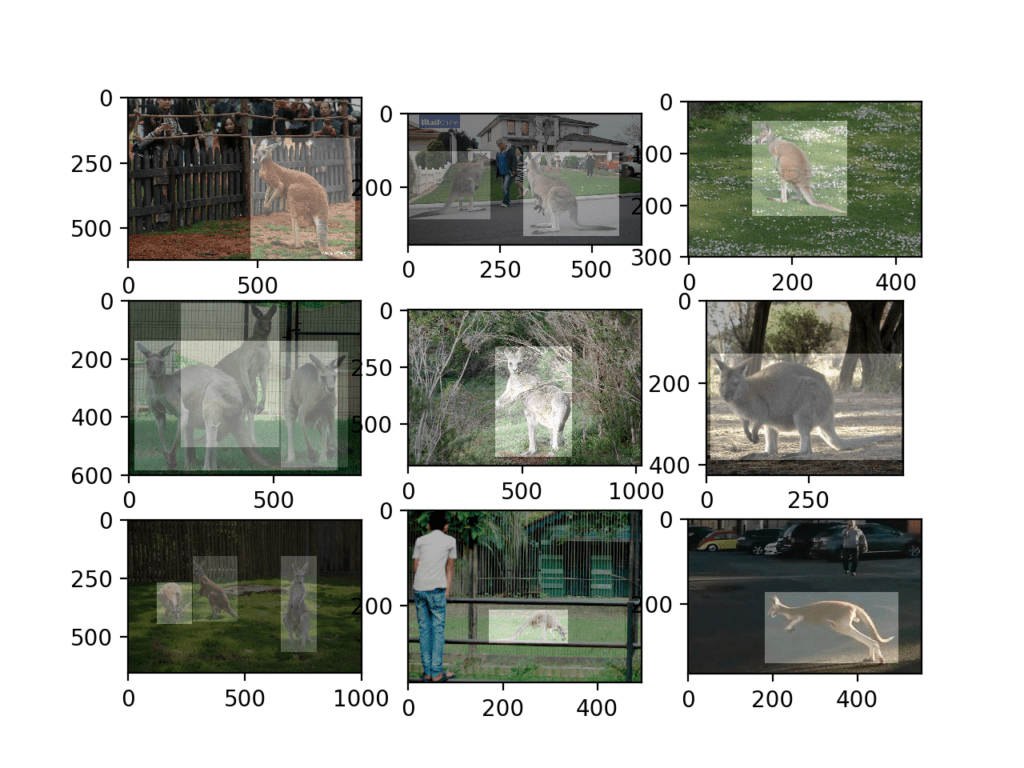
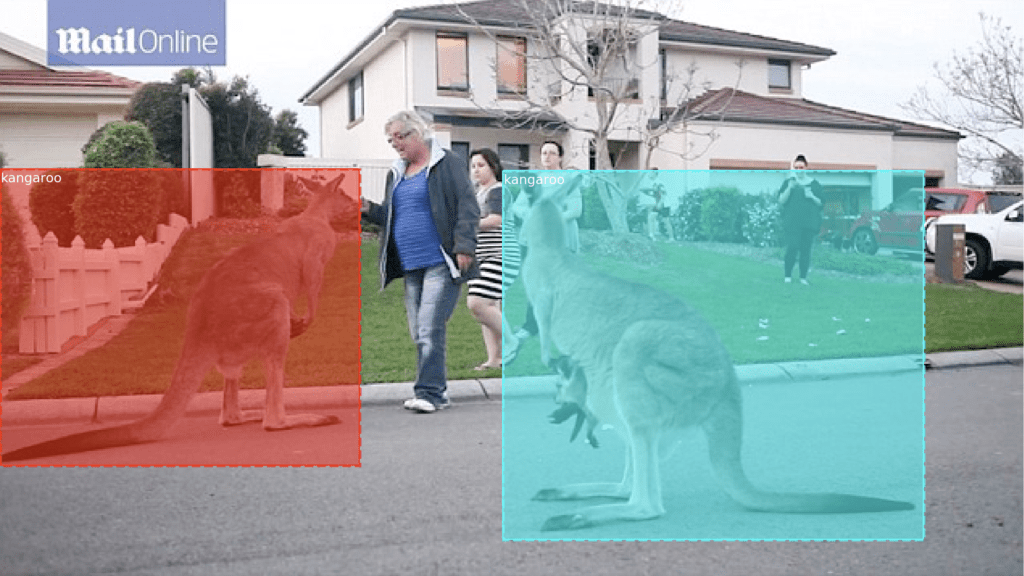
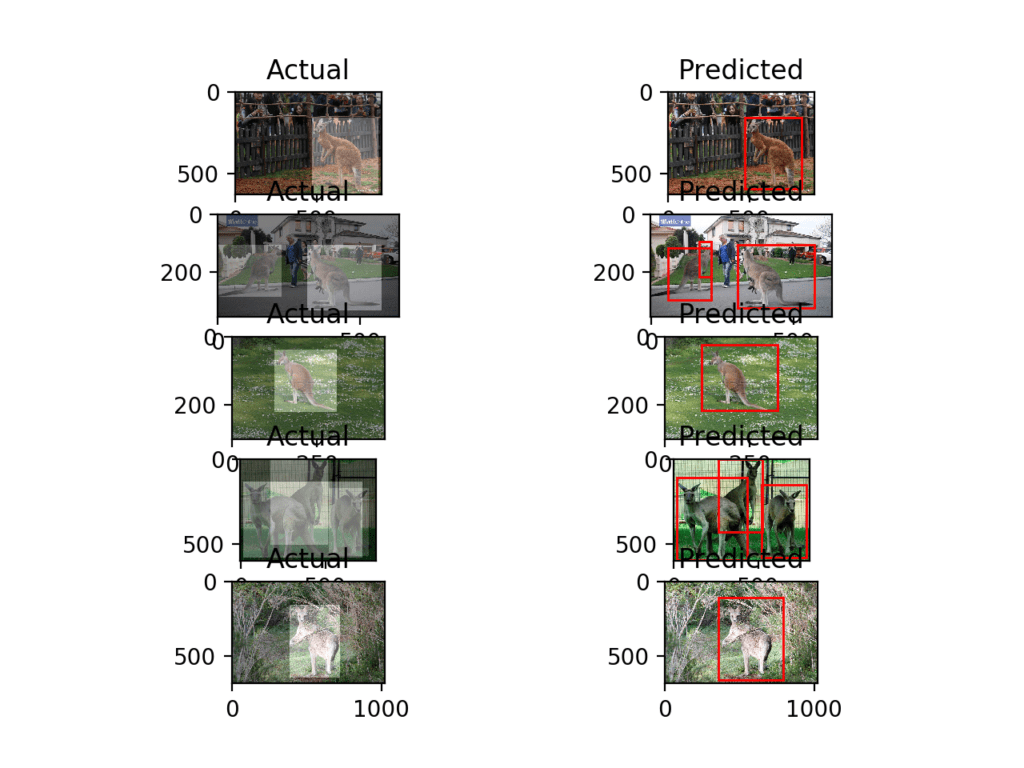
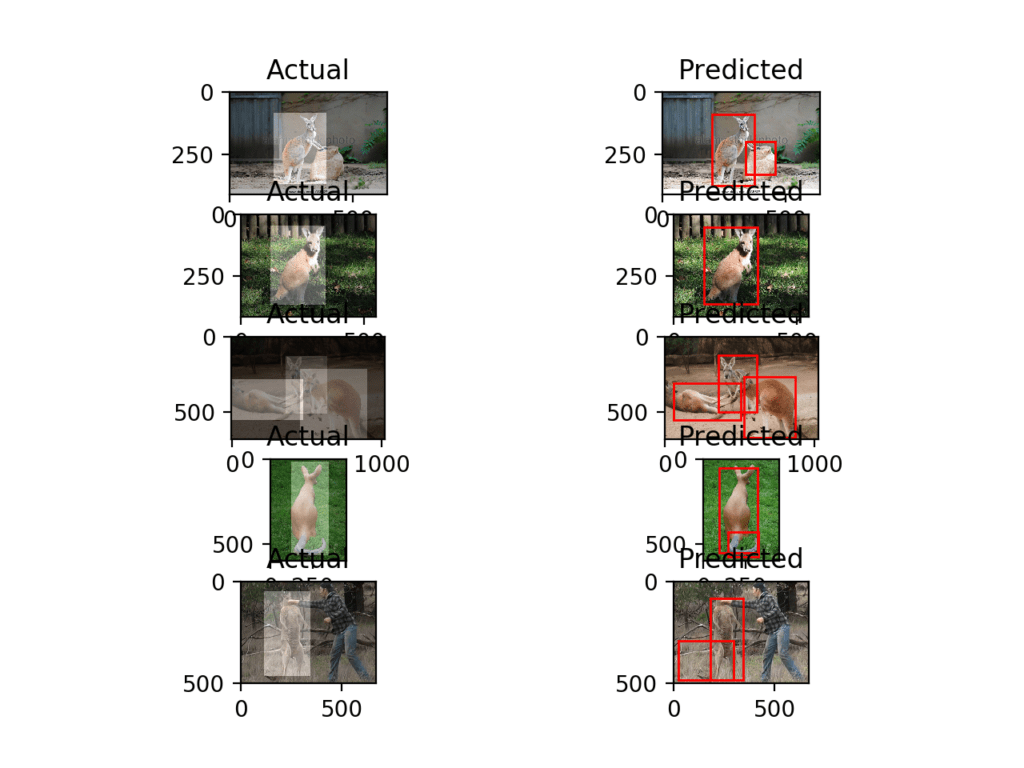


Great tutorial !
Could you give us advice how to annotate images, please ?
What is the best practice ?
How many images per object is enough ?
How to annotate when there are several objects in the same image and they overlap ?
Thank you.
Great questions, thanks!
I hope to cover the topic in the future.
Dear Dr. Jason,
I am a student from China. I am dealing with a problem related to scene classification and wondering if you could provide some good methods and materials.
best, looking forward to hearing from you, Thank you for your time.
Warm regards,
Yajuan Xu
Thanks for the suggestion, I hope to write about the topic in the future.
Here is the image annotation tool.
https://github.com/tzutalin/labelImg
Thanks for sharing.
HEY JASON I need help in my satellite building images dataset I have labels in JSON format in which image coordinates in polygon shapes more than 4 points so mask rcnn is suitable for this kind of dataset because RPN needs 4 points to make a box but I have more than 4 points in my labels and annotated images as well so how it works for polygon? please help is there any method to convert polygon to 4 coordinates or any function which can help.
There maybe, I’m not sure off hand sorry.
use labelimg repo
hi, Jason, while display_instances:
running : display_instances(image, bbox, mask, class_ids, train_set.class_names)
An error ocurred while starting the kernel ,
home/user/anaconda3/bin/python: symbol lookup error: /home/user/anaconda3/lib/python3.6/site‑packages/numpy/core/../../../../libmkl_intel_thread.so: undefined symbol: __kmpc_global_thread_num
Pls find the solution .
thanks
This looks like it might be an issue with your library installation.
Perhaps this post will help you to setup your development environment:
https://machinelearningmastery.com/setup-python-environment-machine-learning-deep-learning-anaconda/
yes!thanks for your guide !and now , it works well on Win10 plateform although still running for much much more time waiting .
The issue is focused on the MKL lib .
But for Ubuntu issue remained ……
Nice work!
hi,Jason, thank for your kind tutorials , and for this case-study,
what is the function of train_set.prepare()?
Please provide much more of HowTo about it ? thanks !
Good question, you can see what prepare() does here:
https://github.com/matterport/Mask_RCNN/blob/master/mrcnn/utils.py#L294
Hi any developments?
very nice steps !! How to predict with real time video (CCTV) instead of images, Thanks.
Great suggestion, I hope to cover it in the future.
Use OpenCV to capture video from attached camera.
Agreed!
Hi Jason,
Thank you very much for the precious tutorial. I face a problem in people counting project when I am going to track people though detecting them is not hard.
would you please give me a tutorial about the best tracking methods such as “deep tracking” or other else?
Best
Maryam
Thanks for the suggestion.
Thank you very much for such a beautiful yet detailed tutorial. Its been great learning from you.
Thanks, I’m glad it helped.
Hi jason, i am trying to train multiple object, how can i change the code to import multiple classes?
Do i use multiple lines of:
self.add_class(“dataset”, 1, “kangaroo”)
self.add_class(“dataset”, 2, “tiger”)?
You can specify all of your classes with a unique integer.
Hi Jason, and then just add each image using:
self.add_class(“dataset”, 1, “kangaroo”)
self.add_class(“dataset”, 2, “tiger”)?
self.add_image(‘dataset’, … )
what parameter do i need set for identify ‘the class’
i solve that problem for polygons shapes
I’m happy to hear that, well done!
Please let me know how to do this
If we have both kangaroo and tiger inside single image, then how van I load the mask?
self.add_class(“dataset”, 1, “kangaroo”)
self.add_class(“dataset”, 2, “tiger”)
I meant this part!!!
Sorry, I cannot review/debug your code.
ValueError: Dimension 1 in both shapes must be equal, but are 8 and 16. Shapes are [1024,8] and [1024,16]. for ‘Assign_682’ (op: ‘Assign’) with input shapes: [1024,8], [1024,16].
hello,Jason,How to solve this error when calculating the mAP value?
Sorry to hear that, I have some suggestions here that might help:
https://machinelearningmastery.com/faq/single-faq/why-does-the-code-in-the-tutorial-not-work-for-me
If we have both tom and jerry inside single image, then how van I load the mask?
self.add_class(“dataset”, 1, “jerry”)
self.add_class(“dataset”, 2, “tom”)
is it true to do same
hi jason,
I want to inquire about this file ~~mask_rcnn_kangaroo_cfg_0005.h5 ,
how i can find it also why you seprate the training and predicting
,I mean at the last version of file it contains only the predicting with out the training ,how the model have saved the new weights after training so it can be used on the predicting step
The model is fit on the training dataset, saved, loaded and used to make prediction on a hold out test dataset.
Does that help?
ya but my question befor train on dataset kangaroo i load weights to model
# load weights (mscoco) and exclude the output layers
model.load_weights(‘mask_rcnn_coco.h5’, by_name=True, exclude=[“mrcnn_class_logits”, “mrcnn_bbox_fc”, “mrcnn_bbox”, “mrcnn_mask”])
then after training
# load model weights
model.load_weights(‘mask_rcnn_kangaroo_cfg_0005.h5’, by_name=True)
why we load the weights again
i have the file mask_rcnn_coco.h5, i think it have any initial weights ,but i do not know what is the file mask_rcnn_kangaroo_cfg_0005.h5 contains and where i can find this problem
The new set of weights is focused on only detecting kangaroos based on our own dataset.
Does that help?
ya but i can not find this new set of weights ,i mean when it creats the file mask_rcnn_kangaroo_cfg_0005.h5
It will be in the same directory as the python file.
thnx for your response ,another question how i can prepare my images to be on same structure of Kangaroo dataset to train and apply the model on it
It is not required, but it might be a helpful start if you are having trouble.
ya I need to do this because I want to implement the model on my problem so I have some images with some circles and I want to detect these circles
same problem with me, i am using google colab.
this ‘mask_rcnn_kangaroo_cfg_0005.h5’ file is created while training as said in the blog. but i cannot find anywhere in my gdrive.
Perhaps try running on your workstation from the command line?
I have ran on Google colab and .h5 saved in (/content/Mask_RCNN/kangaroo_cfg*/) folder. Check
Hi plz i am using colab google, i am having trouble installing RCNN Librery in python setup.py
I don’t know about colab, sorry.
Perhaps try posting on stackoverflow?
Hello Jason,
First of all, nice tutorial! Having the overall code at the end of each step really helped keep track of where I am in the code! Keep up the good job!
I have a question, I notice that it took you on average a minute per epoch to train. However, I tried doing this with a different dataset and right now i’m on my first epoch and it’s ETA 3.5 hours. My desktop is fairly fast with a ryzen 7 cpu and a nvidia 1050Ti gpu.
So is there something that I’m missing? My training dataset consist of 296 pictures of playing cards in different situations with a total file size of 30.4 MB (I’m trying to train a model to detect playing cards)
Or is that a normal? Or is there some setting I’m missing?
Thanks!
It may be a factor of the number of images?
It may be hardware?
Perhaps experiment on some p3 EC2 instances or with a smaller dataset?
Hi Jason.
This post is so helpful to me to learn R-CNN training!
As I do my work, I encounter some problems now.
First I train the model based on ‘mask_rcnn_coco.h5’ weight first.
So i got the model weight : ‘mask_rcnn_carpk_cfg_0010.h5’ file
how can i append more training images and train based on above file?
I just tried to append more images by load_images function, and next I trained the model by load_weights(‘mask_rcnn_carpk_cfg_0010.h5’, by_name=True, exclude=[“mrcnn_class_logits”, “mrcnn_bbox_fc”, “mrcnn_bbox”, “mrcnn_mask”])
But it did not work..
Is there any other things to set??
Thank you!!
Good question, I don’t have an example of this sorry. You may need to dive into the mask rcnn API.
hmm.. Please could you tell me some recommended papers or blogs about Mask R-CNN API for implementing my task?
Thank you!
Perhaps start here:
https://machinelearningmastery.com/how-to-perform-object-detection-in-photographs-with-mask-r-cnn-in-keras/
Hi Jason,
Great tutorial. However, I am bit confused as to why you used Mask RCNN instead of Faster RCNN? Mask RCNN is essentially Faster RCNN except with segmentation added. Here in this example you basically converted the segmentation into bounding boxes so it seems to me that it would have saved you quite a bit of effort and manual labor to just use Faster RCNN model instead?
Thanks,
Nate
Good question.
Optionality. We can do object detection which is what most people want, with ability to do segmentation if needed.
Great Tutorial Sir,
I really learned a lot.
I have a doubt regarding multiclass detection. I have 2 classes: person with a helmet, person without a helmet. what changes should I make in the program? Like adding classes through add_class function.
Huge Respect and Love.
Satyam Sareen
Perhaps this tutorial will help you train your model:
https://machinelearningmastery.com/how-to-train-an-object-detection-model-with-keras/
Good Afternoon Sir,
You have attached the link to the same blog. Can you suggest the changes to be made in your code so that it runs smoothly for multiclass object detection?
Warm Regards
Satyam Sareen
What do you mean smoothly?
Hello Satyam Sareen,
Check out the code below, I have changed it to your requirement. If any query comment it down. Keep it up!
Code:
class KangarooDataset(Dataset):
# load the dataset definitions
def load_dataset(self, dataset_dir, is_train=True):
# define two class
self.add_class(“dataset”, 1, “personWithHelmet”) #Change required
self.add_class(“dataset”, 2, “personWithoutHelmet”) #Change required
# define data locations
images_dir = dataset_dir + ‘/images/’
annotations_dir = dataset_dir + ‘/annots/’
# find all images
for filename in listdir(images_dir):
# extract image id
image_id = filename[:-4]
#print(‘IMAGE ID: ‘,image_id)
# skip all images after 90 if we are building the train set
if is_train and int(image_id) >= 90: #set limit for your train and test set
continue
# skip all images before 90 if we are building the test/val set
if not is_train and int(image_id) < 90:
continue
img_path = images_dir + filename
ann_path = annotations_dir + image_id + '.xml'
# add to dataset
self.add_image('dataset', image_id=image_id, path=img_path, annotation=ann_path, class_ids = [0,1,2]) # for your case it is 0:BG, 1:PerWithHel.., 2:PersonWithoutHel… #Change required
# extract bounding boxes from an annotation file
def extract_boxes(self, filename):
# load and parse the file
tree = ElementTree.parse(filename)
# get the root of the document
root = tree.getroot()
# extract each bounding box
boxes = list()
#for box in root.findall('.//bndbox'):
for box in root.findall('.//object'): #Change required
name = box.find('name').text #Change required
xmin = int(box.find('./bndbox/xmin').text)
ymin = int(box.find('./bndbox/ymin').text)
xmax = int(box.find('./bndbox/xmax').text)
ymax = int(box.find('./bndbox/ymax').text)
#coors = [xmin, ymin, xmax, ymax, name]
coors = [xmin, ymin, xmax, ymax, name] #Change required
boxes.append(coors)
# extract image dimensions
width = int(root.find('.//size/width').text)
height = int(root.find('.//size/height').text)
return boxes, width, height
# load the masks for an image
def load_mask(self, image_id):
# get details of image
info = self.image_info[image_id]
# define box file location
path = info['annotation']
# load XML
boxes, w, h = self.extract_boxes(path)
# create one array for all masks, each on a different channel
masks = zeros([h, w, len(boxes)], dtype='uint8')
# create masks
class_ids = list()
for i in range(len(boxes)):
box = boxes[i]
row_s, row_e = box[1], box[3]
col_s, col_e = box[0], box[2]
if (box[4] == 'personWithHelmet'): #Change required #change this to your .XML file
masks[row_s:row_e, col_s:col_e, i] = 2 #Change required #assign number to your class_id
class_ids.append(self.class_names.index('personWithHelmet')) #Change required
else:
masks[row_s:row_e, col_s:col_e, i] = 1 #Change required
class_ids.append(self.class_names.index('personWithoutHelmet')) #Change required
return masks, asarray(class_ids, dtype='int32')
# load an image reference
def image_reference(self, image_id):
info = self.image_info[image_id]
return info['path']
# define a configuration for the model
class KangarooConfig(Config):
# define the name of the configuration
NAME = "kangaroo_cfg"
# number of classes (background + personWithoutHelmet + personWithHelmet)
NUM_CLASSES = 1 + 2 #Change required
# number of training steps per epoch
STEPS_PER_EPOCH = 90
Thanks for sharing.
You are great @AutoRoboCulture.
Halo, I tried to train with multiple classes in a single image, I am gettting an error like this
File “C:……….\lib\site-packages\keras\engine\training_utils.py”, line 145, in standardize_input_data
str(data_shape))
ValueError: Error when checking input: expected input_image to have shape (None, None, 1) but got array with shape (1024, 1024, 3).
PS: I am working with gray scale images. and 3 classes. Inside single image both classes are present
Thanks
Thank you so much for sharing these changes.
However, after I followed all of them and adjusted the whole thing to fit my dataset, I keep getting this error:
RuntimeError: generator raised StopIteration
from that training line:
model.train(train_set, test_set, learning_rate=config.LEARNING_RATE, epochs=5, layers=’heads’)
Do you have any suggestions to overcome it?
hey i was using your code for the training.
can you please show us your prediction code? i was trying to use Jason’s but it came with a lot of errors which i cannot solve.
Can you share the prediction part, please?
is this model also suppose to detect the mask of the objects ,for the kangaroo on the images or we will need some modification to segment the images.
Yes, if masks are provided.
In the case of kangaroos, we do not provide masks – just bounding boxes, therefore masks cannot be learned.
when i try to test image with multiple kangaroos ,it failed to detect them is there are two kangaroos interference it detect them as only one ?? any advice
Perhaps the model requires more training on photos with multiple kangaroos?
thanks for your response, another question is there a new version of Mask RCNN avilable on github .
also what i need to have mask on my model how i can provide the model and make my model learn it also
The model can learn the mask, if you provide a dataset that has masks on the images.
thanks for your response i confused about some thing ,now we train model without mask ,so what is the mask loss on this case,and how it is calculated??
I don’t follow sorry, what do you mean exactly?
I am getting this error. Please help
OSError Traceback (most recent call last)
in ()
—-> 1 model.load_weights(‘mask_rcnn_kangaroo_cfg_0005.h5’, by_name=True)
2 frames
/usr/local/lib/python3.6/dist-packages/h5py/_hl/files.py in make_fid(name, mode, userblock_size, fapl, fcpl, swmr)
140 if swmr and swmr_support:
141 flags |= h5f.ACC_SWMR_READ
–> 142 fid = h5f.open(name, flags, fapl=fapl)
143 elif mode == ‘r+’:
144 fid = h5f.open(name, h5f.ACC_RDWR, fapl=fapl)
h5py/_objects.pyx in h5py._objects.with_phil.wrapper()
h5py/_objects.pyx in h5py._objects.with_phil.wrapper()
h5py/h5f.pyx in h5py.h5f.open()
OSError: Unable to open file (unable to open file: name = ‘mask_rcnn_kangaroo_cfg_0005.h5’, errno = 2, error message = ‘No such file or directory’, flags = 0, o_flags = 0)
The error suggests that the path to your data file is incorrect or the file is corrupted in some way?
Thanks for the suggestion. The problem was resolved.
How do we resolve the problem with the multiclass label? If we have to identify numbers and characters given in the same image and want to label all the characters and images, then how do we apply the multiclass label.
Perhaps extract the images of detected numbers (called segmentation), then classify each segmented image.
Hi I had the same “could not find file” problem. May you share how you resolve the problem?
Perhaps some of these suggestions will help:
https://machinelearningmastery.com/faq/single-faq/why-does-the-code-in-the-tutorial-not-work-for-me
Hi there, when I copied the example exactly, I am getting a train mAP of 0.000 and a test mAP of 0.000 also. Clearly something is wrong, I was wondering if anyone knew what the issue could be and how to resolve it. Thank you.
Sorry to hear that, I have some suggestions here that might help:
https://machinelearningmastery.com/faq/single-faq/why-does-the-code-in-the-tutorial-not-work-for-me
Hey, did you find why you are receiving 0.000, i´m having the same problem. Thanks in advance!
Dear Jason, Thanks! I really learned a lot.
I am getting this error for the coding line “from mrcnn.utils import Dataset”.
” from mrcnn.utils import Dataset
ModuleNotFoundError: No module named ‘mrcnn’ “.
However, I checked if the library was installed by typing “show mask-rcnn” and got the results below,
Name: mask-rcnn
Version: 2.1
Summary: Mask R-CNN for object detection and instance segmentation
Home-page: https://github.com/matterport/Mask_RCNN
Author: Matterport
Author-email: waleed.abdulla@gmail.com
License: MIT
Location: c:\users\sakal\appdata\local\continuum\anaconda3\lib\site-packages\mask_rcnn-2.1-py3.7.egg
According the information above, It seems no problem about the library installed. Could you please advise me about this. Thanks!!
Sorry to hear that.
Are you running the code from the command line instead of a notebook or IDE?
I run your example code on Spyder IDE
I recommend not using an IDE and instead running the code from the command line:
https://machinelearningmastery.com/faq/single-faq/how-do-i-run-a-script-from-the-command-line
It works now by running the code from the command line. Thanks!
just curious the reason why it is different from running from an IDE
Happy to hear that.
It is a very common problem, I explain more here:
https://machinelearningmastery.com/faq/single-faq/why-dont-use-or-recommend-notebooks
if you want to run in IDE, you have to import the path where your mrcnn library is install, to do that you can write
import sys
sys.path.insert(0, ‘Directory where your mrcnn library is installed’)
by default library will be installed in the location where you have cloned your mrcnn repository
Great tip.
I recommend running from the command line:
https://machinelearningmastery.com/faq/single-faq/how-do-i-run-a-script-from-the-command-line
By the way, I got the Messages below when I installed by typing “python setup.py install”
WARNING:root:Fail load requirements file, so using default ones.
running install
.
.
.
Processing dependencies for mask-rcnn==2.1
Finished processing dependencies for mask-rcnn==2.1
Do you think the warning above matter? Thanks!!
Probably not.
Thanks for that I’ll have a look through the code and see if I’ve made a mistake somewhere when copying.
Is there a file which has the complete code written so that i can just copy and past the whole lot rather than bits at a time?
Thank you 🙂
Each of my tutorials has the complete file embedding, you can copy-paste it directly.
File “”, line 21
self.add_class(“dataset”, 2, “1”)
^
IndentationError: unindent does not match any outer indentation level
Hi
I am getting this error when I added just two new lines, in the code.
def load_dataset(self, dataset_dir, is_train=True):
# define one class
self.add_class(“dataset”, 1, “N”)
self.add_class(“dataset”, 2, “1”) //Added this new line
# define data locations
images_dir = dataset_dir + ‘/images/’
annotations_dir = dataset_dir + ‘/annots/’
for i in range(len(boxes)):
box = boxes[i]
row_s, row_e = box[1], box[3]
col_s, col_e = box[0], box[2]
masks[row_s:row_e, col_s:col_e, i] = 1
class_ids.append(self.class_names.index(‘N’))
class_ids.append(self.class_names.index(‘1′)) //Added this new line.
return masks, asarray(class_ids, dtype=’int32’)
Sorry to hear that, it looks like you did not copy the code with white space.
I show how to copy the code correctly here:
https://machinelearningmastery.com/faq/single-faq/how-do-i-copy-code-from-a-tutorial
IndexError Traceback (most recent call last)
in
2 plt.imshow(image)
3 # plot mask
—-> 4 plt.imshow(mask[:, :, 0], cmap=’gray’, alpha=0.1)
5 plt.show()
IndexError: index 0 is out of bounds for axis 2 with size 0
I am getting this error after i added that extre two lines.
Sorry to hear that, I have some suggestions here:
https://machinelearningmastery.com/faq/single-faq/why-does-the-code-in-the-tutorial-not-work-for-me
hi Sir
I am getting this error. Please help
if is_train and int(image_id) >= 150:
ValueError: invalid literal for int() with base 10: ‘Thumb’
Sorry to hear that, I have some suggestions here:
https://machinelearningmastery.com/faq/single-faq/why-does-the-code-in-the-tutorial-not-work-for-me
I am facing the same problem. Did you manage to resolve this issue?
Perhaps you have a thumb nail file in the folder?
If so, perhaps try deleting it?
did you resovle this problem
ValueError: invalid literal for int() with base 10: ‘Thumb.db’
Hi Sir,
Could you please give some insight where do I need to make changes for the multi-class label in the code so that I could identify the different characters and numbers in a single image?
Please give some insight with examples so that it is easier to understand.
Thanks so much for helping.
This is a common question that I answer here:
https://machinelearningmastery.com/faq/single-faq/can-you-change-the-code-in-the-tutorial-to-___
Thanks for your tutorial.
But i want to ask is there any model can deal with the objects which have similar color on the back ground.
Perhaps. You may have to do some testing, or perhaps use transfer learning to tune an existing model.
Thank you very much for this great and clear tutorial!
If I may ask:
Is there a way to evaluate the model while training? For example at the end of each epoch?
Thanks a million,
Tal
Yes, you can use a hold out validation dataset:
https://machinelearningmastery.com/difference-test-validation-datasets/
Thank you for the quick response!
No problem.
Hi Jason,
I have a problem. My dataset contains only 872 training images and 15 classes. Meanwhile, my images are rather bigger than kangroo or pascal voc files. They are around 1500 pixel wide and 1000 pixel tall. I have changed the python codes in order to apply multi-class classification. My equipment is 1050 ti on a 24 GB memory system. I have run your code for kangroo data, it was ok. But whenever I have done it for my custom data, the memory requirement is getting higher than 20 GB and makes the ubuntu run on slow swap memory yielding a dead situation.
What is the problem? is it normal? What about the ram consumption in your case. I did not check it for kangroo data. But I remember that, on 5th epoch it activated the swap memory.
What could be a walk-around about this problem?
Perhaps you can reduce the size of the image prior to modeling?
Well, for a fair scientfic study, i would not reduce it but, the only way I found is to reduce IMAGE_MIN_DIM =400 and IMAGE_MAX_DIM= 512. However, it is interesting that, for each epoch, the total memory consumption is getting higher.
Moreover, I need to say that, the training procedure always starts with giving warnings such as “UserWarning: Converting sparse IndexedSlices to a dense Tensor of unknown shape. This may consume a large amount of memory.”
This is the problem actually. Is it possible to solve this? I have googled it but the solutions did not come so clear to me (or it sound so technical).
Currently, I can train the model for only 4 epochs. More needs more memory. This is for me, a certain bug since, the advancing epochs should not increase the memory consumption.
Btw, I really thank for your reply.
As I told, this memory issue really made me sad. Is this normal?
Perhaps you can use progressive loading and only load/yield one batch of images into memory at a time.
This can be achieved with the ImageDataGenerator:
https://machinelearningmastery.com/how-to-load-large-datasets-from-directories-for-deep-learning-with-keras/
Dear Jason;
Thanks so much for your advice. Here, I would like to share my experience with you and others. The only solution I have found so far is that setting
the use_multiprocessing=False in model.py and reducing the number of workers to 1. This has helped me. Btw, I am now using 384×384 images by reducing the IMAGE_MAX_DIM = 384 and IMAGE_MIN_DIM =384 . Now I can train it with 20 epochs. This has really helped me.
I hope this information may help others whom lived the same problems.
Cheers
Nice! Thanks for sharing.
Hi Selman, How you annotated that many images, and how much time it took? Can someone help me to annotate automatically
Dear Jason
Good morning!
We have used this model to detect bounding boxes and masks for id cards.
We provided annotations in .csv files as quadrilaterals and modified ‘load_mask’ function accordingly. We are looking for quadrilateral shaped masks.
We are able to detect bounding boxes correctly. We are not able to detect masks correctly. Although incorrect masks do show up.
We have used the exact code. Learning rate is 0.00001. We have used 800 images and 65 epochs for training. A higher learning rate gives NaN loss. We have checked the entire dataset for any discrepancy.
Can you guide where we are going wrong ? Can we use this exact code with exactly the same config with four vertices to generate masks ?
Warm regards,
N. Arvind
Well done!
Perhaps look into data preparation?
Great tutorial! I’ve managed to successfully train a model and now I want to use the model in Android and iOS.
I’ve learned that his requires me to convert my model.h5 file to model.pb and then to a Tensorflow Lite format.
I expected this to be trivial, but alas. The MaskRCNN issue list is riddled with people having problems with this.
Did you ever try this?
If not, it would be a great continuation to this tutorial.
Sorry, I have not tried this.
Hi Jason,
That was nice Tutorial, i have some errors on trying with multiclass.
IndexError: boolean index did not match indexed array along dimension 0; dimension is 2 but corresponding boolean dimension is 1
I have two class ( full glass and empty glass) and have made NUM_CLASSES = 1 + 2 in config along with self.add_class(“dataset”, 1, “Full Glass”) and self.add_class(“dataset”, 2, “Not Full Glass”) also made changes class_ids.append(self.class_names.index(‘Full’))
class_ids.append(self.class_names.index(‘Not Full’)).
Please help me out, i am unable to resolve the error since many attempts.
It’s hard to debug this for you off the cuff, sorry.
Perhaps double check you made all of the required changes?
I am facing the same problem. Did you manage to resolve this issue?
Try removing “Thumb” files from your folder.
Hi
Having same error!! Could you find some solutions regarding this.
I hope its not a repeated question. I wonder if you have tutorial on training a model for custom multi-object detection ? basically, an image taken where we would like to recognize multiple images in an image. There is no pre-trained model on these objects, and we have labeled a few set of images. (again each image, is labeled with multiple rectangular which are covering each object).
Thank you again for all these nice tutorials.
I believe you adapt the above tutorial for this purpose, the model supports multiple objects in one image, and they can be different types.
Dear Dr Jason,
Good day sir, I am a Machine Learning Engineer. I am currently working on logo detection system. I have tried MobileNet SSD, Faster RCNN and their seemed to be a higher number of false positives when I try the model out. It seems its not too good for logo that is very small in size. I have also created Haar and LBP cascade model and it seemed to perform better than the deep learning model, false positive wise. My question: is there any other technique that can do very well with small logos with different contrast, orientations? Thank you.
I’m not sure off hand, sorry. Perhaps check the literature?
I recall some interesting work on test-time augmentation that might be very helpful to you.
Dear Jason!
You’ve made a great work again. Thank you for this post!
What if I want to train an add not jus one object to my model? For example, I want to add 100 new class. If I have 100 class, and every class has 500 images, how can I train the model? Impossible to load 50.000 image into the memory! It is possible to make it with loop, and add a new class to the modell with every iteration?
Do you have a post about this?
Thanx
Yes, you can use progressive loading with a data generator, see this post:
https://machinelearningmastery.com/how-to-load-large-datasets-from-directories-for-deep-learning-with-keras/
Hi Jason,
The notebook is very helpful and full of knowledge but I am having problems while training the model on a different dataset(fruits -apple, banana, orange).
After loading the images,annots and masks when I try to train the model i am getting the following error:
RemoteTraceback Traceback (most recent call last)
RemoteTraceback:
“””
Traceback (most recent call last):
File “/usr/lib/python3.6/multiprocessing/pool.py”, line 119, in worker
result = (True, func(*args, **kwds))
File “/usr/local/lib/python3.6/dist-packages/keras/utils/data_utils.py”, line 641, in next_sample
return six.next(_SHARED_SEQUENCES[uid])
File “/content/Mask_RCNN/mrcnn/model.py”, line 1709, in data_generator
use_mini_mask=config.USE_MINI_MASK)
File “/content/Mask_RCNN/mrcnn/model.py”, line 1265, in load_image_gt
class_ids = class_ids[_idx]
IndexError: boolean index did not match indexed array along dimension 0; dimension is 6 but corresponding boolean dimension is 2
“””
The above exception was the direct cause of the following exception:
IndexError Traceback (most recent call last)
in ()
3 learning_rate = config.LEARNING_RATE,
4 epochs = 10,
—-> 5 layers = ‘all’ )
7 frames
/usr/lib/python3.6/multiprocessing/pool.py in get(self, timeout)
642 return self._value
643 else:
–> 644 raise self._value
645
646 def _set(self, i, obj):
IndexError: boolean index did not match indexed array along dimension 0; dimension is 6 but corresponding boolean dimension is 2
Please provide a hint about the same.
Also, I am using multiclass for 3 fruits.
Perhaps double check that you are loading the data correctly or as you expect?
Hey, How did you solve this issue of IndexError?
I do train model on my won dataset but the prediction of model is not getting right. can you pls help me ?
Actually i have train for kangaroo class name but in prediction i am getting person class tag
Perhaps start with the example in the tutorial and adapt it for your specific dataset?
Thank You i solved it ….But i have total of 125 images of id card and aim is to get id card from images but i am not getting correct output after training of model object detection is results is not good at all …..i have done 50 epochs at 25 steps…Can you pls help me?
I have some general suggestions for diagnosing and improving deep learning model performance here that may help:
https://machinelearningmastery.com/start-here/#better
Hello. I found some issues regarding accuracy of model. I dont know what issue is there which effect accuracy of model. Same cnfiguration as described above is used in my model but accuracy is no good. The ROI getting from prediction of model is not correct. Can some one Please help me out
Is this on your own dataset or the dataset used in the above tutorial?
I have some general suggestions here that might help to diagnose and address performance issues:
https://machinelearningmastery.com/start-here/#better
Hello. I Have this error. I dont know how to solve it:
~/.ve/main/lib/python3.7/site-packages/mask_rcnn-2.1-py3.7.egg/mrcnn/model.py in compile(self, learning_rate, momentum)
2197 tf.reduce_mean(layer.output, keepdims=True)
2198 * self.config.LOSS_WEIGHTS.get(name, 1.))
-> 2199 self.keras_model.metrics_tensors.append(loss)
2200
2201 def set_trainable(self, layer_regex, keras_model=None, indent=0, verbose=1):
AttributeError: ‘Model’ object has no attribute ‘metrics_tensors’
Sorry, I have not seen that error before.
Are you able to confirm that your Keras/TensorFlow/RCNN libraries are up to date?
Are you able to try Python 3.6 instead, I don’t think Python 3.7 is supported?
You can add the line
model.keras_model.metrics_tensors = []
right after the model definition to circumvent the error.
Thanks for sharing.
exactly where should I change in the model.py?
See https://github.com/matterport/Mask_RCNN/issues/1754
Why did you share this Mikael?
Hi Jason Brownlee,
Great tutorial for object detection. This is the first time, I visited this site and I loved the way to document your post. I have walk-through each line of code and successfully implemented kangaroo detection. You have developed well documented code guide for us. Based on your tutorial, I have managed to run this model on Weed detection problem. And yes, I am able detect weed with these. Thanks a lot for your post.
———————————————————————
By the way, I have one question:
–> How to save full keras model (architecture + weights)? I want to convert it to TensorRT for that I need full model.
———————————————————————–
I have tried:
1) self.keras_model.save(“model_name.h5”)
2) save weights only = False
but It gives error:
[TypeError: can’t pickle _thread.RLock objects]
————————————————————————-
If possible please help me on this.
Thanks,
Kevin
Well done Kevin!
model.save() should be sufficient. Perhaps there is an issue with your development environment?
Perhaps try AWS:
https://machinelearningmastery.com/develop-evaluate-large-deep-learning-models-keras-amazon-web-services/
How can I create the annotated xml file? The VGG tool only creates a csv file or json file. Could you please assist in the way of creating the xml file or the conversion from csv/json to xml?
Thanks
I believe there are a ton of image annotation tools available that can create the annotations with/for you.
Hi Reem,
Check out this annotation tool, this will create .xml file for you. As used in this model. Link: [https://github.com/tzutalin/labelImg]
Jason,
Thanks for the very nice tutorial. I was able to train the model and get
mask_rcnn_kangaroo_cfg_0005.h5created. However, when I ran the model evaluation code, I got the following error. Could you help me resolve this?AssertionError: Create model in inference mode, and it is complaining on lineyhat=model.detect(sample, verbose=0)saying thatlen(images) must be equal to BATCH_SIZE.Thanks.
Akash
Sorry to hear that, I have some suggestions here:
https://machinelearningmastery.com/faq/single-faq/why-does-the-code-in-the-tutorial-not-work-for-me
Add BATCH_SIZE = 1 to PredictionConfig as below:
# define the prediction configuration
class PredictionConfig(Config):
# define the name of the configuration
NAME = “id_card_cfg”
# number of classes (background + kangaroo)
NUM_CLASSES = 1 + 1
# simplify GPU config
GPU_COUNT = 1
IMAGES_PER_GPU = 1
BATCH_SIZE = 1
I have my own data set ….Thank you for general suggestions this is helpful for me but i don’t understand that why accuracy of model is not good even using same structure and configuration of model as suggested above.
And I have also tried on different data set for all issues is same by that I conclude that there is some minor issue in the script which is not detected by me so please help me out ….
If u want my source code i will that also
ThankYou
What problem are you having exactly?
With the accuracy of model
You can discover general advice on diagnosing issues and improving performance with neural nets here:
https://machinelearningmastery.com/start-here/#better
Hello Jason,
While trying to train the model I got the following message.
File “C:\Users\userid\AppData\Local\Continuum\anaconda3\lib\site-packages\tensorflow_core\python\framework\ops.py”, line 523, in _disallow_in_graph_mode
” this function with @tf.function.”.format(task))
OperatorNotAllowedInGraphError: using a
tf.Tensoras a Pythonboolis not allowed in Graph execution. Use Eager execution or decorate this function with @tf.function.Could you please suggest on this
Sorry to hear that, are you able to confirm that you are using Python 3.6, TensorFlow 1.14, and Keras 2.3 or better?
Hello Jason,
Thank you for your reply.
I am using python 3.7, TensorFlow 2.0.0 and keras 2.3.1
Regards,
Dinesh
This example will not work with TF 2.0. You must use TF 1.14. I believe I mention this right at the top of the page:
Note: This tutorial requires TensorFlow version 1.14 or higher. It currently does not work with TensorFlow 2 because some third-party libraries have not been updated at the time of writing.
Hello Jason,
Thanks for your reply,
I will use TF 1.14.
Regards,
Dinesh
hello jason,
i just wanted to know how much time it takes to make a prediction on a new image.
so basically how long does it take to run
yhat = model.detect(sample, verbose=0)[0]
thank you for your time.
Fractions of a second, although depends on hardware of course.
well i need to know how many times it can be run in 1 second.if run on your computer can you give me an estimate of how many times it would run in 1 second. (5,10,20,30,40, 50, 60, 60+)
thanks,
mark
Perhaps you can calculate those estimates yourself on your own hardware with your data – that way they will be meaningful/useful to your project?
Pretty cool tutorial, definitely will help us.
Brother is it possible to determine the size or dimension of kangaroo?
Thanks.
In real life from a photo? Not using these models, sorry.
yep! from a photo. Assuming i took a pix of a kangaroo and test it on your model . definitely your model will recognize it as kangaroo. what i’m opt is, the dimension of kangaroo, i’m sure you have technique on how to determine its size using the model that you had created.
No idea off the cuff, sorry.
It does not sound tractable as each photo has a different scale.
Hi.
I found out, that we can’t assign image id randomly (not from 0). Perhaps class Dataset creates list, not a numpy array. I checked myself and realized that I can’t access image with id, for example, 317 while i have only 100 images.
Thus, I don’t know why this field “image id” exists, when it numbered anyway from 0, increasing by 1.
Thanks for sharing.
Thanks for your great article. It’s the best tutorial about object detection. It helped a lot.
Thanks!
Good afternoon, I have a problema with the code. When I start the training the procces is stack in the first Epoch. What can i do to ?
WARNING:tensorflow:From C:\Users\Juan\AppData\Local\Programs\Python\Python36\lib\site-packages\keras\callbacks.py:708: The name tf.summary.FileWriter is deprecated. Please use tf.compat.v1.summary.FileWriter instead.
Epoch 1/5
in this momento I have the problem
TensorFlow 2.0 is not support for this tutorial at the moment, try TensorFlow 1.14 instead.
Sorry to hear that, I have some suggestions here:
https://machinelearningmastery.com/faq/single-faq/why-does-the-code-in-the-tutorial-not-work-for-me
In this momment my tensorflow is 1.14.0. there´s no solution ?
Try down-grading tip 1.14? Or perhaps try a different tutorial/library?
Hi Jason,
it was a very great article and thoroughly explained code.
I have a question for you regarding this tutorial. I am trying out this tutorial on my laptop and I have limited processing power.When I tried with the full data set of kangaroos the first epoch took around 8 hrs approx.I stopped it in between then I tried to reduce the data set to about 10 images and started training process but it still showed 7 hours as the ETA and each epoch had 131 steps.
As per my thinking if I reduce the number of images in the data set the training time should reduce and instead of 131 steps it should have 10 steps in each epoch as the data set has only 10 images.I am currently willing to have a lower accuracy.
Can you let me know if my understanding in wrong?
Less images might impact model performance generally.
Perhaps try running on EC2?
Hi Jason,
I tried using less no. of images but i cannot complete the training process as i am getting the following message
2019-11-01 18:37:31.547297: W T:\src\github\tensorflow\tensorflow\core\framework\allocator.cc:108] Allocation of 603979776 exceeds 10% of system memory.
can you tell me why do i get this message?
Try even fewer images?
Try EC2 with more RAM?
Try a smaller model?
Try progressive loading?
I tried with 3 images also but got the same issue.can you explain or give links to the the last two options you mentioned.
Hi Jason, I plan on following this tutorial for skin segmentation on compaq dataset. The labels are in PBM(Portable Bitmap) format. Is it fine or do I need to do somethings differently ?
Regards
I don’t think it matters as long as the images can be loaded to numpy arrays.
Hi Jason,
Thanks for this great article!
One question:
I already have my model trained and my weights (mask_rcnn_kangaroo_cfg_0019.h5).
How can I valid this with new images?
I mean not to call the test or train datasets
plot_actual_vs_predicted(‘MY PHOTO’, model, cfg)
Load the model and use it to make predictions on a test dataset and compare predictions with the expected values.
The section “How to Evaluate a Mask R-CNN Model” will provide a useful guide.
Thanks Jason,
But why would I need de annots if I want to validate the model with a new image.
To confirm the predictions match the expectations and calculate an evaluation score.
Hi Jason,
thanks a lot for this great tutorial! Could you please give me a quick hint how one can extract the total number of detected objects in each image?
Thanks a lot, osteocyte
It will be the number of bounding boxes returned from a call to predict.
Hi, I already have my trained model (generated with this tutorial). Is it posible to use this model for video live detection?
Do you have a script example or something that you could help me out with.?
Best regards!
Yes, perhaps apply to each frame of the video, or every 20th frame?
I don’t have an example at this stage.
Hello
first thanks for this amazing tutorial!
Second i have an question how can we modifie you’re code to have mask and box
Thank you
You can define a mask and a box and then fit the model on it. In my example I treat them as the same.
self.add_class(“dataset”, 1, “kangaroo”)
self.add_class(“dataset”, 2, “tiger”)
self.add_class(“dataset”, 3, “dog”)
class_ids.append(self.class_names.index(‘kangaroo’))
class_ids.append(self.class_names.index(‘tiger’))
class_ids.append(self.class_names.index(‘dog’))
for multi class classification is this changes are enough anything more needded?
Looks good to me, off the cuff at least.
Please tell how to do for multi class classification?
Take a look on your xml file and then and then modify the parsing.Goal is: to get the right boundig boxes to the right class name. Then create your mask with the right boundig box classname corelation
Great tip!
Hello
first thanks for this amazing tutorial!
Second i have an question how many epochs and time steps are required for 2 lakh dataset
Perhaps test different configurations and see what works best for your specific dataset?
boolean index did not match indexed array along dimension 0; dimension is 4 but corresponding boolean dimension is 2
Sorry to hear that, I have some suggestions here:
https://machinelearningmastery.com/faq/single-faq/why-does-the-code-in-the-tutorial-not-work-for-me
i can understand your point but help me .I am enable to figure out.
based on colour object is detecting.How can i avoid this type of situation
Sorry, I don’t understand your question, can you elaborate please?
Thanks for these tutorials, I’m making good progress on my projects.
Can I please ask: Is it solely tagged content that contributes to the training/prediction, or is it the whole image?
If I create a dataset of 100 photos (as an example), and tag the easiest elements (say people) in these photos, will untagged people in these photos work to “untrain” the model? Would I be better off creating a smaller dataset that is more thoroughly tagged, or do untagged elements not matter? Thanks.
It is the localized object within the image. Both.
Good question. Test both and compare.
Hello Jason,
Thanks for the interesting technical blog.
I am looking for “How to train SSD based object detection on the custom dataset?”. Could you please provide a pointer?
Thanking you!
I don’t have an example, I hope to have one in the future.
Thank you!
You’re welcome.
i have done object detection to detect gloves.
the gloves are white in colour.
but if the person where white colour shirt then also it is detecting as gloves
Well done!
Perhaps expand the training dataset or try data augmentation during training?
i have augmented the images then i need to do annotations separately? or is there any other way?
You can use augmentation that is “annotation-aware”, e.g. apply augmentation in a consistent way to images and annotations.
Big labs might have code for this, e.g. facebook. Otherwise, custom code will be required.
how to retrain the already trained weights with more images?
That is exactly what we do in this tutorial.
i am asking already trained kangaroo weight file for more kangaroo images.
Replacing coco file with kangaroo .h5 file?
Yes, follow this tutorial and adapt the coco weights with your own dataset.
Hi Jason,
Thanks for a great tutorial. My trained model gives many bbox predictions of different sizes for the same kangaroo, and also for random background objects. This was after training for 2 epochs. After training for further epochs, the losses all flatlined to NaN or 0. Just wondering if you’ve ever experienced this.
Thanks again,
Dave
Not really.
Perhaps try fitting the model a few times and compare results?
This is a very great tutorial. For the training, I am stuck with this line model = MaskRCNN(mode=’training’, model_dir=’./’, config = config)
The error is: ‘NoneType’ object has no attribute ‘lower’. How can I fix this?
Sorry to hear that, I have some suggestions here:
https://machinelearningmastery.com/faq/single-faq/why-does-the-code-in-the-tutorial-not-work-for-me
I am trying to predict hand gloves and spects using mask rcnn. I am facing the following issues:
1.the people who are not wearing gloves also it is taking as glove.i think it is taking hand structure
2.It is complety getting baised on colur.where ever it find’s white color it is predicting as gloves.
Please help me. I have 1000 images as by training .I have done for nearly 50 epochs
Perhaps include training examples with hands and gloves in the same image to help the model tell the difference?
Hello there, I am trying to execute this code using my own GPU, however, i have this error
ResourceExhaustedError: 2 root error(s) found.
(0) Resource exhausted: OOM when allocating tensor with shape[2,512,128,128] and type float on /job:localhost/replica:0/task:0/device:GPU:0 by allocator GPU_0_bfc
[[{{node rpn_model_11/rpn_class_raw/convolution-0-TransposeNHWCToNCHW-LayoutOptimizer}}]]
Hint: If you want to see a list of allocated tensors when OOM happens, add report_tensor_allocations_upon_oom to RunOptions for current allocation info.
[[Mean_23/_13623]]
Hint: If you want to see a list of allocated tensors when OOM happens, add report_tensor_allocations_upon_oom to RunOptions for current allocation info.
(1) Resource exhausted: OOM when allocating tensor with shape[2,512,128,128] and type float on /job:localhost/replica:0/task:0/device:GPU:0 by allocator GPU_0_bfc
[[{{node rpn_model_11/rpn_class_raw/convolution-0-TransposeNHWCToNCHW-LayoutOptimizer}}]]
Hint: If you want to see a list of allocated tensors when OOM happens, add report_tensor_allocations_upon_oom to RunOptions for current allocation info.
0 successful operations.
0 derived errors ignored.
Sorry, I don’t know about this error, perhaps try posting to stckoverflow?
Hey Mursyideen, how did you solve this issue ? 🙂 I am having the same problem
Hi Jason, I used your tutorial to prepare a Pistol detector. The data is properly loaded and when I try to train the epochs are frozen. It sometimes freezes on images randomly. Here is output
Epoch 1/5
25/150 [====>…………………….] – ETA: 3:13 – loss: 3.2542 – rpn_class_loss: 0.0182 – rpn_bbox_loss: 0.6457 – mrcnn_class_loss: 0.5098 – mrcnn_bbox_loss: 0.8810 – mrcnn_mask_loss: 1.1995
It stops on different images. I checked all images and annexes are oke. I followed the suggestions here : https://github.com/matterport/Mask_RCNN/issues/287 (Made modifications in the model.py under mrcnn )
My tensorflow is 1.15
and keras : 2.2.4
Any suggestions? I am working on different approachs for pistol detection and mrcnn is one of them. It is critical for my thesis. So I will appreciate any suggestions. Maybe a working combination of keras – tensorflow with mrcnn.
I wonder if you are running out of memory or having a hardware fault?
Perhaps try running on an AWS EC2 instance?
Jason Hi,
I have a set of grayscale images of shape(192,384,3) with none/one/multiple masks in each of size (5,5).
I’m able to train my model, but unable to receive any result – the tuple from the detect() appears to be empty. In rare cases there is a prediction, which is not good enough.
Please help, thanks!
Perhaps the model is not detecting anything on the test images?
A different question:
if the masks = zeros([h, w, len(boxes)], dtype=’uint8′),
in my case each mask is (h = 5,w = 5, i) and the bounding box, for example, is (5, 5, 10, 10).
How masks[row_s:row_e, col_s:col_e, i] = 1, where the indexes are not in the original mask range is (5,5), are affected by the bounding box indexes?
Sorry, I don’t follow your question, are you able to elaborate?
Hello Jason,
I am running this code on my mac and I get this error the running epoch 1 and the program gets stuck here.
Epoch 1/5
/Library/Frameworks/Python.framework/Versions/3.6/lib/python3.6/site-packages/keras/utils/data_utils.py:709: UserWarning: An input could not be retrieved. It could be because a worker has died.We do not have any information on the lost sample.
Any idea about this?
Also, should this code be run only on GPU machines?
I have not seen that before.
No, the code works fine on the GPU or CPU.
Perhaps try re-installing your development environment?
Perhaps try running either on the cpu or gpu?
Perhaps try posting/searching on stackoverflow?
Perhaps try running other examples and see if they work on your workstation?
I’ve seen this error before and I fixed it by lowering my tensorflow version from 2.1 to 1.12 and by installing the appropriate keras-gpu libraries for that.
Yes, as stated at the top, the tutorial does not work with tensorflow 2 because the maskrcnn lib has not been updated.
Hi Jason, what an amazing post..well done on your hard work!
For my application, in addition to the predicted bounding box+mask+class, I also need to extract the last fully-connected layer of the mask_rcnn model (that is, the feature vector representation of the input image).
In keras, we can save a model’s json and weight files. And then load them again. And extract the output of any intermediate layer as:
1. model.summary()
2. feature_extractor = tf.keras.models.Model(inputs=model.input, outputs=model.get_layer(‘avg_pool’).output)
3. features = feature_extractor.predict(my_image)
In mask_rcnn, we load the pre-trained model mask_rcnn_coco.h5.. Do you know how we can access and extract the last fully-connected weights?
My research is stuck because I am unable to complete this step. I shall be grateful if you can guide me (either via email, or on this forum).
Regards-Shankar
Thanks!
Great question.
Hmmm, not off hand, sorry. Some experimentation will be required.
Hey @Jason thank you for a fantastic tutorial. Please keep it up :)!
Two questions if you may,
– How can we reduce the batch_size ?
– How can we reduce the image_dimensions given to the model?
Both of these are attempts to fix the “..Resource exhausted: OOM when allocating tensor with shape..” error
Thanks.
Good question about the batch size, I’m not sure off the cuff. Perhaps check the code for the train() function?
I believe you have control over the images sizes – so you can define your own fixed size.
Thanks Jason for your reply, Here is how I fixed it by modifying the KangarooConfig class
class KangarooConfig(Config):
# define the name of the configuration
NAME = “kangaroo_cfg”
# number of classes (background + kangaroo)
NUM_CLASSES = 1 + 1
STEPS_PER_EPOCH = 131
GPU_COUNT = 1
IMAGES_PER_GPU = 1
IMAGE_MIN_DIM = 400
IMAGE_MAX_DIM = 512
Well done, thanks for sharing!
what this parameters means?
GPU_COUNT = 1
IMAGES_PER_GPU = 1
they are the nunber of GPUs that i have and the batch size ? I want to reduce the batch size to.
Thanks for you help.
Hi Maged,
You can also change the batch size before the train starts like this.
config.BATCH_SIZE=1
Thanks
Hey Jason, When I plot the graph “Actual” vs “Predicted”, the “actual” photos all appear so dark. Is there a way to tweak it so it appears similar to the “Predicted Photo” with red boxes on a transparent photo. Thank you,
Yes, I intentionally darken the photo to highlight the detection.
You can remove the code to do that. Just plot the photo and use the box to drop a colored rectangle.
hi trying to train on my dataset , however i get this error when trying to load the data
help please
FileNotFoundError Traceback (most recent call last)
in ()
1 image_id = 1
—-> 2 image = train_set.load_image(image_id)
3 print(image.shape)
4 # load image mask
5 mask, class_ids = train_set.load_mask(image_id)
6 frames
/usr/local/lib/python3.6/dist-packages/imageio/core/request.py in _parse_uri(self, uri)
271 # Reading: check that the file exists (but is allowed a dir)
272 if not os.path.exists(fn):
–> 273 raise FileNotFoundError(“No such file: ‘%s'” % fn)
274 else:
275 # Writing: check that the directory to write to does exist
FileNotFoundError: No such file: ‘/content/Mask_RCNN/Amine/imagessacdf21.JPG’
Looks like the image you are trying to load does not exist on your workstation.
have you dealt with the problem? got the same issue – in utils.py, the load_mask doesn not add ‘/’ to the path – which results the /images to be concatenated to the image’s name.
Hi Jason, please confirm for mask RCNN model do we need to mask new images also (i.e need to create .xml file) ? If no, then please suggest changes in function ‘def plot_actual_vs_predicted’ for me to get better output the way we got after using ‘display_instances(image, bbox, mask, class_ids, dataset.class_names)’ under evaluate_model function.
You, you can just work with object boxes – and use them as masks, and prepare the data any way you wish.
Hi Jason, when I am creating the model, I keep getting this error
/anaconda3/lib/python3.7/site-packages/mask_rcnn-2.1-py3.7.egg/mrcnn/model.py in detection_targets_graph(proposals, gt_class_ids, gt_boxes, gt_masks, config)
551 positive_count = int(config.TRAIN_ROIS_PER_IMAGE *
552 config.ROI_POSITIVE_RATIO)
–> 553 positive_indices = tf.random_shuffle(positive_indices)[:positive_count]
554 positive_count = tf.shape(positive_indices)[0]
555 # Negative ROIs. Add enough to maintain positive:negative ratio.
AttributeError: module ‘tensorflow’ has no attribute ‘random_shuffle’
I am unsure of how to debug this. I tried changing random_shuffle to random.shuffle in model.py but it does not work. Or have I downloaded the wrong MaskRCNN? What is the link to download the MaskRCNN? Thank you for your help.
It looks like you are using tensorflow version 2, and the maskrcnn model requires tensorflow 1.14 or 1.15.
This is mentioned right at the top of the tutorial.
Hello Jason, your tutorial is really helpful. However, I’ve seen some errors while trying it.
When I am evaluating the model, I received this error and I am unsure of how to debug this.
ValueError: shapes (1,1048576) and (1050624,1) not aligned: 1048576 (dim 1) != 1050624 (dim 0)
Thank you for your help.
I’m sorry to hear that, I have some suggestions here:
https://machinelearningmastery.com/faq/single-faq/why-does-the-code-in-the-tutorial-not-work-for-me
Hi Jason,
I really like your detailed tutorial. Excellent work, thanks.
I am able to run the example without a problem. However, when working with my own images, I got this kind of error when calculating the mAP.
“ValueError: shapes (7,1048576) and (1104896,1) not aligned: 1048576 (dim 1) != 1104896 (dim 0)”.
I was able to train the model and make predictions with other images. But I just cannot evaluate the model’s performance in terms of mAP via compute_ap().
I checked this issue online for some days and didn’t find any solutions. Are you able to show any guidance?
Thanks very much for your help.
Perhaps confirm the data was loaded as you expect and that the inputs to the metric are as required by the API?
Hi Jason,
Thanks for your comments. Yes, some of the input data were not working well for some reason (I will double-check it). I really appreciated your help!
I have one more question about this model: in addition to calculating the mAP, precision, and recall, how to plot accuracy and loss during training to monitor overfit or determine the number of epochs to stop training?
Thank you in advance.
Well done!
Good question, I don’t have an example of plotting the history of this specific model. Perhaps investigate the use of tensorboard?
Hi Twayne,
I received a similar message when trying it with my dataset. Have you figured it out? Thanks,
I have the same problem. Have you managed to solve it?
I have a data set of liver CT which is grayscale.
Is it possible for me to apply the same model (also transfer learning) for grayscale images . Since the pretained models are for RGB images, I am curious about whether I can convert them for my application purpose?
Perhaps try it and compare to fitting a new model from scratch?
Thank you very much for such an informative article.
I have created a colab notebook which walks through this article and here it is.
Hi Jason, thanks for the tutorial. Following your instruction I fitted a custom dataset of 200 photos with one label. I got a Train mAP of 0.986 and a Test mAP of 1.000. The detection results are great and even see things I would miss if I do labeling. My question is that: is 1.000 too good to be true?
Wow, well done.
Perhaps think of ways that you could have a misleading result and test them?
e.g. more/less data? Different measures? Inspect predictions? etc.
hi Mr Brownlee
thanks for this awsome tutorial however when i tried to run it on my datatset (13 images jus for fun) on collab
i get this message:
ValueError Traceback (most recent call last)
in ()
79 # train set
80 train_set = KangarooDataset()
—> 81 train_set.load_dataset(‘kangaroo’, is_train=True)
82 train_set.prepare()
83 print(‘Train: %d’ % len(train_set.image_ids))
in load_dataset(self, dataset_dir, is_train)
22 continue
23 # skip all images after 150 if we are building the train set
—> 24 if is_train and int(image_id) >= 10:
25 continue
26 # skip all images before 150 if we are building the test/val set
ValueError: invalid literal for int() with base 10: ‘sacdf21’
gratefuly yours
Sorry to hear that. Perhaps start with the working tutorial and slowly adapt it to your needs?
absolutely , the tutorial just did awsome but the crafting part keeps bugging over and over again is there any other way to skip this bug, it’s just the splitting part train/test datasets that does not work, I m running on collab if helps?
please I m stuck for hours now
very grateful
Yes, don’t split into train and test sets or split using your own method that does not use file names.
to code does not work without splitting, it considers all data as a unique block, we lose the val dataset?
Hello, I am a student from Brazil and I am having a problem executing the code. on the line:
model.train (train_set, test_set, learning_rate = config.LEARNING_RATE, epochs = 5, layers = ‘heads’)
When running the program I get the following error:
raise StopIteration ()
StopIteration
What could be the cause of this ??
Sorry, I have not seen this error before. I have some suggestions here that might help:
https://machinelearningmastery.com/faq/single-faq/why-does-the-code-in-the-tutorial-not-work-for-me
I checked the versions of python, tensorflow and even numpy and they are all correct. The output when executing the code is as follows:
C:\Users\João Vitor\trabalho>python object_detection.py
Using TensorFlow backend.
Train: 131
Test: 32
Configurations:
BACKBONE resnet101
BACKBONE_STRIDES [4, 8, 16, 32, 64]
BATCH_SIZE 2
BBOX_STD_DEV [0.1 0.1 0.2 0.2]
COMPUTE_BACKBONE_SHAPE None
DETECTION_MAX_INSTANCES 100
DETECTION_MIN_CONFIDENCE 0.7
DETECTION_NMS_THRESHOLD 0.3
FPN_CLASSIF_FC_LAYERS_SIZE 1024
GPU_COUNT 1
GRADIENT_CLIP_NORM 5.0
IMAGES_PER_GPU 2
IMAGE_CHANNEL_COUNT 3
IMAGE_MAX_DIM 1024
IMAGE_META_SIZE 14
IMAGE_MIN_DIM 800
IMAGE_MIN_SCALE 0
IMAGE_RESIZE_MODE square
IMAGE_SHAPE [1024 1024 3]
LEARNING_MOMENTUM 0.9
LEARNING_RATE 0.001
LOSS_WEIGHTS {‘rpn_class_loss’: 1.0, ‘rpn_bbox_loss’: 1.0, ‘mrcnn_class_loss’: 1.0, ‘mrcnn_bbox_loss’: 1.0, ‘mrcnn_mask_loss’: 1.0}
MASK_POOL_SIZE 14
MASK_SHAPE [28, 28]
MAX_GT_INSTANCES 100
MEAN_PIXEL [123.7 116.8 103.9]
MINI_MASK_SHAPE (56, 56)
NAME kangaroo_cfg
NUM_CLASSES 2
POOL_SIZE 7
POST_NMS_ROIS_INFERENCE 1000
POST_NMS_ROIS_TRAINING 2000
PRE_NMS_LIMIT 6000
ROI_POSITIVE_RATIO 0.33
RPN_ANCHOR_RATIOS [0.5, 1, 2]
RPN_ANCHOR_SCALES (32, 64, 128, 256, 512)
RPN_ANCHOR_STRIDE 1
RPN_BBOX_STD_DEV [0.1 0.1 0.2 0.2]
RPN_NMS_THRESHOLD 0.7
RPN_TRAIN_ANCHORS_PER_IMAGE 256
STEPS_PER_EPOCH 131
TOP_DOWN_PYRAMID_SIZE 256
TRAIN_BN False
TRAIN_ROIS_PER_IMAGE 200
USE_MINI_MASK True
USE_RPN_ROIS True
VALIDATION_STEPS 50
WEIGHT_DECAY 0.0001
WARNING:tensorflow:From C:\Users\João Vitor\AppData\Local\Programs\Python\Python36\lib\site-packages\keras\backend\tensorflow_backend.py:492: The name tf.placeholder is deprecated. Please use tf.compat.v1.placeholder instead.
WARNING:tensorflow:From C:\Users\João Vitor\AppData\Local\Programs\Python\Python36\lib\site-packages\keras\backend\tensorflow_backend.py:63: The name tf.get_default_graph is deprecated. Please use tf.compat.v1.get_default_graph instead.
WARNING:tensorflow:From C:\Users\João Vitor\AppData\Local\Programs\Python\Python36\lib\site-packages\keras\backend\tensorflow_backend.py:3630: The name tf.random_uniform is deprecated. Please use tf.random.uniform instead.
WARNING:tensorflow:From C:\Users\João Vitor\AppData\Local\Programs\Python\Python36\lib\site-packages\keras\backend\tensorflow_backend.py:3458: The name tf.nn.max_pool is deprecated. Please use tf.nn.max_pool2d instead.
WARNING:tensorflow:From C:\Users\João Vitor\AppData\Local\Programs\Python\Python36\lib\site-packages\keras\backend\tensorflow_backend.py:1822: The name tf.image.resize_nearest_neighbor is deprecated. Please use tf.compat.v1.image.resize_nearest_neighbor instead.
WARNING:tensorflow:From C:\Users\João Vitor\AppData\Local\Programs\Python\Python36\lib\site-packages\keras\backend\tensorflow_backend.py:1208: calling reduce_max_v1 (from tensorflow.python.ops.math_ops) with keep_dims is deprecated and will be removed in a future version.
Instructions for updating:
keep_dims is deprecated, use keepdims instead
WARNING:tensorflow:From C:\Users\João Vitor\AppData\Local\Programs\Python\Python36\lib\site-packages\keras\backend\tensorflow_backend.py:1242: calling reduce_sum_v1 (from tensorflow.python.ops.math_ops) with keep_dims is deprecated and will be removed in a future version.
Instructions for updating:
keep_dims is deprecated, use keepdims instead
WARNING:tensorflow:From C:\Users\João Vitor\AppData\Local\Programs\Python\Python36\lib\site-packages\tensorflow\python\ops\array_ops.py:1354: add_dispatch_support..wrapper (from tensorflow.python.ops.array_ops) is deprecated and will be removed in a future version.
Instructions for updating:
Use tf.where in 2.0, which has the same broadcast rule as np.where
WARNING:tensorflow:From C:\Users\João Vitor\AppData\Local\Programs\Python\Python36\lib\site-packages\mask_rcnn-2.1-py3.6.egg\mrcnn\model.py:553: The name tf.random_shuffle is deprecated. Please use tf.random.shuffle instead.
WARNING:tensorflow:From C:\Users\João Vitor\AppData\Local\Programs\Python\Python36\lib\site-packages\mask_rcnn-2.1-py3.6.egg\mrcnn\utils.py:202: The name tf.log is deprecated. Please use tf.math.log instead.
WARNING:tensorflow:From C:\Users\João Vitor\AppData\Local\Programs\Python\Python36\lib\site-packages\mask_rcnn-2.1-py3.6.egg\mrcnn\model.py:600: calling crop_and_resize_v1 (from tensorflow.python.ops.image_ops_impl) with box_ind is deprecated and will be removed in a future version.
Instructions for updating:
box_ind is deprecated, use box_indices instead
2019-12-23 13:45:34.251579: I tensorflow/core/platform/cpu_feature_guard.cc:142] Your CPU supports instructions that this TensorFlow binary was not compiled to use: AVX2
Starting at epoch 0. LR=0.001
Checkpoint Path: ./kangaroo_cfg20191223T1345\mask_rcnn_kangaroo_cfg_{epoch:04d}.h5
Selecting layers to train
fpn_c5p5 (Conv2D)
fpn_c4p4 (Conv2D)
fpn_c3p3 (Conv2D)
fpn_c2p2 (Conv2D)
fpn_p5 (Conv2D)
fpn_p2 (Conv2D)
fpn_p3 (Conv2D)
fpn_p4 (Conv2D)
In model: rpn_model
rpn_conv_shared (Conv2D)
rpn_class_raw (Conv2D)
rpn_bbox_pred (Conv2D)
mrcnn_mask_conv1 (TimeDistributed)
mrcnn_mask_bn1 (TimeDistributed)
mrcnn_mask_conv2 (TimeDistributed)
mrcnn_mask_bn2 (TimeDistributed)
mrcnn_class_conv1 (TimeDistributed)
mrcnn_class_bn1 (TimeDistributed)
mrcnn_mask_conv3 (TimeDistributed)
mrcnn_mask_bn3 (TimeDistributed)
mrcnn_class_conv2 (TimeDistributed)
mrcnn_class_bn2 (TimeDistributed)
mrcnn_mask_conv4 (TimeDistributed)
mrcnn_mask_bn4 (TimeDistributed)
mrcnn_bbox_fc (TimeDistributed)
mrcnn_mask_deconv (TimeDistributed)
mrcnn_class_logits (TimeDistributed)
mrcnn_mask (TimeDistributed)
WARNING:tensorflow:From C:\Users\João Vitor\AppData\Local\Programs\Python\Python36\lib\site-packages\keras\optimizers.py:711: The name tf.train.Optimizer is deprecated. Please use tf.compat.v1.train.Optimizer instead.
C:\Users\João Vitor\AppData\Local\Programs\Python\Python36\lib\site-packages\tensorflow\python\ops\gradients_util.py:93: UserWarning: Converting sparse IndexedSlices to a dense Tensor of unknown shape. This may consume a large amount of memory.
“Converting sparse IndexedSlices to a dense Tensor of unknown shape. ”
WARNING:tensorflow:From C:\Users\João Vitor\AppData\Local\Programs\Python\Python36\lib\site-packages\keras\backend\tensorflow_backend.py:675: calling Constant.__init__ (from tensorflow.python.ops.init_ops) with dtype is deprecated and will be removed in a future version.
Instructions for updating:
Call initializer instance with the dtype argument instead of passing it to the constructor
WARNING:tensorflow:From C:\Users\João Vitor\AppData\Local\Programs\Python\Python36\lib\site-packages\keras\callbacks.py:705: The name tf.summary.merge_all is deprecated. Please use tf.compat.v1.summary.merge_all instead.
WARNING:tensorflow:From C:\Users\João Vitor\AppData\Local\Programs\Python\Python36\lib\site-packages\keras\callbacks.py:708: The name tf.summary.FileWriter is deprecated. Please use tf.compat.v1.summary.FileWriter instead.
Epoch 1/5
Traceback (most recent call last):
File “object_detection.py”, line 109, in
model.train(train_set, test_set, learning_rate=config.LEARNING_RATE, epochs=5, layers=’heads’)
File “C:\Users\João Vitor\AppData\Local\Programs\Python\Python36\lib\site-packages\mask_rcnn-2.1-py3.6.egg\mrcnn\model.py”, line 2374, in train
File “C:\Users\João Vitor\AppData\Local\Programs\Python\Python36\lib\site-packages\keras\legacy\interfaces.py”, line 87, in wrapper
return func(*args, **kwargs)
File “C:\Users\João Vitor\AppData\Local\Programs\Python\Python36\lib\site-packages\keras\engine\training.py”, line 2065, in fit_generator
generator_output = next(output_generator)
File “C:\Users\João Vitor\AppData\Local\Programs\Python\Python36\lib\site-packages\keras\utils\data_utils.py”, line 710, in get
raise StopIteration()
StopIteration
I can’t figure out what’s wrong. I am very interested in Mask R-CNN and would like to see it working. Can you help me plz ?? Thank you for your attention and greetings from Brazil
It looks like you are using tensorflow 2.
You must use tensorflow 1.15.
The versions of the libraries I am using are these:
Python: 3.6.8
Tensorflow: 1.15.0
Numpy: 1.16.0
Keras: 2.1.0
Scipy: 1.4.1
So I think the error is not related to the libraries version, because everything is in line with the tutorial.
I recommend updating to keras 2.2, at least.
Hi Jason,
My project is on GOOGLE COLAB. Even though the version of my libraries are “Tensorflow: 1.15.0” and “Keras: 2.2.5”, it still appears these several lines, so how can fix this out
Perhaps colab is inappropriate.
Could you please help us in letting me know where er have to make changes if i wanted to add another label say: Monkey
Yes, in all the places were we add kangaroo.
hi i tried to subset my data to train and val files , the way data is slit in balloon dataset
here is the error
FileNotFoundError Traceback (most recent call last)
in ()
85 # train set
86 train_set = KangarooDataset()
—> 87 train_set.load_dataset(‘Amine’,”train”, is_train=True)
88 train_set.prepare()
89 print(‘train: %d’ % len(train_set.image_ids))
in load_dataset(self, dataset_dir, subset, is_train)
26 #annotations_dir = dataset_dir + ‘/Amine/’
27 # find all images
—> 28 for filename in listdir(images_dir):
29 # extract image id
30 image_id = filename[:-4]
FileNotFoundError: [Errno 2] No such file or directory: ‘Amine/train’
any way to get out of this bug
thanks
Looks like the data is not in the required location your workstation.
Perhaps put the data in the same directory as your code, and run the code from the command line.
Hi, how could I select the dataset by names rather than I split them by index before and after your breakup point,(150), it seems to me that could be a better fixer for this bug without having to manipulate files?
What would be your code to change the splitting key?.
Sorry, I don’t have the capacity to prepare custom code.
Perhaps focus on Python basics first?
hi,
i figuered out how to split the data to train and val with in each file others sub file (annots and images) to respect your data structure
her is the result
train: 8
test: 4 # seems ok but
—————————————————————————
NameError Traceback (most recent call last)
in ()
103 mask, class_ids = train_set.load_mask(image_id)
104 # extract bounding boxes from the masks
–> 105 bbox = extract_bboxes(mask)
106 # display image with masks and bounding boxes
107 display_instances(image, bbox, mask, class_ids, train_set.class_names)
NameError: name ‘extract_bboxes’ is not defined
I have some suggestions here:
https://machinelearningmastery.com/faq/single-faq/can-you-read-review-or-debug-my-code
hi, I tried all clues without any success , I know this would not take few minutes to get solved with a professional like you, all I m asking for is some compassion
thanks
hi, I finally get it screwed away.
thanks
Well done!
Sorry, I don’t have the capacity to customize tutorials – I get hundreds of emails/comments per day – lots of people to help.
More here:
https://machinelearningmastery.com/faq/single-faq/can-you-change-the-code-in-the-tutorial-to-___
If adapting the code is challenging, perhaps start with simpler tutorials here and build up to this more advanced tutorial:
https://machinelearningmastery.com/start-here/#dlfcv
Or, perhaps hire a contractor.
(raj) ➜ Mask_RCNN git:(master) ✗ python start.py
Using TensorFlow backend.
Train: 131
Test: 32
WARNING:tensorflow:From /home/debu/.virtualenvs/raj/lib/python3.6/site-packages/keras/backend/tensorflow_backend.py:514: The name tf.placeholder is deprecated. Please use tf.compat.v1.placeholder instead.
WARNING:tensorflow:From /home/debu/.virtualenvs/raj/lib/python3.6/site-packages/keras/backend/tensorflow_backend.py:71: The name tf.get_default_graph is deprecated. Please use tf.compat.v1.get_default_graph instead.
WARNING:tensorflow:From /home/debu/.virtualenvs/raj/lib/python3.6/site-packages/keras/backend/tensorflow_backend.py:4076: The name tf.random_uniform is deprecated. Please use tf.random.uniform instead.
WARNING:tensorflow:From /home/debu/.virtualenvs/raj/lib/python3.6/site-packages/keras/backend/tensorflow_backend.py:3900: The name tf.nn.max_pool is deprecated. Please use tf.nn.max_pool2d instead.
WARNING:tensorflow:From /home/debu/.virtualenvs/raj/lib/python3.6/site-packages/keras/backend/tensorflow_backend.py:1982: The name tf.image.resize_nearest_neighbor is deprecated. Please use tf.compat.v1.image.resize_nearest_neighbor instead.
WARNING:tensorflow:From /home/debu/raj/Mask_RCNN/mrcnn/model.py:341: The name tf.log is deprecated. Please use tf.math.log instead.
WARNING:tensorflow:From /home/debu/raj/Mask_RCNN/mrcnn/model.py:399: add_dispatch_support..wrapper (from tensorflow.python.ops.array_ops) is deprecated and will be removed in a future version.
Instructions for updating:
Use tf.where in 2.0, which has the same broadcast rule as np.where
WARNING:tensorflow:From /home/debu/raj/Mask_RCNN/mrcnn/model.py:423: calling crop_and_resize_v1 (from tensorflow.python.ops.image_ops_impl) with box_ind is deprecated and will be removed in a future version.
Instructions for updating:
box_ind is deprecated, use box_indices instead
WARNING:tensorflow:From /home/debu/raj/Mask_RCNN/mrcnn/model.py:720: The name tf.sets.set_intersection is deprecated. Please use tf.sets.intersection instead.
WARNING:tensorflow:From /home/debu/raj/Mask_RCNN/mrcnn/model.py:722: The name tf.sparse_tensor_to_dense is deprecated. Please use tf.sparse.to_dense instead.
WARNING:tensorflow:From /home/debu/raj/Mask_RCNN/mrcnn/model.py:772: to_float (from tensorflow.python.ops.math_ops) is deprecated and will be removed in a future version.
Instructions for updating:
Use
tf.castinstead.Traceback (most recent call last):
File “start.py”, line 150, in
model.load_weights(model_path, by_name=True)
File “/home/debu/raj/Mask_RCNN/mrcnn/model.py”, line 2130, in load_weights
saving.load_weights_from_hdf5_group_by_name(f, layers)
File “/home/debu/.virtualenvs/raj/lib/python3.6/site-packages/keras/engine/saving.py”, line 1018, in load_weights_from_hdf5_group_by_name
str(weight_values[i].shape) + ‘.’)
ValueError: Layer #389 (named “mrcnn_bbox_fc”), weight has shape (1024, 8), but the saved weight has shape (1024, 324).
(raj) ➜ Mask_RCNN git:(master) ✗
Looks like a problem with your development environment?
Perhaps confirm TensorFlow 1.15 and Keras 2.2.
Hey there,
Set the number of Classes to match your input class:
# number of classes (background + kangaroo)
NUM_CLASSES = 1 + 1
Hello Jason,
First of all Happy New Year 2020 and looking forward for more exciting blogs from you.
I have one question regarding labelimg tool. As I looked into labelimg tool but there is no way to rotate bounding box. In custom dataset, object is not straight and I can’t rotate images.
Could you please suggest me any other labeling tool which allows to rotate even bounding box?
Thanking you,
Saurabh
Sorry, I don’t have good advice for image annotation tools.
Thank you!
Hi, Jason, the best solution I have found for this is Jupyter Innotator, Its very convenient and easy to use.
https://github.com/ideonate/jupyter-innotater
*Also: The output of the tool does not resemble the xml file structure that is often used in object detection, but the tool produces enough so that you can generate a xml conversion script in python.
*I remember having some difficulties installing the package in Mac initially (something to do with icy-widgets, but I think its fixable), hopefully this was mitigated.
Thanks for sharing.
Hi Saurab,
May be for object detection you can use labelImg or labelme. For segmentation you can use CVAT tool.
Hi Jason Brownlee,
Great tutorial for beginners like me, thanks.
Here the mask-rcnn is saving weights, but i want to save the model along with the weights like model.save(‘xxxx.h5) . But this function is not working here. Please reply me as soon as possible.
Thanks
Thanks!
I believe it is using the tensorflow API. Perhaps investigate an appropriate function.
Thanks for the great tutorial, very helpful in getting started with this kind of work and was able to apply it to a custom dataset.
My question is, suppose I also have binary mask annotations for each image (png files), how would I load them into the model instead of the xml annotations so that the model prediction is a mask rather than a bounding box?
You’re welcome.
Sure, load any custom masks you like.
Hi.
I’m stuck at “Parse Annotation File” step.
Where could I type the “tree = ElementTree.parse(filename)”?
Sorry to hear that, perhaps try copying the “complete examples” at the end of each section.
After training, in the prediction, the displayed image is showing with a bounding box but the label is not there. Please reply to me. Thanks in advance
In this case there is only one label, which is kangaroo.
For a more general example with box and label see this tutorial:
https://machinelearningmastery.com/how-to-perform-object-detection-in-photographs-with-mask-r-cnn-in-keras/
Thanks for your quick reply. The suggested link is helped me.
Could you please help me in converting the above example model to an apk file.
What is “apk”?
I want to convert the trained model to apk file to deploy on the mobile devices. Please suggest to me.
I don’t know what apk is sorry, or about putting it on mobile devices.
Perhaps try posting your question to stackoverflow?
Hi
Does Mask-R-cnn only work in annotated image only, can i use normal image? And which annotation approach (automatic,manual or semi automatic) could gives better results?
It learns from annotated images.
It is used on normal images.
Thank you. So is their any example on automatically annotating image data-set and how to use them for object detection and mask an object?
No, I believe it is manual at this stage.
Thank you very much! One more question, Is their any example on Mask-R-cnn with out using pre-trained weights?
I don’t have such an example.
It makes sense to use pre-trained weights as a starting point for transfer learning.
hi Jason,thanks for your illustration
i run the MaskRCNN on my dataset and it gives me horrible result
Train mAP: 0.818
Test mAP: 0.549
can you advice me why it can result in such this a big difference on the Train and Test set ???
how i can face this problem.
The model has overfit your training dataset.
This might help:
https://machinelearningmastery.com/introduction-to-regularization-to-reduce-overfitting-and-improve-generalization-error/
Hi, i was trying to use Mask_RCNN and i don’t know how to first train the feature map (Backbone) before i return the model to pressed to the next level (Region Proposal Network) because i wanted to see the accuracy of convolution layer.
Thank you!
Not sure that is possible…
Hi Jason, thank you for this wonderful article.
I am working on a case where we have multiple labels for each object in an image.
The task is similar to the one asked in the following problem:
https://stackoverflow.com/questions/49358088/does-tensorflows-object-detection-api-support-multi-class-multi-label-detection
Could you suggest how to approach to this problem?
Yes, I believe the mask rcnn can support that.
Perhaps start with this model:
https://machinelearningmastery.com/how-to-perform-object-detection-in-photographs-with-mask-r-cnn-in-keras/
Hello Jason,
Thank you very much for a great tutorial. It’s a great resource for anyone trying to get started with object detection and for people who need to check their configurations.
I am retraining just the “heads” layer of a resnet101 backbone, on a 3d synthetic dataset generated using Unreal Engine and python. I have 7 object classes + 1 background, and a total of 591 training images and 60 real images for validation.
Using default training config from the maskrcnn official repo, I suspect there is a case of over-fitting, as the val loss decreases while the training loss decreases.
Here they are pasted below.
https://imgur.com/a/CgYJxCs
I also constructed a training curve of my own, by calculating the AP50 (Average Precision at 50% Intersection Over Union) for all the epochs from epoch 1 to epoch 100. It seems like the network is not improving a lot. The curve can be found below.
https://imgur.com/MWzvWZz
How should I adjust my learning rates, weight decays? What kind of heuristics/rules of thumb to use based on the size of the dataset, number of classes etc? My config can be found below.
class aerial_trains_Config(Config):
“””Configuration for training on the toy shapes dataset.
Derives from the base Config class and overrides values specific
to the toy shapes dataset.
“””
# Give the configuration a recognizable name
NAME = “Baldonnell_from_scratch_from9m”
# Train on 1 GPU and 8 images per GPU. We can put multiple images on each
# GPU because the images are small. Batch size is 8 (GPUs * images/GPU).
GPU_COUNT = 1
IMAGES_PER_GPU = 2
# Number of classes (including background)
NUM_CLASSES = 1 + 7 # background + 80 default classes
# Use small images for faster training. Set the limits of the small side
# the large side, and that determines the image shape.
IMAGE_MIN_DIM = 256
IMAGE_MAX_DIM = 2048
# Use smaller anchors because our image and objects are small
RPN_ANCHOR_SCALES = (64, 128, 256, 512, 1024) # anchor side in pixels
# Reduce training ROIs per image because the images are small and have
# few objects. Aim to allow ROI sampling to pick 33% positive ROIs.
TRAIN_ROIS_PER_IMAGE = 32
# Use a small epoch since the data is simple
STEPS_PER_EPOCH = 600
LEARNING_RATE = 0.001
LEARNING_MOMENTUM = 0.9
# Weight decay regularization
WEIGHT_DECAY = 0.0001
Very cool!
This might give you ideas:
https://machinelearningmastery.com/learning-rate-for-deep-learning-neural-networks/
Thank you ver much your great article about Object Detection Model with Keras
I’m happy it helped!
Hi Jason,
This is really a great article. I am trying to solve my multi-object detection problem following your approach, i think there will be a need of just a little tweak into this code but i am stuck.
I have added multiple classes in load_dataset function:
self.add_class(“dataset”, 1, “list”)
self.add_class(“dataset”, 2, “Menu”)
self.add_class(“dataset”, 3, “Home”)
but here in load_mask function you are appending class_ids statically as 1 “kangaroos”,
i want to add classes w.r.t objects found.
Kindly check and help.
And as per me, here object detection is implemented but classification is missing as their is only one object. Correct me if i am wrong here.
I don’t understand, sorry? Can you elaborate?
Looks fine to be, perhaps test it?
Awesome article, thank you for this blog
You’re welcome.
Hello Jason,
Could you please share your views on “How to label overlapping objects?” What is the best practice with reference to overlapping objects? The problem is most of the labeling tools don’t support oriented bounding boxes.
How can I inform my object detector that it should look at only certain part of images without cropping images? Can I edit images and put white/black (constant) color so that object detector will ignore such areas?
Kindly share your views.
Thanking you!
I don’t have specific advice on the topic, sorry.
Thank you!
Hello Dr. Brownlee!
I’m running this matterport/mrcnn code on my custom dataset (to detect comic characters). I’m using a total of 6500 images. My training model saturates with a loss of 0.873 (Steps: 2500, Batch: 2, Epoch(at which saturation happens):9th-10th) and it breaks my heart. What are the ways I could tweak my code to lower the loss? (Rest of the config is default)
Thank you so much!
Some of the suggestions here might help:
https://machinelearningmastery.com/start-here/#better
Hi again Dr. Brownlee!
Is there a way to know if my code will perform well/worse in the first epoch (or some time sooner) rather than waiting for 6 long hours to get a loss value?
Every time I make some changes, I have to run it through the whole cycle till I see the saturation (in loss) after which, I have to manually perform a ‘Keyboard Interrupt’
No.
Hi Jason! This is a great tutorial.This is the exact solution to the problem I’m trying to solve.
One quick question. My model gets trained fine but it is not creating the checkpoint models at any point during the training or at the end. So I’m basically left with a trained model object.
I’ve searched my whole system in the case it was cached at some other location. Could not find it though.
Could you please tell me if you’ve come across this kind of a problem before and how to solve it?
I am on windows 10
With keras==2.2.5
tensorflow==1.15
mask-rcnn-12rics==0.2.3
The models are saved in the current working directory I believe, under a subdirectory for the run.
Hi Jason, I’m having troubles understandig how to detect multiple classes.
During the annotation process, do we need to split each class in its own folder?
e.g. class1/annots and class1/images, class2/annots and class2/images
I don’t know if this is the good approach, since there might be images where both classes appear.
It would be great to know how should the folder structure be and the code for the load_dataset function.
Thanks!
The choice is yours, as long as it is presented consistently to the model during training.
Hey Jason,
Thanks, Thanks, Thanks.
This is the best tutorial i found for keras.
I had no hard problems to do this.
You did very well.
Thanks!
Hi Jason, i build a single/multi-class classification poc project on different object using your tutorials. Thanks for the neat explanation above.
Now as a part of complete project I require your’s suggestion on below points:
1. Ideally in which case model accuracy will be high i.e in single class model or multi-class model (I did single and multi-class on different object) and accuracy on new data seems to be low on traning epoch-100 and learning_rate = 0.0001
2. What are the different hyper-parameters I can tune apart from the learning_rate and epoch for getting better accuracy using Mask RCNN
3. I’m working on architecture project, how can i detect the line connecting different object like A———B, how can i detect the line between A & B
Your help will be very much appreciated !!!
Well done!
This might give you ideas for improving model performance generally:
https://machinelearningmastery.com/start-here/#better
Not sure about detecting lines, sorry. Sounds like classical computer vision might be useful.
Can you share your code for multi class ?
Hey Jason, is it worth it to pass the images through an edge detector like Sobel, prewitt, canny as a pre-processing step before sending them off to Mask RCNN ?
In an attempt to make it “Easier” to increase accuracy ? Any literature or references you recommend reading ?
Probably not. Perhaps try it?
Hi! Can you explain what’s going on with:
pyplot.subplot(330 + 1 + i)
Why those numbers?
3 rows, 3 columns and the image number from 1 to 9.
The code give me a lot of warning such as “Allocator (GPU_0_bfc) ran out of memory trying to allocate 1.15GiB with freed_by_count=0. The caller indicates that this is not a failure, but may mean that there could be performance gains if more memory were available.”
May be I should change a better comptuer.But is there a cheap method?
Perhaps try running on a machine with more RAM, e.g. EC2?
You mean GPU more RAM or CPU?
Perhaps.
Hi Jason, can you kindly create a tutorial to Estimate the Speed of Object in the detected boxes? Or have any reference to such tutorials?
Thanks for the suggestion.
Hello Mr. Jason, thank you for the very beneficial and informative tutorials you are making. I appreciate your great effort. I would like to suggest having a similar tutorial in multiple classes object detection not only a one, if possible. Thanks again.
Thanks.
Great suggestion.
Hi Jason,
When I’m trying to evaluate the PredictionConfig in a case study with marine litter images
cfg = PredictionConfig()
# define the model
model = MaskRCNN(mode=’inference’, model_dir=’./’, config=cfg)
# load model weights
model.load_weights(‘mask_rcnn_train_config_0005.h5’, by_name=True)
# evaluate model on training dataset
train_mAP = evaluate_model(train_set, model, cfg)
I get as a message:
“re-start from epoch 5 ” and the run stucks there.
Should I wait or there is a bug in my code?
Thanks,
Dimitris
No, you can ignore the warning I think.
Thank you for your response. Really appreciated!
D.
You’re welcome.
Hey Jason,
I successfully run your prejct on my cpu.
Now i want to do this on my gpu.
I installed the latest versions of all libaries.
TF-gpu : 2.1.0
keras-gpu: 2.3.1
cudnn: 7.6.5
cudatoolkit: 10.1.243
the problem is, that model.py thorws many Errors like renaming tf.log(x) to tf.math.log(x)…
the question is:
1. Can you publish a project for latest libary versions?
2. Can you say wich libary versions i have to install for using your project on gpu?
Like I said it works fine in an environment without gpu usage. But with is never happened.
I hope you can help me.
The example will not work with TensorFlow 2 because the Mask RCNN library has not yet been updated to support it.
could you give me please an example for settings?
wich version do you use, or wich are available.
Stucked on it for 2 days now…
Yes, I mention this at the top of the page.
You can use TensorFlow 1.14 or 1.15.
I tried but dont works how it should.
I got now:
tf-gpu: 1.14
keras: 2.2.5
cuda: 10.0
cudnn: 7.4.1.5
The script run until Epoch 1/20:
Image 1/100 [………]
an dit doesnt make progress.
Can u give me please your versions of theese 4 things, to get it work?
Perhaps there is something going no with your workstation.
Perhaps try running other code to confirm your libraries can fit a basic model.
Perhaps try running the code on another machine to confirm you have everything you need?
Hello Jason,
I have a question!
Why is it that when training the model, the loss for the classification output on the train set is usually lower than that of the validation datasets (e.g. mrcnn_class_loss and val_mrcnn_class_loss), as well as why is the loss for the bounding box output for the train lower than that of the validation datasets (mrcnn_bbox_loss and val_mrcnn_bbox_loss)?
Thank you.
Some difference between the two sets is to be expected, see this:
https://machinelearningmastery.com/learning-curves-for-diagnosing-machine-learning-model-performance/
Hey Jason,
is it possible that my training on gpu (8GB gpu) not work because the net is to big for this problem?
is tried to use resnet50 but ist got Allocation problems.
How many gpu memory do you have?
Maybe.
I generally recommend training on AWS EC2:
https://machinelearningmastery.com/develop-evaluate-large-deep-learning-models-keras-amazon-web-services/
Hey Jason,
i’m not sure if i can train pictures with the size 1024×1024 with resnet50 on my gpu
I ‘ve got a GeForce RTX 2070 and i can’t run it on gpu.
I don’t have any Exceptions. The commandpromt just hanging.
Over a monitor for gpu i see that it want to use all, but i think it’s not enough.
Can you help me?
Another question is, how can i manipulate the resnet50 to a smaller net (if it’s the solution for my problem)
Might be too large. Perhaps try smaller images first.
I tried to use 64×64 images but it still not works.
I also tried just one picture per epoch.
The problem occured fot others too. https://github.com/matterport/Mask_RCNN/issues/287
Now i’m wondering if its a problem of the generator.
I dont think it’s a problem of storage of gpu because the Script stucks without any errors.
Can u pls help with some advices?
Sorry to hear that, I don’t have any good advice.
did you run your project on gpu ?
is it even possible?
and what libaries you use?
pls say me your versions of :
Tensorflow
Keras
Cudnn
Cuda
Python
I really have no other ideas than trying your versions and hope for working
Yes.
Tensorflow 1.14 or 1.15, Python 3.6 and an EC2 instance:
https://machinelearningmastery.com/develop-evaluate-large-deep-learning-models-keras-amazon-web-services/
It also works just fine on CPU with the same libraries.
Hello Jason
I am working with Faster rcnn for defects detection and i would like that you help me how to detect objects from scratch with my own dataset with of course a pretrained cnn like vgg16 or resnet. How to prepare the data and insert it in Jupyter notebook or even in anaconda virtual environment. I will be very thankful
Thanks
This tutorial will help you to setup your development environment:
https://machinelearningmastery.com/setup-python-environment-machine-learning-deep-learning-anaconda/
Hi Jason,
I would like to ask you that how can I add the name of the label with the AP at the top left of the rectangle ??
You can draw text directly onto the image. Perhaps review the pillow API or the matplitlib API.
Hi Jason, I’m trying to make a traffic light detector, I have a very large dataset of images known as DTLD and I would like to use it in this tutorial.
The images of the dataseet have dimensions 2048X1024 and the objects to be detected are very small. When performing the training and validation for the first time, the result obtained was very bad. I imagine it is due to the resizing performed on the images.
If I change the IMAGE_RESIZE_MODE parameter from “square” to “none” can I continue using transfer learning normally? Or would it be necessary to train the network from scratch?
In the config.py file the following information is provided, however I don’t know if I can change this parameter according to my will.
# Input image resizing
# Generally, use the “square” resizing mode for training and predicting
# and it should work well in most cases. In this mode, images are scaled
# up such that the small side is = IMAGE_MIN_DIM, but ensuring that the
# scaling doesn’t make the long side> IMAGE_MAX_DIM. Then the image is
# padded with zeros to make it a square so multiple images can be put
# in one batch.
# Available resizing modes:
# none: No resizing or padding. Return the image unchanged.
# square: Resize and pad with zeros to get a square image
# of size [max_dim, max_dim].
# pad64: Pads width and height with zeros to make them multiples of 64.
# If IMAGE_MIN_DIM or IMAGE_MIN_SCALE are not None, then it scales
# up before padding. IMAGE_MAX_DIM is ignored in this mode.
# The multiple of 64 is needed to ensure smooth scaling of feature
# maps up and down the 6 levels of the FPN pyramid (2 ** 6 = 64).
# crop: Picks random crops from the image. First, scales the image based
# on IMAGE_MIN_DIM and IMAGE_MIN_SCALE, then picks a random crop of
# size IMAGE_MIN_DIM x IMAGE_MIN_DIM. Can be used in training only.
# IMAGE_MAX_DIM is not used in this mode.
IMAGE_RESIZE_MODE = “square”
IMAGE_MIN_DIM = 800
IMAGE_MAX_DIM = 1024
I wonder if you can use smaller images.
It might be worth looking in the literature for models that are appropriate for this specific problem or detecting small objects generally.
In this case an interesting processing would be to change the size of the 2048×1024 to 2048×512 images, cutting the lower half of the image, as it is a known fact that there are no traffic lights below the horizon line.
Using the default values for maximum and minimum size of images (IMAGE_MIN_DIM = 800, IMAGE_MAX_DIM = 1024) I didn’t get a good result, I was wondering if it would be possible to increase the values IMAGE_MIN_DIM and IMAGE_MAX_DIM and continue using transfer learning.
Good question, perhaps try it and compare results?
anging the values of IMAGE_MIN_DIM and IMAGE_MAX_DIM I get the following error:
OSError: [Errno 12] Cannot allocate memory
I’m running the code on Google Colab, as I don’t have the processing power necessary to train the base in a reasonable time on my computer.
Therefore, there are two possibilities for this error, either it is related to excess size of the images or it is not possible to carry out transfer learning by changing the mentioned parameters.
Perhaps try and AWS EC2 with more memory, say 64GB?
The fact that my images are in BGR (openCV) format and not in RGB format may be sabotaging my training
Perhaps you can convert some and see if it makes a difference?
Hey this is a great tutorial it is very helpful could you please tell what are all the changes required if we want to train multiple classes. I tried on my own iam getting some errors in load_mask() function
Very few changes, just to the definition of the model – e.g. how the dataset is loaded and classes are defined.
I’ve made the cahnges . But I am getting the following error in the part where we check out data set with masks. Please help me out
AssertionError Traceback (most recent call last)
in ()
105 bbox = extract_bboxes(mask)
106 # display image with masks and bounding boxes
–> 107 display_instances(image, bbox, mask, class_ids, train_set.class_names)
/content/drive/My Drive/masked rcnn/Mask_RCNN/mrcnn/visualize.py in display_instances(image, boxes, masks, class_ids, class_names, scores, title, figsize, ax, show_mask, show_bbox, colors, captions)
103 print(“\n*** No instances to display *** \n”)
104 else:
–> 105 assert boxes.shape[0] == masks.shape[-1] == class_ids.shape[0]
106
107 # If no axis is passed, create one and automatically call show()
AssertionError:
In load data set i have added the 2nd class using self.add class and also in load_masks funcion I have added it to class_ids. What else should Idp
Sorry, I don’t know the cause of your fault. Perhaps try posting your code and issue to stackoveflow?
Can we use other weights for training. If so where can we download it.
I’m not aware of other pretrained weights.
Thanks for the tutorial!
I tried to run this on google colab and i had this erorr:
[ module ‘tensorflow’ has no attribute ‘placeholder’ ]
finaly solve it by caling this lines before everything:
%tensorflow_version 1.x
import tensorflow
print(tensorflow.__version__)
Sorry, I don’t know about google colab.
Hi Great tutorial, How about the images that no Kangaroo? it seems that all the images have Kangaroo. How to set the model for images don’t have Kangaroo or have in train data and test data?
Good question. The model could include some images with no objects during training.
thanks for your answer, How to input the data that have no kangaroo? I mean that the xml and images file that have no kangaroo to be the model input? Could you give details how to deal with this. Thanks in advance!
Not sure, I have not done it. Perhaps try experimenting.
Hi, may i know how i want to save the model and how is the code to do the prediction on the new images?
We do exactly this in the tutorial above.
Sir, i didn’t understand the ranges of rows and columns you’ve set for creating masks , can you kindly explain it?
Which part doesn’t make sense to you?
Hi How to set use one GPU in the code?
Configure tensorflow on your workstation to use GPU, then the example will run in the GPU.
thanks for answer, I mean how to revise the code to use one GPU? I mainly use the GCP GPU.
No change to the code, only a change to your tensorflow library.
Hi If my image id is not int type, how to change the code of load_image?
Sorry, I don’t have the capacity to help you customize the code.
Hi I am building a model for image recognition.
The model should able to identify which image is provided by user.
I have two (2) sets of images.
Passport images and Driving Liscence images.
I am building a model using these images.
I am having only 119 images of passport for train.
I am training on passport images
After completion of model when i test the model it gives more probability on Driving liscence images than on passport images.
Whaty can the issue will be?
How i do it with adding a bounding Box for on training images
You can prepare the data with bounding boxes defined and the model will lean how to localize the items in new photos.
i have a model for image recognition.
i am using passport images for training.
when i test it using liscence images it gives more probability on liscence images.
What can be the issue will be?
Perhaps the model has overfit?
Some of these tutorials will help:
https://machinelearningmastery.com/start-here/#better
Starting at epoch 0. LR=0.001
Checkpoint Path: ./content/kangaroo_cfg20200413T1223/mask_rcnn_kangaroo_cfg_{epoch:04d}.h5
Selecting layers to train
fpn_c5p5 (Conv2D)
fpn_c4p4 (Conv2D)
fpn_c3p3 (Conv2D)
fpn_c2p2 (Conv2D)
fpn_p5 (Conv2D)
fpn_p2 (Conv2D)
fpn_p3 (Conv2D)
fpn_p4 (Conv2D)
In model: rpn_model
rpn_conv_shared (Conv2D)
rpn_class_raw (Conv2D)
rpn_bbox_pred (Conv2D)
mrcnn_mask_conv1 (TimeDistributed)
mrcnn_mask_bn1 (TimeDistributed)
mrcnn_mask_conv2 (TimeDistributed)
mrcnn_mask_bn2 (TimeDistributed)
mrcnn_class_conv1 (TimeDistributed)
mrcnn_class_bn1 (TimeDistributed)
mrcnn_mask_conv3 (TimeDistributed)
mrcnn_mask_bn3 (TimeDistributed)
mrcnn_class_conv2 (TimeDistributed)
mrcnn_class_bn2 (TimeDistributed)
mrcnn_mask_conv4 (TimeDistributed)
mrcnn_mask_bn4 (TimeDistributed)
mrcnn_bbox_fc (TimeDistributed)
mrcnn_mask_deconv (TimeDistributed)
mrcnn_class_logits (TimeDistributed)
mrcnn_mask (TimeDistributed)
—————————————————————————
AttributeError Traceback (most recent call last)
in ()
—-> 1 model.train(train_set, test_set, learning_rate=config.LEARNING_RATE, epochs=5, layers=’heads’)
1 frames
/content/Mask_RCNN/mrcnn/model.py in compile(self, learning_rate, momentum)
2197 tf.reduce_mean(layer.output, keepdims=True)
2198 * self.config.LOSS_WEIGHTS.get(name, 1.))
-> 2199 self.keras_model.metrics_tensors.append(loss)
2200
2201 def set_trainable(self, layer_regex, keras_model=None, indent=0, verbose=1):
AttributeError: ‘Model’ object has no attribute ‘metrics_tensors’
this error comes when i train model
tensorflow 1.15
in google colab
Perhaps try running on your workstation or on ec2. Perhaps colab is the issue?
Collab has no issue. I have trained and achieved results using tensorflow 1.15.0 and Keras 2.2.4. However, I want to detect in the video after training on images. How should I achieve it?
Perhaps you can extract frames of the video and pass them to your model?
Hi, I’m a Brazilian student!
I am replicating your tutorial for my own dataset. I’m also using Mask-RCNN for object detection only. During training, only two metrics are presented: loss and val_loss. The metrics you talked about (e.g. mrcnn_class_loss and val_mrcnn_class_loss, mrcnn_bbox_loss and val_mrcnn_bbox_loss), are not displayed during the training, do you know why this happens? I’m using verbose = 1.
Well done.
I don’t know why there is a difference.
When I execute the above complete code the error “module ‘dask.dataframe’ has no attribute ‘Series'” is taken. and I can not solve the problem
What happened
I’m sorry to hear that, perhaps this will give you some ideas:
https://machinelearningmastery.com/faq/single-faq/why-does-the-code-in-the-tutorial-not-work-for-me
Thanks for your reply, I uninstall flask and reinstall it and the problem of “module ‘dask.dataframe’ has no attribute ‘Series’” solved.
Sorry, I don’t know. It says “dask” not “flask” are they related?
Try posting/searching on stackoverflow.
dask is true. Sorry about my mistake
No problem.
Hi Jason, I have searched for text detection and recognition on your blog and I haven’t found anything and can I use RCNN for text detection and what about faster RCNN.
I don’t think have tutorials on that topic, sorry.
Background class detection
Hi when I input an image without Kangaroo, the model outputs y_hat as empty arrays, I think it should be 0’s (no kangaroo then it should see as background class).
yhat[0][‘class_ids’]
>> array([], dtype=int32)
is it true that I’m supposed to have an image dataset without kangaroo so that the model can learn to detect background class?
Thank you a lot,
Look forward to your response,
You could change the model to operate that way if you wish.
hi, I’m thinking some solutions to applying in that way,
1. Add a background dataset
2. Change the source code
I hope you could please tell me which direction is fine.
Thank you a lot
Perhaps explore both and see what works/makes sense?
I have trained the model on images and want to test on videos and lebel objects in video. Any suggestions and links are appreciated.
Perhaps you can extract frames of the video and pass them to your model?
Hi,
I’m trying your code on Colab, to use GPU, but when the train starts it says that I’m not using GPU.
Do you know if I have to run something different or it is simply a system problem?
Thanks a lot.
I don’t know about colab, I recommend running on AWS ec2:
https://machinelearningmastery.com/develop-evaluate-large-deep-learning-models-keras-amazon-web-services/
Hi, I am trying to use my custom images for training with 1 class. When the object isnt there in any image, then I do not generate the xml. Due to this training ‘model.train’ is throwing error ‘No such file or directory’ How to handle this situation.
(Particularly i m trying to solve the kaggle competition for table detection in document images).
Perhaps define a new class as “none”.
So… did this post copy this one: https://towardsdatascience.com/object-detection-using-mask-r-cnn-on-a-custom-dataset-4f79ab692f6d
Or did she copy you?
Not that it matters much, but I can’t find any attribution in either piece, which would be normal courtesy. Credit where it’s due.
They copied me, check the publication dates.
I get ripped off every day. It sucks.
hi jason, can this code applied for another object like bloods or single object and work from anaconda envt
Maybe. Perhaps prototype a model on your dataset and see how it goes. Also, perhaps check the literature for other solutions to the type of problem you are working on and see what types of models they use.
Could you please explain to me how to calculate mAR from the “utils.compute_recall” function, I understand that it returns the AR, but how should I calculate the mAR? Please help me!!
Sorry, I don’t have an example. Thanks for the suggestion!
hi jason
i got a broble when i try to run this
from mrcnn.model import MaskRCNN
output is
ModuleNotFoundError: No module named ‘keras’
how to fix it?
You need to install Keras:
https://machinelearningmastery.com/setup-python-environment-machine-learning-deep-learning-anaconda/
Hey Jason, thank you for the tutorial! I have two questions:
1) I’m getting a terrible train and test mAP. Is the only way to improve this via more data, or do you have any other ideas? (Dataset includes 95 photos for training, and 26 photos for testing)
Train mAP: 0.423
Test mAP: 0.546
2) How could I use this for video multi-object recognition/tracking? Should I just run the video frame by frame? Is there a way I can use my segmentation data to show objects moving across the screen, for example?
Thanks!
Sorry one more question: In relation to the question above about using this for a frame by frame video, I’m wondering if you have any tutorials or ideas on doing a “total object count” for a video. For example, if you were tracking kangaroos across the screen in a video, how could you assign a unique identifier to a newly recognized kangaroo and then report the total number of kangaroos in the video at the end, even if some appeared and left during the video?
Thanks!
Sorry, I do not have tutorials on video or object counts.
Perhaps try data augmentation?
Perhaps try changing the model?
Perhaps try changing learning parameters?
For video, perhaps try applying the model to each frame or a subset of frames?
Hi Jason,
Thanks for the amazing tutorial. I’ve got some brief questions.
Firstly, just to confirm, the masks are passed to the model in the form of an array of shape (H, W, num_masks), correct? This appears to be what’s going on in the load_masks method.
Secondly, I can’t quite identify where the sizes of the training images comes into play. For example, you haven’t specified a specific image size that the model should expect. So, does the model expect a particular input size (i.e. H x W x num. channels) – if so, what is it?
Thanks!
You can plot the image with the mask to confirm they are as you expect. I show this in the tutorial.
Good question. From memory, I believe the model expects a fixed sized images and the library around it handles image resizing.
Awesome tutorial ! Thank you.
Thanks!
Wonderful Works! Thank You!
Well done!
hi jason ,
i have trained my model successfully but it is making many masks more then i expct how to solve this can u please tell me
You will have to debug your code to discover the answer.
hi Jason ,
i have trained my model successfully based by your tutorial(My model is for motorbike detection). And then, how i can get the output file of this trained? Are .h is the output? I mean, i want to just call the output trained model if i want use to other source code for motorbike detection. So, i don’t need to train it from the beginning again if i want detect the motorbike.
Thank you.
You can make a prediction by calling the predict() function on the model:
https://machinelearningmastery.com/how-to-make-classification-and-regression-predictions-for-deep-learning-models-in-keras/
You can save the model to file, load it later and make predictions on new data. No need to retrain:
https://machinelearningmastery.com/save-load-keras-deep-learning-models/
What so ever I do i’m getting the below error while implementing multiclass:
IndexError: boolean index did not match indexed array along dimension 0; dimension is 2 but corresponding boolean dimension is 1
I would request a kind favour from the author to help me in implenting the multiclass object detection.
Sorry to hear that. This is a common question that I answer here:
https://machinelearningmastery.com/faq/single-faq/can-you-change-the-code-in-the-tutorial-to-___
Hi Jason, thank you for the tutorial. I’d like to ask something about anchor boxes. If i have anchor_box_scales = [32, 64, 128], what does these values mean exactly? Are they square pixels (area), or are they scalar values? If i have very small objects that range between 20×20 pixels to 40×40 what should i put as values? Can I only put two? I would love some guidance and insight if possible, of course.
Thank you again.
The average sizes of objects in the dataset used to train the model, I believe.
You can try smaller boxes and see if it makes a difference for your dataset.
Is Mask-RCNN better than retinaNet? May I know what is the best of all models available for object detection?
It may depend on the specifics of your dataset.
Perhaps test a suite of techniques on your dataset and discover which best meets your needs.
Hi jason,
In this tutorial, use 32 last file for test, right? But, How should i do if i want to get randoms data test? so the data test is not the 32 last file but random file. Thank You
Sorry, I don’t understand. Can you please rephrase or elaborate your question?
Is there any way to print the Train and Validation accuracy in the callback?
Probably not a good idea to print from a callback, but perhaps try it directly and see.
Hello Jason,
Thanks a lot for such a great tutorial.
Firstly, how long does it take to calculate mAP scores?? its been half an hour its still processing. i think I am in a loop!!
I just had a doubt. Why do u need to use the scaled image for evaluation during prediction as per your code?
def evaluate_model(dataset, model, cfg):
APs = list()
for image_id in dataset.image_ids:
# load image, bounding boxes and masks for the image id
image, image_meta, gt_class_id, gt_bbox, gt_mask = load_image_gt(dataset, cfg, image_id, use_mini_mask=False)
# convert pixel values (e.g. center)
scaled_image = mold_image(image, cfg)
# convert image into one sample
sample = expand_dims(scaled_image, 0)
# make prediction
yhat = model.detect(sample, verbose=0)
# extract results for first sample
r = yhat[0]
# calculate statistics, including AP
AP, _, _, _ = compute_ap(gt_bbox, gt_class_id, gt_mask, r[“rois”], r[“class_ids”], r[“scores”], r[‘masks’])
# store
APs.append(AP)
# calculate the mean AP across all images
mAP = mean(APs)
return mAP
Also, I didn’t get your following statements:
1.the pixel values of the loaded image must be scaled in the same way as was performed on the training data, e.g. centered. This can be achieved using the mold_image() convenience function.
2. The dimensions of the image then need to be expanded one sample in a dataset and used as input to make a prediction with the model.
Thanks in advance!!!
That sounds too long. Perhaps try running on a faster machine or double check your code.
Yes, any data prep applied to the training data must be also be applied to new data, like test data. This often means scaling the pixels in the same way.
Yes, the model expects one or more samples as input, in this case images. We need to ensure the input has appropriate dimension to meet the expectations of the model.
Hello Jason,
How can I improve my mAP scores? I’ve been getting scores as follows
Train mAP: 0.760
Test mAP: 0.657
don’t know why such low score b’cause prediction its predicting each and every defined object i.e. gun, knife, and sword in my case very accurately.
Thanks in advance!!
Also, I guess something with this particular webpage. This page is working too slowly and getting lagged while other pages of machinelearningmastery or other websites are working perfectly fine
Good question.
As a first step, perhaps try tuning the model and/or getting more data.
Beyond that, the tutorials here will teach you how to get more out of your model:
https://machinelearningmastery.com/start-here/#better
Can you show the code for multiple class?
Hello. I Have this error. I dont know how to solve it:
Traceback (most recent call last):
File “”, line 47, in
train_mAP = evaluate_model(train_set, model, cfg)
File “”, line 32, in evaluate_model
AP, _, _, _ = compute_ap(gt_bbox, gt_class_id, gt_mask, r[“rois”], r[“class_ids”], r[“scores”], r[‘masks’])
File “C:\Users\lenovo\Anaconda3\envs\tensorflow\lib\site-packages\mrcnn\utils.py”, line 739, in compute_ap
iou_threshold)
File “C:\Users\lenovo\Anaconda3\envs\tensorflow\lib\site-packages\mrcnn\utils.py”, line 691, in compute_matches
overlaps = compute_overlaps_masks(pred_masks, gt_masks)
File “C:\Users\lenovo\Anaconda3\envs\tensorflow\lib\site-packages\mrcnn\utils.py”, line 107, in compute_overlaps_masks
masks1 = np.reshape(masks1 > .5, (-1, masks1.shape[-1])).astype(np.float32)
File “C:\Users\lenovo\Anaconda3\envs\tensorflow\lib\site-packages\numpy\core\fromnumeric.py”, line 257, in reshape
return _wrapfunc(a, ‘reshape’, newshape, order=order)
File “C:\Users\lenovo\Anaconda3\envs\tensorflow\lib\site-packages\numpy\core\fromnumeric.py”, line 52, in _wrapfunc
return getattr(obj, method)(*args, **kwds)
ValueError: cannot reshape array of size 0 into shape (0)
can you help please
Sorry to hear that, this may help:
https://machinelearningmastery.com/faq/single-faq/why-does-the-code-in-the-tutorial-not-work-for-me
Hello Jason,
First of all, wanted so thank you for this tutorial. So far, it has been really thorough, especially in helping a ML beginner like me to grasp relatively complex ideas.
I have been following the tutorial step-by-step so far with code on Google Colab and python v 3.6 installed as well. I am using this to work on a school project that uses object detection to recognize traffic lights in images.
When train the model, it gives me an error that others have experienced before i.e. AttributeError: ‘Model’ object has no attribute ‘metrics_tensors’
Not exactly sure what is incorrect here, have looked at the model.py file and there only seems to be that single instance of metrics_tensors when we add metrics to the losses. Were you or the others (who might have faced similar errors) able to identify the source of the error?
Cheers
Well done on your progress.
Perhaps there is a library version problem with your environment. Maybe try and run the example locally instead?
I am geting this error while trying
model = MaskRCNN(mode=’training’, model_dir=’./’, config=config)
error
The following Variables were created within a Lambda layer (anchors)
but are not tracked by said layer:
The layer cannot safely ensure proper Variable reuse across multiple
calls, and consquently this behavior is disallowed for safety. Lambda
layers are not well suited to stateful computation; instead, writing a
subclassed Layer is the recommend way to define layers with
Variables.
if i use
model = modellib.MaskRCNN(mode=”inference”, config=config, model_dir=’./’)
i get error
ValueError: Tried to convert ‘shape’ to a tensor and failed. Error: None values not supported.
Matterport’s Mask R-CNN code is incompatible with the latest versions of tensorflow and keras. I eliminated such errors by installing TensorFlow 1.5.1 and Keras 2.0.8
Correct.
Sorry to hear that, perhaps some of these suggestions will help:
https://machinelearningmastery.com/faq/single-faq/why-does-the-code-in-the-tutorial-not-work-for-me
mAP is always coming 1.0 and in some cases it exceeded one (1.00000876). Could you please suggest what would be the suitable cause?
Not sure off the cuff, perhaps try experimenting with the model and specific inputs.
I have data that consists of images and their corresponding annotation files. I have to detect two classes. I intend to use my own neural network. Can you explain to me how to load data into the network.
You may need to write custom code to load your dataset.
could you please suggest me an article to follow
Yes, the above tutorial shows how to load a custom dataset, perhaps you can adapt it to load your custom dataset.
Great tutorial..!
I used this to make a multi-class model (face mask and without mask) I trained it and got the output.
But it is not differentiating Between both classes as this code is for single class..
How can I get it to classify the classes seperately to detect faces without masks..help.
Well done!
Good question, you can prepare and load the data to have two classes instead of one. Note the location where we define the classes when loading and defining the dataset.
Yes, I did that. I updated the code for 2 classes and trained it. but for the predictions(output) how to differentiate between both classes. its showing boxes on all faces(with mask and without) I want to know which face is without mask or with a mask.
So that I can write a script to detect face mask in a photograph.
Nice work.
Yes, the model output will indicate the box and the label.
Yes, it’s working, thank you so much. Please keep up the good work. this tutorial helped a lot.
Well done!
Hi i am also trying to build a multi class model(Bicycle and car) but I cant seem to get it to work, what changes did you make to the code? my epoch just run forever without exiting
Hi Jason, I’m facing issue while trying to run the Mask-RCNN over the google-COLAB environment where first epoch run not getting completed. I tried to solve it by following multiple steps mention by people on various forum but still facing issue. Including trying on various version of tensorflow from version 1.14 to 1.5.1 and keras from 2.0.8 to 2.1.0.
Will it be please possible for you to run the code again at your end with multiple epoch run and then share the requirement.txt file.
Waiting for your reply…
This is a common question that I answer here:
https://machinelearningmastery.com/faq/single-faq/do-code-examples-run-on-google-colab
Hi, great tutorial! I am stuck at
from mrcnn.model import MaskRCNN
output:
ImportError: Keras requires TensorFlow 2.2 or higher. Install TensorFlow via
pip install tensorflowThe issue is that MaskRCNN seems incompatible with the latest version of tf. I have been installing tensorflow 1.5 to avoid issues with model_dir not recognized.
Thank you
You must use TF 1.14 and Keras 2.2.
Hey Jason,
I have the same problem, but following my error im unable to download an earlier version of tf.
ERROR: Could not find a version that satisfies the requirement tensorflow==1.15 (from versions: 2.2.0rc1, 2.2.0rc2, 2.2.0rc3, 2.2.0rc4, 2.2.0, 2.3.0rc0, 2.3.0rc1, 2.3.0rc2, 2.3.0)
ERROR: No matching distribution found for tensorflow-gpu==1.15
Thank you for all you great work
Hey all,
python 3.8 does not support lower tensorflow versions. Python 3.7 can.
The next steps can be used when working in anaconda
This can be installed via conda with the command conda install -c anaconda python=3.7 as per https://anaconda.org/anaconda/python.
Though not all packages support 3.7 yet, running conda update –all may resolve some dependency failures.
Thanks for sharing.
Generally, Python 3.6 is recommend.
Sorry to hear that.
Hello Jason!
Love your articles.
How about if I want to train from scratch,what changes have to be made to the code.
Thanks Peter.
Do not load the pre-trained weights.
Ok thanks
Another question…Please must all input be of same shape
It is common to reshape images to the same size/shape prior to modeling.
The model will do this for you I believe.
Hi Jason,
Is this architecture capable to work for multi class like predicting kangaroo, lion, tiger, etc?
I tried it but getting very less accuracy. Your advice would help.
Thanks,
Anand.
Yes, see this example:
https://machinelearningmastery.com/how-to-perform-object-detection-in-photographs-with-mask-r-cnn-in-keras/
Hi Jason and thanks a million for the tutorial. I implemented it and it is fully functional.
It’s been 24 hours since I started to learn ML, bear in mind.
I want to adapt your code to detect certain photos of items in scanned images, so it is not kangaroos. I need to train the model on a completely new type of object.
I can create the training set folders with images and annotations as you defined them, no problem.
But what would I have to change in the code in order to train it on a completely new type of object? I started by eliminating the load_weights instruction.
Well done!
Good question. Load the weights as before. The change is focused on how you load your custom dataset – to ensure that the class, image, and mask are represented correctly using the Mask RCNN API – use the existing code as a guide.
thanks for the help Jason. I now understand some more about the topic.
When I try to train the model with your code it always gives me this error at the end. Have you noticed this before? I changed the number of epochs to run the program faster and trigger the error sooner for debugging. The error appears with the kangaroo dataset as well as with my dataset.
5/6 [========================>…..] – ETA: 49s – loss: 3.1602 – rpn_class_loss: 0.0097 – rpn_bbox_loss: 0.5310 – mrcnn_class_loss: 0.2470 – mrcnn_bbox_loss: 1.4792 – mrcnn_mask_loss: 0.8933 C:\Python\lib\site-packages\skimage\transform\_warps.py:830: FutureWarning: Input image dtype is bool. Interpolation is not defined with bool data type. Please set order to 0 or explicitely cast input image to another data type. Starting from version 0.19 a ValueError will be raised instead of this warning.
order = _validate_interpolation_order(image.dtype, order)
C:\Python\lib\site-packages\skimage\transform\_warps.py:830: FutureWarning: Input image dtype is bool. Interpolation is not defined with bool data type. Please set order to 0 or explicitely cast input image to another data type. Starting from version 0.19 a ValueError will be raised instead of this warning.
order = _validate_interpolation_order(image.dtype, order)
Traceback (most recent call last):
File “C:\Python\lib\site-packages\mask_rcnn-2.1-py3.6.egg\mrcnn\model.py”, line 1692, in data_generator
ZeroDivisionError: integer division or modulo by zero
During handling of the above exception, another exception occurred:
Traceback (most recent call last):
File “C:/Users/GABI/PycharmProjects/Object_Recognition/main.py”, line 109, in
model.train(train_set, test_set, learning_rate=config.LEARNING_RATE, epochs=5, layers=’heads’)
File “C:\Python\lib\site-packages\mask_rcnn-2.1-py3.6.egg\mrcnn\model.py”, line 2374, in train
File “C:\Python\lib\site-packages\keras\legacy\interfaces.py”, line 91, in wrapper
return func(*args, **kwargs)
File “C:\Python\lib\site-packages\keras\engine\training.py”, line 1418, in fit_generator
initial_epoch=initial_epoch)
File “C:\Python\lib\site-packages\keras\engine\training_generator.py”, line 234, in fit_generator
workers=0)
File “C:\Python\lib\site-packages\keras\legacy\interfaces.py”, line 91, in wrapper
return func(*args, **kwargs)
File “C:\Python\lib\site-packages\keras\engine\training.py”, line 1472, in evaluate_generator
verbose=verbose)
File “C:\Python\lib\site-packages\keras\engine\training_generator.py”, line 330, in evaluate_generator
generator_output = next(output_generator)
File “C:\Python\lib\site-packages\mask_rcnn-2.1-py3.6.egg\mrcnn\model.py”, line 1810, in data_generator
UnboundLocalError: local variable ‘image_id’ referenced before assignment
Sorry to hear that, I have not seen this error.
Do your Keras and TF versions match the expected versions listed at the top of the tutorial?
Did you copy all of the code?
Are you running from the command line?
@Dan I have the same error, did you manage to get rid of it?
Same thing, did you ever fix it Fabian?
Hi Jason!
Similar to the last question, I want to train on a new dataset in which the objects that I want to detect are not even closely related to the objects the pre-trained model has seen. Is this actually possible or do we have to have images that are similar to the pre-trained model? I guess the root of my question is – how flexible is transfer learning? Can I really take a pretrained model trained on kangaroos and get it to learn to detect random shapes in a new image?
Can a MASK RCNN detect overlapping objects?
It is critical to train on data close to what you want to make predictions on in the future.
Hello and thank you for such a great tutorial! I am stuck on a certain part though. I can’t seem to find the mask_rcnn_kangaroo_cfg files that are supposed to be generated. It’s supposed to be saved in your working directory right? Is there another place the .h5 files could be saved?
The mask_rcnn_kangaroo_cfg are model files created after the code is run.
They are in a subdirectory that is in same directory as the code file, when running the code from the command line:
https://machinelearningmastery.com/faq/single-faq/how-do-i-run-a-script-from-the-command-line
Great Tutorial Jason.
I understood your code, but i have one doubt .
You didn’t include any background images in training (i mean image without kangaroo).
So, how to include background images in training because background images don’t have any masks right?
So please tell me how to do this.
Thanks,
Manikanteswar.
I don’t think it is needed.
But perhaps you can provide images without kangaroos and see if the API/model accepts them.
Hi Jason,
thanks for this great tutorial. how to have the class_name i.e ‘kangaroo’ displayed on the picture? more importantly, how to extract it and save it in some list ?
many thanks
You can use matplotlib to write text on images:
https://matplotlib.org/3.1.1/api/_as_gen/matplotlib.pyplot.text.html
You can save a list to file:
https://machinelearningmastery.com/how-to-save-a-numpy-array-to-file-for-machine-learning/
Hey Jason,
Lets just say you saved my life.
Happy to hear that.
Hi, is there a way for me to see validation/training accuracy in each epoch? Will model.history.keys() even show something? Is there a way? Thank you.
Good question, the performance is reported on the command line.
Perhaps check the API for the train() function to see if it returns a history object.
Thank you, found that can use Tensorboard for the graphic view. I have another question/problem. With my custom dataset around 1000 images and128x128 pixels, and I somehow manage to run out of memory, is there a fix for that?
Well, managed to fix that by, reducing learning rate to 0.00001 and steps per epoch to 50.
Well done!
Use a machine with more memory, like AWS EC2.
Use a smaller dataset.
Use smaller images.
Hi Jason,
Thank you for this great tutorial. Would you have a similar tutorial using YOLO for Keras instead of R-CNN for Keras?
Thank you very much.
Not at this stage.
Is Mask-RCNN better than yoloV3? I’m trying to build a model which could predict stamps in the given bank forms.
I believe it is. It might a good idea to test a suite of models and discover what works best for your specific dataset.
Hi, is it possible to predict in real time? Or would it be possible to get each image shown right after it predicts, so I dont have to wait for the whole batch to finish?
Thanks.
Ohh, sorry for asking too much questions. What if I wanted to just predict the picture and save it with the bounding box filled?
Sure, you can save anything you like.
Yes, you can call predict() with one image in real time.
For people facing memory problems when running the code in the training part, add IMAGES_PER_GPU = 1 in the “#define a configuration for the model” section.
Thanks for the tutorial really helpful
Thanks for sharing!
Hello my good friends
I want to diagnose a car (car brand) through yolo.
Thank you for your help.
09174286232 WhatsApp
asadi.amin.ai@gmail.com
Hello Jason,
Based on this link “mAP (mean Average Precision) for Object Detection, 2018” i cannot really figure out what kind of method is used to calculate the mAP and where i can find it. Is the Pascal Voc used or MS coco. If MS coco is used the interpolation of 101 points is ment by it right? Where could i find it myself next time?
Thank you for your great work,
Nils
mAP is calculated in the rcnn library.
Thanks for the great writeup. Was able to successfully implement this. Question:
If training on new images—I assume we have to come up with an xml file to classify “where in an image an object is”. What is the best way to generate that file?
Also—I did this in tensorflow 2.0. Must be an update. That said, I used your recommended keras. Perhaps you want it add this information to your article.
Thanks for the suggestion.
Is there an easy way to convert your programs output .h5 file to a .pb file for TensorRT use?
I don’t know about those formatas, sorry.
Currently, I’m getting 0.0 train and test mAP accuracy. What could potentially be the issue?
Sorry to hear that, some of these tips may help:
https://machinelearningmastery.com/faq/single-faq/why-does-the-code-in-the-tutorial-not-work-for-me
Can you be a bit more clear about why mold_image is required ?
I can see in source code that mold_image does normalization of the image, but I haven’t seen the same normalization done for Kangaroo Dataset which is used for training the model.
So, why are we doing normalization while predicting ?
If I recall, it is because the data prep is performed automatically when training the model, and when predicting/evaluating we are loading new data and must perform data prep manually.
Traceback (most recent call last):
File “C:\Users\User\anaconda3-38\lib\site-packages\IPython\core\interactiveshell.py”, line 3418, in run_code
exec(code_obj, self.user_global_ns, self.user_ns)
File “”, line 8, in
train_mAP = evaluate_model(train_set, model, cfg)
File “”, line 60, in evaluate_model
AP, _, _, _ = mrcnn.utils.compute_ap(gt_bbox, gt_class_id, gt_mask, r[“rois”], r[“class_ids”], r[“scores”], r[‘masks’])
File “C:\Users\User\PycharmProjects\Test2\mrcnn\utils.py”, line 727, in compute_ap
gt_match, pred_match, overlaps = compute_matches(
File “C:\Users\User\PycharmProjects\Test2\mrcnn\utils.py”, line 682, in compute_matches
overlaps = compute_overlaps_masks(pred_masks, gt_masks)
File “C:\Users\User\PycharmProjects\Test2\mrcnn\utils.py”, line 115, in compute_overlaps_masks
intersections = np.dot(masks1.T, masks2)
File “”, line 5, in dot
ValueError: shapes (2,1048576) and (3136,2) not aligned: 1048576 (dim 1) != 3136 (dim 0)
Is there a solution to this error?
Sorry to hear that you’re having trouble, these tips may help:
https://machinelearningmastery.com/faq/single-faq/why-does-the-code-in-the-tutorial-not-work-for-me
Hi! I am having this error too using tf 2.0. Do you have any updates?
thanks
What is your error message?
Hello, thanks for the tutorial, I managed to run realtime recognition through opencv.
But I have a problem and I am hoping I can get it resolved.
When I call model.predict() it takes 0.54 seconds until it finishes, that is very very slow like 2 frames pre second, how can I speed it up?
Thank you.
You’re welcome!
Perhaps some of these suggestions will help:
https://machinelearningmastery.com/faq/single-faq/how-do-i-speed-up-the-training-of-my-model
Thanks, but I dont have problem with training, but the prediction rate is too slow, I would like to get it atleast to 0.1s per image. Is there a way to reduce the time it takes to compute where the bnd box is? Thank you.
I understand, the suggestions in the link may help, e.g. run on faster machine, find alternate implementation, etc…
Hi Jason, Did you get a chance to write on image annotation?
Though I am aware of a couple of tools like makesense.ai but they all work on a single image at a time. This is cumbersome when there are thousands of images.
Are you aware of any platform where we upload a list of images and their corresponding labels to generate annotations for all in one go?
No, sorry. I have not taken a close look at image annotation.
A question is bothering me for a while and that is about the limitation of Neural Networks in general ( CNNs, RNNs, or other structures) for detecting small objects. I know small object detection is itself a challenging topic. However, is there any limitation in the size of the object that these models can detect as the smallest kernel size can be used is 3 by 3? Please correct me if I am looking at this issue from the wrong point of view (relating kernel size and object size).
Yes, really small or really large objects can be missed and may require specalized handling of the data or custom models that can operate at multiple scales in parallel.
thanks a lot, very straight and clear
You’re welcome.
Hi Jason,
In the code above, at the time of model evaluation or running prediction on a single image, function: mold_image(..) is used to perform pixel centering, This step wasn’t explicit in model training. Is it that this step is taken care off by MaskRCNN model training behind the scenes?
Thanks in advance!!!
Yes.
Thanks Jason for a quick response, I have a follow-up question.
My dataset is images of emergency and non-emergency vehicles. After model training and evaluation, when running it on test set images, model couldn’t detect vehicle in one image. And when I commented the step of mold_image(…), it could successfully detect the vehicle.
So, is it right to say that pre-processing step – centering of image should not be done on this dataset? If so, how do I turn that off during model training.
You’re welcome.
Interesting. If the pre-processing was used during training, it should be used on new data.
Perhaps confirm it was applied during training.
Perhaps confirm any other assumptions.
Hi Jason,
Thanks for your guide!
How would I build a data set of the images that aren’t flagged as difficult?
Thanks
Perhaps exclude all images from train and test that cannot be predicted with a simple model?
But why?
actually I’ve just worked it out
wooo!
Well done!
According to https://www.tensorflow.org/hub/tutorials/object_detection,
The coordinate of the bounding boxes should be in the form of [ymin, xmin, ymax, xmax], which is different from yours. I am a bit confused.
Perhaps it is a different API.
Hello Jason,
Greetings for the day!
While training the model I am receiving the the following errors:
1. File “/usr/local/lib/python3.7/dist-packages/tensorflow_core/python/util/module_wrapper.py”, line 193, in __getattr__
attr = getattr(self._tfmw_wrapped_module, name)
AttributeError: module ‘tensorflow’ has no attribute ‘name_scope’
2. File “/usr/local/lib/python3.7/dist-packages/tensorflow_core/python/keras/applications/__init__.py”, line 22, in
import keras_applications
ModuleNotFoundError: No module named ‘keras_applications’
Could please help me to solve these errors.
Thank you!!
Sorry to hear that, these suggestions may help:
https://machinelearningmastery.com/faq/single-faq/why-does-the-code-in-the-tutorial-not-work-for-me
AttributeError Traceback (most recent call last)
in ()
6 from mrcnn.utils import Dataset
7 from mrcnn.config import Config
—-> 8 from mrcnn.model import MaskRCNN
9
10
/content/Mask-Rcnn/mrcnn/model.py in ()
253
254
–> 255 class ProposalLayer(KE.Layer):
256 “””Receives anchor scores and selects a subset to pass as proposals
257 to the second stage. Filtering is done based on anchor scores and
AttributeError: module ‘keras.engine’ has no attribute ‘Layer’
I am getting this error can you help pls
Perhaps ensure you are using the version of tensorfow and keras described at the top of the tutorial.
Hello Jason ,
Thank you for this comprehensive tutorial !
Issues encountered :
(1)AttributeError: module ‘keras.engine’ has no attribute ‘Layer’ : This issue (also reported by somebedy else in the comments section ) gets resolved (as you have suggested above in another comment)after installing the tensor flow version and keras version that you have mentioned
However , after having resolved the above issue, there is another error :
AttributeError: module ‘tensorflow’ has no attribute ‘name_scope’
Any suggestions on resolving this error please ?
You’re welcome.
Perhaps ensure you are using the version of keras and tensorflow listed above.
please ignore/delete comment , issue resolved
I’m happy to hear that.
Hey Jason,
very nice work.
I have a question for the output.
We get a single class output with a confidence score for this class.
Is it possible to get a class vector for each box?
Example: 2 Classes (Dog, Cat)
Box[x, y , width, height, class:[0.3, 0.7]
So is it possible to say this box is 30% Dog and 70% Cat or something like that?
Even better would be that each class could be 0%-100% for itself. So 65%/100% its a dog and 80%/100% its a cat.
I want decide myself wich class it should take.
Thanks!
Yes, I believe it provides a box for each item discovered in the image and probabilities for all known classes.
Hey Jason,
unluckily it doesnt.
I just get one class for each box and not a multiclass vector.
My problem is that i don’t find any chance to customize the code for output a vector…
If you believe, how can I get this vector…
Thanks for your answer. 🙂
It’s nice that you’re still helping people.
I believe it does, see the kangaroo example where two “objects” are found in one image.
I understand, that I can detect multiple objects in one image.
But i need a multiclass “vector” for one object.
I need: “This object is 60% a dog and 40% a cat.” for example.
Yes, a given prediction gives a vector of probabilities across all known classes I believe. You can sorry by probability and report the top 5. I think I have an example of this for pre-trained image classification models on the blog.
Ciao a tutti, sono alle prime armi con il deep learning…ho addestrato un modello tramite una CNN con Keras ed ho salvato il modello.h5 – Da questo come posso fare object detection per rilevare gli oggetti nelle immagini ? Chi mi aiuta ad eseguire questo prox step? GRAZIE mille
You can load the model and call model.predict() with an input image to perform object detection.
Perhaps this will help:
https://machinelearningmastery.com/how-to-make-classification-and-regression-predictions-for-deep-learning-models-in-keras/
Hello Jason,
I have a different dataset from this. It is a CSV annotation file and it has more than one class in the dataset such as person, car, cat, etc. The bounding box coordinates are in x_min, y_min, x_max, y_max format, where x_min, y_min is the top-left coordinate whereas x_max, y_max is the bottom right coordinate. The class names are text files and I need to change them into integer representation, I think. I have seen in some datasets that they arranged based on classes, but in this dataset, all the images are in one folder. I want to parse the CSV file and preprocess it before loading it to the object detection model. Each image contains more than one object. How can I parse my dataset? I used the pandas read_csv () file function, but I ended up with an error saying that the length of the input image and the images in the annotation file are not equal. This is because the image names are repeated for each bounding box in the annotation.
I really appreciate your suggestion and help
Simeon.
You may have to write some custom code to load your dataset.
Correction: The class names are categorical data. Sorry, I wrote it as text data.
I have reused above code, but I got below error. Is there any one got the same issue and how to solve it ? Thanks.
Traceback (most recent call last):
File “.\kangaroo_detection2.py”, line 124, in
model = MaskRCNN(mode=’training’, model_dir=’./’, config=config)
File “C:\Users\HP\Documents\000_DATA\100_TECH\100_CODE\100_TRAIN\300_ComputerVision\envWinComputerVision_python37\lib\site-packages\mask_rcnn-2.1-py3.7.egg\mrcnn\model.py”, line 1849, in __init__
File “C:\Users\HP\Documents\000_DATA\100_TECH\100_CODE\100_TRAIN\300_ComputerVision\envWinComputerVision_python37\lib\site-packages\mask_rcnn-2.1-py3.7.egg\mrcnn\model.py”, line 1978, in build
File “C:\Users\HP\Documents\000_DATA\100_TECH\100_CODE\100_TRAIN\300_ComputerVision\envWinComputerVision_python37\lib\site-packages\keras\engine\base_layer.py”, line 457, in __call__
output = self.call(inputs, **kwargs)
File “C:\Users\HP\Documents\000_DATA\100_TECH\100_CODE\100_TRAIN\300_ComputerVision\envWinComputerVision_python37\lib\site-packages\mask_rcnn-2.1-py3.7.egg\mrcnn\model.py”, line 323, in call
File “C:\Users\HP\Documents\000_DATA\100_TECH\100_CODE\100_TRAIN\300_ComputerVision\envWinComputerVision_python37\lib\site-packages\mask_rcnn-2.1-py3.7.egg\mrcnn\utils.py”, line 820, in batch_slice
File “C:\Users\HP\Documents\000_DATA\100_TECH\100_CODE\100_TRAIN\300_ComputerVision\envWinComputerVision_python37\lib\site-packages\mask_rcnn-2.1-py3.7.egg\mrcnn\model.py”, line 321, in
File “C:\Users\HP\Documents\000_DATA\100_TECH\100_CODE\100_TRAIN\300_ComputerVision\envWinComputerVision_python37\lib\site-packages\mask_rcnn-2.1-py3.7.egg\mrcnn\model.py”, line 263, in clip_boxes_graph
File “C:\Users\HP\Documents\000_DATA\100_TECH\100_CODE\100_TRAIN\300_ComputerVision\envWinComputerVision_python37\lib\site-packages\tensorflow_core\python\framework\ops.py”, line 645, in set_shape
raise ValueError(str(e))
ValueError: Shapes must be equal rank, but are 3 and 2
Sorry to hear that, perhaps some of these tips will help:
https://machinelearningmastery.com/faq/single-faq/why-does-the-code-in-the-tutorial-not-work-for-me
Hi! Firstly, thank you so much for this guide! It has been insanely helpful and I really appreciate it!
I was wondering if I could get your help on something. I’m currently trying to train the RCNN to detect insects in my backyard and the network is picking up other things like chairs, vases, and people and classifying it as insect. I believe this is from the base network that has 80 objects trained.
Is there anyway I can separate these 80 objects from the network and prevent it from detecting other things and only detect the new insect classes I want?
Thank you!
Perhaps you can write some code to interpret the prediction from the model and only report relevant objects to the user.
Thank you!
You’re welcome!
Hi Jason,
I love this tutorial, very detailed explanation.
I’m using Keras 2.2.4 , TF 1.15, and h5py 3.3.0, My problem is that I’m stuck at ‘model.load_weights’, error message says:
ImportError: dlopen(/Users/fancy/opt/anaconda3/envs/myenv/lib/python3.7/site-packages/h5py/defs.cpython-37m-darwin.so, 2): Symbol not found: _H5Pget_fapl_ros3
Referenced from: /Users/fancy/opt/anaconda3/envs/myenv/lib/python3.7/site-packages/h5py/defs.cpython-37m-darwin.so
Expected in: /Users/fancy/opt/anaconda3/envs/myenv/lib/libhdf5.103.dylib
in /Users/fancy/opt/anaconda3/envs/myenv/lib/python3.7/site-packages/h5py/defs.cpython-37m-darwin.so
I searched a lot but can’t figure out the solution, could you help?
Thank you so much!
Error like this are due to library installation. May be you have some conflicting mix of libraries? Try uninstall h5py and reinstall. That may help.
This worked for me
!pip install ‘h5py==2.10.0’ –force-reinstall
Thank you for this informative tutorial
I have a question about image size
I am having this error
IndexError: index 2048 is out of bounds for axis 0 with size 2048
because my image height is 2048
What to do with large-size images?
Thanks in advance.
There can be a lot of things to do with large images but your error seems to be accessing outside of the array. It sounds to me like some coding mistake more than anything else.
Thank you for your reply
I have already annotated the large size images using VIA tool
the largest image is 2322*4096 and the smallest one is 720 *1280
Should the image resize mode be “square” with max_size=1024 and min_size=800 as default values?
Or I should modify them according to my dataset image size?
Can you kindly tell me what should be the optimum value for max_size and min_size?
I would refer to rescale the image rather than modify the model. The reason is that, modifying the model means retraining, which is very time consuming.
I have already annotated the dataset which was a time-consuming task. I think I will have to re annotate them for the new resized images
I have three questions now:
1.Should I set image_resize_Mode to “square” or “crop”?
2.Do you think that setting max_size and min_size to larger values like 2048 or 4096 rather than 1024 will give better results?
3.Are there any parameters needs to be modified if I change min_size and max_size?
Thanks in advance
I don’t think re-annotate is necessary. There should be a tool to resize/crop image together with the annotation. For square or crop, I would prefer whatever to keep the aspect ratio. And for the size, I would prefer to make it as small as possible while you can still identify the object. You shouldn’t be greedy here, but rather, keep the minimum information for the model so it will not learn from the noise and converge faster.
Thank you for your reply
I would be grateful for you if you tell me tool name to crop the image with annotation
I have used vgg image annotator (VIA)
Thanks in advance
That should not be difficult to write your own program to do the cropping. You may also see if this is something helpful for you: https://github.com/italojs/resize_dataset_pascalvoc
Hi Jason
TNX for sharing such a great article!!
Well described part by part of it
Personally, I faced some debugging errors.
I’m using colab. Installed the Tensroflow and Keras with the specific version mentioned in the begining of the article.
First, after running the cell(in which the trainng starts), I got the Error
ModuleNotFoundError: No module named ‘keras_applications’
in which is described in one of above comments(Back to April 28th).
By a little search, I supposed that all of it is because of h5py version. So, I tried installing h5py v2.8.0. However, the funny thing is I got a new completely different error which is:(The last traceback)
Traceback (most recent call last):
File “/usr/local/lib/python3.7/dist-packages/IPython/core/ultratb.py”, line 1132, in get_records
return _fixed_getinnerframes(etb, number_of_lines_of_context, tb_offset)
File “/usr/local/lib/python3.7/dist-packages/IPython/core/ultratb.py”, line 313, in wrapped
return f(*args, **kwargs)
File “/usr/local/lib/python3.7/dist-packages/IPython/core/ultratb.py”, line 358, in _fixed_getinnerframes
records = fix_frame_records_filenames(inspect.getinnerframes(etb, context))
File “/usr/lib/python3.7/inspect.py”, line 1502, in getinnerframes
frameinfo = (tb.tb_frame,) + getframeinfo(tb, context)
File “/usr/lib/python3.7/inspect.py”, line 1460, in getframeinfo
filename = getsourcefile(frame) or getfile(frame)
File “/usr/lib/python3.7/inspect.py”, line 696, in getsourcefile
if getattr(getmodule(object, filename), ‘__loader__’, None) is not None:
File “/usr/lib/python3.7/inspect.py”, line 733, in getmodule
if ismodule(module) and hasattr(module, ‘__file__’):
File “/usr/local/lib/python3.7/dist-packages/tensorflow/__init__.py”, line 50, in __getattr__
module = self._load()
File “/usr/local/lib/python3.7/dist-packages/tensorflow/__init__.py”, line 44, in _load
module = _importlib.import_module(self.__name__)
File “/usr/lib/python3.7/importlib/__init__.py”, line 127, in import_module
return _bootstrap._gcd_import(name[level:], package, level)
File “”, line 1006, in _gcd_import
File “”, line 983, in _find_and_load
File “”, line 965, in _find_and_load_unlocked
ModuleNotFoundError: No module named ‘tensorflow_core.estimator’
Have you got any ideas for dealing with this?
I appreciate your response
I believe that is more like tensorflow 1.x vs 2.x issue. There’s a lot of change in this major version upgrade and breaks a lot of old code.
Got an error in /Mask_RCNN/mrcnn/model.py”, line 20,
ImportError: cannot import name ‘get_config’ from ‘tensorflow.python.eager.context’.
Tensorflow versions issues as always
Hey Jason, thanks so much for all the great tutorials. I’m having an issue with an “AttributeError: ‘str’ object has no attribute ‘decode'” error when trying to execute the “model.load_weights” block. The error line reads “original_keras_version = f.attrs[‘keras_version’].decode(‘utf8’). Google suggests dropping the “.decode(‘utf8) because it’s no longer necessary after python 3 but that’s not possible due to it being source code. I’m using python 3.6 and force installed tensorflow 1.15.3 and keras 2.2.4 as you directed at the beginning of the tutorial. Any advice is greatly appreciated, thank you.
Hi Josh,
I have the same problem as you. did you manage to fix it?
thank you
Try to use a newer Tensorflow (e.g., 2.x) which I believe it has better support of Python 3
Hi Sofia and Josh,
Did any of you successfully fix this issue? Please do let me know.
Hi James I am facing an issue when trying out the codes.
When using functions like .image_reference(), and .load_image() where inside the functions it will call the self.image_info[image_id] function
I will get this error:
TypeError Traceback (most recent call last)
~\AppData\Local\Temp/ipykernel_15376/2053193333.py in
1 # load an image
2 image_id = ’30_days_01.jpg’
—-> 3 dataset_train.image_reference(image_id)
4
5 # image = dataset_train.load_image(image_id)
~\AppData\Local\Temp/ipykernel_15376/2509526515.py in image_reference(self, image_id)
116 def image_reference(self, image_id):
117 “””Return the path of the image.”””
–> 118 info = self.image_info[image_id]
119 if info[“source”] == “object”:
120 return info[“path”]
TypeError: list indices must be integers or slices, not str
the keras version im using is 2.2.5 and tensorflow version is 1.13.1
I did tried out with the verions mentiond in your article but I’m still having the same error too.
Hope to hear from you soon
Thank you
The error message tells it all – you need image_id to be an integer to make it work.
Thank Adrian,
It is just as what you mentioned. 😀
Hello, great tutorial! I ran the 1st part of the code you have at the beginning of the tutorial. How can I modify this line of code: “display_instances(image, bbox, mask, class_ids, train_set.class_names)” in order to print the image in original dimensions? Because I use very big UAV images and the squares seem very small.
Great work!!!
One of the greatest tutorial on the internet!! Very understandable!!! What modifications should I do in the above code to make it train and work with my custom dataset? Once again, THANKS for the great tutorial and the information…You are awesome!
Thanks for providing this article… it might be a start for me. I just got started into object detection and I’m working on a project that detect bank cheques from images. Can I use this procedures in training with my datasets for my project.
I would be very grateful for response
Best regards
Hi Jeffrey…Yes, but understand that all code and material on my site and in my books was developed and provided for educational purposes only.
I take no responsibility for the code, what it might do, or how you might use it.
If you use my code or material in your own project, please reference the source, including:
The Name of the author, e.g. “Jason Brownlee”.
The Title of the tutorial or book.
The Name of the website, e.g. “Machine Learning Mastery”.
The URL of the tutorial or book.
The Date you accessed or copied the code.
For example:
Jason Brownlee, Machine Learning Algorithms in Python, Machine Learning Mastery, Available from https://machinelearningmastery.com/machine-learning-with-python/, accessed April 15th, 2018.
Also, if your work is public, contact me, I’d love to see it out of general interest.
Hi Jason,
Thanks for the great tutorial, with excellent explaination.
While using example, I am facing following issue (mentioned above by others too).
model.load_weights(“mask_rcnn_coco.h5”, by_name=True, exclude=[“mrcnn_class_logits”, “mrcnn_bbox_fc”, “mrcnn_bbox”, “mrcnn_mask”])
Traceback (most recent call last):
File “/home/kiran/cds2_cp_team5/mrcnn/COCO_creator/CioccaDataset.py”, line 324, in
model.load_weights(str, by_name=True, exclude=[“mrcnn_class_logits”, “mrcnn_bbox_fc”, “mrcnn_bbox”, “mrcnn_mask”])
File “/home/kiran/.pyenv/versions/3.7.13/lib/python3.7/site-packages/mask_rcnn-2.1-py3.7.egg/mrcnn/model.py”, line 2130, in load_weights
File “/home/kiran/.pyenv/versions/3.7.13/lib/python3.7/site-packages/keras/engine/saving.py”, line 1083, in load_weights_from_hdf5_group_by_name
original_keras_version = f.attrs[‘keras_version’].decode(‘utf8’)
I am using TF version 1.15.3 and Keras 2.2.4
Python version: 3.7.13
Can you please help figure out the issue?
Hi Kiran…I would highly recommend that you run your code in Google Colab to determine if there could be versioning issues on your local machine.
Thanks James!
Finally I got around version problems by
1. using 2.x compatible version @ (https://github.com/ahmedfgad/Mask-RCNN-TF2.git)
2. Following versions worked for me
tensorflow==2.2.0
keras==2.3.1
This was lovely to read.
Thank you for your support and feedback!
Hi Guys,
Thanks for the fantastic blog .
A quick question please : Lets suppose I’v trained another Data Set in exactly this way on this model and lets assume I’ve done everything right . Inspite of that ,If I am not getting good results , how should I deal with this ?
How can I tune this model(this particular matter port implementation) if need be ?Is there an option to tune it ?
Do I have the option of training more than just the top layers ?Do I have the option to change hyper params ?
If yes ,would I need to modify the Matter port source code for all of the above or is there anyway around this ?
Please ignore /delete this comment , I missed the section where you have already mentioned in the blog that we can finetune more layers , looks like this is a configuration that is available . Thanks !
why running model on GPU return Nan values
Regards,
If I have to detect defects in the images, but there are not defects in all images, do I need to train with images withou defects also?
Hi Hassan…Best practices can be found here:
https://medium.com/swlh/how-to-detect-defects-on-images-16d6cf3ddc1a
https://aaron-hkheng.medium.com/defect-detection-using-image-recognition-9873236545b8
Thanks for the nice tutorial.
When I execute the training on my GPU I see that some rpn_loss is nan , what could be the reason?
loss: nan – rpn_class_loss: nan – rpn_bbox_loss: nan – mrcnn_class_loss: 0.3515 – mrcnn_bbox_loss: 0.0023 – mrcnn_mask_loss: 0.0010 – val_loss: nan – val_rpn_class_loss: nan – val_rpn_bbox_loss: nan – val_mrcnn_class_loss: 0.1193 – val_mrcnn_bbox_loss: 0.0000e+00 – val_mrcnn_mask_loss: 0.0000e+00
and also I get no object detections for the image after the train on my custom dataset.
Hi Anil…You are very welcome! We have not experienced that issue. Perhaps you could try an experiment with executing your code in Google Colab with the GPU option or AWS. Let us know what you find out!
https://machinelearningmastery.com/google-colab-for-machine-learning-projects/
https://machinelearningmastery.com/develop-evaluate-large-deep-learning-models-keras-amazon-web-services/
Hi, I’m trying to get this up and running with my daughter for a science fair project, I will admit to having spent most of my development career in Java, so not needing to worry as much about hardware.
We are finding ourselves locked in loop, we are trying to get working Tensorflow and Keras versions (recommended above) that both work with this code, each other and the M1 chip. When I checkout Tensorflow GitHub, they only have a Mac x86 version of the older version of TensorFlow. Anyone tackled this one?
Also, just a shout out to the commenters and writers, this has been a really great tutorial and community, so thank you all!
Hi Geoffrey…You may consider investigating Google Colab to get started to avoid complications of a local environment:
https://machinelearningmastery.com/google-colab-for-machine-learning-projects/
Hey there,
is there a possibility to re-train/finetune a pretrained MR-CNN on a custom dataset?
Thanks in advance.
Hi Tobi…Absolutely! The following resource may be of interest to you:
https://pyimagesearch.com/2019/06/03/fine-tuning-with-keras-and-deep-learning/
Thanks for your answer but as i see this resource only shows finetuning classification model(s) but not an object detector
Hi Tobias…Here are some additional thoughts:
Fine-tuning an object detector involves several key steps, and it’s a process used to adapt a pre-trained model to your specific task, improving its accuracy on your particular dataset. Here’s a step-by-step guide on how to fine-tune an object detection model:
### 1. Choose a Pre-trained Model
Start with a pre-trained object detection model that has been trained on a large and general dataset like COCO, Pascal VOC, or ImageNet. Popular architectures include YOLO (You Only Look Once), SSD (Single Shot MultiDetector), and Faster R-CNN.
### 2. Collect and Prepare Your Dataset
– **Collect a dataset** that is relevant to your specific task. Your dataset should include images that represent the kind of objects you want to detect.
– **Annotate your images** by drawing bounding boxes around the objects of interest and labeling them. There are various annotation tools available, such as LabelImg or CVAT.
– **Split your dataset** into training, validation, and test sets. A common split ratio is 70% for training, 15% for validation, and 15% for testing.
### 3. Configure the Model for Your Dataset
– **Modify the model’s head** if necessary, to match the number of classes in your dataset. For instance, if you’re detecting three types of objects, the final layer should output three classes.
– **Adjust the configuration settings** of the model, such as the learning rate, batch size, and the number of epochs. You might start with the configuration of the pre-trained model and adjust based on your dataset size and complexity.
### 4. Augment Your Data (Optional)
Data augmentation involves artificially increasing the size and diversity of your training dataset by applying various transformations like flipping, scaling, cropping, and color variation. This can help improve the robustness of your model.
### 5. Fine-Tune the Model
– **Load the pre-trained model** and modify it for your dataset.
– **Freeze the early layers** of the model to retain learned features that are generally applicable to most visual tasks. Only train the latter layers that are more specific to the detection task.
– **Train the model** on your dataset. Use the training set to train the model and the validation set to tune the hyperparameters and avoid overfitting.
### 6. Evaluate the Model
– **Use the test set** to evaluate the model’s performance. Common metrics for object detection include Precision, Recall, and the mean Average Precision (mAP).
– **Iterate** on your training process by adjusting model configurations, augmenting your data differently, or even collecting more data based on the performance on the test set.
### 7. Deploy the Model
Once satisfied with the model’s performance, deploy it for real-world usage or further testing.
### Tools and Libraries
You can use deep learning frameworks like TensorFlow (with its object detection API), PyTorch (with libraries like Detectron2 or Torchvision), or even higher-level APIs like Keras for fine-tuning object detection models.
Fine-tuning is an iterative process. It might take several rounds of adjustment and training to get the desired accuracy and performance from your object detector.