In the previous post, you saw that OpenCV can extract features from an image using a technique called the Histogram of Oriented Gradients (HOG). In short, this is to convert a “patch” of an image into a numerical vector. This vector, if set up appropriately, can identify key features within that patch. While you can use HOG to compare images for similarity, one practical application is to make it the input to a classifier so you can detect objects in an image.
In this post, you will learn how to create a classifier with HOG. Specifically, you will learn:
How to prepare input data for classifier training
How to run the training and save the model for reuse in OpenCV
Kick-start your project with my book Machine Learning in OpenCV. It provides self-study tutorials with working code.
Let’s get started.
How to Train a Object Detection Engine with HOG in OpenCV Photo by Neil Thomas. Some rights reserved.
Overview
This post is divided into three parts; they are:
HOG for Classification
Preparing Data
Training Classifier using HOG Features
HOG for Classification
In the previous post, you learned that HOG is a technique to generate feature vectors from a region of an image. Chances are, the object in that region determines much of the feature vector.
Object detection is to find the region in a larger image where a particular object is located. Usually, the goal is to find a rectangular bounding box in the large image such that the object is tightly within that box.
Using HOG for object detection is not difficult: You simply draw multiple bounding boxes randomly from the image. Then, you can find the feature vector of the bounding box using HOG and compare the vector to what you expected for the target object.
However, there are multiple details you need to take care of: Firstly, HOG has multiple parameters, including the size of window, block, and cell. This also determined the size and aspect ratio of the bounding box. If your bounding box has a different size, you may need to resize it. Secondly, the HOG is sensitive to rotation. Hence if the image is tilted, the feature vector obtained from HOG may not be useful for object detection.
Finally, every bounding box will produce a HOG vector differently, even if they all identified the same object. You need a clever way to tell if the object is detected, which is usually a machine learning model.
Several models can be used to compare the HOG from a candidate bounding box. In this post, you will use a support vector machine (SVM). OpenCV has a built-in people detector, which is also implemented as an SVM.
Preparing Data
Let’s consider the task of cat detection. For an image with a cat, you want to draw a square around the cat’s face. You will build a SVM with OpenCV for this task.
As in all machine learning projects, the first step is to get the dataset. You can get the dataset with cat image from the Oxford-IIIT Pet Dataset, at this location:
This is an 800MB dataset, which is a small one at the standard of computer vision datasets. The images are annotated in the Pascal VOC format. In short, each image has a corresponding XML file that looks like the following:
XHTML
1
2
3
4
5
6
7
8
9
10
11
12
13
14
15
16
17
18
19
20
21
22
23
24
25
26
27
28
29
<?xml version="1.0"?>
<annotation>
<folder>OXIIIT</folder>
<filename>Abyssinian_100.jpg</filename>
<source>
<database>OXFORD-IIIT Pet Dataset</database>
<annotation>OXIIIT</annotation>
<image>flickr</image>
</source>
<size>
<width>394</width>
<height>500</height>
<depth>3</depth>
</size>
<segmented>0</segmented>
<object>
<name>cat</name>
<pose>Frontal</pose>
<truncated>0</truncated>
<occluded>0</occluded>
<bndbox>
<xmin>151</xmin>
<ymin>71</ymin>
<xmax>335</xmax>
<ymax>267</ymax>
</bndbox>
<difficult>0</difficult>
</object>
</annotation>
The XML file tells you which image file it is referring to, and what object it contains, with the bounding box between the tags <bndbox></bndbox>.
There are some Python library you can use to handle the Pascal VOC XML files. But for a simple case like this, you can simply use Python’s built-in XML parser. The following is a function that, given the XML filename, it reads the content and returns a Python dictionary to tell you all the objects it contains and the corresponding bounding boxes:
1
2
3
4
5
6
7
8
9
10
11
12
13
14
15
16
17
18
import xml.etree.ElementTree asET
def read_voc_xml(xmlfile:str)->dict:
root=ET.parse(xmlfile).getroot()
boxes={"filename":root.find("filename").text,
"objects":[]}
forbox inroot.iter('object'):
bb=box.find('bndbox')
obj={
"name":box.find('name').text,
"xmin":int(bb.find("xmin").text),
"ymin":int(bb.find("ymin").text),
"xmax":int(bb.find("xmax").text),
"ymax":int(bb.find("ymax").text),
}
boxes["objects"].append(obj)
returnboxes
An example of the dictionary returned by the above function is as follows:
In this dataset, there is only one object per image (either a cat or a dog). The bounding box is specified as the pixel coordinates. With the filename you obtained above, you can read the image using OpenCV. The image is a numpy array. Hence you can extract the portion using array slicing. Like the following
1
2
img=cv2.imread(path)
portion=img[ymin:ymax,xmin:xmax]
Let’s focus on our goal of training a classifier. At first, you need to design the parameters for HOG calculation. Let’s consider a vector that is not too long, namely,
window size: (64,64)
block size: (32, 32)
block stride: (16, 16)
cell size: (16, 16)
number of bins: 9
In other words, you will consider a square window of 64×64 pixels on the image with the cell size of 16×16 pixels. Each block has 2×2 cells.
Because the window is square, and you do not want to change the image’s aspect ratio, you will adjust the bounding box in the dataset to a square size. Afterward, you should crop the adjusted bounding box, resize it to 64×64 pixels, and save it as positive samples. You also need negative samples for the training. Since you want to make a cat detector, you can make use of the dog images as negative samples. You want the negative samples to cover the background of the image. Instead of following the bounding boxes, you can simply randomly crop a square region from those images and resize to 64×64 pixels as negative samples.
In code, below is how you can collect 1000 samples of positive and negative samples from the dataset. It is assumed that you downloaded the dataset and expanded the two tar files to the directory oxford-iiit-pet:
1
2
3
4
5
6
7
8
9
10
11
12
13
14
15
16
17
18
19
20
21
22
23
24
25
26
27
28
29
30
31
32
33
34
35
36
37
38
39
40
41
42
43
44
45
46
47
48
49
50
51
52
53
54
55
56
57
58
59
60
61
62
def make_square(xmin,xmax,ymin,ymax):
"""Shrink the bounding box to square shape"""
xcenter=(xmax+xmin)// 2
ycenter=(ymax+ymin)// 2
halfdim=min(xmax-xmin,ymax-ymin)// 2
xmin,xmax=xcenter-halfdim,xcenter+halfdim
ymin,ymax=ycenter-halfdim,ycenter+halfdim
returnxmin,xmax,ymin,ymax
# Define HOG parameters
winSize=(64,64)
blockSize=(32,32)
blockStride=(16,16)
cellSize=(16,16)
nbins=9
num_samples=1000
base_path=pathlib.Path("oxford-iiit-pet")
img_src=base_path/"images"
ann_src=base_path/"annotations"/"xmls"
# collect samples by cropping the images from dataset
You first create an SVM object with cv2.ml.SVM_create(). Then you configure the SVM, since there are many variations. In the above, you used SVM_C_SVC as the type, for it is a C-Support Vector Classifier (SVM for classification that allows imperfect separation). You used a radial basis function kernel (SVM_RBF) since it usually works well. You can also choose to use the simpler linear kernel (SVM_LINEAR) if the task is easy. There are many other parameters for the SVM, too. For example, if RBF kernel is used, you can use svm.setGamma() to set the gamma value, and since you used C-SVC, you can set the value of parameter C using svm.setC(). In the above, you leave all parameters to OpenCV’s default.
The training of SVM requires a terminating condition. In the above, you used svm.setTermCritera() to make the training stop at 10000 iterations or when the loss function falls below $10^-8$, whichever is sooner. After all is done, you just pass on the data and labels to the training routine.
The training data is presented as a numpy array. You set it up in such a way that each row in the array is one sample. The labels required are just integer labels, 0 or 1. Since you’re training a HOG classifier with SVM, you need to convert your samples into HOG features. It is not difficult with OpenCV. Taking the positive and negative samples that you collected, the following is how to create the numpy arrays:
The last line in the code above is to print the support vectors from the trained SVM. It is optional since you already saved the model into the file svm_model.yml.
Here is how you can use the trained model: First you create a HOG object, an SVM object, and then assign the SVM object into HOG as a detector. When you have an image, you use HOG’s detectMultiScale() method to find the locations of the detected object.This function will rescale the image multiple times so that the size of the window you set for HOG does not need to match the object exactly. It is very useful as you would not know how large the target object is within the image. Since the SVM is trained on a particular HOG feature configuration, you must create the HOG object using the same parameters (window, block, cells, and bins) as you used in training. The output of the detect function will be multiple bounding boxes, but you can simply take the best matching one based on the score.
It is assumed the trained SVM has been saved into the file svm_model.yml. You create the SVM object directly using the saved file. The output scores from hog.detectMultiScale() is a N×1 numpy array. Hence you should flatten it to a vector and find the maximum. The corresponding bounding box in the array locations is the best matched one. The bounding box returned by this function is in terms of the coordinate of the top left corner and the width and height. The last line in the code above is to annotate such box directly on the image.
You can indeed run this on the same dataset. The complete code is as follows, which the original bounding box and the detected one by SVM are both drawn on the image and displayed with OpenCV:
1
2
3
4
5
6
7
8
9
10
11
12
13
14
15
16
17
18
19
20
21
22
23
24
25
26
27
28
29
30
31
32
33
34
35
36
37
38
39
40
41
42
43
44
45
46
47
48
49
50
51
52
53
54
55
56
57
58
59
60
61
import pathlib
import xml.etree.ElementTree asET
import cv2
import numpy asnp
def read_voc_xml(xmlfile:str)->dict:
"""read the Pascal VOC XML and return (filename, object name, bounding box)
where bounding box is a vector of (xmin, ymin, xmax, ymax). The pixel
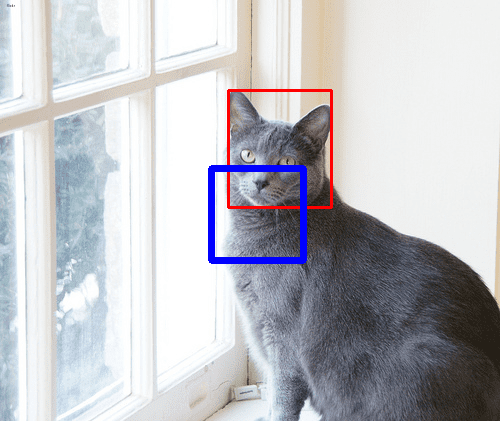
OpenCV will display the annotated images one by one from the dataset. The dataset’s bounding box is in red while the bounding box as reported by the SVM is in blue. Note that it is a cat detector so ideally nothing should be detected if it is a dog image. However, SVM with HOG feature is not very good at this.
The bounding box from the dataset (red) compared to the detection output from the trained model (blue).
In fact, this detector is not very accurate. An example is as above, in which the detected bounding box is quite off from the face of a cat. Even so, it is not a bad model. You may improve the quality of the SVM by tuning the model parameters (such as C and gamma) as well as providing better data for training.
Want to Get Started With Machine Learning with OpenCV?
Take my free email crash course now (with sample code).
Click to sign-up and also get a free PDF Ebook version of the course.
Further Reading
This section provides more resources on the topic if you are looking to go deeper.
It provides self-study tutorials with all working code in Python to turn you from a novice to expert. It equips you with logistic regression, random forest, SVM, k-means clustering, neural networks,
and much more...all using the machine learning module in OpenCV
Kick-start your deep learning journey with hands-on exercises


the results are so bad. I understand that it is not perfect but how come it is so bad ?
Hi emre…Please elaborate on the issues you are experiencing so that we may better assist you.