Face recognition is a computer vision task of identifying and verifying a person based on a photograph of their face.
FaceNet is a face recognition system developed in 2015 by researchers at Google that achieved then state-of-the-art results on a range of face recognition benchmark datasets. The FaceNet system can be used broadly thanks to multiple third-party open source implementations of the model and the availability of pre-trained models.
The FaceNet system can be used to extract high-quality features from faces, called face embeddings, that can then be used to train a face identification system.
In this tutorial, you will discover how to develop a face detection system using FaceNet and an SVM classifier to identify people from photographs.
After completing this tutorial, you will know:
About the FaceNet face recognition system developed by Google and open source implementations and pre-trained models.
How to prepare a face detection dataset including first extracting faces via a face detection system and then extracting face features via face embeddings.
How to fit, evaluate, and demonstrate an SVM model to predict identities from faces embeddings.
Kick-start your project with my new book Deep Learning for Computer Vision, including step-by-step tutorials and the Python source code files for all examples.
Let’s get started.
Update Nov/2019: Updated for TensorFlow v2.0 and MTCNN v0.1.0.
How to Develop a Face Recognition System Using FaceNet in Keras and an SVM Classifier Photo by Peter Valverde, some rights reserved.
Tutorial Overview
This tutorial is divided into five parts; they are:
Face Recognition
FaceNet Model
How to Load a FaceNet Model in Keras
How to Detect Faces for Face Recognition
How to Develop a Face Classification System
Face Recognition
Face recognition is the general task of identifying and verifying people from photographs of their face.
The 2011 book on face recognition titled “Handbook of Face Recognition” describes two main modes for face recognition, as:
Face Verification. A one-to-one mapping of a given face against a known identity (e.g. is this the person?).
Face Identification. A one-to-many mapping for a given face against a database of known faces (e.g. who is this person?).
A face recognition system is expected to identify faces present in images and videos automatically. It can operate in either or both of two modes: (1) face verification (or authentication), and (2) face identification (or recognition).
It is a system that, given a picture of a face, will extract high-quality features from the face and predict a 128 element vector representation these features, called a face embedding.
FaceNet, that directly learns a mapping from face images to a compact Euclidean space where distances directly correspond to a measure of face similarity.
The model is a deep convolutional neural network trained via a triplet loss function that encourages vectors for the same identity to become more similar (smaller distance), whereas vectors for different identities are expected to become less similar (larger distance). The focus on training a model to create embeddings directly (rather than extracting them from an intermediate layer of a model) was an important innovation in this work.
Our method uses a deep convolutional network trained to directly optimize the embedding itself, rather than an intermediate bottleneck layer as in previous deep learning approaches.
These face embeddings were then used as the basis for training classifier systems on standard face recognition benchmark datasets, achieving then-state-of-the-art results.
Our system cuts the error rate in comparison to the best published result by 30% …
The paper also explores other uses of the embeddings, such as clustering to group like-faces based on their extracted features.
It is a robust and effective face recognition system, and the general nature of the extracted face embeddings lends the approach to a range of applications.
How to Load a FaceNet Model in Keras
There are a number of projects that provide tools to train FaceNet-based models and make use of pre-trained models.
Perhaps the most prominent is called OpenFace that provides FaceNet models built and trained using the PyTorch deep learning framework. There is a port of OpenFace to Keras, called Keras OpenFace, but at the time of writing, the models appear to require Python 2, which is quite limiting.
Another prominent project is called FaceNet by David Sandberg that provides FaceNet models built and trained using TensorFlow. The project looks mature, although at the time of writing does not provide a library-based installation nor clean API. Usefully, David’s project provides a number of high-performing pre-trained FaceNet models and there are a number of projects that port or convert these models for use in Keras.
A notable example is Keras FaceNet by Hiroki Taniai. His project provides a script for converting the Inception ResNet v1 model from TensorFlow to Keras. He also provides a pre-trained Keras model ready for use.
We will use the pre-trained Keras FaceNet model provided by Hiroki Taniai in this tutorial. It was trained on MS-Celeb-1M dataset and expects input images to be color, to have their pixel values whitened (standardized across all three channels), and to have a square shape of 160×160 pixels.
Download the model file and place it in your current working directory with the filename ‘facenet_keras.h5‘.
We can load the model directly in Keras using the load_model() function; for example:
1
2
3
4
5
6
7
# example of loading the keras facenet model
from keras.models import load_model
# load the model
model=load_model('facenet_keras.h5')
# summarize input and output shape
print(model.inputs)
print(model.outputs)
Running the example loads the model and prints the shape of the input and output tensors.
We can see that the model indeed expects square color images as input with the shape 160×160, and will output a face embedding as a 128 element vector.
Now that we have a FaceNet model, we can explore using it.
How to Detect Faces for Face Recognition
Before we can perform face recognition, we need to detect faces.
Face detection is the process of automatically locating faces in a photograph and localizing them by drawing a bounding box around their extent.
In this tutorial, we will also use the Multi-Task Cascaded Convolutional Neural Network, or MTCNN, for face detection, e.g. finding and extracting faces from photos. This is a state-of-the-art deep learning model for face detection, described in the 2016 paper titled “Joint Face Detection and Alignment Using Multitask Cascaded Convolutional Networks.”
We can confirm that the library was installed correctly by importing the library and printing the version; for example:
1
2
3
4
# confirm mtcnn was installed correctly
import mtcnn
# print version
print(mtcnn.__version__)
Running the example prints the current version of the library.
1
0.1.0
We can use the mtcnn library to create a face detector and extract faces for our use with the FaceNet face detector models in subsequent sections.
The first step is to load an image as a NumPy array, which we can achieve using the PIL library and the open() function. We will also convert the image to RGB, just in case the image has an alpha channel or is black and white.
1
2
3
4
5
6
# load image from file
image=Image.open(filename)
# convert to RGB, if needed
image=image.convert('RGB')
# convert to array
pixels=asarray(image)
Next, we can create an MTCNN face detector class and use it to detect all faces in the loaded photograph.
1
2
3
4
# create the detector, using default weights
detector=MTCNN()
# detect faces in the image
results=detector.detect_faces(pixels)
The result is a list of bounding boxes, where each bounding box defines a lower-left-corner of the bounding box, as well as the width and height.
If we assume there is only one face in the photo for our experiments, we can determine the pixel coordinates of the bounding box as follows. Sometimes the library will return a negative pixel index, and I think this is a bug. We can fix this by taking the absolute value of the coordinates.
1
2
3
4
5
# extract the bounding box from the first face
x1,y1,width,height=results[0]['box']
# bug fix
x1,y1=abs(x1),abs(y1)
x2,y2=x1+width,y1+height
We can use these coordinates to extract the face.
1
2
# extract the face
face=pixels[y1:y2,x1:x2]
We can then use the PIL library to resize this small image of the face to the required size; specifically, the model expects square input faces with the shape 160×160.
1
2
3
4
# resize pixels to the model size
image=Image.fromarray(face)
image=image.resize((160,160))
face_array=asarray(image)
Tying all of this together, the function extract_face() will load a photograph from the loaded filename and return the extracted face. It assumes that the photo contains one face and will return the first face detected.
We can use this function to extract faces as needed in the next section that can be provided as input to the FaceNet model.
How to Develop a Face Classification System
In this section, we will develop a face detection system to predict the identity of a given face.
The model will be trained and tested using the ‘5 Celebrity Faces Dataset‘ that contains many photographs of five different celebrities.
We will use an MTCNN model for face detection, the FaceNet model will be used to create a face embedding for each detected face, then we will develop a Linear Support Vector Machine (SVM) classifier model to predict the identity of a given face.
5 Celebrity Faces Dataset
The 5 Celebrity Faces Dataset is a small dataset that contains photographs of celebrities.
The dataset was prepared and made available by Dan Becker and provided for free download on Kaggle. Note, a Kaggle account is required to download the dataset.
Download the dataset (this may require a Kaggle login), data.zip (2.5 megabytes), and unzip it in your local directory with the folder name ‘5-celebrity-faces-dataset‘.
You should now have a directory with the following structure (note, there are spelling mistakes in some directory names, and they were left as-is in this example):
1
2
3
4
5
6
7
8
9
10
11
12
13
5-celebrity-faces-dataset
├── train
│ ├── ben_afflek
│ ├── elton_john
│ ├── jerry_seinfeld
│ ├── madonna
│ └── mindy_kaling
└── val
├── ben_afflek
├── elton_john
├── jerry_seinfeld
├── madonna
└── mindy_kaling
We can see that there is a training dataset and a validation or test dataset.
Looking at some of the photos in the directories, we can see that the photos provide faces with a range of orientations, lighting, and in various sizes. Importantly, each photo contains one face of the person.
We will use this dataset as the basis for our classifier, trained on the ‘train‘ dataset only and classify faces in the ‘val‘ dataset. You can use this same structure to develop a classifier with your own photographs.
Detect Faces
The first step is to detect the face in each photograph and reduce the dataset to a series of faces only.
Let’s test out our face detector function defined in the previous section, specifically extract_face().
Looking in the ‘5-celebrity-faces-dataset/train/ben_afflek/‘ directory, we can see that there are 14 photographs of Ben Affleck in the training dataset. We can detect the face in each photograph, and create a plot with 14 faces, with two rows of seven images each.
The complete example is listed below.
1
2
3
4
5
6
7
8
9
10
11
12
13
14
15
16
17
18
19
20
21
22
23
24
25
26
27
28
29
30
31
32
33
34
35
36
37
38
39
40
41
42
43
44
45
46
47
48
# demonstrate face detection on 5 Celebrity Faces Dataset
Running the example takes a moment and reports the progress of each loaded photograph along the way and the shape of the NumPy array containing the face pixel data.
1
2
3
4
5
6
7
8
9
10
11
12
13
14
1 (160, 160, 3)
2 (160, 160, 3)
3 (160, 160, 3)
4 (160, 160, 3)
5 (160, 160, 3)
6 (160, 160, 3)
7 (160, 160, 3)
8 (160, 160, 3)
9 (160, 160, 3)
10 (160, 160, 3)
11 (160, 160, 3)
12 (160, 160, 3)
13 (160, 160, 3)
14 (160, 160, 3)
A figure is created containing the faces detected in the Ben Affleck directory.
We can see that each face was correctly detected and that we have a range of lighting, skin tones, and orientations in the detected faces.
Plot of 14 Faces of Ben Affleck Detected From the Training Dataset of the 5 Celebrity Faces Dataset
So far, so good.
Next, we can extend this example to step over each subdirectory for a given dataset (e.g. ‘train‘ or ‘val‘), extract the faces, and prepare a dataset with the name as the output label for each detected face.
The load_faces() function below will load all of the faces into a list for a given directory, e.g. ‘5-celebrity-faces-dataset/train/ben_afflek/‘.
1
2
3
4
5
6
7
8
9
10
11
12
# load images and extract faces for all images in a directory
def load_faces(directory):
faces=list()
# enumerate files
forfilename inlistdir(directory):
# path
path=directory+filename
# get face
face=extract_face(path)
# store
faces.append(face)
returnfaces
We can call the load_faces() function for each subdirectory in the ‘train‘ or ‘val‘ folders. Each face has one label, the name of the celebrity, which we can take from the directory name.
The load_dataset() function below takes a directory name such as ‘5-celebrity-faces-dataset/train/‘ and detects faces for each subdirectory (celebrity), assigning labels to each detected face.
It returns the X and y elements of the dataset as NumPy arrays.
1
2
3
4
5
6
7
8
9
10
11
12
13
14
15
16
17
18
19
20
# load a dataset that contains one subdir for each class that in turn contains images
def load_dataset(directory):
X,y=list(),list()
# enumerate folders, on per class
forsubdir inlistdir(directory):
# path
path=directory+subdir+'/'
# skip any files that might be in the dir
ifnotisdir(path):
continue
# load all faces in the subdirectory
faces=load_faces(path)
# create labels
labels=[subdir for_inrange(len(faces))]
# summarize progress
print('>loaded %d examples for class: %s'%(len(faces),subdir))
# store
X.extend(faces)
y.extend(labels)
returnasarray(X),asarray(y)
We can then call this function for the ‘train’ and ‘val’ folders to load all of the data, then save the results in a single compressed NumPy array file via the savez_compressed() function.
First, all of the photos in the ‘train‘ dataset are loaded, then faces are extracted, resulting in 93 samples with square face input and a class label string as output. Then the ‘val‘ dataset is loaded, providing 25 samples that can be used as a test dataset.
Both datasets are then saved to a compressed NumPy array file called ‘5-celebrity-faces-dataset.npz‘ that is about three megabytes and is stored in the current working directory.
1
2
3
4
5
6
7
8
9
10
11
12
>loaded 14 examples for class: ben_afflek
>loaded 19 examples for class: madonna
>loaded 17 examples for class: elton_john
>loaded 22 examples for class: mindy_kaling
>loaded 21 examples for class: jerry_seinfeld
(93, 160, 160, 3) (93,)
>loaded 5 examples for class: ben_afflek
>loaded 5 examples for class: madonna
>loaded 5 examples for class: elton_john
>loaded 5 examples for class: mindy_kaling
>loaded 5 examples for class: jerry_seinfeld
(25, 160, 160, 3) (25,)
This dataset is ready to be provided to a face detection model.
Create Face Embeddings
The next step is to create a face embedding.
A face embedding is a vector that represents the features extracted from the face. This can then be compared with the vectors generated for other faces. For example, another vector that is close (by some measure) may be the same person, whereas another vector that is far (by some measure) may be a different person.
The classifier model that we want to develop will take a face embedding as input and predict the identity of the face. The FaceNet model will generate this embedding for a given image of a face.
The FaceNet model can be used as part of the classifier itself, or we can use the FaceNet model to pre-process a face to create a face embedding that can be stored and used as input to our classifier model. This latter approach is preferred as the FaceNet model is both large and slow to create a face embedding.
We can, therefore, pre-compute the face embeddings for all faces in the train and test (formally ‘val‘) sets in our 5 Celebrity Faces Dataset.
Next, we can load our FaceNet model ready for converting faces into face embeddings.
1
2
3
# load the facenet model
model=load_model('facenet_keras.h5')
print('Loaded Model')
We can then enumerate each face in the train and test datasets to predict an embedding.
To predict an embedding, first the pixel values of the image need to be suitably prepared to meet the expectations of the FaceNet model. This specific implementation of the FaceNet model expects that the pixel values are standardized.
1
2
3
4
5
# scale pixel values
face_pixels=face_pixels.astype('float32')
# standardize pixel values across channels (global)
mean,std=face_pixels.mean(),face_pixels.std()
face_pixels=(face_pixels-mean)/std
In order to make a prediction for one example in Keras, we must expand the dimensions so that the face array is one sample.
1
2
# transform face into one sample
samples=expand_dims(face_pixels,axis=0)
We can then use the model to make a prediction and extract the embedding vector.
1
2
3
4
# make prediction to get embedding
yhat=model.predict(samples)
# get embedding
embedding=yhat[0]
The get_embedding() function defined below implements these behaviors and will return a face embedding given a single image of a face and the loaded FaceNet model.
1
2
3
4
5
6
7
8
9
10
11
12
# get the face embedding for one face
def get_embedding(model,face_pixels):
# scale pixel values
face_pixels=face_pixels.astype('float32')
# standardize pixel values across channels (global)
mean,std=face_pixels.mean(),face_pixels.std()
face_pixels=(face_pixels-mean)/std
# transform face into one sample
samples=expand_dims(face_pixels,axis=0)
# make prediction to get embedding
yhat=model.predict(samples)
returnyhat[0]
Tying all of this together, the complete example of converting each face into a face embedding in the train and test datasets is listed below.
1
2
3
4
5
6
7
8
9
10
11
12
13
14
15
16
17
18
19
20
21
22
23
24
25
26
27
28
29
30
31
32
33
34
35
36
37
38
39
40
41
42
43
# calculate a face embedding for each face in the dataset using facenet
from numpy import load
from numpy import expand_dims
from numpy import asarray
from numpy import savez_compressed
from keras.models import load_model
# get the face embedding for one face
def get_embedding(model,face_pixels):
# scale pixel values
face_pixels=face_pixels.astype('float32')
# standardize pixel values across channels (global)
Running the example reports progress along the way.
We can see that the face dataset was loaded correctly and so was the model. The train dataset was then transformed into 93 face embeddings, each comprised of a 128 element vector. The 25 examples in the test dataset were also suitably converted to face embeddings.
The resulting datasets were then saved to a compressed NumPy array that is about 50 kilobytes with the name ‘5-celebrity-faces-embeddings.npz‘ in the current working directory.
Next, the data requires some minor preparation prior to modeling.
First, it is a good practice to normalize the face embedding vectors. It is a good practice because the vectors are often compared to each other using a distance metric.
In this context, vector normalization means scaling the values until the length or magnitude of the vectors is 1 or unit length. This can be achieved using the Normalizer class in scikit-learn. It might even be more convenient to perform this step when the face embeddings are created in the previous step.
1
2
3
4
# normalize input vectors
in_encoder=Normalizer(norm='l2')
trainX=in_encoder.transform(trainX)
testX=in_encoder.transform(testX)
Next, the string target variables for each celebrity name need to be converted to integers.
It is common to use a Linear Support Vector Machine (SVM) when working with normalized face embedding inputs. This is because the method is very effective at separating the face embedding vectors. We can fit a linear SVM to the training data using the SVC class in scikit-learn and setting the ‘kernel‘ attribute to ‘linear‘. We may also want probabilities later when making predictions, which can be configured by setting ‘probability‘ to ‘True‘.
1
2
3
# fit model
model=SVC(kernel='linear')
model.fit(trainX,trainy)
Next, we can evaluate the model.
This can be achieved by using the fit model to make a prediction for each example in the train and test datasets and then calculating the classification accuracy.
Running the example first confirms that the number of samples in the train and test datasets is as we expect
Next, the model is evaluated on the train and test dataset, showing perfect classification accuracy. This is not surprising given the size of the dataset and the power of the face detection and face recognition models used.
1
2
Dataset: train=93, test=25
Accuracy: train=100.000, test=100.000
We can make it more interesting by plotting the original face and the prediction.
First, we need to load the face dataset, specifically the faces in the test dataset. We could also load the original photos to make it even more interesting.
1
2
3
# load faces
data=load('5-celebrity-faces-dataset.npz')
testX_faces=data['arr_2']
The rest of the example is the same up until we fit the model.
First, we need to select a random example from the test set, then get the embedding, face pixels, expected class prediction, and the corresponding name for the class.
1
2
3
4
5
6
# test model on a random example from the test dataset
A different random example from the test dataset will be selected each time the code is run.
Note: Your results may vary given the stochastic nature of the algorithm or evaluation procedure, or differences in numerical precision. Consider running the example a few times and compare the average outcome.
In this case, a photo of Jerry Seinfeld is selected and correctly predicted.
1
2
Predicted: jerry_seinfeld (88.476)
Expected: jerry_seinfeld
A plot of the chosen face is also created, showing the predicted name and probability in the image title.
Detected Face of Jerry Seinfeld, Correctly Identified by the SVM Classifier
Further Reading
This section provides more resources on the topic if you are looking to go deeper.
In this tutorial, you discovered how to develop a face detection system using FaceNet and an SVM classifier to identify people from photographs.
Specifically, you learned:
About the FaceNet face recognition system developed by Google and open source implementations and pre-trained models.
How to prepare a face detection dataset including first extracting faces via a face detection system and then extracting face features via face embeddings.
How to fit, evaluate, and demonstrate an SVM model to predict identities from faces embeddings.
Do you have any questions?
Ask your questions in the comments below and I will do my best to answer.
It provides self-study tutorials on topics like: classification, object detection (yolo and rcnn), face recognition (vggface and facenet), data preparation and much more...
Finally Bring Deep Learning to your Vision Projects
Was looking at whether Transfer learning, Siamese network and triplet loss approaches are applicable to animal face(eg a sheep, goat etc) recognition particularly mobileNet(or otherwise) when your crystal clear blog came up.
Kindly shed more light on its applicability and any other auxiliary hints.
Sorry Sir! but it’s not helping me out because I’m creating my own datasets of 15 people so that’s why facing that error can you help me about what changes should I change in your code ??? and how do i train my own new facenet model ????
What do you suggest when we have tens of thousands of classes.
A Facenet model itself as a classifier or a specific classifier model is to be trained. In terms of scalability and performance which is the preferred method.
Referring to:
“The FaceNet model can be used as part of the classifier itself, or we can use the FaceNet model to pre-process a face to create a face embedding that can be stored and used as input to our classifier model. This latter approach is preferred as the FaceNet model is both large and slow to create a face embedding.”
Hi jason,
As per my understanding The triplet loss is used so that the model can also learn the dissimilarity between the classes rather than only learning similarity between same class.
But here we are not training our model on the actual image dataset on which we need our classification to be done. Rather we are using SVM for that.
So, how can we make use of triplet loss in this method of face recognition?
Hi Jason. nice tutor!
But i wonder that, if i want to identify who is stranger. should i make a folder for ‘stranger’ contains alot of stranger faces???(exclude your 5 Celebrity Faces Dataset ??)
Thanks for your tutorial.
But when i flollow you, i have a warning :
embeddings.npz is not UTF-8 encoded
UserWarning: No training configuration found in save file: the model was *not* compiled. Compile it manually.
Do you know how to fix it.
Thank you so much.
But when I have a new image to recognize, do I need to put it to the validate folder and rerun the code ?
And how can we use this to recognite face in a video ?
Hello Jason,
Thanks for your wonderful tutorial, I’d like to know what is the best solution to apply recognition part if I have a very small dataset -only one face per each identity- in this case, I think SVM wouldn’t help.
Hello Jason,
Thank you for this amazing tutorial, I used python 3 to run this code. I would like to know why am i getting this error (No module named ‘mtcnn’) and how can I correct it?
I want to use transfer learning for masked face recognition. But i didn’t found any better masked face recognition dataset. I need a masked face dataset with proper labeling of each candidate. So is there any better masked face dataset available? where can i find this dataset?
But I have another question, because sometime when i run the code, all worked perfectly and when I run the code again, sometime i have this error warning in load_model part although the face recognition still work
UserWarning: No training configuration found in save file: the model was *not* compiled. Compile it manually.
warnings.warn(‘No training configuration found in save file: ‘
Hi Jason, while I was executing the code “load_model(‘facenet_keras.h5’)”, the exception “tuple index out of range” is thrown, can you tell me why? thanks in advance.
Hi Jason, again wonderful article and tutorial you provided to us. I wonder how I can customize dataset for my needs such as my friends dataset and perform training on it?
Thanks Jason, really helpful as always but I got a weird “invalid argument” error. But I fixed it by changing ‘f’ to ‘F’ in facenet_keras.h5 because I notice it couldn’t recognize character ‘f’. Maybe because it’s trained on Ubuntu but I run your code on Windows 10. I don’t know!
Thank you! Dear Jason, could you please tell me how I can get access to other properties of model. I mean I don’t need model.predict. I need other properties. Is there a way to list all of them such as different convs or avgpool. I tried __dict__ and dir() but they don’t give what I want. For example, how did you know model has a property called “.predict”? Where can I find all of them? Thank you!
Which one would you suggest? If I have to develop Face Verification system then there are few approaches (listing two approaches from your article):
Approach 1: Detect face using MTCNN, train VGGFACE2 on the collected dataset which helps to predict the probability of a given face belonging to a particular class
Approach 2: Detect face using MTCNN, get face embedding vector using facenet keras model and then apply SVM or Neural Network to predict classes
Which approach would you recommend? Can you please explain?
Thanks for the tutorial.
Unit length normalization isn’t for SVM. For SVM you typically use range scaling – MinMaxScaler, or standardization – StandardScaler. The goal is to make different features uniform. Actually, it’s a surprise that unit length normalization produced 100% accuracy in your case. That’s probably due to small data. It does not work for SVM in general and didn’t work for me.
Great article. You have explained all the necessary steps to implement a face recognition system. I am working on a similar problem but in a bigger scale. I am in a belief that a classification based face identification is not a scalable solution. Please give me your opinion.
If I want to recognise a thousand faces in real time manner then, what type of changes do I need to make to your implementation.
I believe it would be really helpful if you create an article about large scale face recognition.
Once i have trained the model on 5 class (each class having 50 images). Now i use the model to detect images that it has not seen, it correctly guesses that the person in the image is class A for example with an accuracy ( prediction ) 65%. Is it possible to now add such image back to training and expect to get better results ?
Thanks for this tutorial. Its really helpful. I wanted to know why you used train and val dataset. I mean are these two used for training purpose. What is the use of val here.?
In the face classification, I am not able to understand where are you selecting the random photo to test against your dataset. How can I add my jpg photo to test again the dataset. Can you explain please. Thanks
Got it. Thanks
What I have seen is that in train dataset I put my pictures more than 30 images and in val dataset I put 1 image of mine for testing. So it was recognizing me fine. But when put some other person pic in val dataset, it was still recognizing it as me
I have trained on 30 classes with
45 images in Train folder and
15 images in Test folder (val)
after this upon testing with a new image which belongs to a class
im getting good results:
Image A – class A (99.996 %) which is correct
Image X – class A (99.996 %) it belongs to an unkown class to the model but still it says that it belongs to class A with extremely high confidence.
Any thoughts on why this occurs ??
Thanks for your reply.
Could you please explain or guide to towards the direction of
“””You might need to train the model on “you” vs “not-you”, or people vs unknown.”””
So when we train the model, do i put a unkown folder?
like train folder :
class A (30 images)
class B (30 images)
unkown ???.
Sorry if this doesnt make sense, its a bit hard to understand what you mean by train the model on “you” vs “not-you”.
Yes, if your goal is to fit a model that can detect you, and when you show it photos of other people, it knows it’s not you, then you need a dataset of lots of photos of you and photos of other people (unknown group) so the model can learn the difference.
Highly appreciated for your assistance.
What if we have more than 2 classes.
Training dataset has 5 classes.
During testing if we feed unseen face of one of the above classes, it may predict the face as one of the class.
But what if we feed faces of unknown class? I would expect the model to predict unknown.
So how we can accomplish this scenario?
AttributeError: ‘JpegImageFile’ object has no attribute ‘getexif’ or
AttributeError: module ‘PIL.Image’ has no attribute ‘Exif’
This error occurs when i use the Image.open command to import the image.
few examples for the images i am getting an error are as follows:
httpssmediacacheakpinimgcomxfecfecaefaadfebejpg.jpg (traing data for elton john)
httpwwwjohnpauljonesarenacomeventimagesEltonCalendarVjpg.jpg (training data fro elton john)
I tried searching for this issue online but was not able to find any helpful solution. Do you have any idea how i may solve this issue?
Dear Jason,
How can we create the face embeddings and fit the classification model without re-training the whole training dataset? I would be grateful if you can share me the code.
Why is the problem of retraining the whole training dataset? Usually the problem is training the model from scratch, which takes a long time to converge. But if you are based on a network trained for one particular purpose and retrain it for a different use, it would not take too long.
@Adrian
When the dataset is big (e.g. in millions of classes) and it is regularly increases, how it is possible to retrain the whole dataset every time? For example my initial dataset contains 2000 classes/subjects and every day it increases by 300 subjects. How can I proceed without retraining the existing model?
Thank you
Usually the first half of the network need not be retrained if your output classes are changed. But if you need to change the output layer from size 2000 to 2300, you need to retrain it anyway. You might think of some other ways make it smarter, e.g., always set one of your output as “not matched” and try to train the network to tell if the face is not any of the known one. Then you can always create a new network for the increased subjects.
Hey Jason,
First of all thank you so much for putting out the effort and organizing this tutorial! You’re truly awesome! 🙂
So I extracted facial embeddings of 3 people(6 high-quality high-resolution 5MP+ images per person as dataset )and trained them using SVM and used my built-in DELL WEBCAM(need I mention it generates a mirror image , ie my left hand appears right on the screen; also it’s a 0.3 MP 640×480 resolution feed) to identify faces.
So my problem is that the probabilities are always different for the same trained face by sometimes a difference as great as 20% under the same lighting conditions! It’s mostly around 71% but sometimes dwindles to 51% for a trained face. For a stranger face it varies between 40% and 68% hence because of this variation, I can’t set a single probability value as a threshold and it’s really cumbersome.
Can these differences be because of the difference in webcam quality and the dataset quality, that the algorithm has a tough time identifying the faces and varies the probability all the time, given the embeddings generated by the dataset are of much higher quality than those of the feed and also that the feed generates a mirror image of the faces in the dataset?
I’ll do just that. Any idea how to downsample? A friend tried with same dataset but with Logitech C310 HD webcam and got a consistent probability score .It’s unlikely it’s the light level in my case as it shows variations in probability at the exact same light conditions.
Okay. One quick thing.
Does both the dataset and webCam feed have to be of the same quality? Cuz I trained my face, Emma Watson and Daniel Radcliffe’s faces (their images size around 5 kb) and my image quality around 70 kb and there’s still some variation in probability
Generally yes, but you can achieve the desired result by using data augmentation either during training, during testing, or both to get the model used to data of varying quality – or to downsample all images to the same quality prior to training/using the model.
In addition to previous suggestions, you can also limit what is analyzed. For example only take face detections of very high confidence. You can use the face detection data to reject highly oblique angles (like if the nose is further left than the left eye, as one of many examples).
Not shown in this tutorial – but is very easy, is to increase the quality of the input by growing the face detection box vertically or horizontally to make it square… do this before resizing to low res. This prevents stretching of faces.
You may also have a shortage of data for your known faces. If possible try to grow that dataset. Furthermore if your dataset is too sparse (you have only a few known faces) you may have trouble because of the SVM maths. It may be beneficial to litter your known faces with a moderately sized dataset from the web (they would need to be caught and handled in code – you could call them JaneDoe1, JaneDoe2, etc). By doing this the SVM should have more cases of ambiguity whereas with only a couple known faces it may have displayed inappropriate confidence.
sir, My problem is my model is not able to distinguish between a known and unknown person in the real world.
Do you have any idea about how to identify an unknown person in the real world?
I guess it’s not really “data augmentation” when 5 out of the 6 images for Daniel radcliffe are 6KB, the last 67…and my face image quality are on average 120 KB, whereas for Emma Watson 2 out of the 3 images are 7 kb and the last 70. (The images generated by the webcam feed, the “test set” are 70 kb.). I guess both the dataset and feed should be same baseline image quality right?
By creating a data set of 500 people of 50 images each and train the model, can I expect good accuracy regarding detection?
Can I try deploying the same model on a Raspberry Pi with a Pi Camera?
Can you suggest any idea about adding a new person’s face to the model once it is deployed?
Hi Jason
i run the code and add two of my own photos in both train and val dataset, SVM predict show correct class_index for my own photos in val dataset, but the SVM predict_proba show probability as below: class_index is 2(0.01181915, 0.01283217), it is the smallest value.
[0.14074676 0.21515797 0.01181915 0.10075247 0.15657367 0.37494997]
[0.1056123 0.20128499 0.01283217 0.1100254 0.23492927 0.33531586]
i see documents saying that SVM predict_proba show meanlingless result on small dataset, is it caused by that? How can i detect one-face class probability?
second question: can you show more code on how to train unknown people class?
I went through your tutorial and I got 100 train and test efficiency. Till now everything is clear.
But the problem arises when I apply the developed model (through your tutorial) to live frames through a webcam (my train ~700 images/class and test images ~300 images/class are captured using webcam).
The model does more misclassification when I apply the trained model to a frame from a webcam.
I am not sure how to normalize the face embedding vector in this case?
Thanks for the reply. It means I should normalize the input image rather than the embedding. If the input image is normalized then I don’t need to normalize the embedding.
I can’t figure out how to introduce the new unsorted pictures into the code. I tried making an npz file using the new pictures in one folder and loading them into the classifier(# load faces
data = load(‘5-celebrity-faces-dataset.npz’), but the classification result was pretty bad so im assuming what i did is not correct.
In following the your tutorial my directory for the pictures looked like this:
├── train
│ ├── A : pictures of person A
│ ├── B : pictures of person B
│ └── C : pictures of person C
│
│
└── val
├── A : pictures of person A
├── B : pictures of person B
└── C : pictures of person C
and got a successful result, with let’s say
“ABC_dataset.npz” & “ABC_embeddings.npz”
So, I’m trying to one step further, and added a folder to the directory
├── train
| ├── A : pictures of person A
| ├── B : pictures of person B
| └── C : pictures of person C
|
|
├── val
| ├── A : pictures of person A
| ├── B : pictures of person B
| └── C : pictures of person C
|
└── test : pictures of persons A, B, C
and the newly added test folder contains pictures of all A, B, C.
In an attempt to introduce the data from the “test” folder,
I extracted arrays of the faces from the pictures of the “test” folder saved the
extracted arrays into an npz file, let’s say “ABC_test_dataset.npz”
And loaded “ABC_test_dataset.npz” into the last part of the tutorial
# load faces
data = load(‘”ABC_test_dataset.npz”‘)
testX_faces = data[‘arr_2’]
# load face embeddings
data = load(‘ABC_embeddings.npz’)
trainX, trainy, testX, testy = data[‘arr_0’], data[‘arr_1’], data[‘arr_2’], data[‘arr_3’]
and so on.
When I tried this, the result I got was pretty bad so I’m assuming what I did is
a wrong way of introducing new dataset into the code.
What if the cause of poor performance is the specific pictures in test? What if you swap around some of the pictures from test with those in train and see if that lifts skill?
What if you confirm the pipeline and add pictures from train into test and confirm they are predicted correctly – they should be?
Thanks for the answer!
I will play with the picture data sets a bit more and tell you how it goes.
Last questions,
1. Is it ok to use gray-scale pictures for the training?
2. What should be the ratio between the number of pictures in the train and val
folders?
For example, train : 1000 pics & val : 100? or train : 1000 & val : 50 is fine?
Hey Jason!
I am trying to develop an attendance collector from video footage.
My problem arises during the classification part,it constantly interchanges the output label names.
Say X and Y are two people then X is always identified as Y and vice versa.
The code is error free and there is no error in the input labels.
How can correct this.Will this be solved if use something apart from SVM. If so what?
Or should i do some fine tuning as specified in one of your earlier answers?
Please guide me.
– First, extract only the face from an image using MTCNN. Please make sure to scale pixels.
– Then find the face embedding using the Facenet model.
– Train binary/multiclass classification model using face embedding vectors obtained in the above step.
– So now you have face embedding vectors for train images and compare them with unknow encoding (a frame from webcam) using Consine or another metric.
– If score < threshold then face is recognized and in order to get a label, predict the class using binary/multiclass classification model trained in step 3.
Hey Jason!
I wanted to try doing image super resolution using GANs to improve the result of my recognition process,but i’m not finding any suitable website or blog to learn from.
Could you please guide.
I prefer using Python for the same.
Thank You!
This model doesn’t able to differentiate between a live video of human and a picture of a human. Bcoz this model looks for the only face, it doesn’t look for the Liveness in the face.
This is another research area in my view. Perhaps for the quick try, you can look whether eyes are blinking or a person is speaking to detect the Liveness. There are other techniques too.
Hi jason, I am only looking at algorithm to tell if an image has face or not, face can be far, at any angle . Preesntly neiter open cv, nor any model works well, Do you know any transfer learning method to only detect if image has face or not with lot of other things in background, Some images has only body but no face, in those case it should say as no face.
Perhaps try detecting and extracting the face first, then pass to a pre-trained model to get a face embedding. Perhaps try a suite of models to see which is the best for your dataset – also fit different model types on the embedding to perform the recognition.
I am trying to classify 800 celebrity faces.
1-using MTCNN to extract faces
2- using facenet to prepare the embedding
3- using KNN to classify the faces.
Problem is-Though we get neglible ‘not detection’ but we get lots of wrong detection.
Is there any solution to reduce the wrong detection.
Other combination of pipeline used-
1-MTCNN+Facenet+SVM
2-One shot learning
3-Also tried regularisation,data augmentation.
(used 100 faces per face)
Hey!
In the Keras FaceNet Pre-Trained Model (88 megabytes) you have mentioned, how should it be downloaded, it has 2 files models and weights and each has “.h5” file. Could you please tell me which has to be downloaded.
I have tried both, but the code is not getting executed, it is stopping after load_model()
There are 2 models. The one that gives you a face embedding and one that classifies embeddings as people. The first model does not need to be retrained. The second model is only trained once and is then used to make predictions for people that it knows about (e.g. during training).
Hello
When I make a test for one image of one person, in every time give different result of probability. Is that right? Or should it give me the same result?
This was great thanks. I am wanting to know how to change the randomisation section to score the entire test dataset. Not clear as it appears it was built to score only on a single, randomly selected index from that array. Any guidance on this?
Hi Jason it’s a good tutorial, but when I try to run this tutorial in tensorflow 2.0 the mtcnn is not compatible with tensorflow v2.0. do you have any idea for this issue.
thank you
Sorry for the delay.
I want to make a faceprint system. So, when people come to register, I take one picture for each person and make some transformation in the picture. Will it correctly predict the person?
Hi Jason I used your code on my own set.In all there were about 20 people each having approximately 30 images.
For testing I decided to see how the code performs in real time. If a random person walks in front of a web cam then will it be able to distinguish between UNKNOWN and some other person in the dataset.
Although I got pretty good results,(each of the person in my set is being correctly identified with a probability of 99%),the unknown people were also being assigned a score of 99%.
From my understanding,the unknown category shouldn’t recieve such a high score.Do you know what is going wrong here.
Training and cross Val error are coming out to be 1 and 0.99 .So I am not sure.Do you think I should reduce the dataset size.
I have used the same code to detect the faces from the my own dataset. I am unable to store the dataset in npz format. My dataset has images around Train-750 pics and val – 400.
The python code is getting killed after certain time . Let me know the workaround
System Specification:
RAM – 16 GB
Swap – 2 GB
OS – Ubuntu 18.04
Please disregard my comment – if your code fails when importing load_model from keras.models then it’s maybe an installation or setup problem. In my case I thought TF2 had keras but nothing was working right until I installed keras after installing TF2
Thanks so much for this Jason Brownlee… I got everything working because of this walkthrough.
I also converted the h5 to tflite which is just one commandline command. Additionally you use the interpreter instead of calling “predict” directly on the model… which involves about 8 lines of additional code, found on Tensorflow’s website. By doing this the embedding is obtained 10 times faster (maybe more). I’m on CPU only btw.
Hi Jason, been following you for the past 3 years and you are very inspiring. Just wanted to say, I tried this code in Colab and eventually hit errors. Are there any alterations when using Google Colab? Thank you again.
Quick question for you, Are you using the same code for the predication or for training classification using face embeddings on nvidia driver supported GPU?
Can you let me know the procedure ?
Since i read in the scikit library documentation, it is published that SciKit lib will not support GPU training.
Hi Jason,
I am getting this warning whenever I load facenet_keras.h5
UserWarning: No training configuration found in save file: the model was *not* compiled. Compile it manually.
warnings.warn(‘No training configuration found in save file: ‘
Hi again,
please guide me how to handle the unknown faces in the input.
The model is working fine when it gets the known faces,
But when an unknown face comes, the model is classifying them to the classes on which it was trained.
Example- model is trained to detect me but when I showed it some other face it is again saying that’s you.
I have been getting not so properly cropped images from the MTCNN detect_faces method. And, I am doing it for a short term project and can’t really get into details inside MTCNN. Just wanted to know why my face recognition is not as per published in this blog. I have used the same datasets and I have followed all instructions thorough.
I have a database with only one photo per person. Does the model have good results in this scenario as well?
I don’t see how to make a classifier from just one sample per class. Is there how or should I calculate the distance between the vectors directly (without a classifier)?
I have implemented this FR system but I’m having a problem understanding why we are using the SVM classifier. I don’t have specific questions because I think my problem is in my formative understanding of FaceNet. Kindly tell me if the following statements are true:
1) The FaceNet model, once loaded and we pass the detected face “predicts” an embedding of the face.
2) We then compare the embedding with the stored embeddings of faces in our dataset using the SVM’s predict function and determine who is the likely owner of the face.
3)Is there a way that we can implement FaceNet without having to use a classifier in the last stage?
The neural net model gives features from an image and the model, e.g. svm, classifies them as different people.
Yes, but it would be fragile – requiring the entire facenet model to be re-trained for any change to your dataset. Or perhaps just the output/classifier part of the model as we would use transfer learning.
Hey Jason,
The tutorial is very specific and easy to understand, a very big thank you for that.
But I wanted to use an image in my local directory instead of a random selection.
According to the comments above I understand that I had to read https://machinelearningmastery.com/how-to-load-and-manipulate-images-for-deep-learning-in-python-with-pil-pillow/ and I was supposed to pass it to “selections” variable.
But I got really confused because selections has just 1D value and I guess I’m supposed to convert my image to a numpy array and then pass it on to selections right?
So what should i do after converting it to a numpy array.
Yeah so I tried everything but I can’t seem to be able to insert an image from local into “selections” could you please help me out LOL really need it for my project
I am having same issue and was wondering how Rujul solved it. I am using Python 3.8.3 and using load_image from keras (version 2.4.3) and not tf.keras. Any help would be greatly appreciated.
Thank you Jason!!! i was able to do that as well, one thing i have noticed, sometimes it confuses faces with someone else, lets i have a trained set for ‘Jimmy Fallon’ so sometimes in a video it detects a random person and says its Jimmy Fallon and that too with more than 90% probability is that normal???
I tried implementing the model but the accuracy obtained on the 5-Celebrity-dataset is nearly 75% and similarly I created my on custom dataset with around 15 images each training class and 5-8 images in test class , the test accuracy obtained was just 61% and I tried increasing the size of the training dataset to nearly 30 images in each dataset but the test accuracy did not increase it remained the same. What should I do to improve the accuracy ?
1- In the paper, it said that facenet layers equal to 140M, but the model that you use it equal to 22,808,144. what is the difference?
2- How can I make a good embedding function that fit my model? Because In the embedding function in facenet and vggface2 there is a difference and I do not understand it
Hi …
When I want to calculate the accuracy of the facenet model, it should the test-data contains known and unknown labels? Because I tried to put labels that not in the dataset, It gave me an error
I tried to put unknown faces and labels, but when I encode the labels, It gives me an error that the dataset labels do not contain the label that I want to test it.
the error in this line:
testy = out_encoder.transform(testy)
You only know whether a prediction is true when training the model and when evaluating the model. After that – when you are using your model in practice, you don’t know if individual predictions are correct or not. All you know is the expected performance of the model on average.
I change by below code, that will read by photo EXIF Orientation tag. Hope it helps.
original code: image=Image.open(filename)
photo alignment by exif: image = ImageOps.exif_transpose(Image.open(filename))
please I need too much an algorithm or tutorial to compare a photo of face with another and have the percentage of similarity after the possibility of comparing a single photo with thousands of photo of faces to have the percentage of similarity
Hii Jason,
I have implemented this face net model to train 5 person’s dataset and the accuracy is also too good but it takes very long time for recognition. Can you give any advice to reduce the computation time for recognition like running the code on gpu or any other classification algo that takes less time.
Firstly, thanks for such amazing tutorials. Your website has been really helpful. So my question goes like this – how can I input multiple face arrays to vggface2 or FaceNet? In both the examples you have posted, you have used the function extract_face which outputs a single face.
Each face is one sample, you can pass in multiple samples to a model as an array and get many predictions in return. Each face must be prepared first before being passed to the model as input.
Helo , your explanation helps me much ! ty for this tuto , well i’m a beginner and i find it usefull and clearly , but i have one question plz if u don’t mind !
i’ve tried to make some modifications on ur code in the final to make it display all the test data instead of just one random picture but i couldn’t , so plz can u write for me the instructions that makes me test model on all the test dataset instead of one exemple ?
This is really a good example and I manage to run it and predict from it. But I have really one concern here, It’s good that we’ve predicted on the test data but what if I want to predict it from any external image? or my video cam image? it seems to me too cumbersome to process the raw/cam images to that level (embedding and so on). Could really have been great if you’ve taken the examples on some external images rather than same test data.
I used MTCNN to detected faces and it worked fine. But now, when I run the same code on the same photos, it doesn’t detect faces anymore. Just returns an empty list as a result.
Thanks for the article! This is one of the very few codes on the topic that is explained step for step. It’s a great guide. I wanted to test the model with a single or multiple new images which are not a part of the original dataset. How can I do that? My efforts have not yielded results. I would appreciate if you could tell me the process or the functions that need to be called/modified for the same.
Another thing is, this seems to work for a limited dataset. I can’t figure out why but when a larger dataset is taken, the shape of the Numpy array changes when loading dataset (function: load_dataset) and the consequent functions since the changed structure of trainX, trainy, etc. is not compatible with the following functions.
Hi Jason and sorry for my trivial question but I have a problem when I load the model:
model = load_model(‘facenet_keras.h5’)
this give me the following error:
bad marshal data (unknown type code)
I suppose that the problem is generated because the facenet_keras.h5 was generated with the 1.x version of tensorflow (while I am usintg the 2.2). Infact to correctly import the method I wrote:
from tensorflow.keras.models import load_model
but when I load the model I have the error mentioned above, please have you some suggestion?
I believe the problem is because you are trying to load the model using tf.keras instead of the standalone Keras library, not the version of tensorflow.
Just to add. Rest all versions being same, for me, it worked in python 3.6, but didn’t work on Python 3.8. Did not test on Python 3.7. So it is python version issue and not that of libraries.
Hello Sir, I have worked with facenet earlier but not using Keras. The model outputs embedding of 128 dimensions but the new Facenet model outputs 512-dimensional embedding. Is it possible to get higher dimensions using the above method?
Does this have the same accuracy as the facenet model?
I am searching for a recent model. This gives quite a different accuracy than the one I am used to with 512 dimensions. Where can I find different versions of the model?
Hello Sir, I have a question regarding the part of detecting faces in a specified directory, it works just fine for 9 images exactly (it prints the face shape and show the image as the code says) and then I come across an error “IndexError: list index out of range” at this line —> x1, y1, width, height = results[0][‘box’]
I just want to understand why is it doing like this
I generated classifier for 2 labels, personA and personB.
When run the code from this article as it is, I can see accuracy 100 % for both labels on test data.
Now I am trying to recognize all faces in an image.
I modified the extract_face function as below and generated embeddings for each face found in one image.
# extract all faces from source image

def extract_faces(image, required_size=(160, 160)):

    faces = list()
# convert to RGB, if needed
image = image.convert('RGB')
# convert to array
pixels = asarray(image)
# create the detector, using default weights
detector = MTCNN()
# detect faces in the image
results = detector.detect_faces(pixels)
for faceFound in results:
# extract the bounding box
x1, y1, width, height = faceFound['box']
# bug fix
x1, y1 = abs(x1), abs(y1)
x2, y2 = x1 + width, y1 + height
# extract the face
face = pixels[y1:y2, x1:x2]
# resize pixels to the model size
img = Image.fromarray(face)
img = image.resize(required_size)
face_array = asarray(img)
faces.append(face_array)
return faces
######################### RECOGNIZE ##############################
X = []
image = Image.open(test_img)
faceResults = extract_faces(image)
for result in faceResults:
X.append(result)
# convert each face in the test set to an embedding
newTestX = list()
for face_pixels in X:
embedding = get_embedding(model, face_pixels)
newTestX.append(embedding)
newTestX = asarray(newTestX)
I executed this code on one image from the same test data which I used while generating classifier.
However, the embedding generated with this code and the one generated from your code are totally different.
And hence the prediction result is also incorrect with this embedding generated with my code.
Can you please help me spot what I am doing wrong here?
Hi Jason, this tutorial is great. I have a question, when i have a new image(has single face),
i get embedded vector through get_embedding() function so, how can i predict this embedding vector for any one in file *_embeddings.npz?
face_embedded_data = np.load(‘file_embeddings.npz’)
trainX, trainy = face_embedded_data[‘arr_0’], face_embedded_data[‘arr_1′]
in_encoder = Normalizer(norm=’l2′)
trainX = in_encoder.transform(trainX)
Hi Jaon,
How can we decrease the loading time of pre-trained facenet model from keras.load_model(‘facenet_keras.h5’). It’s approximately taking 6-7 seconds for me in my laptop. I am deploying the model in raspberry pi which takes more longer. Is there any solution for this??
Hi Jason. Thanks for the post here. It has been very helpful for my project.
I am now trying to train the network on my data (It has images of faces of different people)
But there is an error I am running into
In the create face embedding section, I gout the output showing – Loaded (20,128) (20,) (8,128) (8,)
It has also loaded the model
But in the following line – embedding = get_embedding(model, face_pixels)
I get the below error
ValueError: Error when checking input: expected input_1 to have 4 dimensions, but got array with shape (1, 128)
I tried re-doing the code from the beginning and it’s working now. I have 2 doubts
1. I used my dataset with this code now and it had 2 classes. The code worked perfectly except the the final code snippet.
The pyplot.imshow(random_face_pixels) shows an TypeError: Invalid shape (128,) for image data
And I can confirm that I have followed the code to the letter. Again, not sure why that is the case
2. This code shows the class probability for a randomly selected image from the val folder.
Is there a tutorial on how to find the OVERALL accuracy of the entire model can be found instead of random images taken up?
(Considering all the val images) The papers that I have read up all mostly don’t mention their accuracy based on 1 randomly
selected val image
Hopefully I’ve explained point 2 well. Thanks
This would be alright to measure the performance and accuracy of calculation too right? Want to confirm that this is sufficient and I don’t need to do anything additional
If this is a case, I am assuming the class probability is additional information being provided
Hey, I need to find some more test results from this code like – F1 score, accuracy score graphs and ROC curve
How should I go about implementing that here?
Hey Priyanka, Not sure if you have resolved the issue with pyplot.imshow(random_face_pixels), but this might help. Just make sure that you are using ‘5-celebrity-faces-dataset.npz’ when loading faces (testX_faces) and not ‘5-celebrity-faces-embeddings.npz’
After #load the dataset and #normalize input vectors, I got the error found in variable TrainX. It is said that “ValueError: Found array with dim 4. Estimator expected <= 2.". I don't know how to handle that, even though I tried to reshape it.
Hi Jason,
Thanks for your tutorial. It’s great. I have a question.
How can I recognize a face that does not exist in the training set by this approach?
I have tried to measure the Euclidean distance between the face embeddings to distinguishing faces but the result I got is not satisfying. Your Suggestion will be highly appreciated. Thank you
You can add a “unknown class” during training.
You can interpet the probabilities and return an “unknown” result if none of the classes respond strongly enough.
You can re-train the model to support the new person.
…
Hi Jason, i found one error in your demonstration of extracting face part, the bounding box in MTCNN, some images may have negative values of x or y, this is not a bug, because the face is partially out of the image, like this one: 5-celebrity-faces-dataset/train\jerry_seinfeld\httpwwwwatchidcomsitesdefaultfilesuploadsightingBreitlingwatchJerrySeinfeldjpg.jpg.
if you fix the bug by “x1, y1 = abs(x1), abs(y1)”, then the face image is not properly clipped.
Hey Jason , im getting the following error and have trying to find a solution for days . Could you please help me .
I am using google colab for the code and I placed the model and weight files in a folder name facenet_keras.h5 .
Then when I’m running the code this error is coming.
Unable to open file (unable to open file: name = ‘facenet_keras.h5’, errno = 2, error message = ‘No such file or directory’, flags = 0, o_flags = 0)
My path is /drive/My Drive/facenet_keras_h5 then also the error is shown
I was going through this blog from first line till the end. More than what wrote is the consistently replying every queries. Hats-off to your patience.
My query: I was planning to use your face recognition guide for my kindergarten project to detect kids faces.
1. Will this guide will works well on kids faces?
2. Does the camera feed has to be at certain angle and beyond which detection or recognition could be a problem?
3. Since, new kids enrolled very frequently, how to automate the training of new faces?
Sounds like an application question, not a machine learning question. You will need to devise an appropriate procedure to maintain the system in its environment.
The test image when i was giving from my local system,it predicted the output.But when i gave the same image from webservice model.predict() throws an error as ,”expected input_1 to have 4 dimensions but got (1,128)”. When i was doing from my local i followed the same step as you processed test images before model.fit().When i was giving from webservice. I am training images from one service passed it to model.fit().and from match webservice i am trying to predict but it throws me an error.
Thanks for the reply.. I re-frame my question without webservice part and lets assume train and test images are local.
My project requires train images to be added in model before testing of face. So, I process my train image one-by-one and fit it with the model. Up to this, everything works fine.
Now, I have a test image and processed it as usual (process I mean by extract face and get embedding) and give it to model.predict(). This is where I get this error ”expected input_1 to have 4 dimensions but got (1,128)”
One more thing, if I process one of my test image before model.fit(), I get my output for this face properly.
The new image must be prepared in an identical manner as the training data. Same pixel scaling and same shape, then passed through the model to get the embedding, then passed to the model to get a prediction.
Hi, I need the architecture of FaceNet model, but unable to find it. If there is an official source for it, kindly help out
The paper I found consists of two different architectures and I’m unsure which one is relevant/ being used over here
I’m referring to the FaceNet: A unified embedding for face recognition and clustering paper, and see two architectures there – Zeiler&Fergus based an d Inception based
Congratulations on the tutorial! I’m getting the following warning:
WARNING:tensorflow:6 out of the last 11 calls to <function Model.make_predict_function..predict_function at 0x7f0016e2eae8> triggered tf.function retracing. Tracing is expensive and the excessive number of tracings could be due to (1) creating @tf.function repeatedly in a loop, (2) passing tensors with different shapes, (3) passing Python objects instead of tensors. For (1), please define your @tf.function outside of the loop. For (2), @tf.function has experimental_relax_shapes=True option that relaxes argument shapes that can avoid unnecessary retracing. For (3), please refer to https://www.tensorflow.org/tutorials/customization/performance#python_or_tensor_args and https://www.tensorflow.org/api_docs/python/tf/function for more details.
while using the extract_face function. Do you know that does it mean?
I am trying to implement masked face recognition – using your approach as a starting point. And have been somewhat successful, by adding artificial masks to unmasked images before generating face embeddings.
However, when I take masked images, MTCNN code is not able to detect any face in those images. As a result, I am not able to train using real life examples. Do you have any recommendation or documentation or tutorial at to what can make MTCNN detect masked faces?
TypeError Traceback (most recent call last)
in ()
43 # plot for fun
44 #a = random_face_pixels.resize(128,128)
—> 45 pyplot.imshow (random_face_pixels)
46 title = ‘%s (%.3f)’ % (predict_names[0], class_probability)
47 pyplot.title(title)
5 frames
/usr/local/lib/python3.6/dist-packages/matplotlib/image.py in set_data(self, A)
697 or self._A.ndim == 3 and self._A.shape[-1] in [3, 4]):
698 raise TypeError(“Invalid shape {} for image data”
–> 699 .format(self._A.shape))
700
701 if self._A.ndim == 3:
Great article. I need to know that you also included val samples to create Face_Embeddings npz file, so it means that in case of video capture, we will have to pass all sample frames via complete procedure and create 2x .npz files for each frame and then identify each image in our other trained Face_Embeddings npz file with new Face_Embedding npz file of current frame?
Hi Dr. Brownlee, thanks for sharing this awesome tutorial,
I have been working on one shot learning with siamese network and facenet, even tried with knn, svm and vggg16 and resnet.
for the training I use one image per classe so if i’ve 200 students, i’ve 200 images for classify using one shot learning and facenet.
First of all, The goal is to classify and embedding the students images on database and then detect the images on live camera. unfortunately the detections was not really accurate. sometimes the students are detected as unknown or detected with with correct labelled name in the db.
For instance, when unknown person tested via the camera it will detect this unknown person already existed in the database.
Secondly, I would like to compute face embeddings for new people that doesn’t existed in the db before. then add these new added people would be detected if they tested again.
how can I approach these, Please advise me on how to achieve this? and specifically for embedding new faces to the db, later would be detected with their correct labelled.
share with me if there are some reference that would guide me to achieve that.
I believe some experimentation will be required. E.g. if an embedding cannot be predicted with high confidence, mark it as “new” and “unknown”. The threshold for what is and what is not confident might have to be tuned for your specific dataset/environment.
I will take a look at that and see what I can improve it.
what about adding new faces to the db and encode it automatically without re-training or encoding again. could you please advise or share with me any reference that would be useful to compute face embeddings for new people.
I don’t have an example of this. As I said, you will need to experiment to see what works well for your system. It is perhaps more of an engineering question.
Hi Jason
I have created Indian face dataset of 105 classes and 200 samples per class.
Can I use facenet.keras.h5 model to get the embedding of each sample.
Please suggest me how to train facenet over my dataset
We need To assign Labels to testY just same as we used for trainY
Then it will recognise Image in RAM from webcam with all the already trained embedded images in the dataset. Because in Feature_Embedded_Dataset.npz we have Labels for each POI to compare with Image in RAM
Btw ur code is really resource intensive for 2.2GHz CPU. Will buy GPU soon for my BCS AI Project though 🙂
Thanks for sharing this great tutorial. I am facing below error on extract_faces() function:
ValueError: The channel dimension of the inputs should be defined. Found None.
I have just copied the function and trying to run the program on a set of images. I am not sure where I am wrong – is there anything you can shed lights on?
Perhaps try running it on the dataset used in the tutorial first to confirm the code works on your system, then perhaps prepare your image data in an identical way as the dataset used in the tutorial.
Hi Jason
I am trying to train svm in 1000 classes by using the face net extracted feature. The training time of SVM takes longer time never seems to stop. Is there any way to reduce the training time of SVM
Hi Jason,
First of all Thanks for such a detailed explanation of the implementation of the facenet model.
I am stuck at a point where we import the model, I am getting this error
ValueError: bad marshal data (unknown type code)
I searched for the solution I am not able to find anything.
Could you please let me know what should I do.
Waiting for your reply
It is giving good accuracy when i train with 9-10 different persons images the same way you did, When i check the accuracy it is giving like 90-95%. When i train with 90-100 different persons of images and it is giving 10% accuracy , The accuracy starts to decline when i increase the train images, How can i fix this. Thanks
Hey Jason great post!!!
I have a question I am working on a personal project which is Face Recognition using LBPH,
I made a similar approach using SVM Classifier, but how can I use it to mark Unknown person.
Perhaps add a class of “other” during training?
Perhaps interpet the predicted probabilities and classify as “unknown” for low probabilities?
Perhaps develop a separate model for known vs unknown faces?
Perhaps check the literature for common solutions to this problem?
Hi Jason, first, great thanks to this tutorial. i learnt a lot.
I have question, is this Facenet + SVM able to recognize over 100 faces?
After testing myself, it works well if there are a total of 7 or 8 people (with 5 samples each).
However, the ‘probability’ declines significantly if there are around 20 people (from 0.8 to 0.3). I wonder if this works for 100 people?
# face detection for the 5 Celebrity Faces Dataset
from os import listdir
from os.path import isdir
from PIL import Image
from matplotlib import pyplot
from numpy import savez_compressed
from numpy import asarray
from mtcnn.mtcnn import MTCNN
# extract a single face from a given photograph
def extract_face(filename, required_size=(160, 160)):
# load image from file
image = Image.open(filename)
# convert to RGB, if needed
image = image.convert(‘RGB’)
# convert to array
pixels = asarray(image)
# create the detector, using default weights
detector = MTCNN()
# detect faces in the image
results = detector.detect_faces(pixels)
# extract the bounding box from the first face
x1, y1, width, height = results[0][‘box’]
# bug fix
x1, y1 = abs(x1), abs(y1)
x2, y2 = x1 + width, y1 + height
# extract the face
face = pixels[y1:y2, x1:x2]
# resize pixels to the model size
image = Image.fromarray(face)
image = image.resize(required_size)
face_array = asarray(image)
return face_array
# load images and extract faces for all images in a directory
def load_faces(directory):
faces = list()
# enumerate files
for filename in listdir(directory):
# path
path = directory + filename
# get face
face = extract_face(path)
# store
faces.append(face)
return faces
# load a dataset that contains one subdir for each class that in turn contains images
def load_dataset(directory):
X, y = list(), list()
# enumerate folders, on per class
for subdir in listdir(directory):
# path
path = directory + subdir + ‘/’
# skip any files that might be in the dir
if not isdir(path):
continue
# load all faces in the subdirectory
faces = load_faces(path)
# create labels
labels = [subdir for _ in range(len(faces))]
# summarize progress
print(‘>loaded %d examples for class: %s’ % (len(faces), subdir))
# store
X.extend(faces)
y.extend(labels)
return asarray(X), asarray(y)
# load train dataset
trainX, trainy = load_dataset(‘5-celebrity-faces-dataset/train/’)
print(trainX.shape, trainy.shape)
# load test dataset
testX, testy = load_dataset(‘5-celebrity-faces-dataset/val/’)
# save arrays to one file in compressed format
savez_compressed(‘5-celebrity-faces-dataset.npz’, trainX, trainy, testX, testy)
ERROORRRR!!!
WARNING:tensorflow:5 out of the last 13 calls to <function Model.make_predict_function..predict_function at 0x0000029E333A7730> triggered tf.function retracing. Tracing is expensive and the excessive number of tracings could be due to (1) creating @tf.function repeatedly in a loop, (2) passing tensors with different shapes, (3) passing Python objects instead of tensors. For (1), please define your @tf.function outside of the loop. For (2), @tf.function has experimental_relax_shapes=True option that relaxes argument shapes that can avoid unnecessary retracing. For (3), please refer to https://www.tensorflow.org/tutorials/customization/performance#python_or_tensor_args and https://www.tensorflow.org/api_docs/python/tf/function for more details.
# prediction for the face
samples = expand_dims(random_face_emb, axis=0)
yhat_class = model.predict(samples)
yhat_prob = model.predict_proba(samples)
In this sample, the test face embeddings are loaded from npz file (which created before in ‘Create Face Embeddings’ phase).
So, the model.predict runs fast.
But when I tried to classification images from a stream (camera), I must get new embeddings for every frame. The ‘get embeddings’ process quite slow (around 2-3 seconds on each frame on my computer), so the video output becomes laggy.
Is there anyway to speed up the ‘get embeddings’ process?
You are one of the best that explains complex staffs steps by steps to the point. Your book and blogs are amazing.
The output of MTCNN is the box and keypoints. I was expecting those will be input to the FaceNet.
But it seems you used only the box information as input to the FaceNet? Why you did that?
How we can use the keypoints information for face recognition pipeline?
Thank you for your response.
In this work you used the below steps in that order.
1. Face detection model, MTCNN
2. Create embedding using facenet
3. Classify using SVN
My question is the output of face detection are the bounding box and keypoints (landmark locations like left eye, right eye, … ). But you only used the bounding box information and extracted the face and feed it to facenet to create embeddings. Why you didn’t use the landmark locations informations?
Thank you so much Jason!!
The typical face recognition consists of four stages: detect, align, represent and classify.
I think for detect we used MTCNN, for represent we used facenet and for classify we used svn.
What did we use for face alignment?
“We will focus on the face identification task in this tutorial.” Per your note this task is face identification, which stage (face detection, FaceNet or classification with svn)of face recognition system determined it?
The other question is:
what is the difference between binary classification and face verification?
what is the difference between multi-class classification and face identification?
Classification is mostly a machine learning problem, such as SVM. Using machine learning based classifier like SVM, LR etc, your model is able to generalize, which means learning from features of different images of same class. This is not possible without a classifier. Face classification is also called as face identification.
A face verification is a one to one match which is usually achieved using distance metrics such as euclidean distance, cosine similarity. Distance between two face embedding is being calculated and a threshold will identify whether two faces are same or not. The distance approach can’t generalize like a machine learning model but is helpful when you have a single image of a person,and is thus less accurate than classification approach.
I want a clarification on one point. I have an image which has total 10 faces. But when I implemented detection algorithm(part of code) on it and save this numpy array as an image, then every time it detect only one face(which is the first face in image).
How I can detect all the faces separately??
Hi jason,
I am getting below error while loading model.Please suggest.searched a lot not getting solution.
Error:”ImportError: load_model requires h5py.”
from keras.models import load_model
model=load_model(‘D:/ML_All/deep learning/face detection/FACENET_PRETRAINED/facenet_keras.h5’)
Thanks Jason for reply..Earlier tried with TensorFlow 2.1.0 + Keras 2.3.1 but then also was getting some error while loading model.
Since facenet Keras implementation((https://github.com/nyoki-mtl/keras-facenet) by Hiroki Taniai has used (tensorflow: 1.3.0,keras: 2.1.2).So should not we use same keras,TF version’s in which pretrained model was built to load model.Is it mandatory to have same version to load model in keras using load_model ?
Hey Jason thanks for the tutorial, Is there a way of having the facenet keras model perform faster for video face recognition when running on a CPU.
Perhaps maybe have it converted to a form in which it’s usable by opencv’s dnn module?
You must have photos of each person in the train and test sets so that the model knows about each person (training) and can be evaluated when identifying each person (testing).
The split is up to you, e.g. 50/50 might be a good place to start. Perhaps more or less aggressive depending on the time you have and the reliability you need to demonstrate.
Let’s say about 50/50 split, that means 15 people will have 6 face images in training whereas 5 face images in test.
So while testing the first image, with how many images I will compare? (since identification is one-to-many.
Plus would like to use just the similarity measure without the svm classifier.
If you split 50/50, then half of the images for each person will be used to train the model and half to evaluate it. Each image belongs to one person. You can evaluate model performance using classification accuracy.
Hello Dr. Jason,
Your blog is the best and you explained precisely. Really appreciate.
Please could you compare the Universal Background Models (UBM) and FaceNet model?
I don’t see a paper where UBM is applied for face verification, do you know the reason?
It looks like UBM is mainly used for speaker verification not for face verification, I am wondering why?
Hello Dr. Jason
I am interested to your blog. It is very useful. Thank you for your explain.
I have a question about image size.
I used FaceNet pytorch trained on vggface2 using backbone Inception ResNet v1 to predict my own dataset but i want to use image size 256×256. I tried it and predict embedding.
now, I want to ask this is correct or must be image size 160 x160. specially, I read note in facenet site about the size. this is note
Both pretrained models were trained on 160×160 px images, so will perform best if applied to images resized to this shape.
so, I concluded that I can use image size 256.
another question about Threshold. I choose T 1.03 @ 0.001 FPR but from model trained on 160. is this right?
Is it possible to use an mp4 video file as input. Whereas faces within the video are detected and recognized.
Thank you so much for your time and help, this tutorial helped me a lot
Can you please tell me why am I getting this error : “AttributeError: ‘NoneType’ object has no attribute ‘astype’: on this line: “face_pixels = face_pixels.astype(‘float32’)”.
Actually it is not loading anything in trainX array. I don’t know why.
I have loaded the file like this:
data = load(‘/content/drive/MyDrive/face_detection.npz’,allow_pickle=True)
trainX, trainy, testX, testy = data[‘arr_0’], data[‘arr_1’], data[‘arr_2’], data[‘arr_3’]
Hi Jason,
I am getting the following error could you tell me how to fix it
WARNING:tensorflow:5 out of the last 11 calls to <function Model.make_predict_function..predict_function at 0x000002EA8FCAF310> triggered tf.function retracing. Tracing is expensive and the excessive number of tracings could be due to (1) creating @tf.function repeatedly in a loop, (2) passing tensors with different shapes, (3) passing Python objects instead of tensors. For (1), please define your @tf.function outside of the loop. For (2), @tf.function has experimental_relax_shapes=True option that relaxes argument shapes that can avoid unnecessary retracing. For (3), please refer to https://www.tensorflow.org/guide/function#controlling_retracing and https://www.tensorflow.org/api_docs/python/tf/function for more details.
Thanks again for the very helpful article. With your help, knowing a little bit of python and next to nothing about machine learning, I have created a model consisting of several hundred classes and several thousand pictures. It works fairly well at recognizing pictures of people it has already loaded. I wonder if it is possible to detect whether two or more classes represent the same person? For example, suppose I did not realize that the Ben Affleck in Gone Girl was the same Ben Affleck in Justice League and so I created two separate classes, Ben_Affleck_Gone_Girl and Ben_Affleck_Justice_League. Is there some way to use the model to detect that they are the same person?
You could use a model that predicts the probabilities of class labels and look at the predicted probabilities to see what it really “thinks” about given photos.
Hi Jason!
Thanks for your article. Appreciate the work you’re doing for the community!
When I train my model with 3-5 images/class it works fine.
However, when I am training with a single image/class , the accuracy goes bad.
I understand face-net works as a single shot detection.
I’ve read your article on siamese network also which reaffirmed it should perform well with 1 image/class.
what’s the issue in your opinion?
What I mean to say is that when I am training my model with 3-5 images for each person, the model accuracy is good.
However, when I have 1 training image for each person, the testing accuracy is very poor.
Hello Jason, for my uni project (app for android with face recognition and pose detection) i need to be able trough a image, to face recognize people not by name just giving them an Id , for example, if me and you would appear in the camera the app would learn our faces and I would ve got the Id 1 and you the Id 2 or vice-versa, and the next time we appeared on the camera we would still’ve those Ids.
What would be a solution? I ve seeing face recognition technologies such as amazon rekognition, azure face, tensorflow lite with facenet,, but i dont know if I can do this… Can I? With no previous data of people distinguish them and then learn with those images?
When we classify using e.g. SVM, the maximum probability value for a correct prediction in case of say 5 classes comes around 85%, but when the number of classes goes up to say 75 classes, the maximum prediction probability value for correct prediction comes around 20%.
Model predicts a probability for an unknown face also. So, if I want to filter out an unknown faces using a threshold value, the threshold value will keep changing as I add more faces.
how delete a person from model after trained
instead of retrain model ?
…
is there a way for use a facenet library or any thing built in python instead of loading this model ? (because it is take long time for loading)
I trained the custom face recognition classification model with 1.00000 accuracy but it also predict Unknown faces with class name’s how to fix this problem
I have input array of shape mx112x92 and I reshaped them mx160x160x3 to be compatible with FaceNet. The accuracy score of the model is very bad. Is it preferred to have only colored images to generate the embeddings ?
It’s been a long way for me to get to your post, I learned a lot along the way, otherwise I might not be able to understand some point in this tutorial. lol. The post is clearer than all the other posts I’ve read though. Really appreciate
After done read this post, I was wondering how can i group photos of different people in user’s ios album, just like ios have done in their album app: the album app will list a bunch of face of different people, and when user clicked one of them, it will show all the photos that the face is in.
For now, I build a openface ios version model. I can get face embedings of all the faces in the user’s album, but how can i separate all this embedings into different group or give them different labels automatically without end user interfering. Should I group embedings based on the MSE(mean standard error) between different faces? I tried this method, not smart enough I think.
Hey Jason,
First of all thank you so much for this tutorial. it’s my first deep learning practice, and i completed all code also it’s work! But i have a question for you, how can i load another image or video to detect.
I noticed you use “data = load(‘FGS-faces-embeddings.npz’)” of Test data to show predict result, how can i change “load(‘FGS-faces-embeddings.npz’)” to my realtime data?
Hello Jason. Amazing Project!
I was wondering what is the optimal way to use the model (detect – not train) over 300K+ images?
Should I save their data in one .npz file as your way or is it too large for that? Is there another way like detecting each single image alone? and how will the code look like then?
It may look a beginner’s question, which I am.. Thanks in advance
Their data means the 300+ images? That’s not the good way to use .npz because it means to load everything to memory when you read it; try to keep those images in a zip file or a folder.
Thank you for all the explanations given in this page. I am currently trying to use a pertained model (Swin Transformer, I found a version in Tensorflow) and use it for a multiple output classification task. Do you have any advice or page recommended for this kind of problem? The authors dive a block like the one above for using the pertained model, but since I am having multiple outputs I need to do it in Functional API.
Hello! I am currently trying to try this project on my own data. Every time I get to creating the trainX, I always get an error somewhere along the way during scanning my photos at this part:
x1, y1, w, h = results[0][‘box’]
that sais that the index is out of range when detecting the face, or something like that (sorry, I’m currently running in again and cant give the exact error code and message).
But, does that mean there aren’t any detectable faces in my picture that have caused the error? Thanks!
If there is “index out of range” in this line of code, it means “results” is an empty list. Can’t tell what went wrong but you should investigate in this direction.
Thank you! Every time that happens I always check which image caused that to appear and for now I just assume that there are no detectable faces, so I just remove the picture from the data and it solved it. I need to look more to it but for now, I think it’s good enough
Hello Sir
was working on the example which was posted above tried the example on my own face dataset and some other of my friends dataset and saw that it performs very well on the dataset and saw that even if we generate the embedding for like 5 images still also it works well but in case of larger dataset if we try to do with neural nets dont we need to like change the structure of the neural nets again and again for classifying the image as new faces may come and go
web designing company in trichyMarch 4, 2022 at 6:44 pm#
We are too eager to know about this domain once l learn I want to embed it into the website to do experiments. As a leading web designing company in Trichy, we have done a lot of projects
i mean that the model can take an input image then predict and match if found a similarly with an images stored in a SQL or non-SQL as (mongo db or firebase) databases
Marshal is a serialization format internal to Python. I believe it may not relate to your h5 model file but could be some old pre-compiled code staying around. Try look for any .pyc file and delete them.
Thanks for the tutorial. It really helps developers like me to understand face recognition.
I have a similar problem to classify images as Same or Different. I have seen your other post where you have used the cosine distance in order to do the same but if we need to do that with SVM classifier – is there an approach to do that ?
Hello Jason,
Thanks for the article, it helped me a lot.
I ran into a problem and would love to get help from you.
I do not understand 100% of machine learning and how SVM works exactly, and I tried to extract from the model that you created a validation loss graph, and after a long search, I found that I can’t do it, and I am not 100% sure.
Is it possible to remove the graph from the model? and how do I train the existing model? After a lot of runs, the accuracy did not change (and I’m not sure how to check the amount of accuracy correctly, all I did was create a graph that for each run shows the prediction probability, and the mean didn’t change)
when running the facenet classification part of this tutorial, I get the error :
ValueError: Expected 2D array, got 1D array instead:
array=[].
Reshape your data either using array.reshape(-1, 1) if your data has a single feature or array.reshape(1, -1) if it contains a single sample.
on line: trainX = in_encoder.transform(trainX)
It would be glad if I could know from the q&a of the post till now, but there is not a search bar. I liked this post and I will be thankful if you could tell me what is wrong
Hi Sarah…Thank you for your support and feedback! Stakoverflow.com is a great resource for posting questions regarding errors. The following is an example of a discussion post that may help add clarity:
Is it me or getting embeddings from photos takes more and more time every prediction?..
I mean, at start it takes about 20ms for prediction. After few thousands predictions it runs really slow. It takes 200ms for a single prediction. And this latency growth up with every prediction. After some time its more efficient to reload the model, than trying to get another set of embeddings.
Do you have any ideas why this may happen and how to solve it?
Hi, is there a facenet_keras.h5 model available for python 3.10?
I get a ValueError: bad marshal data (unknown type code) when downloading it with python 3.10,
but when I use TF 2.2, Keras 2.3 or 2.4, Python 3.6- I get numerous other errors,
so using a model written with a newer version seems to be an easier solution.
I know it’s been a long time since you posted this but I still hope I could get a reply from you. When I implemented myself based on your idea, I had problems related to load pretrained facenet model. It’s said that “EOFError: EOF read where object expected”. I search a lot to figure out this problem but still have no idea. For further information, I’m using both tensorflow and keras: 2.13 version.
I’m looking forward to hearing from you.
Your post is really amazing btw. It’s inspired me a lot.
Hi Quy…We do not have experience with that issue. Perhaps you could try your code in Google Colab. This may help determine if there is an issue with the code itself of the Python environment itself.
Hi, I have 2 classes with 120 images per class. When I’m training the SVC model the accuracy is 50%. Is this due to only having 2 classes? Or is my dataset?
Hi James! I solved it! It seems like I look a lot like my mom… so the model classify me as her and her as me! As a recommendation for anyone having problem, don’t use data of someone that looks like you haha
Thanks for answering! Yeah I tried with Madonna and Mindy faces, 22 faces per class. It only improved from 50% to 52%. I’m using facenet model from face_net keras and it gives me embeddings with length of 512 not 128. Could this be the problem?
Thank you and it’s really great and really helps people learning about facial recognition. Your explanation is also very easy to understand. However, there are several things that have changed, such as in Keras FaceNet you no longer need model = load_model(‘facenet_keras.h5’) but only need model = FaceNet().
Can you also help how to run SVC if the test data is obtained in real time from the camera?
File ~\AppData\Roaming\Python\Python311\site-packages\keras\src\utils\traceback_utils.py:70, in filter_traceback..error_handler(*args, **kwargs)
67 filtered_tb = _process_traceback_frames(e.__traceback__)
68 # To get the full stack trace, call:
69 # tf.debugging.disable_traceback_filtering()
—> 70 raise e.with_traceback(filtered_tb) from None
71 finally:
72 del filtered_tb
File ~\AppData\Roaming\Python\Python311\site-packages\keras\src\utils\generic_utils.py:102, in func_load(code, defaults, closure, globs)
100 except (UnicodeEncodeError, binascii.Error):
101 raw_code = code.encode(“raw_unicode_escape”)
–> 102 code = marshal.loads(raw_code)
103 if globs is None:
104 globs = globals()
Thanks for replying Mr. James.
I wasn’t able to load the model but got that particular issue resolved.
Now can you help me with how can i use this for face recognition based attendance system? (i am new to this).
Hi Gado…ResNet152 is a deep residual network with 152 layers, and it is highly effective for image recognition tasks due to its depth and architecture. For face recognition using a live camera feed, you can certainly use ResNet152 or a similar deep learning model. However, it is more common to use models that are specifically optimized for face recognition, such as FaceNet, VGGFace, or models from the Dlib library.
### Steps to Use ResNet152 for Face Recognition
1. **Pre-trained Model**: Load a pre-trained ResNet152 model that has been fine-tuned on a face recognition dataset. You can also use a generic pre-trained ResNet152 model from frameworks like Keras and fine-tune it on a face recognition dataset.
2. **Face Detection**: Use a face detection model to identify faces in the live camera feed. Popular options include Haar cascades, Dlib’s HOG + SVM, or MTCNN.
3. **Face Alignment**: Align the detected faces to ensure consistent input to the recognition model.
4. **Feature Extraction**: Use ResNet152 to extract features from the aligned face images.
5. **Face Recognition**: Compare the extracted features with known face features (e.g., using cosine similarity or a simple classifier).
### Implementation Example
Here is an example of how you might implement this in Python using OpenCV and Keras for a simplified face recognition pipeline with a ResNet model.
#### Step 1: Install Necessary Libraries
Make sure you have the following libraries installed: sh
pip install tensorflow keras opencv-python-headless
pip install mtcnn # for face detection
pip install scipy # for distance calculation
#### Step 2: Load the Pre-trained ResNet152 Model python
from tensorflow.keras.applications import ResNet152
from tensorflow.keras.models import Model
from tensorflow.keras.layers import Input
from tensorflow.keras.preprocessing import image
from tensorflow.keras.applications.resnet import preprocess_input
import numpy as np
# Load ResNet152 model
base_model = ResNet152(weights='imagenet', include_top=False, input_tensor=Input(shape=(224, 224, 3)))
model = Model(inputs=base_model.input, outputs=base_model.output)
#### Step 3: Detect and Align Faces python
import cv2
from mtcnn.mtcnn import MTCNN
# Initialize the face detector
detector = MTCNN()
# Function to detect faces and extract features
def detect_and_extract_features(frame):
faces = detector.detect_faces(frame)
features = []
for face in faces:
x, y, w, h = face['box']
face_img = frame[y:y+h, x:x+w]
face_img = cv2.resize(face_img, (224, 224))
img_array = image.img_to_array(face_img)
img_array = np.expand_dims(img_array, axis=0)
img_array = preprocess_input(img_array)
feature = model.predict(img_array)
features.append((feature, (x, y, w, h)))
return features
#### Step 4: Recognize Faces in Live Camera Feed python
import cv2
from scipy.spatial.distance import cosine
# Load known face features and labels
known_faces = [feature1, feature2, ...] # Replace with actual features
known_labels = ["Person 1", "Person 2", ...]
# Function to recognize faces
def recognize_face(face_feature):
min_distance = float('inf')
label = None
for i, known_feature in enumerate(known_faces):
distance = cosine(face_feature, known_feature)
if distance < min_distance:
min_distance = distance
label = known_labels[i]
return label
# OpenCV to capture video from the webcam
cap = cv2.VideoCapture(0)
while True:
ret, frame = cap.read()
if not ret:
break
features = detect_and_extract_features(frame)
for feature, (x, y, w, h) in features:
label = recognize_face(feature)
if label:
cv2.rectangle(frame, (x, y), (x+w, y+h), (0, 255, 0), 2)
cv2.putText(frame, label, (x, y-10), cv2.FONT_HERSHEY_SIMPLEX, 0.9, (36,255,12), 2)
cv2.imshow('Face Recognition', frame)
if cv2.waitKey(1) & 0xFF == ord('q'):
break
cap.release()
cv2.destroyAllWindows()
### Key Considerations
1. **Pre-trained Models**: Use pre-trained models for feature extraction. You can fine-tune them on your specific face dataset for better accuracy.
2. **Face Detection**: Ensure reliable face detection for better recognition performance.
3. **Feature Matching**: Use appropriate distance metrics for feature matching. Cosine similarity is common for face recognition.
4. **Performance**: Optimize for performance, especially if deploying on resource-constrained devices.
### Conclusion
While ResNet152 can be used for face recognition, it is often more efficient to use models specifically designed for face recognition tasks. If you still prefer using ResNet152, ensure you have a robust pipeline for face detection, alignment, feature extraction, and recognition to achieve the best results.
Thanks for replying! I am using a Yolov8 for face detection. And I saved my known embeddings with its labels on a json file. It is currently working when I set my threshold low it is not recognizing well sometimes it outputs the label of a wrong person but when I set my threshold higher it can’t recognize any known faces. Any tips on how to solve this?

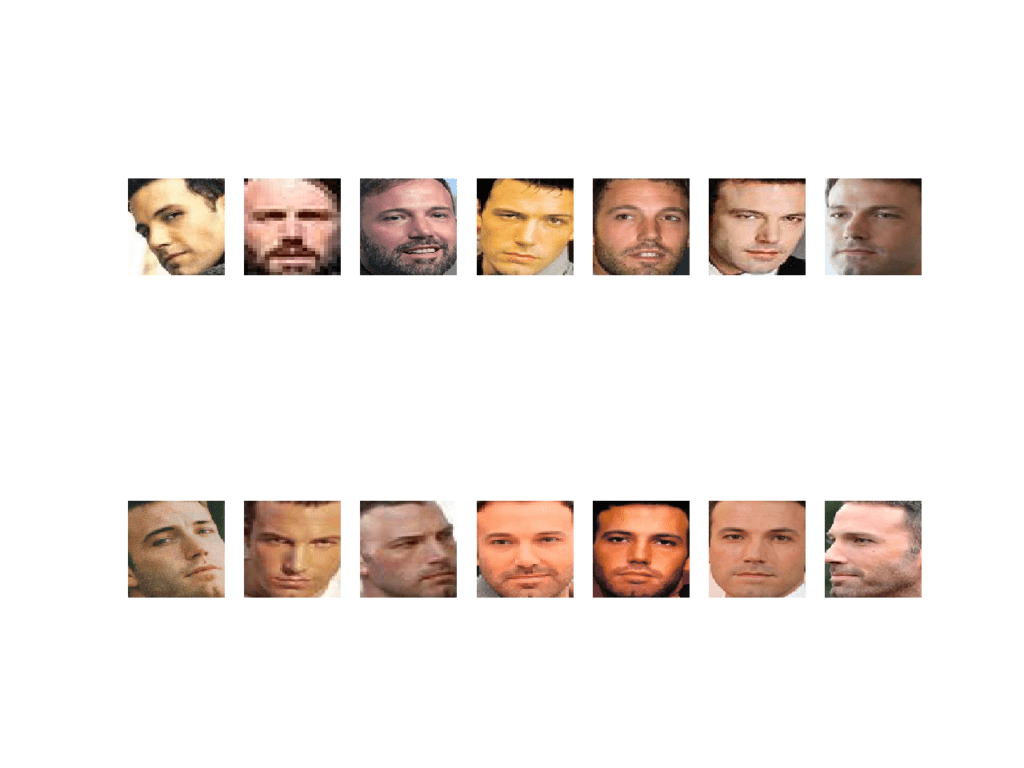
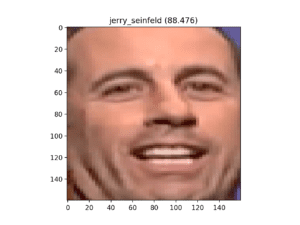


Great tutorial.
Was looking at whether Transfer learning, Siamese network and triplet loss approaches are applicable to animal face(eg a sheep, goat etc) recognition particularly mobileNet(or otherwise) when your crystal clear blog came up.
Kindly shed more light on its applicability and any other auxiliary hints.
I don’t see why not.
How do I solve this error ???
ValueError: Input 0 of layer Conv2d_1a_3x3 is incompatible with the layer: : expected min_ndim=4, found ndim=2. Full shape received: [None, 128]
Sorry to hear that you’re having trouble, some of these tips may help:
https://machinelearningmastery.com/faq/single-faq/why-does-the-code-in-the-tutorial-not-work-for-me
Sorry Sir! but it’s not helping me out because I’m creating my own datasets of 15 people so that’s why facing that error can you help me about what changes should I change in your code ??? and how do i train my own new facenet model ????
Perhaps start with the above tutorial that works, and then adapt it for your own dataset.
Start by ensuring the existing tutorial works on your environment.
Then ensure you have loaded your dataset correctly.
Finally, adapt the example to use your loaded data.
Hi Jason,
This is fantastic, thanks for sharing.
What do you suggest when we have tens of thousands of classes.
A Facenet model itself as a classifier or a specific classifier model is to be trained. In terms of scalability and performance which is the preferred method.
Referring to:
“The FaceNet model can be used as part of the classifier itself, or we can use the FaceNet model to pre-process a face to create a face embedding that can be stored and used as input to our classifier model. This latter approach is preferred as the FaceNet model is both large and slow to create a face embedding.”
Good question, the facenet embedding approach is a good starting point, but perhaps check the literature for more scalable approaches.
Hi jason,
As per my understanding The triplet loss is used so that the model can also learn the dissimilarity between the classes rather than only learning similarity between same class.
But here we are not training our model on the actual image dataset on which we need our classification to be done. Rather we are using SVM for that.
So, how can we make use of triplet loss in this method of face recognition?
See this post:
https://machinelearningmastery.com/one-shot-learning-with-siamese-networks-contrastive-and-triplet-loss-for-face-recognition/
Hi Jason,
I want to try this on Cat and Dog dataset. What do you thing the pre-trained networks face embeddings will work in this case?
No, I don’t think it will work for animals.
Interesting idea though.
Thanks for your reply.
What do you think how much effort will it take to train facenet from scratch?
And certainly how much data?
Not off hand, sorry.
Thanks for the response Jason.
Hi Jason,
Can MTCNN detect faces of cats and dogs from image?
I don’t see why not, but the model would have to be trained on dogs and cats.
Hi Jason,
Thanks for a very nice tutor. But i cant set up mtcnn in my python2? Is there a way to install mtcnn for python2?
I don’t know, I have only used it with Python 3.
Hi Jason. nice tutor!
But i wonder that, if i want to identify who is stranger. should i make a folder for ‘stranger’ contains alot of stranger faces???(exclude your 5 Celebrity Faces Dataset ??)
Good question.
No, if a face does not match any known faces, it would be “unknown”. E.g. has a low probability for all known faces.
Thank you very much. Keep writting tutorials to help thoudsands of thoudsands people like me a round the world learning ML,DL. <3
Thanks, I’m grateful for your support!
yeah! I figured out that MTCNN only require Python3.
Follow this bellow: https://pypi.org/project/mtcnn/
Nice.
Thanks for your tutorial.
But when i flollow you, i have a warning :
embeddings.npz is not UTF-8 encoded
UserWarning: No training configuration found in save file: the model was *not* compiled. Compile it manually.
Do you know how to fix it.
You can safely ignore these warnings.
Thank you so much.
But when I have a new image to recognize, do I need to put it to the validate folder and rerun the code ?
And how can we use this to recognite face in a video ?
You can use the model directly, e.g. in memory.
Perhaps you can process each frame of video as an image with the model?
Hello Jason,
Thanks for your wonderful tutorial, I’d like to know what is the best solution to apply recognition part if I have a very small dataset -only one face per each identity- in this case, I think SVM wouldn’t help.
I think a model that uses a face embedding as an input would be a great starting point.
Hello Jason,
Thank you for this amazing tutorial, I used python 3 to run this code. I would like to know why am i getting this error (No module named ‘mtcnn’) and how can I correct it?
The error suggests you must install the mtcnn library:
I want to use transfer learning for masked face recognition. But i didn’t found any better masked face recognition dataset. I need a masked face dataset with proper labeling of each candidate. So is there any better masked face dataset available? where can i find this dataset?
Perhaps you can take an existing face dataset and mask the faces using opencv or similar?
Thanks for response. Can you refer any work or blog like your for doing mask face using opencv or similar?
Sorry, I do not have a tutorial on this topic, perhaps in the future.
Hello Jason, great tutorial.
Im beginner in python.
I try to understand your code, and little bit confusing when you choice random example from dataset when doing classification
in line 28. selection = choice([i for i in range(testX.shape[0])]),
its choose random vector value in testX.shape[0] from embeddings.npz right?
so how if we want using spesific image from val folder?, Can you refer any work or blog to doing this
Thanks.
Yes, you can see how to load an image here:
https://machinelearningmastery.com/how-to-load-and-manipulate-images-for-deep-learning-in-python-with-pil-pillow/
Kindly share the code of using external images
Thank you so much for the respons,
well I tried and it worked.
But I have another question, because sometime when i run the code, all worked perfectly and when I run the code again, sometime i have this error warning in load_model part although the face recognition still work
UserWarning: No training configuration found in save file: the model was *not* compiled. Compile it manually.
warnings.warn(‘No training configuration found in save file: ‘
why did this happen?
Thanks.
Well done!
You can safely ignore that warning message.
Hey @AI – how did you do the “image loading” part instead of randomly choosing an array from validation? could you please share the code? Thanks!
Hi Jason, while I was executing the code “load_model(‘facenet_keras.h5’)”, the exception “tuple index out of range” is thrown, can you tell me why? thanks in advance.
Sorry, I have not seen that error. I have some suggestions here that may help:
https://machinelearningmastery.com/faq/single-faq/why-does-the-code-in-the-tutorial-not-work-for-me
Hi Jason, again wonderful article and tutorial you provided to us. I wonder how I can customize dataset for my needs such as my friends dataset and perform training on it?
Thanks Jason, really helpful as always but I got a weird “invalid argument” error. But I fixed it by changing ‘f’ to ‘F’ in facenet_keras.h5 because I notice it couldn’t recognize character ‘f’. Maybe because it’s trained on Ubuntu but I run your code on Windows 10. I don’t know!
Nice work!
Thank you! Dear Jason, could you please tell me how I can get access to other properties of model. I mean I don’t need model.predict. I need other properties. Is there a way to list all of them such as different convs or avgpool. I tried __dict__ and dir() but they don’t give what I want. For example, how did you know model has a property called “.predict”? Where can I find all of them? Thank you!
You can access all the weights via get_weights()
Jason Can you Please post a tutorial on how to convert David sandberg tensorflow model in keras using Hiroki Tanai script to convert it into keras
Thanks for the suggestion.
How can I convert this script to tensorflow lite format in order to be used in an android applicaton?? Pleaseeee helpp !!
Sorry, I don’t have experience with that transform.
This will work for many hundreds of people?
I don’t see why not.
Hello Jason,
Thanks for sharing the interesting article!
I have read your two articles on Face Verification: 1) this one and 2) https://machinelearningmastery.com/how-to-perform-face-recognition-with-vggface2-convolutional-neural-network-in-keras/
Which one would you suggest? If I have to develop Face Verification system then there are few approaches (listing two approaches from your article):
Approach 1: Detect face using MTCNN, train VGGFACE2 on the collected dataset which helps to predict the probability of a given face belonging to a particular class
Approach 2: Detect face using MTCNN, get face embedding vector using facenet keras model and then apply SVM or Neural Network to predict classes
Which approach would you recommend? Can you please explain?
Thanks for sharing views.
Perhaps prototype a few approaches and see what works well for your specific project and requirements?
It means, I can try both approaches and have a look at efficiency, and select an approach with the best accuracy.
Thank you!
You’re welcome.
Hi,
I am looking for Speech recognition tutorial on Deep Learning using Keras.
I have gone through your this URL: https://machinelearningmastery.com/category/deep-learning/ but I couldn’t find any tutorial.
Could you please point to the tutorial link (if you have)?
Thank you!
Sorry, I don’t have tutorials on that topic, I hope to cover it in the future.
Thanks for the tutorial.
Unit length normalization isn’t for SVM. For SVM you typically use range scaling – MinMaxScaler, or standardization – StandardScaler. The goal is to make different features uniform. Actually, it’s a surprise that unit length normalization produced 100% accuracy in your case. That’s probably due to small data. It does not work for SVM in general and didn’t work for me.
Thanks for your note.
I followed best practices when using face embeddings from the literature.
Hi Jason,
Great article. You have explained all the necessary steps to implement a face recognition system. I am working on a similar problem but in a bigger scale. I am in a belief that a classification based face identification is not a scalable solution. Please give me your opinion.
If I want to recognise a thousand faces in real time manner then, what type of changes do I need to make to your implementation.
I believe it would be really helpful if you create an article about large scale face recognition.
Good question, perhaps an efficient data structure like a kdtree for the pre-computed embeddings?
Can we extract eyes part out of the extracted face using mtcnn detector?? Any help..
I don’t see why not.
It will find them with a point, you can draw a circle around that point and roughly extract the eyes.
You might have to scale the faces/images to the same pixel size prior to modeling and extraction.
Let me know how you go.
bonsoir monsieur pouvez vous me dire cette application peut fonctionner avec une interface tkinter qui affiche le nom et prénom et la photo reconnu
Sorry, I don’t know about “tkinter”.
Hi Jason,
1 . Here we are using 5 faces, what if we have thousands of faces, how to get the identity or index of those faces.
2. If we have fingerprints or voice which pretrained model would be most suitable.
I don’t see why not.
You may need a different model for fingerprints/voice.
If I have thousands of faces, SVM takes a lot of time. What do I do to get a quick result?
Perhaps try as simpler linear model?
Perhaps try running on a large EC2 instance?
Perhaps try running the code in parallel?
…
Once i have trained the model on 5 class (each class having 50 images). Now i use the model to detect images that it has not seen, it correctly guesses that the person in the image is class A for example with an accuracy ( prediction ) 65%. Is it possible to now add such image back to training and expect to get better results ?
Yes.
Awesome post, thanks for sharing.
Thanks!
Hi Jason
Thanks for this tutorial. Its really helpful. I wanted to know why you used train and val dataset. I mean are these two used for training purpose. What is the use of val here.?
In the face classification, I am not able to understand where are you selecting the random photo to test against your dataset. How can I add my jpg photo to test again the dataset. Can you explain please. Thanks
Here, the validation set is a hold out or test set.
We fit on the train set, then confirm the model has skill by evaluating it on the test set (val).
You could add a new directory to train and val sets, to train and evaluate the model for new people.
Got it. Thanks
What I have seen is that in train dataset I put my pictures more than 30 images and in val dataset I put 1 image of mine for testing. So it was recognizing me fine. But when put some other person pic in val dataset, it was still recognizing it as me
Any idea how can this be solved
Yes, even i was wondering this.
I have trained on 30 classes with
45 images in Train folder and
15 images in Test folder (val)
after this upon testing with a new image which belongs to a class
im getting good results:
Image A – class A (99.996 %) which is correct
Image X – class A (99.996 %) it belongs to an unkown class to the model but still it says that it belongs to class A with extremely high confidence.
Any thoughts on why this occurs ??
You must define the problem and model the way you intend to use it.
If you want the model to classify unknown people as unknown, you must give examples during training.
You might need to train the model on “you” vs “not-you”, or people vs unknown.
Thanks for your reply.
Could you please explain or guide to towards the direction of
“””You might need to train the model on “you” vs “not-you”, or people vs unknown.”””
So when we train the model, do i put a unkown folder?
like train folder :
class A (30 images)
class B (30 images)
unkown ???.
Sorry if this doesnt make sense, its a bit hard to understand what you mean by train the model on “you” vs “not-you”.
Help would be appriciated.
Thanks
Yes, if your goal is to fit a model that can detect you, and when you show it photos of other people, it knows it’s not you, then you need a dataset of lots of photos of you and photos of other people (unknown group) so the model can learn the difference.
Highly appreciated for your assistance.
What if we have more than 2 classes.
Training dataset has 5 classes.
During testing if we feed unseen face of one of the above classes, it may predict the face as one of the class.
But what if we feed faces of unknown class? I would expect the model to predict unknown.
So how we can accomplish this scenario?
You might need to add an “unknown” class during training, or add some if-statements to interpret the predicted probbilities.
Hi Jason,
Thanks for the code. it is very helpful.
For a few images i am getting a error as follows
AttributeError: ‘JpegImageFile’ object has no attribute ‘getexif’ or
AttributeError: module ‘PIL.Image’ has no attribute ‘Exif’
This error occurs when i use the Image.open command to import the image.
few examples for the images i am getting an error are as follows:
httpssmediacacheakpinimgcomxfecfecaefaadfebejpg.jpg (traing data for elton john)
httpwwwjohnpauljonesarenacomeventimagesEltonCalendarVjpg.jpg (training data fro elton john)
I tried searching for this issue online but was not able to find any helpful solution. Do you have any idea how i may solve this issue?
Thanks
I’m sorry to hear that, I have not seen those issues before.
I have some suggestions here that might help:
https://machinelearningmastery.com/faq/single-faq/why-does-the-code-in-the-tutorial-not-work-for-me
is it possible in the real-time after training?
I don’t see why not.
please write a programme about how it works in real-world after training?
Do you mean making a prediction after it is trained?
If so, the tutorial above shows that.
Otherwise, can you please elaborate what you mean exactly?
Hi Jason,
Your content is so much helpful.
What about a system where new faces can be registered? Would I have to retrain the model, containing the new classes (new faces)?
Thanks.
No, just create the face embeddings and fit the classification model.
Dear Jason,
How can we create the face embeddings and fit the classification model without re-training the whole training dataset? I would be grateful if you can share me the code.
Why is the problem of retraining the whole training dataset? Usually the problem is training the model from scratch, which takes a long time to converge. But if you are based on a network trained for one particular purpose and retrain it for a different use, it would not take too long.
@Adrian
When the dataset is big (e.g. in millions of classes) and it is regularly increases, how it is possible to retrain the whole dataset every time? For example my initial dataset contains 2000 classes/subjects and every day it increases by 300 subjects. How can I proceed without retraining the existing model?
Thank you
Usually the first half of the network need not be retrained if your output classes are changed. But if you need to change the output layer from size 2000 to 2300, you need to retrain it anyway. You might think of some other ways make it smarter, e.g., always set one of your output as “not matched” and try to train the network to tell if the face is not any of the known one. Then you can always create a new network for the increased subjects.
Hey Jason,
First of all thank you so much for putting out the effort and organizing this tutorial! You’re truly awesome! 🙂
So I extracted facial embeddings of 3 people(6 high-quality high-resolution 5MP+ images per person as dataset )and trained them using SVM and used my built-in DELL WEBCAM(need I mention it generates a mirror image , ie my left hand appears right on the screen; also it’s a 0.3 MP 640×480 resolution feed) to identify faces.
So my problem is that the probabilities are always different for the same trained face by sometimes a difference as great as 20% under the same lighting conditions! It’s mostly around 71% but sometimes dwindles to 51% for a trained face. For a stranger face it varies between 40% and 68% hence because of this variation, I can’t set a single probability value as a threshold and it’s really cumbersome.
Can these differences be because of the difference in webcam quality and the dataset quality, that the algorithm has a tough time identifying the faces and varies the probability all the time, given the embeddings generated by the dataset are of much higher quality than those of the feed and also that the feed generates a mirror image of the faces in the dataset?
Hope this isn’t too much trouble 🙂
forgot to mention, the variations in probability happen whenever I run the program on different occasions
Could also be light level, etc.
Try data prep that counters these issues?
Yes, it is likely the image quality.
Perhaps downsample the quality of all images to the same baseline level before fitting/using models?
I’ll do just that. Any idea how to downsample? A friend tried with same dataset but with Logitech C310 HD webcam and got a consistent probability score .It’s unlikely it’s the light level in my case as it shows variations in probability at the exact same light conditions.
Yes, I show how to resize images here:
https://machinelearningmastery.com/how-to-load-and-manipulate-images-for-deep-learning-in-python-with-pil-pillow/
Thank you for your prompt replies!
Also, can mirroring the feed be the cause as I’ve mentioned my webcam does that?
Probably not related.
Okay. One quick thing.
Does both the dataset and webCam feed have to be of the same quality? Cuz I trained my face, Emma Watson and Daniel Radcliffe’s faces (their images size around 5 kb) and my image quality around 70 kb and there’s still some variation in probability
Generally yes, but you can achieve the desired result by using data augmentation either during training, during testing, or both to get the model used to data of varying quality – or to downsample all images to the same quality prior to training/using the model.
In addition to previous suggestions, you can also limit what is analyzed. For example only take face detections of very high confidence. You can use the face detection data to reject highly oblique angles (like if the nose is further left than the left eye, as one of many examples).
Not shown in this tutorial – but is very easy, is to increase the quality of the input by growing the face detection box vertically or horizontally to make it square… do this before resizing to low res. This prevents stretching of faces.
You may also have a shortage of data for your known faces. If possible try to grow that dataset. Furthermore if your dataset is too sparse (you have only a few known faces) you may have trouble because of the SVM maths. It may be beneficial to litter your known faces with a moderately sized dataset from the web (they would need to be caught and handled in code – you could call them JaneDoe1, JaneDoe2, etc). By doing this the SVM should have more cases of ambiguity whereas with only a couple known faces it may have displayed inappropriate confidence.
Excellent suggestions!
sir, My problem is my model is not able to distinguish between a known and unknown person in the real world.
Do you have any idea about how to identify an unknown person in the real world?
You must train the model on known and unknown people for it to learn this distinction.
I guess it’s not really “data augmentation” when 5 out of the 6 images for Daniel radcliffe are 6KB, the last 67…and my face image quality are on average 120 KB, whereas for Emma Watson 2 out of the 3 images are 7 kb and the last 70. (The images generated by the webcam feed, the “test set” are 70 kb.). I guess both the dataset and feed should be same baseline image quality right?
Yes.
Thanks for the great tutorial,
By creating a data set of 500 people of 50 images each and train the model, can I expect good accuracy regarding detection?
Can I try deploying the same model on a Raspberry Pi with a Pi Camera?
Can you suggest any idea about adding a new person’s face to the model once it is deployed?
Perhaps try it and see?
Yes, compute face embeddings for new people as needed and re-fit the model.
Hi!
My question is that you train the network every time you want to recognise a face set.
How can we train once and run it multiple times ,say like a new face set every day.
Is it possible to implement this in the example you have coded?
No, the network is trained once. We use face embeddings from the network as inputs to a classifier that has to be updated when new people are added.
Hi Jason
i run the code and add two of my own photos in both train and val dataset, SVM predict show correct class_index for my own photos in val dataset, but the SVM predict_proba show probability as below: class_index is 2(0.01181915, 0.01283217), it is the smallest value.
[0.14074676 0.21515797 0.01181915 0.10075247 0.15657367 0.37494997]
[0.1056123 0.20128499 0.01283217 0.1100254 0.23492927 0.33531586]
i see documents saying that SVM predict_proba show meanlingless result on small dataset, is it caused by that? How can i detect one-face class probability?
second question: can you show more code on how to train unknown people class?
Yes, SVMs cannot predict good probabilities, you must calibrate the probabilities before they can be useful:
https://machinelearningmastery.com/calibrated-classification-model-in-scikit-learn/
You can add new “people” directly by computing their embeddings and using them in your model during training/testing.
Hai – I believe the code on this webpage is not accounting for the fact that docs say predict and predict_proba do not match. See this for example
https://github.com/scikit-learn/scikit-learn/issues/13211
Hello Jason,
Thank you again for sharing the nice blog.
I went through your tutorial and I got 100 train and test efficiency. Till now everything is clear.
But the problem arises when I apply the developed model (through your tutorial) to live frames through a webcam (my train ~700 images/class and test images ~300 images/class are captured using webcam).
The model does more misclassification when I apply the trained model to a frame from a webcam.
I am not sure how to normalize the face embedding vector in this case?
Could you please guide me?
Thanking you,
Saurabh
Perhaps start with simple image preparation from here:
https://machinelearningmastery.com/how-to-normalize-center-and-standardize-images-with-the-imagedatagenerator-in-keras/
Also perhaps try alternate models for learning how to differentiate the embeddings?
how to improve probability?
The tutorials here suggest how to improve deep learning model performance:
https://machinelearningmastery.com/start-here/#better
Hello Jason,
Thanks for the reply. It means I should normalize the input image rather than the embedding. If the input image is normalized then I don’t need to normalize the embedding.
Please feel free to correct me!
Thanking you,
Saurabh
Perhaps try scaling pixels prior to using the embedding.
Thank you Jason, it’s working now. Thanks for the kind help! Looking forward to grow in the Deep Learning era under your guidance.
Happy to hear that.
@saurabh How did you do it for webcam can you please explain me the procedure or share the code…….
Hello Jason, Thank you for your tutorials, is there a method i can use to implement on the raspberry pi 3 ?
kind regards
jada
Sorry, I don’t know about “raspberry pi 3”.
hi, thanks for the tutorial! it was really helpful!!
I have followed the tutorial and got successful result with my own data set of pictures.
Let’s say I used person A, B, C to trained the model
Now I’m trying to introduce a unsorted pictures of the above 3 people(A, B, C) in one folder and sort them
based on the code from your tutorial.
However, I can’t figure out how to introduce the new and unsorted pictures into the above code.
please help?
Thank you in advance!
Sounds straightforward, what is the specific problem you’re having?
I can’t figure out how to introduce the new unsorted pictures into the code. I tried making an npz file using the new pictures in one folder and loading them into the classifier(# load faces
data = load(‘5-celebrity-faces-dataset.npz’), but the classification result was pretty bad so im assuming what i did is not correct.
Perhaps start with the code in the tutorial and slowly adapt it for your specific dataset?
I think my explanation wasn’t clear enough…
In following the your tutorial my directory for the pictures looked like this:
├── train
│ ├── A : pictures of person A
│ ├── B : pictures of person B
│ └── C : pictures of person C
│
│
└── val
├── A : pictures of person A
├── B : pictures of person B
└── C : pictures of person C
and got a successful result, with let’s say
“ABC_dataset.npz” & “ABC_embeddings.npz”
So, I’m trying to one step further, and added a folder to the directory
├── train
| ├── A : pictures of person A
| ├── B : pictures of person B
| └── C : pictures of person C
|
|
├── val
| ├── A : pictures of person A
| ├── B : pictures of person B
| └── C : pictures of person C
|
└── test : pictures of persons A, B, C
and the newly added test folder contains pictures of all A, B, C.
In an attempt to introduce the data from the “test” folder,
I extracted arrays of the faces from the pictures of the “test” folder saved the
extracted arrays into an npz file, let’s say “ABC_test_dataset.npz”
And loaded “ABC_test_dataset.npz” into the last part of the tutorial
# load faces
data = load(‘”ABC_test_dataset.npz”‘)
testX_faces = data[‘arr_2’]
# load face embeddings
data = load(‘ABC_embeddings.npz’)
trainX, trainy, testX, testy = data[‘arr_0’], data[‘arr_1’], data[‘arr_2’], data[‘arr_3’]
and so on.
When I tried this, the result I got was pretty bad so I’m assuming what I did is
a wrong way of introducing new dataset into the code.
Sorry for the VERY LONG question.
Thank you!
Thanks for the elaboration!
I think you’re on the right track, well done!
What if the cause of poor performance is the specific pictures in test? What if you swap around some of the pictures from test with those in train and see if that lifts skill?
What if you confirm the pipeline and add pictures from train into test and confirm they are predicted correctly – they should be?
Let me know how you go.
Thanks for the answer!
I will play with the picture data sets a bit more and tell you how it goes.
Last questions,
1. Is it ok to use gray-scale pictures for the training?
2. What should be the ratio between the number of pictures in the train and val
folders?
For example, train : 1000 pics & val : 100? or train : 1000 & val : 50 is fine?
Thanks!
Sure. Try it and see.
Great question. I like 50/50 splits if there are enough data. I don’t want to be fooled by an optimistic result.
Perhaps run tests to see how sensitive the model/system is to training data size?
Hi, I’m planning on doing something similar. Please post your progress, while I work on it as well
It would be very helpful
Thanks
Hey Jason!
I am trying to develop an attendance collector from video footage.
My problem arises during the classification part,it constantly interchanges the output label names.
Say X and Y are two people then X is always identified as Y and vice versa.
The code is error free and there is no error in the input labels.
How can correct this.Will this be solved if use something apart from SVM. If so what?
Or should i do some fine tuning as specified in one of your earlier answers?
Please guide me.
Awaiting your reply.
Perhaps some of the labels for these people were swapped in the training data?
No that’s not the case.Its correct
You may have to step through your system carefully in order to debug it. I don’t think its something obvious, sorry.
Hello RK,
I am facing the same problem. I think there is a problem with the last model i.e. binary classification.
You should try comparing unknown face embedding with know face embedding.
I think this will help you!
Kindly share the output with me as I am facing a similar problem. I will also update you if I will make progress.
It might be related to the label encoder. The mapping of names to labels must be consistent across code examples.
You can force the consistency with arguments to the encoder, or simply save the encoder object via pickle.
Does that help?
Hello RK,
Finally, I got the solution.
– First, extract only the face from an image using MTCNN. Please make sure to scale pixels.
– Then find the face embedding using the Facenet model.
– Train binary/multiclass classification model using face embedding vectors obtained in the above step.
– So now you have face embedding vectors for train images and compare them with unknow encoding (a frame from webcam) using Consine or another metric.
– If score < threshold then face is recognized and in order to get a label, predict the class using binary/multiclass classification model trained in step 3.
@Jason, please feel free to correct me!
Thanking you,
Saurabh
Look great!
Jason has already written the blog. You can find it here: https://machinelearningmastery.com/how-to-perform-face-recognition-with-vggface2-convolutional-neural-network-in-keras/
Thanks!
Thanks a lot Saurabh!I will try implementing what you have proposed.Thanks a lot for helping.And i will also go through the blog.
Thank you once again Jason
Thanking you,
RK
Hey Jason!
I wanted to try doing image super resolution using GANs to improve the result of my recognition process,but i’m not finding any suitable website or blog to learn from.
Could you please guide.
I prefer using Python for the same.
Thank You!
Thanks for the suggestion, I hope to cover the topic in the future.
Can this model differentiate between a live video of human and an picture of a human shown in front of the camera
I don’t know, perhaps try it out?
If that distinction is important to your application, I believe you could fit a model to detect “non live” examples.
Hello Virinchi,
This model doesn’t able to differentiate between a live video of human and a picture of a human. Bcoz this model looks for the only face, it doesn’t look for the Liveness in the face.
This is another research area in my view. Perhaps for the quick try, you can look whether eyes are blinking or a person is speaking to detect the Liveness. There are other techniques too.
Will this Work for sketch matching with real picture of that person?
Perhaps try it and see?
can you recommend any other method which will be good for matching sketch with picture of that person?
Not off the cuff, perhaps start with some pre-trained models in order to create embedding and see what happens.
ok Thanks Alot Sir
Hi jason, I am only looking at algorithm to tell if an image has face or not, face can be far, at any angle . Preesntly neiter open cv, nor any model works well, Do you know any transfer learning method to only detect if image has face or not with lot of other things in background, Some images has only body but no face, in those case it should say as no face.
Perhaps try detecting and extracting the face first, then pass to a pre-trained model to get a face embedding. Perhaps try a suite of models to see which is the best for your dataset – also fit different model types on the embedding to perform the recognition.
I am trying to classify 800 celebrity faces.
1-using MTCNN to extract faces
2- using facenet to prepare the embedding
3- using KNN to classify the faces.
Problem is-Though we get neglible ‘not detection’ but we get lots of wrong detection.
Is there any solution to reduce the wrong detection.
Other combination of pipeline used-
1-MTCNN+Facenet+SVM
2-One shot learning
3-Also tried regularisation,data augmentation.
(used 100 faces per face)
Sounds like a great project!
Perhaps test different models?
Perhaps test different data preparation?
Perhaps review the errors and see if there is commonality?
Hi Parul Mishra,
Can you share the code for the second mentioned approach? It will be very helpful.
Implement ion of one shot learning .
Thanks
thanks for this amazing work
can i use this trained model in android application ?
You’re welcome!
Perhaps try it and see.
Hey!
In the Keras FaceNet Pre-Trained Model (88 megabytes) you have mentioned, how should it be downloaded, it has 2 files models and weights and each has “.h5” file. Could you please tell me which has to be downloaded.
I have tried both, but the code is not getting executed, it is stopping after load_model()
Download the model, not the standalone weights.
hey!
how can i detect all faces in the pic ? this one takes only the first face
You can adapt the example to operate on all faces. I don’t have the capacity to make this change for you, sorry.
thanks for the amazing work sir
Is it normal to get F1 score =1 ? and i expanded the dataset to be like 250 pics pf 15 persons
and im getting this :
accuracy: train=100.000, test=100.000
precision recall f1-score support
0 1.00 1.00 1.00 6
1 1.00 1.00 1.00 6
2 1.00 1.00 1.00 6
3 1.00 1.00 1.00 6
4 1.00 1.00 1.00 5
5 1.00 1.00 1.00 5
6 1.00 1.00 1.00 5
7 1.00 1.00 1.00 5
8 1.00 1.00 1.00 5
accuracy 1.00 49
macro avg 1.00 1.00 1.00 49
weighted avg 1.00 1.00 1.00 49
is it okay to be 100% correct ?
also what other algorithms can i use to make comparison with SVC ?
Yes, if the prediction problem is trivial.
Hey!
Can I use this for real=time applications using raspberry pi?
Perhaps. I don’t know about raspberry pi.
thanks sir
What other algorithms that i can try beside the SVM ?
Here are some suggestions:
https://machinelearningmastery.com/hyperparameters-for-classification-machine-learning-algorithms/
You can try ANN but SVM is better
Hello. Can any one tell me why this line is returning a None value?
results = detector.detect_faces(pixels)
Thank you
Sorry to hear that, this may help:
https://machinelearningmastery.com/faq/single-faq/why-does-the-code-in-the-tutorial-not-work-for-me
hello , thanks for the code, it is very easy to read and go through.
but I am struggling to understand what you mean by
“No, the network is trained once. We use face embeddings from the network as inputs to a classifier that has to be updated when new people are added.”
so does that mean I do not need to put new person folder on the train folder? and just put the folder in the val folder and run code?
or do have have to rerun the code from start to end with the new people in val and train folder?
You’re welcome.
Not sure I follow.
There are 2 models. The one that gives you a face embedding and one that classifies embeddings as people. The first model does not need to be retrained. The second model is only trained once and is then used to make predictions for people that it knows about (e.g. during training).
Does that help?
sorry i don’t quite understand
for every new person I add,
do i put the images in Train and Val folder?
so you mean as i have run the code throughout,
i only need to run the svm part and the following code to guess the person?
many thanks for your response
If you have new people, you must train the SVM model on these people.
Is that posible to make embedding without prediction? Because I need to separate the train and test dataset from the picture that I want to predict
No.
I don’t see the problem?
Hi Jason. I’m new in Keras and I copied your code for see what will be. But there is an error. Please help me. Thank you.
Traceback (most recent call last):
File “C:\Users\train\untitled0.py”, line 60, in
model_scores = get_model_scores(faces)
File “C:\Users\train\untitled0.py”, line 55, in get_model_scores
return model.predict(samples)
File “C:\Users\Anaconda3\lib\site-packages\keras\engine\training.py”, line 1149, in predict
x, _, _ = self._standardize_user_data(x)
File “C:\Users\Anaconda3\lib\site-packages\keras\engine\training.py”, line 751, in _standardize_user_data
exception_prefix=’input’)
File “C:\Users\Anaconda3\lib\site-packages\keras\engine\training_utils.py”, line 128, in standardize_input_data
‘with shape ‘ + str(data_shape))
ValueError: Error when checking input: expected input_7 to have 4 dimensions, but got array with shape (2, 1, 224, 224, 3)
Sorry to hear that, this might help:
https://machinelearningmastery.com/faq/single-faq/why-does-the-code-in-the-tutorial-not-work-for-me
Great explanation thanks,
Since it’s a biometric systems how can i find the ROC and FAR and FFR?
Thanks!
Perhaps you can use the sklearn metrics:
https://scikit-learn.org/stable/modules/classes.html#sklearn-metrics-metrics
HI …
I have problem here results = detector.detect_faces(pixels) it give that the result is empty
It suggests it did not detect a face.
Hello
When I make a test for one image of one person, in every time give different result of probability. Is that right? Or should it give me the same result?
No, see this:
https://machinelearningmastery.com/faq/single-faq/why-do-i-get-different-results-each-time-i-run-the-code
Hello,
This was great thanks. I am wanting to know how to change the randomisation section to score the entire test dataset. Not clear as it appears it was built to score only on a single, randomly selected index from that array. Any guidance on this?
After the SVM model is fit, you can enumerate your dataset and perform the prediction.
Hi Jason it’s a good tutorial, but when I try to run this tutorial in tensorflow 2.0 the mtcnn is not compatible with tensorflow v2.0. do you have any idea for this issue.
thank you
Yes, the tutorial works with Python 3.6, TensorFlow 2.0, and MTCNN v0.1.0.
Perhaps confirm your versions?
Hello sir that’s great tutorial
I’ll use some of the code and expand the dataset and try different algorithms and ill use Kaggle is it okay ?
Sure, as long as you cite the source and link back to this blog post.
Is the algorithm good for this scenario? > If I take one image and make some transformation on it and put all images in the training dataset.
Thank u…
Not sure I follow. What are you trying to achieve exactly?
Sorry for the delay.
I want to make a faceprint system. So, when people come to register, I take one picture for each person and make some transformation in the picture. Will it correctly predict the person?
Perhaps test it on idealized versions of your task.
Thanks for providing the complete code.
You’re welcome!
How about Face matching, match two faces, How to approach it ?
You will need a distance measure. I don’t have an example sorry.
How to give my own image path from local storage to predict the face?
This will show you how to load an arbitrary image from file:
https://machinelearningmastery.com/how-to-load-and-manipulate-images-for-deep-learning-in-python-with-pil-pillow/
Hi Jason I used your code on my own set.In all there were about 20 people each having approximately 30 images.
For testing I decided to see how the code performs in real time. If a random person walks in front of a web cam then will it be able to distinguish between UNKNOWN and some other person in the dataset.
Although I got pretty good results,(each of the person in my set is being correctly identified with a probability of 99%),the unknown people were also being assigned a score of 99%.
From my understanding,the unknown category shouldn’t recieve such a high score.Do you know what is going wrong here.
Training and cross Val error are coming out to be 1 and 0.99 .So I am not sure.Do you think I should reduce the dataset size.
Perhaps experiment with various changes to the model and evaluate the impact.
Hey may i know how did you implement the code in real time?
So should I add more layers to the model.
To what end?
I have Python 3.6, TensorFlow 2.0, and MTCNN v0.1.0., but I get an error:
AttributeError: module ‘tensorflow’ has no attribute ‘get_default_graph’
I have found a reason – it is the version of keras. V2.2 caused the error, V2.3.1 works fine
Happy to hear that!
Ensure you are using Keras 2.3
Hi Jason,
I have used the same code to detect the faces from the my own dataset. I am unable to store the dataset in npz format. My dataset has images around Train-750 pics and val – 400.
The python code is getting killed after certain time . Let me know the workaround
System Specification:
RAM – 16 GB
Swap – 2 GB
OS – Ubuntu 18.04
Perhaps try less data?
Perhaps try a smaller model?
Perhaps try running on ec2?
I found the solution for it. Actually in the code we are loading the model MTCNN() every time. No need of doing it. Load the model only once.
In the code load the MTCNN() only once. Mention detector = MTCNN() outside of the function . It will solve the memory starvation problem.
Thanks
Happy to hear that.
I had to change your very first code from this
from keras.models import load_model
to this
from tensorflow.keras.models import load_model
I’m not sure but since you’re using keras in TF it seems your code might need to be changed according to the above.
Please disregard my comment – if your code fails when importing load_model from keras.models then it’s maybe an installation or setup problem. In my case I thought TF2 had keras but nothing was working right until I installed keras after installing TF2
You don’t have to change the code, you need to install the standalone Keras library:
https://machinelearningmastery.com/faq/single-faq/what-is-the-difference-between-keras-and-tf-keras
Thanks so much for this Jason Brownlee… I got everything working because of this walkthrough.
I also converted the h5 to tflite which is just one commandline command. Additionally you use the interpreter instead of calling “predict” directly on the model… which involves about 8 lines of additional code, found on Tensorflow’s website. By doing this the embedding is obtained 10 times faster (maybe more). I’m on CPU only btw.
Thank you!
Well done!
Great tip, thanks.
Hi Jason, been following you for the past 3 years and you are very inspiring. Just wanted to say, I tried this code in Colab and eventually hit errors. Are there any alterations when using Google Colab? Thank you again.
Thanks!
I don’t know about colab, sorry. Never used it.
Thanks Jason ! So what environment did you use for this tutorial. Regards
My workstation.
It also runs using this:
https://machinelearningmastery.com/develop-evaluate-large-deep-learning-models-keras-amazon-web-services/
Hi,
How can I improve the performance of the predict face process? It takes 4 seconds to predict(1.8 seconds to extract face)
Use a smaller model.
Use a faster computer.
Use smaller data.
– I am using GPU.
– I predict one image at a time.
– The dataset contains 11500 images (260 people)
Is this actually its performance or can I make it better?
@ Ammar,
Quick question for you, Are you using the same code for the predication or for training classification using face embeddings on nvidia driver supported GPU?
Can you let me know the procedure ?
Since i read in the scikit library documentation, it is published that SciKit lib will not support GPU training.
ref : https://scikit-learn.org/stable/faq.html#why-is-there-no-support-for-deep-or-reinforcement-learning-will-there-be-support-for-deep-or-reinforcement-learning-in-scikit-learn
Hi Jason,
I am getting this warning whenever I load facenet_keras.h5
UserWarning: No training configuration found in save file: the model was *not* compiled. Compile it manually.
warnings.warn(‘No training configuration found in save file: ‘
You can safely ignore it.
Thanks, It worked
Well done.
Hi again,
please guide me how to handle the unknown faces in the input.
The model is working fine when it gets the known faces,
But when an unknown face comes, the model is classifying them to the classes on which it was trained.
Example- model is trained to detect me but when I showed it some other face it is again saying that’s you.
Help me with this
Perhaps create a new class of “unknown” and add many different faces to it.
I have been getting not so properly cropped images from the MTCNN detect_faces method. And, I am doing it for a short term project and can’t really get into details inside MTCNN. Just wanted to know why my face recognition is not as per published in this blog. I have used the same datasets and I have followed all instructions thorough.
Perhaps try different images?
I tried those of Elton John and Ben Affleck. Any other suggestions?
Yes, the dataset has 1 million people in it:
https://www.microsoft.com/en-us/research/project/ms-celeb-1m-challenge-recognizing-one-million-celebrities-real-world/
“IndexError: tuple index out of range” i got this error on your facenet_keras.h5 how to solve it?
Sorry to hear that, perhaps this will help:
https://machinelearningmastery.com/faq/single-faq/why-does-the-code-in-the-tutorial-not-work-for-me
Hi Jason,
That’s great tutorial!!
I have a database with only one photo per person. Does the model have good results in this scenario as well?
I don’t see how to make a classifier from just one sample per class. Is there how or should I calculate the distance between the vectors directly (without a classifier)?
(Sorry about my english skills)
Thanks,
Kevin
Perhaps run some tests?
Hi Jason!
Could you please tell me how to incorporate a database into this? Which will store all the images of the people on whom I want to train the network?
I don’t have an example of loading images from a database, sorry.
When we are predicting the final images from the test set and using the pyplot.imshow(random_face_pixels) script
I am getting an error saying ‘Invalid shape for (128,0) for image data’
the shape of random_face_pixels list is (128,0)
I want it to show me the visual image of the prediction
Perhaps this will help:
https://machinelearningmastery.com/faq/single-faq/why-does-the-code-in-the-tutorial-not-work-for-me
I have implemented this FR system but I’m having a problem understanding why we are using the SVM classifier. I don’t have specific questions because I think my problem is in my formative understanding of FaceNet. Kindly tell me if the following statements are true:
1) The FaceNet model, once loaded and we pass the detected face “predicts” an embedding of the face.
2) We then compare the embedding with the stored embeddings of faces in our dataset using the SVM’s predict function and determine who is the likely owner of the face.
3)Is there a way that we can implement FaceNet without having to use a classifier in the last stage?
The neural net model gives features from an image and the model, e.g. svm, classifies them as different people.
Yes, but it would be fragile – requiring the entire facenet model to be re-trained for any change to your dataset. Or perhaps just the output/classifier part of the model as we would use transfer learning.
Thanks a lot Sir. I appreciate the clarification.
You’re welcome.
Hey Jason,
The tutorial is very specific and easy to understand, a very big thank you for that.
But I wanted to use an image in my local directory instead of a random selection.
According to the comments above I understand that I had to read https://machinelearningmastery.com/how-to-load-and-manipulate-images-for-deep-learning-in-python-with-pil-pillow/ and I was supposed to pass it to “selections” variable.
But I got really confused because selections has just 1D value and I guess I’m supposed to convert my image to a numpy array and then pass it on to selections right?
So what should i do after converting it to a numpy array.
Thanks.
The linked tutorial shows you how to load an image as a numpy array directly. Perhaps re-check it?
Hey so should I straight up insert the numpy array into the “selection” variable ?
Sure, try it.
Yeah so I tried everything but I can’t seem to be able to insert an image from local into “selections” could you please help me out LOL really need it for my project
Sorry, I don’t have the capacity to write code for you.
Perhaps you can hire an engineer on upwork.com?
Hi Jason,
when i try to load model it throws below error
code = marshal.loads(raw_code)
ValueError: bad marshal data (unknown type code)
ValueError: bad marshal data (unknown type code)
code = marshal.loads(raw_code)
ValueError: bad marshal data (unknown type code)
Sorry, I have not seen this error before, perhaps try searching on stackoverflow?
i go this down. it was an issue with my versions…i followed your previous answers.
One thing i have observed, does this work with multiple faces in an image?
I guess not because it detects only one faced images.
Well done.
Each face must be extracted first.
I am getting the same error – how did you solve this?
This may help:
https://machinelearningmastery.com/faq/single-faq/why-does-the-code-in-the-tutorial-not-work-for-me
How did you solve this error??
I am having same issue and was wondering how Rujul solved it. I am using Python 3.8.3 and using load_image from keras (version 2.4.3) and not tf.keras. Any help would be greatly appreciated.
What version of tensorflow are you use?
Sorry for the late reply…using Tensorflow 2.2
Same error message. Looking for solution. @Jason, could you list the version I should use for this tutorual? python, keras, tensorflow?
Works with most versions.
Try TF 2.2, Keras 2.3 or 2.4, Python 3.6.
Thank you Jason!!! i was able to do that as well, one thing i have noticed, sometimes it confuses faces with someone else, lets i have a trained set for ‘Jimmy Fallon’ so sometimes in a video it detects a random person and says its Jimmy Fallon and that too with more than 90% probability is that normal???
Yes, this can happen. No model is perfect.
Is it possible to recognize faces real time?
Yes, perhaps if this model operated on a subset of video frames per second.
I tried implementing the model but the accuracy obtained on the 5-Celebrity-dataset is nearly 75% and similarly I created my on custom dataset with around 15 images each training class and 5-8 images in test class , the test accuracy obtained was just 61% and I tried increasing the size of the training dataset to nearly 30 images in each dataset but the test accuracy did not increase it remained the same. What should I do to improve the accuracy ?
Sorry to hear that, try this:
https://machinelearningmastery.com/faq/single-faq/why-does-the-code-in-the-tutorial-not-work-for-me
Hi…
Thank you for this tutorial.
I have tow questions
1- In the paper, it said that facenet layers equal to 140M, but the model that you use it equal to 22,808,144. what is the difference?
2- How can I make a good embedding function that fit my model? Because In the embedding function in facenet and vggface2 there is a difference and I do not understand it
Don’t know, perhaps a difference in implementation.
Perhaps start with an embedding from the pretrained models and only move to your own model if you want to try and lift performance.
what I mean is the function that you built it in get_embedding in facenet and vggface2
I have another question
How I can get the value of thresholds of predict image.
Thank you for help
The predict() function returns a probability.
Hi …
When I want to calculate the accuracy of the facenet model, it should the test-data contains known and unknown labels? Because I tried to put labels that not in the dataset, It gave me an error
Yes, a test dataset should be images and labels not seen by the model during training.
I tried to put unknown faces and labels, but when I encode the labels, It gives me an error that the dataset labels do not contain the label that I want to test it.
the error in this line:
testy = out_encoder.transform(testy)
The labels must be known to the model during training.
So, How can I check for the true and false negative if it must be known labels?
I don’t follow.
You only know whether a prediction is true when training the model and when evaluating the model. After that – when you are using your model in practice, you don’t know if individual predictions are correct or not. All you know is the expected performance of the model on average.
Hello doctor
Thank you for this tutorial
Is the MTCNN using face alignment by default?
What do you mean “by default”? Default in what?
I mean is the MTCNN using face alignment when it detects faces? If not, are you using face alignment in your function or I should adjust it?
Thanks for your help
MTCNN is used for face detection, it does support face alignment.
I change by below code, that will read by photo EXIF Orientation tag. Hope it helps.
original code: image=Image.open(filename)
photo alignment by exif: image = ImageOps.exif_transpose(Image.open(filename))
please I need too much an algorithm or tutorial to compare a photo of face with another and have the percentage of similarity after the possibility of comparing a single photo with thousands of photo of faces to have the percentage of similarity
Perhaps you can use a distance measure between the embedding of the two faces.
Perhaps also check the literature for similar projects to get ideas.
Hii Jason,
I have implemented this face net model to train 5 person’s dataset and the accuracy is also too good but it takes very long time for recognition. Can you give any advice to reduce the computation time for recognition like running the code on gpu or any other classification algo that takes less time.
Thank you.
Yes, perhaps run on faster hardware or use smaller images or a smaller model.
Hi Jason,
Firstly, thanks for such amazing tutorials. Your website has been really helpful. So my question goes like this – how can I input multiple face arrays to vggface2 or FaceNet? In both the examples you have posted, you have used the function extract_face which outputs a single face.
You’re welcome.
Each face is one sample, you can pass in multiple samples to a model as an array and get many predictions in return. Each face must be prepared first before being passed to the model as input.
Helo , your explanation helps me much ! ty for this tuto , well i’m a beginner and i find it usefull and clearly , but i have one question plz if u don’t mind !
i’ve tried to make some modifications on ur code in the final to make it display all the test data instead of just one random picture but i couldn’t , so plz can u write for me the instructions that makes me test model on all the test dataset instead of one exemple ?
You’re welcome.
This is a common question that I answer here:
https://machinelearningmastery.com/faq/single-faq/can-you-change-the-code-in-the-tutorial-to-___
Hi,
This is really a good example and I manage to run it and predict from it. But I have really one concern here, It’s good that we’ve predicted on the test data but what if I want to predict it from any external image? or my video cam image? it seems to me too cumbersome to process the raw/cam images to that level (embedding and so on). Could really have been great if you’ve taken the examples on some external images rather than same test data.
Thanks.
We do use a separate train and test sets. Perhaps re-read the tutorial.
Hi.
I used MTCNN to detected faces and it worked fine. But now, when I run the same code on the same photos, it doesn’t detect faces anymore. Just returns an empty list as a result.
Maybe you know how to fix it or why it happened?
Thanks.
Sorry to hear that, perhaps you modified the code. Perhaps try to copy-paste the code directly from the tutorial again.
hi great work thank you so much
well in my case i want to take more than one image in last function of the code how can i do please ? thank you !
You can change the code to load more than one image. I cannot change the code for you. What is the problem exactly?
Thanks for the article! This is one of the very few codes on the topic that is explained step for step. It’s a great guide. I wanted to test the model with a single or multiple new images which are not a part of the original dataset. How can I do that? My efforts have not yielded results. I would appreciate if you could tell me the process or the functions that need to be called/modified for the same.
Thanks!
See the example at the end of the tutorial for testing the model on a single image.
Thanks! Got it.
Another thing is, this seems to work for a limited dataset. I can’t figure out why but when a larger dataset is taken, the shape of the Numpy array changes when loading dataset (function: load_dataset) and the consequent functions since the changed structure of trainX, trainy, etc. is not compatible with the following functions.
What do you suppose is the issue at play?
You will have more samples, that is all. Perhaps double check your image loading code and perhaps scale all images to the same input size?
I am very new to this system how to find out your current directory in IDLE and how to keep the file ‘facenet_keras.h5‘ please help e
I recommend working from the command line directly:
https://machinelearningmastery.com/faq/single-faq/how-do-i-run-a-script-from-the-command-line
Hi Jason and sorry for my trivial question but I have a problem when I load the model:
model = load_model(‘facenet_keras.h5’)
this give me the following error:
bad marshal data (unknown type code)
I suppose that the problem is generated because the facenet_keras.h5 was generated with the 1.x version of tensorflow (while I am usintg the 2.2). Infact to correctly import the method I wrote:
from tensorflow.keras.models import load_model
but when I load the model I have the error mentioned above, please have you some suggestion?
I believe the problem is because you are trying to load the model using tf.keras instead of the standalone Keras library, not the version of tensorflow.
Thank you for you prompt answer, I have tested under Windows with TF 2.2 and Python 3.7 and works properly, for the moment is enough for me
Nice work!
How did you solve it?
I have the same problem as Paolo, but for me it doesn’t work with any load_model(). I am currently using Python 3.8, TF 2.4.1 and Keras 2.4.3.
Any other suggestions?
Just to add. Rest all versions being same, for me, it worked in python 3.6, but didn’t work on Python 3.8. Did not test on Python 3.7. So it is python version issue and not that of libraries.
Thanks.
I believe Python 3.8 is not supported by most machine learning libraries.
What about python 3.9.5 version
I use python 3.6 for compatibility.
I don’t know about other versions, I believe newer versions are not supported by many libraries.
Hello Sir, I have worked with facenet earlier but not using Keras. The model outputs embedding of 128 dimensions but the new Facenet model outputs 512-dimensional embedding. Is it possible to get higher dimensions using the above method?
Does this have the same accuracy as the facenet model?
Perhaps there are multiple versions of the model and you are referring to a more recent version?
I am searching for a recent model. This gives quite a different accuracy than the one I am used to with 512 dimensions. Where can I find different versions of the model?
Not sure off hand, try a google scholar search:
https://scholar.google.com/
Hello Sir, I have a question regarding the part of detecting faces in a specified directory, it works just fine for 9 images exactly (it prints the face shape and show the image as the code says) and then I come across an error “IndexError: list index out of range” at this line —> x1, y1, width, height = results[0][‘box’]
I just want to understand why is it doing like this
If you can help that would be so helpful.
Sorry to hear that, this may help:
https://machinelearningmastery.com/faq/single-faq/why-does-the-code-in-the-tutorial-not-work-for-me
Hi, I’m facing the same issue. If you could mention the steps you followed to overcome this error, it will be helpful.
Great tutorial for beginners like me, thank you.
I generated classifier for 2 labels, personA and personB.
When run the code from this article as it is, I can see accuracy 100 % for both labels on test data.
Now I am trying to recognize all faces in an image.
I modified the extract_face function as below and generated embeddings for each face found in one image.
# extract all faces from source image
def extract_faces(image, required_size=(160, 160)):
faces = list()
# convert to RGB, if needed
image = image.convert('RGB')
# convert to array
pixels = asarray(image)
# create the detector, using default weights
detector = MTCNN()
# detect faces in the image
results = detector.detect_faces(pixels)
for faceFound in results:
# extract the bounding box
x1, y1, width, height = faceFound['box']
# bug fix
x1, y1 = abs(x1), abs(y1)
x2, y2 = x1 + width, y1 + height
# extract the face
face = pixels[y1:y2, x1:x2]
# resize pixels to the model size
img = Image.fromarray(face)
img = image.resize(required_size)
face_array = asarray(img)
faces.append(face_array)
return faces
######################### RECOGNIZE ##############################
X = []
image = Image.open(test_img)
faceResults = extract_faces(image)
for result in faceResults:
X.append(result)
# convert each face in the test set to an embedding
newTestX = list()
for face_pixels in X:
embedding = get_embedding(model, face_pixels)
newTestX.append(embedding)
newTestX = asarray(newTestX)
I executed this code on one image from the same test data which I used while generating classifier.
However, the embedding generated with this code and the one generated from your code are totally different.
And hence the prediction result is also incorrect with this embedding generated with my code.
Can you please help me spot what I am doing wrong here?
Perhaps confirm that image data is prepared in an identical manner during training and afterward for new data.
Thank you for the response Jason, I got it working. You were correct, I was not converting the new image data in the same way as for training.
Well done!
Hi Jason, this tutorial is great. I have a question, when i have a new image(has single face),
i get embedded vector through get_embedding() function so, how can i predict this embedding vector for any one in file *_embeddings.npz?
face_embedded_data = np.load(‘file_embeddings.npz’)
trainX, trainy = face_embedded_data[‘arr_0’], face_embedded_data[‘arr_1′]
in_encoder = Normalizer(norm=’l2′)
trainX = in_encoder.transform(trainX)
out_encoder = LabelEncoder()
out_encoder.fit(trainy)
model_predict = SVC(kernel=’linear’, probability=True)
model_predict.fit(trainX, trainy)
embedding = get_embedding(model, face_array)
samples = np.expand_dims(embedding, axis=0)
y_hatclass = model_predict.predict(samples)
y_hatprob = model_predict.predict_proba(samples)
class_index = y_hatclass[0]
class_probability = y_hatprob[0,class_index] * 100
Thanks.
You can create an embedding for an ad hoc photo then pass it through your model for a prediction.
Hi Jaon,
How can we decrease the loading time of pre-trained facenet model from keras.load_model(‘facenet_keras.h5’). It’s approximately taking 6-7 seconds for me in my laptop. I am deploying the model in raspberry pi which takes more longer. Is there any solution for this??
I don’t know sorry, perhaps use a smaller model?
Hello Jason Brownlee,
I just started research and unable to run some of David’s project can I have any Github repo
you can suggest to me get all the codes from any repo
Thanks
You can copy the code required directly from the tutorial, see this:
https://machinelearningmastery.com/faq/single-faq/how-do-i-copy-code-from-a-tutorial
Hi Jason. Thanks for the post here. It has been very helpful for my project.
I am now trying to train the network on my data (It has images of faces of different people)
But there is an error I am running into
In the create face embedding section, I gout the output showing – Loaded (20,128) (20,) (8,128) (8,)
It has also loaded the model
But in the following line – embedding = get_embedding(model, face_pixels)
I get the below error
ValueError: Error when checking input: expected input_1 to have 4 dimensions, but got array with shape (1, 128)
Unsure how to proceed with this
Would appreciate the help
Sorry to hear that, this may help:
https://machinelearningmastery.com/faq/single-faq/why-does-the-code-in-the-tutorial-not-work-for-me
I tried re-doing the code from the beginning and it’s working now. I have 2 doubts
1. I used my dataset with this code now and it had 2 classes. The code worked perfectly except the the final code snippet.
The pyplot.imshow(random_face_pixels) shows an TypeError: Invalid shape (128,) for image data
And I can confirm that I have followed the code to the letter. Again, not sure why that is the case
2. This code shows the class probability for a randomly selected image from the val folder.
Is there a tutorial on how to find the OVERALL accuracy of the entire model can be found instead of random images taken up?
(Considering all the val images) The papers that I have read up all mostly don’t mention their accuracy based on 1 randomly
selected val image
Hopefully I’ve explained point 2 well. Thanks
Sorry to hear that.
Perhaps confirm the shape of your loaded image is 3d, for: rows, cols, channels.
You can calculate accuracy by making a prediction for all examples in a hold out set and calculate total correct predictions divided by total predictions made or use this function:
https://scikit-learn.org/stable/modules/generated/sklearn.metrics.accuracy_score.html
Thanks for the help! I’m looking into the dimensions
As for accuracy, in the above code there is a section that I have mentioned below
# predict
yhat_train = model.predict(trainX)
yhat_test = model.predict(testX)
# score
score_train = accuracy_score(trainy, yhat_train)
score_test = accuracy_score(testy, yhat_test)
# summarize
print(‘Accuracy: train=%.3f, test=%.3f’ % (score_train*100, score_test*100))
This would be alright to measure the performance and accuracy of calculation too right? Want to confirm that this is sufficient and I don’t need to do anything additional
If this is a case, I am assuming the class probability is additional information being provided
Thanks!
Test accuracy is sufficient.
Hey, I need to find some more test results from this code like – F1 score, accuracy score graphs and ROC curve
How should I go about implementing that here?
This may help:
https://machinelearningmastery.com/how-to-calculate-precision-recall-f1-and-more-for-deep-learning-models/
Thanks! I got it to work, and am now able to get the ROC (From your respective post) and the F1 score
However, I see a discrepancy between the accuracy found by the code in the below link (Which came out to be 0.854)
https://machinelearningmastery.com/how-to-calculate-precision-recall-f1-and-more-for-deep-learning-models/
And the accuracy I got from this main post (Which came out to be(Accuracy: train =100.00, test=100.00)
https://machinelearningmastery.com/how-to-develop-a-face-recognition-system-using-facenet-in-keras-and-an-svm-classifier/
Can you explain why these two values are coming out to be different, and which one is a true indicator of accuracy for the data?
Thank you
You can calculate accuracy on your hold out dataset using this function:
https://scikit-learn.org/stable/modules/generated/sklearn.metrics.accuracy_score.html
Hey Priyanka, Not sure if you have resolved the issue with pyplot.imshow(random_face_pixels), but this might help. Just make sure that you are using ‘5-celebrity-faces-dataset.npz’ when loading faces (testX_faces) and not ‘5-celebrity-faces-embeddings.npz’
Hi Jason,
After #load the dataset and #normalize input vectors, I got the error found in variable TrainX. It is said that “ValueError: Found array with dim 4. Estimator expected <= 2.". I don't know how to handle that, even though I tried to reshape it.
Could you please help me?
It suggests you need to change the shape of the data to match the expectations of the model.
How could I reshape the data, Jason?
If you are new to reshaping arrays, see this:
https://machinelearningmastery.com/index-slice-reshape-numpy-arrays-machine-learning-python/
Hi Jason,
Thanks for your tutorial. It’s great. I have a question.
How can I recognize a face that does not exist in the training set by this approach?
I have tried to measure the Euclidean distance between the face embeddings to distinguishing faces but the result I got is not satisfying. Your Suggestion will be highly appreciated. Thank you
Pass the image to the model and get a prediction as we do at the end of the tutorial.
suppose I pass an image that not among the 5 celebrities. How the algorithm can identify that as an unrecognized face?
It cannot.
You can add a “unknown class” during training.
You can interpet the probabilities and return an “unknown” result if none of the classes respond strongly enough.
You can re-train the model to support the new person.
…
Thanks, Jason!
You’re welcome.
Hi Jason, i found one error in your demonstration of extracting face part, the bounding box in MTCNN, some images may have negative values of x or y, this is not a bug, because the face is partially out of the image, like this one: 5-celebrity-faces-dataset/train\jerry_seinfeld\httpwwwwatchidcomsitesdefaultfilesuploadsightingBreitlingwatchJerrySeinfeldjpg.jpg.
if you fix the bug by “x1, y1 = abs(x1), abs(y1)”, then the face image is not properly clipped.
Thanks for the suggestion.
Dear Jason,
I have finished the reading and practicing of your book “Deep Learning for Computer Vision”. I would like to thank you for this book which I like very much. I have written a blog post to summarise in my own way your book: https://questioneurope.blogspot.com/2020/07/deep-learning-for-computer-vision-jason.html
I will certainly go for a next book, hesitating between LSTM, NLP or Time series forecasting. Any advice?
Thanks,
Kind regards
Dominique
Well done Dominique!
Thank you for the review.
I recommend selecting a topic that you are most excited about or that you can apply immediately. If pressed, I would suggest NLP.
Hi jason,
While converting the image to numpy array which filename should be given in filename? Kindly reply as soon as possible
A filename is only needed if you save it. You can save as any filename you want.
Dear Jason,
I ran MTCNN code provided in your book on my own photos and I share it with you:
https://questioneurope.blogspot.com/2020/07/running-mtcnn-on-my-own-photos.html
Kind regards
Dominique
Well done, very impressive!
You’re one of the few that not only put the methods into practice, but also share results. I love it!
Will this model able to identify images out of 10k different faces if trained properly ?
Perhaps develop a prototype and evaluate it for your use case.
HI Jason, how to implement it in live video?
Perhaps you can run the procedure on single frames from your video file.
Hey Jason , im getting the following error and have trying to find a solution for days . Could you please help me .
I am using google colab for the code and I placed the model and weight files in a folder name facenet_keras.h5 .
Then when I’m running the code this error is coming.
Unable to open file (unable to open file: name = ‘facenet_keras.h5’, errno = 2, error message = ‘No such file or directory’, flags = 0, o_flags = 0)
My path is /drive/My Drive/facenet_keras_h5 then also the error is shown
Sorry,I have never used google colab, I cannot give you advice on the topic.
I am getting this error. please help me out
NameError: name ‘face_pixels’ is not defined
I’m sorry to hear that, this will help:
https://machinelearningmastery.com/faq/single-faq/why-does-the-code-in-the-tutorial-not-work-for-me
Dear Jason,
I was going through this blog from first line till the end. More than what wrote is the consistently replying every queries. Hats-off to your patience.
My query: I was planning to use your face recognition guide for my kindergarten project to detect kids faces.
1. Will this guide will works well on kids faces?
2. Does the camera feed has to be at certain angle and beyond which detection or recognition could be a problem?
3. Since, new kids enrolled very frequently, how to automate the training of new faces?
Thanks !
Thanks.
Perhaps test it to see if it is appropriate.
Faces should be head on with the camera.
Sounds like an application question, not a machine learning question. You will need to devise an appropriate procedure to maintain the system in its environment.
Can we use this code and make an android face recognition app from this?
I don’t know about android, sorry.
The test image when i was giving from my local system,it predicted the output.But when i gave the same image from webservice model.predict() throws an error as ,”expected input_1 to have 4 dimensions but got (1,128)”. When i was doing from my local i followed the same step as you processed test images before model.fit().When i was giving from webservice. I am training images from one service passed it to model.fit().and from match webservice i am trying to predict but it throws me an error.
Sorry, I don’t know about your webservice. I suspect it is the cause of the error.
Thanks for the reply.. I re-frame my question without webservice part and lets assume train and test images are local.
My project requires train images to be added in model before testing of face. So, I process my train image one-by-one and fit it with the model. Up to this, everything works fine.
Now, I have a test image and processed it as usual (process I mean by extract face and get embedding) and give it to model.predict(). This is where I get this error ”expected input_1 to have 4 dimensions but got (1,128)”
One more thing, if I process one of my test image before model.fit(), I get my output for this face properly.
The new image must be prepared in an identical manner as the training data. Same pixel scaling and same shape, then passed through the model to get the embedding, then passed to the model to get a prediction.
Hi, I need the architecture of FaceNet model, but unable to find it. If there is an official source for it, kindly help out
The paper I found consists of two different architectures and I’m unsure which one is relevant/ being used over here
I’m referring to the FaceNet: A unified embedding for face recognition and clustering paper, and see two architectures there – Zeiler&Fergus based an d Inception based
I believe it is in the facenet paper.
Also you can load the model and summarize its structure to see.
Currently the mtcnn package does not have alignment feature, but the original facenet repo (https://github.com/davidsandberg/facenet) has alignment feature.
1. Does face alignment affect the accuracy of model predictions?
2. Is there any library to align the face detected by mtcnn?
I am currently using this model 20180402-114759(Inception ResNet v1) from facenet repo.
Good question, I’m not sure off the cuff.
Congratulations on the tutorial! I’m getting the following warning:
WARNING:tensorflow:6 out of the last 11 calls to <function Model.make_predict_function..predict_function at 0x7f0016e2eae8> triggered tf.function retracing. Tracing is expensive and the excessive number of tracings could be due to (1) creating @tf.function repeatedly in a loop, (2) passing tensors with different shapes, (3) passing Python objects instead of tensors. For (1), please define your @tf.function outside of the loop. For (2), @tf.function has experimental_relax_shapes=True option that relaxes argument shapes that can avoid unnecessary retracing. For (3), please refer to https://www.tensorflow.org/tutorials/customization/performance#python_or_tensor_args and https://www.tensorflow.org/api_docs/python/tf/function for more details.
while using the extract_face function. Do you know that does it mean?
I have not seen that error before. Are you Keras and TensorFlow libraries up to date?
Yes, I’m using keras 2.4.0 and tensorflow 2.3.0
It looks like a warning, perhaps try ignoring it for now.
Try moving code,
detector = MTCNN()
outside of the function. That is create detector only once. This warning should go away.
Hi Jason,
Great tutorial. Just had one question.
I am trying to implement masked face recognition – using your approach as a starting point. And have been somewhat successful, by adding artificial masks to unmasked images before generating face embeddings.
However, when I take masked images, MTCNN code is not able to detect any face in those images. As a result, I am not able to train using real life examples. Do you have any recommendation or documentation or tutorial at to what can make MTCNN detect masked faces?
Thanks!
Sorry, I don’t have tutorials on training a mtcnn.
Hi Jason,
Why am I get this error at the end of your code?
TypeError Traceback (most recent call last)
in ()
43 # plot for fun
44 #a = random_face_pixels.resize(128,128)
—> 45 pyplot.imshow (random_face_pixels)
46 title = ‘%s (%.3f)’ % (predict_names[0], class_probability)
47 pyplot.title(title)
5 frames
/usr/local/lib/python3.6/dist-packages/matplotlib/image.py in set_data(self, A)
697 or self._A.ndim == 3 and self._A.shape[-1] in [3, 4]):
698 raise TypeError(“Invalid shape {} for image data”
–> 699 .format(self._A.shape))
700
701 if self._A.ndim == 3:
TypeError: Invalid shape (128,) for image data
Sorry to hear that, this will help:
https://machinelearningmastery.com/faq/single-faq/why-does-the-code-in-the-tutorial-not-work-for-me
Awesome Explanation sir.
I have a built my own FaceNet Model.But i don’t have any dataset.
where can i find the tripplet dataset?
This may help you locate a dataset:
https://machinelearningmastery.com/faq/single-faq/where-can-i-get-a-dataset-on-___
Thank you sir.
You’re welcome.
Great article. I need to know that you also included val samples to create Face_Embeddings npz file, so it means that in case of video capture, we will have to pass all sample frames via complete procedure and create 2x .npz files for each frame and then identify each image in our other trained Face_Embeddings npz file with new Face_Embedding npz file of current frame?
No, you can create the embedding just in time for your application.
For Face Recognition and already having Face_Embeddings.npz file. For Image ‘Test.jpg’ I have acquired testX and testY from face after face detection:
testY will be name that i wll be giving to Test.jpg external file?
X.extend(face)
Y.extend(face)
testX = asarray(X)
testY = asarray(Y)
It gives me error:
testY = out_encoder.transform(testY)
ValueError: y should be a 1d array, got an array of shape (160, 160, 3) instead.
Out encoder takes the name of the “class” or person and converts it into an integer for modeling.
Hi Dr. Brownlee, thanks for sharing this awesome tutorial,
I have been working on one shot learning with siamese network and facenet, even tried with knn, svm and vggg16 and resnet.
for the training I use one image per classe so if i’ve 200 students, i’ve 200 images for classify using one shot learning and facenet.
First of all, The goal is to classify and embedding the students images on database and then detect the images on live camera. unfortunately the detections was not really accurate. sometimes the students are detected as unknown or detected with with correct labelled name in the db.
For instance, when unknown person tested via the camera it will detect this unknown person already existed in the database.
Secondly, I would like to compute face embeddings for new people that doesn’t existed in the db before. then add these new added people would be detected if they tested again.
how can I approach these, Please advise me on how to achieve this? and specifically for embedding new faces to the db, later would be detected with their correct labelled.
share with me if there are some reference that would guide me to achieve that.
Thanks Dr. Brownlee
You’re welcome.
I believe some experimentation will be required. E.g. if an embedding cannot be predicted with high confidence, mark it as “new” and “unknown”. The threshold for what is and what is not confident might have to be tuned for your specific dataset/environment.
Thanks quick response Dr Brownlee,
I will take a look at that and see what I can improve it.
what about adding new faces to the db and encode it automatically without re-training or encoding again. could you please advise or share with me any reference that would be useful to compute face embeddings for new people.
Thanks Dr Brownlee.
I don’t have an example of this. As I said, you will need to experiment to see what works well for your system. It is perhaps more of an engineering question.
Yeah it could be. I will work on that.
Thanks Dr Brownlee for your help
You’re welcome.
Hi Jason
I have created Indian face dataset of 105 classes and 200 samples per class.
Can I use facenet.keras.h5 model to get the embedding of each sample.
Please suggest me how to train facenet over my dataset
Please help me as I m a beginner…
Hi Darshan…the following may be a good starting point:
https://machinelearningmastery.com/how-to-develop-a-face-recognition-system-using-facenet-in-keras-and-an-svm-classifier/
Thanks. Resolved the issue.
We need To assign Labels to testY just same as we used for trainY
Then it will recognise Image in RAM from webcam with all the already trained embedded images in the dataset. Because in Feature_Embedded_Dataset.npz we have Labels for each POI to compare with Image in RAM
Btw ur code is really resource intensive for 2.2GHz CPU. Will buy GPU soon for my BCS AI Project though 🙂
Thanks alot for the Tutorial!!!
Well done!
I made an implementation based in your example using a web cam with low deffinition and I found that removing this normalizacion
face = face.astype(‘float32’)
# standardize pixel values across channels (global)
mean, std = face.mean(), face.std()
face = (face – mean) / std
decreases the distance between embeddings for the same person
Well done!
Hi Dr. Jason,
Thanks for sharing this great tutorial. I am facing below error on extract_faces() function:
ValueError: The channel dimension of the inputs should be defined. Found
None.I have just copied the function and trying to run the program on a set of images. I am not sure where I am wrong – is there anything you can shed lights on?
Sorry to hear that.
Perhaps try running it on the dataset used in the tutorial first to confirm the code works on your system, then perhaps prepare your image data in an identical way as the dataset used in the tutorial.
Hi Jason
I am trying to train svm in 1000 classes by using the face net extracted feature. The training time of SVM takes longer time never seems to stop. Is there any way to reduce the training time of SVM
No of Class:1000
No of image per class: 500
Perhaps try an alternate model that trains faster, such as multinomial logistic regression?
Just to let you know that I have adapted your tutorial to build a working face verification system. Working quite well!!
Well done!
Hi Jason,
First of all Thanks for such a detailed explanation of the implementation of the facenet model.
I am stuck at a point where we import the model, I am getting this error
ValueError: bad marshal data (unknown type code)
I searched for the solution I am not able to find anything.
Could you please let me know what should I do.
Waiting for your reply
I’m sorry to hear that.
These tips will help:
https://machinelearningmastery.com/faq/single-faq/why-does-the-code-in-the-tutorial-not-work-for-me
It is giving good accuracy when i train with 9-10 different persons images the same way you did, When i check the accuracy it is giving like 90-95%. When i train with 90-100 different persons of images and it is giving 10% accuracy , The accuracy starts to decline when i increase the train images, How can i fix this. Thanks
Ouch.
Perhaps try tuning the classification model?
Perhaps try using an alternate classification model?
Can you explain the process of ‘downloading the model file and place it in your current working directory’ ?
Sorry, if downloading files from the internet is new for you, then I don’t think I can help you learn machine learning.
I am aware of dowloading the file. I am not aware of the process of placing it in my current working directory. Can you please help regarding that ?
Heyy Jason! Never mind I got it. The entire post was extremely useful. Cheers!!
Well done!
Current working directory means the location on your file system where your script file was saved.
This may help:
https://machinelearningmastery.com/faq/single-faq/how-do-i-run-a-script-from-the-command-line
Hey Jason great post!!!
I have a question I am working on a personal project which is Face Recognition using LBPH,
I made a similar approach using SVM Classifier, but how can I use it to mark Unknown person.
Good question.
Perhaps add a class of “other” during training?
Perhaps interpet the predicted probabilities and classify as “unknown” for low probabilities?
Perhaps develop a separate model for known vs unknown faces?
Perhaps check the literature for common solutions to this problem?
Hi Jason, first, great thanks to this tutorial. i learnt a lot.
I have question, is this Facenet + SVM able to recognize over 100 faces?
After testing myself, it works well if there are a total of 7 or 8 people (with 5 samples each).
However, the ‘probability’ declines significantly if there are around 20 people (from 0.8 to 0.3). I wonder if this works for 100 people?
Good question, I have not tested 100 faces. Perhaps try an alternate model from the SVM, e.g. an xgboost, multinomial regression, or neural net?
Hu, Jason, thanks for the tutorial. I seem to be missing a piece. In the following step
# load the facenet model
model = load_model(‘facenet_keras.h5’)
print(‘Loaded Model’)
I received the following error.
OSError: SavedModel file does not exist at: facenet_keras.h5/{saved_model.pbtxt|saved_model.pb}
Could you comment, please?
Please delete and we shall never speak of this again. Thanks.
Hahah, no problem. We all make errors – it’s part of development, and talking about them helps all other readers.
Looks like the file is not on your computer. Perhaps download and save it in the same directory as your python script.
How u solved this error?
# face detection for the 5 Celebrity Faces Dataset
from os import listdir
from os.path import isdir
from PIL import Image
from matplotlib import pyplot
from numpy import savez_compressed
from numpy import asarray
from mtcnn.mtcnn import MTCNN
# extract a single face from a given photograph
def extract_face(filename, required_size=(160, 160)):
# load image from file
image = Image.open(filename)
# convert to RGB, if needed
image = image.convert(‘RGB’)
# convert to array
pixels = asarray(image)
# create the detector, using default weights
detector = MTCNN()
# detect faces in the image
results = detector.detect_faces(pixels)
# extract the bounding box from the first face
x1, y1, width, height = results[0][‘box’]
# bug fix
x1, y1 = abs(x1), abs(y1)
x2, y2 = x1 + width, y1 + height
# extract the face
face = pixels[y1:y2, x1:x2]
# resize pixels to the model size
image = Image.fromarray(face)
image = image.resize(required_size)
face_array = asarray(image)
return face_array
# load images and extract faces for all images in a directory
def load_faces(directory):
faces = list()
# enumerate files
for filename in listdir(directory):
# path
path = directory + filename
# get face
face = extract_face(path)
# store
faces.append(face)
return faces
# load a dataset that contains one subdir for each class that in turn contains images
def load_dataset(directory):
X, y = list(), list()
# enumerate folders, on per class
for subdir in listdir(directory):
# path
path = directory + subdir + ‘/’
# skip any files that might be in the dir
if not isdir(path):
continue
# load all faces in the subdirectory
faces = load_faces(path)
# create labels
labels = [subdir for _ in range(len(faces))]
# summarize progress
print(‘>loaded %d examples for class: %s’ % (len(faces), subdir))
# store
X.extend(faces)
y.extend(labels)
return asarray(X), asarray(y)
# load train dataset
trainX, trainy = load_dataset(‘5-celebrity-faces-dataset/train/’)
print(trainX.shape, trainy.shape)
# load test dataset
testX, testy = load_dataset(‘5-celebrity-faces-dataset/val/’)
# save arrays to one file in compressed format
savez_compressed(‘5-celebrity-faces-dataset.npz’, trainX, trainy, testX, testy)
ERROORRRR!!!
WARNING:tensorflow:5 out of the last 13 calls to <function Model.make_predict_function..predict_function at 0x0000029E333A7730> triggered tf.function retracing. Tracing is expensive and the excessive number of tracings could be due to (1) creating @tf.function repeatedly in a loop, (2) passing tensors with different shapes, (3) passing Python objects instead of tensors. For (1), please define your @tf.function outside of the loop. For (2), @tf.function has experimental_relax_shapes=True option that relaxes argument shapes that can avoid unnecessary retracing. For (3), please refer to https://www.tensorflow.org/tutorials/customization/performance#python_or_tensor_args and https://www.tensorflow.org/api_docs/python/tf/function for more details.
Sorry to hear that, perhaps these tips will help:
https://machinelearningmastery.com/faq/single-faq/why-does-the-code-in-the-tutorial-not-work-for-me
# prediction for the face
samples = expand_dims(random_face_emb, axis=0)
yhat_class = model.predict(samples)
yhat_prob = model.predict_proba(samples)
In this sample, the test face embeddings are loaded from npz file (which created before in ‘Create Face Embeddings’ phase).
So, the model.predict runs fast.
But when I tried to classification images from a stream (camera), I must get new embeddings for every frame. The ‘get embeddings’ process quite slow (around 2-3 seconds on each frame on my computer), so the video output becomes laggy.
Is there anyway to speed up the ‘get embeddings’ process?
Good question.
It might not be the best solution for a real-time system.
You are one of the best that explains complex staffs steps by steps to the point. Your book and blogs are amazing.
The output of MTCNN is the box and keypoints. I was expecting those will be input to the FaceNet.
But it seems you used only the box information as input to the FaceNet? Why you did that?
How we can use the keypoints information for face recognition pipeline?
Thanks!
No facenet just classifies an image, no object detection in that model. You need a face detection model first, then face classification.
Thank you for your response.
In this work you used the below steps in that order.
1. Face detection model, MTCNN
2. Create embedding using facenet
3. Classify using SVN
My question is the output of face detection are the bounding box and keypoints (landmark locations like left eye, right eye, … ). But you only used the bounding box information and extracted the face and feed it to facenet to create embeddings. Why you didn’t use the landmark locations informations?
Correct.
The chosen model does not require that information, so it is discarded.
Thank you so much Jason!!
The typical face recognition consists of four stages: detect, align, represent and classify.
I think for detect we used MTCNN, for represent we used facenet and for classify we used svn.
What did we use for face alignment?
I guess no alignment of the image was required or performed in this case.
Dear Dr. Jason,
“We will focus on the face identification task in this tutorial.” Per your note this task is face identification, which stage (face detection, FaceNet or classification with svn)of face recognition system determined it?
The other question is:
what is the difference between binary classification and face verification?
what is the difference between multi-class classification and face identification?
Thank you so much for your assistance.
Classification is an identification task, e.g. SVM, but it requires face detection and face embedding first.
Binary classification has two classes, multi-class classification has more than two classes, you can learn more here:
https://machinelearningmastery.com/types-of-classification-in-machine-learning/
Not sure what face verification is – perhaps whether a face can be recognized by a model or not.
Classification is mostly a machine learning problem, such as SVM. Using machine learning based classifier like SVM, LR etc, your model is able to generalize, which means learning from features of different images of same class. This is not possible without a classifier. Face classification is also called as face identification.
A face verification is a one to one match which is usually achieved using distance metrics such as euclidean distance, cosine similarity. Distance between two face embedding is being calculated and a threshold will identify whether two faces are same or not. The distance approach can’t generalize like a machine learning model but is helpful when you have a single image of a person,and is thus less accurate than classification approach.
Hii Jason,
Thanks for such a helpful article.
I want a clarification on one point. I have an image which has total 10 faces. But when I implemented detection algorithm(part of code) on it and save this numpy array as an image, then every time it detect only one face(which is the first face in image).
How I can detect all the faces separately??
Perhaps write a for-loop over all faces detected in your image.
Hi jason,
I am getting below error while loading model.Please suggest.searched a lot not getting solution.
Error:”ImportError:
load_modelrequires h5py.”from keras.models import load_model
model=load_model(‘D:/ML_All/deep learning/face detection/FACENET_PRETRAINED/facenet_keras.h5’)
I am using below version which is given in link(https://github.com/nyoki-mtl/keras-facenet)
python3.6.12
tensorflow: 1.3.0
keras: 2.1.2
Try updating your keras and tensorflow libraries to the latest versions.
Thanks Jason for reply..Earlier tried with TensorFlow 2.1.0 + Keras 2.3.1 but then also was getting some error while loading model.
Since facenet Keras implementation((https://github.com/nyoki-mtl/keras-facenet) by Hiroki Taniai has used (tensorflow: 1.3.0,keras: 2.1.2).So should not we use same keras,TF version’s in which pretrained model was built to load model.Is it mandatory to have same version to load model in keras using load_model ?
Thanks
Sarvendra
I have developed and tested the tutorial against the later version of keras and tensorflow and recommend the same.
Hi Jason,
Please let me know that above keras facenet implementation is done with which version of keras,tenserflow and python.
I am getting too many issues while loading facenet h5 model.
Thanks
Sarvendra
You can use it with the latest version.
Hey Jason thanks for the tutorial, Is there a way of having the facenet keras model perform faster for video face recognition when running on a CPU.
Perhaps maybe have it converted to a form in which it’s usable by opencv’s dnn module?
I’m sure there is, I’m not across it sorry.
Perhaps start by operating on fewer frames per second and run on fast hardware.
Hi Jason,
Thank you for such incredible tutorial
“Face Identification. A one-to-many mapping for a given face against a database of known faces (e.g. who is this person?).”
Please could you guide me what face dataset to use to evaluate the model for face identification task?
You would use your own dataset.
For example if I have a dataset a total of 165 face images which has 15 people having 11 different images per person.
How I can prepare this dataset to evaluate the model for face identification task?
Good question.
You must have photos of each person in the train and test sets so that the model knows about each person (training) and can be evaluated when identifying each person (testing).
The split is up to you, e.g. 50/50 might be a good place to start. Perhaps more or less aggressive depending on the time you have and the reliability you need to demonstrate.
Let’s say about 50/50 split, that means 15 people will have 6 face images in training whereas 5 face images in test.
So while testing the first image, with how many images I will compare? (since identification is one-to-many.
Plus would like to use just the similarity measure without the svm classifier.
Sorry, I don’t follow.
If you split 50/50, then half of the images for each person will be used to train the model and half to evaluate it. Each image belongs to one person. You can evaluate model performance using classification accuracy.
Hello Dr. Jason,
Your blog is the best and you explained precisely. Really appreciate.
Please could you compare the Universal Background Models (UBM) and FaceNet model?
I don’t see a paper where UBM is applied for face verification, do you know the reason?
It looks like UBM is mainly used for speaker verification not for face verification, I am wondering why?
THanks.
Thanks for the suggestion.
Hello Dr. Jason
I am interested to your blog. It is very useful. Thank you for your explain.
I have a question about image size.
I used FaceNet pytorch trained on vggface2 using backbone Inception ResNet v1 to predict my own dataset but i want to use image size 256×256. I tried it and predict embedding.
now, I want to ask this is correct or must be image size 160 x160. specially, I read note in facenet site about the size. this is note
Both pretrained models were trained on 160×160 px images, so will perform best if applied to images resized to this shape.
so, I concluded that I can use image size 256.
another question about Threshold. I choose T 1.03 @ 0.001 FPR but from model trained on 160. is this right?
Sorry, I’m not familiar with the pytorch implementation and the image sizes it supports.
Perhaps you can contact the developer of the model directly.
Thank you
Is it possible to use an mp4 video file as input. Whereas faces within the video are detected and recognized.
Thank you so much for your time and help, this tutorial helped me a lot
Perhaps the frames of the video (images) can be used as input.
Can you please tell me why am I getting this error : “AttributeError: ‘NoneType’ object has no attribute ‘astype’: on this line: “face_pixels = face_pixels.astype(‘float32’)”.
Actually it is not loading anything in trainX array. I don’t know why.
I have loaded the file like this:
data = load(‘/content/drive/MyDrive/face_detection.npz’,allow_pickle=True)
trainX, trainy, testX, testy = data[‘arr_0’], data[‘arr_1’], data[‘arr_2’], data[‘arr_3’]
Sorry to hear that you’re having trouble, perhaps these tips will help:
https://machinelearningmastery.com/faq/single-faq/why-does-the-code-in-the-tutorial-not-work-for-me
fix it by writing this before running your code:
face_pixels = pixels
Nice work!
Hi Jason,
I am getting the following error could you tell me how to fix it
WARNING:tensorflow:5 out of the last 11 calls to <function Model.make_predict_function..predict_function at 0x000002EA8FCAF310> triggered tf.function retracing. Tracing is expensive and the excessive number of tracings could be due to (1) creating @tf.function repeatedly in a loop, (2) passing tensors with different shapes, (3) passing Python objects instead of tensors. For (1), please define your @tf.function outside of the loop. For (2), @tf.function has experimental_relax_shapes=True option that relaxes argument shapes that can avoid unnecessary retracing. For (3), please refer to https://www.tensorflow.org/guide/function#controlling_retracing and https://www.tensorflow.org/api_docs/python/tf/function for more details.
It looks like a warning that you can probably safely ignore for now.
TF displays a ton of warnings!
Hi Jacob,
This might help you
import logging
tf.get_logger().setLevel(logging.ERROR)
Thanks for sharing!
Thanks again for the very helpful article. With your help, knowing a little bit of python and next to nothing about machine learning, I have created a model consisting of several hundred classes and several thousand pictures. It works fairly well at recognizing pictures of people it has already loaded. I wonder if it is possible to detect whether two or more classes represent the same person? For example, suppose I did not realize that the Ben Affleck in Gone Girl was the same Ben Affleck in Justice League and so I created two separate classes, Ben_Affleck_Gone_Girl and Ben_Affleck_Justice_League. Is there some way to use the model to detect that they are the same person?
You’re welcome.
Well done!
You could use a model that predicts the probabilities of class labels and look at the predicted probabilities to see what it really “thinks” about given photos.
Hi Jason!
Thanks for your article. Appreciate the work you’re doing for the community!
When I train my model with 3-5 images/class it works fine.
However, when I am training with a single image/class , the accuracy goes bad.
I understand face-net works as a single shot detection.
I’ve read your article on siamese network also which reaffirmed it should perform well with 1 image/class.
what’s the issue in your opinion?
Sorry I don’t follow, why are you training on a single class?
What I mean to say is that when I am training my model with 3-5 images for each person, the model accuracy is good.
However, when I have 1 training image for each person, the testing accuracy is very poor.
Yes, we might expect this. The model does not have enough data to generalize to new cases.
You may need a different model or data augmentation during training.
Hello Jason, for my uni project (app for android with face recognition and pose detection) i need to be able trough a image, to face recognize people not by name just giving them an Id , for example, if me and you would appear in the camera the app would learn our faces and I would ve got the Id 1 and you the Id 2 or vice-versa, and the next time we appeared on the camera we would still’ve those Ids.
What would be a solution? I ve seeing face recognition technologies such as amazon rekognition, azure face, tensorflow lite with facenet,, but i dont know if I can do this… Can I? With no previous data of people distinguish them and then learn with those images?
Sorry, I don’t know about android or the APIs you mention.
Hello Jason,
I am facing error in loading the model: model = load_model(‘facenet_keras.h5’)
Error: bad marshal data (unknown type code)
I am using Python3.8/Tensorflow2.4.1/Keras==2.4.3
If I downgrade to python 3.6.2/tensorflow1.3.0/keras2.1.2 (as mentioned in the GitHub): Lot of other errors starts coming.
Could you please suggest?
Sorry, I have not seen this error before. Perhaps it is related to library versions?
Hello Dr Jason, Thanks for the reply. Is it possible to mention the version of Python, TensorFlow and Keras you are running the code with?
All examples are kept updated to use the latest version of the Python libraries.
Install the latest version of TensorFlow and Keras.
Sir I am getting the same error mentioned by the person above.
ValueError: bad marshal data (unknown type code) when trying to load the model.
Hi Hari…the following may be of help to you:
https://stevejeffersonr.medium.com/fixing-model-compatibility-errors-across-tensorflow-versions-6a2114d85ba
HI Jay,
how did you removed this Error, Kindly help me out with this. I m getting the same Error
Hello Dr Jason,
How do we handle unknown faces?
When we classify using e.g. SVM, the maximum probability value for a correct prediction in case of say 5 classes comes around 85%, but when the number of classes goes up to say 75 classes, the maximum prediction probability value for correct prediction comes around 20%.
Model predicts a probability for an unknown face also. So, if I want to filter out an unknown faces using a threshold value, the threshold value will keep changing as I add more faces.
What is the best way to handle unknown faces?
Good question, I’d recommend checking the literature for common solutions to this question. Perhaps you can add a new class for “unknown”.
how delete a person from model after trained
instead of retrain model ?
…
is there a way for use a facenet library or any thing built in python instead of loading this model ? (because it is take long time for loading)
Perhaps you can leave the model as-is and just ignore the inputs/outputs for the deleted person?
How far the 128 values returned by FaceNet for a face is different from 128 encodings returned by face_recogniton.face_encodings() for the same face?
Yes, encoding will be different for each image. A model can be used to classify encodings as people.
How can i know which loss and optimizers function this model is trained by … Pls help me 🙁 Thank u
The loss is specified when you call fit() to train your model.
Model pre trained : facenet_keras.h5 by Hiroki Taniai, i have looking for the detail of this model but u know, i still dont know
Perhaps ask the author of the model directly.
I trained the custom face recognition classification model with 1.00000 accuracy but it also predict Unknown faces with class name’s how to fix this problem
Perhaps you can add unknown faces to the training dataset and train the model to predict “unknown”.
Hello Jason,
I have input array of shape mx112x92 and I reshaped them mx160x160x3 to be compatible with FaceNet. The accuracy score of the model is very bad. Is it preferred to have only colored images to generate the embeddings ?
Thank you
Prakhar
Perhaps try some alternate images?
Perhaps compare your data to other images that work well for the model?
Hi, Jason
It’s been a long way for me to get to your post, I learned a lot along the way, otherwise I might not be able to understand some point in this tutorial. lol. The post is clearer than all the other posts I’ve read though. Really appreciate
After done read this post, I was wondering how can i group photos of different people in user’s ios album, just like ios have done in their album app: the album app will list a bunch of face of different people, and when user clicked one of them, it will show all the photos that the face is in.
For now, I build a openface ios version model. I can get face embedings of all the faces in the user’s album, but how can i separate all this embedings into different group or give them different labels automatically without end user interfering. Should I group embedings based on the MSE(mean standard error) between different faces? I tried this method, not smart enough I think.
Could u shed some light on this, thx
Thanks!
That sounds like a cool project.
Perhaps you can use clustering of embeddings somehow or distance measures between embeddings.
Perhaps check the lecture for similar projects?
Hey Jason,
First of all thank you so much for this tutorial. it’s my first deep learning practice, and i completed all code also it’s work! But i have a question for you, how can i load another image or video to detect.
I noticed you use “data = load(‘FGS-faces-embeddings.npz’)” of Test data to show predict result, how can i change “load(‘FGS-faces-embeddings.npz’)” to my realtime data?
Load an image as per normal, this will help:
https://machinelearningmastery.com/how-to-load-convert-and-save-images-with-the-keras-api/
And this:
https://machinelearningmastery.com/how-to-load-and-manipulate-images-for-deep-learning-in-python-with-pil-pillow/
Thank you for the prompt reply.I’ll try it.
Hello Jason. Amazing Project!
I was wondering what is the optimal way to use the model (detect – not train) over 300K+ images?
Should I save their data in one .npz file as your way or is it too large for that? Is there another way like detecting each single image alone? and how will the code look like then?
It may look a beginner’s question, which I am.. Thanks in advance
Their data means the 300+ images? That’s not the good way to use .npz because it means to load everything to memory when you read it; try to keep those images in a zip file or a folder.
Awesome Explanation ~
I have a built my own FaceNet Model.
But i don’t have any dataset.
Where can i find the tripplet dataset?
Do you think the link to Kaggle on this post works for you?
Hi Adrian,
Thank you for all the explanations given in this page. I am currently trying to use a pertained model (Swin Transformer, I found a version in Tensorflow) and use it for a multiple output classification task. Do you have any advice or page recommended for this kind of problem? The authors dive a block like the one above for using the pertained model, but since I am having multiple outputs I need to do it in Functional API.
Sorry, I don’t think I have anything related.
Hello! I am currently trying to try this project on my own data. Every time I get to creating the trainX, I always get an error somewhere along the way during scanning my photos at this part:
x1, y1, w, h = results[0][‘box’]
that sais that the index is out of range when detecting the face, or something like that (sorry, I’m currently running in again and cant give the exact error code and message).
But, does that mean there aren’t any detectable faces in my picture that have caused the error? Thanks!
If there is “index out of range” in this line of code, it means “results” is an empty list. Can’t tell what went wrong but you should investigate in this direction.
Thank you! Every time that happens I always check which image caused that to appear and for now I just assume that there are no detectable faces, so I just remove the picture from the data and it solved it. I need to look more to it but for now, I think it’s good enough
Hello Sir
was working on the example which was posted above tried the example on my own face dataset and some other of my friends dataset and saw that it performs very well on the dataset and saw that even if we generate the embedding for like 5 images still also it works well but in case of larger dataset if we try to do with neural nets dont we need to like change the structure of the neural nets again and again for classifying the image as new faces may come and go
Yes. That’s the limitation of this design.
We are too eager to know about this domain once l learn I want to embed it into the website to do experiments. As a leading web designing company in Trichy, we have done a lot of projects
Great feedback! Keep moving forward on your machine learning journey!
Hi, can you know your company name?, because I’m also located in Trichy and looking for opportunities in Machine Learning domain.
Hi thanks for this project
what do i need to make this predict from a database of images?
Hi A.S…When you say “database” are you referring to large repository on a drive location or loaded from a relational database such as MySQL or ORACLE?
i mean that the model can take an input image then predict and match if found a similarly with an images stored in a SQL or non-SQL as (mongo db or firebase) databases
thanks for your reply.
Hello ,
i am facing a probel when i first try to load the model using ” model = load_model(‘facenet_keras.h5’) ”
i always end up with this error :
” bad marshal data (unknown type code) ”
do you have an idea how i can solve it ?
Marshal is a serialization format internal to Python. I believe it may not relate to your h5 model file but could be some old pre-compiled code staying around. Try look for any .pyc file and delete them.
Hi Jason,
Thanks for the tutorial. It really helps developers like me to understand face recognition.
I have a similar problem to classify images as Same or Different. I have seen your other post where you have used the cosine distance in order to do the same but if we need to do that with SVM classifier – is there an approach to do that ?
Regards,
Priyank
Hi Priyank…You may find the following of interest:
https://www.analyticsvidhya.com/blog/2021/06/build-an-image-classifier-with-svm/#:~:text=SVM%20trains%20on%20a%20set,Object%20Detection%20and%20image%20classification.
https://medium.com/analytics-vidhya/image-classification-using-machine-learning-support-vector-machine-svm-dc7a0ec92e01
Hi Jason,
Thank you so much for sharing intersting blog.
If posiible could you please share code for triplet loss function.
Hi Madhu…the following is a great resource that you may find helpful:
https://paperswithcode.com/method/triplet-loss
Hello Jason,
Thanks for the article, it helped me a lot.
I ran into a problem and would love to get help from you.
I do not understand 100% of machine learning and how SVM works exactly, and I tried to extract from the model that you created a validation loss graph, and after a long search, I found that I can’t do it, and I am not 100% sure.
Is it possible to remove the graph from the model? and how do I train the existing model? After a lot of runs, the accuracy did not change (and I’m not sure how to check the amount of accuracy correctly, all I did was create a graph that for each run shows the prediction probability, and the mean didn’t change)
Hi Jake…This is the first part of a three part series that will greatly help you understand how SVM works:
https://machinelearningmastery.com/method-of-lagrange-multipliers-the-theory-behind-support-vector-machines-part-1-the-separable-case/
Hello Jason,
load_model(‘facenet_keras.h5’) has the error:
ValueError: bad marshal data (unknown type code)
I guess it is the version issue, while I have:
Keras version: 2.9.0
TF version: 2.9.1
Any way to fix this? Thank you!
Hi wneat…We have not encountered this issue. Have you tried Google Colab to rule out version issues?
I too got this error. Still no solution.
when running the facenet classification part of this tutorial, I get the error :
ValueError: Expected 2D array, got 1D array instead:
array=[].
Reshape your data either using array.reshape(-1, 1) if your data has a single feature or array.reshape(1, -1) if it contains a single sample.
on line: trainX = in_encoder.transform(trainX)
It would be glad if I could know from the q&a of the post till now, but there is not a search bar. I liked this post and I will be thankful if you could tell me what is wrong
Hi Sarah…Thank you for your support and feedback! Stakoverflow.com is a great resource for posting questions regarding errors. The following is an example of a discussion post that may help add clarity:
https://stackoverflow.com/questions/45554008/error-in-python-script-expected-2d-array-got-1d-array-instead
Is it me or getting embeddings from photos takes more and more time every prediction?..
I mean, at start it takes about 20ms for prediction. After few thousands predictions it runs really slow. It takes 200ms for a single prediction. And this latency growth up with every prediction. After some time its more efficient to reload the model, than trying to get another set of embeddings.
Do you have any ideas why this may happen and how to solve it?
Hi T.White…The following resource may be of interest:
https://ieeexplore.ieee.org/document/8050275
i need a code on training a model please????????
Hi, please help, I am getting same error.
Hi Prerona…Please provide the exact verbiage of the error you are receiving. This will better enable us to assist you.
Hi, what should I do if I get an “object is not iterable” error when trying to embed an image?
to get embedding I use the following code:
from keras_facenet import FaceNet
embedder = FaceNet()
embedding = embedder.embeddings(embed)
Hi Roman…The following resource may be of interest to you:
https://rollbar.com/blog/python-typeerror-int-object-not-iterable/#:~:text=The%20Python%20TypeError%3A%20'int‘,object%20to%20be%20%E2%80%9Citerable%E2%80%9D.
Hi, is there a facenet_keras.h5 model available for python 3.10?
I get a ValueError: bad marshal data (unknown type code) when downloading it with python 3.10,
but when I use TF 2.2, Keras 2.3 or 2.4, Python 3.6- I get numerous other errors,
so using a model written with a newer version seems to be an easier solution.
thanks
Hi Aner…The following discussion may prove beneficial:
https://stackoverflow.com/questions/30861493/how-to-fix-python-valueerrorbad-marshal-data
I know it’s been a long time since you posted this but I still hope I could get a reply from you. When I implemented myself based on your idea, I had problems related to load pretrained facenet model. It’s said that “EOFError: EOF read where object expected”. I search a lot to figure out this problem but still have no idea. For further information, I’m using both tensorflow and keras: 2.13 version.
I’m looking forward to hearing from you.
Your post is really amazing btw. It’s inspired me a lot.
Hi Quy…We do not have experience with that issue. Perhaps you could try your code in Google Colab. This may help determine if there is an issue with the code itself of the Python environment itself.
Hi, I have 2 classes with 120 images per class. When I’m training the SVC model the accuracy is 50%. Is this due to only having 2 classes? Or is my dataset?
Excellent post! Thanks in advance!
You are very welcome Pablo! Have you tried another dataset with 2 classes to compare performance?
Hi James! I solved it! It seems like I look a lot like my mom… so the model classify me as her and her as me! As a recommendation for anyone having problem, don’t use data of someone that looks like you haha
Thanks for answering! Yeah I tried with Madonna and Mindy faces, 22 faces per class. It only improved from 50% to 52%. I’m using facenet model from face_net keras and it gives me embeddings with length of 512 not 128. Could this be the problem?
Thank you and it’s really great and really helps people learning about facial recognition. Your explanation is also very easy to understand. However, there are several things that have changed, such as in Keras FaceNet you no longer need model = load_model(‘facenet_keras.h5’) but only need model = FaceNet().
Can you also help how to run SVC if the test data is obtained in real time from the camera?
Thank you and wish you success
Hi Reka…You are very welcome! The following resource may be of interest to you.
https://pythonprogramming.net/linear-svc-example-scikit-learn-svm-python/
hello , i want to load the file : facenet-keras.h5 » but i get get yhis error:
EOFError Traceback (most recent call last)
Cell In[4], line 2
1 # load the model
—-> 2 facenet = tf.keras.models.load_model(‘facenet_keras.h5’)
4 print(facenet.inputs)
5 print(facenet.outputs)
File ~\AppData\Roaming\Python\Python311\site-packages\keras\src\saving\saving_api.py:238, in load_model(filepath, custom_objects, compile, safe_mode, **kwargs)
230 return saving_lib.load_model(
231 filepath,
232 custom_objects=custom_objects,
233 compile=compile,
234 safe_mode=safe_mode,
235 )
237 # Legacy case.
–> 238 return legacy_sm_saving_lib.load_model(
239 filepath, custom_objects=custom_objects, compile=compile, **kwargs
240 )
File ~\AppData\Roaming\Python\Python311\site-packages\keras\src\utils\traceback_utils.py:70, in filter_traceback..error_handler(*args, **kwargs)
67 filtered_tb = _process_traceback_frames(e.__traceback__)
68 # To get the full stack trace, call:
69 #
tf.debugging.disable_traceback_filtering()—> 70 raise e.with_traceback(filtered_tb) from None
71 finally:
72 del filtered_tb
File ~\AppData\Roaming\Python\Python311\site-packages\keras\src\utils\generic_utils.py:102, in func_load(code, defaults, closure, globs)
100 except (UnicodeEncodeError, binascii.Error):
101 raw_code = code.encode(“raw_unicode_escape”)
–> 102 code = marshal.loads(raw_code)
103 if globs is None:
104 globs = globals()
EOFError: EOF read where object expected
Hi jhon…Did you type the code or copy and paste it? Also, you may want to try your model in Google Colab.
How can I use this with latest versions or later versions of the tensorflow and mtcnn since used versions are no more available
Hi Rajesh…Please clarify portions of the code that are not working with your environment. You may also benefit from utilizing Google Colab.
Thanks for replying Mr. James.
I wasn’t able to load the model but got that particular issue resolved.
Now can you help me with how can i use this for face recognition based attendance system? (i am new to this).
ok, if You want to use ResNet and cant load .h5 file – use built-in Tensorflow class:
https://www.tensorflow.org/api_docs/python/tf/keras/applications/ResNet50
Hi, Can I ask how about ResNet152 model? is it applicable for this kind of approach? or how can I run it to recognize face on live camera.
Hi Gado…ResNet152 is a deep residual network with 152 layers, and it is highly effective for image recognition tasks due to its depth and architecture. For face recognition using a live camera feed, you can certainly use ResNet152 or a similar deep learning model. However, it is more common to use models that are specifically optimized for face recognition, such as FaceNet, VGGFace, or models from the Dlib library.
### Steps to Use ResNet152 for Face Recognition
1. **Pre-trained Model**: Load a pre-trained ResNet152 model that has been fine-tuned on a face recognition dataset. You can also use a generic pre-trained ResNet152 model from frameworks like Keras and fine-tune it on a face recognition dataset.
2. **Face Detection**: Use a face detection model to identify faces in the live camera feed. Popular options include Haar cascades, Dlib’s HOG + SVM, or MTCNN.
3. **Face Alignment**: Align the detected faces to ensure consistent input to the recognition model.
4. **Feature Extraction**: Use ResNet152 to extract features from the aligned face images.
5. **Face Recognition**: Compare the extracted features with known face features (e.g., using cosine similarity or a simple classifier).
### Implementation Example
Here is an example of how you might implement this in Python using OpenCV and Keras for a simplified face recognition pipeline with a ResNet model.
#### Step 1: Install Necessary Libraries
Make sure you have the following libraries installed:
sh

pip install tensorflow keras opencv-python-headless

pip install mtcnn  # for face detection

pip install scipy  # for distance calculation
#### Step 2: Load the Pre-trained ResNet152 Model
pythonfrom tensorflow.keras.applications import ResNet152
from tensorflow.keras.models import Model
from tensorflow.keras.layers import Input
from tensorflow.keras.preprocessing import image
from tensorflow.keras.applications.resnet import preprocess_input
import numpy as np
# Load ResNet152 model
base_model = ResNet152(weights='imagenet', include_top=False, input_tensor=Input(shape=(224, 224, 3)))
model = Model(inputs=base_model.input, outputs=base_model.output)
#### Step 3: Detect and Align Faces
pythonimport cv2
from mtcnn.mtcnn import MTCNN
# Initialize the face detector
detector = MTCNN()
# Function to detect faces and extract features
def detect_and_extract_features(frame):
faces = detector.detect_faces(frame)
features = []
for face in faces:
x, y, w, h = face['box']
face_img = frame[y:y+h, x:x+w]
face_img = cv2.resize(face_img, (224, 224))
img_array = image.img_to_array(face_img)
img_array = np.expand_dims(img_array, axis=0)
img_array = preprocess_input(img_array)
feature = model.predict(img_array)
features.append((feature, (x, y, w, h)))
return features
#### Step 4: Recognize Faces in Live Camera Feed
pythonimport cv2
from scipy.spatial.distance import cosine
# Load known face features and labels
known_faces = [feature1, feature2, ...] # Replace with actual features
known_labels = ["Person 1", "Person 2", ...]
# Function to recognize faces
def recognize_face(face_feature):
min_distance = float('inf')
label = None
for i, known_feature in enumerate(known_faces):
distance = cosine(face_feature, known_feature)
if distance < min_distance: min_distance = distance label = known_labels[i] return label # OpenCV to capture video from the webcam cap = cv2.VideoCapture(0) while True: ret, frame = cap.read() if not ret: break features = detect_and_extract_features(frame) for feature, (x, y, w, h) in features: label = recognize_face(feature) if label: cv2.rectangle(frame, (x, y), (x+w, y+h), (0, 255, 0), 2) cv2.putText(frame, label, (x, y-10), cv2.FONT_HERSHEY_SIMPLEX, 0.9, (36,255,12), 2) cv2.imshow('Face Recognition', frame) if cv2.waitKey(1) & 0xFF == ord('q'): break cap.release() cv2.destroyAllWindows()
### Key Considerations
1. **Pre-trained Models**: Use pre-trained models for feature extraction. You can fine-tune them on your specific face dataset for better accuracy.
2. **Face Detection**: Ensure reliable face detection for better recognition performance.
3. **Feature Matching**: Use appropriate distance metrics for feature matching. Cosine similarity is common for face recognition.
4. **Performance**: Optimize for performance, especially if deploying on resource-constrained devices.
### Conclusion
While ResNet152 can be used for face recognition, it is often more efficient to use models specifically designed for face recognition tasks. If you still prefer using ResNet152, ensure you have a robust pipeline for face detection, alignment, feature extraction, and recognition to achieve the best results.
Thanks for replying! I am using a Yolov8 for face detection. And I saved my known embeddings with its labels on a json file. It is currently working when I set my threshold low it is not recognizing well sometimes it outputs the label of a wrong person but when I set my threshold higher it can’t recognize any known faces. Any tips on how to solve this?