Face detection is a computer vision problem that involves finding faces in photos.
It is a trivial problem for humans to solve and has been solved reasonably well by classical feature-based techniques, such as the cascade classifier. More recently deep learning methods have achieved state-of-the-art results on standard benchmark face detection datasets. One example is the Multi-task Cascade Convolutional Neural Network, or MTCNN for short.
In this tutorial, you will discover how to perform face detection in Python using classical and deep learning models.
After completing this tutorial, you will know:
Face detection is a non-trivial computer vision problem for identifying and localizing faces in images.
Face detection can be performed using the classical feature-based cascade classifier using the OpenCV library.
State-of-the-art face detection can be achieved using a Multi-task Cascade CNN via the MTCNN library.
Kick-start your project with my new book Deep Learning for Computer Vision, including step-by-step tutorials and the Python source code files for all examples.
Let’s get started.
Update Nov/2019: Updated for TensorFlow v2.0 and MTCNN v0.1.0.
How to Perform Face Detection With Classical and Deep Learning Methods Photo by Miguel Discart, some rights reserved.
Tutorial Overview
This tutorial is divided into four parts; they are:
Face Detection
Test Photographs
Face Detection With OpenCV
Face Detection With Deep Learning
Face Detection
Face detection is a problem in computer vision of locating and localizing one or more faces in a photograph.
Locating a face in a photograph refers to finding the coordinate of the face in the image, whereas localization refers to demarcating the extent of the face, often via a bounding box around the face.
A general statement of the problem can be defined as follows: Given a still or video image, detect and localize an unknown number (if any) of faces
Detecting faces in a photograph is easily solved by humans, although has historically been challenging for computers given the dynamic nature of faces. For example, faces must be detected regardless of orientation or angle they are facing, light levels, clothing, accessories, hair color, facial hair, makeup, age, and so on.
The human face is a dynamic object and has a high degree of variability in its appearance, which makes face detection a difficult problem in computer vision.
Given a photograph, a face detection system will output zero or more bounding boxes that contain faces. Detected faces can then be provided as input to a subsequent system, such as a face recognition system.
Face detection is a necessary first-step in face recognition systems, with the purpose of localizing and extracting the face region from the background.
There are perhaps two main approaches to face recognition: feature-based methods that use hand-crafted filters to search for and detect faces, and image-based methods that learn holistically how to extract faces from the entire image.
Want Results with Deep Learning for Computer Vision?
Take my free 7-day email crash course now (with sample code).
Click to sign-up and also get a free PDF Ebook version of the course.
Test Photographs
We need test images for face detection in this tutorial.
To keep things simple, we will use two test images: one with two faces, and one with many faces. We’re not trying to push the limits of face detection, just demonstrate how to perform face detection with normal front-on photographs of people.
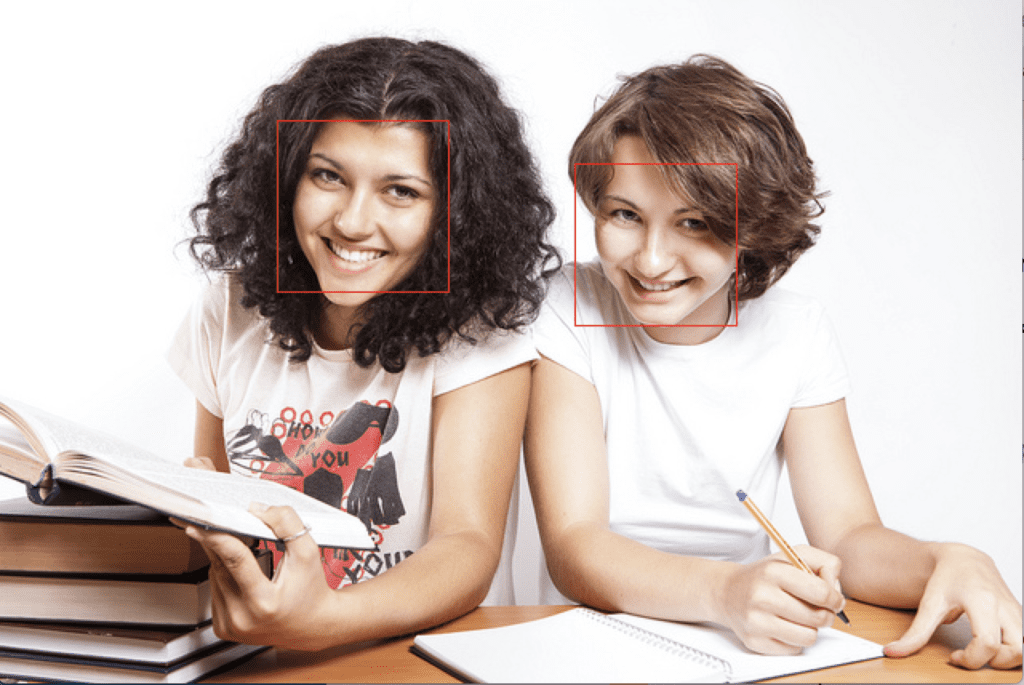
The first image is a photo of two college students taken by CollegeDegrees360 and made available under a permissive license.
Download the image and place it in your current working directory with the filename ‘test1.jpg‘.
College Students (test1.jpg) Photo by CollegeDegrees360, some rights reserved.
In the paper, effective features are learned using the AdaBoost algorithm, although importantly, multiple models are organized into a hierarchy or “cascade.”
In the paper, the AdaBoost model is used to learn a range of very simple or weak features in each face, that together provide a robust classifier.
… feature selection is achieved through a simple modification of the AdaBoost procedure: the weak learner is constrained so that each weak classifier returned can depend on only a single feature . As a result each stage of the boosting process, which selects a new weak classifier, can be viewed as a feature selection process.
The models are then organized into a hierarchy of increasing complexity, called a “cascade“.
Simpler classifiers operate on candidate face regions directly, acting like a coarse filter, whereas complex classifiers operate only on those candidate regions that show the most promise as faces.
… a method for combining successively more complex classifiers in a cascade structure which dramatically increases the speed of the detector by focusing attention on promising regions of the image.
The result is a very fast and effective face detection algorithm that has been the basis for face detection in consumer products, such as cameras.
Their detector, called detector cascade, consists of a sequence of simple-to-complex face classifiers and has attracted extensive research efforts. Moreover, detector cascade has been deployed in many commercial products such as smartphones and digital cameras.
It is a modestly complex classifier that has also been tweaked and refined over the last nearly 20 years.
A modern implementation of the Classifier Cascade face detection algorithm is provided in the OpenCV library. This is a C++ computer vision library that provides a python interface. The benefit of this implementation is that it provides pre-trained face detection models, and provides an interface to train a model on your own dataset.
OpenCV can be installed by the package manager system on your platform, or via pip; for example:
1
sudo pip install opencv-python
Once the installation process is complete, it is important to confirm that the library was installed correctly.
This can be achieved by importing the library and checking the version number; for example:
1
2
3
4
# check opencv version
import cv2
# print version number
print(cv2.__version__)
Running the example will import the library and print the version. In this case, we are using version 4 of the library.
1
4.1.1
OpenCV provides the CascadeClassifier class that can be used to create a cascade classifier for face detection. The constructor can take a filename as an argument that specifies the XML file for a pre-trained model.
OpenCV provides a number of pre-trained models as part of the installation. These are available on your system and are also available on the OpenCV GitHub project.
Download a pre-trained model for frontal face detection from the OpenCV GitHub project and place it in your current working directory with the filename ‘haarcascade_frontalface_default.xml‘.
Running the example first loads the photograph, then loads and configures the cascade classifier; faces are detected and each bounding box is printed.
Each box lists the x and y coordinates for the bottom-left-hand-corner of the bounding box, as well as the width and the height. The results suggest that two bounding boxes were detected.
1
2
[174 75 107 107]
[360 102 101 101]
We can update the example to plot the photograph and draw each bounding box.
This can be achieved by drawing a rectangle for each box directly over the pixels of the loaded image using the rectangle() function that takes two points.
1
2
3
4
5
# extract
x,y,width,height=box
x2,y2=x+width,y+height
# draw a rectangle over the pixels
rectangle(pixels,(x,y),(x2,y2),(0,0,255),1)
We can then plot the photograph and keep the window open until we press a key to close it.
1
2
3
4
5
6
# show the image
imshow('face detection',pixels)
# keep the window open until we press a key
waitKey(0)
# close the window
destroyAllWindows()
The complete example is listed below.
1
2
3
4
5
6
7
8
9
10
11
12
13
14
15
16
17
18
19
20
21
22
23
24
25
26
# plot photo with detected faces using opencv cascade classifier
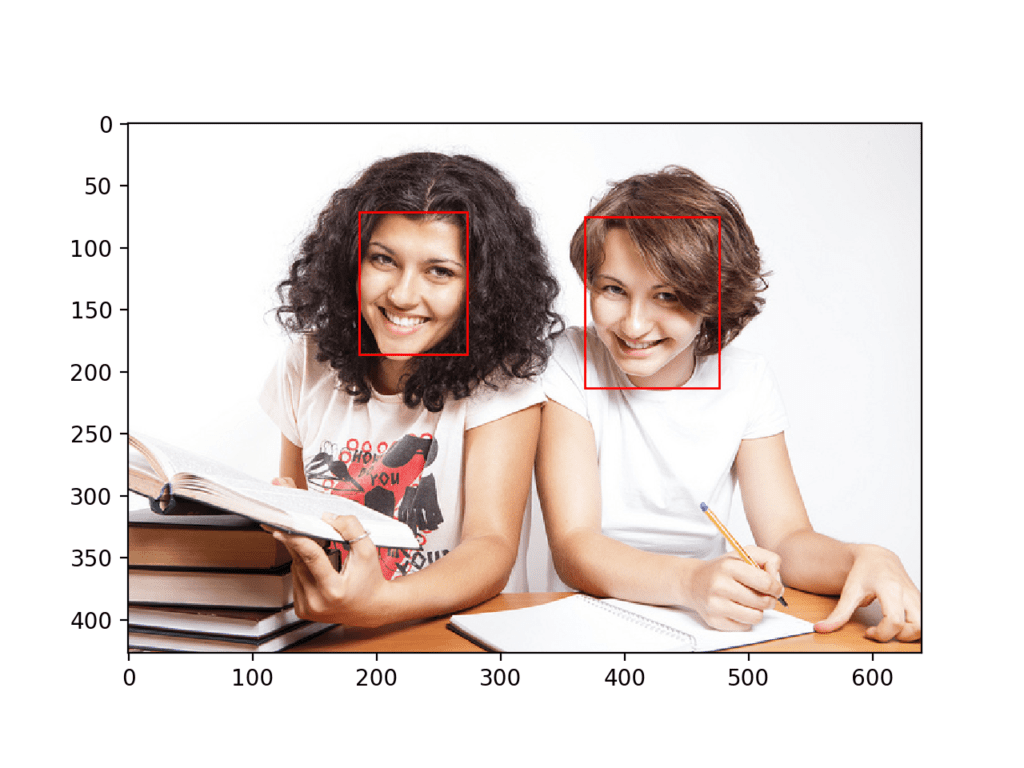
Running the example, we can see that the photograph was plotted correctly and that each face was correctly detected.
College Students Photograph With Faces Detected using OpenCV Cascade Classifier
We can try the same code on the second photograph of the swim team, specifically ‘test2.jpg‘.
1
2
# load the photograph
pixels=imread('test2.jpg')
Running the example, we can see that many of the faces were detected correctly, but the result is not perfect.
Note: Your results may vary given the stochastic nature of the algorithm or evaluation procedure, or differences in numerical precision. Consider running the example a few times and compare the average outcome.
We can see that a face on the first or bottom row of people was detected twice, that a face on the middle row of people was not detected, and that the background on the third or top row was detected as a face.
Swim Team Photograph With Faces Detected using OpenCV Cascade Classifier
The detectMultiScale() function provides some arguments to help tune the usage of the classifier. Two parameters of note are scaleFactor and minNeighbors; for example:
1
2
# perform face detection
bboxes=classifier.detectMultiScale(pixels,1.1,3)
The scaleFactor controls how the input image is scaled prior to detection, e.g. is it scaled up or down, which can help to better find the faces in the image. The default value is 1.1 (10% increase), although this can be lowered to values such as 1.05 (5% increase) or raised to values such as 1.4 (40% increase).
The minNeighbors determines how robust each detection must be in order to be reported, e.g. the number of candidate rectangles that found the face. The default is 3, but this can be lowered to 1 to detect a lot more faces and will likely increase the false positives, or increase to 6 or more to require a lot more confidence before a face is detected.
The scaleFactor and minNeighbors often require tuning for a given image or dataset in order to best detect the faces. It may be helpful to perform a sensitivity analysis across a grid of values and see what works well or best in general on one or multiple photographs.
A fast strategy may be to lower (or increase for small photos) the scaleFactor until all faces are detected, then increase the minNeighbors until all false positives disappear, or close to it.
With some tuning, I found that a scaleFactor of 1.05 successfully detected all of the faces, but the background detected as a face did not disappear until a minNeighbors of 8, after which three faces on the middle row were no longer detected.
1
2
# perform face detection
bboxes=classifier.detectMultiScale(pixels,1.05,8)
The results are not perfect, and perhaps better results can be achieved with further tuning, and perhaps post-processing of the bounding boxes.
Swim Team Photograph With Faces Detected Using OpenCV Cascade Classifier After Some Tuning
Face Detection With Deep Learning
A number of deep learning methods have been developed and demonstrated for face detection.
The MTCNN is popular because it achieved then state-of-the-art results on a range of benchmark datasets, and because it is capable of also recognizing other facial features such as eyes and mouth, called landmark detection.
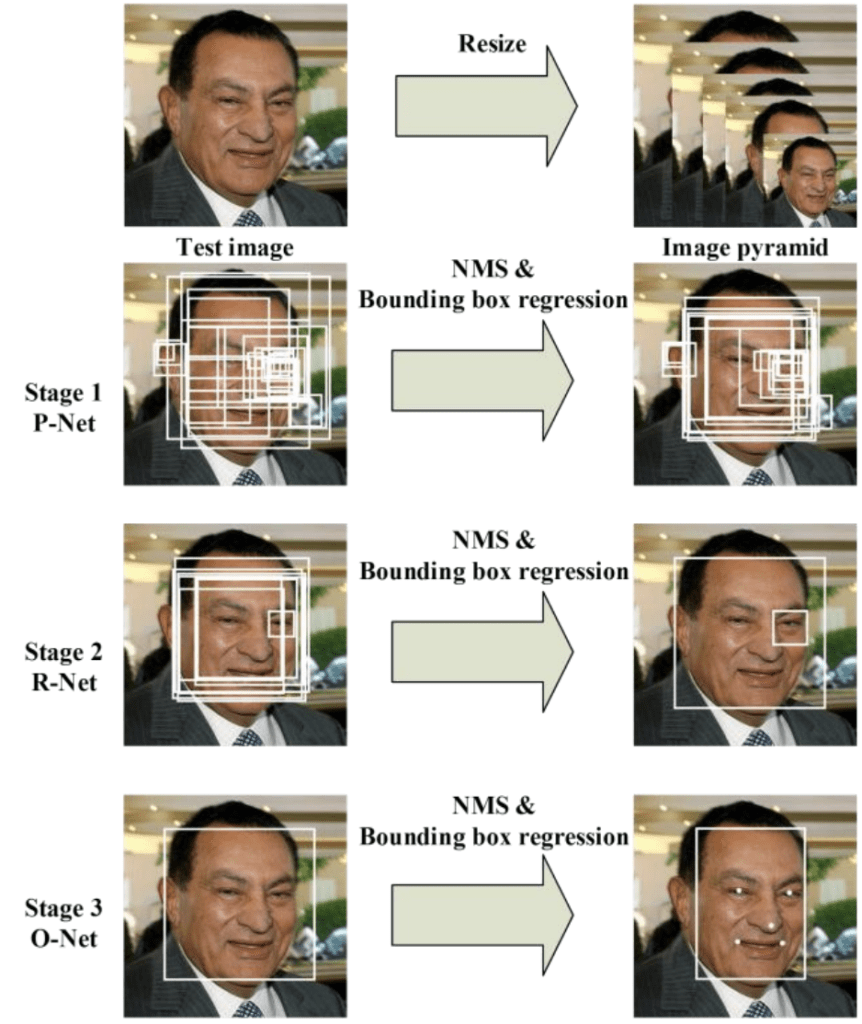
The network uses a cascade structure with three networks; first the image is rescaled to a range of different sizes (called an image pyramid), then the first model (Proposal Network or P-Net) proposes candidate facial regions, the second model (Refine Network or R-Net) filters the bounding boxes, and the third model (Output Network or O-Net) proposes facial landmarks.
The proposed CNNs consist of three stages. In the first stage, it produces candidate windows quickly through a shallow CNN. Then, it refines the windows to reject a large number of non-faces windows through a more complex CNN. Finally, it uses a more powerful CNN to refine the result and output facial landmarks positions.
The image below taken from the paper provides a helpful summary of the three stages from top-to-bottom and the output of each stage left-to-right.
Pipeline for the Multi-Task Cascaded Convolutional Neural NetworkTaken from: Joint Face Detection and Alignment Using Multitask Cascaded Convolutional Networks.
The model is called a multi-task network because each of the three models in the cascade (P-Net, R-Net and O-Net) are trained on three tasks, e.g. make three types of predictions; they are: face classification, bounding box regression, and facial landmark localization.
The three models are not connected directly; instead, outputs of the previous stage are fed as input to the next stage. This allows additional processing to be performed between stages; for example, non-maximum suppression (NMS) is used to filter the candidate bounding boxes proposed by the first-stage P-Net prior to providing them to the second stage R-Net model.
The MTCNN architecture is reasonably complex to implement. Thankfully, there are open source implementations of the architecture that can be trained on new datasets, as well as pre-trained models that can be used directly for face detection. Of note is the official release with the code and models used in the paper, with the implementation provided in the Caffe deep learning framework.
Perhaps the best-of-breed third-party Python-based MTCNN project is called “MTCNN” by Iván de Paz Centeno, or ipazc, made available under a permissive MIT open source license. As a third-party open-source project, it is subject to change, therefore I have a fork of the project at the time of writing available here.
The MTCNN project, which we will refer to as ipazc/MTCNN to differentiate it from the name of the network, provides an implementation of the MTCNN architecture using TensorFlow and OpenCV. There are two main benefits to this project; first, it provides a top-performing pre-trained model and the second is that it can be installed as a library ready for use in your own code.
The library can be installed via pip; for example:
1
sudo pip install mtcnn
After successful installation, you should see a message like:
1
Successfully installed mtcnn-0.1.0
You can then confirm that the library was installed correctly via pip; for example:
1
sudo pip show mtcnn
You should see output like that listed below. In this case, you can see that we are using version 0.0.8 of the library.
1
2
3
4
5
6
7
8
9
10
Name: mtcnn
Version: 0.1.0
Summary: Multi-task Cascaded Convolutional Neural Networks for Face Detection, based on TensorFlow
Home-page: http://github.com/ipazc/mtcnn
Author: Iván de Paz Centeno
Author-email: ipazc@unileon.es
License: MIT
Location: ...
Requires: opencv-python, keras
Required-by:
You can also confirm that the library was installed correctly via Python, as follows:
1
2
3
4
# confirm mtcnn was installed correctly
import mtcnn
# print version
print(mtcnn.__version__)
Running the example will load the library, confirming it was installed correctly; and print the version.
1
0.1.0
Now that we are confident that the library was installed correctly, we can use it for face detection.
An instance of the network can be created by calling the MTCNN() constructor.
By default, the library will use the pre-trained model, although you can specify your own model via the ‘weights_file‘ argument and specify a path or URL, for example:
1
model=MTCNN(weights_file='filename.npy')
The minimum box size for detecting a face can be specified via the ‘min_face_size‘ argument, which defaults to 20 pixels. The constructor also provides a ‘scale_factor‘ argument to specify the scale factor for the input image, which defaults to 0.709.
Once the model is configured and loaded, it can be used directly to detect faces in photographs by calling the detect_faces() function.
This returns a list of dict object, each providing a number of keys for the details of each face detected, including:
‘box‘: Providing the x, y of the bottom left of the bounding box, as well as the width and height of the box.
‘confidence‘: The probability confidence of the prediction.
‘keypoints‘: Providing a dict with dots for the ‘left_eye‘, ‘right_eye‘, ‘nose‘, ‘mouth_left‘, and ‘mouth_right‘.
For example, we can perform face detection on the college students photograph as follows:
1
2
3
4
5
6
7
8
9
10
11
12
# face detection with mtcnn on a photograph
from matplotlib import pyplot
from mtcnn.mtcnn import MTCNN
# load image from file
filename='test1.jpg'
pixels=pyplot.imread(filename)
# create the detector, using default weights
detector=MTCNN()
# detect faces in the image
faces=detector.detect_faces(pixels)
forface infaces:
print(face)
Running the example loads the photograph, loads the model, performs face detection, and prints a list of each face detected.
We can draw the boxes on the image by first plotting the image with matplotlib, then creating a Rectangle object using the x, y and width and height of a given bounding box; for example:
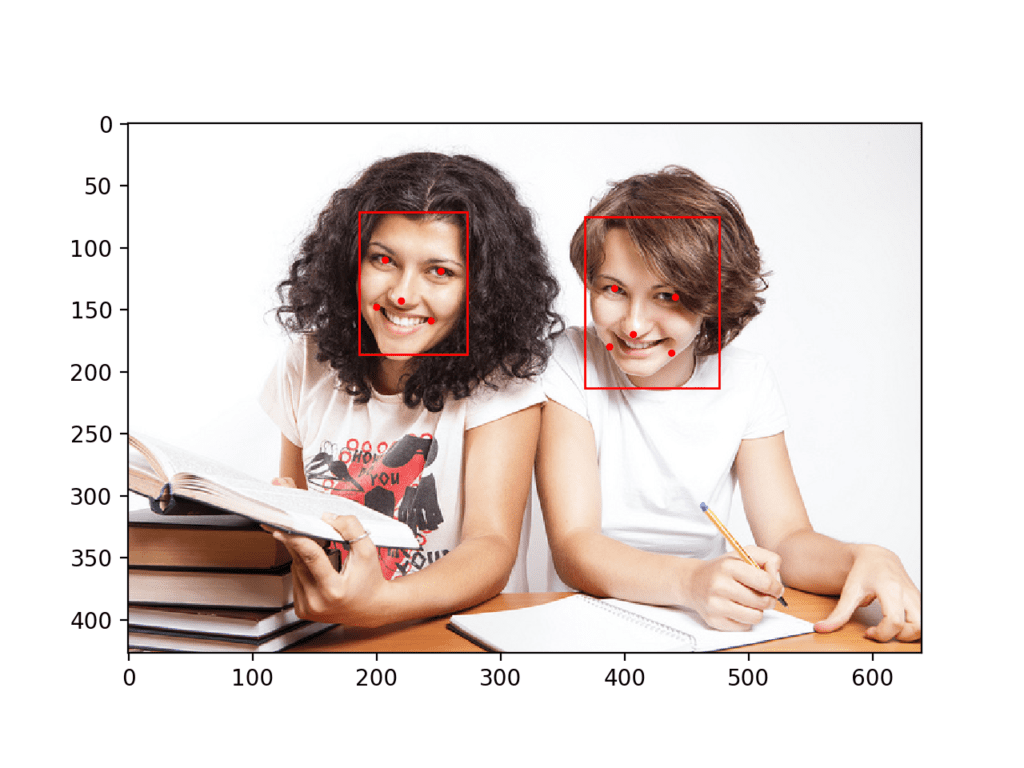
The example plots the photograph again with bounding boxes and facial key points.
We can see that eyes, nose, and mouth are detected well on each face, although the mouth on the right face could be better detected, with the points looking a little lower than the corners of the mouth.
College Students Photograph With Bounding Boxes and Facial Keypoints Drawn for Each Detected Face Using MTCNN
We can now try face detection on the swim team photograph, e.g. the image test2.jpg.
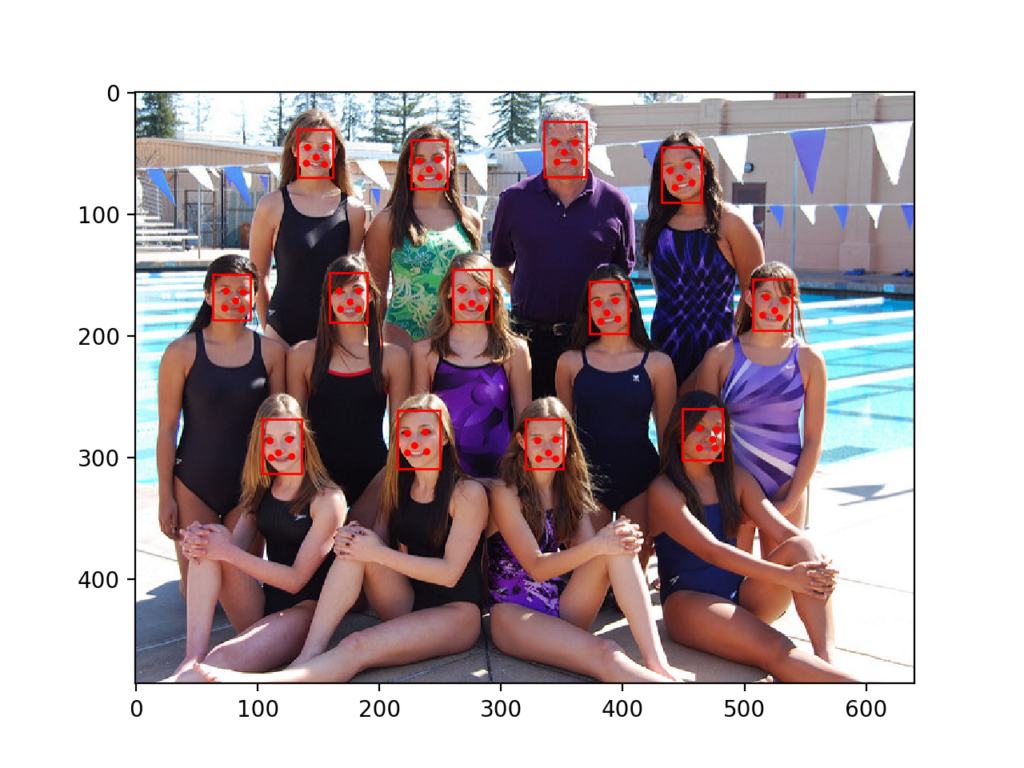
Running the example, we can see that all thirteen faces were correctly detected and that it looks roughly like all of the facial keypoints are also correct.
Swim Team Photograph With Bounding Boxes and Facial Keypoints Drawn for Each Detected Face Using MTCNN
We may want to extract the detected faces and pass them as input to another system.
This can be achieved by extracting the pixel data directly out of the photograph; for example:
1
2
3
4
5
# get coordinates
x1,y1,width,height=result['box']
x2,y2=x1+width,y1+height
# extract face
face=data[y1:y2,x1:x2]
We can demonstrate this by extracting each face and plotting them as separate subplots. You could just as easily save them to file. The draw_faces() below extracts and plots each detected face in a photograph.
1
2
3
4
5
6
7
8
9
10
11
12
13
14
15
16
# draw each face separately
def draw_faces(filename,result_list):
# load the image
data=pyplot.imread(filename)
# plot each face as a subplot
foriinrange(len(result_list)):
# get coordinates
x1,y1,width,height=result_list[i]['box']
x2,y2=x1+width,y1+height
# define subplot
pyplot.subplot(1,len(result_list),i+1)
pyplot.axis('off')
# plot face
pyplot.imshow(data[y1:y2,x1:x2])
# show the plot
pyplot.show()
The complete example demonstrating this function for the swim team photo is listed below.
1
2
3
4
5
6
7
8
9
10
11
12
13
14
15
16
17
18
19
20
21
22
23
24
25
26
27
28
29
30
31
32
# extract and plot each detected face in a photograph
from matplotlib import pyplot
from matplotlib.patches import Rectangle
from matplotlib.patches import Circle
from mtcnn.mtcnn import MTCNN
# draw each face separately
def draw_faces(filename,result_list):
# load the image
data=pyplot.imread(filename)
# plot each face as a subplot
foriinrange(len(result_list)):
# get coordinates
x1,y1,width,height=result_list[i]['box']
x2,y2=x1+width,y1+height
# define subplot
pyplot.subplot(1,len(result_list),i+1)
pyplot.axis('off')
# plot face
pyplot.imshow(data[y1:y2,x1:x2])
# show the plot
pyplot.show()
filename='test2.jpg'
# load image from file
pixels=pyplot.imread(filename)
# create the detector, using default weights
detector=MTCNN()
# detect faces in the image
faces=detector.detect_faces(pixels)
# display faces on the original image
draw_faces(filename,faces)
Running the example creates a plot that shows each separate face detected in the photograph of the swim team.
Plot of Each Separate Face Detected in a Photograph of a Swim Team
Further Reading
This section provides more resources on the topic if you are looking to go deeper.
It provides self-study tutorials on topics like: classification, object detection (yolo and rcnn), face recognition (vggface and facenet), data preparation and much more...
Finally Bring Deep Learning to your Vision Projects
hi there
—————————————————————————
NameError Traceback (most recent call last)
in
1 # load the pre-trained model
—-> 2 classifier = CascadeClassifier(‘haarcascade_frontalface_default.xml’)
NameError: name ‘CascadeClassifier’ is not defined
how can i define cascadeclassifier?
beside, i couldn’t find a plce to put the xml file,
where can i find it in my anaconda file?
sorry, im new to this, hopefully you can guide me !
When I try to install opencv via the following command:
sudo pip install opencv-python
here is the error I get in my console
thank you for helping me
The directory ‘/home/dongorias/.cache/pip/http’ or its parent directory is not owned by the current user and the cache has been disabled. Please check the permissions and owner of that directory. If executing pip with sudo, you may want sudo’s -H flag.
The directory ‘/home/dongorias/.cache/pip’ or its parent directory is not owned by the current user and caching wheels has been disabled. check the permissions and owner of that directory. If executing pip with sudo, you may want sudo’s -H flag.
Requirement already satisfied: opencv-python in /usr/local/lib/python2.7/dist-packages
Requirement already satisfied: numpy>=1.11.1 in /usr/lib/python2.7/dist-packages (from opencv-python)
Hy ,
If I want to classify the gender from these detected faces, how I can do that? Can you please guide me or share any helping link to classify the gender from these detected faces?
Hye,
Please help me. I want to crop each detected face and write them in repository. How I can crop each detected face ?
Actually, I am working on facial expression classifier. Where I will pass each cropped face to my image classifier to get desirous output. How I can crop each detected face and save them in local repository.
Great Article!
Just curious to know how mtcnn performs compared to other face detection models like dlib(not sure if dlib is a deep learning model). I can see that mtcnn just points to the centre of ‘keypoints’, does it support perdicting the whole set of facial landmark indexes?
Hy,
I am facing an issue. Actually, I have an image of class room (you can imagine how students sit in class room). The deep learning model is performing very well to detect the faces in the image. But the issue is, in some cases the faces are overlap to each other. I mean in some cases just eyes, ears or head is visible and the model is marking them as faces (by drawing rectangles). But when I extract regions of interest, that is not a face (just eyes or just head). How I can only mark those faces as valid faces, in which faces are completely visible, because the DL face detector is also marking those faces as a face, in which just eyes (or small part of face is available).
Can you please help me out?
Do you really think that will it be an efficient approach to develop a second model to cross check that either it is complete face or not? If yes, then can you please suggest that what should be approach to cross check the face?
Actually, I am working on expression classifier, where I pass these all detected face to the facial expression classification model. So I have stuck on that point. Can you please suggest me a solution?
Thanks
Hi Jason
Let me start by appreciating the brilliant work you are doing, keep the good work up. Do you have any material on graph neural nets, it could be Graph Reccurent Neural Nets for regressions or Graph Convolution Neural Networks for image classification. Thank you in advance.
“using outputs as inputs to classifier” -> this is not transfer learning but you mean running for example a face recognition algorithm on the discovered bounding boxes I think.
I noticed that this version of mtcnn is very weak on even frontal faces oriented sideways (person lying down on the ground) so am going to now use cv2.flip on y axis and rotate by 90, 180 and 270 degrees (total of 8 images) and then outputting the image with highest number of faces detected (or closest to actual).
if no transfer learning available, are there any parameters that we can adjust for confidence level, number of boxes on a particular face, etc for MTCNN so we have some control over the output?
Everything worked like charm and thank you for the great tutorial.
Intending to move on to face identification. How to identify faces of say my friends in a group? With only handful of photos available, I would have thought there will be a need to fabricate many images of same person for training purposes. Is there an efficient way?
Kindly advise. Thanks again.
Alright, a fantastic read! So glad people are working for advancing technology! Open source is a mystic! However, could we label each face and use it to train another model? Like in the Tensorflow Object Detection API?
plt.subplot(1, len(result_list), i+1)
plt.axis(‘off’)
# plot face
img=plt.imshow(data[y1:y2, x1:x2])
plt.savefig(“C:/Users/Sukirtha/Desktop/”+str(i)+”.jpg”)
Sir the image obtained from the imshow need to be stored in a file (like if the picture contains two images with faces the two images need to be cropped and stored as seperate images in a file).How to perform this here in the code given?
I am a machine learning student at San Jose State University. I am planning to do a project on graffiti detection and classification. I am planning to classify graffiti as Human, animal, text or other objects.
will I be able to that with your book on Deep learning and computer vision? or Do you recommend any other article or model
Hi, I am looking to implement voila-jones method without using OpenCV i.e i want to write a python program for all the steps and train it on a training set but i want it to use as a classifier later on to detect face in the image.I want to know how can i acheive this without using OpenCV.
Dear Jason, thank you very much for such informative article!
I would appreciate it a lot if you can share your opinion in what approach would be the best for solving the following task: neural network has to be able to define if uploaded photo (ID photos) correspond to the following requirements or not:
– eyes are opened
– mouth is closed
– head is not rotated/ tilted
– if there are sunglasses then eyes have to be seen well
– no foreign objects (including hats)
– there is only one person on the photo
It would be great if you can give your professional recommendation on how to train a neural network in this case as well. What are the photos that should be contained in a dataset and what is the size of dataset?
File “C:\Users\91798\Anaconda3\lib\site-packages\mtcnn\mtcnn.py”, line 187, in __init__
config = tf.ConfigProto(log_device_placement=False)
AttributeError: module ‘tensorflow’ has no attribute ‘ConfigProto’
Sir, I want to work on multilingual character recognition. Sir, my question is how to combine two datasets into one large Scale Dataset and train them. Please reply to me. I will be very thankful to you.
I wanted to know if we can use the MTCNN as a pre-trained model in keras, so that I could train the final few layers on my training dataset and then apply it to the test dataset.
Hy,
Hope you will be well.
I am using MTCNN for picture containing multiple faces, it successfully detects all the faces. But I have to work with multiple faces detection in live video stream. But on live video stream, the model is not performing well. Hardly detecting single face (just frontal face). Can you please suggest that what should I use to detect multiple faces in live video streaming. . . .?
HY,
I have experienced on variety of image sizes, but all in vain. MTCNN detects few (2, 3) faces, just with frontal pose in live video stream. I have also tested it by reducing the FPS rate but all in vein.
Can you please suggest / recommend optimal frame size or FPS in video streaming? OR Is there any recommendation from your side for some different model to get best accuracy of face detection on video? Thanks in anticipation for your cooperation. . .
Superb Tutorial Jason!, this seems to help most of us struggling with face_detection problems.
I just wanted to understand that the above model once re-written for tensorflow 2.2 will be more efficient(faster) as TF 2.2 comes with lot of bells and whistles?
You mentioned that the mtcnn can use pre-trained weights as well as training using my own data set. (“there are open source implementations of the architecture that can be trained on new datasets, as well as pre-trained models that can be used directly for face detection”).
I didn’t understand from those paragraphs, can the ipazc/mtcnn be used for training as well, or it is availeable using pre-trained model only?
Hallo Mr. Jason Brownlee, thank you so much for your tutorial for machine learning especially face detection. Can the haar cascade code use matplotlib like the MTCNN? Because I can’t see the result of bounding box of haar_cascade but in MTCNN code I can. Can you give the tutorial for Haar_cascade using matplotlib? Thank You 🙂
The tutorial above when I detect Image more than 600px, it show too big and I can’t see the face and the bounding box. Different if I detect with the MTCNN tutorial that plotted by matplotlib. MTCNN tutorial will show the picture with ideal size so I can capture the result of face detection boundingbox and process time (that I add by myself). that why I need to try plotted by using matplotlib than just cv2
I’m getting this error when i call the detect_face fn .
Any way to frix this?
AbortedError: Operation received an exception:Status: 2, message: could not create a descriptor for a softmax forward propagation primitive, in file tensorflow/core/kernels/mkl_softmax_op.cc:312
[[node model_3/softmax_3/Softmax (defined at /home/pillai/anaconda3/lib/python3.7/site-packages/mtcnn/mtcnn.py:342) ]] [Op:__inference_predict_function_1745]
PUNITHA VALLI SELVA KUMARMarch 16, 2021 at 3:13 pm#
HI, i am using MTCNN to detect the face fro my project, after the face detector, i want to remove the mtcnn from GPU, Can you please telll me how can i able to remove the MTCNN from GPU
Hey I get this below error when i attempt to run the code for detecting faces. the very first part, and it seems as there is something wrong with how i handle the image or the detectmultiScale function. Thanks in advance!
cv version 4.5.1
Traceback (most recent call last):
File “C:/Users/Arngr/PycharmProjects/faceRec/FaceRecognition.py”, line 14, in
bboxes = classifier.detectMultiScale(pixels)
cv2.error: OpenCV(4.5.1) C:\Users\appveyor\AppData\Local\Temp\1\pip-req-build-kh7iq4w7\opencv\modules\objdetect\src\cascadedetect.cpp:1689: error: (-215:Assertion failed) !empty() in function ‘cv::CascadeClassifier::detectMultiScale’
Hi. Thanks for the article. Very insightful. I’m trying to implement this to proceed to detect facial emotions. I seem to be having a bit of a problem detecting faces in the entire dataset to be used as input in my CNN model for training. Do I need to create face embeddings? I keep getting this ‘list index out of range’ error. I could use some help. Thank you.
The list index out of range error is surely due to some issue with the code. The stack trace should tell you where it was hit. Be sure that the input dimension should match perfectly with what the function expects.
Hello Adrian! I’ve been studying a lot from your tutorials and I just did this one. I am interested in making a project and I would like to ask or discuss it with you if I may. I’m thinking of making a face detection from pictures and using the detected faces for training data, similar to your 5 Celebrity Faces project but I provided my own data. I have a bunch of personally collected pictures of a music group that I liked and I want to make their face detection/recognition model. Some pictures are consisted of a single person but some others are group pictures. Is it possible to use the detected faces from group pictures for training data or is it recommended to use single person pictures? How about for testing/validation data? I hope my questions are clear enough. I am still an amateur in machine learning so I apologize in advance for any misunderstandings. Thank you!
If you’re talking about face recognition, it should be only one face at a time. In a group picture, you need face detection first, then recognition. Think of this as an object detection problem on a larger picture first, then an object classification problem on the detected objects. But some advanced algorithms can do both at once.
Thanks for this tutorial, very helpful for my project.
I am however facing a problem when using an image taken from a thermal camera, when I run the code, it does not detect the person. But if i run the code with normal images, it is detected.
What do you think could likely be the reason why the algorithm can not detect a thermal image of a person? And any idea on how to fix this?
Or maybe the MTCNN algorithm is not just suitable for thermal images detection of a person?. If true, could you kindly suggest some other algorithms to detect a person? If you have tutorials on it as well, it will be will great if you can share the link as well.
Thanks for the prompt response, I will look into it.
I was also asking to know aside from MTCNN and OpenCV that you used here for face detection, are there other algorithms for face detection? If yes, I will appreciate you share link to resources on them or just mention them and i can look them up.
thank you, it’s very helpful
i have question , when I build model for facial expression recognition model generally
can I use it for any application of facial expression recognition field? (particular field such as for detect anger of driver)
wonderful explanation and easy to start.
Could you tell me what’s the latest algorithm in face detection and what the improvements to be done to MTCNN?
Can one modify this to use it for product identification and product sourcing instead of facial recognition? Or does a program have to be completely redesigned for that?
Great tutorial. Can I ask why you use data[y1:y2, x1:x2] instead of data[x1:x2, y1:y2]? Why is the y-axis the first rather than the usual x-as-the-first?


Hi!
Thanks for a great article!
But where is Keras here?
The mtcnn model is a Keras model.
Hi Jason, i just checked the mtcnn github repo for keras model infact, i could not find a single keras mention in the code. am i missing anything?
I think you’re right.
I will update the post, thanks!
UPDATE: Yes, it is TensorFlow and I have removed “Keras” from the post title.
Thanks again!
hi there
—————————————————————————
NameError Traceback (most recent call last)
in
1 # load the pre-trained model
—-> 2 classifier = CascadeClassifier(‘haarcascade_frontalface_default.xml’)
NameError: name ‘CascadeClassifier’ is not defined
how can i define cascadeclassifier?
beside, i couldn’t find a plce to put the xml file,
where can i find it in my anaconda file?
sorry, im new to this, hopefully you can guide me !
It suggests you may have missed an import for the opencv class.
how to import opencv class?
in ur step given, i didn’t saw any instruction given to import opencv class
You can install the opencv library as follows:
This is mentioned in the post.
Once installed, you can use the complete example as listed.
type.. classifier = cv2.CascadeClassifier(‘haarcascade_frontalface_default.xml’)
instead of classifier = CascadeClassifier(‘haarcascade_frontalface_default.xml’)
Hello Sir, thanks for the tutorial
When I try to install opencv via the following command:
sudo pip install opencv-python
here is the error I get in my console
thank you for helping me
The directory ‘/home/dongorias/.cache/pip/http’ or its parent directory is not owned by the current user and the cache has been disabled. Please check the permissions and owner of that directory. If executing pip with sudo, you may want sudo’s -H flag.
The directory ‘/home/dongorias/.cache/pip’ or its parent directory is not owned by the current user and caching wheels has been disabled. check the permissions and owner of that directory. If executing pip with sudo, you may want sudo’s -H flag.
Requirement already satisfied: opencv-python in /usr/local/lib/python2.7/dist-packages
Requirement already satisfied: numpy>=1.11.1 in /usr/lib/python2.7/dist-packages (from opencv-python)
Perhaps try upgrading to Python 3 first?
Also, perhaps try searching/posting on stackoverflow? I’m not an expert at debugging workstations, sorry.
Hello Sir, thanks for the tutorial
I have installed mtcnn using pip install mtcnn in anaconda prompt
I am getting following error while running my program
No module named ‘mtcnn.mtcnn’; ‘mtcnn’ is not a package
Thank you for helping me!
You must also run your code from the command line.
my camera is responding very slowly while i am using mtcnn . But works smoothly with cascade classifier.
Perhaps try processing fewer frames?
Hy ,
If I want to classify the gender from these detected faces, how I can do that? Can you please guide me or share any helping link to classify the gender from these detected faces?
Start by preparing a dataset of male and female faces.
Then model the problem as binary classification:
https://machinelearningmastery.com/how-to-develop-a-convolutional-neural-network-to-classify-photos-of-dogs-and-cats/
Hye,
Please help me. I want to crop each detected face and write them in repository. How I can crop each detected face ?
Actually, I am working on facial expression classifier. Where I will pass each cropped face to my image classifier to get desirous output. How I can crop each detected face and save them in local repository.
I show at the end of the tutorial how to crop the faces.
You can then directly save the images.
Great Article!
Just curious to know how mtcnn performs compared to other face detection models like dlib(not sure if dlib is a deep learning model). I can see that mtcnn just points to the centre of ‘keypoints’, does it support perdicting the whole set of facial landmark indexes?
Good question, perhaps someone has performed a direct comparison study.
I’d encourage you to search of google scholar.
Hy,
I am facing an issue. Actually, I have an image of class room (you can imagine how students sit in class room). The deep learning model is performing very well to detect the faces in the image. But the issue is, in some cases the faces are overlap to each other. I mean in some cases just eyes, ears or head is visible and the model is marking them as faces (by drawing rectangles). But when I extract regions of interest, that is not a face (just eyes or just head). How I can only mark those faces as valid faces, in which faces are completely visible, because the DL face detector is also marking those faces as a face, in which just eyes (or small part of face is available).
Can you please help me out?
Perhaps you can develop a second model to classify whether the faces are complete or not?
Do you really think that will it be an efficient approach to develop a second model to cross check that either it is complete face or not? If yes, then can you please suggest that what should be approach to cross check the face?
Actually, I am working on expression classifier, where I pass these all detected face to the facial expression classification model. So I have stuck on that point. Can you please suggest me a solution?
Thanks
It is the first idea that came into my head. Perhaps try a range of approaches.
I am getting an error
from mtcnn.mtcnn import MTCNN

ModuleNotFoundError: No module named 'mtcnn.mtcnn'; 'mtcnn' is not a package
I am running from command prompt
You must install the mtcnn library, e.g. via pip.
Resolved this error I faced. Refer this stackoverflow link: https://stackoverflow.com/questions/32680081/importerror-after-successful-pip-installation
Happy to hear that.
Hi Jason
Let me start by appreciating the brilliant work you are doing, keep the good work up. Do you have any material on graph neural nets, it could be Graph Reccurent Neural Nets for regressions or Graph Convolution Neural Networks for image classification. Thank you in advance.
Thanks!
I don’t have tutorials on the topic, thanks for the suggestion.
Hi Jason, why does the provided
example.pyuse cv2 methods and your driver programs do not?What is example.py?
https://github.com/ipazc/mtcnn/blob/master/example.py
The BGR of cv2 has to be converted to RGB for mtcnn do its best work.
My other question is can you list up a few other open source implementations where I can do some transfer learning on my own dataset?
I saw in other comments above you are suggesting to build a classifier on top of this particular model by using outputs as inputs to classifier?
“using outputs as inputs to classifier” -> this is not transfer learning but you mean running for example a face recognition algorithm on the discovered bounding boxes I think.
I noticed that this version of mtcnn is very weak on even frontal faces oriented sideways (person lying down on the ground) so am going to now use cv2.flip on y axis and rotate by 90, 180 and 270 degrees (total of 8 images) and then outputting the image with highest number of faces detected (or closest to actual).
if no transfer learning available, are there any parameters that we can adjust for confidence level, number of boxes on a particular face, etc for MTCNN so we have some control over the output?
No need for transfer learning, you can use the existing models to create face embeddings for face recognition tasks.
I give an example here:
https://machinelearningmastery.com/how-to-develop-a-face-recognition-system-using-facenet-in-keras-and-an-svm-classifier/
Have you seen this? https://github.com/TencentYoutuResearch/FaceDetection-DSFD
Their results are impressive and I can concur that I am getting much better results without any flipping or rotation of images.
I have not, thanks for the link.
I’m getting so many deprecated error. Can you give version numbers or requirements.txt ?
Yes, Keras 2.2.4 is overdue for an update.
You can safely ignore the warnings for now.
Everything worked like charm and thank you for the great tutorial.
Intending to move on to face identification. How to identify faces of say my friends in a group? With only handful of photos available, I would have thought there will be a need to fabricate many images of same person for training purposes. Is there an efficient way?
Kindly advise. Thanks again.
I give an example here:
https://machinelearningmastery.com/how-to-develop-a-face-recognition-system-using-facenet-in-keras-and-an-svm-classifier/
Awesome post, thanks for sharing.
Thanks.
Alright, a fantastic read! So glad people are working for advancing technology! Open source is a mystic! However, could we label each face and use it to train another model? Like in the Tensorflow Object Detection API?
I’m not familiar with that API, sorry.
Kindly give the code for R too.
Thanks for the suggestion.
AWESOME as always. thanks for this!
You’re welcome, I’m glad it helped.
Sir how to store the extracted images obtained from the code into a file using deep learning technique??
You can save an image using Pillow:
https://machinelearningmastery.com/how-to-load-and-manipulate-images-for-deep-learning-in-python-with-pil-pillow/
x1, y1, width, height = result_list[i][‘box’]
x2, y2 = x1 + width, y1 + height
plt.subplot(1, len(result_list), i+1)
plt.axis(‘off’)
# plot face
img=plt.imshow(data[y1:y2, x1:x2])
plt.savefig(“C:/Users/Sukirtha/Desktop/”+str(i)+”.jpg”)
Sir the image obtained from the imshow need to be stored in a file (like if the picture contains two images with faces the two images need to be cropped and stored as seperate images in a file).How to perform this here in the code given?
Sorry, I don’t have the capacity to write custom code for you.
I believe the tutorial here will guide you on now to save images:
https://machinelearningmastery.com/how-to-load-convert-and-save-images-with-the-keras-api/
When I run the code, it is detecting only one face. What can I do to tackle this issue?
I’m sorry to hear that, I have some suggestions here:
https://machinelearningmastery.com/faq/single-faq/why-does-the-code-in-the-tutorial-not-work-for-me
Hey Jason Brownlee! Do we need to run everything in anaconda terminal? I mean, where do we write this code and run it?
I recommend writing/saving code in a text file with a text editor like sublime:
https://machinelearningmastery.com/machine-learning-development-environment/
Then run from the command line as a script:
https://machinelearningmastery.com/faq/single-faq/how-do-i-run-a-script-from-the-command-line
Thanks for the feedback dude!
You’re welcome!
Hi,
Thanks for the article.
I am a machine learning student at San Jose State University. I am planning to do a project on graffiti detection and classification. I am planning to classify graffiti as Human, animal, text or other objects.
will I be able to that with your book on Deep learning and computer vision? or Do you recommend any other article or model
That sounds like a fun project!
Perhaps you can model it as object detection or perhaps simple image classification.
The tutorials here will help you to get started:
https://machinelearningmastery.com/start-here/#dlfcv
Hello , What to do if only one face need to detect?
You can use the same system.
What problem are you having exactly?
Can I use Haar Cascade to identify name of people in a picture or video from camera?
It finds faces, you can then use a classifier to map faces to names:
https://machinelearningmastery.com/how-to-develop-a-face-recognition-system-using-facenet-in-keras-and-an-svm-classifier/
Hi, I am looking to implement voila-jones method without using OpenCV i.e i want to write a python program for all the steps and train it on a training set but i want it to use as a classifier later on to detect face in the image.I want to know how can i acheive this without using OpenCV.
I don’t know of the cuff Andy, sorry.
Dear Jason, thank you very much for such informative article!
I would appreciate it a lot if you can share your opinion in what approach would be the best for solving the following task: neural network has to be able to define if uploaded photo (ID photos) correspond to the following requirements or not:
– eyes are opened
– mouth is closed
– head is not rotated/ tilted
– if there are sunglasses then eyes have to be seen well
– no foreign objects (including hats)
– there is only one person on the photo
It would be great if you can give your professional recommendation on how to train a neural network in this case as well. What are the photos that should be contained in a dataset and what is the size of dataset?
Thanks.
I think you need a good dataset with many examples of each aspect to detect.
Perhaps object detection?
Perhaps simple image classification?
Maybe try a few approaches and see what works best for your dataset?
Is there a good architecture to detect facial emotions.
Good question. I don’t know. Perhaps search on google scholar?
Sir i am having the following error
File “C:\Users\91798\Anaconda3\lib\site-packages\mtcnn\mtcnn.py”, line 187, in __init__
config = tf.ConfigProto(log_device_placement=False)
AttributeError: module ‘tensorflow’ has no attribute ‘ConfigProto’
why is that ?
Perhaps confirm that you are using TensorFlow version 1.14.
Sir, I want to work on multilingual character recognition. Sir, my question is how to combine two datasets into one large Scale Dataset and train them. Please reply to me. I will be very thankful to you.
Sorry, I don’t have an example of this. I can’t give you useful advice off the cuff.
Hi Jason,
I wanted to know if we can use the MTCNN as a pre-trained model in keras, so that I could train the final few layers on my training dataset and then apply it to the test dataset.
Perhaps.
I don’t have an example of transfer learning with MTCNN, sorry.
Hy,
Hope you will be well.
I am using MTCNN for picture containing multiple faces, it successfully detects all the faces. But I have to work with multiple faces detection in live video stream. But on live video stream, the model is not performing well. Hardly detecting single face (just frontal face). Can you please suggest that what should I use to detect multiple faces in live video streaming. . . .?
Perhaps there is a difference in the preparation or size of the images?
Perhaps compare to classical methods?
HY,
I have experienced on variety of image sizes, but all in vain. MTCNN detects few (2, 3) faces, just with frontal pose in live video stream. I have also tested it by reducing the FPS rate but all in vein.
Can you please suggest / recommend optimal frame size or FPS in video streaming? OR Is there any recommendation from your side for some different model to get best accuracy of face detection on video? Thanks in anticipation for your cooperation. . .
Sorry, I don’t have good advice, other than careful and systematic experimentation.
May I also know how to prepare algorithms for the above codes, as they were very help full
What do you mean exactly?
make i know how to use the same method for real time face detection ?
I hope to cover this in the future.
Perhaps use the model with images captured from a camera?
Great tutorial sir… Can you proceed this tutorial to recognize face on a dataset?
Yes, see this tutorial:
https://machinelearningmastery.com/how-to-develop-a-face-recognition-system-using-facenet-in-keras-and-an-svm-classifier/
Hello sir how can we align the faces for the extracted faces? Bascially, how to use face alignment?
What is face alignment?
Thanks for your great explanation.
You’re welcome.
Can I count the number of faces detected using mtcnn? If yes how to do it?
It provides an array of faces, enumerate the array to see how many were detected.
Superb Tutorial Jason!, this seems to help most of us struggling with face_detection problems.
I just wanted to understand that the above model once re-written for tensorflow 2.2 will be more efficient(faster) as TF 2.2 comes with lot of bells and whistles?
Thanks.
No, it would be functionally no different.
Hello and thank you for this clear tutorial.
You mentioned that the mtcnn can use pre-trained weights as well as training using my own data set. (“there are open source implementations of the architecture that can be trained on new datasets, as well as pre-trained models that can be used directly for face detection”).
I didn’t understand from those paragraphs, can the ipazc/mtcnn be used for training as well, or it is availeable using pre-trained model only?
Thanks
I believe you can use it for training. I have only used the pre-trained model.
Hallo Mr. Jason Brownlee, thank you so much for your tutorial for machine learning especially face detection. Can the haar cascade code use matplotlib like the MTCNN? Because I can’t see the result of bounding box of haar_cascade but in MTCNN code I can. Can you give the tutorial for Haar_cascade using matplotlib? Thank You 🙂
The above tutorial shows how to plot the result from the haar cascade. Perhaps re-read it?
The tutorial above when I detect Image more than 600px, it show too big and I can’t see the face and the bounding box. Different if I detect with the MTCNN tutorial that plotted by matplotlib. MTCNN tutorial will show the picture with ideal size so I can capture the result of face detection boundingbox and process time (that I add by myself). that why I need to try plotted by using matplotlib than just cv2
Perhaps try using smaller images.
Right, gives the good result with the right size. Thank you so much 🙂
You’re welcome.
I’m getting this error when i call the detect_face fn .
Any way to frix this?
AbortedError: Operation received an exception:Status: 2, message: could not create a descriptor for a softmax forward propagation primitive, in file tensorflow/core/kernels/mkl_softmax_op.cc:312
[[node model_3/softmax_3/Softmax (defined at /home/pillai/anaconda3/lib/python3.7/site-packages/mtcnn/mtcnn.py:342) ]] [Op:__inference_predict_function_1745]
Function call stack:
predict_function
I’m sorry to hear that, this may help:
https://machinelearningmastery.com/faq/single-faq/why-does-the-code-in-the-tutorial-not-work-for-me
Rahul,
Have you got any clue to resolve the “softmax forward propagation” issue?
Thanks,
Twarit
did you solve your problem? I am facing the same issue
same issue happened with conda env and conda-installed-tensorflow.
I made a venv(not conda env) and used ‘pip’ to install the packages and it worked!
Great tip.
AttributeError: module ‘tensorflow’ has no attribute ‘get_default_graph’
My tensorflow version is 2.0
Sorry to hear that, this may help:
https://machinelearningmastery.com/faq/single-faq/why-does-the-code-in-the-tutorial-not-work-for-me
Issue resolved!!!
I have created new environment with python 3.7.7 and tensorflow 2.0
It started working.
Well done!
error: OpenCV(4.1.2) /io/opencv/modules/objdetect/src/cascadedetect.cpp:1389: error: (-215:Assertion failed) scaleFactor > 1 && _image.depth() == CV_8U in function ‘detectMultiScale’
Im facing this error when im feeding my image to the detectMultiScale()
Sorry to hear that, perhaps confirm that open cv is installed correctly and is the latest version.
This work is useful for my thesis. Thank you so much Sir.
You’re very welcome.
Can I train the mtcnn model on my own set of images?
Perhaps, but why. It is really good at extracting faces already – why mess that up?
Use the model directly, no need to re-train it.
Hello sir, how to define with spesific dimension like (224px, 224px) for result width and height ?
Sorry, I don’t understand your question. Perhaps you could elaborate or rephrase?
Thank you sir, for such easily defined the problem
huge respect
You’re welcome.
Hi, are there any docs or examples of using just Haarcascades model for Hair Segmentation and Skin segmentation ?
There may be, sorry I don’t have tutorials on those specific topics.
HI, i am using MTCNN to detect the face fro my project, after the face detector, i want to remove the mtcnn from GPU, Can you please telll me how can i able to remove the MTCNN from GPU
mu MTCNN version is 0.1.0
The model will operate on CPU directly.
I have referred in the Task manager, the model is taking the GPU.
It takes the complete 8 GB of my GPU
I will attach the pic for reference
What will be the best Steps_thershold =[ , , ]
As per the source code the Steps_thershold =[ 0.6 , 0.7 , 0.7 ]
because different Steps_thershold =[ , , , ] will gives different Boundary box values
can you please clear it
Sorry, I don’t know what “Steps_thershold” refers to?
Sorry, I cannot help you with configuring GPUs. It is not my area of expertise.
Hey,
Do anyone has a working example of faces recognition using webcam/video.
if git repo is shared, i will wonder
thanks
I don’t have an example of working with video directly.
Great tutorial!
Thank you for this.
You’re welcome!
Hey I get this below error when i attempt to run the code for detecting faces. the very first part, and it seems as there is something wrong with how i handle the image or the detectmultiScale function. Thanks in advance!
cv version 4.5.1
Traceback (most recent call last):
File “C:/Users/Arngr/PycharmProjects/faceRec/FaceRecognition.py”, line 14, in
bboxes = classifier.detectMultiScale(pixels)
cv2.error: OpenCV(4.5.1) C:\Users\appveyor\AppData\Local\Temp\1\pip-req-build-kh7iq4w7\opencv\modules\objdetect\src\cascadedetect.cpp:1689: error: (-215:Assertion failed) !empty() in function ‘cv::CascadeClassifier::detectMultiScale’
Sorry to hear that, perhaps this will help:
https://machinelearningmastery.com/faq/single-faq/why-does-the-code-in-the-tutorial-not-work-for-me
Hi. Thanks for the article. Very insightful. I’m trying to implement this to proceed to detect facial emotions. I seem to be having a bit of a problem detecting faces in the entire dataset to be used as input in my CNN model for training. Do I need to create face embeddings? I keep getting this ‘list index out of range’ error. I could use some help. Thank you.
The list index out of range error is surely due to some issue with the code. The stack trace should tell you where it was hit. Be sure that the input dimension should match perfectly with what the function expects.
Hi, can we do the same things in tensorflow?
Surely. This post may help you start: https://machinelearningmastery.com/how-to-develop-a-face-recognition-system-using-facenet-in-keras-and-an-svm-classifier/
Hello Adrian! I’ve been studying a lot from your tutorials and I just did this one. I am interested in making a project and I would like to ask or discuss it with you if I may. I’m thinking of making a face detection from pictures and using the detected faces for training data, similar to your 5 Celebrity Faces project but I provided my own data. I have a bunch of personally collected pictures of a music group that I liked and I want to make their face detection/recognition model. Some pictures are consisted of a single person but some others are group pictures. Is it possible to use the detected faces from group pictures for training data or is it recommended to use single person pictures? How about for testing/validation data? I hope my questions are clear enough. I am still an amateur in machine learning so I apologize in advance for any misunderstandings. Thank you!
If you’re talking about face recognition, it should be only one face at a time. In a group picture, you need face detection first, then recognition. Think of this as an object detection problem on a larger picture first, then an object classification problem on the detected objects. But some advanced algorithms can do both at once.
Thanks for this tutorial, very helpful for my project.
I am however facing a problem when using an image taken from a thermal camera, when I run the code, it does not detect the person. But if i run the code with normal images, it is detected.
What do you think could likely be the reason why the algorithm can not detect a thermal image of a person? And any idea on how to fix this?
Or maybe the MTCNN algorithm is not just suitable for thermal images detection of a person?. If true, could you kindly suggest some other algorithms to detect a person? If you have tutorials on it as well, it will be will great if you can share the link as well.
Thanks.
Hi Vincent…While I cannot speak directly to your project, the following paper may be a great starting point:
http://uu.diva-portal.org/smash/get/diva2:1275338/FULLTEXT01.pdf
Thanks for the prompt response, I will look into it.
I was also asking to know aside from MTCNN and OpenCV that you used here for face detection, are there other algorithms for face detection? If yes, I will appreciate you share link to resources on them or just mention them and i can look them up.
Thanks.
thank you, it’s very helpful
i have question , when I build model for facial expression recognition model generally
can I use it for any application of facial expression recognition field? (particular field such as for detect anger of driver)
wonderful explanation and easy to start.
Could you tell me what’s the latest algorithm in face detection and what the improvements to be done to MTCNN?
Can one modify this to use it for product identification and product sourcing instead of facial recognition? Or does a program have to be completely redesigned for that?
Hi Tom…You could modify the training and testing datasets to train it for other purposes. This concept is called “transfer learning”:
https://machinelearningmastery.com/how-to-improve-performance-with-transfer-learning-for-deep-learning-neural-networks/
Hey Jason!
Great tutorial. Can I ask why you use data[y1:y2, x1:x2] instead of data[x1:x2, y1:y2]? Why is the y-axis the first rather than the usual x-as-the-first?
Hi Ian…The results should not matter in this case. Have you seen any issues with your results?