Data preparation is required when working with neural networks and deep learning models. Increasingly, data augmentation is also required on more complex object recognition tasks.
In this post, you will discover how to use data preparation and data augmentation with your image datasets when developing and evaluating deep learning models in Python with Keras.
After reading this post, you will know:
- About the image augmentation API provided by Keras and how to use it with your models
- How to perform feature standardization
- How to perform ZCA whitening of your images
- How to augment data with random rotations, shifts, and flips
- How to save augmented image data to disk
Kick-start your project with my new book Deep Learning With Python, including step-by-step tutorials and the Python source code files for all examples.
Let’s get started.
- Jun/2016: First published
- Update Aug/2016: The examples in this post were updated for the latest Keras API. The datagen.next() function was removed
- Update Oct/2016: Updated for Keras 1.1.0, TensorFlow 0.10.0 and scikit-learn v0.18
- Update Jan/2017: Updated for Keras 1.2.0 and TensorFlow 0.12.1
- Update Mar/2017: Updated for Keras 2.0.2, TensorFlow 1.0.1 and Theano 0.9.0
- Update Sep/2019: Updated for Keras 2.2.5 API
- Update Jul/2022: Updated for TensorFlow 2.x API with a workaround on the feature standardization issue
For an extended tutorial on the ImageDataGenerator for image data augmentation, see:
Keras Image Augmentation API
Like the rest of Keras, the image augmentation API is simple and powerful.
Keras provides the ImageDataGenerator class that defines the configuration for image data preparation and augmentation. This includes capabilities such as:
- Sample-wise standardization
- Feature-wise standardization
- ZCA whitening
- Random rotation, shifts, shear, and flips
- Dimension reordering
- Save augmented images to disk
An augmented image generator can be created as follows:
|
1 2 |
from tensorflow.keras.preprocessing.image import ImageDataGenerator datagen = ImageDataGenerator() |
Rather than performing the operations on your entire image dataset in memory, the API is designed to be iterated by the deep learning model fitting process, creating augmented image data for you just in time. This reduces your memory overhead but adds some additional time cost during model training.
After you have created and configured your ImageDataGenerator, you must fit it on your data. This will calculate any statistics required to actually perform the transforms to your image data. You can do this by calling the fit() function on the data generator and passing it to your training dataset.
|
1 |
datagen.fit(train) |
The data generator itself is, in fact, an iterator, returning batches of image samples when requested. You can configure the batch size and prepare the data generator and get batches of images by calling the flow() function.
|
1 |
X_batch, y_batch = datagen.flow(train, train, batch_size=32) |
Finally, you can make use of the data generator. Instead of calling the fit() function on your model, you must call the fit_generator() function and pass in the data generator and the desired length of an epoch as well as the total number of epochs on which to train.
|
1 |
fit_generator(datagen, samples_per_epoch=len(train), epochs=100) |
You can learn more about the Keras image data generator API in the Keras documentation.
Need help with Deep Learning in Python?
Take my free 2-week email course and discover MLPs, CNNs and LSTMs (with code).
Click to sign-up now and also get a free PDF Ebook version of the course.
Point of Comparison for Image Augmentation
Now that you know how the image augmentation API in Keras works, let’s look at some examples.
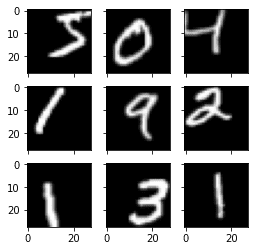
We will use the MNIST handwritten digit recognition task in these examples. To begin with, let’s take a look at the first nine images in the training dataset.
|
1 2 3 4 5 6 7 8 9 10 11 12 |
# Plot images from tensorflow.keras.datasets import mnist import matplotlib.pyplot as plt # load dbata (X_train, y_train), (X_test, y_test) = mnist.load_data() # create a grid of 3x3 images fig, ax = plt.subplots(3, 3, sharex=True, sharey=True, figsize=(4,4)) for i in range(3): for j in range(3): ax[i][j].imshow(X_train[i*3+j], cmap=plt.get_cmap("gray")) # show the plot plt.show() |
Running this example provides the following image that you can use as a point of comparison with the image preparation and augmentation in the examples below.
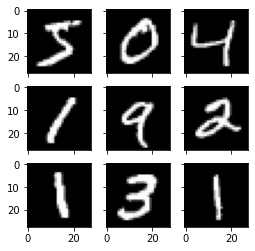
Example MNIST images
Feature Standardization
It is also possible to standardize pixel values across the entire dataset. This is called feature standardization and mirrors the type of standardization often performed for each column in a tabular dataset.
You can perform feature standardization by setting the featurewise_center and featurewise_std_normalization arguments to True on the ImageDataGenerator class. These are set to False by default. However, the recent version of Keras has a bug in the feature standardization so that the mean and standard deviation is calculated across all pixels. If you use the fit() function from the ImageDataGenerator class, you will see an image similar to the one above:
|
1 2 3 4 5 6 7 8 9 10 11 12 13 14 15 16 17 18 19 20 21 22 23 24 25 26 27 |
# Standardize images across the dataset, mean=0, stdev=1 from tensorflow.keras.datasets import mnist from tensorflow.keras.preprocessing.image import ImageDataGenerator import matplotlib.pyplot as plt # load data (X_train, y_train), (X_test, y_test) = mnist.load_data() # reshape to be [samples][width][height][channels] X_train = X_train.reshape((X_train.shape[0], 28, 28, 1)) X_test = X_test.reshape((X_test.shape[0], 28, 28, 1)) # convert from int to float X_train = X_train.astype('float32') X_test = X_test.astype('float32') # define data preparation datagen = ImageDataGenerator(featurewise_center=True, featurewise_std_normalization=True) # fit parameters from data datagen.fit(X_train) # configure batch size and retrieve one batch of images for X_batch, y_batch in datagen.flow(X_train, y_train, batch_size=9, shuffle=False): print(X_batch.min(), X_batch.mean(), X_batch.max()) # create a grid of 3x3 images fig, ax = plt.subplots(3, 3, sharex=True, sharey=True, figsize=(4,4)) for i in range(3): for j in range(3): ax[i][j].imshow(X_batch[i*3+j], cmap=plt.get_cmap("gray")) # show the plot plt.show() break |
For example, the minimum, mean, and maximum values from the batch printed above are:
|
1 |
-0.42407447 -0.04093817 2.8215446 |
And the image displayed is as follows:

Image from feature-wise standardization
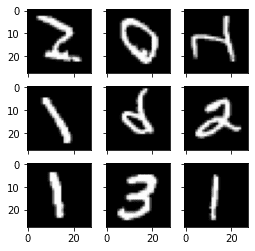
The workaround is to compute the feature standardization manually. Each pixel should have a separate mean and standard deviation, and it should be computed across different samples but independent from other pixels in the same sample. You just need to replace the fit() function with your own computation:
|
1 2 3 4 5 6 7 8 9 10 11 12 13 14 15 16 17 18 19 20 21 22 23 24 25 26 27 28 |
# Standardize images across the dataset, every pixel has mean=0, stdev=1 from tensorflow.keras.datasets import mnist from tensorflow.keras.preprocessing.image import ImageDataGenerator import matplotlib.pyplot as plt # load data (X_train, y_train), (X_test, y_test) = mnist.load_data() # reshape to be [samples][width][height][channels] X_train = X_train.reshape((X_train.shape[0], 28, 28, 1)) X_test = X_test.reshape((X_test.shape[0], 28, 28, 1)) # convert from int to float X_train = X_train.astype('float32') X_test = X_test.astype('float32') # define data preparation datagen = ImageDataGenerator(featurewise_center=True, featurewise_std_normalization=True) # fit parameters from data datagen.mean = X_train.mean(axis=0) datagen.std = X_train.std(axis=0) # configure batch size and retrieve one batch of images for X_batch, y_batch in datagen.flow(X_train, y_train, batch_size=9, shuffle=False): print(X_batch.min(), X_batch.mean(), X_batch.max()) # create a grid of 3x3 images fig, ax = plt.subplots(3, 3, sharex=True, sharey=True, figsize=(4,4)) for i in range(3): for j in range(3): ax[i][j].imshow(X_batch[i*3+j], cmap=plt.get_cmap("gray")) # show the plot plt.show() break |
The minimum, mean, and maximum as printed now have a wider range:
|
1 |
-1.2742625 -0.028436039 17.46127 |
Running this example, you can see that the effect is different, seemingly darkening and lightening different digits.
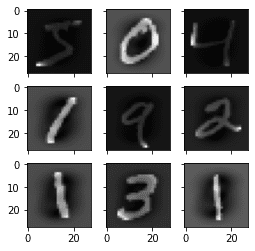
Standardized feature MNIST images
ZCA Whitening
A whitening transform of an image is a linear algebraic operation that reduces the redundancy in the matrix of pixel images.
Less redundancy in the image is intended to better highlight the structures and features in the image to the learning algorithm.
Typically, image whitening is performed using the Principal Component Analysis (PCA) technique. More recently, an alternative called ZCA (learn more in Appendix A of this tech report) shows better results in transformed images that keep all the original dimensions. And unlike PCA, the resulting transformed images still look like their originals. Precisely, whitening converts each image into a white noise vector, i.e., each element in the vector has zero mean and unit standard derivation and is statistically independent of each other.
You can perform a ZCA whitening transform by setting the zca_whitening argument to True. But due to the same issue as feature standardization, you must first zero-center your input data separately:
|
1 2 3 4 5 6 7 8 9 10 11 12 13 14 15 16 17 18 19 20 21 22 23 24 25 26 27 28 |
# ZCA Whitening from tensorflow.keras.datasets import mnist from tensorflow.keras.preprocessing.image import ImageDataGenerator import matplotlib.pyplot as plt # load data (X_train, y_train), (X_test, y_test) = mnist.load_data() # reshape to be [samples][width][height][channels] X_train = X_train.reshape((X_train.shape[0], 28, 28, 1)) X_test = X_test.reshape((X_test.shape[0], 28, 28, 1)) # convert from int to float X_train = X_train.astype('float32') X_test = X_test.astype('float32') # define data preparation datagen = ImageDataGenerator(featurewise_center=True, featurewise_std_normalization=True, zca_whitening=True) # fit parameters from data X_mean = X_train.mean(axis=0) datagen.fit(X_train - X_mean) # configure batch size and retrieve one batch of images for X_batch, y_batch in datagen.flow(X_train - X_mean, y_train, batch_size=9, shuffle=False): print(X_batch.min(), X_batch.mean(), X_batch.max()) # create a grid of 3x3 images fig, ax = plt.subplots(3, 3, sharex=True, sharey=True, figsize=(4,4)) for i in range(3): for j in range(3): ax[i][j].imshow(X_batch[i*3+j].reshape(28,28), cmap=plt.get_cmap("gray")) # show the plot plt.show() break |
Running the example, you can see the same general structure in the images and how the outline of each digit has been highlighted.
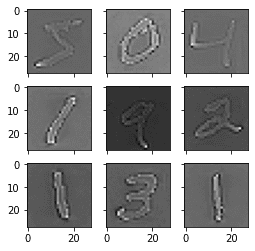
ZCA whitening MNIST images
Random Rotations
Sometimes images in your sample data may have varying and different rotations in the scene.
You can train your model to better handle rotations of images by artificially and randomly rotating images from your dataset during training.
The example below creates random rotations of the MNIST digits up to 90 degrees by setting the rotation_range argument.
|
1 2 3 4 5 6 7 8 9 10 11 12 13 14 15 16 17 18 19 20 21 22 23 24 |
# Random Rotations from tensorflow.keras.datasets import mnist from tensorflow.keras.preprocessing.image import ImageDataGenerator import matplotlib.pyplot as plt # load data (X_train, y_train), (X_test, y_test) = mnist.load_data() # reshape to be [samples][width][height][channels] X_train = X_train.reshape((X_train.shape[0], 28, 28, 1)) X_test = X_test.reshape((X_test.shape[0], 28, 28, 1)) # convert from int to float X_train = X_train.astype('float32') X_test = X_test.astype('float32') # define data preparation datagen = ImageDataGenerator(rotation_range=90) # configure batch size and retrieve one batch of images for X_batch, y_batch in datagen.flow(X_train, y_train, batch_size=9, shuffle=False): # create a grid of 3x3 images fig, ax = plt.subplots(3, 3, sharex=True, sharey=True, figsize=(4,4)) for i in range(3): for j in range(3): ax[i][j].imshow(X_batch[i*3+j].reshape(28,28), cmap=plt.get_cmap("gray")) # show the plot plt.show() break |
Running the example, you can see that images have been rotated left and right up to a limit of 90 degrees. This is not helpful on this problem because the MNIST digits have a normalized orientation, but this transform might be of help when learning from photographs where the objects may have different orientations.
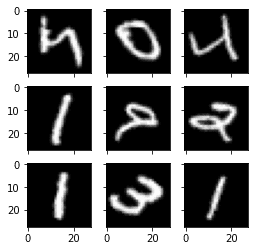
Random rotations of MNIST images
Random Shifts
Objects in your images may not be centered in the frame. They may be off-center in a variety of different ways.
You can train your deep learning network to expect and currently handle off-center objects by artificially creating shifted versions of your training data. Keras supports separate horizontal and vertical random shifting of training data by the width_shift_range and height_shift_range arguments.
|
1 2 3 4 5 6 7 8 9 10 11 12 13 14 15 16 17 18 19 20 21 22 23 24 25 |
# Random Shifts from tensorflow.keras.datasets import mnist from tensorflow.keras.preprocessing.image import ImageDataGenerator import matplotlib.pyplot as plt # load data (X_train, y_train), (X_test, y_test) = mnist.load_data() # reshape to be [samples][width][height][channels] X_train = X_train.reshape((X_train.shape[0], 28, 28, 1)) X_test = X_test.reshape((X_test.shape[0], 28, 28, 1)) # convert from int to float X_train = X_train.astype('float32') X_test = X_test.astype('float32') # define data preparation shift = 0.2 datagen = ImageDataGenerator(width_shift_range=shift, height_shift_range=shift) # configure batch size and retrieve one batch of images for X_batch, y_batch in datagen.flow(X_train, y_train, batch_size=9, shuffle=False): # create a grid of 3x3 images fig, ax = plt.subplots(3, 3, sharex=True, sharey=True, figsize=(4,4)) for i in range(3): for j in range(3): ax[i][j].imshow(X_batch[i*3+j].reshape(28,28), cmap=plt.get_cmap("gray")) # show the plot plt.show() break |
Running this example creates shifted versions of the digits. Again, this is not required for MNIST as the handwritten digits are already centered, but you can see how this might be useful on more complex problem domains.
Random shifted MNIST images
Random Flips
Another augmentation to your image data that can improve performance on large and complex problems is to create random flips of images in your training data.
Keras supports random flipping along both the vertical and horizontal axes using the vertical_flip and horizontal_flip arguments.
|
1 2 3 4 5 6 7 8 9 10 11 12 13 14 15 16 17 18 19 20 21 22 23 24 |
# Random Flips from tensorflow.keras.datasets import mnist from tensorflow.keras.preprocessing.image import ImageDataGenerator import matplotlib.pyplot as plt # load data (X_train, y_train), (X_test, y_test) = mnist.load_data() # reshape to be [samples][width][height][channels] X_train = X_train.reshape((X_train.shape[0], 28, 28, 1)) X_test = X_test.reshape((X_test.shape[0], 28, 28, 1)) # convert from int to float X_train = X_train.astype('float32') X_test = X_test.astype('float32') # define data preparation datagen = ImageDataGenerator(horizontal_flip=True, vertical_flip=True) # configure batch size and retrieve one batch of images for X_batch, y_batch in datagen.flow(X_train, y_train, batch_size=9, shuffle=False): # create a grid of 3x3 images fig, ax = plt.subplots(3, 3, sharex=True, sharey=True, figsize=(4,4)) for i in range(3): for j in range(3): ax[i][j].imshow(X_batch[i*3+j].reshape(28,28), cmap=plt.get_cmap("gray")) # show the plot plt.show() break |
Running this example, you can see flipped digits. Flipping digits is not useful as they will always have the correct left and right orientation, but this may be useful for problems with photographs of objects in a scene that can have a varied orientation.
Randomly flipped MNIST images
Saving Augmented Images to File
The data preparation and augmentation are performed just in time by Keras.
This is efficient in terms of memory, but you may require the exact images used during training. For example, perhaps you would like to use them with a different software package later or only generate them once and use them on multiple different deep learning models or configurations.
Keras allows you to save the images generated during training. The directory, filename prefix, and image file type can be specified to the flow() function before training. Then, during training, the generated images will be written to the file.
The example below demonstrates this and writes nine images to a “images” subdirectory with the prefix “aug” and the file type of PNG.
|
1 2 3 4 5 6 7 8 9 10 11 12 13 14 15 16 17 18 19 20 21 22 23 24 25 |
# Save augmented images to file from tensorflow.keras.datasets import mnist from tensorflow.keras.preprocessing.image import ImageDataGenerator import matplotlib.pyplot as plt # load data (X_train, y_train), (X_test, y_test) = mnist.load_data() # reshape to be [samples][width][height][channels] X_train = X_train.reshape((X_train.shape[0], 28, 28, 1)) X_test = X_test.reshape((X_test.shape[0], 28, 28, 1)) # convert from int to float X_train = X_train.astype('float32') X_test = X_test.astype('float32') # define data preparation datagen = ImageDataGenerator(horizontal_flip=True, vertical_flip=True) # configure batch size and retrieve one batch of images for X_batch, y_batch in datagen.flow(X_train, y_train, batch_size=9, shuffle=False, save_to_dir='images', save_prefix='aug', save_format='png'): # create a grid of 3x3 images fig, ax = plt.subplots(3, 3, sharex=True, sharey=True, figsize=(4,4)) for i in range(3): for j in range(3): ax[i][j].imshow(X_batch[i*3+j].reshape(28,28), cmap=plt.get_cmap("gray")) # show the plot plt.show() break |
Running the example, you can see that images are only written when they are generated.
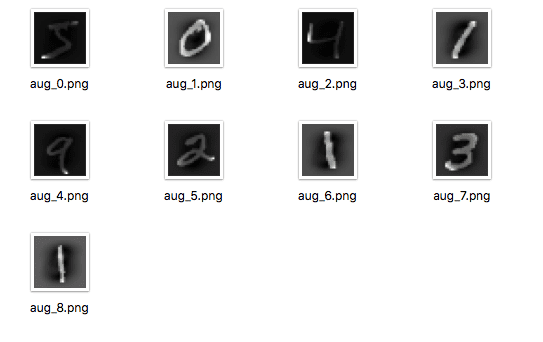
Augmented MNIST images saved to file
Tips for Augmenting Image Data with Keras
Image data is unique in that you can review the data and transformed copies of the data and quickly get an idea of how the model may perceive it.
Below are some tips for getting the most from image data preparation and augmentation for deep learning.
- Review Dataset. Take some time to review your dataset in great detail. Look at the images. Take note of image preparation and augmentations that might benefit the training process of your model, such as the need to handle different shifts, rotations, or flips of objects in the scene.
- Review Augmentations. Review sample images after the augmentation has been performed. It is one thing to intellectually know what image transforms you are using; it is a very different thing to look at examples. Review images both with individual augmentations you are using as well as the full set of augmentations you plan to use. You may see ways to simplify or further enhance your model training process.
- Evaluate a Suite of Transforms. Try more than one image data preparation and augmentation scheme. Often you can be surprised by the results of a data preparation scheme you did not think would be beneficial.
Summary
In this post, you discovered image data preparation and augmentation.
You discovered a range of techniques you can use easily in Python with Keras for deep learning models. You learned about:
- The ImageDataGenerator API in Keras for generating transformed images just in time
- Sample-wise and Feature-wise pixel standardization
- The ZCA whitening transform
- Random rotations, shifts, and flips of images
- How to save transformed images to file for later reuse
Do you have any questions about image data augmentation or this post? Ask your questions in the comments, and I will do my best to answer.


Interesting tutorial.
I’m working through the step to standardize images across the dataset and run into the following error:
AttributeError Traceback (most recent call last)
in ()
18 datagen.flow(X_train, y_train, batch_size=9)
19 # retrieve one batch of images
—> 20 X_batch, y_batch = datagen.next()
21 # create a grid of 3×3 images
22 for i in range(0, 9):
AttributeError: ‘ImageDataGenerator’ object has no attribute ‘next’
I have checked the Keras documentation and see no mention of a next attribute.
Perhaps I’m missing something.
Thanks for the great tutorials!
Yep, the API has changed. See:
https://keras.io/preprocessing/image/
I will update all of the examples ASAP.
UPDATE: I have updated all examples in this post to use the new API. Let me know if you have any problems at all.
Works like a charm! Thanks
Glad to hear it Andy.
for X_batch, y_batch in datagen.flow(X_train, y_train, batch_size=9):
File “/usr/local/lib/python2.7/dist-packages/keras/preprocessing/image.py”, line 475, in next
x = self.image_data_generator.random_transform(x.astype(‘float32’))
File “/usr/local/lib/python2.7/dist-packages/keras/preprocessing/image.py”, line 346, in random_transform
fill_mode=self.fill_mode, cval=self.cval)
File “/usr/local/lib/python2.7/dist-packages/keras/preprocessing/image.py”, line 109, in apply_transform
x = np.stack(channel_images, axis=0)
AttributeError: ‘module’ object has no attribute ‘stack’
how to solve this error …?
I have not seen an error like that before. Perhaps there is a problem with your environment?
Consider re-installing Theano and/or Keras.
i solved this error by updating numpy version ….previously it 1.8.0..now 1.11.1..it means it should be more than 1.9.0
Great, glad to here it narayan.
Now i have question that how to decide value for this parameter So that i can get good testing accuracy ..i have training dataset with 110 category with 32000 images ..
featurewise_center=False,
samplewise_center=False,
featurewise_std_normalization=False,
samplewise_std_normalization=False,
zca_whitening=False,
rotation_range=0.,
width_shift_range=0.,
height_shift_range=0.,
shear_range=0.,
zoom_range=0.,
channel_shift_range=0.,
fill_mode=’nearest’,
cval=0.,
horizontal_flip=False,
vertical_flip=False,
rescale=None,
dim_ordering=K.image_dim_ordering()
Waiting for your positive reply…
My advice is to try a suite of different configurations and see what works best on your problem.
Thanks a lot.
all worked fine except the last code to save images to file, I got the following exception
Walids-MacBook-Pro:DataAugmentation walidahmed$ python augment_save_to_file.py
Using TensorFlow backend.
Traceback (most recent call last):
File “augment_save_to_file.py”, line 20, in
for X_batch, y_batch in datagen.flow(X_train, y_train, batch_size=9, save_to_dir=’images’, save_prefix=’aug’, save_format=’png’):
File “/usr/local/lib/python2.7/site-packages/keras/preprocessing/image.py”, line 490, in next
img = array_to_img(batch_x[i], self.dim_ordering, scale=True)
File “/usr/local/lib/python2.7/site-packages/keras/preprocessing/image.py”, line 140, in array_to_img
raise Exception(‘Unsupported channel number: ‘, x.shape[2])
Exception: (‘Unsupported channel number: ‘, 28)
Any advice?
thanks again
Double check your version of Keras is 1.1.0 and TensorFlow is 0.10.
Hello Jason,
Thanks a lot for your tutorial. It is helping me in many ways.
I had question on mask image or target Y for training image X
Can i also transform Y along with X. Helps in the case of training for segmentation
I managed to do it.
datagen = ImageDataGenerator(shear_range=0.02,dim_ordering=K._image_dim_ordering,rotation_range=5,width_shift_range=0.05, height_shift_range=0.05,zoom_range=0.3,fill_mode=’constant’, cval=0)
for samples in range(0,100):
seed = rd.randint(low=10,high=100000)
for imags_batch in datagen.flow(imgs_train,batch_size=batch_size,save_to_dir=’augmented’,save_prefix=’aug’,seed=seed,save_format=’tif’):
print(‘-‘)
break
for imgs_mask_batch in datagen.flow(imgs_mask_train, batch_size=batch_size, save_to_dir=’augmented’,seed=seed, save_prefix=’mask_aug’,save_format=’tif’):
print(‘|’)
break
print((samples+1)*batch_size)
This is great stuff but I wonder if you could provide an example like this with an RGB image with three channels? I am getting some really buggy results personally with this ImageGenerator.
Great suggestion, thanks Addie.
I wonder what
channel_shift_rangeis about. The doc says “shift range for each channels”, but what does this actually mean? Is it adding a random value to each channel or doing something else?I have not used this one yet, sorry Lucas.
You could try experimenting with it or dive into the source to see what it’s all about.
Hi,
Thanks for the post. I’ve one question i.e., we do feature standardization in the training set, so while testing, we need those standardized values to apply on testing images ?
Yes Indra, any transforms like standardization performed on the data prior to modeling will also need to be performed on new data when testing or making predictions.
In the case of standardization, we need to keep track of means and standard deviations.
Thanks again Jason. Why do we subplot 330+1+i? Thanks
This is matplotlab syntax.
The 33 creates a grid of 3×3 images. The number after that (1-9) indicates the position in that grid to place the next image (left to right, top to bottom ordering).
I hope that helps.
How do I save the augmented images into a directory with a class label prefix or even better into a subdirectory of class name?
Great question Vineeth,
You can specify any directory and filename prefix you like in the call to flow()
can we augment data of a particular class. I mean images of a class which are less, to deal with the class imbalance problem.
Great idea.
Yes, but you may need to prepare the data for each class separately.
Hi Jason,
Thanks for your post!
I have a question: Does this apply to image data with RGBXYZ for each pixel?
Each of my input image is of six channels including RGB and XYZ (world coordinate), which was acquired from an organized point cloud by PCL(Point Cloud Library). I am wondering whether there is a correct way to do data augmentation for my images.
I think ImageDataGenerator might be correct only for RGB images? Because when you shift/rotate/flip the RGB image, it means camera movement indeed, and the XYZ coordinates should be changed as well.
Thanks.
Hi Lebron, I believe this specific API is intended for 3d pixel data. You might be able to devise your own similar domain-specific transforms for you own data.
Thanks Jason!
To confirm, do you mean image with RGB only by “3d pixel data”? And if I have more channels, I have to do all the augmentation by myself, rather than using Keras API?
Yes, I believe that to be the case, but I could be wrong.
When I use zoom_range of 0.2 and inspect the output images, it seems to zoom h and v axes independently. However I want to have a small amount of zoom variation while preserving the aspect ratio of the images.
Also, when I specify a rotation_range, the rotated images have aliasing artefacts. Is there any way to specify rotations with antialiasing?
I’m not sure off hand.
Do you think these concerns will affect the skill of the model?
Thanks Jason,
Aspect ratio of the image is important in a facial recognition setting. Antialiasing of rotated images I’m not so sure about, but as they are small images (244 x 244) it doesn’t make sense to degrade them further.
I can modify my own copy of the Keras code to maintain the aspect ratio of the zoom and should be able to substitute PIL’s rotation function, which does antialiasing, for the one used in Keras.
Keep up the good work, your writing has really helped me get up to speed with Keras quickly
Very nice Brian.
Let me know how you go.
Hi Brian.
The transformations in ImageGenerator are applied using [scipy.ndimage.interpolation.affine_transform](https://docs.scipy.org/doc/scipy-0.14.0/reference/generated/scipy.ndimage.interpolation.affine_transform.html), with “order” (the order of spline used for interpolation) set to zero.
Change this to one for linear interpolation or higher for higher orders.
Hi Jason,
Thank you for your post! Very clear!
I am trying to use ImageDataGenerator now. But if I want to apply feature standardization to unseen data in the future, I need to save the ImageDataGenerator to disk, right? Any suggestion to do it? Thanks a lot.
That is correct, or you can standardize manually and just save the coefficients used.
Hi Jason
I using Keras 2.x ‘tf’ seeting.
Why I can’t using
X_batch, y_batch = datagen.flow(train, train, batch_size=32)
For example :
from keras.datasets import mnist
from keras.preprocessing.image import ImageDataGenerator
# load data
(X_train, y_train), (X_test, y_test) = mnist.load_data()
# reshape to be [samples][pixels][width][height]
X_train = X_train.reshape(X_train.shape[0], 28, 28,1)
X_test = X_test.reshape(X_test.shape[0], 28, 28,1)
# convert from int to float
X_train = X_train.astype(‘float32’)
X_test = X_test.astype(‘float32’)
# define data preparation
datagen = ImageDataGenerator(featurewise_center=True, featurewise_std_normalization=True)
# fit parameters from data
datagen.fit(X_train)
# configure batch size and retrieve one batch of images
X_batch, y_batch = datagen.flow(X_train, y_train, batch_size=9)
Can you tell me why?
Thanks!
What error do you get exactly?
Hi, Hason
The error message is :
too many values to unpack (expected 2)
I’m sorry I have not seen this error before, I do not have any good suggestions.
# load data
(X_train, y_train), (X_test, y_test) = mnist.load_data()
I think this should be done without the brackets around the train and test pairs:
# load data
X_train, y_train, X_test, y_test = mnist.load_data()
It is returning four things, but you are only accepting the two tuples.
Hi Jason,
I have training data of the shape (2000,4,100,100) which means 2000 samples of the size 100×100 with 4 channels and dtype= uint8, stored as ‘.npy’ file. Can I use Image Augmentation technique on such data?
You may, try it and see.
Hi Jason,
Since I used the fit_generator method instead of fit(), I need to use evaluate_generator in order to correctly evaluate the model or not? Is the same for predict_generator? I’m a little confused.
Hi Jason,
I have a quick question about the image augmentation. I am attempting to greatly increase the size of my training data set using data augmentation in order to increase my segmentation accuracy. Does the image generator feed multiple augmentations of the same image to the model or does it just return a single augmented version instead of the original? There seems to be no way to modify the number of augmented images the Image Data Generator actually returns.
Never mind, I found my answer in the Keras documentation.
Glad to hear it.
Great question.
From the doc: “The data will be looped over (in batches) indefinitely.”
https://keras.io/preprocessing/image/
Also, if for example I have multiple options set in the data augmentation generator. Will it create a lot of different combinations of the data? For example:
– original data;
– shifted data;
– rotated data;
– noisy data;
– shifted + rotated data;
– shifted + noisy data;
– shifted + rotated + noisy data, etc.
Or will it only create one set of all the transforms created together, i.e:
– shifted + rotated + noisy data only;
If it is the latter, do you have any advice as to how should we combine different output results? Append them maybe in a list or something?
All the best,
a very good tutorial
It applies all of the specified transforms in creating the augmented data.
Hello Jason,
I made the exercice with your book which I find just great!!!
The problem is: it applies on randomly choosen images instead of doing it on the same ones from the “Point of comparison” sub-chapter. And always different samples.
How could I solve this?
I must say I don’t understand how it comes the “i” applies on the pyplot.subplot and on the X-batch[].
Thank you!!
Alice
Think of the augmented images as randomly modified versions of your training dataset. You have a new dataset with lots of variations of the data you provided. You do not need to tie them back to the original examples.
Or perhaps I misunderstand your question?
I think the problem of Alice is the same as mine, the data that are plotted after each modification are never the same, which is difficult to make a comparison because they change everytime.
For example :
-the first plot gives me : 5 6 3, 0 1 9, 2 3 1
– after the ZCA whitening i have : 2 3 8, 3 2 5, 0 1 7
Yes, by design, the augmentation will create different augmented versions of the images each time it is called.
This is what we want, so the model does a better job of generalizing.
What is the problem exactly, could you help me to understand please?
Hello Jason,
I have the same problem as Alice. I think that what she was saying was that the pictures that she plot after random modifications are never the same
It looks like the 9 pictures that are plotted are chosen randomly everytime.
It would be nice if you could answer me on this problem,
Thank you !
Yes, this is by design. This is exactly what we want from image augmentation.
If you want to preserve the order of the original dataset, use the shuffle parameter in the flow method:
…
for X_batch, y_batch in datagen.flow(X_train, y_train, batch_size=9, shuffle=False):
…
Hi,
When I run the above script, I get this error:
Using TensorFlow backend.
C:\Users\sacheu\AppData\Local\Programs\Python\Python35\lib\site-packages\keras\preprocessing\image.py:653: UserWarning: Expected input to be images (as Numpy array) following the data format convention “channels_first” (channels on axis 1), i.e. expected either 1, 3 or 4 channels on axis 1. However, it was passed an array with shape (60000, 1, 28, 28) (1 channels).
‘ (‘ + str(x.shape[self.channel_axis]) + ‘ channels).’)
can you please tell me how to fix it?
i think i have the latest version of the libraries. And I am using python 3.5.
Thank you.
You could try changing the order of the channels in code or in the Keras configuration file.
For example, in code:
Or if this is the cause, comment it out.
I have the same problem. Nothing works.
The message is a warning, and I still get the output images, but i.e. Feature Standardization is black and white, not gray scaled. So I suppose it is not working?
When I try to comment it out or change the order from ‘th’ to ‘tf’ – it completely brakes. The message is: … (28 channels)
I am new and any comments are welcome.
Perhaps double check you have the latest version of Keras installed? 2.0.8 or 2.0.9?
(C:\ProgramData\Anaconda3) C:\ProgramData\Anaconda3\etc\conda\activate.d>set “KERAS_BACKEND=theano”
(C:\ProgramData\Anaconda3) C:\Users\Tom>conda install -c conda-forge keras Fetching package metadata ……………
Solving package specifications: .
# All requested packages already installed.
# packages in environment at C:\ProgramData\Anaconda3:
#
keras 2.0.6 py36_0 conda-forge
It looks like it is up to date. But..
I used this tutorial: https://machinelearningmastery.com/setup-python-environment-machine-learning-deep-learning-anaconda/ and typing:
import keras
print(‘keras: %s’ % keras.__version__)
gives me:
Using Theano backend.
keras: 2.0.6
but according to tutorial it should be:
Using TensorFlow backend.
keras: 1.2.1
You can change the backend used by Keras in the ~/.keras/keras.json configuration file.
Ok, at the moment I can say that:
– Those warning messages are just a warning. They are in each example. I do not know how to make them disappear, but it turns out that they are harmless.
– Example Feature Standardization is black and white, not gray scaled. Maybe there is an error in script? I am to novice to spot it.
– Other examples seems to work correctly despite the warning message. (So I just saw a warning, saw different output, spotted comment with similar problem and just stopped. My bad).
– I can write set “KERAS_BACKEND=tensorflow” to change the backend (I don’t know what does it means, but never mind 🙂 ).
– You are awesome for making those tutorials. Thank You!
Thanks.
Hi, thanks for your share. When I try to use zca-whitening and feature-wised centering on bigger data, I found it’s very very hard to get enough memory to do the fit() function. As the data-set has about 10000 pictures and 224*224 pixels, even generate a flow iterator will use full of my 16GB memory. When try to use fit() for zca-whitening,centering,normalization which the documents said have to use the fit() function, I never success. Will you give some advice for data preparation for bigger data? Thank you very much!
Are you able to use the flow_from_directory instead of loading it all into memory?
https://keras.io/preprocessing/image/
I have the same exact problem with MS-COCO and NUS-WIDE datasets and I have 128GB memory. The flow_from_directory() requires your data to be in a specific directory structure.
From the Keras v2.1.2 documentation…
directory: path to the target directory. It should contain one subdirectory per class.
MS-COCO and NUS-WIDE are not structured this way natively.
Also, Xiaojie was talking specifically about the fit() function, which is called before the flow (or flow_from_directory) function.
Hi Jason,
Thanks for this nice post. I have a quick question. I have large-dataset which I am loading to model using custom data-generator. I am using it in model.fit_generator(). Now I want to use data-augmentation. So my question is, how/where can I use keras ImageDataGenerator? Thank you very much.
I believe this tutorial will help:
https://blog.keras.io/building-powerful-image-classification-models-using-very-little-data.html
Hi
Shall we run both fit_transform with origin images set and with augmented ones separately ? Or shell we combine them into ơne. On the latter one how do we combine them ?
Thanks.
Steve
Just the augmented images.
Thanks Jason. Bought all of your ML books, love it ! Would you write one about Transfer Learning deep enough with ImageNet and few other so that we can re-use the pre-trained one for our own purpose ?
Thanks.
Thanks again for your support Steve.
Yes, I have a post scheduled on re-using the VGG model. It should appear on the blog soon.
Thanks for this great post !
In the Random Shifts part, can we have control on the file names ?
Is it possible to save files as:
‘aug’+original_file_name+’png’ ?
Thanks.
Yes, you can control the filenames. Perhaps the API will make it clearer:
https://keras.io/preprocessing/image/
thanks for your tutorial. When I try to use :
pred = model.predict_generator(data_gen.flow_from_directory(“../input/valid_img”, target_size=(input_size, input_size)))
I cannot get the image filename that correspond to the predicted probability. Is there any solutions?
The order of predictions will match the order of files in the directory I would expect.
I have check it, however, this is not the case since I got a pretty low accuracy compared to the val_acc. I found someone solving it by setting the batch_size to 1 when use predict_generator and ImageDataGenerator.flow_from_directory, but this is not what I want.
Hi Jason,
Do you have any idea about how we can apply the same idea on signals? I mean signal augmentation for Deep learning? Thank you
Not off hand. Consider how transforms can be used on your specific data to create new patterns. E.g. even just adding random noise is a good start.
Once the features have been centered, using featurewise_center=True in keras.preprocessing.image.ImageDataGenerator(), How can I retrieve that statistics so that I use it to preprocess the images to be used for prediction/testing during evaluate_generator() etc
Good question, I’m not sure off the cuff, perhaps post to Keras group or slack channel:
https://machinelearningmastery.com/get-help-with-keras/
Hi Jason,
Thank you very much for all the posts you shared, which are a very useful and help a lot.
I would like to ask if do you have an idea about implemented data augmentation algorithms for time series data(such as acceleration, AC voltage, …)
Thank you
Not at this stage, thanks for the suggestion.
Hi Jason, i have a question, suppose we have semantic segmentation task and we want to rotate and flip both the image and the output image labels, how do we apply the transformations? Should i concatenate the image and the labels to a homogeneous array and then apply the appropriate transformations?
Good question, you might want more control and apply augmentation one pair at a time.
Hi Jason,
Thank you for your nice post! How can I use augmentation to data that I have on my disk? I see you imported mnist and I could not realize how to change this for my purpose.
You can load the data via the augmentation API and use it to make an augmented version of your dataset. This augmentation could be used directly or saved to file.
hi Jason,
Quick question: after the images are augmented, your script saves them into smaller files. What if I want to stitch these augmented files into a single file, similar to the original mnist file so that I can use nmist.load_data() function to load them into, say a CNN engine? Would the following work?
nmist_new = []
for X_batch, y_batch in datagen.flow(X_train, y_train, batch_size=9):
# create a grid of 3×3 images
for i in range(0, 9):
nmist_new.append(array(X_batch, y_batch))
I am not sure what format should be used.
Good question, I think some experimentation would be required.
Perhaps use of numpy’s hstack and vstack to create a larger array from the image arrays?
Yeah, I think need some tweaks or look into Keras’ mnist_load() function how what the data format is when writing back. This link has the original data format:
http://yann.lecun.com/exdb/mnist/
Scroll down to the bottom for training and test dataset structures. They used some header information for each image. I think hstack and vstack are the way to go, but need to take care of those headers (think should be easy). I am still not sure what those “xxxx” mean. I think the files are just filled by the 28×28 small image data.
It might be easier to write your own progressive loading function. A heck of a lot simpler actually.
Dear Jason,
I used the code to generator featurewise standardized samples, but did not get the same result as shown in the web.
Tien
How was it different?
Hello Jason
i have a dataset of images (jpg not a csv file) and each class of this images is in a folder car in folder with name cat and dog with folder name dog so how can i apply a deep learning model on this data do i need image data generator ?
thank you
I think this tutorial will help:
https://blog.keras.io/building-powerful-image-classification-models-using-very-little-data.html
Your blog is awesome. Appreciate it.
Thanks.
Hello Jason,
I am a bit confused while understanding of “with image augmentation”
Assume:-
Total Training Image:- 10 (#X_train Image)
ImageDataGenerator(rotation_range=90) #Randomly Rotation
model.fit_generator(datagen.flow(x_train, y_train, batch_size=1),
steps_per_epoch=len(x_train) / 1, epochs=epochs)
Does it mean we are training model of 10 randomly rotated image ?
or Are we Training model 10 original images + 10 randomly rotated images with fit_generator () ?
I am assuming , We are training model with 10 randomly rotated image.
Q.1 Am i correct ?
Here I tried data augmentation on CIFAR10 (color Image, image[10])
But I am not getting proper output image after augmentation
https://pasteboard.co/HkvZLT1.png
Here is code:-
import matplotlib.pyplot as plt
from keras.preprocessing.image import ImageDataGenerator
x1=x_train[10:11,:,:,:]
y1=y_train[10:11,]
datagen = ImageDataGenerator(rotation_range=90)
print (x1.shape) #Shape (1, 32, 32, 3)
print (y1.shape) #Shape (1, 10)
plt.imshow(x1[0]) #Image 1
plt.show()
for x_batch,y_batch in datagen.flow(x1,y1, batch_size=1):
for i in range(0, 1):
plt.imshow(x_batch[i].reshape(32,32,3)) #Image 2
plt.show()
print (y_batch)
break
Jason, Could you please help ?
Thank you
10 randomly modified versions of 10 different images.
Got it.
I Tried to do rotation of 1 image. But when i am doing plt.show(), image is not properly displayed.
Here is image
https://pasteboard.co/HkvZLT1.png
Here is code:-
import matplotlib.pyplot as plt
from keras.preprocessing.image import ImageDataGenerator
x1=x_train[10:11,:,:,:]
y1=y_train[10:11,]
datagen = ImageDataGenerator(rotation_range=90)
print (x1.shape) #Shape (1, 32, 32, 3)
print (y1.shape) #Shape (1, 10)
plt.imshow(x1[0]) #Image 1
plt.show()
for x_batch,y_batch in datagen.flow(x1,y1, batch_size=1):
for i in range(0, 1):
plt.imshow(x_batch[i].reshape(32,32,3)) #Image 2
plt.show()
print (y_batch)
break
Thank you Jason
I don’t have any good suggestions sorry. Perhaps try posting your code and error on StackOverflow?
Hello. Thanks for the tutorial. It was so helpful. Actually, I have 3 questions:
1. When I use your code, the Mnist images change from one data augmentation method to the other. I mean, it’s performed on different 9 samples of digits each time. Do you know how to solve this problem? Because they need to be the same so that I can compare.
2. The first technique (standardization) doesn’t work for me. I get digits with the same luminosity: no darkening or lightening. Why is that? I just copied and pasted the code.
3. I need to do data augmentation on 3D medical images (DICOM format). Is it possible to do it using the ImageDataGenerator from Keras? Or is there a simple way to do it?
Thanks again.
Sorry, I don’t follow the first question.
Perhaps the code has changed?
Sorry, I don’t know about 3D images.
Dear Jason,
I want to know that how can I upload an image file in python which contains multiple images that is more than one images in a single file.Thanks for your precious time.
Sorry, I don’t have a specific example of this.
ok Thanx Sir for your time.
You’re welcome.
Hello.
I am running the examples in a Jupyter notebook and I don’t get to see the darkening and whitening that we see in this blog in section “Feature Standardization”. In this section, I also see different numbers every time I run it. I have double check the code to see that I am not missing anything.
Has anybody got the same results here?
Perhaps the API has changed?
Perhaps results are diffrent when running from the command line, as I would recommend?
Hi Jason!
Thanks for all your tutorials, you are doing great work bringing concepts forward to people wanting to learn!
I have a question with respect to data wrangling. I have always written my own small scripts that handle data loading. But what I’d actually like to do is prepare the data in a similar way to how for example the MNIST or CIFAR datasets are stored for Keras. I have read up on the format of the files etc, but I wonder, someone else must’ve written some code that does this for their own data, and surely they would’ve made it public. I’ve searched everywhere and can’t find it.
Basically, what I am looking for is a script that takes data in some structure (say data/train and data/validation subfolders) and prepares it in pickled batches like MNIST and CIFAR come, so that it can be easily shared and reused.
Do you have any leads for this?
Nice idea.
Not that I’m aware. I would expect you’ll have to code something custom for this.
Little update :
According to the doc (https://keras.io/preprocessing/image/#imagedatagenerator-class),
featurewise_center and featurewise_std_normalization are set False by default.
Thanks, perhaps the API has changed.
HI Jason,
How to rotate an image with exactly 90 degree. ImageDataGenerator produces images which randomly rotated. I want the images rotated exactly 90 degree. How to do that
Perhaps write code to pre-rotate and save the rotated images?
Hi Jason, I’m working on a classificator just for learn. I’m using sequence class to generate batches on my data and use multiprocessing function to training the model.
My problem is: ¿how can I fit this generator of augmentations and the generator that I’ve been created?. I mean this augmentation generator could be trained by:
And my generator of batches:
Can I mix this, doing something like:
history = model.fit_generator(train_datagen.flow(batcg_train)….
Thank You
I have an example of using a generator in this post that might provide a useful guide:
https://machinelearningmastery.com/develop-a-deep-learning-caption-generation-model-in-python/
Hi, Jason, thanks for this great tutorial.
Here I have a question for you, when I’m trying your example of feature standardization in my local computer, I see no changes related to darkening or lightening, the resulting images seems same. I cannot figure out why. By the way, in order to just compare the first 9 images, we must set shuffle to False when we use flow() function to get batches.
Here are code:
Perhaps the API has changed?
Hi, duliqiang, (and Hi Jason, thanks again for these awesome tutorials)
I have the same problem (no lightening or deeming). Looked into the API but couldn’t find anything to try. Are there any update on this?
Thanks!
I will write an updated tutorial on this topic.
Hi Jason,
I have a question:
why do you convert the data to float before further working with it.
Is this necessary and will it lead to wrong results when obmitted?
Thank you
I believed it was required at the time.
Hey Jason !
Nice post as always !
I think I missed something, I looked at previous replies but I didnt find a clear answer to my question, so let me ask it, sorry if you already answered to it.
When you use the fit_generator() method, the model is trained only with the transformed images? It is not trained with original images + transformed image, right?
ImageGenerator allows to generate transformed data to augment the dataset.
But what is the point of training the model only with the transformed images and not with original images PLUS the transformed images?
I feel that the point of augmenting is to augment 😀 so if our dataset is not bigger after, it is not augmented.
What am I missing here? If keras implemented it this way, it maybe good to train only with transformed images, but why? I thought that the whole point of this was to increase the number of images to train with.
Is it possible, with the same methods, to generate mutiple type of transformed images (rotation, translation and whitening for exemple) and train the model with all transformed images and also with original images?
That would make more sense and that would really be augmentation of the original dataset.
It is only trained on the augmented images. The set of augmented images covers un-augmented images – it has expanded the training dataset.
Hi Jason,
I need to predict value on 125000 images, for which I’m using following snippet:
———————————————————————————————————
test_datagen=ImageDataGenerator(rescale=1/255)
test_generator = test_datagen.flow(x,batch_size=10,seed=42,shuffle=False)
y_pred = model.predict_generator(test_generator,steps=n_pred//10,verbose=1)
———————————————————————————————————
But I’m getting Memory Error.
Can you please suggest. How to approach
Perhaps try flow_from_directory() to progressively load data rather than loading it all into memory?
Since, I’m reading from a readOnly directory and without and subfolder to identify the labels, hence I can’t use flow_from_directory. Also, I think copying all the image to separate directory would be a costly process.
You can flow from a read only directory, just disable any saving of images (the default).
It’s unable to read when there are no subfolder.
I have used:
# Define data pre-processing
test_image_gen = ImageDataGenerator(rescale=1/255)
test_generator = test_image_gen.flow_from_directory(test_dir,target_size=(Image_width,Image_height),batch_size=batch_size,seed=42,class_mode = None,classes=None)
============================================================
Found 0 images belonging to 0 classes.
I see, yes, when flowing from a dir, you must have a sub directory for each class.
Hi Jason,
I have doubt like I have trained a convnet model with data augmentation. Now i need to interpret and get classification from the trained model using the new inputs in real time. I have used ImageDataGenerator with flow_from_directory and fit_generartor… Which method i need to use to predict the result? Could you please brief on that?
You use predict_generator(), you may also need to create a new generator that only has the same scaling (fit on the training dataset), but no augmentation.
Hi Jason,
I wished to convert the augmented data (cifar10 test dataset) to 0 -1 values in npz format.
Not sure if my script is correct as below:
However when I run the CNN model using the npz file as input image (which is using
the npz value as poisson rate), It complains that the rate for poisson generator
cannnot be negative.
Is there any other settings in the ImageDataGenerator() to be set in order to get
values between 0 and 1?
Best Regards
Del
.
for x_batch, y_batch in test
Not sure I understand how saving the data is related to the poisson distribution, sorry?
Hi Jason,
Sorry I am actually trying to convert a ANN CNN network to Spiking NN, the image pixel
density value is treated as poisson rate for poisson generator,
Sorry I am new to this. I am able to generate 0-1 value range datasets.
From my previous post, I am able to save x_test.npz, how do I save the corrresponding
y_test.npz?
You can save a .npz file using savez_compressed():
https://docs.scipy.org/doc/numpy/reference/generated/numpy.savez_compressed.html
Hi,
I checked my input images generated with rotation and zoom (ImageDataGenerator)
But after the images change, black spaces created.
Originally all image have a white background.
How can I remove this black spaces?
I believe you can specify “fill_mode” and/or “cval” to indicate the pixel value for filling and set it to 255 or 1, depending on the pixel scale.
More details here:
https://keras.io/preprocessing/image/
Hi Jason,
I’m getting an error in the example “Saving Augmented Images to File”
Traceback (most recent call last):
File “”, line 1, in
File “C:\Users\XXX\AppData\Local\Continuum\anaconda3\envs\env_python_3.6\lib\site-packages\keras_preprocessing\image\iterator.py”, line 100, in __next__
return self.next(*args, **kwargs)
File “C:\Users\XXX\AppData\Local\Continuum\anaconda3\envs\env_python_3.6\lib\site-packages\keras_preprocessing\image\iterator.py”, line 112, in next
return self._get_batches_of_transformed_samples(index_array)
File “C:\Users\XXX\AppData\Local\Continuum\anaconda3\envs\env_python_3.6\lib\site-packages\keras_preprocessing\image\numpy_array_iterator.py”, line 159, in _get_batches_of_transformed_samples
img = array_to_img(batch_x[i], self.data_format, scale=True)
File “C:\Users\XXX\AppData\Local\Continuum\anaconda3\envs\env_python_3.6\lib\site-packages\keras_preprocessing\image\utils.py”, line 228, in array_to_img
raise ImportError(‘Could not import PIL.Image. ‘
ImportError: Could not import PIL.Image. The use of
array_to_imgrequires PIL.The error suggests you need to install Pillow, you can learn how here:
https://machinelearningmastery.com/how-to-load-and-manipulate-images-for-deep-learning-in-python-with-pil-pillow/
Is this code correct if I use featurewise_center and featurewise_std_normalization for both train and test datasets?
test_datagen = ImageDataGenerator(
rescale=1./255,
featurewise_center=True,
featurewise_std_normalization=True)
train_datagen = ImageDataGenerator(
rescale=1./255,
featurewise_center=True,
featurewise_std_normalization=True,
rotation_range=20,
width_shift_range=0.2,
height_shift_range=0.2,
horizontal_flip=True)
train_generator = train_datagen.flow_from_directory(
os.path.join(args.data_dir , ‘train/’),
target_size=(args.fixed_width, args.fixed_width),
batch_size=args.batch_size,
class_mode=’categorical’)
validation_generator = test_datagen.flow_from_directory(
os.path.join(args.data_dir, ‘val/’),
target_size=(args.fixed_width, args.fixed_width),
batch_size=args.batch_size,
class_mode=’categorical’)
sgd = SGD(lr=args.learning_rate, decay=0.005, momentum=0.9, nesterov=True)
model.compile(loss=’categorical_crossentropy’, optimizer=sgd, metrics=[‘accuracy’])
Perhaps check this tutorial:
https://machinelearningmastery.com/how-to-configure-image-data-augmentation-when-training-deep-learning-neural-networks/
Sir, I am having trouble while saving the images. After the data augmentation, how can we save all those new images to our local machines? any idea for that.
Set “save_to_dir” when calling flow.
Learn more here:
https://keras.io/preprocessing/image/
I have a dataset with 4532 samples in the train, 698 in the validation set and 599 samples in the test set. I am trying to train VGG16 with data augmentation using the following code:
# Data Preprocess and Data Augmentation
train_datagen = ImageDataGenerator(
rotation_range=40,
width_shift_range=0.2,
height_shift_range=0.2,
shear_range=0.2,
zoom_range=0.2,
horizontal_flip=True,
rescale=1. / 255,
fill_mode=’nearest’
)
vald_datagen = ImageDataGenerator()
test_datagen = ImageDataGenerator()
train_datagen.fit(train_data, augment=True)
…
tr_bs = train_data.shape[0]//batch_size
vl_bs = vald_data.shape[0]//batch_size
for e in range(epoch):
print(‘Epoch’, e)
batches = 0
for (x_batch, y_batch), (val_x, val_y) in zip(
train_datagen.flow(train_data, train_labels_one_hot_coded,
batch_size=tr_bs),
vald_datagen.flow(vald_data, vald_labels_one_hot_coded,
batch_size=vl_bs)):
model.fit(x_batch, y_batch, validation_data=(val_x, val_y))
batches += 1
if batches >= len(train_data) / tr_bs:
# we need to break the loop by hand because
# the generator loops indefinitely
break
At the beginning of the train procedure keras shows this information:
Found 4532 images belonging to 7 classes.
Found 698 images belonging to 7 classes.
Found 599 images belonging to 7 classes.
which are compatible with the numbers in my dataset. However, this became a source of confusion for me. I thought when we perform augmentation, I should at least have 8 times of actual number of samples in the train set. can you please tell me how to check number of augmented data samples? (I don’t save the augmented images anywhere, is that a must or I can use online as I do the training?!)
The summary is just what was found as a starting point, augmentation is performed on top of that.
Hi,
Great post Jason!
I have this question:
During the model training process, does it consider only the augmented data? or does it also consider the initial data as well?
I suppose that considering the initial data would help to a better fit.
Does it matter?
Thank you
Training only used augmented, which is a super set (includes) of the initial data.
Hi Jason,
First of all a hearty thanks for making such detailed tutorials. I can’t thank you enough.
While running the image standardization script, the image grid plot I get has no dark or lightening effects on any of the digits. Also, the resulting plot of the final script is completely different with no visible data augmentation. Keras version (2.3.1)
Perhaps try this tutorial:
https://machinelearningmastery.com/how-to-configure-image-data-augmentation-when-training-deep-learning-neural-networks/
Hi Jason,
Thank you for all your articles. They are very helpful. 🙂
Do you have any idea/hints as to how to use the fit_generator() method if the model has multiple inputs?
You might have to create a custom generator.
if I have another dataset like malimg dataset, how to get X_train, X_test, y_train, y_test values, in my dataset i have grayscale images in 25 folders.
all my dataset is in png format.
kindly help me
If each of the 25 folders are 25 classes, then you can use the ImageDataGenerator directly. It supports grayscale images as far as I understand.
See this tutorial:
https://machinelearningmastery.com/how-to-load-large-datasets-from-directories-for-deep-learning-with-keras/
How do I know the mapping between the directory and its class? Like if I use a softmax for the model, how do I know it detected which class?
Good question, see this:
https://machinelearningmastery.com/how-to-load-large-datasets-from-directories-for-deep-learning-with-keras/
great tutorial as usual, many thanks
I’m trying this on colored images and I’m getting images with different colors, how can keep the colors and just do the augmentation ?
The operations like zoom and flip do not effect colors.
Perhaps confirm that your images are being loaded correctly?
Hey Jason,
Your tutorials are awesome. Thank you for such an effort you put on preparing these materials.
Data Augmentation is used to increase the size of training data, but you set number_of_step = training_size / number of batches. In other words, number of training data stays the same while our purpose was increasing the training size! Am I missing anything here?
Thanks!
You can train as much as you like.
sir,I’m a novice. I’d like to ask you how you do a series of operations on the same nine pictures
Specify all of the operations you want in the imagedatagenerator configuration.
Sir,the problem has been solved,but I read the local image in the flow from directory method for zca operation, but it has no effect
Well done.
Perhaps double check your configuration for ZCA?
Thanks for your nice tutorial
My question is about using “zca_whitening” with data generators.
Actually in time of using data generators, we do not have our train data in the form of numpy array to pass it “fit” method in following code:
train_datagen.fit(x_train)
Whyat should be done here?
Sorry, I don’t understand. Perhaps you can rephrase your question?
In this line of code : “train_datagen.fit(x_train)”
x_train refers to our train dataset in form of a numpy array. right?
but when we are using imagedatagenerator to read images from a directory, in practice there is no x_train in form of numpy array.
What should be passed as argument of “fit” method when we are using imagedatagenerator?
We don’t call fit() when using an image data generator.
We call fit_generator() and pass it the prepared generator.
Perhaps this will help:
https://machinelearningmastery.com/how-to-load-large-datasets-from-directories-for-deep-learning-with-keras/
How to perform image augmentation on dicom(.dcm) image??
Sorry, I don’t know about “dicom” images.
How could I specify the number of augmented images to be generated?
Typically the augmented images are generated just in time as they are needed by the model, e.g. batch by batch.
If you want to pre-generate them, you can loop through the image generation process until you have a sufficient number for your project.
Thank you for your post. Is there a way for up-sampling an imbalanced class when we load images using imagegenerator and flow_directory in keras?
Thank you for your help
I don’t think so off the cuff. You might need to write a custom data generator.
Great tutorial, Jason.
Is there a way to have random rotations by a fixed angle? For example, a rotation of -90, 0 , or 90, i.e., not any angle within the rotation range but exactly 90, -90 or 90.
Off the cuff, I don’t think so. It might be easier to create your own generator with more control over the augmentations.
hello Jason
My project is about estimating age using OPG images with neural network danet(Based on age) and dasnet(Based on age and aid sex) This is a raw project in gitlab and Implementation for a article with Over 2000 images. But me I tried to run it for 112 images, which is 72 tutorials, 20 validations and 20 tests, with a little change danet runed but dasnet NO. Please guide me…
This is my Google Drive project link:
https://drive.google.com/file/d/12omJoMgXckE4zGyN4w-BRI02iHW22DvS/view?usp=sharing
link in git lab:
https://gitlab.citius.usc.es/nicolas.vila.blanco/chronological-age-estimation-opg-images/-/blob/317d4c9b3ead35e930b70a14779e7cbf0635a730/train_dasnet.py
Article link is in git lab.
I really need your help, thank you
I sent you a message in Canton, but because I did not know where to see it, I wrote the answer to my message here as well
I’m happy to answer questions, but I don’t have the capacity to review code/data.
Thank you Jason for your help.
I have a question, when we apply data augmentation ( I am applying the Sequential augmenter with only flip operation using imgaug package) does it replace the original image? should we concatenate the original data as well when generating the batch data?
hey jason great post im trying to use but keep getting error after first example
/usr/local/lib/python3.7/dist-packages/matplotlib/image.py in set_data(self, A)
697 or self._A.ndim == 3 and self._A.shape[-1] in [3, 4]):
698 raise TypeError(“Invalid shape {} for image data”
–> 699 .format(self._A.shape))
700
701 if self._A.ndim == 3:
TypeError: Invalid shape (28, 28, 1) for image data
any thoughts on how to fix doing it on google colab
Hi Matt…Did you copy and paste the code or did you type it in manually?
update got it you just have to squeeze the img first :D)
img = X_batch[i*3+j]
img = np.squeeze(img)
ax[i][j].imshow(img, cmap=plt.get_cmap(“gray”))
Thank you for the feedback Matt! Keep up the great work!
Hi Dr.James Carmichael
I am a student from Taiwan
Thank you for your articles that always inspire me a lot.
I would like to ask you, how to concatenate the input data such as using (mean1, std1) two related values as one input data?
thanks
Hi Ray…You are very welcome! I would recommend using Pandas to perform this function:
https://pandas.pydata.org/docs/user_guide/merging.html
Hi Jason,
Your writing has helped me in learning tremendously. I am wondering if you will be making a version of this tutorial with Keras’s new, recommended version of Image Data Generator. When applying it, the deprecation warning is returned. A corollary question in terms of updating code with a new Class, how do you find all the instances where it has been used in your projects?
Hi Angelique…You are very welcome! Thank you for your suggestion! We will consider it going forward.
Aside from the warning you noted, have you found any issues with the current version performance that you could share?