Develop a Deep Learning Model to Automatically
Describe Photographs in Python with Keras, Step-by-Step.
Caption generation is a challenging artificial intelligence problem where a textual description must be generated for a given photograph.
It requires both methods from computer vision to understand the content of the image and a language model from the field of natural language processing to turn the understanding of the image into words in the right order. Recently, deep learning methods have achieved state-of-the-art results on examples of this problem.
Deep learning methods have demonstrated state-of-the-art results on caption generation problems. What is most impressive about these methods is a single end-to-end model can be defined to predict a caption, given a photo, instead of requiring sophisticated data preparation or a pipeline of specifically designed models.
In this tutorial, you will discover how to develop a photo captioning deep learning model from scratch.
After completing this tutorial, you will know:
How to prepare photo and text data for training a deep learning model.
How to design and train a deep learning caption generation model.
How to evaluate a train caption generation model and use it to caption entirely new photographs.
We introduce a new benchmark collection for sentence-based image description and search, consisting of 8,000 images that are each paired with five different captions which provide clear descriptions of the salient entities and events.
…
The images were chosen from six different Flickr groups, and tend not to contain any well-known people or locations, but were manually selected to depict a variety of scenes and situations.
The dataset is available for free. You must complete a request form and the links to the dataset will be emailed to you. I would love to link to them for you, but the email address expressly requests: “Please do not redistribute the dataset“.
You can use the link below to request the dataset (note, this may not work any more, see below):
Within a short time, you will receive an email that contains links to two files:
Flickr8k_Dataset.zip (1 Gigabyte) An archive of all photographs.
Flickr8k_text.zip (2.2 Megabytes) An archive of all text descriptions for photographs.
UPDATE (Feb/2019): The official site seems to have been taken down (although the form still works). Here are some direct download links from my datasets GitHub repository:
Download the datasets and unzip them into your current working directory. You will have two directories:
Flickr8k_Dataset: Contains 8092 photographs in JPEG format.
Flickr8k_text: Contains a number of files containing different sources of descriptions for the photographs.
The dataset has a pre-defined training dataset (6,000 images), development dataset (1,000 images), and test dataset (1,000 images).
One measure that can be used to evaluate the skill of the model are BLEU scores. For reference, below are some ball-park BLEU scores for skillful models when evaluated on the test dataset (taken from the 2017 paper “Where to put the Image in an Image Caption Generator“):
BLEU-1: 0.401 to 0.578.
BLEU-2: 0.176 to 0.390.
BLEU-3: 0.099 to 0.260.
BLEU-4: 0.059 to 0.170.
We describe the BLEU metric more later when we work on evaluating our model.
Next, let’s look at how to load the images.
Prepare Photo Data
We will use a pre-trained model to interpret the content of the photos.
There are many models to choose from. In this case, we will use the Oxford Visual Geometry Group, or VGG, model that won the ImageNet competition in 2014. Learn more about the model here:
Keras provides this pre-trained model directly. Note, the first time you use this model, Keras will download the model weights from the Internet, which are about 500 Megabytes. This may take a few minutes depending on your internet connection.
We could use this model as part of a broader image caption model. The problem is, it is a large model and running each photo through the network every time we want to test a new language model configuration (downstream) is redundant.
Instead, we can pre-compute the “photo features” using the pre-trained model and save them to file. We can then load these features later and feed them into our model as the interpretation of a given photo in the dataset. It is no different to running the photo through the full VGG model; it is just we will have done it once in advance.
This is an optimization that will make training our models faster and consume less memory.
We can load the VGG model in Keras using the VGG class. We will remove the last layer from the loaded model, as this is the model used to predict a classification for a photo. We are not interested in classifying images, but we are interested in the internal representation of the photo right before a classification is made. These are the “features” that the model has extracted from the photo.
Keras also provides tools for reshaping the loaded photo into the preferred size for the model (e.g. 3 channel 224 x 224 pixel image).
Below is a function named extract_features() that, given a directory name, will load each photo, prepare it for VGG, and collect the predicted features from the VGG model. The image features are a 1-dimensional 4,096 element vector.
The function returns a dictionary of image identifier to image features.
1
2
3
4
5
6
7
8
9
10
11
12
13
14
15
16
17
18
19
20
21
22
23
24
25
26
27
28
# extract features from each photo in the directory
First, we will load the file containing all of the descriptions.
1
2
3
4
5
6
7
8
9
10
11
12
13
# load doc into memory
def load_doc(filename):
# open the file as read only
file=open(filename,'r')
# read all text
text=file.read()
# close the file
file.close()
returntext
filename='Flickr8k_text/Flickr8k.token.txt'
# load descriptions
doc=load_doc(filename)
Each photo has a unique identifier. This identifier is used on the photo filename and in the text file of descriptions.
Next, we will step through the list of photo descriptions. Below defines a function load_descriptions() that, given the loaded document text, will return a dictionary of photo identifiers to descriptions. Each photo identifier maps to a list of one or more textual descriptions.
1
2
3
4
5
6
7
8
9
10
11
12
13
14
15
16
17
18
19
20
21
22
23
24
25
# extract descriptions for images
def load_descriptions(doc):
mapping=dict()
# process lines
forline indoc.split('\n'):
# split line by white space
tokens=line.split()
iflen(line)<2:
continue
# take the first token as the image id, the rest as the description
image_id,image_desc=tokens[0],tokens[1:]
# remove filename from image id
image_id=image_id.split('.')[0]
# convert description tokens back to string
image_desc=' '.join(image_desc)
# create the list if needed
ifimage_id notinmapping:
mapping[image_id]=list()
# store description
mapping[image_id].append(image_desc)
returnmapping
# parse descriptions
descriptions=load_descriptions(doc)
print('Loaded: %d '%len(descriptions))
Next, we need to clean the description text. The descriptions are already tokenized and easy to work with.
We will clean the text in the following ways in order to reduce the size of the vocabulary of words we will need to work with:
Convert all words to lowercase.
Remove all punctuation.
Remove all words that are one character or less in length (e.g. ‘a’).
Remove all words with numbers in them.
Below defines the clean_descriptions() function that, given the dictionary of image identifiers to descriptions, steps through each description and cleans the text.
1
2
3
4
5
6
7
8
9
10
11
12
13
14
15
16
17
18
19
20
21
22
23
import string
def clean_descriptions(descriptions):
# prepare translation table for removing punctuation
table=str.maketrans('','',string.punctuation)
forkey,desc_list indescriptions.items():
foriinrange(len(desc_list)):
desc=desc_list[i]
# tokenize
desc=desc.split()
# convert to lower case
desc=[word.lower()forwordindesc]
# remove punctuation from each token
desc=[w.translate(table)forwindesc]
# remove hanging 's' and 'a'
desc=[wordforwordindesc iflen(word)>1]
# remove tokens with numbers in them
desc=[wordforwordindesc ifword.isalpha()]
# store as string
desc_list[i]=' '.join(desc)
# clean descriptions
clean_descriptions(descriptions)
Once cleaned, we can summarize the size of the vocabulary.
Ideally, we want a vocabulary that is both expressive and as small as possible. A smaller vocabulary will result in a smaller model that will train faster.
For reference, we can transform the clean descriptions into a set and print its size to get an idea of the size of our dataset vocabulary.
1
2
3
4
5
6
7
8
9
10
11
# convert the loaded descriptions into a vocabulary of words
Finally, we can save the dictionary of image identifiers and descriptions to a new file named descriptions.txt, with one image identifier and description per line.
Below defines the save_descriptions() function that, given a dictionary containing the mapping of identifiers to descriptions and a filename, saves the mapping to file.
Running the example first prints the number of loaded photo descriptions (8,092) and the size of the clean vocabulary (8,763 words).
1
2
Loaded: 8,092
Vocabulary Size: 8,763
Finally, the clean descriptions are written to ‘descriptions.txt‘.
Taking a look at the file, we can see that the descriptions are ready for modeling. The order of descriptions in your file may vary.
1
2
3
4
5
6
2252123185_487f21e336 bunch on people are seated in stadium
2252123185_487f21e336 crowded stadium is full of people watching an event
2252123185_487f21e336 crowd of people fill up packed stadium
2252123185_487f21e336 crowd sitting in an indoor stadium
2252123185_487f21e336 stadium full of people watch game
...
Develop Deep Learning Model
In this section, we will define the deep learning model and fit it on the training dataset.
This section is divided into the following parts:
Loading Data.
Defining the Model.
Fitting the Model.
Complete Example.
Loading Data
First, we must load the prepared photo and text data so that we can use it to fit the model.
We are going to train the data on all of the photos and captions in the training dataset. While training, we are going to monitor the performance of the model on the development dataset and use that performance to decide when to save models to file.
The train and development dataset have been predefined in the Flickr_8k.trainImages.txt and Flickr_8k.devImages.txt files respectively, that both contain lists of photo file names. From these file names, we can extract the photo identifiers and use these identifiers to filter photos and descriptions for each set.
The function load_set() below will load a pre-defined set of identifiers given the train or development sets filename.
1
2
3
4
5
6
7
8
9
10
11
12
13
14
15
16
17
18
19
20
21
22
23
# load doc into memory
def load_doc(filename):
# open the file as read only
file=open(filename,'r')
# read all text
text=file.read()
# close the file
file.close()
returntext
# load a pre-defined list of photo identifiers
def load_set(filename):
doc=load_doc(filename)
dataset=list()
# process line by line
forline indoc.split('\n'):
# skip empty lines
iflen(line)<1:
continue
# get the image identifier
identifier=line.split('.')[0]
dataset.append(identifier)
returnset(dataset)
Now, we can load the photos and descriptions using the pre-defined set of train or development identifiers.
Below is the function load_clean_descriptions() that loads the cleaned text descriptions from ‘descriptions.txt‘ for a given set of identifiers and returns a dictionary of identifiers to lists of text descriptions.
The model we will develop will generate a caption given a photo, and the caption will be generated one word at a time. The sequence of previously generated words will be provided as input. Therefore, we will need a ‘first word’ to kick-off the generation process and a ‘last word‘ to signal the end of the caption.
We will use the strings ‘startseq‘ and ‘endseq‘ for this purpose. These tokens are added to the loaded descriptions as they are loaded. It is important to do this now before we encode the text so that the tokens are also encoded correctly.
1
2
3
4
5
6
7
8
9
10
11
12
13
14
15
16
17
18
19
20
# load clean descriptions into memory
def load_clean_descriptions(filename,dataset):
# load document
doc=load_doc(filename)
descriptions=dict()
forline indoc.split('\n'):
# split line by white space
tokens=line.split()
# split id from description
image_id,image_desc=tokens[0],tokens[1:]
# skip images not in the set
ifimage_id indataset:
# create list
ifimage_id notindescriptions:
descriptions[image_id]=list()
# wrap description in tokens
desc='startseq '+' '.join(image_desc)+' endseq'
# store
descriptions[image_id].append(desc)
returndescriptions
Next, we can load the photo features for a given dataset.
Below defines a function named load_photo_features() that loads the entire set of photo descriptions, then returns the subset of interest for a given set of photo identifiers.
This is not very efficient; nevertheless, this will get us up and running quickly.
1
2
3
4
5
6
7
# load photo features
def load_photo_features(filename,dataset):
# load all features
all_features=load(open(filename,'rb'))
# filter features
features={k:all_features[k]forkindataset}
returnfeatures
We can pause here and test everything developed so far.
Running this example first loads the 6,000 photo identifiers in the training dataset. These features are then used to filter and load the cleaned description text and the pre-computed photo features.
We are nearly there.
1
2
3
Dataset: 6,000
Descriptions: train=6,000
Photos: train=6,000
The description text will need to be encoded to numbers before it can be presented to the model as in input or compared to the model’s predictions.
The first step in encoding the data is to create a consistent mapping from words to unique integer values. Keras provides the Tokenizer class that can learn this mapping from the loaded description data.
Below defines the to_lines() to convert the dictionary of descriptions into a list of strings and the create_tokenizer() function that will fit a Tokenizer given the loaded photo description text.
1
2
3
4
5
6
7
8
9
10
11
12
13
14
15
16
17
18
# convert a dictionary of clean descriptions to a list of descriptions
def to_lines(descriptions):
all_desc=list()
forkey indescriptions.keys():
[all_desc.append(d)fordindescriptions[key]]
returnall_desc
# fit a tokenizer given caption descriptions
def create_tokenizer(descriptions):
lines=to_lines(descriptions)
tokenizer=Tokenizer()
tokenizer.fit_on_texts(lines)
returntokenizer
# prepare tokenizer
tokenizer=create_tokenizer(train_descriptions)
vocab_size=len(tokenizer.word_index)+1
print('Vocabulary Size: %d'%vocab_size)
We can now encode the text.
Each description will be split into words. The model will be provided one word and the photo and generate the next word. Then the first two words of the description will be provided to the model as input with the image to generate the next word. This is how the model will be trained.
For example, the input sequence “little girl running in field” would be split into 6 input-output pairs to train the model:
1
2
3
4
5
6
7
X1, X2 (text sequence), y (word)
photo startseq, little
photo startseq, little, girl
photo startseq, little, girl, running
photo startseq, little, girl, running, in
photo startseq, little, girl, running, in, field
photo startseq, little, girl, running, in, field, endseq
Later, when the model is used to generate descriptions, the generated words will be concatenated and recursively provided as input to generate a caption for an image.
The function below named create_sequences(), given the tokenizer, a maximum sequence length, and the dictionary of all descriptions and photos, will transform the data into input-output pairs of data for training the model. There are two input arrays to the model: one for photo features and one for the encoded text. There is one output for the model which is the encoded next word in the text sequence.
The input text is encoded as integers, which will be fed to a word embedding layer. The photo features will be fed directly to another part of the model. The model will output a prediction, which will be a probability distribution over all words in the vocabulary.
The output data will therefore be a one-hot encoded version of each word, representing an idealized probability distribution with 0 values at all word positions except the actual word position, which has a value of 1.
1
2
3
4
5
6
7
8
9
10
11
12
13
14
15
16
17
18
19
20
21
22
# create sequences of images, input sequences and output words for an image
We will need to calculate the maximum number of words in the longest description. A short helper function named max_length() is defined below.
1
2
3
4
# calculate the length of the description with the most words
def max_length(descriptions):
lines=to_lines(descriptions)
returnmax(len(d.split())fordinlines)
We now have enough to load the data for the training and development datasets and transform the loaded data into input-output pairs for fitting a deep learning model.
Defining the Model
We will define a deep learning based on the “merge-model” described by Marc Tanti, et al. in their 2017 papers:
The authors provide a nice schematic of the model, reproduced below.
Schematic of the Merge Model For Image Captioning
We will describe the model in three parts:
Photo Feature Extractor. This is a 16-layer VGG model pre-trained on the ImageNet dataset. We have pre-processed the photos with the VGG model (without the output layer) and will use the extracted features predicted by this model as input.
Sequence Processor. This is a word embedding layer for handling the text input, followed by a Long Short-Term Memory (LSTM) recurrent neural network layer.
Decoder (for lack of a better name). Both the feature extractor and sequence processor output a fixed-length vector. These are merged together and processed by a Dense layer to make a final prediction.
The Photo Feature Extractor model expects input photo features to be a vector of 4,096 elements. These are processed by a Dense layer to produce a 256 element representation of the photo.
The Sequence Processor model expects input sequences with a pre-defined length (34 words) which are fed into an Embedding layer that uses a mask to ignore padded values. This is followed by an LSTM layer with 256 memory units.
Both the input models produce a 256 element vector. Further, both input models use regularization in the form of 50% dropout. This is to reduce overfitting the training dataset, as this model configuration learns very fast.
The Decoder model merges the vectors from both input models using an addition operation. This is then fed to a Dense 256 neuron layer and then to a final output Dense layer that makes a softmax prediction over the entire output vocabulary for the next word in the sequence.
The function below named define_model() defines and returns the model ready to be fit.
We also create a plot to visualize the structure of the network that better helps understand the two streams of input.
Plot of the Caption Generation Deep Learning Model
Fitting the Model
Now that we know how to define the model, we can fit it on the training dataset.
The model learns fast and quickly overfits the training dataset. For this reason, we will monitor the skill of the trained model on the holdout development dataset. When the skill of the model on the development dataset improves at the end of an epoch, we will save the whole model to file.
At the end of the run, we can then use the saved model with the best skill on the training dataset as our final model.
We can do this by defining a ModelCheckpoint in Keras and specifying it to monitor the minimum loss on the validation dataset and save the model to a file that has both the training and validation loss in the filename.
We can then specify the checkpoint in the call to fit() via the callbacks argument. We must also specify the development dataset in fit() via the validation_data argument.
We will only fit the model for 20 epochs, but given the amount of training data, each epoch may take 30 minutes on modern hardware.
Running the example first prints a summary of the loaded training and development datasets.
1
2
3
4
5
6
7
8
Dataset: 6,000
Descriptions: train=6,000
Photos: train=6,000
Vocabulary Size: 7,579
Description Length: 34
Dataset: 1,000
Descriptions: test=1,000
Photos: test=1,000
After the summary of the model, we can get an idea of the total number of training and validation (development) input-output pairs.
1
Train on 306,404 samples, validate on 50,903 samples
The model then runs, saving the best model to .h5 files along the way.
On my run, the best validation results were saved to the file:
model-ep002-loss3.245-val_loss3.612.h5
This model was saved at the end of epoch 2 with a loss of 3.245 on the training dataset and a loss of 3.612 on the development dataset
Note: Your results may vary given the stochastic nature of the algorithm or evaluation procedure, or differences in numerical precision. Consider running the example a few times and compare the average outcome.
Let me know what you get in the comments below.
If you ran the example on AWS, copy the model file back to your current working directory. If you need help with commands on AWS, see the post:
Note: If you had no problems in the previous section, please skip this section. This section is for those who do not have enough memory to train the model as described in the previous section (e.g. cannot use AWS EC2 for whatever reason).
The training of the caption model does assume you have a lot of RAM.
The code in the previous section is not memory efficient and assumes you are running on a large EC2 instance with 32GB or 64GB of RAM. If you are running the code on a workstation of 8GB of RAM, you cannot train the model.
A workaround is to use progressive loading. This was discussed in detail in the second-last section titled “Progressive Loading” in the post:
I recommend reading that section before continuing.
If you want to use progressive loading, to train this model, this section will show you how.
The first step is we must define a function that we can use as the data generator.
We will keep things very simple and have the data generator yield one photo’s worth of data per batch. This will be all of the sequences generated for a photo and its set of descriptions.
The function below data_generator() will be the data generator and will take the loaded textual descriptions, photo features, tokenizer and max length. Here, I assume that you can fit this training data in memory, which I believe 8GB of RAM should be more than capable.
How does this work? Read the post I just mentioned above that introduces data generators.
1
2
3
4
5
6
7
8
9
# data generator, intended to be used in a call to model.fit_generator()
You can see that we are calling the create_sequence() function to create a batch worth of data for a single photo rather than an entire dataset. This means that we must update the create_sequences() function to delete the “iterate over all descriptions” for-loop.
The updated function is as follows:
1
2
3
4
5
6
7
8
9
10
11
12
13
14
15
16
17
18
19
20
# create sequences of images, input sequences and output words for an image
Note, this is a very basic data generator. The big memory saving it offers is to not have the unrolled sequences of train and test data in memory prior to fitting the model, that these samples (e.g. results from create_sequences()) are created as needed per photo.
Some off-the-cuff ideas for further improving this data generator include:
Randomize the order of photos each epoch.
Work with a list of photo ids and load text and photo data as needed to cut even further back on memory.
Yield more than one photo’s worth of samples per batch.
I have experienced with these variations myself in the past. Let me know if you do and how you go in the comments.
You can sanity check a data generator by calling it directly, as follows:
Running this sanity check will show what one batch worth of sequences looks like, in this case 47 samples to train on for the first photo.
1
2
3
(47, 4096)
(47, 34)
(47, 7579)
Finally, we can use the fit_generator() function on the model to train the model with this data generator.
In this simple example we will discard the loading of the development dataset and model checkpointing and simply save the model after each training epoch. You can then go back and load/evaluate each saved model after training to find the one we the lowest loss that you can then use in the next section.
The code to train the model with the data generator is as follows:
1
2
3
4
5
6
7
8
9
10
# train the model, run epochs manually and save after each epoch
Perhaps evaluate each saved model and choose the one final model with the lowest loss on a holdout dataset. The next section may help with this.
Did you use this new addition to the tutorial?
How did you go?
Evaluate Model
Once the model is fit, we can evaluate the skill of its predictions on the holdout test dataset.
We will evaluate a model by generating descriptions for all photos in the test dataset and evaluating those predictions with a standard cost function.
First, we need to be able to generate a description for a photo using a trained model.
This involves passing in the start description token ‘startseq‘, generating one word, then calling the model recursively with generated words as input until the end of sequence token is reached ‘endseq‘ or the maximum description length is reached.
The function below named generate_desc() implements this behavior and generates a textual description given a trained model, and a given prepared photo as input. It calls the function word_for_id() in order to map an integer prediction back to a word.
We will generate predictions for all photos in the test dataset and in the train dataset.
The function below named evaluate_model() will evaluate a trained model against a given dataset of photo descriptions and photo features. The actual and predicted descriptions are collected and evaluated collectively using the corpus BLEU score that summarizes how close the generated text is to the expected text.
BLEU scores are used in text translation for evaluating translated text against one or more reference translations.
Here, we compare each generated description against all of the reference descriptions for the photograph. We then calculate BLEU scores for 1, 2, 3 and 4 cumulative n-grams.
We can put all of this together with the functions from the previous section for loading the data. We first need to load the training dataset in order to prepare a Tokenizer so that we can encode generated words as input sequences for the model. It is critical that we encode the generated words using exactly the same encoding scheme as was used when training the model.
We then use these functions for loading the test dataset.
The complete example is listed below.
1
2
3
4
5
6
7
8
9
10
11
12
13
14
15
16
17
18
19
20
21
22
23
24
25
26
27
28
29
30
31
32
33
34
35
36
37
38
39
40
41
42
43
44
45
46
47
48
49
50
51
52
53
54
55
56
57
58
59
60
61
62
63
64
65
66
67
68
69
70
71
72
73
74
75
76
77
78
79
80
81
82
83
84
85
86
87
88
89
90
91
92
93
94
95
96
97
98
99
100
101
102
103
104
105
106
107
108
109
110
111
112
113
114
115
116
117
118
119
120
121
122
123
124
125
126
127
128
129
130
131
132
133
134
135
136
137
138
139
140
141
142
143
144
145
146
147
148
149
150
151
152
153
154
155
156
157
158
159
160
161
162
163
164
from numpy import argmax
from pickle import load
from keras.preprocessing.text import Tokenizer
from keras.preprocessing.sequence import pad_sequences
from keras.models import load_model
from nltk.translate.bleu_score import corpus_bleu
# load doc into memory
def load_doc(filename):
# open the file as read only
file=open(filename,'r')
# read all text
text=file.read()
# close the file
file.close()
returntext
# load a pre-defined list of photo identifiers
def load_set(filename):
doc=load_doc(filename)
dataset=list()
# process line by line
forline indoc.split('\n'):
# skip empty lines
iflen(line)<1:
continue
# get the image identifier
identifier=line.split('.')[0]
dataset.append(identifier)
returnset(dataset)
# load clean descriptions into memory
def load_clean_descriptions(filename,dataset):
# load document
doc=load_doc(filename)
descriptions=dict()
forline indoc.split('\n'):
# split line by white space
tokens=line.split()
# split id from description
image_id,image_desc=tokens[0],tokens[1:]
# skip images not in the set
ifimage_id indataset:
# create list
ifimage_id notindescriptions:
descriptions[image_id]=list()
# wrap description in tokens
desc='startseq '+' '.join(image_desc)+' endseq'
# store
descriptions[image_id].append(desc)
returndescriptions
# load photo features
def load_photo_features(filename,dataset):
# load all features
all_features=load(open(filename,'rb'))
# filter features
features={k:all_features[k]forkindataset}
returnfeatures
# covert a dictionary of clean descriptions to a list of descriptions
def to_lines(descriptions):
all_desc=list()
forkey indescriptions.keys():
[all_desc.append(d)fordindescriptions[key]]
returnall_desc
# fit a tokenizer given caption descriptions
def create_tokenizer(descriptions):
lines=to_lines(descriptions)
tokenizer=Tokenizer()
tokenizer.fit_on_texts(lines)
returntokenizer
# calculate the length of the description with the most words
Note: Your results may vary given the stochastic nature of the algorithm or evaluation procedure, or differences in numerical precision. Consider running the example a few times and compare the average outcome.
We can see that the scores fit within and close to the top of the expected range of a skillful model on the problem. The chosen model configuration is by no means optimized.
1
2
3
4
BLEU-1: 0.579114
BLEU-2: 0.344856
BLEU-3: 0.252154
BLEU-4: 0.131446
Generate New Captions
Now that we know how to develop and evaluate a caption generation model, how can we use it?
Almost everything we need to generate captions for entirely new photographs is in the model file.
We also need the Tokenizer for encoding generated words for the model while generating a sequence, and the maximum length of input sequences, used when we defined the model (e.g. 34).
We can hard code the maximum sequence length. With the encoding of text, we can create the tokenizer and save it to a file so that we can load it quickly whenever we need it without needing the entire Flickr8K dataset. An alternative would be to use our own vocabulary file and mapping to integers function during training.
We can create the Tokenizer as before and save it as a pickle file tokenizer.pkl. The complete example is listed below.
1
2
3
4
5
6
7
8
9
10
11
12
13
14
15
16
17
18
19
20
21
22
23
24
25
26
27
28
29
30
31
32
33
34
35
36
37
38
39
40
41
42
43
44
45
46
47
48
49
50
51
52
53
54
55
56
57
58
59
60
61
62
63
64
65
66
67
68
69
70
71
72
73
from keras.preprocessing.text import Tokenizer
from pickle import dump
# load doc into memory
def load_doc(filename):
# open the file as read only
file=open(filename,'r')
# read all text
text=file.read()
# close the file
file.close()
returntext
# load a pre-defined list of photo identifiers
def load_set(filename):
doc=load_doc(filename)
dataset=list()
# process line by line
forline indoc.split('\n'):
# skip empty lines
iflen(line)<1:
continue
# get the image identifier
identifier=line.split('.')[0]
dataset.append(identifier)
returnset(dataset)
# load clean descriptions into memory
def load_clean_descriptions(filename,dataset):
# load document
doc=load_doc(filename)
descriptions=dict()
forline indoc.split('\n'):
# split line by white space
tokens=line.split()
# split id from description
image_id,image_desc=tokens[0],tokens[1:]
# skip images not in the set
ifimage_id indataset:
# create list
ifimage_id notindescriptions:
descriptions[image_id]=list()
# wrap description in tokens
desc='startseq '+' '.join(image_desc)+' endseq'
# store
descriptions[image_id].append(desc)
returndescriptions
# covert a dictionary of clean descriptions to a list of descriptions
Next, we must load the photo we which to describe and extract the features.
We could do this by re-defining the model and adding the VGG-16 model to it, or we can use the VGG model to predict the features and use them as inputs to our existing model. We will do the latter and use a modified version of the extract_features() function used during data preparation, but adapted to work on a single photo.
1
2
3
4
5
6
7
8
9
10
11
12
13
14
15
16
17
18
19
20
# extract features from each photo in the directory
Note: Your results may vary given the stochastic nature of the algorithm or evaluation procedure, or differences in numerical precision. Consider running the example a few times and compare the average outcome.
In this case, the description generated was as follows:
1
startseq dog is running across the beach endseq
You could remove the start and end tokens and you would have the basis for a nice automatic photo captioning model.
It’s like living in the future guys!
It still completely blows my mind that we can do this. Wow.
Extensions
This section lists some ideas for extending the tutorial that you may wish to explore.
Alternate Pre-Trained Photo Models. A small 16-layer VGG model was used for feature extraction. Consider exploring larger models that offer better performance on the ImageNet dataset, such as Inception.
Smaller Vocabulary. A larger vocabulary of nearly eight thousand words was used in the development of the model. Many of the words supported may be misspellings or only used once in the entire dataset. Refine the vocabulary and reduce the size, perhaps by half.
Pre-trained Word Vectors. The model learned the word vectors as part of fitting the model. Better performance may be achieved by using word vectors either pre-trained on the training dataset or trained on a much larger corpus of text, such as news articles or Wikipedia.
Tune Model. The configuration of the model was not tuned on the problem. Explore alternate configurations and see if you can achieve better performance.
Did you try any of these extensions? Share your results in the comments below.
Further Reading
This section provides more resources on the topic if you are looking go deeper.
thanks for this great article about image caption!
My results after training were a bit worse (loss 3.566 – val_loss 3.859, then started to overfit) so i decided to try keras.applications.inception_v3.InceptionV3 for the base model. Currently it is still running and i am curious to see if it will do better.
5 frames
in create_sequence(caption, max_length_of_caption, vocab_size, image_input)
1 def create_sequence(caption,max_length_of_caption,vocab_size,image_input):
—-> 2 input_sequence=[],image_sequence=[],output_sequence=[]
3 for caption in captions:
4 caption=caption.split(‘ ‘)
5 caption=[wordtoindex[w] for w in caption if w in vocab]
ValueError: not enough values to unpack (expected 2, got 0)
hey ben!!!Can you please share the code and results of the inception model?so that we can also try and know more about the inception model.Thanks in advance
Hi,
i have tried using the inception v3 but the bleu scores are even than that of vgg16 model.
BLEU-1: 0.514655
BLEU-2: 0.266434
BLEU-3: 0.179374
BLEU-4: 0.078146
Hi Jason,
Once again great Article.
I ran into some error while executing the code under “Complete example ” section.
The error I got was
ValueError: Error when checking target: expected dense_3 to have shape (None, 7579) but got array with shape (306404, 1)
Any idea how to fix this?
Thanks
The fault appears to have been introduced in a recent version of Keras in the to_categorical() function. I can confirm the fault occurs with Keras 2.1.1.
This looks like he did change the network for feature extraction. When using include_top=False and wheigts=’imagenet” you get this type of data structure.
In the prepare data section, if using Python 2.7 there is no str.maketrans method.
To make this work just comment that line and in line 46 do this:
desc = [w.translate(None, string.punctuation) for w in desc]
after using the function to_vocabulary()
I am getting a vocabulary of size 24 which is too less though I have followed the code line by line.
Can u help?
Hi Jason,
I met some trouble running your code. I got a MemoryError on the instruction :
return array(X1), array(X2), array(y)
I am using a virtual machine with Linux (Debian), Python3, with 32Giga of memory.
Could you tell me what was the size of the memory on the computer you used to check your program ?
Please slightly explain that. I am not getting why did you do [0] in tokenizer.texts_to_sequences([desc])[0] . I have also read array indexing. How it become 2D array from that? Please explain it
It’s throwing a Value error for input_1 after sometime. I tried everything i can but i am not able to understand. Can you paste the link of your project so i can compare ?
Thanks for such a great work. I found an error message when running a code
FileNotFoundError: [Errno 2] No such file or directory: ‘descriptions.txt’
Please help
Any chance you could show what that would look like functioning with this example? 🙂 I’m struggling a bit to bring a similar generator from the other example to this script.
And thanks for the blog, it is really wonderful 🙂 For now I just cut down the training set a lot to work around the memory error and understand.the code better.
Thank you for this amazing article about image captioning.
Currently I am trying to re-implement the whole code, except that I am doing it in pure Tensorflow. I’m curious to see if my re-implementation is working as smooth as yours.
Also a shower thought, it might be better to get a better vector representations for words if using the pretrained word2vec embeddings, for example Glove 6B or GoogleNews. Learning embeddings from scratch with only 8k words might have some performance loss.
Again thank you for putting everything together, it will take quite some time to implement from scratch without your tutorial.
Hi Jason! Thanks for your amazing tutorial! I have a question. I don’t understand the meaning of the number 1 on this line (extract_features):
image = image.reshape((1, image.shape[0], image.shape[1], image.shape[2]))
Can you explain me what reshape does and the meaning of the arguments?
Hi Jason,
Can you provide a link for the tokenizer as well as the model file.
I Cannot train this model in my system but would like to see if I can use it to create an Android app
Hi Jason, thanks for the tutorial! I want to ask you if you could explain (or send me some links), to better understand, how exactly the fitting works.
Example description: the girl is …
The LSTM network during fitting takes the beginning of the sequence of my description (startseq) and it produces a vector with all possible subsequent words. This vector is combined with the vector of the input image features and it is passed within an FF layer where we then take the most probable word (with softmax). it’s right?
At this point how does the fitting go on? Is the new sequence (e.g startseq – the) passed into the LSTM network, predicts all possible next words, etc.? Continuing this way up to endseq?
If the network incorrectly generates the next word, what happens? How are the weights arranged? The fitting continues by taking in input “startseq – wrong_word” or continues with the correct one (eg startseq – the)?
Hi Jason great article on caption generator i think the best till now available online.. i am a newbee in ML(AI). i extracted the features and stored it to features.pkl file but getting an error on create sequence functions memory error and i can see you have suggested progressive loading i do not get that properly could you suggest my how to use the current code modified for progressive loading::
[2/13/2018 12:34 PM] Sanchawat, Hardik:
Using TensorFlow backend.
Dataset: 6000
Descriptions: train=6000
Photos: train=6000
Vocabulary Size: 7579
Description Length: 34
Traceback (most recent call last):
File “C:\Users\hardik.sanchawat\Documents\Scripts\flickr\test.py”, line 154, in
X1train, X2train, ytrain = create_sequences(tokenizer, max_length, train_descriptions, train_features)
File “C:\Users\hardik.sanchawat\Documents\Scripts\flickr\test.py”, line 109, in create_sequences
return array(X1), array(X2), array(y)
MemoryError
And i got the error
ValueError: Error when checking target: expected dense_3 to have 4 dimensions, but got array with shape (13, 4485)
Then i updated to_categorical function as you mentioned and the error changed to this
ValueError: Error when checking target: expected dense_3 to have 4 dimensions, but got array with shape (13, 1, 4485)
Been trying to figure out the exact input shapes of the model since 2 days please help 🙁
I just wanted to know that when you are loading the training data, you are tokenizing the train descriptions. But when you are working with test data, you are not tokenizing the test descriptions, instead working with the previous tokens. Shouldn’t the test descriptions be tokenized too before passing to create_sequence for test ?
This tutorial is of great help to us all, I think. I have a question: Does the model eventually learn to predict captions not present in the corpus? I mean, is it possible for the model to output sentences that are never seen before? In the example you give, the model predicted “startseq dog is running across the beach endseq”. Is this sentence found in the training corpus, or did the model make it up based on previous observations? And also, If it is possible for the model to combine sentences, how much training data do you think it needs to do that?
Hi Jeson, I have a question. What exactly is the LSTM used for? During fitting it takes an input (eg startseq – girl) and outputs a vector of 256 elements that contain the most probable words after the prefix? Is it trained through backpropagation? The purpose of the fitting is to make sure that given a prefix / input the LSTM gives me back a vector that represents “better” the possible following words (which are then merge with the features, etc …)
the new model doesn’t contain any fully connected layer because I read that we can extract the features from the fc2 layers of the pre-trained model also
Yes all my libraries are upto date, have checked.
I solved the problem i posted before….my problem was in the data generator.
I am using progressive loading.After fixing the problem i checked my inputs using this code:
but now it’s showing this error:
ValueError: Error when checking input: expected input_1 to have 2 dimensions, but got array with shape (8, 224, 224, 3)
do i have to change the model architecture for progressive loading??
I am stock with the same issue. The example above runs me into memory problems even when I tried it using AWS EC2 g2.2xlarge instance or a laptop with 16 GB RAM. So I tried the progressive loading example you referred to frequently but I have the same trouble with the input of the model. I tried to use inputs[0] as inputs1 for the define_model function but that returned the error ‘Error when checking input: expected input_13 to have 5 dimensions, but got array with shape (13, 224, 224, 3)’. Do I have to reshape input[0], or is the problem in inputs2?
getting the same error for me
File “fittingmodel.py”, line 189, in
model.fit([X1train, X2train], ytrain, epochs=20, verbose=2, callbacks=[checkpoint], validation_data=([X1test, X2test], ytest))
File “C:\Users\pranyaram\Anaconda3\envs\tensorflow\lib\site-packages\keras\engine\training.py”, line 1630, in fit
batch_size=batch_size)
File “C:\Users\pranyaram\Anaconda3\envs\tensorflow\lib\site-packages\keras\engine\training.py”, line 1476, in _standardize_user_data
exception_prefix=’input’)
File “C:\Users\pranyaram\Anaconda3\envs\tensorflow\lib\site-packages\keras\engine\training.py”, line 123, in _standardize_input_data
str(data_shape))
ValueError: Error when checking input: expected input_1 to have shape (4096,) but got array with shape (1,)
Due to lack of resources I tried running this in small amount of data.Everything worked fine but the generating new description part is giving this error.
C:\Users\Tanisha\AppData\Local\conda\conda\envs\tensorflow\lib\site-packages\h5py\__init__.py:36: FutureWarning: Conversion of the second argument of issubdtype from float to np.floating is deprecated. In future, it will be treated as np.float64 == np.dtype(float).type.
from ._conv import register_converters as _register_converters
Using TensorFlow backend.
2018-03-31 12:07:43.176707: I C:\tf_jenkins\workspace\rel-win\M\windows-gpu\PY\35\tensorflow\core\platform\cpu_feature_guard.cc:140] Your CPU supports instructions that this TensorFlow binary was not compiled to use: AVX2
2018-03-31 12:07:43.574792: I C:\tf_jenkins\workspace\rel-win\M\windows-gpu\PY\35\tensorflow\core\common_runtime\gpu\gpu_device.cc:1212] Found device 0 with properties:
name: GeForce 820M major: 2 minor: 1 memoryClockRate(GHz): 1.25
pciBusID: 0000:08:00.0
totalMemory: 2.00GiB freeMemory: 1.65GiB
2018-03-31 12:07:43.584220: I C:\tf_jenkins\workspace\rel-win\M\windows-gpu\PY\35\tensorflow\core\common_runtime\gpu\gpu_device.cc:1283] Ignoring visible gpu device (device: 0, name: GeForce 820M, pci bus id: 0000:08:00.0, compute capability: 2.1) with Cuda compute capability 2.1. The minimum required Cuda capability is 3.0.
Traceback (most recent call last):
File “7_generate_discription.py”, line 72, in
description = generate_desc(model, tokenizer, photo, max_length)
File “7_generate_discription.py”, line 48, in generate_desc
yhat = model.predict([photo,sequence], verbose=0)
File “C:\Users\Tanisha\AppData\Local\conda\conda\envs\tensorflow\lib\site-packages\keras\engine\training.py”, line 1817, in predict
check_batch_axis=False)
File “C:\Users\Tanisha\AppData\Local\conda\conda\envs\tensorflow\lib\site-packages\keras\engine\training.py”, line 123, in _standardize_input_data
str(data_shape))
ValueError: Error when checking : expected input_2 to have shape (25,) but got array with shape (34,)
i am getting this error
X1train, X2train, ytrain = create_sequences(tokenizer, max_length, train_descriptions, train_features)
File “fittingmodel.py”, line 109, in create_sequences
return array(X1), array(X2), array(y)
MemoryError
ile “fittingmodel.py”, line 189, in
model.fit([X1train, X2train], ytrain, epochs=20, verbose=2, callbacks=[checkpoint], validation_data=([X1test, X2test], ytest))
File “C:\Users\pranyaram\Anaconda3\envs\tensorflow\lib\site-packages\keras\engine\training.py”, line 1522, in fit
batch_size=batch_size)
File “C:\Users\pranyaram\Anaconda3\envs\tensorflow\lib\site-packages\keras\engine\training.py”, line 1378, in _standardize_user_data
exception_prefix=’input’)
File “C:\Users\pranyaram\Anaconda3\envs\tensorflow\lib\site-packages\keras\engine\training.py”, line 144, in _standardize_input_data
str(array.shape))
ValueError: Error when checking input: expected input_1 to have shape (None, 4096) but got array with shape (0, 1)
I tried to use pre-trained model and copy-paste the code above to my Anaconda python 3.6 and Keras version of 2.1.5. First, it will run smoothly without any problem, and it begins to crawl on several image files. Unfortunately, after a while, I get this kind of error:
Hi, can you provide me the weights file. My laptop is having 12GB RAM, NVIDIA GeForce 820M Graphics, all supported drivers. But Iam getting the memory error issue.
I have tried progressive loading also.. But it is not working.. It is not saving the weights file even after steps per epoch=70000 is completed even. I cant afford for the AWS.
So, I request you to give me the weights file.
Thanks in advance.
Traceback (most recent call last):
File “generate_captions5.py”, line 64, in
tokenizer = load(open(‘descriptions.txt’, ‘rb’))
_pickle.UnpicklingError: could not find MARK
I am having the same issue as well. I first did it will the MS COCO dataset because it has many more images and captions, but when I ran into the issue, I followed the tutorial with the Flicker Dataset and I am running into the same issue again. Has anyone figured out the solution?
I had copied the code correctly, but I had been using the data generator because the COCO dataset has so much data. When I tried again with the Flicker dataset, I used the data generator as well, because I wasn’t sure if my 16 gigs of RAM would be enough to load all the data in at once. I am trying again, but without the data generator. I hope it works
It is not generating the exact same caption for each image, but it does place “a man in a red shirt is” at the beginning of each caption and the captions do not seem to be accurate.
File “”, line 1, in
runfile(‘C:/Users/Owner/.spyder-py3/ML/4.py’, wdir=’C:/Users/Owner/.spyder-py3/ML’)
File “C:\Users\Owner\Anaconda_3\lib\site-packages\spyder\utils\site\sitecustomize.py”, line 705, in runfile
execfile(filename, namespace)
File “C:\Users\Owner\Anaconda_3\lib\site-packages\spyder\utils\site\sitecustomize.py”, line 102, in execfile
exec(compile(f.read(), filename, ‘exec’), namespace)
File “C:/Users/Owner/.spyder-py3/ML/4.py”, line 161, in
model = define_model(vocab_size, max_length)
File “C:/Users/Owner/.spyder-py3/ML/4.py”, line 129, in define_model
plot_model(model, to_file=’model.png’, show_shapes=True)
File “C:\Users\Owner\Anaconda_3\lib\site-packages\keras\utils\vis_utils.py”, line 135, in plot_model
dot = model_to_dot(model, show_shapes, show_layer_names, rankdir)
File “C:\Users\Owner\Anaconda_3\lib\site-packages\keras\utils\vis_utils.py”, line 56, in model_to_dot
_check_pydot()
File “C:\Users\Owner\Anaconda_3\lib\site-packages\keras\utils\vis_utils.py”, line 31, in _check_pydot
raise ImportError(‘Failed to import pydot. You must install pydot’
ImportError: Failed to import pydot. You must install pydot and graphviz for pydotprint to work.
getting this even if i installed pydot and graphviz
I have trained the data using progressive loading and I stopped after 4 iterations, with a loss of 3.4952.
I am unable to understand this part,
In this simple example we will discard the loading of the development dataset and model checkpointing and simply save the model after each training epoch. You can then go back and load/evaluate each saved model after training to find the one we the lowest loss that you can then use in the next section.
Do you mean we have to load test set in the same way using progressive loading ?
Please help me understanding how to load the test set.
Error by runing “The complete code example is listed below.” in the Loading Data section:
Message Body:
Dataset: 6000
Descriptions: train=6000
Traceback (most recent call last):
File “task2.py”, line 64, in
train_features = load_photo_features(‘features.pkl’, train)
File “task2.py”, line 53, in load_photo_features
features = {k: all_features[k] for k in dataset}
File “task2.py”, line 53, in
features = {k: all_features[k] for k in dataset}
KeyError: ‘878758390_dd2cdc42f6’
Hello sir I’m learning from your articles that I find very informative and educational, I’ve been trying to compile this code :
# extract features from all images
directory = ‘Flicker8k_Dataset’
features = extract_features(directory)
print(‘Extracted Features: %d’ % len(features))
# save to file
dump(features, open(‘features.pkl’, ‘wb’))
but an error occurred and I don’t understand it can you help me fix it and thanks for all of you
here’s the mistake I made:
PermissionError Traceback (most recent call last)
in ()
1 # extract features from all images
2 directory = ‘Flicker8k_Dataset’
—-> 3 features = extract_features(directory)
4 print(‘Extracted Features: %d’ % len(features))
5 # save to file
in extract_features(directory)
13 # load an image from file
14 filename = directory + ‘/’ + name
—> 15 image = load_img(filename, target_size=(224, 224))
16 # convert the image pixels to a numpy array
17 image = img_to_array(image)
~\Anaconda3\envs\envir1\lib\site-packages\keras\preprocessing\image.py in load_img(path, grayscale, target_size, interpolation)
360 raise ImportError(‘Could not import PIL.Image. ‘
361 ‘The use of array_to_img requires PIL.’)
–> 362 img = pil_image.open(path)
363 if grayscale:
364 if img.mode != ‘L’:
~\Anaconda3\envs\envir1\lib\site-packages\PIL\Image.py in open(fp, mode)
2546
2547 if filename:
-> 2548 fp = builtins.open(filename, “rb”)
2549 exclusive_fp = True
2550
Hi Jason,
when I try to compile code related to the extracted features from all images I get this error that is “Permission denied” you told me earlier that Looks like the dataset is missing or is not available on my workstation I tried to fix the trick but in vain.
Do you have any idea how I could do that?
Do I need a user right or something like that?
or maybe I need to reload the database?
You appear to have a problem loading the data from your hard drive. Perhaps you stored the data in a location where you/your code does not have permission to read?
Perhaps you are using a notebook or an IDE as another user?
Try running from the command line and check file permissions.
Thank you very much mr.jason but I have some problems after download the pretrained model when make the model prediction
‘
—————————————————————————
FailedPreconditionError Traceback (most recent call last)
~/.local/lib/python3.6/site-packages/tensorflow/python/client/session.py in _do_call(self, fn, *args)
1349 try:
-> 1350 return fn(*args)
1351 except errors.OpError as e:
~/.local/lib/python3.6/site-packages/tensorflow/python/framework/errors_impl.py in __exit__(self, type_arg, value_arg, traceback_arg)
472 compat.as_text(c_api.TF_Message(self.status.status)),
–> 473 c_api.TF_GetCode(self.status.status))
474 # Delete the underlying status object from memory otherwise it stays alive
FailedPreconditionError: Attempting to use uninitialized value block1_conv2_5/kernel
[[Node: block1_conv2_5/kernel/read = Identity[T=DT_FLOAT, _class=[“loc:@block1_conv2_5/kernel”], _device=”/job:localhost/replica:0/task:0/device:CPU:0″](block1_conv2_5/kernel)]]
During handling of the above exception, another exception occurred:
FailedPreconditionError Traceback (most recent call last)
in ()
24 return features
25 directory = ‘../ProjectPattern/Flickr8k_Dataset/Flicker8k_Dataset’
—> 26 features =extract_feature(directory)
27 dump(features,open(“feature.pkl”,”wb”))
in extract_feature(directory)
17 img =preprocess_input(img)
18 #extract feature by make prediction use the pretrained model
—> 19 feature = model.predict(img,verbose=0)
20 #extract img_id
21 img_id = name.split(‘.’)[0]
~/.local/lib/python3.6/site-packages/tensorflow/python/keras/_impl/keras/engine/training.py in predict(self, x, batch_size, verbose, steps)
1811 f = self.predict_function
1812 return self._predict_loop(
-> 1813 f, ins, batch_size=batch_size, verbose=verbose, steps=steps)
1814
1815 def train_on_batch(self, x, y, sample_weight=None, class_weight=None):
~/.local/lib/python3.6/site-packages/tensorflow/python/keras/_impl/keras/engine/training.py in _predict_loop(self, f, ins, batch_size, verbose, steps)
1306 else:
1307 ins_batch = _slice_arrays(ins, batch_ids)
-> 1308 batch_outs = f(ins_batch)
1309 if not isinstance(batch_outs, list):
1310 batch_outs = [batch_outs]
FailedPreconditionError: Attempting to use uninitialized value block1_conv2_5/kernel
[[Node: block1_conv2_5/kernel/read = Identity[T=DT_FLOAT, _class=[“loc:@block1_conv2_5/kernel”], _device=”/job:localhost/replica:0/task:0/device:CPU:0″](block1_conv2_5/kernel)]]
Caused by op ‘block1_conv2_5/kernel/read’, defined at:
File “/usr/lib/python3.6/runpy.py”, line 193, in _run_module_as_main
“__main__”, mod_spec)
File “/usr/lib/python3.6/runpy.py”, line 85, in _run_code
exec(code, run_globals)
File “/home/abdo96/.local/lib/python3.6/site-packages/ipykernel_launcher.py”, line 16, in
app.launch_new_instance()
File “/home/abdo96/.local/lib/python3.6/site-packages/traitlets/config/application.py”, line 658, in launch_instance
app.start()
File “/home/abdo96/.local/lib/python3.6/site-packages/ipykernel/kernelapp.py”, line 478, in start
self.io_loop.start()
File “/home/abdo96/.local/lib/python3.6/site-packages/zmq/eventloop/ioloop.py”, line 177, in start
super(ZMQIOLoop, self).start()
File “/home/abdo96/.local/lib/python3.6/site-packages/tornado/ioloop.py”, line 888, in start
handler_func(fd_obj, events)
File “/home/abdo96/.local/lib/python3.6/site-packages/tornado/stack_context.py”, line 277, in null_wrapper
return fn(*args, **kwargs)
File “/home/abdo96/.local/lib/python3.6/site-packages/zmq/eventloop/zmqstream.py”, line 440, in _handle_events
self._handle_recv()
File “/home/abdo96/.local/lib/python3.6/site-packages/zmq/eventloop/zmqstream.py”, line 472, in _handle_recv
self._run_callback(callback, msg)
File “/home/abdo96/.local/lib/python3.6/site-packages/zmq/eventloop/zmqstream.py”, line 414, in _run_callback
callback(*args, **kwargs)
File “/home/abdo96/.local/lib/python3.6/site-packages/tornado/stack_context.py”, line 277, in null_wrapper
return fn(*args, **kwargs)
File “/home/abdo96/.local/lib/python3.6/site-packages/ipykernel/kernelbase.py”, line 283, in dispatcher
return self.dispatch_shell(stream, msg)
File “/home/abdo96/.local/lib/python3.6/site-packages/ipykernel/kernelbase.py”, line 233, in dispatch_shell
handler(stream, idents, msg)
File “/home/abdo96/.local/lib/python3.6/site-packages/ipykernel/kernelbase.py”, line 399, in execute_request
user_expressions, allow_stdin)
File “/home/abdo96/.local/lib/python3.6/site-packages/ipykernel/ipkernel.py”, line 208, in do_execute
res = shell.run_cell(code, store_history=store_history, silent=silent)
File “/home/abdo96/.local/lib/python3.6/site-packages/ipykernel/zmqshell.py”, line 537, in run_cell
return super(ZMQInteractiveShell, self).run_cell(*args, **kwargs)
File “/home/abdo96/.local/lib/python3.6/site-packages/IPython/core/interactiveshell.py”, line 2728, in run_cell
interactivity=interactivity, compiler=compiler, result=result)
File “/home/abdo96/.local/lib/python3.6/site-packages/IPython/core/interactiveshell.py”, line 2850, in run_ast_nodes
if self.run_code(code, result):
File “/home/abdo96/.local/lib/python3.6/site-packages/IPython/core/interactiveshell.py”, line 2910, in run_code
exec(code_obj, self.user_global_ns, self.user_ns)
File “”, line 26, in
features =extract_feature(directory)
File “”, line 2, in extract_feature
model = VGG19()
File “/home/abdo96/.local/lib/python3.6/site-packages/keras/applications/vgg19.py”, line 117, in VGG19
x = Conv2D(64, (3, 3), activation=’relu’, padding=’same’, name=’block1_conv2′)(x)
File “/home/abdo96/.local/lib/python3.6/site-packages/keras/engine/topology.py”, line 590, in __call__
self.build(input_shapes[0])
File “/home/abdo96/.local/lib/python3.6/site-packages/keras/layers/convolutional.py”, line 138, in build
constraint=self.kernel_constraint)
File “/home/abdo96/.local/lib/python3.6/site-packages/keras/legacy/interfaces.py”, line 91, in wrapper
return func(*args, **kwargs)
File “/home/abdo96/.local/lib/python3.6/site-packages/keras/engine/topology.py”, line 414, in add_weight
constraint=constraint)
File “/home/abdo96/.local/lib/python3.6/site-packages/keras/backend/tensorflow_backend.py”, line 392, in variable
v = tf.Variable(value, dtype=tf.as_dtype(dtype), name=name)
File “/home/abdo96/.local/lib/python3.6/site-packages/tensorflow/python/ops/variables.py”, line 229, in __init__
constraint=constraint)
File “/home/abdo96/.local/lib/python3.6/site-packages/tensorflow/python/ops/variables.py”, line 376, in _init_from_args
self._snapshot = array_ops.identity(self._variable, name=”read”)
File “/home/abdo96/.local/lib/python3.6/site-packages/tensorflow/python/ops/array_ops.py”, line 127, in identity
return gen_array_ops.identity(input, name=name)
File “/home/abdo96/.local/lib/python3.6/site-packages/tensorflow/python/ops/gen_array_ops.py”, line 2134, in identity
“Identity”, input=input, name=name)
File “/home/abdo96/.local/lib/python3.6/site-packages/tensorflow/python/framework/op_def_library.py”, line 787, in _apply_op_helper
op_def=op_def)
File “/home/abdo96/.local/lib/python3.6/site-packages/tensorflow/python/framework/ops.py”, line 3160, in create_op
op_def=op_def)
File “/home/abdo96/.local/lib/python3.6/site-packages/tensorflow/python/framework/ops.py”, line 1625, in __init__
self._traceback = self._graph._extract_stack() # pylint: disable=protected-access
FailedPreconditionError (see above for traceback): Attempting to use uninitialized value block1_conv2_5/kernel
[[Node: block1_conv2_5/kernel/read = Identity[T=DT_FLOAT, _class=[“loc:@block1_conv2_5/kernel”], _device=”/job:localhost/replica:0/task:0/device:CPU:0″](block1_conv2_5/kernel)]]
‘
so the problem solved by specifying which weights used not None(random initialization)
but used pretraining on ‘imagenet’ and specify the include_top argument to be True
~/.local/lib/python3.6/site-packages/tensorflow/python/layers/network.py in _run_internal_graph(self, inputs, masks)
896
897 # Apply activity regularizer if any:
–> 898 if layer.activity_regularizer is not None:
899 regularization_losses = [
900 layer.activity_regularizer(x) for x in computed_tensors
AttributeError: ‘InputLayer’ object has no attribute ‘activity_regularizer’
I used verison 2.1.5
the another question No, I didn’t copy all the code exactly but I understand the idea and imitate it in some parts and in other parts are written in my own
Hi, jason brownlee thanks for this fatanstic article.
I am curios to know that how he while loop is getting stopped in progressive training data genertor function ?
Please explain this to me
Sir,
Great article indeed! But I’m facing problems downloading the model. Every time I try to download the model with the code you provided, after sometimes the connection gets lost and shows this message: “ConnectionResetError: [WinError 10054] An existing connection was forcibly closed by the remote host”
Can you give any alternate solution to this problem? I have tried several times but failed.
– Perhaps you can review the code in Keras that downloads the model and download it manually?
– Perhaps you can use an alternate internet connection to download the model?
– Perhaps you can setup an EC2 instance and download the model there to work with?
– Perhaps you can ask a friend or peer to download the model for you?
Hello Sir,
Your article is very interesting and easy to understand.
For the above code I am getting a very accurate caption if I use the same image as you have shown in the figure. But if I use some other image I am getting some description but not a correct one. So could you please tell me what is the problem here?
Thanks in advance.
I have trained the data using progressive loading untill 19 iterations.
Caption for your provided test image is generated. However, for new one( image of rabbit and other animals) i got the caption “dog is running …”.
Is there a way to train the models more than 19 iterations to get a better result or how to solve this issue?
Hey , Jason the post is really amazing , but can you help to load me this especially the first step (Keras) which will probably take 1hour in CPU , I wanna test that I’m in GPU , how shall I be able to get that , Keras (GPU) so as to save time tho.
Thanks Jason.
Hey Jason wassup , can you please explain what is meant by these lines :-
filepath = ‘model-ep{epoch:03d}-loss{loss:.3f}-val_loss{val_loss:.3f}.h5′
checkpoint = ModelCheckpoint(filepath, monitor=’val_loss’, verbose=1, save_best_only=True, mode=’min’)
1. The line in filepath especially this – epoch:03d}-loss{loss:.3f}-val_loss{val_loss:.3f} ?
hey jason!! I ran the code that returns a dictionary of image identifier to image features. but did nt work and gave the following error. Please Guide me how to fix this bug.
FileNotFoundError Traceback (most recent call last)
in ()
39 # extract features from all images
40 directory = ‘Flicker8k_Dataset’
—> 41 features = extract_features(directory)
42 print(‘Extracted Features: %d’ % len(features))
43 # save to file
in extract_features(directory)
18 # extract features from each photo
19 features = dict()
—> 20 for name in listdir(directory):
21 # load an image from file
22 filename = directory + ‘/’ + name
FileNotFoundError: [WinError 3] The system cannot find the path specified: ‘Flicker8k_Dataset’
jason i have code and dataset in the same directory.I can access a test png image from the same directory but i am unable to access the dataset images..I don’t know whats wrong with it.Please help me solving the issue because i can also access the flick_text dataset.The only issue i have with images dataset.
1) I have installed the latest environment except tensorflow 1.5 becuase higher versions not working for me.
2) I have dataset and code in the same directory
3) I ran the code from command line but still found no luck.
4) I have exactly copied the code.
5) I searched the error on stackoverflow but never found any authentic solution yet.
Now i am facing an error while running the code “# define the model
model = define_model(vocab_size, max_length)” in the progressive training section.I have installed pydot and graphviz libraries but still come up with the following error.
C:\anaconda3\lib\site-packages\keras\utils\vis_utils.py in _check_pydot()
24 # Attempt to create an image of a blank graph
25 # to check the pydot/graphviz installation.
—> 26 pydot.Dot.create(pydot.Dot())
27 except OSError:
28 raise OSError(
C:\anaconda3\lib\site-packages\pydot.py in create(self, prog, format)
1881 raise Exception(
1882 ‘”{prog}” not found in path.’.format(
-> 1883 prog=prog))
1884 else:
1885 raise
In model evaluation section when i come to run the code
” filename = ‘model-ep002-loss3.245-val_loss3.612.h5’
model = load_model(filename)”
I come up with the error
“OSError: Unable to open file (unable to open file: name = ‘model-ep002-loss3.245-val_loss3.612.h5’, errno = 2, error message = ‘No such file or directory’, flags = 0, o_flags = 0)”
i want to ask where is the file ‘model-ep002-loss3.245-val_loss3.612.h5’??and how to select the file??should i pick up the file with least loss value???
Jason i trained the model upto 20 epochs.Now please explain which model i should use for prediction? and if i should select from 1-5 then why i am running it for 20 epochs?
I just want to understand the the whole pipeline.The CNN-VGG16 extracts the the features of image to a fixed length 256 vector.The text is cleaned and preprocesed , the RNN-LSTM predicts the next words of the sequence.
What is the strategy and intuition of the encoder/decoder?
how these two modalities (image and text) are merged by FF?
What alternative algorithms i can used for photo feature extraction or what extra modifications in the model is likely to perform better results?? or what extra building blocks needs to be added to the current tutorial for getting even refined results?
Dropout layer usually used to get rid of over-fitting.While Dense layer is usually used to change the dimensions.
Why Dropout_1 and dropout_2 are not changing the dimensions while we set some of the connections to 0 ??What is the the intuition behind Dropout_1 and Dropout_2 Layer??Please suggest some links or explaination
Hi Jason!
I implemented the above mentioned tutorial using VGG16 CNN architecture.Please let me know the code or tutorial that implements Inceptin model for image captioning.
Dear abbas,
kindly how did you solve your problem? I have the same problem :
PermissionError : [Errno 13] Permission Denied: Flickr8k_Dataset/Flicker8k_Dataset’
Hi Jason Brownlee! Good tutorial. I doubt how model guarantee to generate semantically correct sentences. Please share your intuition or any available resource. For example, there is three word in vocabulary “is, dog, running”, so how could we guarantee model will generate a sentence with correct grammar structure like ‘dog is running’. Thank you
I am trying to train my model using inception model.While training i come with the following error.How do i change the Shape of the input?
CODE:
# train the model, run epochs manually and save after each epoch
epochs = 5
steps = len(train_descriptions)
for i in range(epochs):
# create the data generator
generator = data_generator(train_descriptions, train_features, tokenizer, max_length)
# fit for one epoch
model.fit_generator(generator, epochs=1, steps_per_epoch=steps, verbose=1)
# save model
model.save(‘inception-model_’ + str(i) + ‘.h5’)
ERROR:
Error when checking input: expected input_3 to have shape (4096,) but got array with shape (2048,)
jason my model is not loading even the print command is not giving me the output..
the following block of code is not giving the output..where is the error?
# load the model
filename = ‘xraysmodel_8.h5’
print(‘abbas’)
model = load_model(filename)
# evaluate model
evaluate_model(model, test_descriptions, test_features, tokenizer, max_length)
I trained the model when I save the image from “http://media.einfachtierisch.de/thumbnail/600/0/media.einfachtierisch.de/images/2017/07/glueckliche-freigaenger-katze-Shutterstock-Olga-Visav_504063007.jpg” then I am still getting the text
startseq dog is running through the grass endseq
what do I make wrong?
The test image appears as intended.
Hi Jason
It was a nice article.
I trained the model for 12 epochs in my gpu.
But the prediction was not so accurate.
Most of the times I got the prediction with “man in blue shirt is riding his bohemian on the street” . with the keywords in this sentence.
Finally someone who understands the importance of separating mathematics from ‘implementation’. The drawback most tutorials have is that they try to discuss both simultaneously and hence making things quite confusing. ‘Implementation’ requires a completely different approach from understanding the theory.
Another wonderful thing about this tutorial is that you actually go through the preprocessing steps. This is where I usually get stuck because most university and online courses and tutorials do not discuss them at all.
Traceback (most recent call last):
File “C:\Users\hp\AppData\Local\Programs\Python\Python36\lib\site-packages\pydot.py”, line 1861, in create
stderr=subprocess.PIPE, stdout=subprocess.PIPE)
File “C:\Users\hp\AppData\Local\Programs\Python\Python36\lib\subprocess.py”, line 709, in __init__
restore_signals, start_new_session)
File “C:\Users\hp\AppData\Local\Programs\Python\Python36\lib\subprocess.py”, line 997, in _execute_child
startupinfo)
FileNotFoundError: [WinError 2] The system cannot find the file specified
During handling of the above exception, another exception occurred:
Traceback (most recent call last):
File “C:\Users\hp\AppData\Local\Programs\Python\Python36\lib\site-packages\keras\utils\vis_utils.py”, line 26, in _check_pydot
pydot.Dot.create(pydot.Dot())
File “C:\Users\hp\AppData\Local\Programs\Python\Python36\lib\site-packages\pydot.py”, line 1867, in create
raise OSError(*args)
FileNotFoundError: [WinError 2] “dot.exe” not found in path.
During handling of the above exception, another exception occurred:
Traceback (most recent call last):
File “C:\Users\hp\Desktop\iitp\caption_new\5.py”, line 163, in
model = define_model(vocab_size, max_length)
File “C:\Users\hp\Desktop\iitp\caption_new\5.py”, line 131, in define_model
plot_model(model, to_file=’model.png’, show_shapes=True)
File “C:\Users\hp\AppData\Local\Programs\Python\Python36\lib\site-packages\keras\utils\vis_utils.py”, line 133, in plot_model
dot = model_to_dot(model, show_shapes, show_layer_names, rankdir)
File “C:\Users\hp\AppData\Local\Programs\Python\Python36\lib\site-packages\keras\utils\vis_utils.py”, line 55, in model_to_dot
_check_pydot()
File “C:\Users\hp\AppData\Local\Programs\Python\Python36\lib\site-packages\keras\utils\vis_utils.py”, line 29, in _check_pydot
‘pydot failed to call GraphViz.’
OSError: pydot failed to call GraphViz.Please install GraphViz (https://www.graphviz.org/) and ensure that its executables are in the $PATH.
So,I followed exactly all the steps as shown above and after progressive loading,when the model is getting compiled,it keeps on running epoch 1/1 over and over again and keeps saving different .h5 files. So,I stopped the process after 5 iterations and got a loss of ~3.38 and when I am generating captions,it is not giving even close captions. What should I do to improve my results? Should I let the model to be trained for more iterations or will it cause over-fitting?
Hi Jason,
I am trying to create image caption for my own datasets. Like I have 4k images with single caption. I am able to run and create model for Flickr8K dataset.Its work properly. But when I use my dataset I am able to generate all required files except model. When I try to train the model it gives error –
__________________________________________________________________________________________________
Layer (type) Output Shape Param # Connected to
==================================================================================================
input_2 (InputLayer) (None, 27) 0
__________________________________________________________________________________________________
input_1 (InputLayer) (None, 4096) 0
__________________________________________________________________________________________________
embedding_1 (Embedding) (None, 27, 256) 1058048 input_2[0][0]
__________________________________________________________________________________________________
dropout_1 (Dropout) (None, 4096) 0 input_1[0][0]
__________________________________________________________________________________________________
dropout_2 (Dropout) (None, 27, 256) 0 embedding_1[0][0]
__________________________________________________________________________________________________
dense_1 (Dense) (None, 256) 1048832 dropout_1[0][0]
__________________________________________________________________________________________________
lstm_1 (LSTM) (None, 256) 525312 dropout_2[0][0]
__________________________________________________________________________________________________
add_1 (Add) (None, 256) 0 dense_1[0][0]
lstm_1[0][0]
__________________________________________________________________________________________________
dense_2 (Dense) (None, 256) 65792 add_1[0][0]
__________________________________________________________________________________________________
dense_3 (Dense) (None, 4133) 1062181 dense_2[0][0]
==================================================================================================
Total params: 3,760,165
Trainable params: 3,760,165
Non-trainable params: 0
__________________________________________________________________________________________________
None
Traceback (most recent call last):
File “train2.py”, line 179, in
model.fit([X1train, X2train], ytrain, epochs=20, verbose=2, callbacks=[checkpoint], validation_data=([X1test, X2test], ytest))
ValueError: Error when checking input: expected input_1 to have 2 dimensions, but got array with shape (10931, 7, 7, 512)
Great article. I just wanted to ask where to do you start developing code for such implementations. Do you refer papers and code from scratch or refer material that explains implementation code in detail and translate it to keras ?
Great tutorial. I am wondering what the best way to limit the vocabulary size. As num_words does not influence tokenizer.fit_on_text, are these changes correct:
Create a list of the n most frequent words you want to work with from the dataset, save them to file, then use them to filter the dataset prior to modeling.
One more question. For Progressive Loading it seems that the batch size is 1 from the data_generator. If I would like to create a batch i run into the problem of size defining as the “create_sequences” output is variable in size from:
How can I create a batch of “in_img, in_seq, out_word” (if each sequence will be a different length)? Is there an easy way to make a larger batch size? Again thank you for your help.
Sorry I didn’t explain well. From my understanding your “data_generator” releases data for 1 image into “model.fit_generator” at a time. I would like to change this to a batch of images.
The problem I am having is if I try to use a code structure like below, I am not able to create the empty arrays (unless I pad each line to “max_length”, and make “batch_features = np.zeros((batch_size, max_length, NN_input_shape))”).
#code structure
def generator(features, labels, batch_size):
# Create empty arrays to contain batch of features and labels#
batch_features = np.zeros((batch_size, 64, 64, 3))
batch_labels = np.zeros((batch_size,1))
while True:
for i in range(batch_size):
# choose random index in features
index= random.choice(len(features),1)
batch_features[i] = some_processing(features[index])
batch_labels[i] = labels[index]
yield batch_features, batch_labels
Also, is there somewhere I can donate money to your site?
Error message:
ayer time_distributed_11 was called with an input that isn’t a symbolic tensor. Received type: . Full input: []. All inputs to the layer should be tensors.
I’m looking to find the output X1 by using (img1) as an input but I get this error message.
I am trying to use the model you presented above for recognizing handwritten documents. In literature the feature extraction stage for OCR produces another 2-D matrix for each image (a feature vector is found for each column vector in the image). How can I then convert this 2-D matrix into a 1-D vector?
Firstly I would like to thank you for sharing your knowledge and helping everyone. I am new to this field now. Could you please explain, why are removing all single letter words?
Yes, removing words having numbers and removing punctuation does make sense. Even removing single letter word also makes sense, but by removing “a”, wont it affect formation of new sentences?
ModuleNotFoundError: No module named ‘_pywrap_tensorflow_internal’
During handling of the above exception, another exception occurred:
ImportError Traceback (most recent call last)
in ()
1 from numpy import array
2 from pickle import load
—-> 3 from keras.preprocessing.text import Tokenizer
4 from keras.preprocessing.sequence import pad_sequences
5 from keras.utils import to_categorical
~\AppData\Local\Continuum\anaconda3\envs\tensorflow\lib\site-packages\keras\__init__.py in ()
1 from __future__ import absolute_import
2
—-> 3 from . import utils
4 from . import activations
5 from . import applications
~\AppData\Local\Continuum\anaconda3\envs\tensorflow\lib\site-packages\keras\utils\__init__.py in ()
4 from . import data_utils
5 from . import io_utils
—-> 6 from . import conv_utils
7
8 # Globally-importable utils.
~\AppData\Local\Continuum\anaconda3\envs\tensorflow\lib\site-packages\keras\utils\conv_utils.py in ()
7 from six.moves import range
8 import numpy as np
—-> 9 from .. import backend as K
10
11
~\AppData\Local\Continuum\anaconda3\envs\tensorflow\lib\site-packages\keras\backend\__init__.py in ()
85 elif _BACKEND == ‘tensorflow’:
86 sys.stderr.write(‘Using TensorFlow backend.\n’)
—> 87 from .tensorflow_backend import *
88 else:
89 # Try and load external backend.
~\AppData\Local\Continuum\anaconda3\envs\tensorflow\lib\site-packages\keras\backend\tensorflow_backend.py in ()
4
5 import tensorflow as tf
—-> 6 from tensorflow.python.framework import ops as tf_ops
7 from tensorflow.python.training import moving_averages
8 from tensorflow.python.ops import tensor_array_ops
~\AppData\Local\Continuum\anaconda3\envs\tensorflow\lib\site-packages\tensorflow\python\__init__.py in ()
47 import numpy as np
48
—> 49 from tensorflow.python import pywrap_tensorflow
50
51 # Protocol buffers
~\AppData\Local\Continuum\anaconda3\envs\tensorflow\lib\site-packages\tensorflow\python\pywrap_tensorflow.py in ()
72 for some common reasons and solutions. Include the entire stack trace
73 above this error message when asking for help.””” % traceback.format_exc()
—> 74 raise ImportError(msg)
75
76 # pylint: enable=wildcard-import,g-import-not-at-top,unused-import,line-too-long
ImportError: Traceback (most recent call last):
File “C:\Users\gaurav.anand\AppData\Local\Continuum\anaconda3\envs\tensorflow\lib\site-packages\tensorflow\python\pywrap_tensorflow_internal.py”, line 14, in swig_import_helper
return importlib.import_module(mname)
File “C:\Users\gaurav.anand\AppData\Local\Continuum\anaconda3\envs\tensorflow\lib\importlib\__init__.py”, line 126, in import_module
return _bootstrap._gcd_import(name[level:], package, level)
File “”, line 994, in _gcd_import
File “”, line 971, in _find_and_load
File “”, line 955, in _find_and_load_unlocked
File “”, line 658, in _load_unlocked
File “”, line 571, in module_from_spec
File “”, line 922, in create_module
File “”, line 219, in _call_with_frames_removed
ImportError: DLL load failed: The specified module could not be found.
During handling of the above exception, another exception occurred:
Traceback (most recent call last):
File “C:\Users\gaurav.anand\AppData\Local\Continuum\anaconda3\envs\tensorflow\lib\site-packages\tensorflow\python\pywrap_tensorflow.py”, line 58, in
from tensorflow.python.pywrap_tensorflow_internal import *
File “C:\Users\gaurav.anand\AppData\Local\Continuum\anaconda3\envs\tensorflow\lib\site-packages\tensorflow\python\pywrap_tensorflow_internal.py”, line 17, in
_pywrap_tensorflow_internal = swig_import_helper()
File “C:\Users\gaurav.anand\AppData\Local\Continuum\anaconda3\envs\tensorflow\lib\site-packages\tensorflow\python\pywrap_tensorflow_internal.py”, line 16, in swig_import_helper
return importlib.import_module(‘_pywrap_tensorflow_internal’)
File “C:\Users\gaurav.anand\AppData\Local\Continuum\anaconda3\envs\tensorflow\lib\importlib\__init__.py”, line 126, in import_module
return _bootstrap._gcd_import(name[level:], package, level)
ModuleNotFoundError: No module named ‘_pywrap_tensorflow_internal’
Yes, it has now worked somehow after creating new environment with latest tensorflow version. However, it is giving me another possibly known error. Please have a look once.
c:\users\gaurav.anand\appdata\local\continuum\anaconda3\envs\tensorflow1.7\lib\site-packages\keras\engine\training.py in train_on_batch(self, x, y, sample_weight, class_weight)
1207 x, y,
1208 sample_weight=sample_weight,
-> 1209 class_weight=class_weight)
1210 if self._uses_dynamic_learning_phase():
1211 ins = x + y + sample_weights + [1.]
c:\users\gaurav.anand\appdata\local\continuum\anaconda3\envs\tensorflow1.7\lib\site-packages\keras\engine\training.py in _standardize_user_data(self, x, y, sample_weight, class_weight, check_array_lengths, batch_size)
785 feed_output_shapes,
786 check_batch_axis=False, # Don’t enforce the batch size.
–> 787 exception_prefix=’target’)
788
789 # Generate sample-wise weight values given the sample_weight and
c:\users\gaurav.anand\appdata\local\continuum\anaconda3\envs\tensorflow1.7\lib\site-packages\keras\engine\training_utils.py in standardize_input_data(data, names, shapes, check_batch_axis, exception_prefix)
125 ‘: expected ‘ + names[i] + ‘ to have ‘ +
126 str(len(shape)) + ‘ dimensions, but got array ‘
–> 127 ‘with shape ‘ + str(data_shape))
128 if not check_batch_axis:
129 data_shape = data_shape[1:]
ValueError: Error when checking target: expected dense_6 to have 4 dimensions, but got array with shape (11, 1, 3857)
I have made an only change in line 114:
inputs1 = Input(shape=(4096,)) >> inputs1 = Input(shape=(7, 7, 512,))
Because, it was earlier giving error for Data structure mismatch for inputs1 but now it is giving same error in 3rd dense layer.
As I read other comments, it is a common issue.
Could you please share your opinion how to get rid of this ?
Any external guide to data structure mismatch would be much appreciated.
I guess the problem is that I am defining model’s inputs1 with shape
inputs1 = Input(shape=(4096,))
but data_generator() method is generating in_img of shape (11,7,7,512).
Probably there is a need to change format of features.pkl file’s data.
Some image captioning libraries (such as Im2txt) are able to provide a confidence score for their generated captions. This helps us when we have a caption that is wrong, so that we can at least tell whether or not by the confidence if the model was ‘unsure’ about the text it generated. How would we go about adding something like that to this?
Thank you for your response, Dr. Bronwlee. Okay, but does ‘accuracy’ mean anything? I mean Keras is doing some calculations to get these numbers, right? Even if it does not help us to learn about the model’s performance, does the accuracy metric represent anything?
5,5 million parameters… and 8000 examples? Clearly, the old rule doesn’t apply that the training data should be at least as many as the # parameters. Is there a way to think about this? Clearly, I shouldn’t use my intuition from a linear system of equations?
Many thanks for your kind help. When we use model.fit for training, we are using training data as well as validation data. But When we use mode.fit_generator (Progressive Loading), in that case why we are not using validation data?
I added that progressive loading much later, as a simpler version for those that were having trouble. You can update it to use validation data if you wish.
Due to internet connectivity, my download when i run feature_extraction.py code.
later i tried to run the code again and it is not downloading and not showing error also.
without features.pkl file i cant proceed furthur.
is there any other way to make it download
Is the feature order directly tied to the caption? How much does the model rely on input’s order?
Imagine if the extracted features of an image are [‘dog’, ‘water’, ‘blue’, ‘sand’] and the caption is “dog at the beach”, now this is correct and expected caption.
Now the same image, but the features are [‘sand’, ‘water’, ‘dog’, ‘blue’], how different might the new caption be?
Can we achieve the same caption with differently ordered features vector?
I am new to deep learning implementation.I dont know where to insert the required techniques inside the code written by you.? Can you suggest a tutorial or some sourse for it
1. The training vocab and the testing vocab are different, that I can see. Why would a trained model ever encounter a word only in the test set? Wouldn’t test set captions (and hence the words in the test) only be used when calculating BLEU scores?
2. Could this ‘unknown word’ token ever be generated by the model?
3. When adding new data with new words to the training data, why would you stick with the older vocabulary and not ‘evaluate’ the newer one?
Thank you for this clear and thorough tutorial. I have two questions to make sure I understand things correctly:
1. By removing single letters from the descriptions, the generated descriptions will never include/generate descriptions with ‘a’ or ‘I’. Is that correct?
2. Because load_clean_descriptions filters by testing/training the tokenizer may be missing words that are in the test set but not the training set. Is this correct? And for fitting I understand you want to keep test/training data separate, but for the vocabulary ideally you would include the entire vocabulary from both the test and training set. Is this correct?
3. If I understand correctly one could use an even larger vocabulary (would be a bigger model) but in principle there is no reason not to include a larger vocabulary?
Hello
I wanted to know what should be the target validation loss.
Right now, I am getting the best validation loss of 3.86 after 5 epochs. However, you have a lower validation as well as training loss than mine just after two epochs.
Is my model trained enough or should I train again?
I want to test the model with more images.
Can you tell me the source from which i can get images which will run efficiently using the code.Itried some randon images from google but they were unsatisfactory.Also tell me steps to add new image along with model to train it?
Another question is that if feature.pkl file has been created the first time I ran the code and I have it in my directory
do I have to run these commands if I ran the code another time
# extract features from all images
directory = ‘Flicker8k_Dataset’
features = extract_features(directory)
print(‘Extracted Features: %d’ % len(features))
# save to file
dump(features, open(‘features.pkl’, ‘wb’))
Hey Jason, thanks for the tutorial. The model trained fine for me but when I tried to generate caption for a single new image I encountered the following error:
ValueError: Error when checking input: expected input_8 to have shape (110,) but got array with shape (34,)
Hi Jason,
I come back tonight with the question regarding the VGG16.layers.pop() method which seems not to work with Keras 2.2.2…
Before and after pop() and reshaping the model, the light one has exactly the same architecture as the original one…
Features extracted has dim = 1000 which cause me trouble with my Input = (4096,)…
If I change the input to (1000,) the performance is low…
Thanks for the help
Best regards
Jerome
Prasanna Kumar BeheraOctober 15, 2018 at 12:35 am#
Hi Jason,
My question is, are we retraining all the parameters of the VGG16 models in this example?
If yes, why should we train since we are using already trained model?
If no, then what part of the above coding is doing since we have not set layer.trainable = False for any layer?
Please let me when we should train all the layers or when we should not when using a pretrained model like VGG16?
Hy Jason. I am new to ML and you are the source which rise my interest in ML. I am following your above tutorial. I am confuse to get some concept, where you are applying tokenization to the text. You mentioned that ” The model will be provided one word and the photo and generate the next word. After that it recursively run to generate new sentence”.I am just confuse here that what are you doing here? What is the purpose of doing that? Please explain in detail that point or suggest me a source to get help from somewhere else.
Second question is that when we will done with that, the model will generate captions, which are in the data-set (I mean to say exact some captions will be suggested for new unseen images or it can be new captions based on image )..plz explain it in details..
Hi Jason,
Thank you for an amazing tutorial. I learnt many things here. esp. progressive loading. So here I have one query as you explain in “progressive loading” section:
“Finally, we can use the fit_generator() function on the model to train the model with this data generator.
In this simple example we will discard the loading of the development dataset and model checkpointing and simply save the model after each training epoch. You can then go back and load/evaluate each saved model after training to find the one we the lowest loss that you can then use in the next section.”
I have already got all 20 models from 20 epochs by training the “training” dataset. Now how do I check which model is best using the development set?? Because we have not included development set in the fit_generator(). So how to choose the best model from 20 saved models ? Should I apply evaluate() function on development set for each model?? It would be great if you could give me some idea/hint further on this!! Thanks.
HI Jason, Can you tell me what do you mean by 3-4 epochs? I hope that evaluating the model will just go though all the images once and generate descriptions for them and then calculate the BLEU score from that. So, what 3-4 epochs are you speaking about?
OSError: Unable to open file (unable to open file: name = ‘model-ep001-loss3.245-val_loss3.612.h5’, errno = 2, error message = ‘No such file or directory’, flags = 0, o_flags = 0)
I am a computer science and engineering student. Me and team mates are doing the same project. Reply me,
1.Can we develop this using MATLab?
2.Can we use the same code to our project for reference purpose using python?
3.In how many months we can complete it?
4.Suggest me what to use either python or matlab?
Hi Jason. Thank you for this tutorial. I want to develop text-to-image model. Does it work if I change input and output elements? or What would you suggest ?
As, we know that data_generator is yielding one example at a time and each time the function is called, the function execution starts where it previously left off. So, since the “for ids, descs in train_descs.items():” loop is still not complete in the mid-way, it should loop and yield more sequences until it ends.
So, my quesiton is if the loop can continue till all the “train_descs.items()” are encountered, then why do we need the “while 1:” loop there?
I want to know where am I going wrong, kindly let me know.
Can you explain what is 47 in the dimension? I mean, data_generator is outputting one example at a time then instead of 47, shouldn’t it be 1? Can you explain me the dimension?
Hi Jason, You have set steps_per_epoch=len(descriptions) and passed it into model.fit_generator(). As far as I’ve read, steps_per_epoch signify the total no. of batches before a epoch to finish. See this :
I want to clarify how data_generator is feeding the data to fit_generator. I mean, is it giving it one training example at a time or some batch of training examples at a time.
epochs = 20
steps = len(train_descriptions)
for i in range(epochs):
# create the data generator
generator = data_generator(train_descriptions, train_features, tokenizer, max_length)
# fit for one epoch
model.fit_generator(generator, epochs=1, steps_per_epoch=steps, verbose=1)
# save model
model.save(‘model_’ + str(i) + ‘.h5’)
steps_per_epoch represents the no. of batches that will be trained in one epoch.
As you have said before that data_generator is feeding a batch of examples to fit_generator so that should mean that that in one batch, let’s say x examples are being sent for training process. This should mean that no. of batches for 1 epoch training should be (total no. of training examples)/(1 batch size). On running below snippet, total no. of training examples comes out to be 6000.
print(len(train_descriptions))
6000
So,steps_per_epoch should be 6000/(1 batch size), but in your code steps_per_epoch = len(train_descriptions)
Why have you set it so large?
Are you forcing fit_generator to train over one example at a time even though data_generator is generating a batch of training example at a time?
in evaluate_model(mapping, tokenizer, maxlen, model, feature_vector)
33 for ids,descs in mapping.items():#1
34 count += 1
—> 35 pred_caption = generate_desc(feature_vector[ids],tokenizer,model,maxlen)#caption string returned
36 for desc in descs:#2
37 reference.append(desc.split())
KeyError: ‘2258277193_586949ec62’
When I search for this image in my pc, I found that its id and its descriptions are present in the
Flickr8k.lemma.token.txt
cleanedcaptions.txt
However, the image is not present in Flicker8k_Dataset.
I resolved the problem by putting an appropriate image that relates well to its description in Flickr8k.lemma.token.txt. The above image was really missing from the image directory. I reckon that anyone must have faced the same problem as mine.
ValueError: Error when checking input: expected input_3 to have shape (34,) but got array with shape (30,)
Sir,while evaluating the model,I’m getting such an error how should I get rid of it?I exactly typed the code and I’m also using the same dataset as mentioned above.
I am a student. My model is taking an hour or more to train. After training, I’m not getting the desired results. So, I don’t want to retrain it and sit back and see. There could be a high change that it may not work well again. I think AWS requires some bucks for this.
I’m using MacBook Air.
8 GB RAM
i5 5th gen processor
Is there any “free” source to train the model which will take lesser time.
Like many mentioned, it is a very comprehensive tutorial on caption generation. Progressive loading is a big plus.
Do you plan to cover or have some ideas on the topic of using image and description to search for similar images? Example of what I am trying to do: I already implemented CNN CBIR model that extracts features clusters them and when new image comes in, its features are extracted and nearest neighbors are given as similar images suggestions. This works fine, but I would like to enhance it by adding image description in the mix, so that when I give a picture of the steering wheel and specify “car part”, I will be given list of images of the steering wheels, and not all circular options like bike wheels for example.
I thought to use lucene to help with image description search first and then use CNN to find similar images, but not sure if it is the best approach to take as lucene search might throw out images that are relevant, but not well described.
I dont think that trying to come up with a model that would combine the text along with image features will be straight forward or would perform well as oppose to having elasticsearch in the mix where I can take advantage of text search that elastic provides out of the box, but elastic falls short of image search (tried LIRE before and the results were really bad compared to ConvNet approach)
if you have any other ideas or suggestions, I am all ears 🙂
Hey Jason!
Amazing tutorial. Great Learning experience from start till end.
I wanted to ask you what do you mean exactly in the last section of the article under ‘Extensions’ section by,
‘Pre-trained Word Vectors. The model learned the word vectors as part of fitting the model. Better performance may be achieved by using word vectors either pre-trained on the training dataset or trained on a much larger corpus of text, such as news articles or Wikipedia.’
respected sir,
I am not able to download the datasheet from the link that is provided by flickr 8k.
It is showing
The requested URL /HockenmaierGroup/Framing_Image_Description/Flickr8k_Dataset.zip was not found on this server.
Additionally, a 404 Not Found error was encountered while trying to use an ErrorDocument to handle the request.
In the function, create_sequences(), the pad_sequences was generating a list so big that the 17 GB Kaggle RAM was crashing. So I tried appending directly to numpy arrays instead of creating it as a list first. However, now it is taking infinite time to execute. Is there any alternative to this function or any way to increase the rate. Please help
P.S Thanks for uploading the dataset, I spent days searching for it on the internet.
i used progressive loading and after execution there were 20 models one for each epoch.
but further sections are using one single file for model . but i have 20 models.how to proceed?
i have developed a deep learning model with a .csv file as training data.
file contains a column with text data and during execution of the code
could not convert string to float: ‘Moong(Green Gram)’
this error is being displayed.
what should i do?
Jason…..we tried to complete the model generation using progressive loading…total 19 epochs ……And now we are getting outputs but the accuracy is very worse..is there any suggestions to improve the accuracy…..pls help
Great article!
Comprehensive, well-written and well-explained. I used the progressive loading approach and ran the scripts in Google Colab. Everything worked fine (got some errors along the process every now and then, but managed to solve them all). I am currently extracting features using VGG16, VGG19, ResNet50 and Inception and hopefully will make a comparison between them. Thanks for this great post!
I wanted to get your opinion on this. Since I used progressive loading, I do not have a measure for the loss function on the validation dataset, so I took the models and evaluated the BLEU scores directly. However, it’s not straightforward to decide which models gives the best performance and when exactly the model starts to overfit.
I calculated the mean squared error between some “ideal” BLEU scores taken from Marc Tanti et al. (BLEU-1 = 0.6, BLEU-2 = 0.413, BLEU-3 = 0.273, BLEU-4 = 0.178) and the BLEU scores I’ve obtained for my models. The best performing one was actually model_0.h, which was the model calculated after the first epoch. However, I don’t know if the mean squared error is actually very indicative or relevant in this case, but I didn’t know what else to use. From the limited amount of research I’ve done online, I tend to believe that BLEU-4 is a bit more important than the rest of the BLEU scores, but I am not sure. Do you have any suggestions?
Hy Jason!
Thanks for great article.
I tried to run the model through progressive loading. My code is running perfectly. But my model generates generates just 3,4 type of captions for every image. It seems model is being trained on just 3,4 captions. I follow exact your code.
Any suggestion to improve my results.
(PS: I am testing on the same images, on which model has been trained . . .but still result is worse)
~\Anaconda3\lib\site-packages\keras\utils\vis_utils.py in _check_pydot()
18 if pydot is None:
19 raise ImportError(
—> 20 ‘Failed to import pydot. ‘
21 ‘Please install pydot. ‘
22 ‘For example with pip install pydot.’)
ImportError: Failed to import pydot. Please install pydot. For example with pip install pydot.
/usr/local/lib/python3.6/dist-packages/keras/engine/training.py in train_on_batch(self, x, y, sample_weight, class_weight)
1209 x, y,
1210 sample_weight=sample_weight,
-> 1211 class_weight=class_weight)
1212 if self._uses_dynamic_learning_phase():
1213 ins = x + y + sample_weights + [1.]
/usr/local/lib/python3.6/dist-packages/keras/engine/training.py in _standardize_user_data(self, x, y, sample_weight, class_weight, check_array_lengths, batch_size)
749 feed_input_shapes,
750 check_batch_axis=False, # Don’t enforce the batch size.
–> 751 exception_prefix=’input’)
752
753 if y is not None:
/usr/local/lib/python3.6/dist-packages/keras/engine/training_utils.py in standardize_input_data(data, names, shapes, check_batch_axis, exception_prefix)
136 ‘: expected ‘ + names[i] + ‘ to have shape ‘ +
137 str(shape) + ‘ but got array with shape ‘ +
–> 138 str(data_shape))
139 return data
140
ValueError: Error when checking input: expected input_7 to have shape (4096,) but got array with shape (1536,)
Hy Jason!
Thanks for great article.
I am traying to change learning rate to 1e-5 so I change the code like this:
# compile model
opt = SGD(lr=0.01, momentum=0.9)
model.compile(loss=’categorical_crossentropy’, optimizer=’opt’)
# summarize model
model.summary()
return model
but I received this error
ValueError: Unknown optimizer: opt
so how can I change it .
———————–
another thing:
I tried to extract the features by using resnet50 so I only change a little in the code like this :
from keras.applications.resnet50 import ResNet50
from keras.applications.resnet50 import preprocess_input, decode_predictions
and
# load the model
model = ResNet50()
but it is not working , can you help me to change it
jason i am facing the same error while trying inceptionv3
ValueError: Error when checking input: expected input_1 to have shape (4096,) but got array with shape (2048,)
please let me know how to specify the input shape for my inceptionv3?
please write code if possible.
Hi Jason , thank you For this article. I want to ask you what is the best learning rate and regularization to this code Because I tried to use different learning rate but the results was not ok
Hi Jason. Extremely Thank You for this fascinating article. Now I’ve chosen this for my Masters Project. Sir can you give me the Data Flow Diagram for the same upto 2 levels. Actually i’ve done but still want to clarify. So can you please try it.
this problem because i am using pc , but using the GPU to train your models, the backend may be configured to use a sophisticated stack of GPU libraries so if i train my model using gpu maybe i will not face like this problem
Thank you…! Now I’m facing another issue. While running the evaluation code, I got some error.
Using TensorFlow backend.
Traceback (most recent call last):
File “./evaluate.py”, line 7, in
from nltk.translate.bleu_score import corpus_bleu
ImportError: No module named nltk.translate.bleu_score
Yes. Thank You Jason. But now when I try to get caption for another image, the first caption is displaying. I’ve tried several images but the caption is not changing. Why is it so?
Yeah.. Now it is working. But the caption has no accuracy. Jason, what about trying MS-COCO dataset instead of flickr? As the number of images n their captions are very high, Is there any chance for getting accurate results?
This is such a great blog! So glad to see you still actively responding.
I’m a noob to machine learning, so forgive my simplistic understanding. I have a question about how to alter the “style” of the captions (style transfer). For example, how would I go about changing the existing captions to match the linguistic style of a child, or of different people (ie, Donald Trump, Snoop Dog, etc.), using text files with speech samples of various people?
Based on your article here, you stated that I could use Pre-trained Word Vectors, or use my own vocabulary file and mapping to integers function during training..?? Can you explain that a little more and perhaps point me in the right direction for applying these methods?
Any recommendation would be appreciated. Thanks in advance.
Good question, you might need to first translate the text examples in the training dataset, then use that as the training dataset for fitting the caption model.
Hi.. Jason. Now I’m going to change the dataset by Flickr30K dataset. Inorder to check any change in accuracy. So I’ve a doubt, here flickr 8K provides 6K train images. So is there any chance of increasing accuracy as increasing the number of train images?
Hi Jason,
Thank you so much for your great work, which is really helpful to understand image captioning work from scratch.I have prepared own dataset containing Nepalese socio-cultural images (total 400 images with 3 captions per image).
1. It works fine on training set but generates jumbled sentences on test set.Why this happen and how to generate relevent and grammatically correct captions?
2. What is the role of accuracy? I think accuracy refers to the VGG16’s accuracy, so is it relevent to calculate here?
3. After 40 epoch, there is no significant decreases on loss. So is there any way to reduce loss?
4. I have changed droupout from 0.5 to other values but no significant changes in result happen.So, is it necessary to put droupout on small dataset also?
When you train your model with progressive loading, what is the reason that you used a for loop and train your model with one epoch?
for i in range(epochs):
# create the data generator
generator = data_generator(train_descriptions, train_features, tokenizer, max_length)
# fit for one epoch
model.fit_generator(generator, epochs=1, steps_per_epoch=steps, verbose=1)
# save model
model.save(‘model_’ + str(i) + ‘.h5’)
This is an excellent tutorial and really thankful for it. May I check with you, why did you use 256 for your dense_1 and lstm_1 layers? Are there any considerations how one might choose this number?
Hi Jason
can you plz tell me what basically this error is ?
mportError Traceback (most recent call last)
ImportError: numpy.core.multiarray failed to import
The above exception was the direct cause of the following exception:
SystemError Traceback (most recent call last)
~\Anaconda3\lib\importlib\_bootstrap.py in _find_and_load(name, import_)
Hello Jason. I have a problem with the file of features
features = {k: all_features[k] for k in dataset}
IndexError: only integers, slices (:), ellipsis (...), numpy.newaxis (None) and integer or boolean arrays are valid indices
Could you help, please
While executing the code for generating new caption I got an error.
File “./ur_caption.py”, line 73, in
description = generate_desc(model, tokenizer, photo, max_length)
File “./ur_caption.py”, line 49, in generate_desc
yhat = model.predict([photo,sequence], verbose=0)
File “/usr/local/lib/python2.7/dist-packages/keras/engine/training.py”, line 1149, in predict
x, _, _ = self._standardize_user_data(x)
File “/usr/local/lib/python2.7/dist-packages/keras/engine/training.py”, line 751, in _standardize_user_data
exception_prefix=’input’)
File “/usr/local/lib/python2.7/dist-packages/keras/engine/training_utils.py”, line 138, in standardize_input_data
str(data_shape))
ValueError: Error when checking input: expected input_2 to have shape (74,) but got array with shape (34,)
Hi Anjali,
I am also trying to implement photo caption generation as my project. I have already implemented it on Flickr8k and now I am planning to implement it on Flickr30k. For any queries you can contact me on saurabh18@somaiya.edu
hi Jason :
for vgg16 we put model = Model(inputs=model.inputs, outputs=model.layers[-1].output)
for inception v2 is the same of I should change outputs=model.layers[-2]
It might be different considering the architecture of the model. Perhaps use the API to create average pooling layer on the output and add output layers to it?
~\Anaconda3\lib\site-packages\keras\engine\training.py in train_on_batch(self, x, y, sample_weight, class_weight)
1209 x, y,
1210 sample_weight=sample_weight,
-> 1211 class_weight=class_weight)
1212 if self._uses_dynamic_learning_phase():
1213 ins = x + y + sample_weights + [1.]
~\Anaconda3\lib\site-packages\keras\engine\training.py in _standardize_user_data(self, x, y, sample_weight, class_weight, check_array_lengths, batch_size)
749 feed_input_shapes,
750 check_batch_axis=False, # Don’t enforce the batch size.
–> 751 exception_prefix=’input’)
752
753 if y is not None:
~\Anaconda3\lib\site-packages\keras\engine\training_utils.py in standardize_input_data(data, names, shapes, check_batch_axis, exception_prefix)
126 ‘: expected ‘ + names[i] + ‘ to have ‘ +
127 str(len(shape)) + ‘ dimensions, but got array ‘
–> 128 ‘with shape ‘ + str(data_shape))
129 if not check_batch_axis:
130 data_shape = data_shape[1:]
ValueError: Error when checking input: expected input_6 to have 2 dimensions, but got array with shape (15, 7, 7, 512)
I am a little confused, after training I received 20 models(for 20 epochs ) should I evaluate all of them and take the heighest accuracy and if like this it need along time.
and thank you for your help
Hi Jason,
Thank you very much for your amazing article
I have a problem:
tokenizer = load(open(‘tokenizer.pkl’, ‘rb’))
FileNotFoundError: [Errno 2] No such file or directory: ‘tokenizer.pkl’
I don’t know how the file is organized.
Could you help me, please!
like instead of steps_per_epoch = len(train_descriptions)
can we give it as len(train_descriptions)/batch_size=32
How do we ensure generator is yielding o/p in batches?
currently if my understanding is correct, in our case the generator is yielding single output so we had steps_per_epoch = len(train_descriptions). am i right?
So in this case, where our data generator is yielding single sample everytime, we can’t use
steps_per_epoch = len(train_descriptions)/batch_size=32 ? am I right?
There the Data Generator I built is yielding one output i.e. single trainX, trainY for every yield
So while fit_generator, I just gave a try giving “steps_per_epoch = total_samples/32 (batch_size)”, then I tried to evaluate model saved after 1 epoch and results seems to be surprising almost same and not making any sense for any input we give, may be beacuse not all the records are passed through the model, becasue the generator I coded is yielding one record at a time and steps I am asking is lesser i.e. diving by batch size.
So changed it back to steps_per_epoch = total samples, then the model I saved after 1 epoch is giving some sensible outputs may not be very accurate as its just 1 epoch but taking some good amount of time to train.
Sir, I’m getting memory error while running updated code too..What can I do sir ? My jupyter notebook is also not responding when running that code..please give me a solution sir…
hello Jason!
I use the progressive loading and I fund
BLEU-1: 0.536255
BLEU-2: 0.289525
BLEU-3: 0.201866
BLEU-4: 0.096334
can you explain me what I can do for ameliorate this.
secondly when I wnnt generate a new caption whith a new photograph for example a Photo of a dog at the beach, I fund this description “startseq two black dogs are playing in the water endseq”, you see it’s not a good description.
Hello Jason,
I am doing this experiment with Flickr30k dataset. When training the same decoder architecture and evaluating on test data, the model performance is decreasing when compared to Flickr8k. The BLEU scores for F30k are worse than F8k. What should be done to solve this problem?
Maybe,
1) Limit the vocabulary? (F8k had around 8000 words and F30k has 18000 words)
2) Add another LSTM layer? (but doubles the training time)
3) Increase/Decrease word vector dimension?
4) Change no. of units in LSTM?
5) Add more Dense layers?
What should be done to achieve similar performance of F8k on F30k?
Also, I have a doubt. In create_sequences function, we are not passing the vocab_size, but it is used in the to_categorical method. How is it one-hot encoding it if vocab_size variable is not passed in the function?
We might not need to pass the vocab_size as argument for the create_sequences function because the vocab_size is a global variable so it can be used inside the create_sequences function. Is that right, Jason Brownlee?
Hi Jason,
Thank you for your great tutorial. I’ve been trying to understand your code line by line. However, I can’t figure out this line
vocab_size = len(tokenizer.word_index) + 1
I thought the vocab_size should be the same as the tokenizer.word_index. Why did you add an extra 1?
i try two more images, one picture is a bird and the other is the “55470226_52ff517151”, but the return description is always “man in red shirt is standing on the street”
I’ve tried InceptionV3 and VGG16 as Encoder and two types of RNN as Decoder making a combination of 4 image captioning models and compared results. I also implemented BEAM search algorithm and compared results with simple argmax.
hello jaso :
I want to ask you why for image caption we are using different matrix (bleu1, bleu2, bleu3 , bleu4) why 4 blue scores not one and what are the different betwwen them .
when i test images using those three models i found that :
resnet50 generate a good sentence better than vgg16 ,
but the problem that inception v3 generate a good sentence better than vgg16 and resnet50
, so why bleu score for inception v3 is lowest than vgg16 and resnet50 , really i am so confused
How do you create the model to get that results.
I don’t get as that results.
Can you please tell me how do you create the network to achieve those scores you obtained?
If you are okay, may I know.
My email address is phyukhaing7@gmail.com
Hi saddam, Jason:
For VGG16, I got poor result (specical BLUE-4). Not high as your result
BLEU-1: 0.487551
BLEU-2: 0.259738
BLEU-3: 0.179878
BLEU-4: 0.085398
Is there any modification compared to this article?
I want to compare the results of those three models and write a discussion about it so I trained those three models until 32 epochs and I received those results , so for example depends on bleu score can I say that resnet50 gave me the best results
I just want to know if I change the dataset from 8K to 30K, then should I change the sequence model architecture as well?, because I tried training with same architecture on 30k and it was overfitting and the for every new image it is given same caption.
Also, in the Show and Tell paper by A. Karpathy, LSTM units used is 512 and as mentioned in this paper (https://arxiv.org/pdf/1805.09137.pdf) embedding size and vocab_size used is 512 as well.
512 vocab_size seems less or maybe having less vocabulary gives better results sometimes?
For example, in Flickr8k, max_length found is 34. But if we set it to 16, wouldn’t it throw an error saying “expected input_shape is (32, ) but got (16, )” or something like that.
How to solve this problem?
In Decoder Model,
Input_layer_1 = Input_Shape((max_length, ))
Thanks you Sir for this great tutorial. I implemented the Image captioning in Google Colab. Can you please upload a tutorial for attention mechanism used in Image captioning with code.
I read about your merge model that you described in some other post and you used it here.
But, it is not-understandable that you used LSTM (not making use of the image features) and the CNN separately.
I mean, your lstm layer is just using word sequences( vectors) to generate the next word without using the image features.
Image features are only added when you combine the LSTM and CNN vectors. Before combining, LSTM is not aware of the image because it is not using the image features. How is the LSTM generating the right captions when you are not even using the image features during LSTM network?
“why” questions might not be tractable at this time. We don’t have good theories on why many of these models work so well. But they do – so we use them.
Same with drugs issued by doctors. No idea why they work, but they do – so we use them.
1. The network is assuming that the caption for every image will use at max 34 words because the longest caption is of 34 words.
2. The embedding layer is taking a word index and outputting a 256 long vector.
3. After the dropout, the LSTM layer is used “consisting of 34 LSTM cells”.
4. Each LSTM cell is producing a new word which is a 256 long vector.
Correct me on the above points if I’m wrong.
1. I’m not able to understand how the output dimension of LSTM is (None,256).
2. How is the LSTM using the image information because CNN output is not being fed to the LSTM layer?
3. What is the output of dense_3 layer.
4. From which layer are we extracting the word sequences?
Got the answer of the above 3rd question that the output of dense_3 is the next word.
1. But, does output of LSTM hold some significance or does it just compute some 256 long vector which will later be used(combined) with a CNN?
2. Kindly explain how the 34 LSTM cells are taking input. I reckon you are giving the input sequence of words to these 34 LSTMs(if the length of the input sequence is less than 34 then these are padded). Each word is a 256-dimensional vector.
This is a wonderful tutorial. Thank you Jason Brownlee. Would love to see a tutorial on attention mechanism applied on an image caption generator (preferably this one).
I’ve encountered a problem regarding feature extraction. In both the training phase and test phase when using the VGG16 feature extractor model, it is necessary to download VGG16 weight model which is 500+ MB. So, I followed the link they used to download the weight model and downloaded it.
Then instead of using “VGG16()” I used:
load_model(“/folder/vgg16_weights_tf_dim_ordering_tf_kernels.h5”).
But then it shows the error:
“raise ValueError(‘Cannot create group in read only mode.’)
ValueError: Cannot create group in read only mode.”
But for the same image it works perfectly when I use “VGG16()” and they download it from the link below:
I tried to apply the above code and generated caption with BLEU-1 score of 0.52. But when I observed the predicted captions, same sentence were repeating for multiple Images. For example, if a dog appears in the Image then the model generate a caption : “dog is running through the grass” for multiple image. How to make a model more accurate so that its should not repeat the same caption. ?
Hello Jason. I have a problem..I triyed many time but i can not fixed problem.plz tell me the solution….
Total params: 134,260,544
Trainable params: 134,260,544
Non-trainable params: 0
_________________________________________________________________
None
—————————————————————————
FileNotFoundError Traceback (most recent call last)
in
39 # extract features from all images
40 directory = ‘Flickr8k_Dataset’
—> 41 features = extract_features(directory)
42 print(‘Extracted Features: %d’ % len(features))
43 # save to file
in extract_features(directory)
18 # extract features from each photo
19 features = dict()
—> 20 for name in listdir(directory):
21 # load an image from file
22 filename = directory + ‘\\Users\Admin’ + name
FileNotFoundError: [WinError 3] The system cannot find the path specified: ‘Flickr8k_Dataset’
h5py\_objects.pyx in h5py._objects.with_phil.wrapper()
h5py\_objects.pyx in h5py._objects.with_phil.wrapper()
h5py\h5f.pyx in h5py.h5f.open()
OSError: Unable to open file (unable to open file: name = ‘model-ep002-loss3.245-val_loss3.612.h5’, errno = 2, error message = ‘No such file or directory’, flags = 0, o_flags = 0)
filename = ‘model-ep002-loss4.6485-val_loss3.1147’
model = load_model(filename)
this code generate a error
OSError: Unable to open file (unable to open file: name = ‘model-ep002-loss4.6485-val_loss3.1147’, errno = 2, error message = ‘No such file or directory’, flags = 0, o_flags = 0)
But when I observed the predicted captions, same sentence were repeating for multiple Images. For example, if a dog appears in the Image then the model generate a caption : “dog is running through the grass” for multiple image.
Thanks for the great tutorial! I have a doubt regarding the LSTM layer. Do we have as many memory units as the number of dimensions in the embedding matrix, and the dimension of input size to each unit is the size of the vocabulary? And is the output of each of the 256 unit 1×1, such that all outputs taken together is a 256 dimensional vector? If so, why do we need an LSTM? Can we not simply use 256 FC layers with each layer taking one dimension of all caption words generated?
So the embeddings for the prefix generated so far is fed all at once only to the first LSTM unit? Which means the input size for the first LSTM is |vocab-size| x |Dimensionality of embedding space|.
Now, I am learning about image captioning.
When I train the model, I got less accuracy for more epochs.
That is right?
If you have any attention example, let me know.
I don’t get your results.
My results are less.
What can be my faults?
I also have some doubts.
My previous understanding is that the less the loss, the better the performance.
But I don’t get like that.
Please explain to me.
I already used the alternate download link, both Flickr8k_Dataset and Flickr8k_text already downloaded but still showing the same error :
PermissionError : [Errno 13] Permission Denied: Flickr8k_Dataset/Flicker8k_Dataset’
I have fixed my error, I hope you fix it the given code :
in the line no. 40 directory = ‘Flickr8k_Dataset’ should be modified to directory = ‘Flickr8k_Dataset/Flicker8k_Dataset’
====================================================================
Total params: 5,527,963
Trainable params: 5,527,963
Non-trainable params: 0
_________________________________________________________________________
None
Traceback (most recent call last):
File “test4.py”, line 181, in
model = define_model(vocab_size, max_length)
File “test4.py”, line 138, in define_model
plot_model(model, to_file=’model.png’, show_shapes=True)
File “C:\Users\Excellence\Anaconda3\lib\site-packages\keras\utils\vis_utils.py”, line 240, in plot_model
expand_nested, dpi)
File “C:\Users\Excellence\Anaconda3\lib\site-packages\keras\utils\vis_utils.py”, line 79, in model_to_dot
_check_pydot()
File “C:\Users\Excellence\Anaconda3\lib\site-packages\keras\utils\vis_utils.py”, line 22, in _check_pydot
‘Failed to import pydot. ‘
ImportError: Failed to import pydot. Please install pydot. For example with pip install pydot.
Hi Jason,
Yet another great explanation. I am about to start this project. I would love to see you implement attention mechanism for this.
In case if I have missed your blog on applying attention mechanism in Image Captioning, please share me at E-mail: ishritam.ml@gmail.com
Thanks for another great tutorial.
I tried your code and get one error, which is:
ValueError: Error when checking input: expected input_10 to have shape (4096,) but got array with shape (1000,) #and sometimes I get input_1
So I changed inputs1 shape in define_model() to 1000 instead of 4096, then the code worked fine.
Here is the losses values I reached model-ep004-loss3.402-val_loss3.741
and here are my Blue scores:
BLEU-1: 0.528189
BLEU-2: 0.286299
BLEU-3: 0.198691
BLEU-4: 0.093021
which is obviously lower than yours.
The problem is now the captioning is very poor, here are some examples:
– “young girl in blue and blue and blue shirt is jumping into pool”, there is neither a girl nor a pool in the image. By the way, this image is from the dataset.
– “man in red shirt is jumping into the water”, this was an image for just a beach with no people.
– “dog is running through the grass”, this was the dog example photo.
Would you please advise on how to increase the accuracy of the generated captions? Thank you
P.S.: I tried refitting the model but got the same loss value for the same number of epochs.
I was following it and got stuck at the fit_generator() part.
——————————————————————————————-
# train the model, run epochs manually and save after each epoch
epochs = 20
steps = len(train_descriptions)
for i in range(epochs):
# create the data generator
generator = data_generator(train_descriptions, train_features, tokenizer, max_length, vocab_size)
# fit for one epoch
model.fit_generator(generator, epochs=1, steps_per_epoch=steps, verbose=1)
# save model
model.save(‘model_’ + str(i) + ‘.h5’)
———————————————————————————————————
This part of the code throws me the following error.
could not broadcast input array from shape (48,4096) into shape (48)
i know it’s a bit late ,but i had the same problem and was using tensorflow.keras
when i used the keras library it worked fine
so i’m pretty sure the problem is in one of the transformation works differently on your keras version than the one used it the tutorial
First of all Jason, this blog has the best demonstration of image caption generation I have got on the internet. And after reading your other posts this blog has been the first stop for anything I want to learn in deep learning or machine learning. I want to heartily thank you for such amazing work which is of great help for undergraduate students like me.
I know it is very late but it is for others who may face this problem in future.
If you want to use tf.keras with progressive loading here is the trick that worked for me:
I was trying get my hands dirty on the code. My extracted features are in the form [1, 2560, 8] to use this in the first encoder what should I do?
When I put inputs1 = Input(shape=(2560, 8, )), I get an error
ValueError: Error when checking target: expected dense_28 to have 3 dimensions, but got array with shape (47, 7579)
Hello Sir, I am getting the accuracy of around 35% even after training the model for 20 epochs and there isn’t any sudden change after training another 5 epochs. Do you recommend any changes or maybe what might be the error? The BLEU scores you mentioned below are coming almost the same what you got.
Please let me know if any changes are recommended from your side. Thank you.
Thank you for posting this code and explaining it such easily. I had one doubt that I had trained this model for 20 epochs, and I just got an accuracy of around 35%. After that, I trained the model for another 5 epochs, but there weren’t any considerable changes in the accuracy of the model.
I disagree, there are tutorials on diagnosing learning dynamics with learning curves, then tutorials on fixing each issue, such as regularization for overfitting and ensembles for better prediction.
Sir, I was following your steps, the test results seemed to be horrible. Predominantly, it is generating a particular type of sentence, whenever a human is detected. Or a different sentence whenever a dog is detected. Which model should be used instead of VGG16 to improve the performance?
And I played around with the structure of the model, and no of epochs, still there were no noticeable changes. What are your suggestions?
Thank you.
Thank for your great explanation.
I really love your articles.
I have a question:
total Vocabulary Size: 8,763 in token file
Why we not use this vocabulary for training instead of Vocabulary on train dataset (Vocabulary Size: 7,579) ?
IMO, It will cover more words which not appear on training dataset
It is good practice to use the vocab in the training set only and pretend we don’t have access to the test set until after the model is prepared.
The reason for this is to develop a robust and independent estimate of the model performance when making predictions on new data – unseen during training.
Tune Model. The configuration of the model was not tuned on the problem. Explore alternate configurations and see if you can achieve better performance.
Nice article, and very well explained. I just had a doubt regarding the keras tokenizer used. In the code, the tokenizer is fit on the train_descriptions, and when the create_sequences is called for the test data, the same tokenizer which was fit on the train data is used. I had a doubt that how does the tokenizer work with the data which it was not fitted on? I’m kinda new to this, so I’m not really sure about that. Could you please briefly explain this?
The tokenizer is fit on the training data and is then used to prepare data as input to the model. If it is used on test data that has words not seen during training, those words are marked as 0 (unknown).
And one more query: why weren’t the training sequences normalized here? Like what if we just normalize by dividing it by the vocab size? I’m training the model at the moment without normalizing them. Just curious what would happen if we used normalized sequence data. I’m guessing it should atleast result in faster convergence of the model, if not significantly improve results.
I tried that model with MDI dataset.
But result very bad.
I checked and have found some points:
– vocabulary size: huge more than 21000 => more difficult.
– many name such as character name in movies or place, … such as Harry Potter, …
– there are many frame same with 1 caption (now I use single frame for 1 caption and ignore other which same caption)
Thanks for this elaborate post. It is really informative and details every small step which I found quite useful in building an Image Caption Generator in PyTorch.
I used an architecture similar to yours and also used 200 dimensional Glove Vectors as word embeddings. However, after training the model, I can observe that loss is going down yet the caption predicted for every image is the same.
I ran my project in google colab and here’s the notebook link for the same:
Hi. I am using above code for medical image captioning. but unfortunately i got the same caption for all images i give to the model. loss value on my dataset is 0,75 so i don’t think so its overfittting issue or my model would not be trained very well. can you please help me out in this matter.?
Hi Jason,
Thank you so much for your super super super helpful post. I appreciate your effort!
I got my best training result is ep005-loss3.515-val_loss3.829.
I tried to use the trained model to generate a caption for a picture, in which a guy with a naked upper body is doing a chest push in the gym. The generated caption is “startseq two children are playing in the snow endseq”.
Do you have any idea how to improve the model?Thank you.
May I ask one more question? In my mind, usually, what we need for developing and evaluating a model is a training dataset and a testing dataset. So what is the purpose of the “Flickr_8k.devImages.txt” dataset?
And I find that the size of the “Flickr_8k.devImages.txt” is equal to the size of “Flickr_8k.testImages.txt”. Is this quantitative equivalent a coincidence or a necessity?
Can you manage to train the model using the Flickr30k dataset? I tried it and got a “killed: 9” output, which means the training is too massive for the memory of my laptop. If you are able to come over that, could you please share how you did it?
Dear Jason
I am running a visual question answering task. It is seems similar to the image captioning problem. Take as input : image features (which I have saved in a h5py file) and question tokens (which I have pickled) and outputs are the answers (the whole answer is considered a target , so 3129 answers –one word or more – and 3129 labels in my case)
I am using the Keras sequence utility to create the generator.
I am getting a dimension error in the output layer when the model tries to start training.
I have copied my getitem function in the generator and also a sample of my model.
Would you please have a look my code and help figure out the problem?
Best wishes
Epoch 1/1
Traceback (most recent call last):
File “”, line 32, in
validation_data=valid_generator)
File “C:\python\envs\tf2-keras\lib\site-packages\keras\legacy\interfaces.py”, line 91, in wrapper
return func(*args, **kwargs)
File “C:\python\envs\tf2-keras\lib\site-packages\keras\engine\training.py”, line 1732, in fit_generator
initial_epoch=initial_epoch)
File “C:\python\envs\tf2-keras\lib\site-packages\keras\engine\training_generator.py”, line 220, in fit_generator
reset_metrics=False)
File “C:\python\envs\tf2-keras\lib\site-packages\keras\engine\training.py”, line 1508, in train_on_batch
class_weight=class_weight)
File “C:\python\envs\tf2-keras\lib\site-packages\keras\engine\training.py”, line 621, in _standardize_user_data
exception_prefix=’target’)
File “C:\python\envs\tf2-keras\lib\site-packages\keras\engine\training_utils.py”, line 145, in standardize_input_data
str(data_shape))
ValueError: Error when checking target: expected output to have shape (3129,) but got array with shape (1,)
# this is the getitem function
The __getitem__ of my generator look like this:
def __getitem__(self, index):
‘Generate one batch of data’
# Generate indexes of the batch
indexes = self.indexes[index*self.batch_size:(index+1)*self.batch_size]
# self.T.append(indexes)
list_IDs_temp = [self.list_IDs[k] for k in indexes]
# Generate data
for i,k in enumerate(list_IDs_temp):
temp =self.Features[‘image_features’][k]
imfeatures[i,]=temp[0,:]
question_tokens[i,]=self.Questions[indexes[i]]
answers=self.Answer[indexes[i]]
stdout, stderr:
b”
b”‘F:\\New’ is not recognized as an internal or external command,\r\noperable program or batch file.\r\n”
—————————————————————————
AssertionError Traceback (most recent call last)
in
160
161 # define the model
–> 162 model = define_model(vocab_size, max_length)
163 # train the model, run epochs manually and save after each epoch
164 epochs = 20
in define_model(vocab_size, max_length)
128 # summarize model
129 model.summary()
–> 130 plot_model(model, to_file=’model.png’, show_shapes=True)
131 return model
132
F:\New folder\lib\site-packages\keras\utils\vis_utils.py in model_to_dot(model, show_shapes, show_layer_names, rankdir, expand_nested, dpi, subgraph)
77 from ..models import Sequential
78
—> 79 _check_pydot()
80 if subgraph:
81 dot = pydot.Cluster(style=’dashed’, graph_name=model.name)
F:\New folder\lib\site-packages\keras\utils\vis_utils.py in _check_pydot()
26 # Attempt to create an image of a blank graph
27 # to check the pydot/graphviz installation.
—> 28 pydot.Dot.create(pydot.Dot())
29 except OSError:
30 raise OSError(
I’m wondering why the tokenizer is fit on the training, validation, and test data separately. I understand that we don’t want sequences from one set to leak into another, but wouldn’t we want the integer representation of each word to be the same across all sets, and then get the sequences from that representation?
If the model is learning relationships between integers in sequences, and the integers have totally different meaning (and thus expected placement in sequences) between train and test, then wouldn’t that be bad?
Would your answer change if word2vec was used since the location of the word in the vector space has meaning?
Sorry, I misunderstood. I thought it would be a problem if the dev and test sets have longer sequences or different words, but I guess that’s a part of it!
When I try to train the model I get the error: “NotImplementedError: Cannot convert a symbolic Tensor (args_2:0) to a numpy array.”
This is in TensorFlow 2.1 so I’m importing from tensorflow.keras and using fit instead of fit_generator. I tried directly copying your complete progressive loading example (and making those two changes) and still have the error.
# extract features from each photo in the directory
def extract_features(directory):
# load the model
model = VGG16()
# re-structure the model
model.layers.pop()
model = Model(inputs=model.inputs, outputs=model.layers[-1].output)
# summarize
print(model.summary())
# extract features from each photo
features = dict()
for name in listdir(directory):
# load an image from file
filename = directory + ‘/’ + name
image = load_img(filename, target_size=(224, 224))
# convert the image pixels to a numpy array
image = img_to_array(image)
# reshape data for the model
image = image.reshape((1, image.shape[0], image.shape[1], image.shape[2]))
# prepare the image for the VGG model
image = preprocess_input(image)
# get features
feature = model.predict(image, verbose=0)
# get image id
image_id = name.split(‘.’)[0]
# store feature
features[image_id] = feature
print(‘>%s’ % name)
return features
# extract features from all images
directory = ‘C:\Flicker8k_Dataset’
features = extract_features(directory)
print(‘Extracted Features: %d’ % len(features))CA
# save to file
dump(features, open(‘features.pkl’, ‘wb’))
”’ When i run this code after loading all the images it’s showing this error”’
in extract_features(directory)
13 # load an image from file
14 filename = directory + ‘/’ + name
—> 15 image = load_img(filename, target_size=(224, 224))
16 # convert the image pixels to a numpy array
17 image = img_to_array(image)
~\.conda\envs\tensorflow\lib\site-packages\keras_preprocessing\image\utils.py in load_img(path, grayscale, color_mode, target_size, interpolation)
108 raise ImportError(‘Could not import PIL.Image. ‘
109 ‘The use of load_img requires PIL.’)
–> 110 img = pil_image.open(path)
111 if color_mode == ‘grayscale’:
112 if img.mode != ‘L’:
Jason, Minor typo. The text for this line, “Running this example first loads the 6,000 photo identifiers in the test dataset”, should say “train dataset” instead of test dataset.
~\Anaconda3\envs\tf-gpu\lib\site-packages\tensorflow_core\python\keras\engine\data_adapter.py in __init__(self, x, y, sample_weights, standardize_function, workers, use_multiprocessing, max_queue_size, **kwargs)
765
766 if standardize_function is not None:
–> 767 dataset = standardize_function(dataset)
768
769 if kwargs.get(“shuffle”, False) and self.get_size() is not None:
~\Anaconda3\envs\tf-gpu\lib\site-packages\tensorflow_core\python\keras\engine\training_v2.py in standardize_function(dataset)
682 return x, y
683 return x, y, sample_weights
–> 684 return dataset.map(map_fn, num_parallel_calls=dataset_ops.AUTOTUNE)
685
686 if mode == ModeKeys.PREDICT:
~\Anaconda3\envs\tf-gpu\lib\site-packages\tensorflow_core\python\data\ops\dataset_ops.py in __init__(self, func, transformation_name, dataset, input_classes, input_shapes, input_types, input_structure, add_to_graph, use_legacy_function, defun_kwargs)
3145 with tracking.resource_tracker_scope(resource_tracker):
3146 # TODO(b/141462134): Switch to using garbage collection.
-> 3147 self._function = wrapper_fn._get_concrete_function_internal()
3148
3149 if add_to_graph:
~\Anaconda3\envs\tf-gpu\lib\site-packages\tensorflow_core\python\eager\function.py in _get_concrete_function_internal(self, *args, **kwargs)
2393 “””Bypasses error checking when getting a graph function.”””
2394 graph_function = self._get_concrete_function_internal_garbage_collected(
-> 2395 *args, **kwargs)
2396 # We’re returning this concrete function to someone, and they may keep a
2397 # reference to the FuncGraph without keeping a reference to the
~\Anaconda3\envs\tf-gpu\lib\site-packages\tensorflow_core\python\eager\function.py in _create_graph_function(self, args, kwargs, override_flat_arg_shapes)
2591 arg_names=arg_names,
2592 override_flat_arg_shapes=override_flat_arg_shapes,
-> 2593 capture_by_value=self._capture_by_value),
2594 self._function_attributes,
2595 # Tell the ConcreteFunction to clean up its graph once it goes out of
~\Anaconda3\envs\tf-gpu\lib\site-packages\tensorflow_core\python\data\ops\dataset_ops.py in wrapper_fn(*args)
3138 attributes=defun_kwargs)
3139 def wrapper_fn(*args): # pylint: disable=missing-docstring
-> 3140 ret = _wrapper_helper(*args)
3141 ret = structure.to_tensor_list(self._output_structure, ret)
3142 return [ops.convert_to_tensor(t) for t in ret]
~\Anaconda3\envs\tf-gpu\lib\site-packages\tensorflow_core\python\data\ops\dataset_ops.py in _wrapper_helper(*args)
3080 nested_args = (nested_args,)
3081
-> 3082 ret = autograph.tf_convert(func, ag_ctx)(*nested_args)
3083 # If func returns a list of tensors, nest.flatten() and
3084 # ops.convert_to_tensor() would conspire to attempt to stack
~\Anaconda3\envs\tf-gpu\lib\site-packages\tensorflow_core\python\autograph\impl\api.py in wrapper(*args, **kwargs)
235 except Exception as e: # pylint:disable=broad-except
236 if hasattr(e, ‘ag_error_metadata’):
–> 237 raise e.ag_error_metadata.to_exception(e)
238 else:
239 raise
NotImplementedError: in converted code:
C:\Users\Mohit\Anaconda3\envs\tf-gpu\lib\site-packages\tensorflow_core\python\keras\engine\training_v2.py:677 map_fn
batch_size=None)
C:\Users\Mohit\Anaconda3\envs\tf-gpu\lib\site-packages\tensorflow_core\python\keras\engine\training.py:2410 _standardize_tensors
exception_prefix=’input’)
C:\Users\Mohit\Anaconda3\envs\tf-gpu\lib\site-packages\tensorflow_core\python\keras\engine\training_utils.py:513 standardize_input_data
data = [np.asarray(d) for d in data]
C:\Users\Mohit\Anaconda3\envs\tf-gpu\lib\site-packages\tensorflow_core\python\keras\engine\training_utils.py:513
data = [np.asarray(d) for d in data]
C:\Users\Mohit\Anaconda3\envs\tf-gpu\lib\site-packages\numpy\core\_asarray.py:85 asarray
return array(a, dtype, copy=False, order=order)
C:\Users\Mohit\Anaconda3\envs\tf-gpu\lib\site-packages\tensorflow_core\python\framework\ops.py:728 __array__
” array.”.format(self.name))
NotImplementedError: Cannot convert a symbolic Tensor (args_2:0) to a numpy array.
Thank you for this article. Amazing implementation and explanation of the entire process.
I had a question regarding improving the BLEU score for this task:
You said we should try out using different Pre-Trained Image models like InceptionV3 and also try to add regularization.
Where exactly according to your expertise should these changes be implemented? Should we make changes in extract_features() or in define_model() or both to get better results?
Also, is there a faster way to know if our new model will do better as these models take a couple of hours to run?
hey Jason, just wanna ask why you implement this by VGG16 when there is more accurate and efficient pre-trained models are available like Inception V3 ResNet etc.. just wanna know your reasons behind choosing VGG16 model….
Hi Jason, I am using Tensorflow 2.0 , and while running the code , I am receiving this error
I used both the method but I am receiving error . Can you please help me out.
1) with normal model.fit() method
Epoch 1/20
—————————————————————————
UnboundLocalError Traceback (most recent call last)
in ()
4 checkpoint = ModelCheckpoint(filepath, monitor=’val_loss’, verbose=1, save_best_only=True, mode=’min’)
5 # fit model
—-> 6 model.fit([X1train, X2train], ytrain, epochs=20, verbose=2, batch_size = 3, callbacks=[checkpoint], validation_data=([X1test, X2test], ytest))
1 frames
/usr/local/lib/python3.6/dist-packages/tensorflow/python/keras/engine/training.py in fit(self, x, y, batch_size, epochs, verbose, callbacks, validation_split, validation_data, shuffle, class_weight, sample_weight, initial_epoch, steps_per_epoch, validation_steps, validation_batch_size, validation_freq, max_queue_size, workers, use_multiprocessing, **kwargs)
857 logs = tmp_logs # No error, now safe to assign to logs.
858 callbacks.on_train_batch_end(step, logs)
–> 859 epoch_logs = copy.copy(logs)
860
861 # Run validation.
UnboundLocalError: local variable ‘logs’ referenced before assignment
2) and while running the code of Progressive Loading method. I am receiving this error
WARNING:tensorflow:Model was constructed with shape (None, 2048) for input Tensor(“input_11:0”, shape=(None, 2048), dtype=float32), but it was called on an input with incompatible shape (None, None, None).
—————————————————————————
ValueError Traceback (most recent call last)
in ()
1 for i in range(epochs):
2 generator = data_generator(train_descriptions, train_features, wordtoix, max_length, number_pics_per_batch)
—-> 3 model.fit_generator(generator, epochs=1, steps_per_epoch=steps, verbose=1)
4 model.save(‘./model_weights/model_’ + str(i) + ‘.h5’)
12 frames
/usr/local/lib/python3.6/dist-packages/tensorflow/python/framework/func_graph.py in wrapper(*args, **kwargs)
966 except Exception as e: # pylint:disable=broad-except
967 if hasattr(e, “ag_error_metadata”):
–> 968 raise e.ag_error_metadata.to_exception(e)
969 else:
970 raise
I got the same error. I also went through the checklist and have imported all packages, copied code correctly, etc. It only happens with the low_RAM version. With the original it didn’t, but I ran out of RAM.
Hey,i also got the same error,i want to train the model on my local machine but i get the same error,i am using tensorflow 2.2.0 and keras version 2.3.0,were you able to solve it?
==================================================================
Also, i tried running it on colab,it seems to work fine there, colab uses tensorflow 2.2.0 and keras 2.3.1 version,i am scared to install keras again on my local machine so that it doesnt screw up the system…if you found the solution to this error please do let me know.
For anyone who is getting this error on google colab, I have a temporary fix for it. Simply downgrade the version of keras and tensorflow. Use pip for this.
Run the following code:
pip uninstall keras
pip install keras == 2.3.1
pip uninstall tensorflow
pip install tensorflow == 2.2
After running the above codes in different cells, simply restart your runtime and your error will be solved.
I have used your code only in training and evaluating. But somehow I got this error while evaluating, and I am not sure why it happened.
C:\Users\Harshit\Anaconda3\envs\ImageProcessing\lib\site-packages\tensorflow_core\python\framework\indexed_slices.py:433: UserWarning: Converting sparse IndexedSlices to a dense Tensor of unknown shape. This may consume a large amount of memory.
“Converting sparse IndexedSlices to a dense Tensor of unknown shape. ”
Traceback (most recent call last):
File “”, line 1, in
runfile(‘C:/Users/Harshit/Desktop/Flickr8k_dataset/Evaluate model.py’, wdir=’C:/Users/Harshit/Desktop/Flickr8k_dataset’)
File “C:\Users\Harshit\Anaconda3\envs\ImageProcessing\lib\site-packages\spyder_kernels\customize\spydercustomize.py”, line 827, in runfile
execfile(filename, namespace)
File “C:\Users\Harshit\Anaconda3\envs\ImageProcessing\lib\site-packages\spyder_kernels\customize\spydercustomize.py”, line 110, in execfile
exec(compile(f.read(), filename, ‘exec’), namespace)
File “C:/Users/Harshit/Desktop/Flickr8k_dataset/Evaluate model.py”, line 164, in
evaluate_model(model, test_descriptions, test_features, tokenizer, max_length)
File “C:/Users/Harshit/Desktop/Flickr8k_dataset/Evaluate model.py”, line 119, in evaluate_model
yhat = generate_desc(model, tokenizer, photos[key], max_length)
File “C:/Users/Harshit/Desktop/Flickr8k_dataset/Evaluate model.py”, line 98, in generate_desc
yhat = model.predict([photo,sequence], verbose=0)
File “C:\Users\Harshit\Anaconda3\envs\ImageProcessing\lib\site-packages\keras\engine\training.py”, line 1441, in predict
x, _, _ = self._standardize_user_data(x)
File “C:\Users\Harshit\Anaconda3\envs\ImageProcessing\lib\site-packages\keras\engine\training.py”, line 579, in _standardize_user_data
exception_prefix=’input’)
File “C:\Users\Harshit\Anaconda3\envs\ImageProcessing\lib\site-packages\keras\engine\training_utils.py”, line 145, in standardize_input_data
str(data_shape))
ValueError: Error when checking input: expected input_6 to have shape (28,) but got array with shape (34,)
I have trained the model for 20 epochs after which the accuracy is around 0.5 and validation set accuracy is 0.3.
How will this be able to generate good captions?
hi, Jason
I’m a bit confused. one picture in the data set corresponds to five sentences, which means that the label of each picture will choose one from these five sentences during the training?
Hi, Jason.
That’s a great article and it helped me a lot.
I just want to tell you that model.layers.pop() does not remove the layer from the model.
The features that I extracted are 1000 dimensional, not 4096.
(I do not know how it is working for you. Maybe it worked fine with older Keras.)
Hi Jason,
I am working a project of image captioning. I have read some papers of image captioning. However, I don’t which evalution they used. And I am confuse between corpus_bleu and sentence_bleu. Image captioning’s output is a sentence for an image. So I think we should calculate sentence_bleu for each image, then calculate the average, but I saw you use corpus_bleu.
Can you tell me which evaluation is suitable? Which was used in the papers?
So I have trained the model on my own dataset (Bengali language). I got the best val loss as 2.99.
Now the problem is, when I run the generate_desc function I get the following error:
ValueError: Data cardinality is ambiguous:
x sizes: 4096, 33
Please provide data which shares the same first dimension.
There was no such issue during training at all. What could possibly cause this?
I reshaped the features vector, in my case the features len for every image is 4096, the feature vector which is passed to the “generate_desc” is of shape (4096, ) , which is ambiguous for the model bcs it does not seem that it is a one sample/photo features vector.
The fix:
yhat = model.predict([np.reshape(photo, (1, 4096)),sequence], verbose=0)
Hey Jason, thanks for sharing such an awesome tutorial. I enjoyed reading it now soon will try to implement it.
But just out of curiosity is there any tutorial which can generate images from captions i.e.(Text-to-Image synthesis)
hey jason i m getting error
—————————————————————————
KeyError Traceback (most recent call last)
in ()
142 print(‘Descriptions: train=%d’ % len(train_descriptions))
143 # photo features
–> 144 train_features = load_photo_features(‘features.pkl’, train)
145 print(‘Photos: train=%d’ % len(train_features))
146 # prepare tokenizer
1 frames
in (.0)
64 all_features = load(open(filename, ‘rb’))
65 # filter features
—> 66 features = {k: all_features[k] for k in dataset}
67 return features
68
I’m preparing photo data and getting this error can you resolve this.
tensorflow.python.framework.errors_impl.ResourceExhaustedError: OOM when allocating tensor with shape[25088,4096] and type float on /job:localhost/replica:0/task:0/device:CPU:0 by allocator mklcpu [Op:RandomUniform]
Thanks for another great article. You have done it again. I’d not be far off saying that you are one of my inspirations on my journey to Machine Learning. I have followed your articles for quite a while, ranging from small queries to entire topics like this one.
I was curious about how this model performs on Flickr30K dataset. Unfortunately using same hyper-parameters led to the model output just 1 sentence overall. The sentence being ” man in blue shirt is sitting on the ground with his arms crossed end end of the ground end end of the ground end end of the ground end end of the ground end end of the ground end end of the ground end end of the ground end end of the ground end end of the ground end end of the ground end end of the ground end end of the ground end”. (The max length for this dataset was 74).
I have used the progressive loading using generators as instructed by your tutorial. Could you point out any possible reasons why this would be happening?
PS: I haven’t run the model on Flickr8k to confirm that my implementation is correct or not.
I am facing Name Error for the below code while fitting the model. Please help me resolve this.
# define the captioning model
def define_model(vocab_size, max_length):
Awesome tutorial! It’s an incredible achievement of Computer Vision and NLP techniques!
Thank you Jason it’s very inspirational!
I share my comments and results.
1) Image caption HORIZON:
– For when a tutorial that gives voice to the predicted captions of the images?
– I guess these techniques can also be applied as alternative to multi-label image classification, isn’t it?
– Also It could be useful to explicit the image pattern recognition obtained during the “solo” computer vision training, by labelling the image through captioning them, do you agree?
2) MINOR COMMENTS:
– There are only 8,091 Images in image dataset folder but we got 8092 from text Image description: the missing image is: “2258277193_586949ec62.jpg”
– I realise that you do not apply “stopwords” in cleaning text process. Why?
– your manual data-generator does not admit to setup parallel process (workers/threads arguments) while fitting keras model (model.fit_generator)
3) I EXPERIMENT with YOUR BASELINE MODEL
– I reduced the vocabulary length by filtering-out words that repeat a minimum number of times (e.g. 5 times). I got worse results using 10 times repetition but, a faster code.
– I apply Glove pre-trained words library within Embedding layer training. The results are better.
– I tried to apply Conv1D besides MaxPool1D layers following the embedding layers. But I get worse results. Probably because I can not use mask_zero=True, because Conv1D does not support it.
– I realised there are other alternatives to word coding “texts_to_sequences” such as “texts_to_matrix”, or “one_hot” but as you do I do not apply either.
– I have 16 GB RAM memory on my Mac but I can run the whole dataset training but, surprisingly the code was quicker using your data generator 11minutes/epoch vs 15minutes/epoch. I guess because it works around RAM limit.
– I also applied validation data on training generation dataset. So I can apply directly the best_model from callbacks list (for progressive training).
– In addition to VGG16 Model I applied “Inceptionv3” app. The results are better than VGG16.
– I complete the code, including the output Inceptionv3 prediction within my code. So I can plot the images examples with X-axis = image caption prediction andY-axis = the Image Inceptionv3 Class prediction. So you can get a more complete vision of the results obtained using Computer vision alone plus Image Caption.
– I select a lower learning rate for the epochs training, to get a lower losses.
– Anyway, the dog image example I think it is a very simple case because, when I try other images examples, sometimes the image captions are very funny and you get a completely crazy caption !
– I believe the most singular contribution of my code experiment was replacing the “add” layer (were the two models merge) vs “Multiply” or “Subtract” layers. I got the best results with “Subtract” layer (subtracting the outputs of the NLP model from Image Features model). I do not know why the model performs better with subtract layer.
– I got for image example: “black and white dog is running on the beach” besides, the “Border_Collie” from Inceptionv3 Image prediction-. With very similars BLEU scores to you.
BLEU-1 = 0.570
BLEU-2 = 0.343
BLEU-3 = 0.133
BLEU-4 = 0.133
Jason your Tutorial collection is astonish and also because you are a great teacher. Thank you.
I have just finished the reading of your book « Deep Learning for Natural Language Processing». It’s excellent, contains tons of information and I thank you for this journey in NLP.
hey jason,
I am having a problem,
TypeError Traceback (most recent call last)
in ()
168 generator = data_generator(train_descriptions, train_features, tokenizer, max_length, vocab_size)
169 # fit for one epoch
–> 170 Model.fit_generator(generator, epochs=1, steps_per_epoch=steps, verbose=1)
171 # save model
172 model.save(‘model_’ + str(i) + ‘.h5’)
/usr/local/lib/python3.6/dist-packages/keras/legacy/interfaces.py in wrapper(*args, **kwargs)
89 warnings.warn(‘Update your ' + object_name + ' call to the ‘ +
90 ‘Keras 2 API: ‘ + signature, stacklevel=2)
—> 91 return func(*args, **kwargs)
92 wrapper._original_function = func
93 return wrapper
Hello Jason,
Would you please tell me how to do this thing on Googlecolab? I am having hard time with “extract_features” function in preparation section.
Traceback (most recent call last):
File “load.py”, line 72, in
train_features = load_features(‘features.pkl’,train)
File “load.py”, line 33, in load_features
features = {k: all_features[k] for k in dataset}
File “load.py”, line 33, in
features = {k: all_features[k] for k in dataset}
KeyError: ‘3356642567_f1d92cb81b.jpg’
epochs = 20
steps = len(train_descriptions)
for i in range(epochs):
# create the data generator
generator = data_generator(train_descriptions, train_features, tokenizer, max_length, vocab_size)
# fit for one epoch
model.fit_generator(generator, epochs=1, steps_per_epoch=steps, verbose=1)
# save model
model.save(‘model_’ + str(i) + ‘.h5’)
In the above code, there are two epoch initialzation , epochs=20 and epochs=1 (in fit_generator), can you describe what both of them actually mean with help of a rough example that can distinguish the significance of both ?
Hello, first thanks for this great article!i’ve learnt alot from your code.
i tried it with my laptop but somehow i have a error when fitting the model(something like failed to call GraphViz),, i have it installed but the error is not gone…
just wondering if i can download the final model somewhere so i can try it with my own pics?
Also, i’m thinking if it is possible to have algorithms like YOLO that will capture objects in a pic, and then create captions from these object tags?
like we detect one man , a dog ,grass, we may infer the caption as ‘ a man playing with a dog in a park’?
Hey James..I have implemented object detection model but I am not able to incorporate image captioning model with YOLO to generate caption. Can you please help me with this.
Hey Ashutosh, how did you get started with google colab?
I am trying to replicate the same code in colab but not getting even the pickle file of features extracted.
Hi Jason,
Thank you for wonder full explanation.
I struct in some where
# fit for one epoch
model.fit_generator(generator, epochs=1, steps_per_epoch=steps, verbose=1)
this line giving error below
File “F:\ProgramData\Anaconda3\lib\site-packages\tensorflow\python\framework\func_graph.py”, line 973, in wrapper
raise e.ag_error_metadata.to_exception(e)
I’ve been trying to compile the code for extracting the features from the image. I am getting the following error:
PermissionError Traceback (most recent call last)
in
30 # extract features from all images
31 directory = ‘Flickr8k_Dataset’
—> 32 features = extract_features(directory)
33 print(‘Extracted Features: %d’ % len(features))
34 # save to file
in extract_features(directory)
12 # load an image from file
13 filename = directory + ‘/’ + name
—> 14 image = load_img(filename, target_size=(224, 224))
15 # convert the image pixels to a numpy array
16 image = img_to_array(image)
I have tried changing the permission for the folder by giving it full access. But the error seems to persist. I ran the next part of the code which extracts the descriptions of the images and it ran without any errors. I’m working with jupyter notbeook in Visual Studio code.
The error suggests you do not have permission to access files on your machine, it suggests you were using a work machine controlled by someone else.
If you have control over your machine, give yourself permission to access the files, or place the files in a location where you can access them with permissions.
Sorry, I don’t know a thing about windows permission administration, I have not used the operating system.
I had one small question. Could you let me know which IDE you have used to run this code? Do you have any suggestions where you think this code will run better?
ValueError: Input 0 of layer dense_18 is incompatible with the layer: expected axis -1 of input shape to have value 4096 but received input with shape [1, 1000]
You noted the following in your article regarding evaluating the models:
“Note: Your results may vary given the stochastic nature of the algorithm or evaluation procedure, or differences in numerical precision. Consider running the example a few times and compare the average outcome.”
I can understand how the final model during training i.e. weights, loss etc may vary as you’ve stated. However, when I run the same test image through the trained model, I obtain a different prediction every time – is this due to the same reason as above? or some other reason – shouldn’t the final output always be the same for the same image?
The evaluation procedure from the TensorFlow tutorial uses the line below to convert the probability to an integer. As it’s random, it always generates random predictions. By changing the evaluation method to argmax instead, I get consistent predictions
from tensorflow:
predicted_id = tf.random.categorical(predictions, 1)[0][0].numpy()
I’ve trained the model with progressive loading for 3 epochs. When I used a new image to generate captions, it gave me the accurate caption. But everytime I use an image that has beach in it, I get the same caption, “man in red shirt is standing on the beach”, even if there no man in the image. I tried re fitting the model. But the issue is the same. Do you have any suggestions on how to improve the accuracy?
Its showing that my GPU is performing tasks but by epoch is stuck at 1st one and it isn’t showing any progress.
I have an RTX 2070 Max-Q GPU and an i7 Processor
can anyone help me out?
i’m getting this error after completing 1 epochs, while running Progressive loading code example.
ValueError: Failed to find data adapter that can handle input: ,
what should I do? please help me
hello sir, while running the below code after some execution i am getting the error:
# extract features from each photo in the directory
def extract_features(directory):
# load the model
model = VGG16()
# re-structure the model
model = Model(inputs=model.inputs, outputs=model.layers[-2].output)
# summarize
#print(model.summary())
# extract features from each photo
features = dict()
for name in listdir(directory):
# load an image from file
filename = directory + ‘/’ + name
image = load_img(filename, target_size=(224, 224))
# convert the image pixels to a numpy array
image = img_to_array(image)
# reshape data for the model
image = image.reshape((1, image.shape[0], image.shape[1], image.shape[2]))
# prepare the image for the VGG model
image = preprocess_input(image)
# get features
feature = model.predict(image, verbose=0)
# get image id
image_id = name.split(‘.’)[0]
# store feature
features[image_id] = feature
print(‘>%s’ % name)
return features
# extract features from all images
directory = ‘/content/drive/My Drive/Flickr_Data/Images/’
features = extract_features(directory)
print(‘Extracted Features: %d’ % len(features))
# save to file
dump(features, open(‘features.pkl’, ‘wb’))
This is the error comes after some execution with my image file. I could not able to figure out. please help me!!!
UnidentifiedImageError Traceback (most recent call last)
in ()
32 # extract features from all images
33 directory = ‘/content/drive/My Drive/Flickr_Data/Images/’
—> 34 features = extract_features(directory)
35 print(‘Extracted Features: %d’ % len(features))
36 # save to file
I was unable to train the model normal way even using AWS m5.2xlarge (32gig). So I tried the generator variant but it shows the error when I’m fitting it
WARNING:tensorflow:From project1.py:339: Model.fit_generator (from tensorflow.python.keras.engine.training) is deprecated and will be removed in a future version.
Instructions for updating:
Please use the Model. fit, which supports generators.
Traceback (most recent call last):
File “project1.py”, line 339, in
model.fit_generator(generator, epochs=1, steps_per_epoch=steps, verbose=1)
File “/home/ubuntu/.local/lib/python3.6/site-packages/tensorflow/python/util/deprecation.py”, line 324, in new_func
return func(*args, **kwargs)
File “/home/ubuntu/.local/lib/python3.6/site-packages/tensorflow/python/keras/engine/training.py”, line 1829, in fit_generator
initial_epoch=initial_epoch)
File “/home/ubuntu/.local/lib/python3.6/site-packages/tensorflow/python/keras/engine/training.py”, line 108, in _method_wrapper
return method(self, *args, **kwargs)
File “/home/ubuntu/.local/lib/python3.6/site-packages/tensorflow/python/keras/engine/training.py”, line 1098, in fit
tmp_logs = train_function(iterator)
File “/home/ubuntu/.local/lib/python3.6/site-packages/tensorflow/python/eager/def_function.py”, line 780, in __call__
result = self._call(*args, **kwds)
File “/home/ubuntu/.local/lib/python3.6/site-packages/tensorflow/python/eager/def_function.py”, line 823, in _call
self._initialize(args, kwds, add_initializers_to=initializers)
File “/home/ubuntu/.local/lib/python3.6/site-packages/tensorflow/python/eager/def_function.py”, line 697, in _initialize
*args, **kwds))
File “/home/ubuntu/.local/lib/python3.6/site-packages/tensorflow/python/eager/function.py”, line 2855, in _get_concrete_function_internal_garbage_collected
graph_function, _, _ = self._maybe_define_function(args, kwargs)
File “/home/ubuntu/.local/lib/python3.6/site-packages/tensorflow/python/eager/function.py”, line 3213, in _maybe_define_function
graph_function = self._create_graph_function(args, kwargs)
File “/home/ubuntu/.local/lib/python3.6/site-packages/tensorflow/python/eager/function.py”, line 3075, in _create_graph_function
capture_by_value=self._capture_by_value),
File “/home/ubuntu/.local/lib/python3.6/site-packages/tensorflow/python/framework/func_graph.py”, line 986, in func_graph_from_py_func
func_outputs = python_func(*func_args, **func_kwargs)
File “/home/ubuntu/.local/lib/python3.6/site-packages/tensorflow/python/eager/def_function.py”, line 600, in wrapped_fn
return weak_wrapped_fn().__wrapped__(*args, **kwds)
File “/home/ubuntu/.local/lib/python3.6/site-packages/tensorflow/python/framework/func_graph.py”, line 973, in wrapper
raise e.ag_error_metadata.to_exception(e)
ValueError: in user code:
How can I get flickr30k dataset? I searched a lot but couldn’t find it. The link they provide after filling up the form is broken and says forbidden. Can anyone have the zip file that I can get directly
Hi Jason. This tutorial is fantastic thank you. You also have the patience of a saint responding to all of these. Keep up the great work!
I’ve adapted this tutorial to run on some images that are pretty difficult to classify anyway (they are similar).
I’m getting an output but it is the same words for every image. Does this mean the model is overfit or underfit? What are the most likely parameters I should look at changing?
Is there a latest (optimized) version of this program, because it has low accuracy. I need help how to fine tune the model, how to reduce vocabulary, and how to use inception instead of vgg16? some snippets would be really helpful, specially the code snippet to use inception instead of vgg16. Thanks any help would be appreciated. This is a great post thanks
Yes i faced same error. You faced it because you may be using latest tensorflow (v.24). Whereas this code only works with tensorflow 1.x.
To overcome this problem i used Tensorflow 1.13.1 and keras 2.2.4.
We really need a latest version which works on tensorflow 2
hey Jason, I followed your tutorial to train a model using progressive loading on the Flickr 30k dataset. I’m using several VMs to train the model using 10 epochs and batch size of 3.
Train time ETA is 48 hours. Even if I decrease number of epochs or change batch size, ETA stays the same! Any explanation or tips to decrease training time?
It’s training very slowly and not very well at that. After about 30 hours the current loss is 5.66. I’ve even converted the features dataframe into a Delta Lake table to be read in through the generator, so I’m not quite sure what else I could do to make it better.
Hello, I am having some trouble with the model.fit_generator method.
# train the model, run epochs manually and save after each epoch
epochs = 20
steps = len(train_descriptions)
for i in range(epochs):
# create the data generator
generator = data_generator(train_descriptions, train_features, tokenizer, max_length)
# fit for one epoch
model.fit_generator(generator, epochs=1, steps_per_epoch=steps, verbose=1)
# save model
model.save(‘/content/drive/Shareddrives/AITrust/model_’ + str(i) + ‘.h5’)
while running this cell, the following output is generated
/usr/local/lib/python3.6/dist-packages/tensorflow/python/keras/engine/training.py:1844: UserWarning: Model.fit_generator is deprecated and will be removed in a future version. Please use Model.fit, which supports generators.
warnings.warn(‘Model.fit_generator is deprecated and ‘
—————————————————————————
TypeError Traceback (most recent call last)
in ()
6 generator = data_generator(train_descriptions, train_features, tokenizer, max_length)
7 # fit for one epoch
—-> 8 model.fit_generator(generator, epochs=1, steps_per_epoch=steps, verbose=1)
9 # save model
10 model.save(‘/content/drive/Shareddrives/AITrust/model_’ + str(i) + ‘.h5′)
9 frames
/usr/local/lib/python3.6/dist-packages/numpy/core/numeric.py in full(shape, fill_value, dtype, order)
312 if dtype is None:
313 dtype = array(fill_value).dtype
–> 314 a = empty(shape, dtype, order)
315 multiarray.copyto(a, fill_value, casting=’unsafe’)
316 return a
TypeError: ‘function’ object cannot be interpreted as an integer
I am using tensorflow 2.4.0 and keras 2.4.3. I have also changed
out_seq = to_categorical([out_seq], num_classes=vocab_size)[0]
to
out_seq = to_categorical([out_seq], num_classes=vocab_size)
# define the model
model = define_model(vocab_size, max_length)
# train the model, run epochs manually and save after each epoch
epochs = 20
steps = len(train_descriptions)
for i in range(epochs):
# create the data generator
generator = data_generator(train_descriptions, train_features, tokenizer, max_length, vocab_size)
# fit for one epoch
model.fit(generator,epochs=20,verbose=1,steps_per_epoch=steps)
# save model
model.save(‘model_’ + str(i) + ‘.h5’)
/usr/local/lib/python3.7/dist-packages/tensorflow/python/keras/engine/training.py:1844: UserWarning: Model.fit_generator is deprecated and will be removed in a future version. Please use Model.fit, which supports generators.
warnings.warn(‘Model.fit_generator is deprecated and ‘
—————————————————————————
ValueError Traceback (most recent call last)
in ()
6 generator = data_generator(train_descriptions, train_features, tokenizer, max_length, vocab_size)
7 # fit for one epoch
—-> 8 model.fit_generator(generator, epochs=1, steps_per_epoch=steps, verbose=1)
9 # save model
10 model.save(‘model_’ + str(i) + ‘.h5’)
File “/Library/Frameworks/Python.framework/Versions/3.8/lib/python3.8/site-packages/plaidml/keras/backend.py”, line 1529, in rnn
raise NotImplementedError(‘rnn is not implemented with mask support’)
NotImplementedError: rnn is not implemented with mask support
Hello Sir, i want to plot the graph between training and testing or dev loss but with model.fit_generator i could not able to do so. i have to go with model.fit_generator because while using model.fit i am getting RAM issues so anyhow i have to go with model.fit_generator,
Please tell me how to implement the graph between training and testing.
Hey Jason,
Thank you for all the posts. They’re heavily informative.
How can I use checkpoints whilst using progressive loading?
I mean the model.fit is inside a loop
so I’m confused.
Thanks again
okay, thanks a lot. worked it out.
Just a thing more, I tried to use a batch size of 64. The accuracy increased but the bleu scores dropped in comparison to when using the batch size of 6000.
Could you please guide me to the possible reason?
yes, I read that in your post. Should I not be using batch training then? Since the higher the batch size the lower my bleu score goes. Just wanted to know why is this happening. couldnt get an answer anywhere.
Iam trying to run the code in “Prepare Photo Data” section and when I run I get the following error that says model.fit() require model.compile(), however, there is no model compilation in this code fragment.
Traceback (most recent call last):

  File "extract_image_features.py", line 39, in

    features = compute_features(IMAGE_DIR)

  File "extract_image_features.py", line 31, in compute_features

    feature = model.fit(img, verbose=0)

  File "/Users/saratk/envs/tf/lib/python3.8/site-packages/tensorflow/python/keras/engine/training.py", line 1032, in fit

    self._assert_compile_was_called()

  File "/Users/saratk/envs/tf/lib/python3.8/site-packages/tensorflow/python/keras/engine/training.py", line 2592, in _assert_compile_was_called

    raise RuntimeError('You must compile your model before '

RuntimeError: You must compile your model before training/testing. Use
model.compile(optimizer, loss).
I am running above example and from section – Photo and Caption Dataset, getting the below error
NotFoundError Traceback (most recent call last)
in
1 #extract features from all images
2 directory=’Flicker8k_Dataset’
—-> 3 features=extract_features(directory)
4
5 print (“Extracted features : “, len(features))
in extract_features(directory)
34
35 #get features
—> 36 feature=model.predict(image, verbose=0)
37
38 #get image id
~\AppData\Roaming\Python\Python37\site-packages\tensorflow\python\keras\engine\training.py in predict(self, x, batch_size, verbose, steps, callbacks, max_queue_size, workers, use_multiprocessing)
1627 for step in data_handler.steps():
1628 callbacks.on_predict_batch_begin(step)
-> 1629 tmp_batch_outputs = self.predict_function(iterator)
1630 if data_handler.should_sync:
1631 context.async_wait()
~\AppData\Roaming\Python\Python37\site-packages\tensorflow\python\eager\def_function.py in __call__(self, *args, **kwds)
826 tracing_count = self.experimental_get_tracing_count()
827 with trace.Trace(self._name) as tm:
–> 828 result = self._call(*args, **kwds)
829 compiler = “xla” if self._experimental_compile else “nonXla”
830 new_tracing_count = self.experimental_get_tracing_count()
~\AppData\Roaming\Python\Python37\site-packages\tensorflow\python\eager\def_function.py in _call(self, *args, **kwds)
893 # If we did not create any variables the trace we have is good enough.
894 return self._concrete_stateful_fn._call_flat(
–> 895 filtered_flat_args, self._concrete_stateful_fn.captured_inputs) # pylint: disable=protected-access
896
897 def fn_with_cond(inner_args, inner_kwds, inner_filtered_flat_args):
~\AppData\Roaming\Python\Python37\site-packages\tensorflow\python\eager\function.py in _call_flat(self, args, captured_inputs, cancellation_manager)
1917 # No tape is watching; skip to running the function.
1918 return self._build_call_outputs(self._inference_function.call(
-> 1919 ctx, args, cancellation_manager=cancellation_manager))
1920 forward_backward = self._select_forward_and_backward_functions(
1921 args,
hi Jason, here is the link to my code, see the last cell
I have done the same as mentioned in the blog, can you plz help, error coming in the last step only
Hi Jason Sir I was hoping you could help me, I am using progressive overloading method to get the best model I get the following error stack
  File "Basic_model.py", line 357, in

    model = define_model(vocab_size, max_length)

  File "Basic_model.py", line 310, in define_model

    se3 = LSTM(256)(se2)

  File "/home/aditya/miniconda3/envs/tf/lib/python3.7/site-packages/tensorflow/python/keras/layers/recurrent.py", line 660, in __call__

    return super(RNN, self).__call__(inputs, **kwargs)

  File "/home/aditya/miniconda3/envs/tf/lib/python3.7/site-packages/tensorflow/python/keras/engine/base_layer.py", line 952, in __call__

    input_list)

  File "/home/aditya/miniconda3/envs/tf/lib/python3.7/site-packages/tensorflow/python/keras/engine/base_layer.py", line 1091, in _functional_construction_call

    inputs, input_masks, args, kwargs)

  File "/home/aditya/miniconda3/envs/tf/lib/python3.7/site-packages/tensorflow/python/keras/engine/base_layer.py", line 822, in _keras_tensor_symbolic_call

    return self._infer_output_signature(inputs, args, kwargs, input_masks)

  File "/home/aditya/miniconda3/envs/tf/lib/python3.7/site-packages/tensorflow/python/keras/engine/base_layer.py", line 863, in _infer_output_signature

    outputs = call_fn(inputs, *args, **kwargs)

  File "/home/aditya/miniconda3/envs/tf/lib/python3.7/site-packages/tensorflow/python/keras/layers/recurrent_v2.py", line 1157, in call

    inputs, initial_state, _ = self._process_inputs(inputs, initial_state, None)

  File "/home/aditya/miniconda3/envs/tf/lib/python3.7/site-packages/tensorflow/python/keras/layers/recurrent.py", line 859, in _process_inputs

    initial_state = self.get_initial_state(inputs)

  File "/home/aditya/miniconda3/envs/tf/lib/python3.7/site-packages/tensorflow/python/keras/layers/recurrent.py", line 643, in get_initial_state

    inputs=None, batch_size=batch_size, dtype=dtype)

  File "/home/aditya/miniconda3/envs/tf/lib/python3.7/site-packages/tensorflow/python/keras/layers/recurrent.py", line 2507, in get_initial_state

    self, inputs, batch_size, dtype))

  File "/home/aditya/miniconda3/envs/tf/lib/python3.7/site-packages/tensorflow/python/keras/layers/recurrent.py", line 2987, in _generate_zero_filled_state_for_cell

    return _generate_zero_filled_state(batch_size, cell.state_size, dtype)

  File "/home/aditya/miniconda3/envs/tf/lib/python3.7/site-packages/tensorflow/python/keras/layers/recurrent.py", line 3003, in _generate_zero_filled_state

    return nest.map_structure(create_zeros, state_size)

  File "/home/aditya/miniconda3/envs/tf/lib/python3.7/site-packages/tensorflow/python/util/nest.py", line 659, in map_structure

    structure[0], [func(*x) for x in entries],

  File "/home/aditya/miniconda3/envs/tf/lib/python3.7/site-packages/tensorflow/python/util/nest.py", line 659, in

    structure[0], [func(*x) for x in entries],

  File "/home/aditya/miniconda3/envs/tf/lib/python3.7/site-packages/tensorflow/python/keras/layers/recurrent.py", line 3000, in create_zeros

    return array_ops.zeros(init_state_size, dtype=dtype)

  File "/home/aditya/miniconda3/envs/tf/lib/python3.7/site-packages/tensorflow/python/util/dispatch.py", line 201, in wrapper

    return target(*args, **kwargs)

  File "/home/aditya/miniconda3/envs/tf/lib/python3.7/site-packages/tensorflow/python/ops/array_ops.py", line 2819, in wrapped

    tensor = fun(*args, **kwargs)

  File "/home/aditya/miniconda3/envs/tf/lib/python3.7/site-packages/tensorflow/python/ops/array_ops.py", line 2868, in zeros

    output = _constant_if_small(zero, shape, dtype, name)

  File "/home/aditya/miniconda3/envs/tf/lib/python3.7/site-packages/tensorflow/python/ops/array_ops.py", line 2804, in _constant_if_small

    if np.prod(shape) < 1000:

  File "", line 6, in prod

  File "/home/aditya/miniconda3/envs/tf/lib/python3.7/site-packages/numpy/core/fromnumeric.py", line 3031, in prod

    keepdims=keepdims, initial=initial, where=where)

  File "/home/aditya/miniconda3/envs/tf/lib/python3.7/site-packages/numpy/core/fromnumeric.py", line 87, in _wrapreduction

    return ufunc.reduce(obj, axis, dtype, out, **passkwargs)

  File "/home/aditya/miniconda3/envs/tf/lib/python3.7/site-packages/tensorflow/python/framework/ops.py", line 855, in __array__

    " a NumPy call, which is not supported".format(self.name))

NotImplementedError: Cannot convert a symbolic Tensor (lstm/strided_slice:0) to a numpy array. This error may indicate that you're trying to pass a Tensor to a NumPy call, which is not supported
I have followed the steps you mentioned in your blog. After some trials, I am able to run the entire project.
But the issue I am facing is that for whatever image I provide, my model always says either ‘A man in red t-shirt standing on street’ or ‘Two dogs are playing on ground’.
I am unable to understand which section is creating this problem. I am very new in this area. Can you please suggest in which areas might create this problem?
First of all, thanks for this fruitful tutorial, it has helped me a lot and I’ve learnt a lot from this. I want to make an extension by changing the CNN model from VGG16 to InceptionV3. Will it be a better choice? The output of Inception V3 is (None, 2048). Please help me in this regard.
Also, I want to use BERT Transformers Model for word embeddings. Will it be a better choice?
Can you please upload the model that you trained and used in the example? My system is not really powerful and the progressive loading method is giving out really bad models.So I would really appreciate if you could share your model ‘model-ep002-loss3.245-val_loss3.612.h5’.
Hi Jason nice article and thank you for giving us something to learn !
a few question tho
1. can this used to video for the captioning?
2. how much photos that it need to take for the sequence to make the caption?
currently got 23k frames data that i got from around 200 videos, i did apply it to it and it works for making model train and evaluating, didnt try the model to the video yet since i didnt see any description for how much frames could it take to make a caption in your article
any suggestion or clue which or where should i look from your code in your article to modified it if my data are video and make the system process the caption after looking from a few frames ?
i did use this example with my video frames data with my own token etc, but i havent tried the model to video yet since i didnt see how much images(or frames because i input the data with my frames/images from my video) sequence it takes to predict and i am a little bit confused at that part.
but for trying to make the model with my own data(frames from my video), i already did and it works fine,
thanks a lot for your tutorial. it helped me a lot but excuse me when i print (actual and predicted sentences ) i got the same sentence every time i got the actual from test descriptions . i need to get the new captions that used the model h5 . Thanks a lot
Hi, Jason, I followed through the tutorial from beginning to end. So my best model was the one with val-loss 3.882, and test BLEU-1 score was 0.5461!
I have learned that BLEU-1 score of 0.5 is a state-of-the-art performance, but when I try generating captions with new images of people and animal from the internet, the phrase “man in black shirt is sitting on the sidewalk” keeps coming up for random images. Does this mean that for these images the model does not recognize them at all?
Would you please guide us on how to perform image captioning for a custom dataset? The problem is assigning unique identifiers to the labels of each image. Any kind of help will be appreciated…. thank you
While running the code in Google Colab I my runtime stops working because of this message: “Your session crashed after using all available RAM” . does anyone know what might be the reason for it or how to fix it?
Thank you for the great tutorial. It’s beneficial for me. 🙂
I tried using another model, progressive loading, and added a data validation set using the generator.
First, I’m using this code to make some tests on a translated Flickr8k dataset, I intend to publish my findings later, how can I cite you and your website? Standard latex citing the site would be ok?
Second, as told on the article, val_loss reaches minimum values on the very first epochs, but comparing BLEU score, the latest epoch showed better numbers, why do you think this might be happening?
Hey Jason, is there any work done on image captioning using conventional machine learning. I am working on report generation for medical images. can you suggest me some literature that i should i review for my thesis?
for img,path in img_data:
fv = image_features_extract_model(img)
Below is the ERROR:
—————————————————————————
NotFoundError Traceback (most recent call last)
~\AppData\Local\Temp/ipykernel_81952/3499706949.py in
—-> 1 for img,path in img_data:
2 fv = image_features_extract_model(img)
~\miniconda3\envs\tensor\lib\site-packages\tensorflow\python\framework\ops.py in raise_from_not_ok_status(e, name)
6895 message = e.message + (” name: ” + name if name is not None else “”)
6896 # pylint: disable=protected-access
-> 6897 six.raise_from(core._status_to_exception(e.code, message), None)
6898 # pylint: enable=protected-access
6899
~\miniconda3\envs\tensor\lib\site-packages\six.py in raise_from(value, from_value)
NotFoundError: NewRandomAccessFile failed to Create/Open: \Images\1000268201_693b08cb0e.jpg : The system cannot find the path specified.
; No such process
[[{{node ReadFile}}]] [Op:IteratorGetNext]
Any idea why the system is not able to access the path.
Hi Jason
Thank you for your perfect article
I successfully train and evaluate model but I get this result:
startseq rushed rushed rushed rushed rushed rushed rushed rushed rushed rushed rushed rushed rushed rushed rushed rushed rushed rushed rushed rushed rushed rushed rushed rushed rushed rushed rushed rushed rushed rushed rushed rushed rushed rushed
I’m eager to help, but I just don’t have the capacity to debug code for you.
I am happy to make some suggestions:
Consider aggressively cutting the code back to the minimum required. This will help you isolate the problem and focus on it.
Consider cutting the problem back to just one or a few simple examples.
Consider finding other similar code examples that do work and slowly modify them to meet your needs. This might expose your misstep.
Consider posting your question and code to StackOverflow.
Thanks a lot dear Jason for your answering.
I will follow your recommendations and post the results.
Your website is like a book which I learn many thing from even comments.
best wishes
I am trying to use the same code with Flickr30K dataset. And also I am computing Bleu and Cider score. It works fine with Flickr8K. I split the the Flickr30K dataset to 29000 train, 1000 validation and 1000 test images. and trained the model. But the model generates the same two sentence for every image in the list. Why does this happen. How can I fix it. Also the Bleu scores are higher the Flickr8K, but the Cider score is too low. I tried to reduce the vocabulary size like in the ” What is the Role of Recurrent Neural Networks (RNNs) in an Image
Caption Generator?” paper. But it doesn’t work. Thank you so much.
Thank you for this excellent example of image captioning!
I am currently working on a project where I need to caption images of playing cards. Importantly, the model needs to capture the ORDER of the playing cards (from left to right).
If I train a CNN LSTM, as in your example, and the captions are correctly formatted (left-right), will this model capture such as spatial relationship?
I.e. is an image captioning model the correct approach for this task?
I train a model, like you described above, on images of playing cards. Each image is captioned, describing the cards in strictly left-to-right order. E.g.
5 of Diamonds — 3 of Clubs — Ace of Hearts
I use the trained model to make a prediction on a new image of 3 playing cards. Will the predicted caption have the correct left-to-right ordering?
I.e. can the image captioning approach you describe learn (in this case left-to-right) spatial relationships?
Hi Jason, this is a very well-written tutorial on caption generation, thank you! All procedures, including data preparation, model architecture, training and evaluation are thoroughly explained in detail using simple terms. For me, it has been a good refreshment for the encoder-decoder architecture. I also appreciate the provided code, from which I learn a lot, especially the code for recursively generating output text.
Now looking back from the end of 2022, I’m curious whether the following could increase the performance of the caption generator:
• Plug in the photo feature extractor and let it be fine-tuned along with training the decoder
• Use a transformer for the decoder
Hi Jason, Hi all
Thanks Jason for this very helpful tutorial!
Could anyone please send a link for downloading their trained model and tokenizer? Then we can try directly the last part (Generate New Captions) without training and saving..
So, I searched for pre-trained models and found and tried this one, which looks very impressive (not only) for captioning: https://github.com/salesforce/LAVIS
Just wanted to share this with all here, as I always benefit from this very helpful website.
hello, can you please tell me if these codes are updated to the latest evolutions in image captioning field , or there are other recouse that are up to date 2023?
please reply to me
thank you.
Hi tounes…Our content is up to date with stable library levels. Are you having any particular issues with executing the code that we can assist you with?
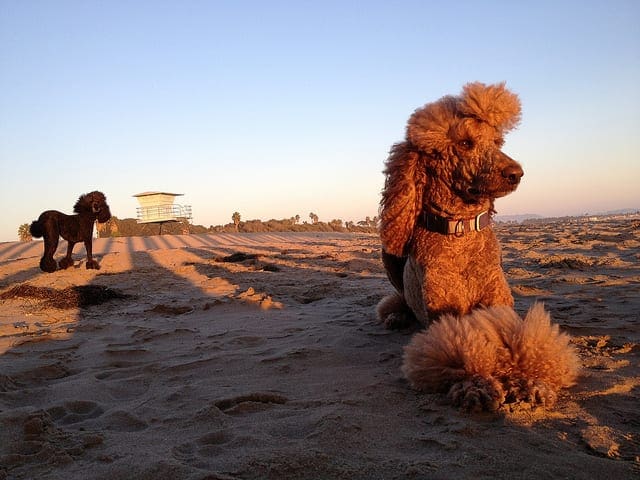
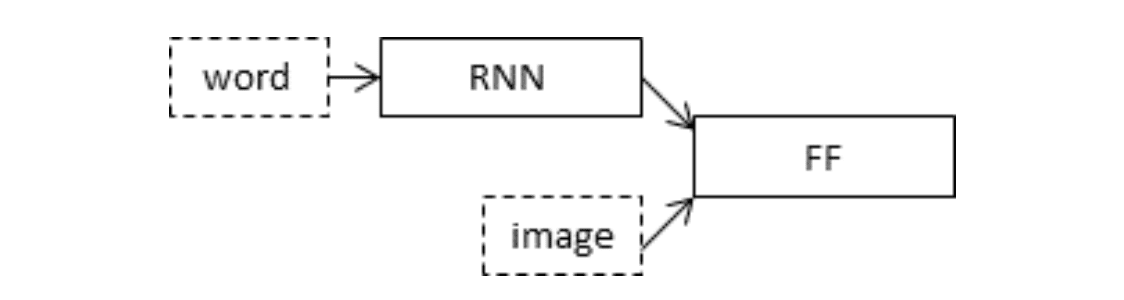
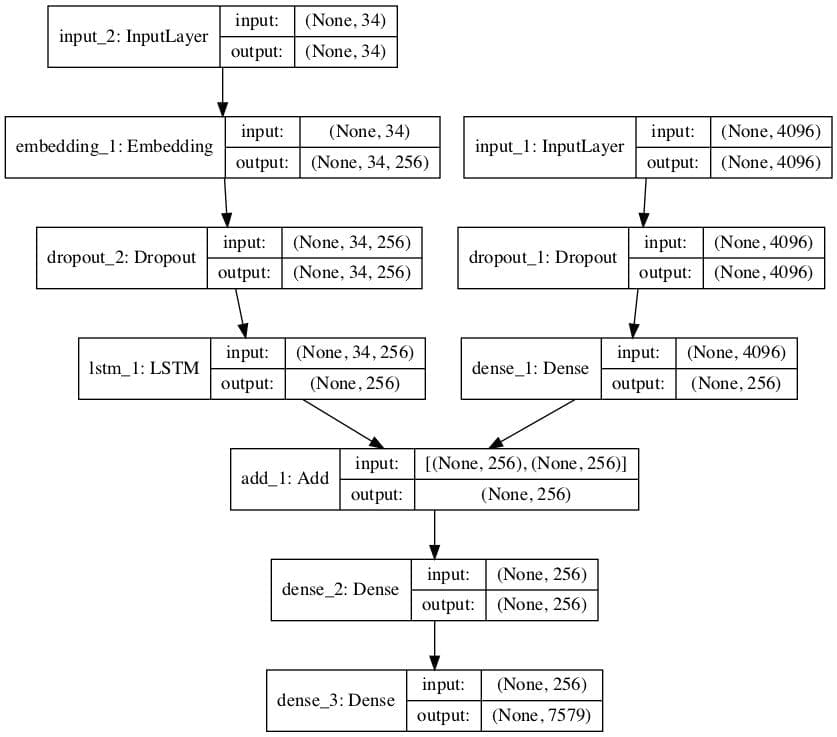
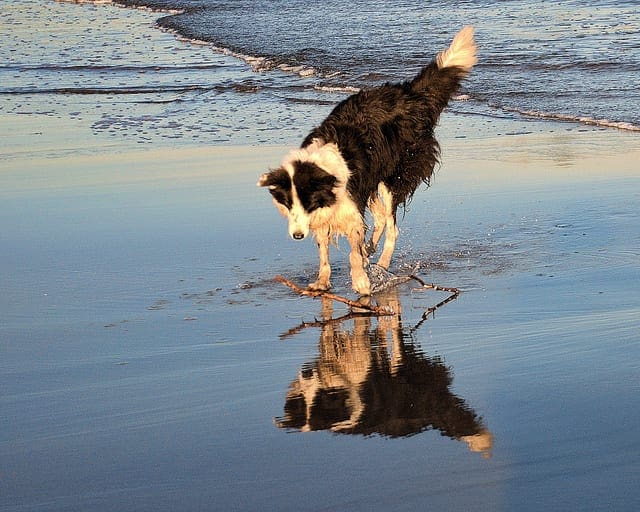


Hi Jason,
thanks for this great article about image caption!
My results after training were a bit worse (loss 3.566 – val_loss 3.859, then started to overfit) so i decided to try keras.applications.inception_v3.InceptionV3 for the base model. Currently it is still running and i am curious to see if it will do better.
Let me know how you go Christian.
hi jason m recieving this error can u please help me in this
NameError: name ‘Flickr8k_Dataset’ is not defined
You may have missed a line of code or the dataset is not in the same directory as the python file.
Can you provide complete source code link without split code parts?
please 🙂
Hello Bhagyashree…The tutorial contains full code listing that you may utilize.
how to solve this , error happen
ValueError
6 generator = data_generator(train_descriptions, train_features, tokenizer, max_length, vocab_size)
7 # fit for one epoch
—-> 8 model.fit_generator( generator,epochs=1, steps_per_epoch=steps, verbose=1)
I don’t have enough context to comment, sorry.
Perhaps these tips will help:
https://machinelearningmastery.com/faq/single-faq/why-does-the-code-in-the-tutorial-not-work-for-me
Hello Jason
I,m facing a value error could u help
ValueError Traceback (most recent call last)
in ()
6 image_input=image_input.reshape(2048,)
7 gen=generate(desc_dict,photo,max_length_of_caption,vocab_size,image_input)
—-> 8 model.fit(gen,epochs=1,steps_per_epoch=6000,verbose=1)
9
10
5 frames
in create_sequence(caption, max_length_of_caption, vocab_size, image_input)
1 def create_sequence(caption,max_length_of_caption,vocab_size,image_input):
—-> 2 input_sequence=[],image_sequence=[],output_sequence=[]
3 for caption in captions:
4 caption=caption.split(‘ ‘)
5 caption=[wordtoindex[w] for w in caption if w in vocab]
ValueError: not enough values to unpack (expected 2, got 0)
These tips may help:
https://machinelearningmastery.com/faq/single-faq/why-does-the-code-in-the-tutorial-not-work-for-me
Hey, did a find a solution? I’m facing the same error.
What accuracy are you getting in your NLP scores?
Hello Jason can you help me with the frontend part I tried using the flask app but failed
Perhaps this will help:
https://machinelearningmastery.com/faq/single-faq/how-do-i-deploy-my-python-file-as-an-application
Christian / Jason – instead would Batch normalization help us here. am facing the same issue, over fitting.
BN should also speed up the training and should also give us more accurate results. any inputs ?
The model usually does fit in 3-5 epochs.
You can try batchnorm if you like. Not sure if it will help.
yep, i agree… not required..thanks..
am also trying inceptionV3, let you know the results..
Great.
Hey did anyone try the Inception model? What were the results?
hey ben!!!Can you please share the code and results of the inception model?so that we can also try and know more about the inception model.Thanks in advance
can you plz send me the code at shauryaprataps261@gmail.com
did you find code ?
I am getting the same
Hi,
i have tried using the inception v3 but the bleu scores are even than that of vgg16 model.
BLEU-1: 0.514655
BLEU-2: 0.266434
BLEU-3: 0.179374
BLEU-4: 0.078146
Nice work!
i also tried Inception i got BLEU-1 0.571
Well done!
@vishal, can you share the inception v3 code ?
Hello Christian Sir,
To avoid overfit, you used keras.application.inceptionV3, m geeting some error in this line:
print(‘Extracted Features: %d’ % len(features))
—————————————————————————
TypeError Traceback (most recent call last)
in ()
—-> 1 print(‘Extracted Features: %d’ % len(features))
TypeError: object of type ‘NoneType’ has no len()
Please help in resolving this
HI Christian, Please can you share working Inception V3 code, I am not able to make InceptionV3 model working, I am getting following error.
Incompatible shapes: [47,8,8,256] vs. [47,256]
[[{{node gradient_tape/model_10/add_7/add/BroadcastGradientArgs}}]] [Op:__inference_train_function_1153371]
Hi Jason,
Once again great Article.
I ran into some error while executing the code under “Complete example ” section.
The error I got was
ValueError: Error when checking target: expected dense_3 to have shape (None, 7579) but got array with shape (306404, 1)
Any idea how to fix this?
Thanks
Hi Akash, nice catch.
The fault appears to have been introduced in a recent version of Keras in the to_categorical() function. I can confirm the fault occurs with Keras 2.1.1.
You can learn more about the fault here:
https://github.com/fchollet/keras/issues/8519
There are two options:
1. Downgrade Keras to 2.0.8
or
2. Modify the code, change line 104 in the training code example from:
to
I hope that helps.
Thanks Jason. It’s working now.
Can you suggest the changes to be made to use Inception model and word embedding like word2vec.
I’m glad to hear that.
Yes, simply load the inception model and prepare the images.
https://keras.io/applications/
Hi Akash
Could you please tell how did you git rid of this problem?
I am facing
ValueError: Error when checking input: expected input_1 to have 2 dimensions, but got array with shape (11, 7, 7, 512)
and after changing input structure to inputs1 = Input(shape=(7, 7, 512,)) I am facing
ValueError: Error when checking target: expected dense_3 to have 4 dimensions, but got array with shape (11, 3857)
I have tried with Keras 2.0.8 and latest 2.2.2 versions.
Any help would be much appreciated.
Thanks
Did you used different input shape?.If you changed the input shape then you have to flatten it and add fully connected dense layer of 4096 neurons.
Should I avoid using “include_top = false” while feature extraction ?
or keep it as true ?
Anesh how to fix this error?
Error when checking input: expected input_3 to have shape (4096,) but got array with shape (2048,)
Change the data to meet the model or change the model to meet the data.
Hi Jason,
Big thumbs up, nicely written, really informative article. I especially like the step by step approach.
But when I tried to go through it, I got an error in load_poto_features saying that “name ‘load’ not defined”. Which is kinda odd.
Otherwise everything seems fine.
Thanks.
Perhaps double check you have the load function imported from pickle?
Hi Jason
I am a regular follower of your tutorials. They are great. I got to learn a lot. Thank you so much. Please keep up the good work
You’re welcome!
____________________________________________________________________________________________________
Layer (type) Output Shape Param # Connected to
====================================================================================================
input_2 (InputLayer) (None, 34) 0
____________________________________________________________________________________________________
input_1 (InputLayer) (None, 4096) 0
____________________________________________________________________________________________________
embedding_1 (Embedding) (None, 34, 256) 1940224 input_2[0][0]
____________________________________________________________________________________________________
dropout_1 (Dropout) (None, 4096) 0 input_1[0][0]
____________________________________________________________________________________________________
dropout_2 (Dropout) (None, 34, 256) 0 embedding_1[0][0]
____________________________________________________________________________________________________
dense_1 (Dense) (None, 256) 1048832 dropout_1[0][0]
____________________________________________________________________________________________________
lstm_1 (LSTM) (None, 256) 525312 dropout_2[0][0]
____________________________________________________________________________________________________
add_1 (Add) (None, 256) 0 dense_1[0][0]
lstm_1[0][0]
____________________________________________________________________________________________________
dense_2 (Dense) (None, 256) 65792 add_1[0][0]
____________________________________________________________________________________________________
dense_3 (Dense) (None, 7579) 1947803 dense_2[0][0]
====================================================================================================
Total params: 5,527,963
Trainable params: 5,527,963
Non-trainable params: 0
_________________________
ValueError: Error when checking input: expected input_1 to have 2 dimensions, but got array with shape (306404, 7, 7, 512)
Getting error during mode.fit
model.fit([X1train, X2train], ytrain, epochs=20, verbose=2, callbacks=[checkpoint], validation_data=([X1test, X2test], ytest))
Keras 2.0.8 with tensorflow
what is wrong ?
Not sure, did you copy all of the code exactly?
Is your numpy and tensorflow also up to date?
This looks like he did change the network for feature extraction. When using include_top=False and wheigts=’imagenet” you get this type of data structure.
Nice.
@maibam did you find the solution?
I am getting similar error –
ValueError: Error when checking input: expected input_1 to have 2 dimensions, but got array with shape (17952, 7, 7, 512)
Please help me out.
Thanks!!
Ensure your version of Keras is up to date. v2.1.6 or better.
__________________________________________________________________________________________________
Layer (type) Output Shape Param # Connected to
==================================================================================================
input_2 (InputLayer) (None, 27) 0
__________________________________________________________________________________________________
input_1 (InputLayer) (None, 4096) 0
__________________________________________________________________________________________________
embedding_1 (Embedding) (None, 27, 256) 1058048 input_2[0][0]
__________________________________________________________________________________________________
dropout_1 (Dropout) (None, 4096) 0 input_1[0][0]
__________________________________________________________________________________________________
dropout_2 (Dropout) (None, 27, 256) 0 embedding_1[0][0]
__________________________________________________________________________________________________
dense_1 (Dense) (None, 256) 1048832 dropout_1[0][0]
__________________________________________________________________________________________________
lstm_1 (LSTM) (None, 256) 525312 dropout_2[0][0]
__________________________________________________________________________________________________
add_1 (Add) (None, 256) 0 dense_1[0][0]
lstm_1[0][0]
__________________________________________________________________________________________________
dense_2 (Dense) (None, 256) 65792 add_1[0][0]
__________________________________________________________________________________________________
dense_3 (Dense) (None, 4133) 1062181 dense_2[0][0]
==================================================================================================
Total params: 3,760,165
Trainable params: 3,760,165
Non-trainable params: 0
__________________________________________________________________________________________________
None
Traceback (most recent call last):
File “train2.py”, line 179, in
model.fit([X1train, X2train], ytrain, epochs=20, verbose=2, callbacks=[checkpoint], validation_data=([X1test, X2test], ytest))
ValueError: Error when checking input: expected input_1 to have 2 dimensions, but got array with shape (10931, 7, 7, 512)
keras version is – 2.2.0
Please help me out.
Looks like the dimensions of your data do not match the expectations of the model.
You can change the data or change the model.
If you changed the input shape by include_top=False then you have to flatten it and add two FC dense layer of 4096 neurons.
Thank you for the article. It is great to see full pipeline.
Always following your articles with admiration
Thanks!
In the prepare data section, if using Python 2.7 there is no str.maketrans method.
To make this work just comment that line and in line 46 do this:
desc = [w.translate(None, string.punctuation) for w in desc]
Thanks Gonzalo!
after using the function to_vocabulary()
I am getting a vocabulary of size 24 which is too less though I have followed the code line by line.
Can u help?
Are you able to confirm that your Python is version 3.5+ and that you have the latest version of all libraries installed?
Hi Jason,
I am using your code step by step. There is a light mistake :
you wrote
# save descriptions
save_doc(descriptions, ‘descriptions.txt’)
in fact the right intruction is
# save descriptions
save_descriptions(descriptions, ‘descriptions.txt’)
as you wrote in the final example
best
Thanks Minel, fixed.
Hi jason
Another small detail. I had to write
from pickle import load
to run the instruction
all_features = load(open(filename, ‘rb’))
Best
Nice catch, fixed. Thanks!
Hi Jason,
I met some trouble running your code. I got a MemoryError on the instruction :
return array(X1), array(X2), array(y)
I am using a virtual machine with Linux (Debian), Python3, with 32Giga of memory.
Could you tell me what was the size of the memory on the computer you used to check your program ?
Best
I expect 8GB of RAM would be enough.
Perhaps try and use progressive loading instead, as described in this post:
https://machinelearningmastery.com/prepare-photo-caption-dataset-training-deep-learning-model/
thanks, Jason for a great tutorial!
from line 96 to 104 in the main complete code.
seq = tokenizer.texts_to_sequences([desc])[0]
out_seq = to_categorical([out_seq], num_classes=vocab_size)[0]
seq = tokenizer.texts_to_sequences([desc])[0]
i did not understand why did you do [0] in tokenizer.texts_to_sequences([desc])[0], and moreover why did you passed a 2d list?
what does texts_to_sequences do??
You can learn more about the function here:
https://keras.io/preprocessing/text/#text_to_word_sequence
It takes a 2D array, here we provide our 1d array as a 2d array and retrieve the result.
You can learn more about Python array indexing here:
https://machinelearningmastery.com/index-slice-reshape-numpy-arrays-machine-learning-python/
Please slightly explain that. I am not getting why did you do [0] in tokenizer.texts_to_sequences([desc])[0] . I have also read array indexing. How it become 2D array from that? Please explain it
Because the function returns a 2D array and we only need the first dimension.
Thank for the advice.In fact, I upgraded the VM (64Go, 16 cores) and it worked fine (using 45Go of memory)
Best
Nice! Glad to hear it.
I get the same error even with 64GB VM :/ What to do
I’m sorry to hear that, perhaps there is something else going on with your workstation?
I can confirm the example works on workstations and on EC2 instances with and without GPUs.
It’s throwing a Value error for input_1 after sometime. I tried everything i can but i am not able to understand. Can you paste the link of your project so i can compare ?
Are you able to confirm that your Python environment is up to date?
And sir, You said the pickle size must be about 127Mb but mine turns out to be above 700MB what did i do wrong ?
The size may be different on different platforms (macos/linux/windows).
Hi Jason – hello from Queensland 🙂
Your tutorials on applied ML in Python are the best on the net hands down, thanks for putting them together!
Thanks Josh!
hai Jason.. When i run the train.py script my lap freeze…I don’t know whether its training or not.Did anyone face this issue ?
Thanks..!
Sorry to hear that.
Perhaps try running it on AWS for a few dollars:
https://machinelearningmastery.com/develop-evaluate-large-deep-learning-models-keras-amazon-web-services/
Thanks for such a great work. I found an error message when running a code
FileNotFoundError: [Errno 2] No such file or directory: ‘descriptions.txt’
Please help
Ensure you generate the descriptions file before running the prior model – check the tutorial steps again and ensure you execute each in turn.
Hi Jason,
I’m getting a MemoryError when I try to prepare the training sequences:
Traceback (most recent call last):
File “C:\Users\Daniel\Desktop\project\deeplearningmodel.py”, line 154, in
X1train, X2train, ytrain = create_sequences(tokenizer, max_length, train_descriptions, train_features)
File “C:\Users\Daniel\Desktop\project\deeplearningmodel.py”, line 104, in create_sequences
out_seq = to_categorical([out_seq], num_classes=vocab_size)[0]
File “C:\Program Files\Anaconda3\lib\site-packages\keras\utils\np_utils.py”, line 24, in to_categorical
categorical = np.zeros((n, num_classes))
MemoryError
any advice? I have 8GB of RAM.
Perhaps try using progressive loading described in this post:
https://machinelearningmastery.com/develop-a-caption-generation-model-in-keras/
Any chance you could show what that would look like functioning with this example? 🙂 I’m struggling a bit to bring a similar generator from the other example to this script.
Thanks for the suggestion, I’ll schedule time to update the example.
Great! Thanks so much
And thanks for the blog, it is really wonderful 🙂 For now I just cut down the training set a lot to work around the memory error and understand.the code better.
Thanks Daniel.
I’m having the same problem. Can you please show the example with progressive generator please ?
I provide an example here:
https://machinelearningmastery.com/prepare-photo-caption-dataset-training-deep-learning-model/
Update: I have updated the tutorial to include an example of training using progressive loading (a data generator).
Hi Jason,
Thank you for this amazing article about image captioning.
Currently I am trying to re-implement the whole code, except that I am doing it in pure Tensorflow. I’m curious to see if my re-implementation is working as smooth as yours.
Also a shower thought, it might be better to get a better vector representations for words if using the pretrained word2vec embeddings, for example Glove 6B or GoogleNews. Learning embeddings from scratch with only 8k words might have some performance loss.
Again thank you for putting everything together, it will take quite some time to implement from scratch without your tutorial.
Try it and see if it lifts model skill. Let me know how you go.
Hello Jason,
Is there a R package to perform modeling of images?
regards
sasikanth
I don’t know, sorry.
Hi Jason! Thanks for your amazing tutorial! I have a question. I don’t understand the meaning of the number 1 on this line (extract_features):
image = image.reshape((1, image.shape[0], image.shape[1], image.shape[2]))
Can you explain me what reshape does and the meaning of the arguments?
Thanks in advance.
Great question, see this post to learn more about numpy arrays:
https://machinelearningmastery.com/index-slice-reshape-numpy-arrays-machine-learning-python/
Hi Jason! thank you for your great code.
but i have one question.
How long does it take to execute under code?
# define the model
model = define_model(vocab_size, max_length)
This code does not run during the third day.
I think that “se3 = LSTM(256)(se2)” code in define_model function is causing the problem.
My computer configuration is like this.
Intel(R) Core(TM) i7-5820K CPU @ 3.30GHz – 6 core
Ram 62G
GeForce GTX TITAN X – 2core
please help me~~
Ouch, something is wrong.
Perhaps try running on AWS?
Perhaps try other models and test your rig/setup?
Perhaps try fewer epochs or a smaller model to see if your setup can train the model at all?
1. No. i try running on my indicvdual linux server and using jupyter notebook
2. No i am using only your code , no other model, no modify
3.
model.fit([X1train, X2train], ytrain, epochs=20, verbose=1, callbacks=[checkpoint], validation_data=([X1test, X2test], ytest))
This code has not yet been executed
so I do not think epoch is a problem.
Perhaps run from the command line as a background process without notebook?
Perhaps check memory usage and cpu/gpu utilization?
ConnectionResetError: [WinError 10054] An existing connection was forcibly closed by the remote host
hi sir… I am getting this error above when i run feature extract code.
Sorry, I have not seen that error.
Hi Krishna,
I’m also getting this error time to time. Were you able to solve this issue?
You have to connect to the internet to download the vgg network.
Hi Jason!
Is it possible to run this neural network on a 8GB RAM laptop with 2GB Graphics card with Intel core i5 processor?
Perhaps.
You might need to adjust it to use progressive loading so that it does not try to hold the entire dataset in RAM.
Hi jason
Is it possible to run on cpu with progressive loading without any issues??
Yes!
Hi Jason,
Can you provide a link for the tokenizer as well as the model file.
I Cannot train this model in my system but would like to see if I can use it to create an Android app
Sorry, I cannot share the models.
When I am running
tokenizer = Tokenizer()
I am getting error,
Traceback (most recent call last):
File “”, line 1, in
NameError: name ‘Tokenizer’ is not defined
How to solve this. Any idea please.
Ensure you import the Tokenizer.
Hi Jason, thanks for the tutorial! I want to ask you if you could explain (or send me some links), to better understand, how exactly the fitting works.
Example description: the girl is …
The LSTM network during fitting takes the beginning of the sequence of my description (startseq) and it produces a vector with all possible subsequent words. This vector is combined with the vector of the input image features and it is passed within an FF layer where we then take the most probable word (with softmax). it’s right?
At this point how does the fitting go on? Is the new sequence (e.g startseq – the) passed into the LSTM network, predicts all possible next words, etc.? Continuing this way up to endseq?
If the network incorrectly generates the next word, what happens? How are the weights arranged? The fitting continues by taking in input “startseq – wrong_word” or continues with the correct one (eg startseq – the)?
Thanks for your help
Marco
This is not fitting, it is inference.
Generating the “wrong” word might not matter, the network could correct.
Also, we can sample the probability distribution of the generated sequence to pull out multiple possible descriptions:
https://machinelearningmastery.com/beam-search-decoder-natural-language-processing/
To learn more see this post and the referenced papers:
https://machinelearningmastery.com/caption-generation-inject-merge-architectures-encoder-decoder-model/
Hi Jason great article on caption generator i think the best till now available online.. i am a newbee in ML(AI). i extracted the features and stored it to features.pkl file but getting an error on create sequence functions memory error and i can see you have suggested progressive loading i do not get that properly could you suggest my how to use the current code modified for progressive loading::
[2/13/2018 12:34 PM] Sanchawat, Hardik:
Using TensorFlow backend.
Dataset: 6000
Descriptions: train=6000
Photos: train=6000
Vocabulary Size: 7579
Description Length: 34
Traceback (most recent call last):
File “C:\Users\hardik.sanchawat\Documents\Scripts\flickr\test.py”, line 154, in
X1train, X2train, ytrain = create_sequences(tokenizer, max_length, train_descriptions, train_features)
File “C:\Users\hardik.sanchawat\Documents\Scripts\flickr\test.py”, line 109, in create_sequences
return array(X1), array(X2), array(y)
MemoryError
My system configuration is :
OS: Windows 10
Processor: AMD A8 PRO-7150B R5, 10 Compute Cores 4C+6G 1.90 GHz
Memory(RAM): 16 GB (14.9GB Usable)
System type: 64-bit OS, x64-based processor
I have an example of progressive loading here:
https://machinelearningmastery.com/prepare-photo-caption-dataset-training-deep-learning-model/
Update: I have updated the tutorial to include an example of training using progressive loading (a data generator).
Hi Jason,
I am trying to using plot _model . but I getting error
raise ImportError(‘Failed to import pydot. You must install pydot’
ImportError: Failed to import pydot. You must install pydot and graphviz for
pydotprintto work.I tried
conda install graphviz
conda install pydotplus
to install pydot.
my python version is3.x
eras vesion is 2.1.3
Could you please help me , to solve this problem
I’m sorry to hear that.
Perhaps the installed libraries are not available in your current Python environment?
Perhaps try posting the error to stackoverflow? I’m not an expert at debugging workstations.
If you are on windows go here and install this, https://graphviz.gitlab.io/_pages/Download/Download_windows.html 2.38 stable msi file.
after that, add the graphviz’s bin onto your system PATH variables. Restart your computer and the path should be picked up.
Then you won’t have that error again.
Thanks Vinneth,
I am using Mac. I tried toes pydotplus, but still its giving same error.
HI
I am getting the same error, how did you fix it?
Regards
Precious Angrish
Hey Kavya i assume this will surely resolve your error , as it also worked for me as well, https://stackoverflow.com/questions/36869258/how-to-use-graphviz-with-anaconda-spyder.
Thanks
I used Progressive Loading from https://machinelearningmastery.com/prepare-photo-caption-dataset-training-deep-learning-model/#comment-429470 This tutorial and updated the input layer to inputs1 = Input(shape=(224, 224, 3))
And i got the error
ValueError: Error when checking target: expected dense_3 to have 4 dimensions, but got array with shape (13, 4485)
Then i updated to_categorical function as you mentioned and the error changed to this
ValueError: Error when checking target: expected dense_3 to have 4 dimensions, but got array with shape (13, 1, 4485)
Been trying to figure out the exact input shapes of the model since 2 days please help 🙁
Hey Vineeth!
Were you able to solve this issue? I am stuck on this for a few days too.
Are you able to confirm your Python and Keras versions?
Hi Jason, why do you apply dropout to the input instead to applying it to the dense layer?
I used a little experimentation to come up with the model.
Try changing it up and see if you can lift skill or reduce training time or model complexity Alex. I’m eager to hear how you go.
Hi Jason,
I just wanted to know that when you are loading the training data, you are tokenizing the train descriptions. But when you are working with test data, you are not tokenizing the test descriptions, instead working with the previous tokens. Shouldn’t the test descriptions be tokenized too before passing to create_sequence for test ?
The train and test data are tokenized.
Hi Jason,
This tutorial is of great help to us all, I think. I have a question: Does the model eventually learn to predict captions not present in the corpus? I mean, is it possible for the model to output sentences that are never seen before? In the example you give, the model predicted “startseq dog is running across the beach endseq”. Is this sentence found in the training corpus, or did the model make it up based on previous observations? And also, If it is possible for the model to combine sentences, how much training data do you think it needs to do that?
The model attempts to generalize beyond what it has seen during training.
In fact, this is the goal with a machine learning model.
Nevertheless, the model will be bounded by the types of text and images seen during training, just not the specific combinations.
Hi Jeson, I have a question. What exactly is the LSTM used for? During fitting it takes an input (eg startseq – girl) and outputs a vector of 256 elements that contain the most probable words after the prefix? Is it trained through backpropagation? The purpose of the fitting is to make sure that given a prefix / input the LSTM gives me back a vector that represents “better” the possible following words (which are then merge with the features, etc …)
It is used for interpreting the text generated so far, needed to generate the next word.
Hi Jason,
for the line:
features = dict()
I got syntaxerror: invalid syntax
How can I fix this error?
Perhaps double check that you have copied the code while maintaining white space?
Perhaps confirm Python 3?
Hi Jason,
is the following line:
model = Model(inputs=model.inputs, outputs=model.layers[-1].output)
means we will save the features of fc2 layer of the vgg16 model?
We are creating a new model without the last layer.
the new model doesn’t contain any fully connected layer because I read that we can extract the features from the fc2 layers of the pre-trained model also
when I run the line model.summary() I got the last layer is :
block5_conv4 (Conv2D) (None, 14, 14, 512) 2359808
but according to the VGG16 it should be
fc2 (Dense) (None, 4096) 16781312 fc1[0][0]
I don’t know where is the problem?
That is because you must have specified include_top = False in VGG. This will not include the fully connected part of the network.
Hi Jason,
how we can feed the saved features in the pickle file (features.pkl) to a linear regression model
That would be a lot of input features! Sorry, I don’t have a worked example.
ValueError: Error when checking input: expected input_1 to have shape (None, 4096) but got array with shape (0, 1)
I am getting this error..can anyone help me understand and fix it?
Are you able to confirm that you have Python3 and all libs up to date?
Yes all my libraries are upto date, have checked.
I solved the problem i posted before….my problem was in the data generator.
I am using progressive loading.After fixing the problem i checked my inputs using this code:
generator = data_generator(descriptions, tokenizer, max_length)
inputs, outputs = next(generator)
print(inputs[0].shape)
print(inputs[1].shape)
print(outputs.shape)
and it’s giving me an output like this:
(13, 224, 224, 3)
(13, 28)
(13, 4485)
but now it’s showing this error:
ValueError: Error when checking input: expected input_1 to have 2 dimensions, but got array with shape (8, 224, 224, 3)
do i have to change the model architecture for progressive loading??
NOTE:for progressive loading have used this code:https://machinelearningmastery.com/prepare-photo-caption-dataset-training-deep-learning-model/
I am stock with the same issue. The example above runs me into memory problems even when I tried it using AWS EC2 g2.2xlarge instance or a laptop with 16 GB RAM. So I tried the progressive loading example you referred to frequently but I have the same trouble with the input of the model. I tried to use inputs[0] as inputs1 for the define_model function but that returned the error ‘Error when checking input: expected input_13 to have 5 dimensions, but got array with shape (13, 224, 224, 3)’. Do I have to reshape input[0], or is the problem in inputs2?
I think the model architecture needs to be changed for the progressive loading example particularly the input shapes.
getting the same error for me
File “fittingmodel.py”, line 189, in
model.fit([X1train, X2train], ytrain, epochs=20, verbose=2, callbacks=[checkpoint], validation_data=([X1test, X2test], ytest))
File “C:\Users\pranyaram\Anaconda3\envs\tensorflow\lib\site-packages\keras\engine\training.py”, line 1630, in fit
batch_size=batch_size)
File “C:\Users\pranyaram\Anaconda3\envs\tensorflow\lib\site-packages\keras\engine\training.py”, line 1476, in _standardize_user_data
exception_prefix=’input’)
File “C:\Users\pranyaram\Anaconda3\envs\tensorflow\lib\site-packages\keras\engine\training.py”, line 123, in _standardize_input_data
str(data_shape))
ValueError: Error when checking input: expected input_1 to have shape (4096,) but got array with shape (1,)
What version of libs are you using?
Here’s what I’m running:
Hi Jason,
Thanks for the article.
Due to lack of resources I tried running this in small amount of data.Everything worked fine but the generating new description part is giving this error.
C:\Users\Tanisha\AppData\Local\conda\conda\envs\tensorflow\lib\site-packages\h5py\__init__.py:36: FutureWarning: Conversion of the second argument of issubdtype from
floattonp.floatingis deprecated. In future, it will be treated asnp.float64 == np.dtype(float).type.from ._conv import register_converters as _register_converters
Using TensorFlow backend.
2018-03-31 12:07:43.176707: I C:\tf_jenkins\workspace\rel-win\M\windows-gpu\PY\35\tensorflow\core\platform\cpu_feature_guard.cc:140] Your CPU supports instructions that this TensorFlow binary was not compiled to use: AVX2
2018-03-31 12:07:43.574792: I C:\tf_jenkins\workspace\rel-win\M\windows-gpu\PY\35\tensorflow\core\common_runtime\gpu\gpu_device.cc:1212] Found device 0 with properties:
name: GeForce 820M major: 2 minor: 1 memoryClockRate(GHz): 1.25
pciBusID: 0000:08:00.0
totalMemory: 2.00GiB freeMemory: 1.65GiB
2018-03-31 12:07:43.584220: I C:\tf_jenkins\workspace\rel-win\M\windows-gpu\PY\35\tensorflow\core\common_runtime\gpu\gpu_device.cc:1283] Ignoring visible gpu device (device: 0, name: GeForce 820M, pci bus id: 0000:08:00.0, compute capability: 2.1) with Cuda compute capability 2.1. The minimum required Cuda capability is 3.0.
Traceback (most recent call last):
File “7_generate_discription.py”, line 72, in
description = generate_desc(model, tokenizer, photo, max_length)
File “7_generate_discription.py”, line 48, in generate_desc
yhat = model.predict([photo,sequence], verbose=0)
File “C:\Users\Tanisha\AppData\Local\conda\conda\envs\tensorflow\lib\site-packages\keras\engine\training.py”, line 1817, in predict
check_batch_axis=False)
File “C:\Users\Tanisha\AppData\Local\conda\conda\envs\tensorflow\lib\site-packages\keras\engine\training.py”, line 123, in _standardize_input_data
str(data_shape))
ValueError: Error when checking : expected input_2 to have shape (25,) but got array with shape (34,)
Any idea how can i fix this ?
Thanks.
Are you able to confirm that your Keras version and TF are up to date?
Did you copy all of the code as is?
Yeah those two are updated i just changed “max_length = 34” to “max_length = 25” in the code and now its working.
I’m glad to hear you worked it out.
Changing max_length did not give any error to you?
i am getting this error
X1train, X2train, ytrain = create_sequences(tokenizer, max_length, train_descriptions, train_features)
File “fittingmodel.py”, line 109, in create_sequences
return array(X1), array(X2), array(y)
MemoryError
Perhaps try running the example on a machine with more RAM, or update the example to use progressive loading described in this post:
https://machinelearningmastery.com/prepare-photo-caption-dataset-training-deep-learning-model/
what backend are you using??
TensorFlow.
can some one give me this file “model-ep{epoch:03d}-loss{loss:.3f}-val_loss{val_loss:.3f}.h5”
my pc don’t have enough processing power .
Perhaps you could train the model on an EC2 instance:
https://machinelearningmastery.com/develop-evaluate-large-deep-learning-models-keras-amazon-web-services/
ile “fittingmodel.py”, line 189, in
model.fit([X1train, X2train], ytrain, epochs=20, verbose=2, callbacks=[checkpoint], validation_data=([X1test, X2test], ytest))
File “C:\Users\pranyaram\Anaconda3\envs\tensorflow\lib\site-packages\keras\engine\training.py”, line 1522, in fit
batch_size=batch_size)
File “C:\Users\pranyaram\Anaconda3\envs\tensorflow\lib\site-packages\keras\engine\training.py”, line 1378, in _standardize_user_data
exception_prefix=’input’)
File “C:\Users\pranyaram\Anaconda3\envs\tensorflow\lib\site-packages\keras\engine\training.py”, line 144, in _standardize_input_data
str(array.shape))
ValueError: Error when checking input: expected input_1 to have shape (None, 4096) but got array with shape (0, 1)
Are you able to confirm that you are using Python 3 and that your version of Keras is up to date?
which keras version should i use
The most recent.
even still i am getting the same error once check the model training file how to reduce the training size to avoid memory error.
You can use progressive loading to reduce the memory requirements for the model.
Update: I have updated the tutorial to include an example of training using progressive loading (a data generator).
Hello, Jason! Thank you for your tutorial.
I tried to use pre-trained model and copy-paste the code above to my Anaconda python 3.6 and Keras version of 2.1.5. First, it will run smoothly without any problem, and it begins to crawl on several image files. Unfortunately, after a while, I get this kind of error:
“OSError: cannot identify image file ‘Flicker8k_Dataset/find.py”
Any idea what is wrong? I am running it on my laptop with GPU NVIDIA GeForce 1050 Ti with Intel Core i7-7700HQ with Windows 10 OS.
Thank you in advance!
Looks like something very strange is going on.
I have not seen this error. Perhaps try running from the commandline, often notebooks and IDEs introduce new and crazy faults of their own.
Using TensorFlow backend.
Dataset: 6000
Descriptions: train=6000
Photos: train=6000
Vocabulary Size: 7579
Description Length: 34
Traceback (most recent call last):
File “model_fit.py”, line 154, in
X1train, X2train, ytrain = create_sequences(tokenizer, max_length, train_descriptions, train_features)
File “model_fit.py”, line 109, in create_sequences
return array(X1), array(X2), array(y)
MemoryError
how to reduce the training size to avoid this error.
You can use progressive loading to reduce the memory requirements for the model.
I got the same error “OSError: cannot identify image file ‘Flicker8k_Dataset/desktop.ini'” did you fix it?
Looks like you have a windows file called desktop.ini in the directory for some reason. Delete it.
Hi, can you provide me the weights file. My laptop is having 12GB RAM, NVIDIA GeForce 820M Graphics, all supported drivers. But Iam getting the memory error issue.
I have tried progressive loading also.. But it is not working.. It is not saving the weights file even after steps per epoch=70000 is completed even. I cant afford for the AWS.
So, I request you to give me the weights file.
Thanks in advance.
Sorry, I cannot share the weights file.
I will schedule time into updating the tutorial to add a progressive loading example.
Update: I have updated the tutorial to include an example of training using progressive loading (a data generator).
Hi,
I got an error while generating the captions.
Here is the error:
Traceback (most recent call last):
File “generate_captions5.py”, line 64, in
tokenizer = load(open(‘descriptions.txt’, ‘rb’))
_pickle.UnpicklingError: could not find MARK
I have not seen this error before, sorry. Perhaps try running the code again?
startseq man in red shirt is standing on the street endseq
caption is generating but it is giving same caption for different images.
Perhaps your model requires further training?
Hi I am also facing the same issue. Can you tell what you did to overcome the problem @harsha
Same issue I am facing as well.
Hey, have you figured out the problem?
I am having the same issue as well. I first did it will the MS COCO dataset because it has many more images and captions, but when I ran into the issue, I followed the tutorial with the Flicker Dataset and I am running into the same issue again. Has anyone figured out the solution?
Are you able to confirm your tensorflow and keras versions?
My TensorFlow version is 2.3.1 and my Keras version is 2.4.3. However, I am using the keras built into tensorflow.
The versions look good.
Perhaps these instructions will help you copy the code without error:
https://machinelearningmastery.com/faq/single-faq/how-do-i-copy-code-from-a-tutorial
I had copied the code correctly, but I had been using the data generator because the COCO dataset has so much data. When I tried again with the Flicker dataset, I used the data generator as well, because I wasn’t sure if my 16 gigs of RAM would be enough to load all the data in at once. I am trying again, but without the data generator. I hope it works
It is not generating the exact same caption for each image, but it does place “a man in a red shirt is” at the beginning of each caption and the captions do not seem to be accurate.
Perhaps try training the model again?
Perhaps select a different final model?
Perhaps tune the learning parameters?
val-loss is improving up to 3 epoches only, there’s no any improvement in further epoches.
model-ep003-loss3.662-val_loss3.824.h5. This is the last epoche that has improved till now.
File “”, line 1, in
runfile(‘C:/Users/Owner/.spyder-py3/ML/4.py’, wdir=’C:/Users/Owner/.spyder-py3/ML’)
File “C:\Users\Owner\Anaconda_3\lib\site-packages\spyder\utils\site\sitecustomize.py”, line 705, in runfile
execfile(filename, namespace)
File “C:\Users\Owner\Anaconda_3\lib\site-packages\spyder\utils\site\sitecustomize.py”, line 102, in execfile
exec(compile(f.read(), filename, ‘exec’), namespace)
File “C:/Users/Owner/.spyder-py3/ML/4.py”, line 161, in
model = define_model(vocab_size, max_length)
File “C:/Users/Owner/.spyder-py3/ML/4.py”, line 129, in define_model
plot_model(model, to_file=’model.png’, show_shapes=True)
File “C:\Users\Owner\Anaconda_3\lib\site-packages\keras\utils\vis_utils.py”, line 135, in plot_model
dot = model_to_dot(model, show_shapes, show_layer_names, rankdir)
File “C:\Users\Owner\Anaconda_3\lib\site-packages\keras\utils\vis_utils.py”, line 56, in model_to_dot
_check_pydot()
File “C:\Users\Owner\Anaconda_3\lib\site-packages\keras\utils\vis_utils.py”, line 31, in _check_pydot
raise ImportError(‘Failed to import pydot. You must install pydot’
ImportError: Failed to import pydot. You must install pydot and graphviz for
pydotprintto work.getting this even if i installed pydot and graphviz
Perhaps restart your machine?
Perhaps comment out the part where you visualize the model?
getting same error!
Tried using solution from stackoverflow, upgraded packages..but it ain’t working..
No problem, just skip that part and proceed. Comment out the plotting of the model.
I have trained the data using progressive loading and I stopped after 4 iterations, with a loss of 3.4952.
I am unable to understand this part,
In this simple example we will discard the loading of the development dataset and model checkpointing and simply save the model after each training epoch. You can then go back and load/evaluate each saved model after training to find the one we the lowest loss that you can then use in the next section.
Do you mean we have to load test set in the same way using progressive loading ?
Please help me understanding how to load the test set.
I am suggesting that you may want to load the test data in the existing way and evaluate your model (next section).
Error by runing “The complete code example is listed below.” in the Loading Data section:
Message Body:
Dataset: 6000
Descriptions: train=6000
Traceback (most recent call last):
File “task2.py”, line 64, in
train_features = load_photo_features(‘features.pkl’, train)
File “task2.py”, line 53, in load_photo_features
features = {k: all_features[k] for k in dataset}
File “task2.py”, line 53, in
features = {k: all_features[k] for k in dataset}
KeyError: ‘878758390_dd2cdc42f6’
Perhaps confirm that you have the full dataset in place?
Yes, some images were missed.
Thank you
Hello sir I’m learning from your articles that I find very informative and educational, I’ve been trying to compile this code :
# extract features from all images
directory = ‘Flicker8k_Dataset’
features = extract_features(directory)
print(‘Extracted Features: %d’ % len(features))
# save to file
dump(features, open(‘features.pkl’, ‘wb’))
but an error occurred and I don’t understand it can you help me fix it and thanks for all of you
here’s the mistake I made:
PermissionError Traceback (most recent call last)
in ()
1 # extract features from all images
2 directory = ‘Flicker8k_Dataset’
—-> 3 features = extract_features(directory)
4 print(‘Extracted Features: %d’ % len(features))
5 # save to file
in extract_features(directory)
13 # load an image from file
14 filename = directory + ‘/’ + name
—> 15 image = load_img(filename, target_size=(224, 224))
16 # convert the image pixels to a numpy array
17 image = img_to_array(image)
~\Anaconda3\envs\envir1\lib\site-packages\keras\preprocessing\image.py in load_img(path, grayscale, target_size, interpolation)
360 raise ImportError(‘Could not import PIL.Image. ‘
361 ‘The use of
array_to_imgrequires PIL.’)–> 362 img = pil_image.open(path)
363 if grayscale:
364 if img.mode != ‘L’:
~\Anaconda3\envs\envir1\lib\site-packages\PIL\Image.py in open(fp, mode)
2546
2547 if filename:
-> 2548 fp = builtins.open(filename, “rb”)
2549 exclusive_fp = True
2550
PermissionError: [Errno 13] Permission denied: ‘Flicker8k_Dataset/Flicker8k_Dataset’
Looks like the dataset is missing or is not available on your workstation.
Hello sir, Thanks for your effort
I have trained the data using progressive loading and my machine restarted after 11 iterations,
how can i continue training from that checkpoint ?
Load the last saved model, then continue training. As simple as that.
I doubt more than a handful of epochs is required on this problem.
thank you !
i have loaded the last model (‘model_11.h5’) that has 3.445 loss, now it continue training with 5.4461 loss, is that normal ?
Interesting, that is a little surprising. I wonder if there is a fault or if indeed the model loss has gotten worse.
Some careful experiments may be required.
Thank you, I think so too….
I already downloaded Flicker8k_Datasets and extracted it in the same file where I work with jupyter notebook.
I consulted Google and Youtube to try to fix this error but in vain…
I don’t know but could you be so kind as to direct me and help me fix the problem.
Thank you very much for your efforts…
What problem?
Hi Jason,
when I try to compile code related to the extracted features from all images I get this error that is “Permission denied” you told me earlier that Looks like the dataset is missing or is not available on my workstation I tried to fix the trick but in vain.
Do you have any idea how I could do that?
Do I need a user right or something like that?
or maybe I need to reload the database?
*the error :
~\Anaconda3\envs\envir1\lib\site-packages\PIL\Image.py in open(fp, mode)2546
2547 if filename:
-> 2548 fp = builtins.open(filename, “rb”)
2549 exclusive_fp = True
2550
PermissionError: [Errno 13] Permission denied: ‘Flicker8k_Dataset/Flicker8k_Dataset’
thanks a lot 🙂 🙂
You appear to have a problem loading the data from your hard drive. Perhaps you stored the data in a location where you/your code does not have permission to read?
Perhaps you are using a notebook or an IDE as another user?
Try running from the command line and check file permissions.
Thanks Jason. I really appreciate your knowledge and the way you express it to us through your articles, it’s amazing.
Thanks, I’m glad the tutorials help!
Thank you very much mr.jason but I have some problems after download the pretrained model when make the model prediction
‘
—————————————————————————
FailedPreconditionError Traceback (most recent call last)
~/.local/lib/python3.6/site-packages/tensorflow/python/client/session.py in _do_call(self, fn, *args)
1349 try:
-> 1350 return fn(*args)
1351 except errors.OpError as e:
~/.local/lib/python3.6/site-packages/tensorflow/python/client/session.py in _run_fn(session, feed_dict, fetch_list, target_list, options, run_metadata)
1328 feed_dict, fetch_list, target_list,
-> 1329 status, run_metadata)
1330
~/.local/lib/python3.6/site-packages/tensorflow/python/framework/errors_impl.py in __exit__(self, type_arg, value_arg, traceback_arg)
472 compat.as_text(c_api.TF_Message(self.status.status)),
–> 473 c_api.TF_GetCode(self.status.status))
474 # Delete the underlying status object from memory otherwise it stays alive
FailedPreconditionError: Attempting to use uninitialized value block1_conv2_5/kernel
[[Node: block1_conv2_5/kernel/read = Identity[T=DT_FLOAT, _class=[“loc:@block1_conv2_5/kernel”], _device=”/job:localhost/replica:0/task:0/device:CPU:0″](block1_conv2_5/kernel)]]
During handling of the above exception, another exception occurred:
FailedPreconditionError Traceback (most recent call last)
in ()
24 return features
25 directory = ‘../ProjectPattern/Flickr8k_Dataset/Flicker8k_Dataset’
—> 26 features =extract_feature(directory)
27 dump(features,open(“feature.pkl”,”wb”))
in extract_feature(directory)
17 img =preprocess_input(img)
18 #extract feature by make prediction use the pretrained model
—> 19 feature = model.predict(img,verbose=0)
20 #extract img_id
21 img_id = name.split(‘.’)[0]
~/.local/lib/python3.6/site-packages/tensorflow/python/keras/_impl/keras/engine/training.py in predict(self, x, batch_size, verbose, steps)
1811 f = self.predict_function
1812 return self._predict_loop(
-> 1813 f, ins, batch_size=batch_size, verbose=verbose, steps=steps)
1814
1815 def train_on_batch(self, x, y, sample_weight=None, class_weight=None):
~/.local/lib/python3.6/site-packages/tensorflow/python/keras/_impl/keras/engine/training.py in _predict_loop(self, f, ins, batch_size, verbose, steps)
1306 else:
1307 ins_batch = _slice_arrays(ins, batch_ids)
-> 1308 batch_outs = f(ins_batch)
1309 if not isinstance(batch_outs, list):
1310 batch_outs = [batch_outs]
~/.local/lib/python3.6/site-packages/tensorflow/python/keras/_impl/keras/backend.py in __call__(self, inputs)
2551 session = get_session()
2552 updated = session.run(
-> 2553 fetches=fetches, feed_dict=feed_dict, **self.session_kwargs)
2554 return updated[:len(self.outputs)]
2555
~/.local/lib/python3.6/site-packages/tensorflow/python/client/session.py in run(self, fetches, feed_dict, options, run_metadata)
893 try:
894 result = self._run(None, fetches, feed_dict, options_ptr,
–> 895 run_metadata_ptr)
896 if run_metadata:
897 proto_data = tf_session.TF_GetBuffer(run_metadata_ptr)
~/.local/lib/python3.6/site-packages/tensorflow/python/client/session.py in _run(self, handle, fetches, feed_dict, options, run_metadata)
1126 if final_fetches or final_targets or (handle and feed_dict_tensor):
1127 results = self._do_run(handle, final_targets, final_fetches,
-> 1128 feed_dict_tensor, options, run_metadata)
1129 else:
1130 results = []
~/.local/lib/python3.6/site-packages/tensorflow/python/client/session.py in _do_run(self, handle, target_list, fetch_list, feed_dict, options, run_metadata)
1342 if handle is None:
1343 return self._do_call(_run_fn, self._session, feeds, fetches, targets,
-> 1344 options, run_metadata)
1345 else:
1346 return self._do_call(_prun_fn, self._session, handle, feeds, fetches)
~/.local/lib/python3.6/site-packages/tensorflow/python/client/session.py in _do_call(self, fn, *args)
1361 except KeyError:
1362 pass
-> 1363 raise type(e)(node_def, op, message)
1364
1365 def _extend_graph(self):
FailedPreconditionError: Attempting to use uninitialized value block1_conv2_5/kernel
[[Node: block1_conv2_5/kernel/read = Identity[T=DT_FLOAT, _class=[“loc:@block1_conv2_5/kernel”], _device=”/job:localhost/replica:0/task:0/device:CPU:0″](block1_conv2_5/kernel)]]
Caused by op ‘block1_conv2_5/kernel/read’, defined at:
File “/usr/lib/python3.6/runpy.py”, line 193, in _run_module_as_main
“__main__”, mod_spec)
File “/usr/lib/python3.6/runpy.py”, line 85, in _run_code
exec(code, run_globals)
File “/home/abdo96/.local/lib/python3.6/site-packages/ipykernel_launcher.py”, line 16, in
app.launch_new_instance()
File “/home/abdo96/.local/lib/python3.6/site-packages/traitlets/config/application.py”, line 658, in launch_instance
app.start()
File “/home/abdo96/.local/lib/python3.6/site-packages/ipykernel/kernelapp.py”, line 478, in start
self.io_loop.start()
File “/home/abdo96/.local/lib/python3.6/site-packages/zmq/eventloop/ioloop.py”, line 177, in start
super(ZMQIOLoop, self).start()
File “/home/abdo96/.local/lib/python3.6/site-packages/tornado/ioloop.py”, line 888, in start
handler_func(fd_obj, events)
File “/home/abdo96/.local/lib/python3.6/site-packages/tornado/stack_context.py”, line 277, in null_wrapper
return fn(*args, **kwargs)
File “/home/abdo96/.local/lib/python3.6/site-packages/zmq/eventloop/zmqstream.py”, line 440, in _handle_events
self._handle_recv()
File “/home/abdo96/.local/lib/python3.6/site-packages/zmq/eventloop/zmqstream.py”, line 472, in _handle_recv
self._run_callback(callback, msg)
File “/home/abdo96/.local/lib/python3.6/site-packages/zmq/eventloop/zmqstream.py”, line 414, in _run_callback
callback(*args, **kwargs)
File “/home/abdo96/.local/lib/python3.6/site-packages/tornado/stack_context.py”, line 277, in null_wrapper
return fn(*args, **kwargs)
File “/home/abdo96/.local/lib/python3.6/site-packages/ipykernel/kernelbase.py”, line 283, in dispatcher
return self.dispatch_shell(stream, msg)
File “/home/abdo96/.local/lib/python3.6/site-packages/ipykernel/kernelbase.py”, line 233, in dispatch_shell
handler(stream, idents, msg)
File “/home/abdo96/.local/lib/python3.6/site-packages/ipykernel/kernelbase.py”, line 399, in execute_request
user_expressions, allow_stdin)
File “/home/abdo96/.local/lib/python3.6/site-packages/ipykernel/ipkernel.py”, line 208, in do_execute
res = shell.run_cell(code, store_history=store_history, silent=silent)
File “/home/abdo96/.local/lib/python3.6/site-packages/ipykernel/zmqshell.py”, line 537, in run_cell
return super(ZMQInteractiveShell, self).run_cell(*args, **kwargs)
File “/home/abdo96/.local/lib/python3.6/site-packages/IPython/core/interactiveshell.py”, line 2728, in run_cell
interactivity=interactivity, compiler=compiler, result=result)
File “/home/abdo96/.local/lib/python3.6/site-packages/IPython/core/interactiveshell.py”, line 2850, in run_ast_nodes
if self.run_code(code, result):
File “/home/abdo96/.local/lib/python3.6/site-packages/IPython/core/interactiveshell.py”, line 2910, in run_code
exec(code_obj, self.user_global_ns, self.user_ns)
File “”, line 26, in
features =extract_feature(directory)
File “”, line 2, in extract_feature
model = VGG19()
File “/home/abdo96/.local/lib/python3.6/site-packages/keras/applications/vgg19.py”, line 117, in VGG19
x = Conv2D(64, (3, 3), activation=’relu’, padding=’same’, name=’block1_conv2′)(x)
File “/home/abdo96/.local/lib/python3.6/site-packages/keras/engine/topology.py”, line 590, in __call__
self.build(input_shapes[0])
File “/home/abdo96/.local/lib/python3.6/site-packages/keras/layers/convolutional.py”, line 138, in build
constraint=self.kernel_constraint)
File “/home/abdo96/.local/lib/python3.6/site-packages/keras/legacy/interfaces.py”, line 91, in wrapper
return func(*args, **kwargs)
File “/home/abdo96/.local/lib/python3.6/site-packages/keras/engine/topology.py”, line 414, in add_weight
constraint=constraint)
File “/home/abdo96/.local/lib/python3.6/site-packages/keras/backend/tensorflow_backend.py”, line 392, in variable
v = tf.Variable(value, dtype=tf.as_dtype(dtype), name=name)
File “/home/abdo96/.local/lib/python3.6/site-packages/tensorflow/python/ops/variables.py”, line 229, in __init__
constraint=constraint)
File “/home/abdo96/.local/lib/python3.6/site-packages/tensorflow/python/ops/variables.py”, line 376, in _init_from_args
self._snapshot = array_ops.identity(self._variable, name=”read”)
File “/home/abdo96/.local/lib/python3.6/site-packages/tensorflow/python/ops/array_ops.py”, line 127, in identity
return gen_array_ops.identity(input, name=name)
File “/home/abdo96/.local/lib/python3.6/site-packages/tensorflow/python/ops/gen_array_ops.py”, line 2134, in identity
“Identity”, input=input, name=name)
File “/home/abdo96/.local/lib/python3.6/site-packages/tensorflow/python/framework/op_def_library.py”, line 787, in _apply_op_helper
op_def=op_def)
File “/home/abdo96/.local/lib/python3.6/site-packages/tensorflow/python/framework/ops.py”, line 3160, in create_op
op_def=op_def)
File “/home/abdo96/.local/lib/python3.6/site-packages/tensorflow/python/framework/ops.py”, line 1625, in __init__
self._traceback = self._graph._extract_stack() # pylint: disable=protected-access
FailedPreconditionError (see above for traceback): Attempting to use uninitialized value block1_conv2_5/kernel
[[Node: block1_conv2_5/kernel/read = Identity[T=DT_FLOAT, _class=[“loc:@block1_conv2_5/kernel”], _device=”/job:localhost/replica:0/task:0/device:CPU:0″](block1_conv2_5/kernel)]]
‘
Wow. I have not seen this before, sorry.
Perhaps try searching or posting on stackoverflow?
so the problem solved by specifying which weights used not None(random initialization)
but used pretraining on ‘imagenet’ and specify the include_top argument to be True
Well done, I’m glad to hear that.
When using Merged input in model the error below showed
Thanks in advance
in ()
29 plot_model(model,to_file=’model.png’,show_shapes=True,show_layer_names=True)
30 return model
—> 31 define_model(vocab_size,max_len)
in define_model(vocab_size, max_length)
26 model = Model(inputs=[input1,input2],outputs=output)
27
—> 28 model.compile(loss=’categorical_crossentropy’,optimizer=’Adam’)(mask)
29 plot_model(model,to_file=’model.png’,show_shapes=True,show_layer_names=True)
30 return model
~/.local/lib/python3.6/site-packages/tensorflow/python/keras/_impl/keras/engine/training.py in compile(self, optimizer, loss, metrics, loss_weights, sample_weight_mode, weighted_metrics, target_tensors, **kwargs)
679
680 # Prepare output masks.
–> 681 masks = self.compute_mask(self.inputs, mask=None)
682 if masks is None:
683 masks = [None for _ in self.outputs]
~/.local/lib/python3.6/site-packages/tensorflow/python/keras/_impl/keras/engine/topology.py in compute_mask(self, inputs, mask)
785 return self._output_mask_cache[cache_key]
786 else:
–> 787 _, output_masks = self._run_internal_graph(inputs, masks)
788 return output_masks
789
~/.local/lib/python3.6/site-packages/tensorflow/python/layers/network.py in _run_internal_graph(self, inputs, masks)
896
897 # Apply activity regularizer if any:
–> 898 if layer.activity_regularizer is not None:
899 regularization_losses = [
900 layer.activity_regularizer(x) for x in computed_tensors
AttributeError: ‘InputLayer’ object has no attribute ‘activity_regularizer’
What version of Keras are you using?
Did you copy all of the code exactly?
I used verison 2.1.5
the another question No, I didn’t copy all the code exactly but I understand the idea and imitate it in some parts and in other parts are written in my own
Sorry, I cannot help you debug your own modifications.
I wrote this problem in the stack overflow but no one answer so I will try to fix this problem in my own Thank you for your answers
Hang in there.
Hi, jason brownlee thanks for this fatanstic article.
I am curios to know that how he while loop is getting stopped in progressive training data genertor function ?
Please explain this to me
def data_generator(descriptions, photos, tokenizer, max_length):
# loop for ever over images
while 1:
for key, desc_list in descriptions.items():
# retrieve the photo feature
photo = photos[key][0]
in_img, in_seq, out_word = create_sequences(tokenizer, max_length, desc_list, photo)
yield [[in_img, in_seq], out_word]
Note the yield.
The number of epochs will decide how many times the yeild to the caller will be performed.
Hi jason Brownlee,
Can you please tell me what is the heighest BLEU Scores you got from this approach on standard dataset like flickr 8k, 30k etc.
Please guide me how u you mananged to acheive this much Blue scores.
What is the architecutre You used.
Is there any result comparable to “show and tell model” ?
All details of the model are in the post.
You can learn more about the chosen architecture here:
https://machinelearningmastery.com/caption-generation-inject-merge-architectures-encoder-decoder-model/
Sir,
Great article indeed! But I’m facing problems downloading the model. Every time I try to download the model with the code you provided, after sometimes the connection gets lost and shows this message: “ConnectionResetError: [WinError 10054] An existing connection was forcibly closed by the remote host”
Can you give any alternate solution to this problem? I have tried several times but failed.
I’m sorry to hear that, I have some ideas:
– Perhaps you can review the code in Keras that downloads the model and download it manually?
– Perhaps you can use an alternate internet connection to download the model?
– Perhaps you can setup an EC2 instance and download the model there to work with?
– Perhaps you can ask a friend or peer to download the model for you?
Hello Sir,
Your article is very interesting and easy to understand.
For the above code I am getting a very accurate caption if I use the same image as you have shown in the figure. But if I use some other image I am getting some description but not a correct one. So could you please tell me what is the problem here?
Thanks in advance.
Perhaps try a suite of images to see how the model performs on average?
I have trained the data using progressive loading untill 19 iterations.
Caption for your provided test image is generated. However, for new one( image of rabbit and other animals) i got the caption “dog is running …”.
Is there a way to train the models more than 19 iterations to get a better result or how to solve this issue?
thank you
The model may only need 2-5 training iterations.
Hi Jason,
Can you please share me full github repository of image captioning?
No need, all of the code is listed above.
Hey , Jason the post is really amazing , but can you help to load me this especially the first step (Keras) which will probably take 1hour in CPU , I wanna test that I’m in GPU , how shall I be able to get that , Keras (GPU) so as to save time tho.
Thanks Jason.
There are some commands on this post to check if you are using the GPU:
https://machinelearningmastery.com/command-line-recipes-deep-learning-amazon-web-services/
Thanks Jason , one more thing i wanna ask is that in the FILENAME i must put the complete path to working directory right?
If the data is in the current working directory, then the path can be relative.
Hey Jason wassup , can you please explain what is meant by these lines :-
filepath = ‘model-ep{epoch:03d}-loss{loss:.3f}-val_loss{val_loss:.3f}.h5′
checkpoint = ModelCheckpoint(filepath, monitor=’val_loss’, verbose=1, save_best_only=True, mode=’min’)
1. The line in filepath especially this – epoch:03d}-loss{loss:.3f}-val_loss{val_loss:.3f} ?
It is the name of the file that will be saved with placeholders for specific values of the model at the time of saving.
hey jason!! I ran the code that returns a dictionary of image identifier to image features. but did nt work and gave the following error. Please Guide me how to fix this bug.
FileNotFoundError Traceback (most recent call last)
in ()
39 # extract features from all images
40 directory = ‘Flicker8k_Dataset’
—> 41 features = extract_features(directory)
42 print(‘Extracted Features: %d’ % len(features))
43 # save to file
in extract_features(directory)
18 # extract features from each photo
19 features = dict()
—> 20 for name in listdir(directory):
21 # load an image from file
22 filename = directory + ‘/’ + name
FileNotFoundError: [WinError 3] The system cannot find the path specified: ‘Flicker8k_Dataset’
It looks like you do not have the dataset in the same directory as the code.
jason i have code and dataset in the same directory.I can access a test png image from the same directory but i am unable to access the dataset images..I don’t know whats wrong with it.Please help me solving the issue because i can also access the flick_text dataset.The only issue i have with images dataset.
I have list of things to try here:
https://machinelearningmastery.com/faq/single-faq/why-does-the-code-in-the-tutorial-not-work-for-me
1) I have installed the latest environment except tensorflow 1.5 becuase higher versions not working for me.
2) I have dataset and code in the same directory
3) I ran the code from command line but still found no luck.
4) I have exactly copied the code.
5) I searched the error on stackoverflow but never found any authentic solution yet.
If you type “ls” is the “Flicker8k_Dataset” directory in the current directory beside the code file/s?
I replaced the relative path(as in the tutorial) with absolute full path and it worked for me
Glad to hear it.
Now i am facing an error while running the code “# define the model
model = define_model(vocab_size, max_length)” in the progressive training section.I have installed pydot and graphviz libraries but still come up with the following error.
—————————————————————————
FileNotFoundError Traceback (most recent call last)
C:\anaconda3\lib\site-packages\pydot.py in create(self, prog, format)
1877 shell=False,
-> 1878 stderr=subprocess.PIPE, stdout=subprocess.PIPE)
1879 except OSError as e:
C:\anaconda3\lib\subprocess.py in __init__(self, args, bufsize, executable, stdin, stdout, stderr, preexec_fn, close_fds, shell, cwd, env, universal_newlines, startupinfo, creationflags, restore_signals, start_new_session, pass_fds, encoding, errors)
708 errread, errwrite,
–> 709 restore_signals, start_new_session)
710 except:
C:\anaconda3\lib\subprocess.py in _execute_child(self, args, executable, preexec_fn, close_fds, pass_fds, cwd, env, startupinfo, creationflags, shell, p2cread, p2cwrite, c2pread, c2pwrite, errread, errwrite, unused_restore_signals, unused_start_new_session)
996 os.fspath(cwd) if cwd is not None else None,
–> 997 startupinfo)
998 finally:
FileNotFoundError: [WinError 2] The system cannot find the file specified
During handling of the above exception, another exception occurred:
Exception Traceback (most recent call last)
in ()
1 # define the model
—-> 2 model = define_model(vocab_size, max_length)
in define_model(vocab_size, max_length)
20 # summarize model
21 model.summary()
—> 22 plot_model(model, to_file=’model.png’, show_shapes=True)
23 return model
C:\anaconda3\lib\site-packages\keras\utils\vis_utils.py in plot_model(model, to_file, show_shapes, show_layer_names, rankdir)
131 ‘LR’ creates a horizontal plot.
132 “””
–> 133 dot = model_to_dot(model, show_shapes, show_layer_names, rankdir)
134 _, extension = os.path.splitext(to_file)
135 if not extension:
C:\anaconda3\lib\site-packages\keras\utils\vis_utils.py in model_to_dot(model, show_shapes, show_layer_names, rankdir)
53 from ..models import Sequential
54
—> 55 _check_pydot()
56 dot = pydot.Dot()
57 dot.set(‘rankdir’, rankdir)
C:\anaconda3\lib\site-packages\keras\utils\vis_utils.py in _check_pydot()
24 # Attempt to create an image of a blank graph
25 # to check the pydot/graphviz installation.
—> 26 pydot.Dot.create(pydot.Dot())
27 except OSError:
28 raise OSError(
C:\anaconda3\lib\site-packages\pydot.py in create(self, prog, format)
1881 raise Exception(
1882 ‘”{prog}” not found in path.’.format(
-> 1883 prog=prog))
1884 else:
1885 raise
Exception: “dot.exe” not found in path.
Try commenting out the call to plot_model().
thanks jason! my training is in progress.
Glad to hear it.
In model evaluation section when i come to run the code
” filename = ‘model-ep002-loss3.245-val_loss3.612.h5’
model = load_model(filename)”
I come up with the error
“OSError: Unable to open file (unable to open file: name = ‘model-ep002-loss3.245-val_loss3.612.h5’, errno = 2, error message = ‘No such file or directory’, flags = 0, o_flags = 0)”
i want to ask where is the file ‘model-ep002-loss3.245-val_loss3.612.h5’??and how to select the file??should i pick up the file with least loss value???
You must change the filename to the model that you saved while training.
Jason i trained the model upto 20 epochs.Now please explain which model i should use for prediction? and if i should select from 1-5 then why i am running it for 20 epochs?
The one with the lowest error on a validation set.
I just want to understand the the whole pipeline.The CNN-VGG16 extracts the the features of image to a fixed length 256 vector.The text is cleaned and preprocesed , the RNN-LSTM predicts the next words of the sequence.
What is the strategy and intuition of the encoder/decoder?
how these two modalities (image and text) are merged by FF?
More on the model architecture here:
https://machinelearningmastery.com/caption-generation-inject-merge-architectures-encoder-decoder-model/
What alternative algorithms i can used for photo feature extraction or what extra modifications in the model is likely to perform better results?? or what extra building blocks needs to be added to the current tutorial for getting even refined results?
I have some suggestions here:
https://machinelearningmastery.com/improve-deep-learning-performance/
Dropout layer usually used to get rid of over-fitting.While Dense layer is usually used to change the dimensions.
Why Dropout_1 and dropout_2 are not changing the dimensions while we set some of the connections to 0 ??What is the the intuition behind Dropout_1 and Dropout_2 Layer??Please suggest some links or explaination
Not get rid of, but reduce the likelihood of overfitting.
You can learn more about the intuitions for dropout here:
https://machinelearningmastery.com/dropout-regularization-deep-learning-models-keras/
Hi Jason!
I implemented the above mentioned tutorial using VGG16 CNN architecture.Please let me know the code or tutorial that implements Inceptin model for image captioning.
You can change the example to use inception if you wish.
Dear abbas,
kindly how did you solve your problem? I have the same problem :
PermissionError : [Errno 13] Permission Denied: Flickr8k_Dataset/Flicker8k_Dataset’
Use the alternate download for the dataset listed in the tutorial.
Hi Jason Brownlee! Good tutorial. I doubt how model guarantee to generate semantically correct sentences. Please share your intuition or any available resource. For example, there is three word in vocabulary “is, dog, running”, so how could we guarantee model will generate a sentence with correct grammar structure like ‘dog is running’. Thank you
Perhaps you can run the generated sentences through another process that corrects grammar.
Sir where can i find the implemented tutorial for extracting features from images using inception v3?
You can remove the VGG and add the Inception model yourself.
I am trying to train my model using inception model.While training i come with the following error.How do i change the Shape of the input?
CODE:
# train the model, run epochs manually and save after each epoch
epochs = 5
steps = len(train_descriptions)
for i in range(epochs):
# create the data generator
generator = data_generator(train_descriptions, train_features, tokenizer, max_length)
# fit for one epoch
model.fit_generator(generator, epochs=1, steps_per_epoch=steps, verbose=1)
# save model
model.save(‘inception-model_’ + str(i) + ‘.h5’)
ERROR:
Error when checking input: expected input_3 to have shape (4096,) but got array with shape (2048,)
It looks like you model and data have differing shapes, perhaps change the model or change the data.
do you have any working example for changing data dimensions?
You can learn about the reshape() function here:
https://machinelearningmastery.com/index-slice-reshape-numpy-arrays-machine-learning-python/
my input has dimension of 4096 while its giving error that its 2048.
__________________________________________________________________________________________________
Layer (type) Output Shape Param # Connected to
==================================================================================================
input_4 (InputLayer) (None, 34) 0
__________________________________________________________________________________________________
input_3 (InputLayer) (None, 4096) 0
__________________________________________________________________________________________________
embedding_2 (Embedding) (None, 34, 256) 1940224 input_4[0][0]
__________________________________________________________________________________________________
dropout_3 (Dropout) (None, 4096) 0 input_3[0][0]
__________________________________________________________________________________________________
dropout_4 (Dropout) (None, 34, 256) 0 embedding_2[0][0]
__________________________________________________________________________________________________
dense_4 (Dense) (None, 256) 1048832 dropout_3[0][0]
__________________________________________________________________________________________________
lstm_2 (LSTM) (None, 256) 525312 dropout_4[0][0]
__________________________________________________________________________________________________
add_2 (Add) (None, 256) 0 dense_4[0][0]
lstm_2[0][0]
__________________________________________________________________________________________________
dense_5 (Dense) (None, 256) 65792 add_2[0][0]
__________________________________________________________________________________________________
dense_6 (Dense) (None, 7579) 1947803 dense_5[0][0]
==================================================================================================
Total params: 5,527,963
Trainable params: 5,527,963
Non-trainable params: 0
ERROR:
Error when checking input: expected input_3 to have shape (4096,) but got array with shape (2048,)
Looks like there is a mismatch between your data and the model.
so then how to make data and model inter harmony?
Sorry, I don’t understand, can you elaborate?
jason my model is not loading even the print command is not giving me the output..
the following block of code is not giving the output..where is the error?
# load the model
filename = ‘xraysmodel_8.h5’
print(‘abbas’)
model = load_model(filename)
# evaluate model
evaluate_model(model, test_descriptions, test_features, tokenizer, max_length)
Are you running from the command line? If so, it will report something.
no i am using jupyter notebook
I recommend not using a notebook. Instead, run from the command line, here’s how:
https://machinelearningmastery.com/faq/single-faq/how-do-i-run-a-script-from-the-command-line
Thanks for the great post.
I trained the model when I save the image from “http://media.einfachtierisch.de/thumbnail/600/0/media.einfachtierisch.de/images/2017/07/glueckliche-freigaenger-katze-Shutterstock-Olga-Visav_504063007.jpg” then I am still getting the text
startseq dog is running through the grass endseq
what do I make wrong?
The test image appears as intended.
Perhaps a bug in your check?
Perhaps try other images?
Perhaps the model is overfit?
Hi, I have tried other images and the same result. Even after only 2 or 3 iterations I mostly get the same text. As Paul described below.
That is surprising.
How can i change my data or my model accordingly to match it??
jason! please let me know how can i change learning rate,momentum and number of neurons in this tutorial? can i do it or not?
Learn how to change the learning rate here:
https://machinelearningmastery.com/understand-the-dynamics-of-learning-rate-on-deep-learning-neural-networks/
can i change learning rate and optimizer for this tutorial. if yes then how
Yes, here are some examples:
https://machinelearningmastery.com/understand-the-dynamics-of-learning-rate-on-deep-learning-neural-networks/
Hi Jason
It was a nice article.
I trained the model for 12 epochs in my gpu.
But the prediction was not so accurate.
Most of the times I got the prediction with “man in blue shirt is riding his bohemian on the street” . with the keywords in this sentence.
Help me out .
It needs far fewer epochs, try early stopping against a validation set.
HI Paul, have you found a solution to this? I have a similiar issue.
Hi jason,
While progressive loading, we will get 20 models. Which model is choosen for prediction?
The one with the best skill on the hold out set, likely within epoch 1-5.
Hi jason,
I got the following error when i ran the extract_features function.
can you please help me fix it?
field_value = self._fields.get(field)
TypeError: descriptor ‘_fields’ for ‘OpDef’ objects doesn’t apply to ‘OpDef’ object
This might give you some ideas:
https://machinelearningmastery.com/faq/single-faq/why-does-the-code-in-the-tutorial-not-work-for-me
Hello Jason! I just wanted to know why aren’t we validating the trained model in progressive loading…
You can, as I note in the tutorial. The progressive loading is just a small example to help those who don’t have enough RAM to run the main example.
I meant to ask, ‘Why cant we simultaneously validate, as in the previous code wherein no progressive loading is used?”
Finally someone who understands the importance of separating mathematics from ‘implementation’. The drawback most tutorials have is that they try to discuss both simultaneously and hence making things quite confusing. ‘Implementation’ requires a completely different approach from understanding the theory.
Another wonderful thing about this tutorial is that you actually go through the preprocessing steps. This is where I usually get stuck because most university and online courses and tutorials do not discuss them at all.
I’m glad the tutorial helps Malik.
Traceback (most recent call last):
File “C:\Users\hp\AppData\Local\Programs\Python\Python36\lib\site-packages\pydot.py”, line 1861, in create
stderr=subprocess.PIPE, stdout=subprocess.PIPE)
File “C:\Users\hp\AppData\Local\Programs\Python\Python36\lib\subprocess.py”, line 709, in __init__
restore_signals, start_new_session)
File “C:\Users\hp\AppData\Local\Programs\Python\Python36\lib\subprocess.py”, line 997, in _execute_child
startupinfo)
FileNotFoundError: [WinError 2] The system cannot find the file specified
During handling of the above exception, another exception occurred:
Traceback (most recent call last):
File “C:\Users\hp\AppData\Local\Programs\Python\Python36\lib\site-packages\keras\utils\vis_utils.py”, line 26, in _check_pydot
pydot.Dot.create(pydot.Dot())
File “C:\Users\hp\AppData\Local\Programs\Python\Python36\lib\site-packages\pydot.py”, line 1867, in create
raise OSError(*args)
FileNotFoundError: [WinError 2] “dot.exe” not found in path.
During handling of the above exception, another exception occurred:
Traceback (most recent call last):
File “C:\Users\hp\Desktop\iitp\caption_new\5.py”, line 163, in
model = define_model(vocab_size, max_length)
File “C:\Users\hp\Desktop\iitp\caption_new\5.py”, line 131, in define_model
plot_model(model, to_file=’model.png’, show_shapes=True)
File “C:\Users\hp\AppData\Local\Programs\Python\Python36\lib\site-packages\keras\utils\vis_utils.py”, line 133, in plot_model
dot = model_to_dot(model, show_shapes, show_layer_names, rankdir)
File “C:\Users\hp\AppData\Local\Programs\Python\Python36\lib\site-packages\keras\utils\vis_utils.py”, line 55, in model_to_dot
_check_pydot()
File “C:\Users\hp\AppData\Local\Programs\Python\Python36\lib\site-packages\keras\utils\vis_utils.py”, line 29, in _check_pydot
‘
pydotfailed to call GraphViz.’OSError:
pydotfailed to call GraphViz.Please install GraphViz (https://www.graphviz.org/) and ensure that its executables are in the $PATH.Looks like you need to install pygraphviz, or comment out the plotting of the model.
—-> 1 description = generate_desc(model, tokenizer, photo, max_length)
2 print(description)
in generate_desc(model, tokenizer, photo, max_length)
10 sequence = tokenizer.texts_to_sequences([in_text])[0]
11 sequence = pad_sequences([sequence], maxlen=max_length)
—> 12 yhat = model.predict([photo,sequence], verbose=0)
13 yhat = argmax(yhat)
14 word = word_for_id(yhat, tokenizer)
AttributeError: ‘dict’ object has no attribute ‘ndim’
Ensure that you copy all code for the example.
@Shantanu Singh have you resolved your problem, cause I am facing the exact same problem
Are all of your libraries up to date?
When i am training, i am getting an vocab length of 8359. It is less than what you are getting.
Will it be a problem?
Maybe.
Hello, i am stuck into this..’startseq’ and ‘endseq’ are not added in the Description.txt file but there is no error when i am running that module
We add them in the load_clean_descriptions() function after loading the data.
So,I followed exactly all the steps as shown above and after progressive loading,when the model is getting compiled,it keeps on running epoch 1/1 over and over again and keeps saving different .h5 files. So,I stopped the process after 5 iterations and got a loss of ~3.38 and when I am generating captions,it is not giving even close captions. What should I do to improve my results? Should I let the model to be trained for more iterations or will it cause over-fitting?
The progressive loading example runs epochs manually, not the same epoch again and again.
Perhaps test each saved model and use the one with the lowest loss to generate captions.
Hi Jason,
I am trying to create image caption for my own datasets. Like I have 4k images with single caption. I am able to run and create model for Flickr8K dataset.Its work properly. But when I use my dataset I am able to generate all required files except model. When I try to train the model it gives error –
__________________________________________________________________________________________________
Layer (type) Output Shape Param # Connected to
==================================================================================================
input_2 (InputLayer) (None, 27) 0
__________________________________________________________________________________________________
input_1 (InputLayer) (None, 4096) 0
__________________________________________________________________________________________________
embedding_1 (Embedding) (None, 27, 256) 1058048 input_2[0][0]
__________________________________________________________________________________________________
dropout_1 (Dropout) (None, 4096) 0 input_1[0][0]
__________________________________________________________________________________________________
dropout_2 (Dropout) (None, 27, 256) 0 embedding_1[0][0]
__________________________________________________________________________________________________
dense_1 (Dense) (None, 256) 1048832 dropout_1[0][0]
__________________________________________________________________________________________________
lstm_1 (LSTM) (None, 256) 525312 dropout_2[0][0]
__________________________________________________________________________________________________
add_1 (Add) (None, 256) 0 dense_1[0][0]
lstm_1[0][0]
__________________________________________________________________________________________________
dense_2 (Dense) (None, 256) 65792 add_1[0][0]
__________________________________________________________________________________________________
dense_3 (Dense) (None, 4133) 1062181 dense_2[0][0]
==================================================================================================
Total params: 3,760,165
Trainable params: 3,760,165
Non-trainable params: 0
__________________________________________________________________________________________________
None
Traceback (most recent call last):
File “train2.py”, line 179, in
model.fit([X1train, X2train], ytrain, epochs=20, verbose=2, callbacks=[checkpoint], validation_data=([X1test, X2test], ytest))
ValueError: Error when checking input: expected input_1 to have 2 dimensions, but got array with shape (10931, 7, 7, 512)
keras version is – 2.2.0
How I can solve this error?
Please help me out.
Looks like the dimensions of your data do not match the expected dimensions of the model. You can change the data or the model.
Ok thanks Jason,
I will try to change the model.
Hi Kingson
Were you able to get rid of the above problem? Since I am also getting the same error while training the model.
Thanks in advance
Hey ….Did u solve this error?
I m also stuck here…Please help
Hey Jason,
Great article. I just wanted to ask where to do you start developing code for such implementations. Do you refer papers and code from scratch or refer material that explains implementation code in detail and translate it to keras ?
Thanks,
Satendra
Start by understanding the principle of the approach (from multiple papers), then implement it using whatever tools, e.g. keras.
Hi Jason,
Great tutorial. I am wondering what the best way to limit the vocabulary size. As num_words does not influence tokenizer.fit_on_text, are these changes correct:
def create_tokenizer(descriptions):
lines = to_lines(descriptions)
tokenizer = Tokenizer(num_words = VOCAB_NUM_WORDS)
tokenizer.fit_on_texts(lines)
tokenizer.texts_to_sequences(lines)
return tokenizer
and
vocab_size = VOCAB_NUM_WORDS
Create a list of the n most frequent words you want to work with from the dataset, save them to file, then use them to filter the dataset prior to modeling.
I have many examples of this on the blog, for example:
https://machinelearningmastery.com/develop-word-embedding-model-predicting-movie-review-sentiment/
Thank you!
One more question. For Progressive Loading it seems that the batch size is 1 from the data_generator. If I would like to create a batch i run into the problem of size defining as the “create_sequences” output is variable in size from:
in_img, in_seq, out_word = create_sequences(tokenizer, max_length, desc_list, photo)
For example i can’t size define to something like:
batch_features = np.zeros((batch_size, 17, 1280))
batch_labels = np.zeros((batch_size, 17, 40000))
How can I create a batch of “in_img, in_seq, out_word” (if each sequence will be a different length)? Is there an easy way to make a larger batch size? Again thank you for your help.
Not sure I follow.
In progressive loading, the generator will release a batch of data. You can change the code to make this as few or as many samples as you wish.
Sorry I didn’t explain well. From my understanding your “data_generator” releases data for 1 image into “model.fit_generator” at a time. I would like to change this to a batch of images.
The problem I am having is if I try to use a code structure like below, I am not able to create the empty arrays (unless I pad each line to “max_length”, and make “batch_features = np.zeros((batch_size, max_length, NN_input_shape))”).
#code structure
def generator(features, labels, batch_size):
# Create empty arrays to contain batch of features and labels#
batch_features = np.zeros((batch_size, 64, 64, 3))
batch_labels = np.zeros((batch_size,1))
while True:
for i in range(batch_size):
# choose random index in features
index= random.choice(len(features),1)
batch_features[i] = some_processing(features[index])
batch_labels[i] = labels[index]
yield batch_features, batch_labels
Also, is there somewhere I can donate money to your site?
Correct.
Yes, you can build up data as Python lists then covert the lists to numpy arrays before you return them. It is a strategy I use all the time.
Here the part of my code where I have a problem :
size = 64
img1 = load_img(‘00598546-9.jpg’, target_size=(1, size, size))
imshow(img1)
X1 = (TimeDistributed(Conv2D(32, (3,3), activation=’relu’), input_shape=(None, size, size, 3)))(img1)
Error message:
ayer time_distributed_11 was called with an input that isn’t a symbolic tensor. Received type: . Full input: []. All inputs to the layer should be tensors.
I’m looking to find the output X1 by using (img1) as an input but I get this error message.
How can I use (img1) to find the output ?
Are you able to confirm that your libraries are up to date?
How can I make sure it’s up to date ?
Thank you.
It depends on the method you used to install the libraries.
Perhaps this post will help:
https://machinelearningmastery.com/setup-python-environment-machine-learning-deep-learning-anaconda/
Hi Jason,
I am trying to use the model you presented above for recognizing handwritten documents. In literature the feature extraction stage for OCR produces another 2-D matrix for each image (a feature vector is found for each column vector in the image). How can I then convert this 2-D matrix into a 1-D vector?
The vector output will be a the probability of an image belonging to each output class.
After training it for two epoch it gives caption as “man in red shirt standing on Street” for every other image i put
Sounds like it got stuck, try training it again?
After training again for 6 epoch and loss of 3.3 its showing captions for girls as boys and calling a bird as a dog, should I train it for 20 epoch?
No, the model does not need very much training.
For new Images it is not working, can you send me a trained model? because I tried up to 10 epoch and it is not working
What do you mean it is not working?
Same problem with me. I’ve trained the model several times now but it is giving same captions to all other images when i test it.
Is the sequence length the number of words in a sequence?
Yes. Or rather, the maximum number of words that may appear in a sequence.
Hi Jason,
Firstly I would like to thank you for sharing your knowledge and helping everyone. I am new to this field now. Could you please explain, why are removing all single letter words?
Yes, removing words having numbers and removing punctuation does make sense. Even removing single letter word also makes sense, but by removing “a”, wont it affect formation of new sentences?
It does, but it makes the problem simpler to model with little effect on meaning.
Hello Jason
I am facing the following error while training the model with progressive loading.
Could you please help to fix this?
ImportError Traceback (most recent call last)
~\AppData\Local\Continuum\anaconda3\envs\tensorflow\lib\site-packages\tensorflow\python\pywrap_tensorflow_internal.py in swig_import_helper()
13 try:
—> 14 return importlib.import_module(mname)
15 except ImportError:
~\AppData\Local\Continuum\anaconda3\envs\tensorflow\lib\importlib\__init__.py in import_module(name, package)
125 level += 1
–> 126 return _bootstrap._gcd_import(name[level:], package, level)
127
~\AppData\Local\Continuum\anaconda3\envs\tensorflow\lib\importlib\_bootstrap.py in _gcd_import(name, package, level)
~\AppData\Local\Continuum\anaconda3\envs\tensorflow\lib\importlib\_bootstrap.py in _find_and_load(name, import_)
~\AppData\Local\Continuum\anaconda3\envs\tensorflow\lib\importlib\_bootstrap.py in _find_and_load_unlocked(name, import_)
~\AppData\Local\Continuum\anaconda3\envs\tensorflow\lib\importlib\_bootstrap.py in _load_unlocked(spec)
~\AppData\Local\Continuum\anaconda3\envs\tensorflow\lib\importlib\_bootstrap.py in module_from_spec(spec)
~\AppData\Local\Continuum\anaconda3\envs\tensorflow\lib\importlib\_bootstrap_external.py in create_module(self, spec)
~\AppData\Local\Continuum\anaconda3\envs\tensorflow\lib\importlib\_bootstrap.py in _call_with_frames_removed(f, *args, **kwds)
ImportError: DLL load failed: The specified module could not be found.
During handling of the above exception, another exception occurred:
ModuleNotFoundError Traceback (most recent call last)
~\AppData\Local\Continuum\anaconda3\envs\tensorflow\lib\site-packages\tensorflow\python\pywrap_tensorflow.py in ()
57
—> 58 from tensorflow.python.pywrap_tensorflow_internal import *
59 from tensorflow.python.pywrap_tensorflow_internal import __version__
~\AppData\Local\Continuum\anaconda3\envs\tensorflow\lib\site-packages\tensorflow\python\pywrap_tensorflow_internal.py in ()
16 return importlib.import_module(‘_pywrap_tensorflow_internal’)
—> 17 _pywrap_tensorflow_internal = swig_import_helper()
18 del swig_import_helper
~\AppData\Local\Continuum\anaconda3\envs\tensorflow\lib\site-packages\tensorflow\python\pywrap_tensorflow_internal.py in swig_import_helper()
15 except ImportError:
—> 16 return importlib.import_module(‘_pywrap_tensorflow_internal’)
17 _pywrap_tensorflow_internal = swig_import_helper()
~\AppData\Local\Continuum\anaconda3\envs\tensorflow\lib\importlib\__init__.py in import_module(name, package)
125 level += 1
–> 126 return _bootstrap._gcd_import(name[level:], package, level)
127
ModuleNotFoundError: No module named ‘_pywrap_tensorflow_internal’
During handling of the above exception, another exception occurred:
ImportError Traceback (most recent call last)
in ()
1 from numpy import array
2 from pickle import load
—-> 3 from keras.preprocessing.text import Tokenizer
4 from keras.preprocessing.sequence import pad_sequences
5 from keras.utils import to_categorical
~\AppData\Local\Continuum\anaconda3\envs\tensorflow\lib\site-packages\keras\__init__.py in ()
1 from __future__ import absolute_import
2
—-> 3 from . import utils
4 from . import activations
5 from . import applications
~\AppData\Local\Continuum\anaconda3\envs\tensorflow\lib\site-packages\keras\utils\__init__.py in ()
4 from . import data_utils
5 from . import io_utils
—-> 6 from . import conv_utils
7
8 # Globally-importable utils.
~\AppData\Local\Continuum\anaconda3\envs\tensorflow\lib\site-packages\keras\utils\conv_utils.py in ()
7 from six.moves import range
8 import numpy as np
—-> 9 from .. import backend as K
10
11
~\AppData\Local\Continuum\anaconda3\envs\tensorflow\lib\site-packages\keras\backend\__init__.py in ()
85 elif _BACKEND == ‘tensorflow’:
86 sys.stderr.write(‘Using TensorFlow backend.\n’)
—> 87 from .tensorflow_backend import *
88 else:
89 # Try and load external backend.
~\AppData\Local\Continuum\anaconda3\envs\tensorflow\lib\site-packages\keras\backend\tensorflow_backend.py in ()
4
5 import tensorflow as tf
—-> 6 from tensorflow.python.framework import ops as tf_ops
7 from tensorflow.python.training import moving_averages
8 from tensorflow.python.ops import tensor_array_ops
~\AppData\Local\Continuum\anaconda3\envs\tensorflow\lib\site-packages\tensorflow\python\__init__.py in ()
47 import numpy as np
48
—> 49 from tensorflow.python import pywrap_tensorflow
50
51 # Protocol buffers
~\AppData\Local\Continuum\anaconda3\envs\tensorflow\lib\site-packages\tensorflow\python\pywrap_tensorflow.py in ()
72 for some common reasons and solutions. Include the entire stack trace
73 above this error message when asking for help.””” % traceback.format_exc()
—> 74 raise ImportError(msg)
75
76 # pylint: enable=wildcard-import,g-import-not-at-top,unused-import,line-too-long
ImportError: Traceback (most recent call last):
File “C:\Users\gaurav.anand\AppData\Local\Continuum\anaconda3\envs\tensorflow\lib\site-packages\tensorflow\python\pywrap_tensorflow_internal.py”, line 14, in swig_import_helper
return importlib.import_module(mname)
File “C:\Users\gaurav.anand\AppData\Local\Continuum\anaconda3\envs\tensorflow\lib\importlib\__init__.py”, line 126, in import_module
return _bootstrap._gcd_import(name[level:], package, level)
File “”, line 994, in _gcd_import
File “”, line 971, in _find_and_load
File “”, line 955, in _find_and_load_unlocked
File “”, line 658, in _load_unlocked
File “”, line 571, in module_from_spec
File “”, line 922, in create_module
File “”, line 219, in _call_with_frames_removed
ImportError: DLL load failed: The specified module could not be found.
During handling of the above exception, another exception occurred:
Traceback (most recent call last):
File “C:\Users\gaurav.anand\AppData\Local\Continuum\anaconda3\envs\tensorflow\lib\site-packages\tensorflow\python\pywrap_tensorflow.py”, line 58, in
from tensorflow.python.pywrap_tensorflow_internal import *
File “C:\Users\gaurav.anand\AppData\Local\Continuum\anaconda3\envs\tensorflow\lib\site-packages\tensorflow\python\pywrap_tensorflow_internal.py”, line 17, in
_pywrap_tensorflow_internal = swig_import_helper()
File “C:\Users\gaurav.anand\AppData\Local\Continuum\anaconda3\envs\tensorflow\lib\site-packages\tensorflow\python\pywrap_tensorflow_internal.py”, line 16, in swig_import_helper
return importlib.import_module(‘_pywrap_tensorflow_internal’)
File “C:\Users\gaurav.anand\AppData\Local\Continuum\anaconda3\envs\tensorflow\lib\importlib\__init__.py”, line 126, in import_module
return _bootstrap._gcd_import(name[level:], package, level)
ModuleNotFoundError: No module named ‘_pywrap_tensorflow_internal’
Failed to load the native TensorFlow runtime.
See https://www.tensorflow.org/install/install_sources#common_installation_problems
for some common reasons and solutions. Include the entire stack trace
above this error message when asking for help.
Sorry to hear that.
Perhaps post your error to stackoverflow?
downgrade your tensorflow to version 1.5, i hope it will work for you.
Yes, it has now worked somehow after creating new environment with latest tensorflow version. However, it is giving me another possibly known error. Please have a look once.
Model:
__________________________________________________________________________________________________
Layer (type) Output Shape Param # Connected to
==================================================================================================
input_4 (InputLayer) (None, 30) 0
__________________________________________________________________________________________________
input_3 (InputLayer) (None, 7, 7, 512) 0
__________________________________________________________________________________________________
embedding_2 (Embedding) (None, 30, 256) 987392 input_4[0][0]
__________________________________________________________________________________________________
dropout_3 (Dropout) (None, 7, 7, 512) 0 input_3[0][0]
__________________________________________________________________________________________________
dropout_4 (Dropout) (None, 30, 256) 0 embedding_2[0][0]
__________________________________________________________________________________________________
dense_4 (Dense) (None, 7, 7, 256) 131328 dropout_3[0][0]
__________________________________________________________________________________________________
lstm_2 (LSTM) (None, 256) 525312 dropout_4[0][0]
__________________________________________________________________________________________________
add_2 (Add) (None, 7, 7, 256) 0 dense_4[0][0]
lstm_2[0][0]
__________________________________________________________________________________________________
dense_5 (Dense) (None, 7, 7, 256) 65792 add_2[0][0]
__________________________________________________________________________________________________
dense_6 (Dense) (None, 7, 7, 3857) 991249 dense_5[0][0]
==================================================================================================
—————————————————————————
ValueError Traceback (most recent call last)
in ()
178 generator = data_generator(train_descriptions, train_features, tokenizer, max_length)
179 # fit for one epoch
–> 180 model.fit_generator(generator, epochs=1, steps_per_epoch=steps, verbose=1)
181 # save model
182 model.save(‘model_’ + str(i) + ‘.h5’)
c:\users\gaurav.anand\appdata\local\continuum\anaconda3\envs\tensorflow1.7\lib\site-packages\keras\legacy\interfaces.py in wrapper(*args, **kwargs)
89 warnings.warn(‘Update your
' + object_name +call to the Keras 2 API: ‘ + signature, stacklevel=2)90 '
—> 91 return func(*args, **kwargs)
92 wrapper._original_function = func
93 return wrapper
c:\users\gaurav.anand\appdata\local\continuum\anaconda3\envs\tensorflow1.7\lib\site-packages\keras\engine\training.py in fit_generator(self, generator, steps_per_epoch, epochs, verbose, callbacks, validation_data, validation_steps, class_weight, max_queue_size, workers, use_multiprocessing, shuffle, initial_epoch)
1413 use_multiprocessing=use_multiprocessing,
1414 shuffle=shuffle,
-> 1415 initial_epoch=initial_epoch)
1416
1417 @interfaces.legacy_generator_methods_support
c:\users\gaurav.anand\appdata\local\continuum\anaconda3\envs\tensorflow1.7\lib\site-packages\keras\engine\training_generator.py in fit_generator(model, generator, steps_per_epoch, epochs, verbose, callbacks, validation_data, validation_steps, class_weight, max_queue_size, workers, use_multiprocessing, shuffle, initial_epoch)
211 outs = model.train_on_batch(x, y,
212 sample_weight=sample_weight,
–> 213 class_weight=class_weight)
214
215 outs = to_list(outs)
c:\users\gaurav.anand\appdata\local\continuum\anaconda3\envs\tensorflow1.7\lib\site-packages\keras\engine\training.py in train_on_batch(self, x, y, sample_weight, class_weight)
1207 x, y,
1208 sample_weight=sample_weight,
-> 1209 class_weight=class_weight)
1210 if self._uses_dynamic_learning_phase():
1211 ins = x + y + sample_weights + [1.]
c:\users\gaurav.anand\appdata\local\continuum\anaconda3\envs\tensorflow1.7\lib\site-packages\keras\engine\training.py in _standardize_user_data(self, x, y, sample_weight, class_weight, check_array_lengths, batch_size)
785 feed_output_shapes,
786 check_batch_axis=False, # Don’t enforce the batch size.
–> 787 exception_prefix=’target’)
788
789 # Generate sample-wise weight values given the
sample_weightandc:\users\gaurav.anand\appdata\local\continuum\anaconda3\envs\tensorflow1.7\lib\site-packages\keras\engine\training_utils.py in standardize_input_data(data, names, shapes, check_batch_axis, exception_prefix)
125 ‘: expected ‘ + names[i] + ‘ to have ‘ +
126 str(len(shape)) + ‘ dimensions, but got array ‘
–> 127 ‘with shape ‘ + str(data_shape))
128 if not check_batch_axis:
129 data_shape = data_shape[1:]
ValueError: Error when checking target: expected dense_6 to have 4 dimensions, but got array with shape (11, 1, 3857)
I have made an only change in line 114:
inputs1 = Input(shape=(4096,)) >> inputs1 = Input(shape=(7, 7, 512,))
Because, it was earlier giving error for Data structure mismatch for inputs1 but now it is giving same error in 3rd dense layer.
As I read other comments, it is a common issue.
Could you please share your opinion how to get rid of this ?
Any external guide to data structure mismatch would be much appreciated.
I have some suggestions here:
https://machinelearningmastery.com/faq/single-faq/why-does-the-code-in-the-tutorial-not-work-for-me
Thanks for FAQ page.
I guess the problem is that I am defining model’s inputs1 with shape
inputs1 = Input(shape=(4096,))
but data_generator() method is generating in_img of shape (11,7,7,512).
Probably there is a need to change format of features.pkl file’s data.
Is it right to move in this direction?
Some image captioning libraries (such as Im2txt) are able to provide a confidence score for their generated captions. This helps us when we have a caption that is wrong, so that we can at least tell whether or not by the confidence if the model was ‘unsure’ about the text it generated. How would we go about adding something like that to this?
Good question. Perhaps contact the developers and ask their approach?
I have got to say. This is the best image captioning tutorial I have found online. Thank you for helping me understand it better.
Thanks, I’m glad it helped.
Would it make sense to monitor the accuracy and validation accuracy for image captioning?
That is what I added to model.compile:
model.compile(loss=’categorical_crossentropy’, optimizer=’adam’, metrics=[‘accuracy’])
That gave for the first epoch an accuracy of 0.9463.
And a validation accuracy of 0.9903.
Doesn’t that seem too high though for the 1st epoch?
No accuracy does not tell us much about the performance of the model. We must use a score like BLEU.
Thank you for your response, Dr. Bronwlee. Okay, but does ‘accuracy’ mean anything? I mean Keras is doing some calculations to get these numbers, right? Even if it does not help us to learn about the model’s performance, does the accuracy metric represent anything?
No. You can monitor loss though.
I am Unable to make Progressive Loading, After first epoch I am getting error like
5995/6000 [============================>.] – ETA: 2s – loss: 4.6600
5996/6000 [============================>.] – ETA: 2s – loss: 4.6597
5997/6000 [============================>.] – ETA: 1s – loss: 4.6597
5998/6000 [============================>.] – ETA: 1s – loss: 4.6595
5999/6000 [============================>.] – ETA: 0s – loss: 4.6595
6000/6000 [==============================] – 3329s 555ms/step – loss: 4.6598
Process finished with exit code -1073741819 (0xC0000005)
I am running on Lenovo Laptop with 16 GB RAM., Intel i5, Pychram IDE
First, confirm your environment is up to date:
https://machinelearningmastery.com/setup-python-environment-machine-learning-deep-learning-anaconda/
Then, I have some suggestions here:
https://machinelearningmastery.com/faq/single-faq/why-does-the-code-in-the-tutorial-not-work-for-me
C:\Users\navee\Anaconda3\python.exe “D:/Image Caption/versions.py”
Using TensorFlow backend.
Anaconda Version3.6.6 |Anaconda 4.3.1 (64-bit)| (default, Jun 28 2018, 11:27:44) [MSC v.1900 64 bit (AMD64)]
Keras Version2.1.5
Tensorflow Version1.9.0
Matplotlib Version2.2.2
Numpy Version1.15.0
Process finished with exit code 0
Well done!
5,5 million parameters… and 8000 examples? Clearly, the old rule doesn’t apply that the training data should be at least as many as the # parameters. Is there a way to think about this? Clearly, I shouldn’t use my intuition from a linear system of equations?
Yes, the old ways of thinking do not apply.
I have not seen a good conceptual model for thinking about highly over-specified models.
Nevertheless, they are skillful and do generalize.
Hi Jason,
Many thanks for your kind help. When we use model.fit for training, we are using training data as well as validation data. But When we use mode.fit_generator (Progressive Loading), in that case why we are not using validation data?
I added that progressive loading much later, as a simpler version for those that were having trouble. You can update it to use validation data if you wish.
hi Jason
Due to internet connectivity, my download when i run feature_extraction.py code.
later i tried to run the code again and it is not downloading and not showing error also.
without features.pkl file i cant proceed furthur.
is there any other way to make it download
No, sorry. You require the dataset to work through the example.
thank you jason
i got the dataset
but due to memory error , i am doing with progressive loading
I am getting value error
valueError: Error when checking input : expected input_1 to have 4 dimensions but got array with shape (28,4096)
thank you Jason in advance
Perhaps ensure that you have copied the data exactly and that your libraries are up to date?
Hi Jason,
thank you for this super tutorial.
But I have a question :):
My generated caption is for the sample picture:
“startseq dog is running through the snow endseq”
and not
“startseq dog is running across the beach endseq”
My BLUE Score is also lower as in your tutorial.
BLEU-1: 0.553073
BLEU-2: 0.293371
BLEU-3: 0.200420
BLEU-4: 0.090321
Do have any idea why, or better how can I improve my result?
TIA
Michael
Perhaps try fitting the model again?
Hi!
Is the feature order directly tied to the caption? How much does the model rely on input’s order?
Imagine if the extracted features of an image are [‘dog’, ‘water’, ‘blue’, ‘sand’] and the caption is “dog at the beach”, now this is correct and expected caption.
Now the same image, but the features are [‘sand’, ‘water’, ‘dog’, ‘blue’], how different might the new caption be?
Can we achieve the same caption with differently ordered features vector?
Yes, the order of the generated words is important for the design of this specific model.
Jason – given the model architecture, if I use my own data, with only 1 caption per image, would it impact the quality of the outcome?
It will, perhaps some changes to the model configuration or training will be required. Experiment.
hiii Jason
your tutorial is super and its working fine
but
i have a doubt !!
in generating new caption , will it generate captions to only images in Flickr data set or general to normal images (downloaded in google)?
thank you very much Jason
It will generate captions for any photo you provide.
Remember, it is just an experiment, not an application.
hii Jason
yeah , just to test how it is generaing captions for images other than present in flickr dataset
but it is giving appropriate captions only for images in dataset . For all the other images , generating some caption which no way related to image
Perhaps your model has overfit. You could try adding some regularization.
what should i do to add regularization
Try Dropout, weight noise, weight regularization, activation regularization, early stopping, etc.
On which part of the program should i apply the given techniques.
And how to apply all of them?
I cannot know, I recommend testing a number of different approaches and discover what works.
If this is a challenge, then I am currently writing a series of tutorials on this exact topic (e.g. how to improve model performance).
I am new to deep learning implementation.I dont know where to insert the required techniques inside the code written by you.? Can you suggest a tutorial or some sourse for it
Hello Jason,
Why is there ” + 1 ” every time you find the vocabulary size from the tokenizer?
To start numbering of tokenized words at “1” rather than “0”. We need room for the “0” value for “unknown word”.
When would we encounter an unknown word if the vocabulary consists of all the words in the training data?
There may be words in the test set not in the training set.
There may be works in new data not in the training set.
Does that help?
I am still a bit confused to be honest.
1. The training vocab and the testing vocab are different, that I can see. Why would a trained model ever encounter a word only in the test set? Wouldn’t test set captions (and hence the words in the test) only be used when calculating BLEU scores?
2. Could this ‘unknown word’ token ever be generated by the model?
3. When adding new data with new words to the training data, why would you stick with the older vocabulary and not ‘evaluate’ the newer one?
Yes, it is an artefact of evaluating the model.
In the future, you would finalize the model by training it on all available data and use it to generate captions.
The model may still generate unknown word tokens if it gets confused.
Jason,
Thank you for this clear and thorough tutorial. I have two questions to make sure I understand things correctly:
1. By removing single letters from the descriptions, the generated descriptions will never include/generate descriptions with ‘a’ or ‘I’. Is that correct?
2. Because load_clean_descriptions filters by testing/training the tokenizer may be missing words that are in the test set but not the training set. Is this correct? And for fitting I understand you want to keep test/training data separate, but for the vocabulary ideally you would include the entire vocabulary from both the test and training set. Is this correct?
3. If I understand correctly one could use an even larger vocabulary (would be a bigger model) but in principle there is no reason not to include a larger vocabulary?
Yes, you can add them back if you like. It just makes the vocab larger/model slower to train.
Yes, train defines the vocab. Ideally you want your model to have all the words that may be seen.
Yes, there is good reason to use a larger vocab, it will be more expressive, but I was trying to keep the example fast/simple.
Hello
I wanted to know what should be the target validation loss.
Right now, I am getting the best validation loss of 3.86 after 5 epochs. However, you have a lower validation as well as training loss than mine just after two epochs.
Is my model trained enough or should I train again?
Lower is better.
I want to test the model with more images.
Can you tell me the source from which i can get images which will run efficiently using the code.Itried some randon images from google but they were unsatisfactory.Also tell me steps to add new image along with model to train it?
I expect there are other image captioning datasets you can use.
Sorry, I cannot point you to them off the cuff.
Hi Jason
I really like this post, it helped a lot
your post is better than my daily DL learning class
I have a question
I ran the code until fitting the model, actually till this line
“Train on 306404 samples, validate on 50903 samples
Epoch 1/20”
until now it took 20 mins but nothing has appeared
Does it take so much of time to run each epoch?
Or am I doing something wrong?
I really hope this code work properly with me so I can optimize it and see different results
Thanks
It can take a while.
Another question is that if feature.pkl file has been created the first time I ran the code and I have it in my directory
do I have to run these commands if I ran the code another time
# extract features from all images
directory = ‘Flicker8k_Dataset’
features = extract_features(directory)
print(‘Extracted Features: %d’ % len(features))
# save to file
dump(features, open(‘features.pkl’, ‘wb’))
Thanks again
Once you have created the features, you don’t need to create them again.
Thanks a lot
now it’s working properly
will let you know what I will get at the end
Thanks again, really appreciate your hard work, so happy that I understand your code very well
Well done!
Hey Jason, thanks for the tutorial. The model trained fine for me but when I tried to generate caption for a single new image I encountered the following error:
ValueError: Error when checking input: expected input_8 to have shape (110,) but got array with shape (34,)
Sorry to hear that, I have some suggestions here:
https://machinelearningmastery.com/faq/single-faq/why-does-the-code-in-the-tutorial-not-work-for-me
Hi Jason! Thanks a lot for this!
I tried your model with ResNet50 and got model-ep005-loss3.417-val_loss3.767.h5, so yours works a little bit better even when it comes to BLEU.
I’m gonna try to reduce the vocabulary size and see what happens.
Nice work!
I cannot clearly see how to ‘correct’ misspelling. I have already gone through the vocabulary and there are about 1000 misspelled words.
Any thoughts on how I could go over that?
Perhaps remove or correct all captions with misspellings?
Getting the following error when calling train_features = load_photo_features(‘features.pkl’, train)
The error occurs when trying to run all_features = load(open(filename, ‘rb’))
UnpicklingError: pickle data was truncated
Has anybody a solution to this?
I have some suggestions here:
https://machinelearningmastery.com/faq/single-faq/why-does-the-code-in-the-tutorial-not-work-for-me
Hi Jason,
I come back tonight with the question regarding the VGG16.layers.pop() method which seems not to work with Keras 2.2.2…
Before and after pop() and reshaping the model, the light one has exactly the same architecture as the original one…
Features extracted has dim = 1000 which cause me trouble with my Input = (4096,)…
If I change the input to (1000,) the performance is low…
Thanks for the help
Best regards
Jerome
Thanks, I’ll investigate.
I found the same. 1,000 dims.
Hi Jason,
My question is, are we retraining all the parameters of the VGG16 models in this example?
If yes, why should we train since we are using already trained model?
If no, then what part of the above coding is doing since we have not set layer.trainable = False for any layer?
Please let me when we should train all the layers or when we should not when using a pretrained model like VGG16?
No, we are not re-training the vgg, we are using the vgg to output features that are fed into the captioning model.
My BLEU scores with progressive loading
BLEU-1: 0.547871
BLEU-2: 0.293608
BLEU-3: 0.196752
BLEU-4: 0.086692
Nice work.
Hy Jason. I am new to ML and you are the source which rise my interest in ML. I am following your above tutorial. I am confuse to get some concept, where you are applying tokenization to the text. You mentioned that ” The model will be provided one word and the photo and generate the next word. After that it recursively run to generate new sentence”.I am just confuse here that what are you doing here? What is the purpose of doing that? Please explain in detail that point or suggest me a source to get help from somewhere else.
Second question is that when we will done with that, the model will generate captions, which are in the data-set (I mean to say exact some captions will be suggested for new unseen images or it can be new captions based on image )..plz explain it in details..
Perhaps it will be helpful to learn more about this type of model:
https://machinelearningmastery.com/caption-generation-inject-merge-architectures-encoder-decoder-model/
Yes, the model can be used to generate captions for new unseen photos, we do this at the end of the tutorial.
valueError: Error when checking input: expected input_2 to have shape (40,) but got array with shape (34,)
I am getting that error, I am unable to figure it out. Can you please help me to get that?
I have some suggestions here:
https://machinelearningmastery.com/faq/single-faq/why-does-the-code-in-the-tutorial-not-work-for-me
I am just confused about the max_length method.
What is the purpose of that method. Why we are trying to find that. Please slightly explain ti
To find the number of words in the longest description.
We need this so we can pad all other descriptions to that length (in terms of numbers of words).
hi Jason
my BLEU scores are like this
BLEU-1: 0.528302
BLEU-2: 0.277568
BLEU-3: 0.227300
BLEU-4: 0.117189
and here is my validation loss
Train on 306404 samples, validate on 50903 samples
Epoch 1/20
306404/306404 [==============================] – 9983s 33ms/step – loss: 4.5003 – val_loss: 4.0387
Epoch 00001: val_loss improved from inf to 4.03874, saving model to model-ep001-loss4.500-val_loss4.039.h5
Epoch 2/20
306404/306404 [==============================] – 9512s 31ms/step – loss: 3.8575 – val_loss: 3.8717
Epoch 00002: val_loss improved from 4.03874 to 3.87171, saving model to model-ep002-loss3.857-val_loss3.872.h5
Epoch 3/20
306404/306404 [==============================] – 7866s 26ms/step – loss: 3.6712 – val_loss: 3.8360
Epoch 00003: val_loss improved from 3.87171 to 3.83603, saving model to model-ep003-loss3.671-val_loss3.836.h5
Epoch 4/20
306404/306404 [==============================] – 10109s 33ms/step – loss: 3.5803 – val_loss: 3.8296
Epoch 00004: val_loss improved from 3.83603 to 3.82960, saving model to model-ep004-loss3.580-val_loss3.830.h5
Epoch 5/20
306404/306404 [==============================] – 5384s 18ms/step – loss: 3.5246 – val_loss: 3.8364
Though, when I try to generate a description for a random image from the intern the model seems not working properly
it gives me the same sentence for different kind of images
any suggestion?
It suggests the model may be overfit, perhaps try re-fitting the model or using a model it over fewer epochs or using some regularization.
I see
Thanks
I will try and post my experiment
Hi Omnia,
I am interested in your model’s result. May I know how to change the model.
Hi Jason,
Thanks for such nice work.
I want to know how I print actual caption for the test image. If I am using a new image from the test set.
I show how to print a caption for a new image in the tutorial.
Hi Jason,
in fitting the model, I’m not sure if my thought of input and output is correct
here is the command
model.fit([X1train, X2train], ytrain, epochs=20, verbose=2, validation_data=([X1test, X2test], ytest)
I understand that X1train contains the photo which should be the feature of the photo as integers, correct me if I’m wrong
X2train is sequence text which is the ground truth captions corresponding to the photo
I didn’t understand what is ytrain
would you please explain it briefly
another question is that how does the output penalize if it generates a wrong caption?
Thanks
Correct.
ytrain is the next word to be predicted by the model for each sample.
Dear Dr. Brownlee.
The create_sequences() function that returns for us input-output pairs of training data makes teacher forcing possible in this example, right?
I guess so, or more accurately, the way we use the sequences during training.
Hi Jason
Thanks a lot for your advice
I’m using Pycharm
I tried different types of regularization until I picked the best one, also different optimizers
I got pretty good bleu scores and predictions, the model was predicting everything in details for flicker image
and good enough for some images from the internet
Though for images from the internet, the model couldn’t clearly recognize cat from dog face, I’m still working on that
These are my blue score
BLEU-1: 0.601031
BLEU-2: 0.380297
BLEU-3: 0.279632
BLEU-4: 0.151589
Thanks again
Well done!
Omnia! Please can you share the code using inception model?IF yes then let me know..also i would like to check your results
Hi Omnia ! Can you tell me which regularization technique you used and helped impove the BLEU score.
Hi Omnia, can you share the approach you used for regularization at saurabh18@somaiya.edu?
Thanks!
Hi Jason,
Thank you for an amazing tutorial. I learnt many things here. esp. progressive loading. So here I have one query as you explain in “progressive loading” section:
“Finally, we can use the fit_generator() function on the model to train the model with this data generator.
In this simple example we will discard the loading of the development dataset and model checkpointing and simply save the model after each training epoch. You can then go back and load/evaluate each saved model after training to find the one we the lowest loss that you can then use in the next section.”
I have already got all 20 models from 20 epochs by training the “training” dataset. Now how do I check which model is best using the development set?? Because we have not included development set in the fit_generator(). So how to choose the best model from 20 saved models ? Should I apply evaluate() function on development set for each model?? It would be great if you could give me some idea/hint further on this!! Thanks.
Good question.
Evaluate each of the saved mode on a validation dataset and use the one with the best performance. Probably around epoch 3-4.
HI Jason, Can you tell me what do you mean by 3-4 epochs? I hope that evaluating the model will just go though all the images once and generate descriptions for them and then calculate the BLEU score from that. So, what 3-4 epochs are you speaking about?
I meant that the best performing model was found after the completion of 3 or 4 epochs.
Hi Jason
If I want to generate descriptions for the test images, how do I pass the photo features
(which we already have extracted) to the generate_desc model?
As in the following command, we are passing a single extracted feature for a given image
photo = extract_features(cat.jpg)
description = generate_desc(model, tokenizer, photo, max_length)
I want to generate a description for the test image using test features without using the
function extract feature again, could you please suggest any way to do it?
Thanks
The example at the end of the tutorial shows you how to generate a description for one photo.
Correct
That’s what I meant to say
in the example, it shows how to generate for one photo but with using the extract feature function,
If we already extracted features for the test images
why do we need to use extract_features again to generate a description
can’t we use our saved features in the test?
Yes, if you have already extracted the feature, then you can pass the extracted feature directly to generate_desc().
Hello,
This is a very good work.
What Machine learning techniques do you use in this work?
Thank you.
LSTMs.
Anyone received this problem during test phase?
OSError: Unable to open file (unable to open file: name = ‘model-ep001-loss3.245-val_loss3.612.h5’, errno = 2, error message = ‘No such file or directory’, flags = 0, o_flags = 0)
You must change the code to load the file that you saved.
Hi Mr.Jason,
I am a computer science and engineering student. Me and team mates are doing the same project. Reply me,
1.Can we develop this using MATLab?
2.Can we use the same code to our project for reference purpose using python?
3.In how many months we can complete it?
4.Suggest me what to use either python or matlab?
Sorry, I don’t have examples in matlab, I can’t give you good advice.
Hi I am also facing the same issue. Can you tell what you did to overcome the problem @harsha
Hi Jason. Thank you for this tutorial. I want to develop text-to-image model. Does it work if I change input and output elements? or What would you suggest ?
I don’t have a tutorial on text to image at this stage, I hope to cover it in the future – then I can give you good advice.
Hi Jason, Why have you taken the maximum size of the sentence to be 34, when the maximum length of a sentence is 33?
Is there any reason for selection of this particular RNN architecture? Is it giving any benefit?
Yes, I cover this architecture more here:
https://machinelearningmastery.com/caption-generation-inject-merge-architectures-encoder-decoder-model/
Hello Jason, Can you explain what is the role of mask_zero inside the embedding layer?
We zero pad inputs to the same length, the zero mask ignores those inputs. E.g. it is an efficiency.
Can you elaborate on your answer, I didn’t get anything.
Hi Jason! I’m waiting for you to elaborate on zero mask. Didn’t get anything from your comment.
Hi Jason, Inside the
data_generator()function why have you used thewhile 1:loop?Can you email all the previous answers that I’ve asked?
Because it is a generator that will yield each loop when called.
You can learn more about python generators here:
https://wiki.python.org/moin/Generators
I learned that on the repetitive calling of the generator function, the execution starts where it previously left off.
So, in
Shouldn’t this be :
Where am I getting wrong?
Shouldn’t this be :
def data_generator(tokenizer,train_descs,train_features,maxlen):
for ids, descs in train_descs.items():
feature = train_features[ids][0]
feature_vector, inseq, outseq = create_sequence(tokenizer,descs,feature,maxlen)
yield[[feature_vector,inseq],outseq]
generator = data_generator(tokenizer,train_descs,train_features,maxlen)
Where am I getting wrong?
It looks like you are calling the generator from within the data_generator function.
Sorry the last line in the second code snippet is outside the function.
def data_generator(tokenizer,train_descs,train_features,maxlen):
for ids, descs in train_descs.items():
feature = train_features[ids][0]
feature_vector, inseq, outseq = create_sequence(tokenizer,descs,feature,maxlen)
yield[[feature_vector,inseq],outseq]
generator = data_generator(tokenizer,train_descs,train_features,maxlen)
As, we know that data_generator is yielding one example at a time and each time the function is called, the function execution starts where it previously left off. So, since the “for ids, descs in train_descs.items():” loop is still not complete in the mid-way, it should loop and yield more sequences until it ends.
So, my quesiton is if the loop can continue till all the “train_descs.items()” are encountered, then why do we need the “while 1:” loop there?
I want to know where am I going wrong, kindly let me know.
Good question. To loop over the entire dataset as many times as we need (e.g. number of epochs is exhausted).
On running this:
# test the data generator
generator = data_generator(train_descriptions, train_features, tokenizer, max_length)
inputs, outputs = next(generator)
print(inputs[0].shape)
print(inputs[1].shape)
print(outputs.shape)
I’m getting :
(5, 4096)
(47, 33)
(7266,)
whereas your output is
(47, 4096)
(47, 34)
(47, 7579)
Am I getting wrong somewhere?
Also, can you explain these dimensions?
Perhaps ensure that you copied all of the code and that your Keras and Tensorflow are up to date.
Can you explain what is 47 in the dimension? I mean, data_generator is outputting one example at a time then instead of 47, shouldn’t it be 1? Can you explain me the dimension?
I believe I explain this in the post:
I am coding the stuff myself and rectified something and now the output is :
(47, 4096)
(47, 33)
(7266,)
Even now, print(outputs.shape) is giving me (7266,).
Stll, I want to ask that if data_generator is outputting 1 example at a time then why is 47 the first dimension?
Aah!! Finally, I got it right. Thanks. It was a small glitch.
Well done!
Perhaps confirm that you are using Keras 2.2.4 or better, the output should have 47 samples worth of output as well.
Hi Jason, You have set steps_per_epoch=len(descriptions) and passed it into model.fit_generator(). As far as I’ve read, steps_per_epoch signify the total no. of batches before a epoch to finish. See this :
https://stackoverflow.com/questions/48604149/keras-fit-generator-and-steps-per-epoch
and also this :
https://datascience.stackexchange.com/questions/29719/how-to-set-batch-size-steps-per-epoch-and-validation-steps
Correct.
I want to clarify how data_generator is feeding the data to fit_generator. I mean, is it giving it one training example at a time or some batch of training examples at a time.
It releases one batch of samples per loop.
epochs = 20
steps = len(train_descriptions)
for i in range(epochs):
# create the data generator
generator = data_generator(train_descriptions, train_features, tokenizer, max_length)
# fit for one epoch
model.fit_generator(generator, epochs=1, steps_per_epoch=steps, verbose=1)
# save model
model.save(‘model_’ + str(i) + ‘.h5’)
steps_per_epoch represents the no. of batches that will be trained in one epoch.
As you have said before that data_generator is feeding a batch of examples to fit_generator so that should mean that that in one batch, let’s say x examples are being sent for training process. This should mean that no. of batches for 1 epoch training should be (total no. of training examples)/(1 batch size). On running below snippet, total no. of training examples comes out to be 6000.
print(len(train_descriptions))
6000
So,steps_per_epoch should be 6000/(1 batch size), but in your code steps_per_epoch = len(train_descriptions)
Why have you set it so large?
Are you forcing fit_generator to train over one example at a time even though data_generator is generating a batch of training example at a time?
Feel free to change it.
Hi Jason, does max_length = 34 or any other bigger value have any effect on model performing well?
Try it and see.
Hi Jason, I’m running
evaluate_model(mapping,tokenizer,maxlen,model,features)
and getting this error.
—————————————————————————
KeyError Traceback (most recent call last)
in
—-> 1 evaluate_model(mapping,tokenizer,maxlen,model,features)
in evaluate_model(mapping, tokenizer, maxlen, model, feature_vector)
33 for ids,descs in mapping.items():#1
34 count += 1
—> 35 pred_caption = generate_desc(feature_vector[ids],tokenizer,model,maxlen)#caption string returned
36 for desc in descs:#2
37 reference.append(desc.split())
KeyError: ‘2258277193_586949ec62’
When I search for this image in my pc, I found that its id and its descriptions are present in the
Flickr8k.lemma.token.txt
cleanedcaptions.txt
However, the image is not present in Flicker8k_Dataset.
Why isn’t there any image Flicker8k_Dataset.
I redownloaded the dataset and searched the above-mentioned image in it and guess what, It was NOT present in that too !!
Also, when I loaded
featuresfrom features.pkl and then ranprint(features[‘2258277193_586949ec62’]) then it gave me
KeyError Traceback (most recent call last)
in
—-> 1 features[‘2258277193_586949ec62’]
KeyError: ‘2258277193_586949ec62’
From this, It seems like
2258277193_586949ec62.jpgwas never present in the dataset.But, its description is present in Flickr8k.lemma.token.txt.
Can you share the dataset?
Perhaps ignore that token then?
I am also getting KeyError: ‘2258277193_586949ec62’
how to resolve this. and how to get this image?
Hello Geeta…Please specify which code listing you are working with so that we can better assist you.
Perhaps you skipped a step, are you able to confirm that you have all of the steps/code?
Are you able to confirm that your Python and libraries are up to date?
I resolved the problem by putting an appropriate image that relates well to its description in Flickr8k.lemma.token.txt. The above image was really missing from the image directory. I reckon that anyone must have faced the same problem as mine.
Can you check this on your system? Also check that it is present in Flickr8k.lemma.token.txt.
The example in the blog post works perfectly for me and tens of thousands of readers, I suspect there is something going on with your local version.
Hi Jason!! Can you have a look at my model image
https://drive.google.com/open?id=1anAmPPIi0pfoe_3ISQ2AzaSuibI1KRqo
I cannot understand that there is an “input_3” and an “input_2” layer. Is there any problem if there is no “input_1” present in it?
Sorry, I don’t have the capacity to debug your model or model diagrams.
Just see and tell if missing of input_1 signify anything bad?
ValueError: Error when checking input: expected input_3 to have shape (34,) but got array with shape (30,)
Sir,while evaluating the model,I’m getting such an error how should I get rid of it?I exactly typed the code and I’m also using the same dataset as mentioned above.
Sorry to hear that, I have some suggestions here:
https://machinelearningmastery.com/faq/single-faq/why-does-the-code-in-the-tutorial-not-work-for-me
Hi Jason !! Can you tell me about other regularization techniques to improve the model?
Can you suggest adding anything to improve accuracy?
Yes, I list regularization methods here:
https://machinelearningmastery.com/introduction-to-regularization-to-reduce-overfitting-and-improve-generalization-error/
Are there any other regularisation techniques specific to the caption generation task that can be helpful?
Not really.
I tried my model using my MacBook Air Webcam and it gave pretty bad results and the captions that it generated were from the training dataset.
Where am I going? I am ready to try all the possibilities to improve my model. What can I do?
I am a student. My model is taking an hour or more to train. After training, I’m not getting the desired results. So, I don’t want to retrain it and sit back and see. There could be a high change that it may not work well again. I think AWS requires some bucks for this.
I’m using MacBook Air.
8 GB RAM
i5 5th gen processor
Is there any “free” source to train the model which will take lesser time.
Yes, fit a smaller model on less data as a prototype, then scale up once you find a good config.
Hi Jason,
Like many mentioned, it is a very comprehensive tutorial on caption generation. Progressive loading is a big plus.
Do you plan to cover or have some ideas on the topic of using image and description to search for similar images? Example of what I am trying to do: I already implemented CNN CBIR model that extracts features clusters them and when new image comes in, its features are extracted and nearest neighbors are given as similar images suggestions. This works fine, but I would like to enhance it by adding image description in the mix, so that when I give a picture of the steering wheel and specify “car part”, I will be given list of images of the steering wheels, and not all circular options like bike wheels for example.
I thought to use lucene to help with image description search first and then use CNN to find similar images, but not sure if it is the best approach to take as lucene search might throw out images that are relevant, but not well described.
Very cool idea. I have not tried this but I believe it would be straight-forward to implement.
Let me know how you go.
I dont think that trying to come up with a model that would combine the text along with image features will be straight forward or would perform well as oppose to having elasticsearch in the mix where I can take advantage of text search that elastic provides out of the box, but elastic falls short of image search (tried LIRE before and the results were really bad compared to ConvNet approach)
if you have any other ideas or suggestions, I am all ears 🙂
Thanks for the nice tutorial.
It is interesting to see that even though the LSTM and CNN have no connection, the decoder may produce proper caption words.
How does the LSTM choose words without any information about the image? What is the implicit mechanism in this architecture?
Any comment is welcome.
It has the extracted features from the image as input. They are abstract, but it finds meaning in them.
Hey Jason!
Amazing tutorial. Great Learning experience from start till end.
I wanted to ask you what do you mean exactly in the last section of the article under ‘Extensions’ section by,
‘Pre-trained Word Vectors. The model learned the word vectors as part of fitting the model. Better performance may be achieved by using word vectors either pre-trained on the training dataset or trained on a much larger corpus of text, such as news articles or Wikipedia.’
Thank You!
You can use word vectors learned on another dataset, more here:
https://machinelearningmastery.com/develop-word-embeddings-python-gensim/
hey Jason , thank you for this amazing article .
i wanted to ask you about an issue i ve faced in the generate_desc function , i am getting in the model.predict line this error :
ValueError: Error when checking input: expected input_2 to have shape (74,) but got array with shape (34,).
any solutions please!
thank you !!
Sorry to hear that, I have some suggestions here:
https://machinelearningmastery.com/faq/single-faq/why-does-the-code-in-the-tutorial-not-work-for-me
sir i couldn’t download the datasets after filling the form .please let me know if there is another way
You should be sent an email with the link after completing the form, I believe.
sir, i am also unable to download neither the dataset nor the text files. I am getting a 404 error.
You must fill out this form in order to download the dataset:
https://forms.illinois.edu/sec/1713398
respected sir,
I am not able to download the datasheet from the link that is provided by flickr 8k.
It is showing
The requested URL /HockenmaierGroup/Framing_Image_Description/Flickr8k_Dataset.zip was not found on this server.
Additionally, a 404 Not Found error was encountered while trying to use an ErrorDocument to handle the request.
It looks like they have taken the site down, it says: “Proper NLP home page coming soon.”
I will prepare a workaround ASAP.
UPDATE:
I have added direct download links to the post.
In the function, create_sequences(), the pad_sequences was generating a list so big that the 17 GB Kaggle RAM was crashing. So I tried appending directly to numpy arrays instead of creating it as a list first. However, now it is taking infinite time to execute. Is there any alternative to this function or any way to increase the rate. Please help
P.S Thanks for uploading the dataset, I spent days searching for it on the internet.
Perhaps try the progressive loading section?
i used progressive loading and after execution there were 20 models one for each epoch.
but further sections are using one single file for model . but i have 20 models.how to proceed?
Choose the model with the lowest validation error, you might need to evaluate each.
If that is a pain, use any model, e.g. from epoch 4.
Thank you very much.
i have developed a deep learning model with a .csv file as training data.
file contains a column with text data and during execution of the code
could not convert string to float: ‘Moong(Green Gram)’
this error is being displayed.
what should i do?
I’m not sure what the cause might be, sorry. Perhaps try debugging the data loading/transforming part of your code?
Hi Jason, I am unable to have access to the Flickr 8k dataset after filling the form. The link shows this:
Please help me with it. Thank you!
Not Found
The requested URL /HockenmaierGroup/Framing_Image_Description/Flickr8k_Dataset.zip was not found on this server.
Additionally, a 404 Not Found error was encountered while trying to use an ErrorDocument to handle the request.
Yes, they have recently removed it.
I have added direct download links above in the dataset section.
Jason…..we tried to complete the model generation using progressive loading…total 19 epochs ……And now we are getting outputs but the accuracy is very worse..is there any suggestions to improve the accuracy…..pls help
Please don’t use accuracy, instead use BLEU scores – perhaps re-read the post!
How to train this model using mscoco dataset?
Sorry, I don’t have an example of training with MSCOCO. Thanks for the suggestion.
Great article!
Comprehensive, well-written and well-explained. I used the progressive loading approach and ran the scripts in Google Colab. Everything worked fine (got some errors along the process every now and then, but managed to solve them all). I am currently extracting features using VGG16, VGG19, ResNet50 and Inception and hopefully will make a comparison between them. Thanks for this great post!
I wanted to get your opinion on this. Since I used progressive loading, I do not have a measure for the loss function on the validation dataset, so I took the models and evaluated the BLEU scores directly. However, it’s not straightforward to decide which models gives the best performance and when exactly the model starts to overfit.
I calculated the mean squared error between some “ideal” BLEU scores taken from Marc Tanti et al. (BLEU-1 = 0.6, BLEU-2 = 0.413, BLEU-3 = 0.273, BLEU-4 = 0.178) and the BLEU scores I’ve obtained for my models. The best performing one was actually model_0.h, which was the model calculated after the first epoch. However, I don’t know if the mean squared error is actually very indicative or relevant in this case, but I didn’t know what else to use. From the limited amount of research I’ve done online, I tend to believe that BLEU-4 is a bit more important than the rest of the BLEU scores, but I am not sure. Do you have any suggestions?
Thank you for your time!
Perhaps look at the loss or the learning curve of loss across all saved models?
Thanks.
Well done! Let me know what works well/best.
Why did you increment vocab_size by 1 ??
To start words at index 1 and make room for 0 == unknown word.
Hy Jason!
Thanks for great article.
I tried to run the model through progressive loading. My code is running perfectly. But my model generates generates just 3,4 type of captions for every image. It seems model is being trained on just 3,4 captions. I follow exact your code.
Any suggestion to improve my results.
(PS: I am testing on the same images, on which model has been trained . . .but still result is worse)
Sorry to hear that, some ideas:
Perhaps try re-fitting the model?
Perhaps try using a different final model?
Perhaps there was a typo in your code or you skipped a line?
Hy Jason !
I am not getting that why you reshaped image in the 4 dimensions .
image = image.reshape((1, image.shape[0], image.shape[1], image.shape[2]))
What is the purpose of reshaping the input images in that dimension. Please help me out . . .
The model expects an array of samples as input, e.g. 1 sample, and each image has rows, cols and channels.
Hi Jason, how can I continue your code with beam search algorithm? Because I want to show all the captions per image. Thanks!
This might help:
https://machinelearningmastery.com/beam-search-decoder-natural-language-processing/
Where should I put the beam search algorithm in your code? Can you explain this to me because I want it to try. Thanks!
Sorry, I don’t have a worked example.
I have problems in this section
The complete updated example with progressive loading (use of the data generator) for training the caption generation model is listed below.
my output is shown below :
Requirement already satisfied: pydot in c:\users\rijoanrabbi\anaconda3\lib\site-packages (1.4.1)
Requirement already satisfied: pyparsing>=2.1.4 in c:\users\rijoanrabbi\anaconda3\lib\site-packages (from pydot) (2.2.0)
Dataset: 6000
Descriptions: train=6000
Photos: train=6000
Vocabulary Size: 7579
Description Length: 34
__________________________________________________________________________________________________
Layer (type) Output Shape Param # Connected to
==================================================================================================
input_9 (InputLayer) (None, 34) 0
__________________________________________________________________________________________________
input_8 (InputLayer) (None, 4096) 0
__________________________________________________________________________________________________
embedding_3 (Embedding) (None, 34, 256) 1940224 input_9[0][0]
__________________________________________________________________________________________________
dropout_5 (Dropout) (None, 4096) 0 input_8[0][0]
__________________________________________________________________________________________________
dropout_6 (Dropout) (None, 34, 256) 0 embedding_3[0][0]
__________________________________________________________________________________________________
dense_7 (Dense) (None, 256) 1048832 dropout_5[0][0]
__________________________________________________________________________________________________
lstm_3 (LSTM) (None, 256) 525312 dropout_6[0][0]
__________________________________________________________________________________________________
add_3 (Add) (None, 256) 0 dense_7[0][0]
lstm_3[0][0]
__________________________________________________________________________________________________
dense_8 (Dense) (None, 256) 65792 add_3[0][0]
__________________________________________________________________________________________________
dense_9 (Dense) (None, 7579) 1947803 dense_8[0][0]
==================================================================================================
Total params: 5,527,963
Trainable params: 5,527,963
Non-trainable params: 0
__________________________________________________________________________________________________
—————————————————————————
ImportError Traceback (most recent call last)
in ()
162
163 # define the model
–> 164 model = define_model(vocab_size, max_length)
165 # train the model, run epochs manually and save after each epoch
166 epochs = 20
in define_model(vocab_size, max_length)
130 # summarize model
131 model.summary()
–> 132 plot_model(model, to_file=’model.png’, show_shapes=True)
133 return model
134
~\Anaconda3\lib\site-packages\keras\utils\vis_utils.py in plot_model(model, to_file, show_shapes, show_layer_names, rankdir)
130 ‘LR’ creates a horizontal plot.
131 “””
–> 132 dot = model_to_dot(model, show_shapes, show_layer_names, rankdir)
133 _, extension = os.path.splitext(to_file)
134 if not extension:
~\Anaconda3\lib\site-packages\keras\utils\vis_utils.py in model_to_dot(model, show_shapes, show_layer_names, rankdir)
53 from ..models import Sequential
54
—> 55 _check_pydot()
56 dot = pydot.Dot()
57 dot.set(‘rankdir’, rankdir)
~\Anaconda3\lib\site-packages\keras\utils\vis_utils.py in _check_pydot()
18 if pydot is None:
19 raise ImportError(
—> 20 ‘Failed to import
pydot. ‘21 ‘Please install
pydot. ‘22 ‘For example with
pip install pydot.’)ImportError: Failed to import
pydot. Please installpydot. For example withpip install pydot.You can comment out the plot_model() call if you like.
Hii…..How did u solve this error?
I m also stuck here….I need ur help
how many epoches takes for this training ? it took’s 6 hours per epoces ,now i am concerning how much time it will be taken ?
my laptop configuration
cpu:2.2GHz
Ram: 4Gb
graphics: 2Gb
another thanks for your previous reply 🙂
Typically good results (low loss) can be seen in the first few epochs.
jason plz tell How many epochs takes for this training plzz tell us…Beacuse Evary Epoch take 3hour….5 Epoch enough or Not…plz tell me
..
Typically just 2-3 epochs is sufficient.
Hi Jason
Awesome tutorial
Can you please guide me on how to call fit_generator like the same way we call model.fit(….)
filepath = ‘model-ep{epoch:03d}-loss{loss:.3f}-val_loss{val_loss:.3f}.h5′
checkpoint = ModelCheckpoint(filepath, monitor=’val_loss’, verbose=1,save_best_only=True, mode=’min’)
model.fit([X1train, X2train], ytrain, epochs=20, verbose=2, callbacks=[checkpoint], validation_data=([X1test, X2test], ytest))
i.e. along with callbacks , save best only and include a tensorboard callback to it too!
It’d be of great help.
Thank you!
You can fall fit_generator() in an identical way to calling fit().
What problem are you having exactly?
In Including a tensorboard callback
generator_train=data_generator(train_descriptions,train_features,tokenizer,max_len)
generator_test=data_generator(test_descriptions,test_features,tokenizer,max_len)
generator_validtn=data_generator(validtn_descriptions,validtn_features,tokenizer,max_len)
model.fit_generator(generator_train,steps_per_epoch=32,epochs=20,verbose=2,callbacks=[checkpoint],validation_data=generator_test,validation_steps=32)
———————————————————————————————————————————————-
ValueError Traceback (most recent call last)
in ()
14 #model.fit_generator(generator_train,steps_per_epoch=64,epochs=20,verbose=2,validation_data=next(generator_validtn),validation_steps=64,callbacks=[checkpoint])#tf.keras.callbacks.TensorBoard()
15
—> 16 model.fit_generator(generator_train,steps_per_epoch=32,epochs=20,verbose=2,callbacks=[checkpoint],validation_data=generator_test,validation_steps=32)
/usr/local/lib/python3.6/dist-packages/keras/legacy/interfaces.py in wrapper(*args, **kwargs)
89 warnings.warn(‘Update your
' + object_name + 'call to the ‘ +90 ‘Keras 2 API: ‘ + signature, stacklevel=2)
—> 91 return func(*args, **kwargs)
92 wrapper._original_function = func
93 return wrapper
/usr/local/lib/python3.6/dist-packages/keras/engine/training.py in fit_generator(self, generator, steps_per_epoch, epochs, verbose, callbacks, validation_data, validation_steps, class_weight, max_queue_size, workers, use_multiprocessing, shuffle, initial_epoch)
1416 use_multiprocessing=use_multiprocessing,
1417 shuffle=shuffle,
-> 1418 initial_epoch=initial_epoch)
1419
1420 @interfaces.legacy_generator_methods_support
/usr/local/lib/python3.6/dist-packages/keras/engine/training_generator.py in fit_generator(model, generator, steps_per_epoch, epochs, verbose, callbacks, validation_data, validation_steps, class_weight, max_queue_size, workers, use_multiprocessing, shuffle, initial_epoch)
215 outs = model.train_on_batch(x, y,
216 sample_weight=sample_weight,
–> 217 class_weight=class_weight)
218
219 outs = to_list(outs)
/usr/local/lib/python3.6/dist-packages/keras/engine/training.py in train_on_batch(self, x, y, sample_weight, class_weight)
1209 x, y,
1210 sample_weight=sample_weight,
-> 1211 class_weight=class_weight)
1212 if self._uses_dynamic_learning_phase():
1213 ins = x + y + sample_weights + [1.]
/usr/local/lib/python3.6/dist-packages/keras/engine/training.py in _standardize_user_data(self, x, y, sample_weight, class_weight, check_array_lengths, batch_size)
749 feed_input_shapes,
750 check_batch_axis=False, # Don’t enforce the batch size.
–> 751 exception_prefix=’input’)
752
753 if y is not None:
/usr/local/lib/python3.6/dist-packages/keras/engine/training_utils.py in standardize_input_data(data, names, shapes, check_batch_axis, exception_prefix)
136 ‘: expected ‘ + names[i] + ‘ to have shape ‘ +
137 str(shape) + ‘ but got array with shape ‘ +
–> 138 str(data_shape))
139 return data
140
ValueError: Error when checking input: expected input_7 to have shape (4096,) but got array with shape (1536,)
I dob’t believe callbacks make sense or can be used the same way when running epochs manually as we do in the progressive loading section.
Yeah, But I need a tensorboard callback for this, So how should I proceed with it?
No, sorry.
Thanks all.
Finally i can run this in my laptop within 48 hours running in my laptop to train 6 epoches only.
i have some issues with library function and parameter name or rename problem with direction setup.
Well done!
Hi Jason thanks for the excellent write up.
My workstation has 4 Titan XP GPUs and 128 GB RAM (Ubuntu 14.04) and stalls when training, right after showing “Epoch 1/20”.
If I run the version with progressive loading, it does proceed with training, but is too slow to be practical.
Please let me know if you have any suggestions!
Wow, that is an impressive machine!
I recommend running from the command line, not from a notebook or IDE, more advice here:
https://machinelearningmastery.com/faq/single-faq/why-does-the-code-in-the-tutorial-not-work-for-me
Hy Jason!
Thanks for great article.
I am traying to change learning rate to 1e-5 so I change the code like this:
# compile model
opt = SGD(lr=0.01, momentum=0.9)
model.compile(loss=’categorical_crossentropy’, optimizer=’opt’)
# summarize model
model.summary()
return model
but I received this error
ValueError: Unknown optimizer: opt
so how can I change it .
———————–
another thing:
I tried to extract the features by using resnet50 so I only change a little in the code like this :
from keras.applications.resnet50 import ResNet50
from keras.applications.resnet50 import preprocess_input, decode_predictions
and
# load the model
model = ResNet50()
but it is not working , can you help me to change it
Yes, don’t quite it like ‘opt’, just specify the variable name: opt
Why is resnet not working?
Hy Jason!
Thanks it is working.
but when I am trying to train the model with resnet50 I received this error:
ValueError: Error when checking input: expected input_1 to have shape (4096,) but got array with shape (2048,)
is every model has different shape and what shape I should write for resnet50 and inceptionv3
another thing:
to extract the features by using inceptionv3 should i only change a little in the code like this :
from keras.applications.inception_v3 import InceptionV3
and
# load the model
model = InceptionV3()
and thank you so much for your help
You can change the same of your input to match the model or change the model to match the shape of your data.
For example, you can specify the input shape for the pre-trained model and use average pooling on the output layer.
jason i am facing the same error while trying inceptionv3
ValueError: Error when checking input: expected input_1 to have shape (4096,) but got array with shape (2048,)
please let me know how to specify the input shape for my inceptionv3?
please write code if possible.
Perhaps start with vgg. Once you have it working, you can try adapting it to use another model.
Hy jason!
Really thank you I changed only the shape and it is working but I found that vgg16 is better than inceptionv3 , is it true?
It can, it depends on the specifics of the application.
Saddam can you please share your code or github link for inceptionv3 and resnet50? link: edwardsharma1311@gmail.com
Thank you so much my dear teacher
You’re welcome.
Hi Jason , thank you For this article. I want to ask you what is the best learning rate and regularization to this code Because I tried to use different learning rate but the results was not ok
I don’t know the best hyperparameters for the model, perhaps you can experiment and discover what works well/best, more here:
https://machinelearningmastery.com/understand-the-dynamics-of-learning-rate-on-deep-learning-neural-networks/
Hi Jason. Extremely Thank You for this fascinating article. Now I’ve chosen this for my Masters Project. Sir can you give me the Data Flow Diagram for the same upto 2 levels. Actually i’ve done but still want to clarify. So can you please try it.
Sorry, I cannot prepare a data flow diagram for you. You have everything you need to create one yourself.
heyy Can u plz send your data flow diagram. I too just want to clarify
Hi Jason , when I am traying to decrease the size of Dense from 256 to 128 I found this error
ValueError: Operands could not be broadcast together with shapes (128,) (256,).
what is the reason for this error
I’m not sure off the cuff, you can debug the error to discover it’s cause, here are some suggestions:
https://machinelearningmastery.com/faq/single-faq/can-you-read-review-or-debug-my-code
another question :
I run your code and in epoch 3 I received this result
BLEU-1: 0.566754
BLEU-2: 0.310778
BLEU-3: 0.210816
BLEU-4: 0.095132
why I didn’t received like your result specially blue-4 .
This is due to the stochastic nature of the learning algorithm, more here:
https://machinelearningmastery.com/faq/single-faq/why-do-i-get-different-results-each-time-i-run-the-code
i read (https://machinelearningmastery.com/faq/single-faq/why-do-i-get-different-results-each-time-i-run-the-code) and i understand that :
this problem because i am using pc , but using the GPU to train your models, the backend may be configured to use a sophisticated stack of GPU libraries so if i train my model using gpu maybe i will not face like this problem
and thank you for helping
BLEU-1: 0.566754
BLEU-2: 0.310778
BLEU-3: 0.210816
BLEU-4: 0.095132
i am focusing about BLEU-4 why its 0.095132 at least it should be 0.9 no 0.09
and your result for BLEU-4: 0.131446 and my result BLEU-4: 0.095132
The main reason is the stochastic learning algorithm of neural networks.
another question :
to add one lstm more I only add
se3 = LSTM(256, return_sequences=True)(se2)
before
se4 = LSTM(256)(se3)
is this true or no? and thank you for your help
It looks correct.
Hey, amazing work
When i train my network iam getting this error:-
if len(set(self.inputs)) != len(self.inputs):
TypeError: unhashable type: ‘numpy.ndarray’
What is the problem?
That is very odd, I have not seen that before, sorry.
Hey Jason,
Can I train the following model on Flickr30K with 16GB of RAM?
Thanks
Yes, but you may have to use progressive loading.
hii Jason, I’m using progressive loading. And the last sequence of code is as follows…..
Total params: 5,527,963
Trainable params: 5,527,963
Non-trainable params: 0
__________________________________________________________________________________________________
WARNING:tensorflow:From /usr/local/lib/python2.7/dist-packages/tensorflow/python/ops/math_ops.py:3066: to_int32 (from tensorflow.python.ops.math_ops) is deprecated and will be removed in a future version.
Instructions for updating:
Use tf.cast instead.
Epoch 1/1
2019-04-05 16:17:05.604626: I tensorflow/core/platform/cpu_feature_guard.cc:141] Your CPU supports instructions that this TensorFlow binary was not compiled to use: AVX2 FMA
2019-04-05 16:17:05.824794: I tensorflow/core/platform/profile_utils/cpu_utils.cc:94] CPU Frequency: 1796570000 Hz
2019-04-05 16:17:05.834826: I tensorflow/compiler/xla/service/service.cc:150] XLA service 0x6e06d60 executing computations on platform Host. Devices:
2019-04-05 16:17:05.834922: I tensorflow/compiler/xla/service/service.cc:158] StreamExecutor device (0): ,
6000/6000 [==============================] – 5512s 919ms/step – loss: 4.7276
Epoch 1/1
6000/6000 [==============================] – 5896s 983ms/step – loss: 3.9618
Epoch 1/1
6000/6000 [==============================] – 5610s 935ms/step – loss: 3.7152
Epoch 1/1
2800/6000 [============>. . . . . . . . . . . . . . . . . ] – ETA- 52:12 loss:3.58
And it is still loading. So my question is when do i want to close the terminal as it is taking hours to load?
It is not loading, the code is running and the model is being fit.
You can probably kill it after 5-10 epochs.
Thank you…! Now I’m facing another issue. While running the evaluation code, I got some error.
Using TensorFlow backend.
Traceback (most recent call last):
File “./evaluate.py”, line 7, in
from nltk.translate.bleu_score import corpus_bleu
ImportError: No module named nltk.translate.bleu_score
Yes, Ive fixed it myself. And the BLEU Scores i got is:
BLEU-1: 0.555265
BLEU-2: 0.311960
BLEU-3: 0.217599
BLEU-4: 0.103576
Well done.
It looks like you might need to install the nltk library.
Yes. Thank You Jason. But now when I try to get caption for another image, the first caption is displaying. I’ve tried several images but the caption is not changing. Why is it so?
Perhaps your model is overfit?
You could try fitting the model again, or using a model from an earlier step in the training process?
Yeah.. Now it is working. But the caption has no accuracy. Jason, what about trying MS-COCO dataset instead of flickr? As the number of images n their captions are very high, Is there any chance for getting accurate results?
I suspect your model is overfit.
You can explore another dataset, let me know how you go.
Ever since started studying books authored by you, my zeal for machine learning grew up fast
Thanks, I’m happy to hear that!
Hi Jason,
I am using InceptionV3 model here…everything is going great but when i am testing train model with an image i got an error…………………….
File “\Anaconda3\lib\site-packages\keras\engine\training_utils.py”, line 138, in standardize_input_data
str(data_shape))
ValueError: Error when checking input: expected input_12 to have shape (2048,) but got array with shape (1000,)
Looks like a mismatch between data and model. You may have to debug it:
https://machinelearningmastery.com/faq/single-faq/can-you-read-review-or-debug-my-code
Hi Jason.
This is such a great blog! So glad to see you still actively responding.
I’m a noob to machine learning, so forgive my simplistic understanding. I have a question about how to alter the “style” of the captions (style transfer). For example, how would I go about changing the existing captions to match the linguistic style of a child, or of different people (ie, Donald Trump, Snoop Dog, etc.), using text files with speech samples of various people?
Based on your article here, you stated that I could use Pre-trained Word Vectors, or use my own vocabulary file and mapping to integers function during training..?? Can you explain that a little more and perhaps point me in the right direction for applying these methods?
Any recommendation would be appreciated. Thanks in advance.
Good question, you might need to first translate the text examples in the training dataset, then use that as the training dataset for fitting the caption model.
Hi Jason,
i solved my previous problem but now i got stuck with the result
startseq man man man man man man man man man man man man man man man man man man man man man man man man man man man man man man man man man man
every time i generate the caption .
Perhaps your model is overfit or underfit?
Perhaps try fitting it again?
Hi Alka
I also have same problem. Could you resolve it?
Hi.. Jason. Now I’m going to change the dataset by Flickr30K dataset. Inorder to check any change in accuracy. So I’ve a doubt, here flickr 8K provides 6K train images. So is there any chance of increasing accuracy as increasing the number of train images?
I think it is likely, yes.
Hi Jason,
Thank you so much for your great work, which is really helpful to understand image captioning work from scratch.I have prepared own dataset containing Nepalese socio-cultural images (total 400 images with 3 captions per image).
1. It works fine on training set but generates jumbled sentences on test set.Why this happen and how to generate relevent and grammatically correct captions?
2. What is the role of accuracy? I think accuracy refers to the VGG16’s accuracy, so is it relevent to calculate here?
3. After 40 epoch, there is no significant decreases on loss. So is there any way to reduce loss?
4. I have changed droupout from 0.5 to other values but no significant changes in result happen.So, is it necessary to put droupout on small dataset also?
Best regards
Shayak
shayakraj@ioe.edu.np
Perhaps the model requires further training or tuning, these tutorials may help:
https://machinelearningmastery.com/start-here/#better
Accuracy is useless, use BLEU or similar scores.
Monitor validation loss compared to train loss for the right time to stop training, see this:
https://machinelearningmastery.com/learning-curves-for-diagnosing-machine-learning-model-performance/
Dropout helps stop overfitting, monitor learning curves to see if you are overfitting.
Hii Jason, I’m using 3000 development images and 25381 train images as I’m using flickr30K dataset. So how many epochs we need?
It is an intractable question.
Train until the model achieves a good fit.
While extracting the features of images, i got an error.
terminate called after throwing an instance of ‘std::bad_alloc’
what(): std::bad_alloc
Aborted (core dumped)
i’ve waited one whole day for the execution, but it end up like this. What will be the reason?
Sorry to hear that.
It sounds like a hardware fault.
Perhaps try searching/posting about it on stackoverflow?
Such a great post! I learned a lot from it.
When you train your model with progressive loading, what is the reason that you used a for loop and train your model with one epoch?
for i in range(epochs):
# create the data generator
generator = data_generator(train_descriptions, train_features, tokenizer, max_length)
# fit for one epoch
model.fit_generator(generator, epochs=1, steps_per_epoch=steps, verbose=1)
# save model
model.save(‘model_’ + str(i) + ‘.h5’)
Many thanks.
In this tutorial, because I want to save my model manually each epoch.
Hi Jason,
This is an excellent tutorial and really thankful for it. May I check with you, why did you use 256 for your dense_1 and lstm_1 layers? Are there any considerations how one might choose this number?
Trial and error. There is no reliable way to select the number of nodes other than experimentation:
https://machinelearningmastery.com/faq/single-faq/how-many-layers-and-nodes-do-i-need-in-my-neural-network
Hi Jason
can you plz tell me what basically this error is ?
mportError Traceback (most recent call last)
ImportError: numpy.core.multiarray failed to import
The above exception was the direct cause of the following exception:
SystemError Traceback (most recent call last)
~\Anaconda3\lib\importlib\_bootstrap.py in _find_and_load(name, import_)
SystemError: returned a result with an error set
—————————————————————————
ImportError Traceback (most recent call last)
ImportError: numpy.core._multiarray_umath failed to import
—————————————————————————
ImportError Traceback (most recent call last)
ImportError: numpy.core.umath failed to import
Sorry, I have not seen this error before.
It looks like numpy might not be installed correctly.
Perhaps try this tutorial:
https://machinelearningmastery.com/setup-python-environment-machine-learning-deep-learning-anaconda/
hi jason
how can i use beam search with this code
This might help:
https://machinelearningmastery.com/beam-search-decoder-natural-language-processing/
thank you teacher jason :
i read this https://machinelearningmastery.com/beam-search-decoder-natural-language-processing/
and the data is :
# define a sequence of 10 words over a vocab of 5 words
data = [[0.1, 0.2, 0.3, 0.4, 0.5],
[0.5, 0.4, 0.3, 0.2, 0.1],
[0.1, 0.2, 0.3, 0.4, 0.5],
[0.5, 0.4, 0.3, 0.2, 0.1],
[0.1, 0.2, 0.3, 0.4, 0.5],
[0.5, 0.4, 0.3, 0.2, 0.1],
[0.1, 0.2, 0.3, 0.4, 0.5],
[0.5, 0.4, 0.3, 0.2, 0.1],
[0.1, 0.2, 0.3, 0.4, 0.5],
[0.5, 0.4, 0.3, 0.2, 0.1]]
but i dont know where is the data that i can use it in our code in this page
Sorry, I cannot implement this for you.
Hello Jason. I have a problem with the file of features
features = {k: all_features[k] for k in dataset}
IndexError: only integers, slices (
:), ellipsis (...), numpy.newaxis (None) and integer or boolean arrays are valid indicesCould you help, please
Thank you
I’m sorry to hear that, I have some suggestions here:
https://machinelearningmastery.com/faq/single-faq/why-does-the-code-in-the-tutorial-not-work-for-me
While executing the code for generating new caption I got an error.
File “./ur_caption.py”, line 73, in
description = generate_desc(model, tokenizer, photo, max_length)
File “./ur_caption.py”, line 49, in generate_desc
yhat = model.predict([photo,sequence], verbose=0)
File “/usr/local/lib/python2.7/dist-packages/keras/engine/training.py”, line 1149, in predict
x, _, _ = self._standardize_user_data(x)
File “/usr/local/lib/python2.7/dist-packages/keras/engine/training.py”, line 751, in _standardize_user_data
exception_prefix=’input’)
File “/usr/local/lib/python2.7/dist-packages/keras/engine/training_utils.py”, line 138, in standardize_input_data
str(data_shape))
ValueError: Error when checking input: expected input_2 to have shape (74,) but got array with shape (34,)
How to resolve this?
Sorry to hear that, I have some suggestions here:
https://machinelearningmastery.com/faq/single-faq/why-does-the-code-in-the-tutorial-not-work-for-me
Hi Anjali,
I am also trying to implement photo caption generation as my project. I have already implemented it on Flickr8k and now I am planning to implement it on Flickr30k. For any queries you can contact me on saurabh18@somaiya.edu
Cheers!
hi Jason :
for vgg16 we put model = Model(inputs=model.inputs, outputs=model.layers[-1].output)
for inception v2 is the same of I should change outputs=model.layers[-2]
It might be different considering the architecture of the model. Perhaps use the API to create average pooling layer on the output and add output layers to it?
hi Jason :
I want to ask you about why I got like this result:
with model-ep001-loss4.514-val_loss4.070.h5 : I got this result
BLEU-1: 0.568186
BLEU-2: 0.308237
BLEU-3: 0.208821
BLEU-4: 0.094350
but with model-ep002-loss3.878-val_loss3.897.h5 : I got this result
BLEU-1: 0.431618
BLEU-2: 0.224081
BLEU-3: 0.148920
BLEU-4: 0.059321
Good question, I answer it here:
https://machinelearningmastery.com/faq/single-faq/why-do-i-get-different-results-each-time-i-run-the-code
thank you so much
You’re welcome.
hi jaso :
for example with progressive how can i change batch size equal to 16 or any number
and thank you for your help
Hi Jason
while progressive loading i am having this error
Dataset: 6000
Descriptions: train=6000
Photos: train=6000
Vocabulary Size: 3857
Description Length: 30
__________________________________________________________________________________________________
Layer (type) Output Shape Param # Connected to
==================================================================================================
input_7 (InputLayer) (None, 30) 0
__________________________________________________________________________________________________
input_6 (InputLayer) (None, 4096) 0
__________________________________________________________________________________________________
embedding_3 (Embedding) (None, 30, 256) 987392 input_7[0][0]
__________________________________________________________________________________________________
dropout_5 (Dropout) (None, 4096) 0 input_6[0][0]
__________________________________________________________________________________________________
dropout_6 (Dropout) (None, 30, 256) 0 embedding_3[0][0]
__________________________________________________________________________________________________
dense_7 (Dense) (None, 256) 1048832 dropout_5[0][0]
__________________________________________________________________________________________________
lstm_3 (LSTM) (None, 256) 525312 dropout_6[0][0]
__________________________________________________________________________________________________
add_3 (Add) (None, 256) 0 dense_7[0][0]
lstm_3[0][0]
__________________________________________________________________________________________________
dense_8 (Dense) (None, 256) 65792 add_3[0][0]
__________________________________________________________________________________________________
dense_9 (Dense) (None, 3857) 991249 dense_8[0][0]
==================================================================================================
Total params: 3,618,577
Trainable params: 3,618,577
Non-trainable params: 0
__________________________________________________________________________________________________
WARNING:tensorflow:From C:\Users\Dell\Anaconda3\lib\site-packages\tensorflow\python\ops\math_ops.py:3066: to_int32 (from tensorflow.python.ops.math_ops) is deprecated and will be removed in a future version.
Instructions for updating:
Use tf.cast instead.
Epoch 1/1
—————————————————————————
ValueError Traceback (most recent call last)
in
168 generator = data_generator(train_descriptions, train_features, tokenizer, max_length)
169 # fit for one epoch
–> 170 model.fit_generator(generator, epochs=1, steps_per_epoch=steps, verbose=1)
171 # save model
172 model.save(‘model_’ + str(i) + ‘.h5’)
~\Anaconda3\lib\site-packages\keras\legacy\interfaces.py in wrapper(*args, **kwargs)
89 warnings.warn(‘Update your
' + object_name + 'call to the ‘ +90 ‘Keras 2 API: ‘ + signature, stacklevel=2)
—> 91 return func(*args, **kwargs)
92 wrapper._original_function = func
93 return wrapper
~\Anaconda3\lib\site-packages\keras\engine\training.py in fit_generator(self, generator, steps_per_epoch, epochs, verbose, callbacks, validation_data, validation_steps, class_weight, max_queue_size, workers, use_multiprocessing, shuffle, initial_epoch)
1416 use_multiprocessing=use_multiprocessing,
1417 shuffle=shuffle,
-> 1418 initial_epoch=initial_epoch)
1419
1420 @interfaces.legacy_generator_methods_support
~\Anaconda3\lib\site-packages\keras\engine\training_generator.py in fit_generator(model, generator, steps_per_epoch, epochs, verbose, callbacks, validation_data, validation_steps, class_weight, max_queue_size, workers, use_multiprocessing, shuffle, initial_epoch)
215 outs = model.train_on_batch(x, y,
216 sample_weight=sample_weight,
–> 217 class_weight=class_weight)
218
219 outs = to_list(outs)
~\Anaconda3\lib\site-packages\keras\engine\training.py in train_on_batch(self, x, y, sample_weight, class_weight)
1209 x, y,
1210 sample_weight=sample_weight,
-> 1211 class_weight=class_weight)
1212 if self._uses_dynamic_learning_phase():
1213 ins = x + y + sample_weights + [1.]
~\Anaconda3\lib\site-packages\keras\engine\training.py in _standardize_user_data(self, x, y, sample_weight, class_weight, check_array_lengths, batch_size)
749 feed_input_shapes,
750 check_batch_axis=False, # Don’t enforce the batch size.
–> 751 exception_prefix=’input’)
752
753 if y is not None:
~\Anaconda3\lib\site-packages\keras\engine\training_utils.py in standardize_input_data(data, names, shapes, check_batch_axis, exception_prefix)
126 ‘: expected ‘ + names[i] + ‘ to have ‘ +
127 str(len(shape)) + ‘ dimensions, but got array ‘
–> 128 ‘with shape ‘ + str(data_shape))
129 if not check_batch_axis:
130 data_shape = data_shape[1:]
ValueError: Error when checking input: expected input_6 to have 2 dimensions, but got array with shape (15, 7, 7, 512)
This is a common question that I answer here:
https://machinelearningmastery.com/faq/single-faq/why-does-the-code-in-the-tutorial-not-work-for-me
but how can i solve it? any hint ?
hi jason :
I am a little confused, after training I received 20 models(for 20 epochs ) should I evaluate all of them and take the heighest accuracy and if like this it need along time.
and thank you for your help
Evaluate all and choose one with lowest loss.
hi jason :
thank you for your answering
means i should choose the heighst blue score because we are using BLUE
Yes, a larger BLEU score is better.
A model having high blue score blue is 0.57.also loss 4.6699.
and another model having blue score 0.43 and loss 3.088
What would we choose???
This will help you understand the score:
https://machinelearningmastery.com/calculate-bleu-score-for-text-python/
Hi Jason,
Thank you very much for your amazing article
I have a problem:
tokenizer = load(open(‘tokenizer.pkl’, ‘rb’))
FileNotFoundError: [Errno 2] No such file or directory: ‘tokenizer.pkl’
I don’t know how the file is organized.
Could you help me, please!
I think you might have missed some lines of code.
Can we use batch_size with progressive loading?
like instead of steps_per_epoch = len(train_descriptions)
can we give it as len(train_descriptions)/batch_size=32
How do we ensure generator is yielding o/p in batches?
currently if my understanding is correct, in our case the generator is yielding single output so we had steps_per_epoch = len(train_descriptions). am i right?
Yes, you have complete control over the data generator.
You can load and yield any number of sample you wish.
So in this case, where our data generator is yielding single sample everytime, we can’t use
steps_per_epoch = len(train_descriptions)/batch_size=32 ? am I right?
The steps per epoch should be the total samples divided by the batch size, perhaps as you have listed.
Taking this as reference I built data generator for Neural machine translation to load larger data and one-hot encode the targets and train the model without facing Memory Error, just an extension to your tutorial at https://machinelearningmastery.com/develop-neural-machine-translation-system-keras/.
There the Data Generator I built is yielding one output i.e. single trainX, trainY for every yield
So while fit_generator, I just gave a try giving “steps_per_epoch = total_samples/32 (batch_size)”, then I tried to evaluate model saved after 1 epoch and results seems to be surprising almost same and not making any sense for any input we give, may be beacuse not all the records are passed through the model, becasue the generator I coded is yielding one record at a time and steps I am asking is lesser i.e. diving by batch size.
So changed it back to steps_per_epoch = total samples, then the model I saved after 1 epoch is giving some sensible outputs may not be very accurate as its just 1 epoch but taking some good amount of time to train.
Well done!
Sir, I’m getting memory error while running updated code too..What can I do sir ? My jupyter notebook is also not responding when running that code..please give me a solution sir…
Run from the command line, not a notebook.
Use progressive loading.
hello Jason!
I use the progressive loading and I fund
BLEU-1: 0.536255
BLEU-2: 0.289525
BLEU-3: 0.201866
BLEU-4: 0.096334
can you explain me what I can do for ameliorate this.
secondly when I wnnt generate a new caption whith a new photograph for example a Photo of a dog at the beach, I fund this description “startseq two black dogs are playing in the water endseq”, you see it’s not a good description.
Thanks!
I give general suggestions for improving deep learning performance here:
https://machinelearningmastery.com/start-here/#better
It is a good description if you consider the reflection of the dog. Perhaps try another photo?
Hello Jason,
I am doing this experiment with Flickr30k dataset. When training the same decoder architecture and evaluating on test data, the model performance is decreasing when compared to Flickr8k. The BLEU scores for F30k are worse than F8k. What should be done to solve this problem?
Maybe,
1) Limit the vocabulary? (F8k had around 8000 words and F30k has 18000 words)
2) Add another LSTM layer? (but doubles the training time)
3) Increase/Decrease word vector dimension?
4) Change no. of units in LSTM?
5) Add more Dense layers?
What should be done to achieve similar performance of F8k on F30k?
Perhaps try each approach and evaluate the effect on model skill.
Also, I have a doubt. In create_sequences function, we are not passing the vocab_size, but it is used in the to_categorical method. How is it one-hot encoding it if vocab_size variable is not passed in the function?
Looks like a bug, create_sequences uses the vocab size.
I will schedule time to update the code.
Thanks!
Update: Fixed.
Hi Saurabh,
We might not need to pass the vocab_size as argument for the create_sequences function because the vocab_size is a global variable so it can be used inside the create_sequences function. Is that right, Jason Brownlee?
Yes, but that was not the intent. I like to pass things around.
Yes, I thought of that too, because of vocab_size being a global variable. Anyways, thanks!
i try to download the dataset but it failed two times when download about 873 Mb
I’m sorry to hear that.
Perhaps try downloading from a different computer, at a different time of day, or via a different internet connection?
Hi Jason,
Thank you for your great tutorial. I’ve been trying to understand your code line by line. However, I can’t figure out this line
vocab_size = len(tokenizer.word_index) + 1
I thought the vocab_size should be the same as the tokenizer.word_index. Why did you add an extra 1?
Good question.
We add 1 for the integer “0” used for “unknown”, e.g. words not in our vocab.
Therefore, integers assigned to words in our vocab start at 1, not 0.
FInally i successfully download the dataset file. looks like the sample of your code looks wrong,
# extract features from all images
directory = ‘Flicker8k_Dataset’
should be ‘Flickr8k not Flicker8k
# extract features from all images
directory = ‘Flickr8k_Dataset’
Thanks, fixed!
Just let you know,
I tried the example.jpg and got “two dogs are running in the snow” 🙂
i try two more images, one picture is a bird and the other is the “55470226_52ff517151”, but the return description is always “man in red shirt is standing on the street”
Perhaps try a different fit of the model?
Do you mean try different pictures?
if so, I had tried about ten different pictures, man, dog or child, the model return
9 time “man in red shirt is standing on the street” and 1 time ” two dogs are running in the grass’.
I’m suggesting perhaps try refitting the model/try different checkpoints of saved model weights.
Your chosen model may have overfit.
Ha, nice!
The image has a rejection that might make it a complex example.
Hi Jason, thanks for this awesome tutorial. I’d like to share my work which is highly inspired by this tutorial.
Github repo: https://github.com/dabasajay/Image-Caption-Generator
I’ve tried InceptionV3 and VGG16 as Encoder and two types of RNN as Decoder making a combination of 4 image captioning models and compared results. I also implemented BEAM search algorithm and compared results with simple argmax.
Please have a look, thank you.
Ajay Dabas
Github: https://github.com/dabasajay
Nice work.
hello jaso :
I want to ask you why for image caption we are using different matrix (bleu1, bleu2, bleu3 , bleu4) why 4 blue scores not one and what are the different betwwen them .
Good question, I explain more here:
https://machinelearningmastery.com/calculate-bleu-score-for-text-python/
Hi Jason
I am trying to replace the RNN model used for the language model by a CNN language model.
I have understood the conepts but i am not able to figure out how to code it.
If you don’t mind , please help me with the above
Perhaps this will help as a starting point:
https://machinelearningmastery.com/how-to-develop-convolutional-neural-network-models-for-time-series-forecasting/
hi jason :
i used vgg16 ,resnet50 and inception v3 in my model and the results like this :
vgg16 :
Bleu_1: 0.661
Bleu_2: 0.486
Bleu_3: 0.350
Bleu_4: 0.252
resnet50 :
Bleu_1: 0.682
Bleu_2: 0.511
Bleu_3: 0.375
Bleu_4: 0.274
inception v3 :
Bleu_1: 0.646
Bleu_2: 0.470
Bleu_3: 0.339
Bleu_4: 0.248
when i test images using those three models i found that :
resnet50 generate a good sentence better than vgg16 ,
but the problem that inception v3 generate a good sentence better than vgg16 and resnet50
, so why bleu score for inception v3 is lowest than vgg16 and resnet50 , really i am so confused
Nice work!
Perhaps the BLEU score is not capturing what you noticed in the generated sentence structure? It is a very simple score.
Please saddam share your code with me .I also want to try the inception model.thanks in advance.
abbaskhan857@yahoo.com
Dear Saddam,
How do you create the model to get that results.
I don’t get as that results.
Can you please tell me how do you create the network to achieve those scores you obtained?
If you are okay, may I know.
My email address is phyukhaing7@gmail.com
Best Regards,
I ran the code as described in the tutorial.
Are you able to confirm your libraries are up to date?
Yes, my library is up to date.
I don’t get Saddam’s result.
I would like to get the best result.
How should change the model?
Hi saddam, Jason:
For VGG16, I got poor result (specical BLUE-4). Not high as your result
BLEU-1: 0.487551
BLEU-2: 0.259738
BLEU-3: 0.179878
BLEU-4: 0.085398
Is there any modification compared to this article?
Perhaps try fitting the model a few times and compare results?
I want to compare the results of those three models and write a discussion about it so I trained those three models until 32 epochs and I received those results , so for example depends on bleu score can I say that resnet50 gave me the best results
It is a good idea to average the results of a neural network over multiple runs, if possible.
Thank you so much
Hi Saddam,
Can you please tell me what parameters did you use in your network to achieve those scores you obtained?
You can email me at this address: saurabh18@somaiya.edu
All of the parameters are listed in the code directly.
What parameters are you having problems with exactly?
Hi Jason,
I just want to know if I change the dataset from 8K to 30K, then should I change the sequence model architecture as well?, because I tried training with same architecture on 30k and it was overfitting and the for every new image it is given same caption.
Also, in the Show and Tell paper by A. Karpathy, LSTM units used is 512 and as mentioned in this paper (https://arxiv.org/pdf/1805.09137.pdf) embedding size and vocab_size used is 512 as well.
512 vocab_size seems less or maybe having less vocabulary gives better results sometimes?
I am confused.
The embedding size is not the vocab size, more details on embeddings here:
https://machinelearningmastery.com/what-are-word-embeddings/
More data may help if you don’t want to tune the model.
Hi Jason,
Sorry for the late reply. I tried Ajay’s code and added support for xception,mobilenet and resent50 models.
Now it is giving proper captions.
Also, I wanted to know if we can give a different max_length value other than what we found in the dataset?
For example, in Flickr8k, max_length of a caption is 34. What if I want to set it to some lower number. How can I do it?
As mentioned in this (https://arxiv.org/pdf/1805.09137.pdf):
“Following are a few key hyperparameters that we retained across various models. These could be helpful for attempting to reproduce our results.”
RNN Size: 512
Batch size: 16
Learning Rate: 4e-4
Learning Rate Decay: 50% every 50000 iterations
RNN Sequence max_length: 16
Dropout in RNN: 50%
Gradient clip: 0.1%
Yes, you can change the length, I would encourage you to explore changing many aspects of the model configuration.
For example, in Flickr8k, max_length found is 34. But if we set it to 16, wouldn’t it throw an error saying “expected input_shape is (32, ) but got (16, )” or something like that.
How to solve this problem?
In Decoder Model,
Input_layer_1 = Input_Shape((max_length, ))
You must change the expectation of the model.
So, if i change max_len to 16, what should be done in order to handle the captions whose length is greater than 16?
Should i clip each caption to length 16? But, won’t it result in loss of information?
You can truncate them:
https://machinelearningmastery.com/data-preparation-variable-length-input-sequences-sequence-prediction/
Thanks Jason!
I’ll try using this and test whether the results are improving or not.
i am getting same caption for different test images.
The model may have overfit, perhaps try fitting it again or choosing a different set of weights/final model?
Thanks you Sir for this great tutorial. I implemented the Image captioning in Google Colab. Can you please upload a tutorial for attention mechanism used in Image captioning with code.
Thanks for the suggestion, perhaps in the future.
Dear Jason,
It’s a very good tutorial. Loved it, And made it working. I have two qustions.
1. How can we make the network Predict the exact captions which we used for training?
Example:
Original: a dog is playing with the ball
predicted should be: a dog is playing with the ball
(not some random/ something close to the original)
2. How to stop the longer prediction?
Example: (Currently this is what happening)
Original: a dog is playing with the ball
Predicted: a dog is playing with the ball ball ball ball ball ball ball ball ball ball ball ball
A clear explanation would be helpful.
Thanks a lot
We cannot predict the exact captions used in training.
Your error suggests that model may need to be re-fit.
Can you give any suggestions on how to do it? (Predicting exact captions)
I tried several times retraining the model but I had no luck, Do you think longer training would help?
All models have error, none will predict a training dataset perfectly.
Perhaps this will help:
https://machinelearningmastery.com/faq/single-faq/why-cant-i-get-100-accuracy-or-zero-error-with-my-model
Since LSTM cells produce sequential information, and the sequence in the above model is “words in the caption”.
You have used LSTM layer before the features from CNN are used to generate the caption.
We know that it is the decoder network which is generating the words of the caption but I’m unable to understand the role of LSTM.
Which of these: LSTM or the decoder ?
is generating the sequence.
If decoder is generating the sequence then what is the role of the LSTM layer?
Good question.
This might help to better understand the architecture:
https://machinelearningmastery.com/caption-generation-inject-merge-architectures-encoder-decoder-model/
Hi Jason !
I read about your merge model that you described in some other post and you used it here.
But, it is not-understandable that you used LSTM (not making use of the image features) and the CNN separately.
I mean, your lstm layer is just using word sequences( vectors) to generate the next word without using the image features.
Image features are only added when you combine the LSTM and CNN vectors. Before combining, LSTM is not aware of the image because it is not using the image features. How is the LSTM generating the right captions when you are not even using the image features during LSTM network?
“why” questions might not be tractable at this time. We don’t have good theories on why many of these models work so well. But they do – so we use them.
Same with drugs issued by doctors. No idea why they work, but they do – so we use them.
Here is what I’ve understood from your model:
1. The network is assuming that the caption for every image will use at max 34 words because the longest caption is of 34 words.
2. The embedding layer is taking a word index and outputting a 256 long vector.
3. After the dropout, the LSTM layer is used “consisting of 34 LSTM cells”.
4. Each LSTM cell is producing a new word which is a 256 long vector.
Correct me on the above points if I’m wrong.
1. I’m not able to understand how the output dimension of LSTM is (None,256).
2. How is the LSTM using the image information because CNN output is not being fed to the LSTM layer?
3. What is the output of dense_3 layer.
4. From which layer are we extracting the word sequences?
Got the answer of the above 3rd question that the output of dense_3 is the next word.
1. But, does output of LSTM hold some significance or does it just compute some 256 long vector which will later be used(combined) with a CNN?
2. Kindly explain how the 34 LSTM cells are taking input. I reckon you are giving the input sequence of words to these 34 LSTMs(if the length of the input sequence is less than 34 then these are padded). Each word is a 256-dimensional vector.
Correct me if I’m wrong in the 2nd part.
Seems reasonable.
Perhaps study this post and the associated papers:
https://machinelearningmastery.com/caption-generation-inject-merge-architectures-encoder-decoder-model/
I’ve read about those architectures but still had some doubts and I’ve asked them on the post above.
Kindly answer them.
This is a wonderful tutorial. Thank you Jason Brownlee. Would love to see a tutorial on attention mechanism applied on an image caption generator (preferably this one).
Great suggestion, thanks.
I’ve encountered a problem regarding feature extraction. In both the training phase and test phase when using the VGG16 feature extractor model, it is necessary to download VGG16 weight model which is 500+ MB. So, I followed the link they used to download the weight model and downloaded it.
Then instead of using “VGG16()” I used:
load_model(“/folder/vgg16_weights_tf_dim_ordering_tf_kernels.h5”).
But then it shows the error:
“raise ValueError(‘Cannot create group in read only mode.’)
ValueError: Cannot create group in read only mode.”
But for the same image it works perfectly when I use “VGG16()” and they download it from the link below:
https://github.com/fchollet/deep-learning-models/releases/download/v0.1/vgg16_weights_tf_dim_ordering_tf_kernels.h5
Downloading the model each time is not actually practical. Is there any workaround?
I believe you can specify the path to the model via the API, meaning you can download it once and reuse it each time.
E.g. the “weights” argument when loading the model.
https://keras.io/applications/
Hi Jason,
I tried to apply the above code and generated caption with BLEU-1 score of 0.52. But when I observed the predicted captions, same sentence were repeating for multiple Images. For example, if a dog appears in the Image then the model generate a caption : “dog is running through the grass” for multiple image. How to make a model more accurate so that its should not repeat the same caption. ?
Thanks,
Ankit
Perhaps try fitting the model again and selecting a final model with lower loss on the holdout dataset?
Ok, I will try. Thank you for your quick response.
You’re welcome.
Hello Jason. I have a problem..I triyed many time but i can not fixed problem.plz tell me the solution….
Total params: 134,260,544
Trainable params: 134,260,544
Non-trainable params: 0
_________________________________________________________________
None
—————————————————————————
FileNotFoundError Traceback (most recent call last)
in
39 # extract features from all images
40 directory = ‘Flickr8k_Dataset’
—> 41 features = extract_features(directory)
42 print(‘Extracted Features: %d’ % len(features))
43 # save to file
in extract_features(directory)
18 # extract features from each photo
19 features = dict()
—> 20 for name in listdir(directory):
21 # load an image from file
22 filename = directory + ‘\\Users\Admin’ + name
FileNotFoundError: [WinError 3] The system cannot find the path specified: ‘Flickr8k_Dataset’
It suggests the data file is not in the same location as the script. Ensure the python code and data folder are in the same directory and run from the command line:
https://machinelearningmastery.com/faq/single-faq/how-do-i-run-a-script-from-the-command-line
What could be the real worle applications to this project?
Captaining photos is a real world application.
whats wrong plz guide.
filename = ‘model-ep002-loss3.245-val_loss3.612.h5’
model = load_model(filename)
# evaluate model
evaluate_model(model, test_descriptions, test_features, tokenizer, max_length)
OSError Traceback (most recent call last)
in
1 filename = ‘model-ep002-loss3.245-val_loss3.612.h5’
—-> 2 model = load_model(filename)
3 # evaluate model
4 evaluate_model(model, test_descriptions, test_features, tokenizer, max_length)
D:\anconda3\lib\site-packages\keras\engine\saving.py in load_model(filepath, custom_objects, compile)
415 model = None
416 opened_new_file = not isinstance(filepath, h5py.Group)
–> 417 f = h5dict(filepath, ‘r’)
418 try:
419 model = _deserialize_model(f, custom_objects, compile)
D:\anconda3\lib\site-packages\keras\utils\io_utils.py in __init__(self, path, mode)
184 self._is_file = False
185 elif isinstance(path, str):
–> 186 self.data = h5py.File(path, mode=mode)
187 self._is_file = True
188 elif isinstance(path, dict):
D:\anconda3\lib\site-packages\h5py\_hl\files.py in __init__(self, name, mode, driver, libver, userblock_size, swmr, rdcc_nslots, rdcc_nbytes, rdcc_w0, track_order, **kwds)
392 fid = make_fid(name, mode, userblock_size,
393 fapl, fcpl=make_fcpl(track_order=track_order),
–> 394 swmr=swmr)
395
396 if swmr_support:
D:\anconda3\lib\site-packages\h5py\_hl\files.py in make_fid(name, mode, userblock_size, fapl, fcpl, swmr)
168 if swmr and swmr_support:
169 flags |= h5f.ACC_SWMR_READ
–> 170 fid = h5f.open(name, flags, fapl=fapl)
171 elif mode == ‘r+’:
172 fid = h5f.open(name, h5f.ACC_RDWR, fapl=fapl)
h5py\_objects.pyx in h5py._objects.with_phil.wrapper()
h5py\_objects.pyx in h5py._objects.with_phil.wrapper()
h5py\h5f.pyx in h5py.h5f.open()
OSError: Unable to open file (unable to open file: name = ‘model-ep002-loss3.245-val_loss3.612.h5’, errno = 2, error message = ‘No such file or directory’, flags = 0, o_flags = 0)
I have some suggestions here:
https://machinelearningmastery.com/faq/single-faq/why-does-the-code-in-the-tutorial-not-work-for-me
filename = ‘model-ep002-loss4.6485-val_loss3.1147’
model = load_model(filename)
this code generate a error
OSError: Unable to open file (unable to open file: name = ‘model-ep002-loss4.6485-val_loss3.1147’, errno = 2, error message = ‘No such file or directory’, flags = 0, o_flags = 0)
whats wrong????
plz tell us..
Ensure the file exists in the same directory as your .py file.
thanks jason great tutorial.
You’re very welcome.
whats wrong
File “D:\anconda3\lib\site-packages\IPython\core\interactiveshell.py”, line 3326, in run_code
exec(code_obj, self.user_global_ns, self.user_ns)
File “”, line 3, in
from keras.preprocessing.text import Tokenizer
File “D:\anconda3\lib\site-packages\keras\__init__.py”, line 3, in
from . import utils
File “D:\anconda3\lib\site-packages\keras\utils\__init__.py”, line 5, in
from . import io_utils
File “D:\anconda3\lib\site-packages\keras\utils\io_utils.py”, line 13, in
import h5py
File “D:\anconda3\lib\site-packages\h5py\__init__.py”, line 49, in
from ._hl.files import (
File “D:\anconda3\lib\site-packages\h5py\_hl\files.py”, line 13
swmr_support = True
^
IndentationError: unexpected indent
Looks like you have not preserved the indenting when you copied the code.
Hi Jason,
I am getting error while executing tokenizer
Traceback (most recent call last):
File “tokenizer.py”, line 65, in
tokenizer = load(open(‘tokenizer.pkl’, ‘rb’))
_pickle.UnpicklingError: invalid load key, ‘f’.
Sorry to hear that, I have some suggestions here that might help:
https://machinelearningmastery.com/faq/single-faq/why-does-the-code-in-the-tutorial-not-work-for-me
Jason Brownlee great tutorial…
After 4 Epoch val did not chnage..
Epoch 00004: val_loss improved from 3.85954 to 3.84653, saving model to model-ep004-loss3.609-val_loss3.847.h5
Epoch 5/20
– 8447s – loss: 3.5627 – val_loss: 3.8547
Epoch 00005: val_loss did not improve from 3.84653
Epoch 6/20
– 8873s – loss: 3.5319 – val_loss: 3.8623
Epoch 00006: val_loss did not improve from 3.84653
Epoch 7/20
– 8550s – loss: 3.5109 – val_loss: 3.8818
Epoch 00007: val_loss did not improve from 3.84653
Epoch 8/20
– 11736s – loss: 3.5004 – val_loss: 3.8942
Epoch 00008: val_loss did not improve from 3.84653
Epoch 9/20
– 8654s – loss: 3.4960 – val_loss: 3.9139
Epoch 00009: val_loss did not improve from 3.84653
Epoch 10/20
jason after 4 epoch value did not change.if i can stop this program right now….because value did not change.10 epoch enough to train this model.
I believe so.
Perhaps choose the model with the lowest validation loss.
Dataset: 6000
Descriptions: train=6000
Vocabulary Size: 7579
Description Length: 34
Dataset: 1000
Descriptions: test=1000
Photos: test=1000
BLEU-1: 0.535757
BLEU-2: 0.282579
BLEU-3: 0.192619
BLEU-4: 0.089498
But when I observed the predicted captions, same sentence were repeating for multiple Images. For example, if a dog appears in the Image then the model generate a caption : “dog is running through the grass” for multiple image.
Perhaps try fitting the model again, or use a different checkpoint?
Thanks Janson Brownlee I will try..
Great tutorial.thanks for quick responce…
Thanks.
Hi Aman. has your problem solved? If yes, how so?
I am facing the same issue. The same caption is being generated for the pictures.
Regards.
Thanks for the great tutorial! I have a doubt regarding the LSTM layer. Do we have as many memory units as the number of dimensions in the embedding matrix, and the dimension of input size to each unit is the size of the vocabulary? And is the output of each of the 256 unit 1×1, such that all outputs taken together is a 256 dimensional vector? If so, why do we need an LSTM? Can we not simply use 256 FC layers with each layer taking one dimension of all caption words generated?
No, the number of nodes in a layer is unrelated to the number of inputs to the layer.
LSTM is needed to process the sequence of inputs (words generated so far).
So the embeddings for the prefix generated so far is fed all at once only to the first LSTM unit? Which means the input size for the first LSTM is |vocab-size| x |Dimensionality of embedding space|.
The LSTM receives one word at a time, yes a sequence of n words where each word is a m sized vector.
And the caption prefix is used as input only to the first LSTM cell?
Yes.
Thanks for the great tutorial!
You’re welcome.
Thanks for your great tutorial.
Now, I am learning about image captioning.
When I train the model, I got less accuracy for more epochs.
That is right?
If you have any attention example, let me know.
Best Regards
Yes, you may need to use early stopping.
Thanks a lot, Sir,
When I train the model, I got four-loss files. When I test with that loss files, I got the following results.
For model-ep001-loss4.544-val_loss4.103.h5 file, the results are:
BLEU-1: 0.523776
BLEU-2: 0.283197
BLEU-3: 0.197006
BLEU-4: 0.094024
For model-ep002-loss3.907-val_loss3.933.h5 file, the results are:
BLEU-1: 0.457893
BLEU-2: 0.246748
BLEU-3: 0.172982
BLEU-4: 0.080477
For model-ep003-loss3.721-val_loss3.874.h5 file, the results are:
BLEU-1: 0.550797
BLEU-2: 0.302675
BLEU-3: 0.206961
BLEU-4: 0.094808
For model-ep005-loss3.577-val_loss3.874.h5 file, the results are:
BLEU-1: 0.475467
BLEU-2: 0.245151
BLEU-3: 0.164806
BLEU-4: 0.072125
I don’t get your results.
My results are less.
What can be my faults?
I also have some doubts.
My previous understanding is that the less the loss, the better the performance.
But I don’t get like that.
Please explain to me.
Best Regards,
I got the same model as above ‘model-ep005-loss3.577-val_loss3.874.h5 file’
My results are less too.
Perhaps try fitting the model a few times?
Loss is a good guide, but in this case we are selecting a model based on BLEU on the hold out dataset.
thanks a lot
Dear Dr.Jason,
I have an error , I hope you can help me to fix it :
PermissionError : [Errno 13] Permission Denied: Flickr8k_Dataset/Flicker8k_Dataset’
Yes, I provide new links for the dataset in the tutorial. See the section titled “UPDATE (Feb/2019)”
I already used the alternate download link, both Flickr8k_Dataset and Flickr8k_text already downloaded but still showing the same error :
PermissionError : [Errno 13] Permission Denied: Flickr8k_Dataset/Flicker8k_Dataset’
and features.pkl file can not be created !
That is a strange error, I though it was your web browser.
What is reporting that error exactly? Python?
If Python could not find the file, it would say “not found”, not “permission denied”.
Dear Dr.Jason,
I have fixed my error, I hope you fix it the given code :
in the line no. 40 directory = ‘Flickr8k_Dataset’ should be modified to directory = ‘Flickr8k_Dataset/Flicker8k_Dataset’
Thanks, but that sounds specific to the way you have unzipped the dataset and placed it in your code directory.
yes of course, sometime busy minds do such a mistake !
Dear Jason,
once agian I faced this error:
====================================================================
Total params: 5,527,963
Trainable params: 5,527,963
Non-trainable params: 0
_________________________________________________________________________
None
Traceback (most recent call last):
File “test4.py”, line 181, in
model = define_model(vocab_size, max_length)
File “test4.py”, line 138, in define_model
plot_model(model, to_file=’model.png’, show_shapes=True)
File “C:\Users\Excellence\Anaconda3\lib\site-packages\keras\utils\vis_utils.py”, line 240, in plot_model
expand_nested, dpi)
File “C:\Users\Excellence\Anaconda3\lib\site-packages\keras\utils\vis_utils.py”, line 79, in model_to_dot
_check_pydot()
File “C:\Users\Excellence\Anaconda3\lib\site-packages\keras\utils\vis_utils.py”, line 22, in _check_pydot
‘Failed to import
pydot. ‘ImportError: Failed to import
pydot. Please installpydot. For example withpip install pydot.I can install pydot but where I have to put it?
You can comment out the call to “plot_model()”
Dear Jason,
for time saving, instead of ‘epochs = 20’ if i make it ‘epochs = 5’ what will be the problem?
No problem. Perhaps test it?
I don’t know why it is breaking in epoch 4 and it is not continuing :
Total params: 5,527,963
Trainable params: 5,527,963
Non-trainable params: 0
__________________________________________________________________________________________________
C:\Users\Excellence\Anaconda3\lib\site-packages\tensorflow_core\python\framework\indexed_slices.py:424: UserWarning: Converting sparse IndexedSlices to a dense Tensor of unknown shape. This may consume a large amount of memory.
“Converting sparse IndexedSlices to a dense Tensor of unknown shape. ”
Epoch 1/1
6000/6000 [==============================] – 1953s 325ms/step – loss: 4.6870
Epoch 1/1
6000/6000 [==============================] – 1902s 317ms/step – loss: 3.8931
Epoch 1/1
6000/6000 [==============================] – 2424s 404ms/step – loss: 3.6361
Epoch 1/1
4834/6000 [=======================>……] – ETA: 10:46 – loss: 3.4892
(base) C:\Users\Excellence>
Perhaps you are running out of memory?
Try running on EC2 with more RAM?
Try fitting on less data?
Hi Jason,
Yet another great explanation. I am about to start this project. I would love to see you implement attention mechanism for this.
In case if I have missed your blog on applying attention mechanism in Image Captioning, please share me at E-mail: ishritam.ml@gmail.com
Thank you:)
Thanks for the suggestion.
Hi Jason,
Thanks for another great tutorial.
I tried your code and get one error, which is:
ValueError: Error when checking input: expected input_10 to have shape (4096,) but got array with shape (1000,) #and sometimes I get input_1
So I changed inputs1 shape in define_model() to 1000 instead of 4096, then the code worked fine.
Here is the losses values I reached model-ep004-loss3.402-val_loss3.741
and here are my Blue scores:
BLEU-1: 0.528189
BLEU-2: 0.286299
BLEU-3: 0.198691
BLEU-4: 0.093021
which is obviously lower than yours.
The problem is now the captioning is very poor, here are some examples:
– “young girl in blue and blue and blue shirt is jumping into pool”, there is neither a girl nor a pool in the image. By the way, this image is from the dataset.
– “man in red shirt is jumping into the water”, this was an image for just a beach with no people.
– “dog is running through the grass”, this was the dog example photo.
Would you please advise on how to increase the accuracy of the generated captions? Thank you
P.S.: I tried refitting the model but got the same loss value for the same number of epochs.
Perhaps you are using a different version or you changed the code example?
I have some suggestions here:
https://machinelearningmastery.com/faq/single-faq/why-does-the-code-in-the-tutorial-not-work-for-me
Hi Jason,
Thanks for the blog. Its wonderful.
I was following it and got stuck at the
fit_generator()part.——————————————————————————————-
# train the model, run epochs manually and save after each epoch
epochs = 20
steps = len(train_descriptions)
for i in range(epochs):
# create the data generator
generator = data_generator(train_descriptions, train_features, tokenizer, max_length, vocab_size)
# fit for one epoch
model.fit_generator(generator, epochs=1, steps_per_epoch=steps, verbose=1)
# save model
model.save(‘model_’ + str(i) + ‘.h5’)
———————————————————————————————————
This part of the code throws me the following error.
could not broadcast input array from shape (48,4096) into shape (48)The shape (48,4096) here is of image_input.
I do not understand why is it behaving like this.
Please help me.
Sorry to hear that, I have some suggestions here:
https://machinelearningmastery.com/faq/single-faq/why-does-the-code-in-the-tutorial-not-work-for-me
Thanks for the response.
I tried the code on Google Colab with the usual approach and not the progressive loading, and it runs perfectly.
Well done!
I tried with the regular approach but It doesn’t work due to full ram consumption. Runtime automatically restarts after RAM is full
Try the progressive loading example above.
i know it’s a bit late ,but i had the same problem and was using tensorflow.keras
when i used the keras library it worked fine
so i’m pretty sure the problem is in one of the transformation works differently on your keras version than the one used it the tutorial
Great tip!
Yes, use standalone Keras, not tf.keras.
First of all Jason, this blog has the best demonstration of image caption generation I have got on the internet. And after reading your other posts this blog has been the first stop for anything I want to learn in deep learning or machine learning. I want to heartily thank you for such amazing work which is of great help for undergraduate students like me.
I know it is very late but it is for others who may face this problem in future.
If you want to use tf.keras with progressive loading here is the trick that worked for me:
in function data_generator(): change
yield [[in_img, in_seq], out_word]
to
yield [in_img, in_seq], out_word
Thanks for your kind words and for the sharing this tip Kevin!
I was trying get my hands dirty on the code. My extracted features are in the form [1, 2560, 8] to use this in the first encoder what should I do?
When I put
inputs1 = Input(shape=(2560, 8, )), I get an errorValueError: Error when checking target: expected dense_28 to have 3 dimensions, but got array with shape (47, 7579)
Sorry to hear that you’re having trouble.
I have some suggestions here:
https://machinelearningmastery.com/faq/single-faq/why-does-the-code-in-the-tutorial-not-work-for-me
Great tutorial. I am having trouble when loading the photo features.
features = {k: all_features[k] for k in dataset}
gives me this error:
KeyError: ‘2657663775_bc98bf67ac’
Do you have any suggestions as to why this is? Thanks.
Sorry to hear that, I have some suggestions here:
https://machinelearningmastery.com/faq/single-faq/why-does-the-code-in-the-tutorial-not-work-for-me
Natalie Jones have you been able to find the error?
Thank you so much for this amazing tutorial.. I’m facing a problem when I’m trying to run this line:
model = define_model(vocab_size, max_length)
it gives me the following error:
TypeError: Error converting shape to a TensorShape: int() argument must be a string, a bytes-like object or a number, not ‘function’.
You’re welcome!
Sorry to hear that, perhaps some of the suggestions here will help:
https://machinelearningmastery.com/faq/single-faq/why-does-the-code-in-the-tutorial-not-work-for-me
Hello Sir, I am getting the accuracy of around 35% even after training the model for 20 epochs and there isn’t any sudden change after training another 5 epochs. Do you recommend any changes or maybe what might be the error? The BLEU scores you mentioned below are coming almost the same what you got.
Please let me know if any changes are recommended from your side. Thank you.
Accuracy is a bad measure on this dataset. Focus on the BLEU scores.
Hello Sir,
Thank you for posting this code and explaining it such easily. I had one doubt that I had trained this model for 20 epochs, and I just got an accuracy of around 35%. After that, I trained the model for another 5 epochs, but there weren’t any considerable changes in the accuracy of the model.
What changes do you recommend in the model?
Thank you
Do not use accuracy for photo classification, instead use BELU.
How would using BLEU instead of accuracy differ and what are its advantages? What is a good BLEU score?
Accuracy is invalid for evaluating image captioning because you are predicting multiple words, not class labels.
More on BLEU here:
https://machinelearningmastery.com/calculate-bleu-score-for-text-python/
What about other evaluation metrics such as CIDER or METEOR?
Sorry, I don’t have tutorials on those metrics.
And if we wantto improve thr bleu score what changes do you recommend?
Some of the suggestions here will help:
https://machinelearningmastery.com/start-here/#better
There isn’t anything in here to help me improve the BLEU-4 score in this code.
I disagree, there are tutorials on diagnosing learning dynamics with learning curves, then tutorials on fixing each issue, such as regularization for overfitting and ensembles for better prediction.
But what about just improving the BLEU score explicitly?
BLEU is improved by improving the model.
Sir, I was following your steps, the test results seemed to be horrible. Predominantly, it is generating a particular type of sentence, whenever a human is detected. Or a different sentence whenever a dog is detected. Which model should be used instead of VGG16 to improve the performance?
And I played around with the structure of the model, and no of epochs, still there were no noticeable changes. What are your suggestions?
Thank you.
Perhaps try training the model again?
Perhaps use a different final model?
Perhaps try adding regularization to reduce overfitting?
What do you suggest doing to improve the model?
Diagnose the learning curve and try the suggestions here:
https://machinelearningmastery.com/start-here/#better
Hi Jason,
Thank for your great explanation.
I really love your articles.
I have a question:
total Vocabulary Size: 8,763 in token file
Why we not use this vocabulary for training instead of Vocabulary on train dataset (Vocabulary Size: 7,579) ?
IMO, It will cover more words which not appear on training dataset
Thanks!
It is good practice to use the vocab in the training set only and pretend we don’t have access to the test set until after the model is prepared.
The reason for this is to develop a robust and independent estimate of the model performance when making predictions on new data – unseen during training.
I see your point, thank you
Tune Model. The configuration of the model was not tuned on the problem. Explore alternate configurations and see if you can achieve better performance.
How do we tune the model?
Change something, like the learning rate, run an experiment and summarize the performance. If it is better keep it. Repeat with other configration.
Hi Jason!
Nice article, and very well explained. I just had a doubt regarding the keras tokenizer used. In the code, the tokenizer is fit on the train_descriptions, and when the create_sequences is called for the test data, the same tokenizer which was fit on the train data is used. I had a doubt that how does the tokenizer work with the data which it was not fitted on? I’m kinda new to this, so I’m not really sure about that. Could you please briefly explain this?
Thanks
Thanks.
The tokenizer is fit on the training data and is then used to prepare data as input to the model. If it is used on test data that has words not seen during training, those words are marked as 0 (unknown).
Oh I get it now! Thanks.
And one more query: why weren’t the training sequences normalized here? Like what if we just normalize by dividing it by the vocab size? I’m training the model at the moment without normalizing them. Just curious what would happen if we used normalized sequence data. I’m guessing it should atleast result in faster convergence of the model, if not significantly improve results.
If by normalize you mean scale to the range 0-1, then this is not needed. Words are encoded as integer values, then mapped to word vectors.
Okay, thank you so much.
Hi Jason.
I cannot find the features.pkl file. Getting the error No such file or directory: ‘features.pkl’. Please guide me.
You must create and save that file as an earlier step in the tutorial.
Hi Jason
What does this part of the code do? Is it one hot encoding being done here-
Encodes words as integers, then defines the input and output sequences for a given sample.
Has anyone got the same captions no matter what the supplied image is? My BLEU score is not that bad:
BLEU-1: 0.555407
BLEU-2: 0.284509
BLEU-3: 0.181447
BLEU-4: 0.076735
For feature extraction I used the following method:
Perhaps try re-fitting your model?
I’m also stuck with same problem.
Hi Jason,
I tried that model with MDI dataset.
But result very bad.
I checked and have found some points:
– vocabulary size: huge more than 21000 => more difficult.
– many name such as character name in movies or place, … such as Harry Potter, …
– there are many frame same with 1 caption (now I use single frame for 1 caption and ignore other which same caption)
Do you have any suggestion for this situation?
Many thanks!
I’m not familiar with that dataset.
Try a range models.
Try aggressively reducing the vocab.
Try tuning the model.
Try transfer learning.
…
Hi Jason!
Thanks for this elaborate post. It is really informative and details every small step which I found quite useful in building an Image Caption Generator in PyTorch.
I used an architecture similar to yours and also used 200 dimensional Glove Vectors as word embeddings. However, after training the model, I can observe that loss is going down yet the caption predicted for every image is the same.
I ran my project in google colab and here’s the notebook link for the same:
https://colab.research.google.com/drive/1ZFxoJhWU5NfQVipOPiB3qxyyzil9TCY0
I would be highly grateful to you if you could look at it once and let me know where I’m going wrong.
I have subscribed to your mailing list and I love the tips you’ve given in the pdf for ml_performance_improvement_cheatsheet.
Thanks for your help!:)
This is a common question hat I answer here:
https://machinelearningmastery.com/faq/single-faq/can-you-read-review-or-debug-my-code
Thanks Jason.
You’re welcome.
The model is showing bad results even after 100 epochs.Any suggestions?
Perhaps re-run and stop after just a few epochs?
Tried that too but the loss rate gets increased after some epochs , the loss rate isn’t going below 3.
ConnectionResetError: [WinError 10054] An existing connection was forcibly closed by the remote host
While downloading the VGG model
Sounds like you are having internet issues.
Perhaps try again?
Perhaps try from a different internet connection?
Perhaps try from a diffrent computer?
Hi. I am using above code for medical image captioning. but unfortunately i got the same caption for all images i give to the model. loss value on my dataset is 0,75 so i don’t think so its overfittting issue or my model would not be trained very well. can you please help me out in this matter.?
Thanks
Perhaps the model was overfit?
Perhaps use early stopping?
Perhaps use a different architecture?
Perhaps explore some of the ideas here?
https://machinelearningmastery.com/start-here/#better
i am also facing this issues please help
What are the real world applications of this device?
Describe the contents of photos.
Traceback (most recent call last):
File “E:/MS Final/features.pkl”, line 41, in
features = extract_features(directory)
File “E:/MS Final/features.pkl”, line 23, in extract_features
image = load_img(filename, target_size=(224, 224))
File “C:\Users\hso\AppData\Local\Programs\Python\Python36\lib\site-packages\keras_preprocessing\image\utils.py”, line 110, in load_img
img = pil_image.open(path)
File “C:\Users\hso\AppData\Local\Programs\Python\Python36\lib\site-packages\PIL\Image.py”, line 2809, in open
fp = builtins.open(filename, “rb”)
PermissionError: [Errno 13] Permission denied: ‘Flickr8k_Dataset/Flicker8k_Dataset’
Please help what is the problem ?
Looks like you don’t have permission to open the files.
Perhaps change the permission?
============= RESTART: E:/Project Study/Fitted Model – Final.py =============
Using TensorFlow backend.
Dataset: 6000
Descriptions: train=6000
Photos: train=6000
Vocabulary Size: 7579
Description Length: 34
Traceback (most recent call last):
File “E:/Project Study/Fitted Model – Final.py”, line 154, in
X1train, X2train, ytrain = create_sequences(tokenizer, max_length, train_descriptions, train_features, vocab_size)
File “E:/Project Study/Fitted Model – Final.py”, line 109, in create_sequences
return array(X1), array(X2), array(y)
MemoryError: Unable to allocate 8.65 GiB for an array with shape (306404, 7579) and data type float32
>>>
Can you please help ?
Perhaps try the progressive loading version listed above.
During data preprocessing,i am getting an error while using the directory variable and filename. What has to be done over there?
Ensure you have the code and data in the same directory and run code from the command line.
Hi Jason,
Thank you so much for your super super super helpful post. I appreciate your effort!
I got my best training result is ep005-loss3.515-val_loss3.829.
I tried to use the trained model to generate a caption for a picture, in which a guy with a naked upper body is doing a chest push in the gym. The generated caption is “startseq two children are playing in the snow endseq”.
Do you have any idea how to improve the model?Thank you.
You’re welcome!
Nice work.
Perhaps try using a different final model?
Perhaps try training again?
Perhaps try tuning the model?
Ideas here:
https://machinelearningmastery.com/start-here/#better
Hi Jason,
Thank you for your feedback!
May I ask one more question? In my mind, usually, what we need for developing and evaluating a model is a training dataset and a testing dataset. So what is the purpose of the “Flickr_8k.devImages.txt” dataset?
And I find that the size of the “Flickr_8k.devImages.txt” is equal to the size of “Flickr_8k.testImages.txt”. Is this quantitative equivalent a coincidence or a necessity?
Thank you!
I don’t recall off hand. It could be used for validation:
https://machinelearningmastery.com/difference-test-validation-datasets/
Hello Jason,
Thank for your post. What if each image has multiple descriptions in csv file like flicker30k dataset?
You’re welcome.
You can train the model using each description for the same image input.
Hi Nafees,
Can you manage to train the model using the Flickr30k dataset? I tried it and got a “killed: 9” output, which means the training is too massive for the memory of my laptop. If you are able to come over that, could you please share how you did it?
Thanks!
Perhaps try the progressive loading version?
Dear Jason
I am running a visual question answering task. It is seems similar to the image captioning problem. Take as input : image features (which I have saved in a h5py file) and question tokens (which I have pickled) and outputs are the answers (the whole answer is considered a target , so 3129 answers –one word or more – and 3129 labels in my case)
I am using the Keras sequence utility to create the generator.
I am getting a dimension error in the output layer when the model tries to start training.
I have copied my getitem function in the generator and also a sample of my model.
Would you please have a look my code and help figure out the problem?
Best wishes
Epoch 1/1
Traceback (most recent call last):
File “”, line 32, in
validation_data=valid_generator)
File “C:\python\envs\tf2-keras\lib\site-packages\keras\legacy\interfaces.py”, line 91, in wrapper
return func(*args, **kwargs)
File “C:\python\envs\tf2-keras\lib\site-packages\keras\engine\training.py”, line 1732, in fit_generator
initial_epoch=initial_epoch)
File “C:\python\envs\tf2-keras\lib\site-packages\keras\engine\training_generator.py”, line 220, in fit_generator
reset_metrics=False)
File “C:\python\envs\tf2-keras\lib\site-packages\keras\engine\training.py”, line 1508, in train_on_batch
class_weight=class_weight)
File “C:\python\envs\tf2-keras\lib\site-packages\keras\engine\training.py”, line 621, in _standardize_user_data
exception_prefix=’target’)
File “C:\python\envs\tf2-keras\lib\site-packages\keras\engine\training_utils.py”, line 145, in standardize_input_data
str(data_shape))
ValueError: Error when checking target: expected output to have shape (3129,) but got array with shape (1,)
# this is the getitem function
The __getitem__ of my generator look like this:
def __getitem__(self, index):
‘Generate one batch of data’
imfeatures = np.empty((self.batch_size,2048))
question_tokens = np.empty((self.batch_size,14))
answers = np.empty((self.batch_size,3129))
# Generate indexes of the batch
indexes = self.indexes[index*self.batch_size:(index+1)*self.batch_size]
# self.T.append(indexes)
list_IDs_temp = [self.list_IDs[k] for k in indexes]
# Generate data
for i,k in enumerate(list_IDs_temp):
temp =self.Features[‘image_features’][k]
imfeatures[i,]=temp[0,:]
question_tokens[i,]=self.Questions[indexes[i]]
answers=self.Answer[indexes[i]]
return [imfeatures,question_tokens],answers
#And this is what my model looks like:
ImInput = Input(shape=(2048,),name=’image_input’)
QInput = Input(shape=(14,),name=’question’)
# some dense layers and dropouts
#Then the layers are merged
M =Multiply()[ImInput,QInput]
#Some dense layers and dropouts
output=Dense(3129,activation=’softmax’,name=’output’)(M)
model = Model([ImInput,X],output)
model.compile(optimizer=’RMSprop’,loss=’categorical_crossentropy’,metrics = [‘accuracy’])
model.fit_generator(train_generator,
epochs=1,
verbose =1,
validation_data=valid_generator)
This is a common question that I answer here:
https://machinelearningmastery.com/faq/single-faq/can-you-read-review-or-debug-my-code
In Train With Progressive Loading
I get the following error. Please Help
Dataset: 6000
Descriptions: train=6000
Photos: train=6000
Vocabulary Size: 7579
Description Length: 34
Model: “model_4”
__________________________________________________________________________________________________
Layer (type) Output Shape Param # Connected to
==================================================================================================
input_8 (InputLayer) (None, 34) 0
__________________________________________________________________________________________________
input_7 (InputLayer) (None, 4096) 0
__________________________________________________________________________________________________
embedding_4 (Embedding) (None, 34, 256) 1940224 input_8[0][0]
__________________________________________________________________________________________________
dropout_7 (Dropout) (None, 4096) 0 input_7[0][0]
__________________________________________________________________________________________________
dropout_8 (Dropout) (None, 34, 256) 0 embedding_4[0][0]
__________________________________________________________________________________________________
dense_10 (Dense) (None, 256) 1048832 dropout_7[0][0]
__________________________________________________________________________________________________
lstm_4 (LSTM) (None, 256) 525312 dropout_8[0][0]
__________________________________________________________________________________________________
add_4 (Add) (None, 256) 0 dense_10[0][0]
lstm_4[0][0]
__________________________________________________________________________________________________
dense_11 (Dense) (None, 256) 65792 add_4[0][0]
__________________________________________________________________________________________________
dense_12 (Dense) (None, 7579) 1947803 dense_11[0][0]
==================================================================================================
Total params: 5,527,963
Trainable params: 5,527,963
Non-trainable params: 0
__________________________________________________________________________________________________
“dot” with args [‘-Tps’, ‘C:\\Users\\MANJUP~1\\AppData\\Local\\Temp\\tmp1f9neqi1’] returned code: 1
stdout, stderr:
b”
b”‘F:\\New’ is not recognized as an internal or external command,\r\noperable program or batch file.\r\n”
—————————————————————————
AssertionError Traceback (most recent call last)
in
160
161 # define the model
–> 162 model = define_model(vocab_size, max_length)
163 # train the model, run epochs manually and save after each epoch
164 epochs = 20
in define_model(vocab_size, max_length)
128 # summarize model
129 model.summary()
–> 130 plot_model(model, to_file=’model.png’, show_shapes=True)
131 return model
132
F:\New folder\lib\site-packages\keras\utils\vis_utils.py in plot_model(model, to_file, show_shapes, show_layer_names, rankdir, expand_nested, dpi)
238 “””
239 dot = model_to_dot(model, show_shapes, show_layer_names, rankdir,
–> 240 expand_nested, dpi)
241 _, extension = os.path.splitext(to_file)
242 if not extension:
F:\New folder\lib\site-packages\keras\utils\vis_utils.py in model_to_dot(model, show_shapes, show_layer_names, rankdir, expand_nested, dpi, subgraph)
77 from ..models import Sequential
78
—> 79 _check_pydot()
80 if subgraph:
81 dot = pydot.Cluster(style=’dashed’, graph_name=model.name)
F:\New folder\lib\site-packages\keras\utils\vis_utils.py in _check_pydot()
26 # Attempt to create an image of a blank graph
27 # to check the pydot/graphviz installation.
—> 28 pydot.Dot.create(pydot.Dot())
29 except OSError:
30 raise OSError(
F:\New folder\lib\site-packages\pydot.py in create(self, prog, format, encoding)
1943 print(message)
1944
-> 1945 assert process.returncode == 0, process.returncode
1946
1947 return stdout_data
AssertionError: 1
Sorry to hear that, perhaps this will help:
https://machinelearningmastery.com/faq/single-faq/why-does-the-code-in-the-tutorial-not-work-for-me
Hello Jason,
If we need to find accuracy from this then what to do? Is there any code ?
Accuracy is a bad metric for this problem, we use BLEU instead:
https://machinelearningmastery.com/calculate-bleu-score-for-text-python/
Thank you!
You’re welcome.
This article is awesome Jason!
here is what i got “dog is running through the water”
Well done!
Hi Jason,
I’m wondering why the tokenizer is fit on the training, validation, and test data separately. I understand that we don’t want sequences from one set to leak into another, but wouldn’t we want the integer representation of each word to be the same across all sets, and then get the sequences from that representation?
If the model is learning relationships between integers in sequences, and the integers have totally different meaning (and thus expected placement in sequences) between train and test, then wouldn’t that be bad?
Would your answer change if word2vec was used since the location of the word in the vector space has meaning?
Thank you for the great tutorial.
best,
Jamie
We create a single tokenizer from the training dataset.
Sorry, I misunderstood. I thought it would be a problem if the dev and test sets have longer sequences or different words, but I guess that’s a part of it!
When I try to train the model I get the error: “NotImplementedError: Cannot convert a symbolic Tensor (args_2:0) to a numpy array.”
This is in TensorFlow 2.1 so I’m importing from tensorflow.keras and using fit instead of fit_generator. I tried directly copying your complete progressive loading example (and making those two changes) and still have the error.
Thank you for your help.
I recommend not using tf.keras and instead use standalone Keras 2.3 running on top of tensorflow 2.1:
https://machinelearningmastery.com/faq/single-faq/what-is-the-difference-between-keras-and-tf-keras
Same problem I’ m facing with tf.keras , any solution..?
Use standalone keras, not tf.keras.
# extract features from each photo in the directory
def extract_features(directory):
# load the model
model = VGG16()
# re-structure the model
model.layers.pop()
model = Model(inputs=model.inputs, outputs=model.layers[-1].output)
# summarize
print(model.summary())
# extract features from each photo
features = dict()
for name in listdir(directory):
# load an image from file
filename = directory + ‘/’ + name
image = load_img(filename, target_size=(224, 224))
# convert the image pixels to a numpy array
image = img_to_array(image)
# reshape data for the model
image = image.reshape((1, image.shape[0], image.shape[1], image.shape[2]))
# prepare the image for the VGG model
image = preprocess_input(image)
# get features
feature = model.predict(image, verbose=0)
# get image id
image_id = name.split(‘.’)[0]
# store feature
features[image_id] = feature
print(‘>%s’ % name)
return features
# extract features from all images
directory = ‘C:\Flicker8k_Dataset’
features = extract_features(directory)
print(‘Extracted Features: %d’ % len(features))CA
# save to file
dump(features, open(‘features.pkl’, ‘wb’))
”’ When i run this code after loading all the images it’s showing this error”’
in extract_features(directory)
13 # load an image from file
14 filename = directory + ‘/’ + name
—> 15 image = load_img(filename, target_size=(224, 224))
16 # convert the image pixels to a numpy array
17 image = img_to_array(image)
~\.conda\envs\tensorflow\lib\site-packages\keras_preprocessing\image\utils.py in load_img(path, grayscale, color_mode, target_size, interpolation)
108 raise ImportError(‘Could not import PIL.Image. ‘
109 ‘The use of
load_imgrequires PIL.’)–> 110 img = pil_image.open(path)
111 if color_mode == ‘grayscale’:
112 if img.mode != ‘L’:
~\.conda\envs\tensorflow\lib\site-packages\PIL\Image.py in open(fp, mode)
2894 warnings.warn(message)
2895 raise UnidentifiedImageError(
-> 2896 “cannot identify image file %r” % (filename if filename else fp)
2897 )
2898
UnidentifiedImageError: cannot identify image file ‘C:\\Flicker8k_Dataset/Flicker8k_Dataset – Shortcut.lnk’
”’Can you please help me”’
See this:
https://machinelearningmastery.com/faq/single-faq/why-does-the-code-in-the-tutorial-not-work-for-me
can you also provide solution with tf.keras … it will help me to know more .. thanks Jason
Jason, Minor typo. The text for this line, “Running this example first loads the 6,000 photo identifiers in the test dataset”, should say “train dataset” instead of test dataset.
Thanks, fixed!
This error is coming , help me if you can 🙂
NotImplementedError: Cannot convert a symbolic Tensor (args_2:0) to a numpy array.
model.fit_generator(generator, epochs=1, steps_per_epoch=steps, verbose=1)
12 # save model
13 model.save(“models/model_” + str(i) + ‘.h5’)
~\Anaconda3\envs\tf-gpu\lib\site-packages\tensorflow_core\python\util\deprecation.py in new_func(*args, **kwargs)
322 ‘in a future version’ if date is None else (‘after %s’ % date),
323 instructions)
–> 324 return func(*args, **kwargs)
325 return tf_decorator.make_decorator(
326 func, new_func, ‘deprecated’,
~\Anaconda3\envs\tf-gpu\lib\site-packages\tensorflow_core\python\keras\engine\training.py in fit_generator(self, generator, steps_per_epoch, epochs, verbose, callbacks, validation_data, validation_steps, validation_freq, class_weight, max_queue_size, workers, use_multiprocessing, shuffle, initial_epoch)
1304 use_multiprocessing=use_multiprocessing,
1305 shuffle=shuffle,
-> 1306 initial_epoch=initial_epoch)
1307
1308 @deprecation.deprecated(
~\Anaconda3\envs\tf-gpu\lib\site-packages\tensorflow_core\python\keras\engine\training.py in fit(self, x, y, batch_size, epochs, verbose, callbacks, validation_split, validation_data, shuffle, class_weight, sample_weight, initial_epoch, steps_per_epoch, validation_steps, validation_freq, max_queue_size, workers, use_multiprocessing, **kwargs)
817 max_queue_size=max_queue_size,
818 workers=workers,
–> 819 use_multiprocessing=use_multiprocessing)
820
821 def evaluate(self,
~\Anaconda3\envs\tf-gpu\lib\site-packages\tensorflow_core\python\keras\engine\training_v2.py in fit(self, model, x, y, batch_size, epochs, verbose, callbacks, validation_split, validation_data, shuffle, class_weight, sample_weight, initial_epoch, steps_per_epoch, validation_steps, validation_freq, max_queue_size, workers, use_multiprocessing, **kwargs)
233 max_queue_size=max_queue_size,
234 workers=workers,
–> 235 use_multiprocessing=use_multiprocessing)
236
237 total_samples = _get_total_number_of_samples(training_data_adapter)
~\Anaconda3\envs\tf-gpu\lib\site-packages\tensorflow_core\python\keras\engine\training_v2.py in _process_training_inputs(model, x, y, batch_size, epochs, sample_weights, class_weights, steps_per_epoch, validation_split, validation_data, validation_steps, shuffle, distribution_strategy, max_queue_size, workers, use_multiprocessing)
591 max_queue_size=max_queue_size,
592 workers=workers,
–> 593 use_multiprocessing=use_multiprocessing)
594 val_adapter = None
595 if validation_data:
~\Anaconda3\envs\tf-gpu\lib\site-packages\tensorflow_core\python\keras\engine\training_v2.py in _process_inputs(model, mode, x, y, batch_size, epochs, sample_weights, class_weights, shuffle, steps, distribution_strategy, max_queue_size, workers, use_multiprocessing)
704 max_queue_size=max_queue_size,
705 workers=workers,
–> 706 use_multiprocessing=use_multiprocessing)
707
708 return adapter
~\Anaconda3\envs\tf-gpu\lib\site-packages\tensorflow_core\python\keras\engine\data_adapter.py in __init__(self, x, y, sample_weights, standardize_function, workers, use_multiprocessing, max_queue_size, **kwargs)
765
766 if standardize_function is not None:
–> 767 dataset = standardize_function(dataset)
768
769 if kwargs.get(“shuffle”, False) and self.get_size() is not None:
~\Anaconda3\envs\tf-gpu\lib\site-packages\tensorflow_core\python\keras\engine\training_v2.py in standardize_function(dataset)
682 return x, y
683 return x, y, sample_weights
–> 684 return dataset.map(map_fn, num_parallel_calls=dataset_ops.AUTOTUNE)
685
686 if mode == ModeKeys.PREDICT:
~\Anaconda3\envs\tf-gpu\lib\site-packages\tensorflow_core\python\data\ops\dataset_ops.py in map(self, map_func, num_parallel_calls)
1589 else:
1590 return ParallelMapDataset(
-> 1591 self, map_func, num_parallel_calls, preserve_cardinality=True)
1592
1593 def flat_map(self, map_func):
~\Anaconda3\envs\tf-gpu\lib\site-packages\tensorflow_core\python\data\ops\dataset_ops.py in __init__(self, input_dataset, map_func, num_parallel_calls, use_inter_op_parallelism, preserve_cardinality, use_legacy_function)
3924 self._transformation_name(),
3925 dataset=input_dataset,
-> 3926 use_legacy_function=use_legacy_function)
3927 self._num_parallel_calls = ops.convert_to_tensor(
3928 num_parallel_calls, dtype=dtypes.int32, name=”num_parallel_calls”)
~\Anaconda3\envs\tf-gpu\lib\site-packages\tensorflow_core\python\data\ops\dataset_ops.py in __init__(self, func, transformation_name, dataset, input_classes, input_shapes, input_types, input_structure, add_to_graph, use_legacy_function, defun_kwargs)
3145 with tracking.resource_tracker_scope(resource_tracker):
3146 # TODO(b/141462134): Switch to using garbage collection.
-> 3147 self._function = wrapper_fn._get_concrete_function_internal()
3148
3149 if add_to_graph:
~\Anaconda3\envs\tf-gpu\lib\site-packages\tensorflow_core\python\eager\function.py in _get_concrete_function_internal(self, *args, **kwargs)
2393 “””Bypasses error checking when getting a graph function.”””
2394 graph_function = self._get_concrete_function_internal_garbage_collected(
-> 2395 *args, **kwargs)
2396 # We’re returning this concrete function to someone, and they may keep a
2397 # reference to the FuncGraph without keeping a reference to the
~\Anaconda3\envs\tf-gpu\lib\site-packages\tensorflow_core\python\eager\function.py in _get_concrete_function_internal_garbage_collected(self, *args, **kwargs)
2387 args, kwargs = None, None
2388 with self._lock:
-> 2389 graph_function, _, _ = self._maybe_define_function(args, kwargs)
2390 return graph_function
2391
~\Anaconda3\envs\tf-gpu\lib\site-packages\tensorflow_core\python\eager\function.py in _maybe_define_function(self, args, kwargs)
2701
2702 self._function_cache.missed.add(call_context_key)
-> 2703 graph_function = self._create_graph_function(args, kwargs)
2704 self._function_cache.primary[cache_key] = graph_function
2705 return graph_function, args, kwargs
~\Anaconda3\envs\tf-gpu\lib\site-packages\tensorflow_core\python\eager\function.py in _create_graph_function(self, args, kwargs, override_flat_arg_shapes)
2591 arg_names=arg_names,
2592 override_flat_arg_shapes=override_flat_arg_shapes,
-> 2593 capture_by_value=self._capture_by_value),
2594 self._function_attributes,
2595 # Tell the ConcreteFunction to clean up its graph once it goes out of
~\Anaconda3\envs\tf-gpu\lib\site-packages\tensorflow_core\python\framework\func_graph.py in func_graph_from_py_func(name, python_func, args, kwargs, signature, func_graph, autograph, autograph_options, add_control_dependencies, arg_names, op_return_value, collections, capture_by_value, override_flat_arg_shapes)
976 converted_func)
977
–> 978 func_outputs = python_func(*func_args, **func_kwargs)
979
980 # invariant:
func_outputscontains only Tensors, CompositeTensors,~\Anaconda3\envs\tf-gpu\lib\site-packages\tensorflow_core\python\data\ops\dataset_ops.py in wrapper_fn(*args)
3138 attributes=defun_kwargs)
3139 def wrapper_fn(*args): # pylint: disable=missing-docstring
-> 3140 ret = _wrapper_helper(*args)
3141 ret = structure.to_tensor_list(self._output_structure, ret)
3142 return [ops.convert_to_tensor(t) for t in ret]
~\Anaconda3\envs\tf-gpu\lib\site-packages\tensorflow_core\python\data\ops\dataset_ops.py in _wrapper_helper(*args)
3080 nested_args = (nested_args,)
3081
-> 3082 ret = autograph.tf_convert(func, ag_ctx)(*nested_args)
3083 # If
funcreturns a list of tensors,nest.flatten()and3084 #
ops.convert_to_tensor()would conspire to attempt to stack~\Anaconda3\envs\tf-gpu\lib\site-packages\tensorflow_core\python\autograph\impl\api.py in wrapper(*args, **kwargs)
235 except Exception as e: # pylint:disable=broad-except
236 if hasattr(e, ‘ag_error_metadata’):
–> 237 raise e.ag_error_metadata.to_exception(e)
238 else:
239 raise
NotImplementedError: in converted code:
C:\Users\Mohit\Anaconda3\envs\tf-gpu\lib\site-packages\tensorflow_core\python\keras\engine\training_v2.py:677 map_fn
batch_size=None)
C:\Users\Mohit\Anaconda3\envs\tf-gpu\lib\site-packages\tensorflow_core\python\keras\engine\training.py:2410 _standardize_tensors
exception_prefix=’input’)
C:\Users\Mohit\Anaconda3\envs\tf-gpu\lib\site-packages\tensorflow_core\python\keras\engine\training_utils.py:513 standardize_input_data
data = [np.asarray(d) for d in data]
C:\Users\Mohit\Anaconda3\envs\tf-gpu\lib\site-packages\tensorflow_core\python\keras\engine\training_utils.py:513
data = [np.asarray(d) for d in data]
C:\Users\Mohit\Anaconda3\envs\tf-gpu\lib\site-packages\numpy\core\_asarray.py:85 asarray
return array(a, dtype, copy=False, order=order)
C:\Users\Mohit\Anaconda3\envs\tf-gpu\lib\site-packages\tensorflow_core\python\framework\ops.py:728 __array__
” array.”.format(self.name))
NotImplementedError: Cannot convert a symbolic Tensor (args_2:0) to a numpy array.
Perhaps this will help:
https://machinelearningmastery.com/faq/single-faq/why-does-the-code-in-the-tutorial-not-work-for-me
Hi Jason,
Thank you for this article. Amazing implementation and explanation of the entire process.
I had a question regarding improving the BLEU score for this task:
You said we should try out using different Pre-Trained Image models like InceptionV3 and also try to add regularization.
Where exactly according to your expertise should these changes be implemented? Should we make changes in extract_features() or in define_model() or both to get better results?
Also, is there a faster way to know if our new model will do better as these models take a couple of hours to run?
Thank you
It would be a change to the model itself, e.g. loading a saved model from another task and adapting it for use on this task.
This will give you ideas:
https://machinelearningmastery.com/how-to-improve-performance-with-transfer-learning-for-deep-learning-neural-networks/
And this:
https://machinelearningmastery.com/how-to-use-transfer-learning-when-developing-convolutional-neural-network-models/
So do you mean that we use transfer learning and add a model (like VGG) in the define_model() method even after doing feature extraction using VGG?
No, I was thinking you would transfer an NLP model from another task.
You can do whatever you like though.
hey Jason, just wanna ask why you implement this by VGG16 when there is more accurate and efficient pre-trained models are available like Inception V3 ResNet etc.. just wanna know your reasons behind choosing VGG16 model….
It is a simple model that is easy to understand and works well in may cases.
Hey Jason, Thanks for creating such a wonderful article
With standalone Keras the code runs fine
As I am now using tensorflow 2.1 and while trying to run the show, facing the below error:
NotImplementedError: Cannot convert a symbolic Tensor (args_2:0) to a numpy array.
I have gone the below link which you have posted but it’s of no help
https://machinelearningmastery.com/faq/single-faq/why-does-the-code-in-the-tutorial-not-work-for-me
Please have a look on it and in case required I can pass the code to you
You can run the example using Keras 2.3 on top of TensorFlow 2.1 directly. No need to change the code.
Hey Jason,
I tried using Keras(2.3) from TensorFlow(2.1) and facing the below issue:
NotImplementedError: Cannot convert a symbolic Tensor (args_2:0) to a numpy array.
Sorry to hear that, I can confirm the code works with these versions, I suspect this will help you:
https://machinelearningmastery.com/faq/single-faq/why-does-the-code-in-the-tutorial-not-work-for-me
PermissionError Traceback (most recent call last)
in
1 directory =”D:\Flickr8k_Dataset”
—-> 2 features = extract_features(directory)
3 print(‘Extracted Features: %d’ % len(features))
4 # save to file
5 dump(features, open(r’features.pkl’, ‘rb’))
in extract_features(directory)
13 # load an image from file
14 filename = directory + ‘/’ + name
—> 15 image = load_img(filename, target_size=(224, 224))
16 # convert the image pixels to a numpy array
17 image = img_to_array(image)
~\anaconda3\lib\site-packages\keras_preprocessing\image\utils.py in load_img(path, grayscale, color_mode, target_size, interpolation)
108 raise ImportError(‘Could not import PIL.Image. ‘
109 ‘The use of
load_imgrequires PIL.’)–> 110 img = pil_image.open(path)
111 if color_mode == ‘grayscale’:
112 if img.mode != ‘L’:
~\anaconda3\lib\site-packages\PIL\Image.py in open(fp, mode)
2807
2808 if filename:
-> 2809 fp = builtins.open(filename, “rb”)
2810 exclusive_fp = True
2811
PermissionError: [Errno 13] Permission denied: ‘D:\\Flickr8k_Dataset/Flicker8k_Dataset’
Can you please help me?
Looks like you don’t have permission to access your own files on your own workstation!
how to change that?
It will be specific to your workstation.
If you are not the admin of your workstation, perhaps contact the admin.
Or, perhaps try downloading the data set again and save it in a different location on your workstation.
sir i used your code to develop desktop app.now i want to create android app.is it possible.if possible how?
I don’t know about creating android apps, I teach machine learning.
Hi Jason, I am using Tensorflow 2.0 , and while running the code , I am receiving this error
I used both the method but I am receiving error . Can you please help me out.
1) with normal model.fit() method
Epoch 1/20
—————————————————————————
UnboundLocalError Traceback (most recent call last)
in ()
4 checkpoint = ModelCheckpoint(filepath, monitor=’val_loss’, verbose=1, save_best_only=True, mode=’min’)
5 # fit model
—-> 6 model.fit([X1train, X2train], ytrain, epochs=20, verbose=2, batch_size = 3, callbacks=[checkpoint], validation_data=([X1test, X2test], ytest))
1 frames
/usr/local/lib/python3.6/dist-packages/tensorflow/python/keras/engine/training.py in fit(self, x, y, batch_size, epochs, verbose, callbacks, validation_split, validation_data, shuffle, class_weight, sample_weight, initial_epoch, steps_per_epoch, validation_steps, validation_batch_size, validation_freq, max_queue_size, workers, use_multiprocessing, **kwargs)
857 logs = tmp_logs # No error, now safe to assign to logs.
858 callbacks.on_train_batch_end(step, logs)
–> 859 epoch_logs = copy.copy(logs)
860
861 # Run validation.
UnboundLocalError: local variable ‘logs’ referenced before assignment
2) and while running the code of Progressive Loading method. I am receiving this error
WARNING:tensorflow:Model was constructed with shape (None, 2048) for input Tensor(“input_11:0”, shape=(None, 2048), dtype=float32), but it was called on an input with incompatible shape (None, None, None).
—————————————————————————
ValueError Traceback (most recent call last)
in ()
1 for i in range(epochs):
2 generator = data_generator(train_descriptions, train_features, wordtoix, max_length, number_pics_per_batch)
—-> 3 model.fit_generator(generator, epochs=1, steps_per_epoch=steps, verbose=1)
4 model.save(‘./model_weights/model_’ + str(i) + ‘.h5’)
12 frames
/usr/local/lib/python3.6/dist-packages/tensorflow/python/framework/func_graph.py in wrapper(*args, **kwargs)
966 except Exception as e: # pylint:disable=broad-except
967 if hasattr(e, “ag_error_metadata”):
–> 968 raise e.ag_error_metadata.to_exception(e)
969 else:
970 raise
ValueError: in user code:
/usr/local/lib/python3.6/dist-packages/tensorflow/python/keras/engine/training.py:571 train_function *
outputs = self.distribute_strategy.run(
/usr/local/lib/python3.6/dist-packages/tensorflow/python/distribute/distribute_lib.py:951 run **
return self._extended.call_for_each_replica(fn, args=args, kwargs=kwargs)
/usr/local/lib/python3.6/dist-packages/tensorflow/python/distribute/distribute_lib.py:2290 call_for_each_replica
return self._call_for_each_replica(fn, args, kwargs)
/usr/local/lib/python3.6/dist-packages/tensorflow/python/distribute/distribute_lib.py:2649 _call_for_each_replica
return fn(*args, **kwargs)
/usr/local/lib/python3.6/dist-packages/tensorflow/python/keras/engine/training.py:541 train_step **
self.trainable_variables)
/usr/local/lib/python3.6/dist-packages/tensorflow/python/keras/engine/training.py:1807 _minimize
trainable_variables))
/usr/local/lib/python3.6/dist-packages/tensorflow/python/keras/optimizer_v2/optimizer_v2.py:521 _aggregate_gradients
filtered_grads_and_vars = _filter_grads(grads_and_vars)
/usr/local/lib/python3.6/dist-packages/tensorflow/python/keras/optimizer_v2/optimizer_v2.py:1219 _filter_grads
([v.name for _, v in grads_and_vars],))
ValueError: No gradients provided for any variable: [‘dense_15/kernel:0’, ‘dense_15/bias:0’, ‘lstm_5/lstm_cell_5/kernel:0’, ‘lstm_5/lstm_cell_5/recurrent_kernel:0’, ‘lstm_5/lstm_cell_5/bias:0’, ‘dense_16/kernel:0’, ‘dense_16/bias:0’, ‘dense_17/kernel:0’, ‘dense_17/bias:0’].
I’ll list out the main value error here
a) Normal model.fit method()
– UnboundLocalError: local variable ‘logs’ referenced before assignment
b) Progressive Loading method
– ValueError: No gradients provided for any variable: [‘dense_15/kernel:0’, ‘dense_15/bias:0’, ‘lstm_5/lstm_cell_5/kernel:0’, ‘lstm_5/lstm_cell_5/recurrent_kernel:0’, ‘lstm_5/lstm_cell_5/bias:0’, ‘dense_16/kernel:0’, ‘dense_16/bias:0’, ‘dense_17/kernel:0’, ‘dense_17/bias:0’].
I’m sorry to hear that, I have not seen this error. Perhaps this will help:
https://machinelearningmastery.com/faq/single-faq/why-does-the-code-in-the-tutorial-not-work-for-me
I got the same error. I also went through the checklist and have imported all packages, copied code correctly, etc. It only happens with the low_RAM version. With the original it didn’t, but I ran out of RAM.
Hey,i also got the same error,i want to train the model on my local machine but i get the same error,i am using tensorflow 2.2.0 and keras version 2.3.0,were you able to solve it?
==================================================================
Also, i tried running it on colab,it seems to work fine there, colab uses tensorflow 2.2.0 and keras 2.3.1 version,i am scared to install keras again on my local machine so that it doesnt screw up the system…if you found the solution to this error please do let me know.
I am also getting the same error. I am using google colab to run the code. i got this error in google colab. Did u find the solution for the error?
Try running on your own workstation or on an AWS EC2 instance.
For anyone who is getting this error on google colab, I have a temporary fix for it. Simply downgrade the version of keras and tensorflow. Use pip for this.
Run the following code:
pip uninstall keras
pip install keras == 2.3.1
pip uninstall tensorflow
pip install tensorflow == 2.2
After running the above codes in different cells, simply restart your runtime and your error will be solved.
Thanks for sharing!
I am also getting same error.
Sorry to hear that, this may help:
https://machinelearningmastery.com/faq/single-faq/why-does-the-code-in-the-tutorial-not-work-for-me
I have used your code only in training and evaluating. But somehow I got this error while evaluating, and I am not sure why it happened.
C:\Users\Harshit\Anaconda3\envs\ImageProcessing\lib\site-packages\tensorflow_core\python\framework\indexed_slices.py:433: UserWarning: Converting sparse IndexedSlices to a dense Tensor of unknown shape. This may consume a large amount of memory.
“Converting sparse IndexedSlices to a dense Tensor of unknown shape. ”
Traceback (most recent call last):
File “”, line 1, in
runfile(‘C:/Users/Harshit/Desktop/Flickr8k_dataset/Evaluate model.py’, wdir=’C:/Users/Harshit/Desktop/Flickr8k_dataset’)
File “C:\Users\Harshit\Anaconda3\envs\ImageProcessing\lib\site-packages\spyder_kernels\customize\spydercustomize.py”, line 827, in runfile
execfile(filename, namespace)
File “C:\Users\Harshit\Anaconda3\envs\ImageProcessing\lib\site-packages\spyder_kernels\customize\spydercustomize.py”, line 110, in execfile
exec(compile(f.read(), filename, ‘exec’), namespace)
File “C:/Users/Harshit/Desktop/Flickr8k_dataset/Evaluate model.py”, line 164, in
evaluate_model(model, test_descriptions, test_features, tokenizer, max_length)
File “C:/Users/Harshit/Desktop/Flickr8k_dataset/Evaluate model.py”, line 119, in evaluate_model
yhat = generate_desc(model, tokenizer, photos[key], max_length)
File “C:/Users/Harshit/Desktop/Flickr8k_dataset/Evaluate model.py”, line 98, in generate_desc
yhat = model.predict([photo,sequence], verbose=0)
File “C:\Users\Harshit\Anaconda3\envs\ImageProcessing\lib\site-packages\keras\engine\training.py”, line 1441, in predict
x, _, _ = self._standardize_user_data(x)
File “C:\Users\Harshit\Anaconda3\envs\ImageProcessing\lib\site-packages\keras\engine\training.py”, line 579, in _standardize_user_data
exception_prefix=’input’)
File “C:\Users\Harshit\Anaconda3\envs\ImageProcessing\lib\site-packages\keras\engine\training_utils.py”, line 145, in standardize_input_data
str(data_shape))
ValueError: Error when checking input: expected input_6 to have shape (28,) but got array with shape (34,)
I’m sorry to hear that, this may help:
https://machinelearningmastery.com/faq/single-faq/why-does-the-code-in-the-tutorial-not-work-for-me
I have trained the model for 20 epochs after which the accuracy is around 0.5 and validation set accuracy is 0.3.
How will this be able to generate good captions?
You can ignore accuracy, it is a poor metric for this task. We instead use BLEU.
Will we get better predictions if we use GloVe vectors as they cover a wider corpus and account for relations between words?
It depends on the specifics of the model and the dataset. Try it and see.
hi, Jason
I’m a bit confused. one picture in the data set corresponds to five sentences, which means that the label of each picture will choose one from these five sentences during the training?
We train it on one description or on each description. Give the model lots of ways to “think” about an image which may or may not be useful.
got it, thanks
Hi, Jason.
That’s a great article and it helped me a lot.
I just want to tell you that model.layers.pop() does not remove the layer from the model.
The features that I extracted are 1000 dimensional, not 4096.
(I do not know how it is working for you. Maybe it worked fine with older Keras.)
https://github.com/tensorflow/tensorflow/issues/22479
Regards.
The tutorial uses the Keras API directly, it looks like you are trying to change it to use tf.keras.
Hi Jason,
I am working a project of image captioning. I have read some papers of image captioning. However, I don’t which evalution they used. And I am confuse between corpus_bleu and sentence_bleu. Image captioning’s output is a sentence for an image. So I think we should calculate sentence_bleu for each image, then calculate the average, but I saw you use corpus_bleu.
Can you tell me which evaluation is suitable? Which was used in the papers?
Good question.
If you are interested in the metric used in a specific paper, perhaps contact the authors directly.
To learn the difference between the different BLEU scores, see this tutorial:
https://machinelearningmastery.com/calculate-bleu-score-for-text-python/
Hi again Jason,
So I have trained the model on my own dataset (Bengali language). I got the best val loss as 2.99.
Now the problem is, when I run the generate_desc function I get the following error:
ValueError: Data cardinality is ambiguous:
x sizes: 4096, 33
Please provide data which shares the same first dimension.
There was no such issue during training at all. What could possibly cause this?
Regards.
Sorry the error is gone. But the same caption is being generated for all the images.
Perhaps try tuning your model to the dataset.
ell done!
Perhaps you will need to adapt the code, I cannot diagnose the error off the cuff.
Hey,
How did you fix the data cardinality issue? I have it too
ValueError: Data cardinality is ambiguous:
x sizes: 2048, 1
Make sure all arrays contain the same number of samples.
I reshaped the features vector, in my case the features len for every image is 4096, the feature vector which is passed to the “generate_desc” is of shape (4096, ) , which is ambiguous for the model bcs it does not seem that it is a one sample/photo features vector.
The fix:
yhat = model.predict([np.reshape(photo, (1, 4096)),sequence], verbose=0)
Hey Jason, thank you for an amazing tutorial.
I have one question though,
I tried using the above given VGG16 model, the highest BLEU score I reached is 0.35
And using Xception, I got 0.37
How can I increase this?
Nice work.
Good question, some of the suggestions here may help:
https://machinelearningmastery.com/start-here/#better
Hi , this error is coming for me. can anyone help me plz ?
FileNotFoundError: [WinError 3] The system cannot find the path specified: ‘Flickr8k_Dataset’
Ensure you download the dataset and run the code from the same directory as the unzipped dataset, e.g. from the command line.
Hey Jason, thanks for sharing such an awesome tutorial. I enjoyed reading it now soon will try to implement it.
But just out of curiosity is there any tutorial which can generate images from captions i.e.(Text-to-Image synthesis)
Thanks.
I hope to write a tutorial on that topic in the future. Probably a GAN would be used.
Hey, so I am interested in using this source code in my own project. So how can I cite this?
Good question, this will help:
https://machinelearningmastery.com/faq/single-faq/how-do-i-reference-or-cite-a-book-or-blog-post
hey jason i m getting error
—————————————————————————
KeyError Traceback (most recent call last)
in ()
142 print(‘Descriptions: train=%d’ % len(train_descriptions))
143 # photo features
–> 144 train_features = load_photo_features(‘features.pkl’, train)
145 print(‘Photos: train=%d’ % len(train_features))
146 # prepare tokenizer
1 frames
in (.0)
64 all_features = load(open(filename, ‘rb’))
65 # filter features
—> 66 features = {k: all_features[k] for k in dataset}
67 return features
68
KeyError: ‘2855417531_521bf47b50’
Sorry to hear that, this will help:
https://machinelearningmastery.com/faq/single-faq/why-does-the-code-in-the-tutorial-not-work-for-me
Hi jason,
AWS ec2 instance don’t have sufficient memory to extract and install CUDA for tensorflow.
No need, if you use an existing instance, no need to install cuda as it is already installed and ready to use:
https://machinelearningmastery.com/develop-evaluate-large-deep-learning-models-keras-amazon-web-services/
Hello Jason
I’m preparing photo data and getting this error can you resolve this.
tensorflow.python.framework.errors_impl.ResourceExhaustedError: OOM when allocating tensor with shape[25088,4096] and type float on /job:localhost/replica:0/task:0/device:CPU:0 by allocator mklcpu [Op:RandomUniform]
The error suggests you have run out of memory.
Perhaps try running on a machine with more memory, like an EC2 instance.
Yeah, I’m running it on EC2 instance 1gb ram free instance.
You may need more system memory, e.g. try the instance described here:
https://machinelearningmastery.com/develop-evaluate-large-deep-learning-models-keras-amazon-web-services/
Hi Jason,
Thanks for another great article. You have done it again. I’d not be far off saying that you are one of my inspirations on my journey to Machine Learning. I have followed your articles for quite a while, ranging from small queries to entire topics like this one.
I was curious about how this model performs on Flickr30K dataset. Unfortunately using same hyper-parameters led to the model output just 1 sentence overall. The sentence being ” man in blue shirt is sitting on the ground with his arms crossed end end of the ground end end of the ground end end of the ground end end of the ground end end of the ground end end of the ground end end of the ground end end of the ground end end of the ground end end of the ground end end of the ground end end of the ground end”. (The max length for this dataset was 74).
I have used the progressive loading using generators as instructed by your tutorial. Could you point out any possible reasons why this would be happening?
PS: I haven’t run the model on Flickr8k to confirm that my implementation is correct or not.
Best!
Thanks.
Perhaps the model is overfit, try tuning the learning hyperparameters, or perhaps even a larger model.
I have copy pasted same code but with inception model. It giving me a mismatch error.
Can you please slove my issue
This will help:
https://machinelearningmastery.com/faq/single-faq/can-you-read-review-or-debug-my-code
I am getting this error please help me to resolve
ValueError: could not broadcast input array from shape (47,1000) into shape (47)
Sorry to hear that, this will help:
https://machinelearningmastery.com/faq/single-faq/why-does-the-code-in-the-tutorial-not-work-for-me
I am getting this one please help
ValueError: No gradients provided for any variable: [’embedding_8/embeddings:0′, ‘dense_24/kernel:0’, ‘dense_24/bias:0’, ‘lstm_8/lstm_cell_8/kernel:0’, ‘lstm_8/lstm_cell_8/recurrent_kernel:0’, ‘lstm_8/lstm_cell_8/bias:0’, ‘dense_25/kernel:0’, ‘dense_25/bias:0’, ‘dense_26/kernel:0’, ‘dense_26/bias:0’].
I’m sorry to hear that, this will help:
https://machinelearningmastery.com/faq/single-faq/why-does-the-code-in-the-tutorial-not-work-for-me
I have tried that on colab but displays that error
I recommend not using colab.
First I tried on Jupiter but I got error then tried on colab other than that?
I’m getting a strange error.
While training X1train, X2train and ytrain using “create_sequences” function, the following error is popping up.
Traceback (most recent call last):
File “”, line 1, in
X1train, X2train, ytrain = create_sequences(tokenizer, max_length, train_descriptions, train_features, vocab_size)
File “”, line 21, in create_sequences
return array(X1), array(X2), array(y)
TypeError: array() argument 1 must be a unicode character, not list
Could you please help me with this?
Sorry to hear that, this may help:
https://machinelearningmastery.com/faq/single-faq/why-does-the-code-in-the-tutorial-not-work-for-me
Are you able to confirm that your libraries are up to date (e.g, check version numbers)? – Yes, they’re up to date.
Are you able to confirm that you copied all of the code exactly (preserving white space)? – Definitely
Are you able to confirm that you saved any required data files in the same folder as the code? – Yes
Have you tried running the code from the command line, not a notebook or an IDE? – Yes sir.
Have you tried searching for a similar error in the comments or on StackOverflow? – No specific solution found on StackOverflow or Github either.
Please Help!
I found the issue and updated the tutorial.
Hi Jason,
Just curious about what the issue was. Do you mind sharing the details?
BTW, thank you so much for such a beautiful piece of code.
The preparation of the VGG model required modification due to an API change. E.g. the pop() function on the layers no longer did anything.
When defining model with code
model = define_model(vocab_size, max_length)
Got error
Traceback (most recent call last):
File “”, line 1, in
model = define_model(vocab_size, max_length)
File “”, line 3, in define_model
inputs1 = input(shape=[4096,])
TypeError: raw_input() got an unexpected keyword argument ‘shape’
Help with this please.
This will help:
https://machinelearningmastery.com/faq/single-faq/why-does-the-code-in-the-tutorial-not-work-for-me
I am facing Name Error for the below code while fitting the model. Please help me resolve this.
# define the captioning model
def define_model(vocab_size, max_length):
# define checkpoint callback
filepath = ‘model-ep{epoch:03d}-loss{loss:.3f}-val_loss{val_loss:.3f}.h5′
checkpoint = ModelCheckpoint(filepath, monitor=’val_loss’, verbose=1, save_best_only=True, mode=’min’)
# fit model
model.fit([X1train, X2train], ytrain, epochs=20, verbose=2, callbacks=[checkpoint], validation_data=([X1test, X2test], ytest))
NameError Traceback (most recent call last)
in
1 # fit model
—-> 2 model.fit([X1train, X2train], ytrain, epochs=20, verbose=2, callbacks=[checkpoint], validation_data=([X1test, X2test], ytest))
NameError: name ‘model’ is not defined
Please help me fix this .
I’m sorry to hear that, this will help:
https://machinelearningmastery.com/faq/single-faq/why-does-the-code-in-the-tutorial-not-work-for-me
Thanks Jason, I tried that.
I’m sorry to say, but stuck with this now:
MemoryError Traceback (most recent call last)
in
152 print(‘Description Length: %d’ % max_length)
153 # prepare sequences
–> 154 X1train, X2train, ytrain = create_sequences(tokenizer, max_length, train_descriptions, train_features, vocab_size)
155
156 # dev dataset
in create_sequences(tokenizer, max_length, descriptions, photos, vocab_size)
107 X2.append(in_seq)
108 y.append(out_seq)
–> 109 return array(X1), array(X2), array(y)
110
111 # define the captioning model
MemoryError: Unable to allocate 4.68 GiB for an array with shape (306404, 4096) and data type float32
How can this be solved?
It looks like you ran out of memory.
Try running on a machine with more memory.
Try running on AWS EC2.
Try using a smaller model or less data.
Hi Jason:
Awesome tutorial! It’s an incredible achievement of Computer Vision and NLP techniques!
Thank you Jason it’s very inspirational!
I share my comments and results.
1) Image caption HORIZON:
– For when a tutorial that gives voice to the predicted captions of the images?
– I guess these techniques can also be applied as alternative to multi-label image classification, isn’t it?
– Also It could be useful to explicit the image pattern recognition obtained during the “solo” computer vision training, by labelling the image through captioning them, do you agree?
2) MINOR COMMENTS:
– There are only 8,091 Images in image dataset folder but we got 8092 from text Image description: the missing image is: “2258277193_586949ec62.jpg”
– I realise that you do not apply “stopwords” in cleaning text process. Why?
– your manual data-generator does not admit to setup parallel process (workers/threads arguments) while fitting keras model (model.fit_generator)
3) I EXPERIMENT with YOUR BASELINE MODEL
– I reduced the vocabulary length by filtering-out words that repeat a minimum number of times (e.g. 5 times). I got worse results using 10 times repetition but, a faster code.
– I apply Glove pre-trained words library within Embedding layer training. The results are better.
– I tried to apply Conv1D besides MaxPool1D layers following the embedding layers. But I get worse results. Probably because I can not use mask_zero=True, because Conv1D does not support it.
– I realised there are other alternatives to word coding “texts_to_sequences” such as “texts_to_matrix”, or “one_hot” but as you do I do not apply either.
– I have 16 GB RAM memory on my Mac but I can run the whole dataset training but, surprisingly the code was quicker using your data generator 11minutes/epoch vs 15minutes/epoch. I guess because it works around RAM limit.
– I also applied validation data on training generation dataset. So I can apply directly the best_model from callbacks list (for progressive training).
– In addition to VGG16 Model I applied “Inceptionv3” app. The results are better than VGG16.
– I complete the code, including the output Inceptionv3 prediction within my code. So I can plot the images examples with X-axis = image caption prediction andY-axis = the Image Inceptionv3 Class prediction. So you can get a more complete vision of the results obtained using Computer vision alone plus Image Caption.
– I select a lower learning rate for the epochs training, to get a lower losses.
– Anyway, the dog image example I think it is a very simple case because, when I try other images examples, sometimes the image captions are very funny and you get a completely crazy caption !
– I believe the most singular contribution of my code experiment was replacing the “add” layer (were the two models merge) vs “Multiply” or “Subtract” layers. I got the best results with “Subtract” layer (subtracting the outputs of the NLP model from Image Features model). I do not know why the model performs better with subtract layer.
– I got for image example: “black and white dog is running on the beach” besides, the “Border_Collie” from Inceptionv3 Image prediction-. With very similars BLEU scores to you.
BLEU-1 = 0.570
BLEU-2 = 0.343
BLEU-3 = 0.133
BLEU-4 = 0.133
Jason your Tutorial collection is astonish and also because you are a great teacher. Thank you.
Thanks JG.
Images in a database can be described, then humans can search the database for images that match their free form requirements.
Stop words increase the complexity of the problem and don’t add a lot of semantic meaning. You can add them back if you like.
Very cool experiments, thank you so much for sharing!
Dear Jason,
I have just finished the reading of your book « Deep Learning for Natural Language Processing». It’s excellent, contains tons of information and I thank you for this journey in NLP.
I have posted my review on your book here: http://questioneurope.blogspot.com/2020/08/deep-learning-for-natural-language.html
Dominique
Thanks, well done!
hey jason,
I am having a problem,
TypeError Traceback (most recent call last)
in ()
168 generator = data_generator(train_descriptions, train_features, tokenizer, max_length, vocab_size)
169 # fit for one epoch
–> 170 Model.fit_generator(generator, epochs=1, steps_per_epoch=steps, verbose=1)
171 # save model
172 model.save(‘model_’ + str(i) + ‘.h5’)
/usr/local/lib/python3.6/dist-packages/keras/legacy/interfaces.py in wrapper(*args, **kwargs)
89 warnings.warn(‘Update your
' + object_name + 'call to the ‘ +90 ‘Keras 2 API: ‘ + signature, stacklevel=2)
—> 91 return func(*args, **kwargs)
92 wrapper._original_function = func
93 return wrapper
TypeError: fit_generator() missing 1 required positional argument: ‘generator’
can you suggest a solution please
Sorry to hear that, the tips here may help:
https://machinelearningmastery.com/faq/single-faq/can-you-read-review-or-debug-my-code
Hi. I have a question how can we add attention machenisim to this code or on this model.??
Thanks
Not off hand.
Hello Jason,
Would you please tell me how to do this thing on Googlecolab? I am having hard time with “extract_features” function in preparation section.
This is a common question that I answer here:
https://machinelearningmastery.com/faq/single-faq/do-code-examples-run-on-google-colab
Hey I’m having this problem. Can you help me?
Traceback (most recent call last):
File “load.py”, line 72, in
train_features = load_features(‘features.pkl’,train)
File “load.py”, line 33, in load_features
features = {k: all_features[k] for k in dataset}
File “load.py”, line 33, in
features = {k: all_features[k] for k in dataset}
KeyError: ‘3356642567_f1d92cb81b.jpg’
Sorry to hear that, the tips here may help:
https://machinelearningmastery.com/faq/single-faq/why-does-the-code-in-the-tutorial-not-work-for-me
epochs = 20
steps = len(train_descriptions)
for i in range(epochs):
# create the data generator
generator = data_generator(train_descriptions, train_features, tokenizer, max_length, vocab_size)
# fit for one epoch
model.fit_generator(generator, epochs=1, steps_per_epoch=steps, verbose=1)
# save model
model.save(‘model_’ + str(i) + ‘.h5’)
In the above code, there are two epoch initialzation , epochs=20 and epochs=1 (in fit_generator), can you describe what both of them actually mean with help of a rough example that can distinguish the significance of both ?
There’s no contradiction. We are enumerating the epochs manually.
E.g. the first is our manual outer loop, the second is the inner call to the Keras API to run one epoch.
while running i got
model_1.h5
model_2.h5 like that till model_19.h
but non of file made like model-ep002-loss3.245-val_loss3.612.h5. where I can find this file.
Your file names will be different. Use the files you have.
Hello once again
When I trained the model under progressive loading then in the first epoch only I’m getting NaN loss. Why would that be so?
Perhaps some of these tips will help:
https://machinelearningmastery.com/faq/single-faq/why-does-the-code-in-the-tutorial-not-work-for-me
I have looked for all of them but then also the loss is coming about to be Nan. Any other suggestions about why this would be happening?
Only that library versions are not up to date or step was skipped in data preparation or modeling from the tutorial.
Hello, first thanks for this great article!i’ve learnt alot from your code.
i tried it with my laptop but somehow i have a error when fitting the model(something like failed to call GraphViz),, i have it installed but the error is not gone…
just wondering if i can download the final model somewhere so i can try it with my own pics?
Thanks.
Yes, you can install pydot and pygraphviz, or comment out the call to the plot_model – which is not needed to complete the tutorial.
Thanks Jason, that worked!
Well done!
Also, i’m thinking if it is possible to have algorithms like YOLO that will capture objects in a pic, and then create captions from these object tags?
like we detect one man , a dog ,grass, we may infer the caption as ‘ a man playing with a dog in a park’?
Yes, you can use two models in that way.
Hey, Can you please me to execute the code for image captioning using object detection model YOLO.
Hi Maverick…The following resource may be of interest to you:
https://machinelearningmastery.com/how-to-perform-object-detection-with-yolov3-in-keras/
Hey James..I have implemented object detection model but I am not able to incorporate image captioning model with YOLO to generate caption. Can you please help me with this.
Hi, thanks for the article.
I followed it and trained the model but at the time of inferencing and generating new captions, I get the error
CUDNN_STATUS_BAD_PARAM.
I am running it on google colab with gpu enabled, in cpu, it might take centuries to run.
Please help of possible.
Sorry to hear that, I can’t help you with google colab:
https://machinelearningmastery.com/faq/single-faq/do-code-examples-run-on-google-colab
Hey Ashutosh, how did you get started with google colab?
I am trying to replicate the same code in colab but not getting even the pickle file of features extracted.
Hi Jason,
Thank you for wonder full explanation.
I struct in some where
# fit for one epoch
model.fit_generator(generator, epochs=1, steps_per_epoch=steps, verbose=1)
this line giving error below
File “F:\ProgramData\Anaconda3\lib\site-packages\tensorflow\python\framework\func_graph.py”, line 973, in wrapper
raise e.ag_error_metadata.to_exception(e)
ValueError: in user code:
F:\ProgramData\Anaconda3\lib\site-packages\tensorflow\python\keras\engine\training.py:806 train_function *
return step_function(self, iterator)
F:\ProgramData\Anaconda3\lib\site-packages\tensorflow\python\keras\engine\training.py:796 step_function **
outputs = model.distribute_strategy.run(run_step, args=(data,))
F:\ProgramData\Anaconda3\lib\site-packages\tensorflow\python\distribute\distribute_lib.py:1211 run
return self._extended.call_for_each_replica(fn, args=args, kwargs=kwargs)
F:\ProgramData\Anaconda3\lib\site-packages\tensorflow\python\distribute\distribute_lib.py:2585 call_for_each_replica
return self._call_for_each_replica(fn, args, kwargs)
F:\ProgramData\Anaconda3\lib\site-packages\tensorflow\python\distribute\distribute_lib.py:2945 _call_for_each_replica
return fn(*args, **kwargs)
F:\ProgramData\Anaconda3\lib\site-packages\tensorflow\python\keras\engine\training.py:789 run_step **
outputs = model.train_step(data)
F:\ProgramData\Anaconda3\lib\site-packages\tensorflow\python\keras\engine\training.py:757 train_step
self.trainable_variables)
F:\ProgramData\Anaconda3\lib\site-packages\tensorflow\python\keras\engine\training.py:2737 _minimize
trainable_variables))
F:\ProgramData\Anaconda3\lib\site-packages\tensorflow\python\keras\optimizer_v2\optimizer_v2.py:562 _aggregate_gradients
filtered_grads_and_vars = _filter_grads(grads_and_vars)
F:\ProgramData\Anaconda3\lib\site-packages\tensorflow\python\keras\optimizer_v2\optimizer_v2.py:1271 _filter_grads
([v.name for _, v in grads_and_vars],))
ValueError: No gradients provided for any variable: [’embedding_5/embeddings:0′, ‘dense_15/kernel:0’, ‘dense_15/bias:0’, ‘lstm_5/lstm_cell_5/kernel:0’, ‘lstm_5/lstm_cell_5/recurrent_kernel:0’, ‘lstm_5/lstm_cell_5/bias:0’, ‘dense_16/kernel:0’, ‘dense_16/bias:0’, ‘dense_17/kernel:0’, ‘dense_17/bias:0’].
I am facing this error:
ValueError: No model found in config file.
in ()
179 generator = data_generator(train_descriptions, train_features, tokenizer, max_length)
180 # fit for one epoch
–> 181 model.fit_generator(generator, epochs=1, steps_per_epoch=len(train_descriptions), verbose=1)
182 # save model
183 model.save(‘model_’ + str(i) + ‘.h5’)
12 frames
/usr/local/lib/python3.6/dist-packages/tensorflow/python/framework/func_graph.py in wrapper(*args, **kwargs)
971 except Exception as e: # pylint:disable=broad-except
972 if hasattr(e, “ag_error_metadata”):
–> 973 raise e.ag_error_metadata.to_exception(e)
974 else:
975 raise
How should i solve this?
Sorry to hear that, perhaps some of these suggestions will help:
https://machinelearningmastery.com/faq/single-faq/why-does-the-code-in-the-tutorial-not-work-for-me
Hello jason,
I’ve been trying to compile the code for extracting the features from the image. I am getting the following error:
PermissionError Traceback (most recent call last)
in
30 # extract features from all images
31 directory = ‘Flickr8k_Dataset’
—> 32 features = extract_features(directory)
33 print(‘Extracted Features: %d’ % len(features))
34 # save to file
in extract_features(directory)
12 # load an image from file
13 filename = directory + ‘/’ + name
—> 14 image = load_img(filename, target_size=(224, 224))
15 # convert the image pixels to a numpy array
16 image = img_to_array(image)
~\AppData\Local\Programs\Python\Python37\lib\site-packages\tensorflow\python\keras\preprocessing\image.py in load_img(path, grayscale, color_mode, target_size, interpolation)
299 “””
300 return image.load_img(path, grayscale=grayscale, color_mode=color_mode,
–> 301 target_size=target_size, interpolation=interpolation)
302
303
~\AppData\Local\Programs\Python\Python37\lib\site-packages\keras_preprocessing\image\utils.py in load_img(path, grayscale, color_mode, target_size, interpolation)
111 raise ImportError(‘Could not import PIL.Image. ‘
112 ‘The use of
load_imgrequires PIL.’)–> 113 with open(path, ‘rb’) as f:
114 img = pil_image.open(io.BytesIO(f.read()))
115 if color_mode == ‘grayscale’:
PermissionError: [Errno 13] Permission denied: ‘Flickr8k_Dataset/Flicker8k_Dataset’
I have tried changing the permission for the folder by giving it full access. But the error seems to persist. I ran the next part of the code which extracts the descriptions of the images and it ran without any errors. I’m working with jupyter notbeook in Visual Studio code.
Thank you!
Looks like you do not have permission on your workstation to access the dataset.
Maybe talk to your admin or check the help documentation for your operating system.
I run this code on my personal machine. So, I don’t know what you meant by admin. Do you have any suggestions for softwares where I can run this code?
The error suggests you do not have permission to access files on your machine, it suggests you were using a work machine controlled by someone else.
If you have control over your machine, give yourself permission to access the files, or place the files in a location where you can access them with permissions.
Sorry, I don’t know a thing about windows permission administration, I have not used the operating system.
Thank you, Jason!
I had one small question. Could you let me know which IDE you have used to run this code? Do you have any suggestions where you think this code will run better?
Yes, I use sublime text editor and run examples from the command line:
https://machinelearningmastery.com/faq/single-faq/how-do-i-run-a-script-from-the-command-line
Hello Jason,
Im getting the following error:
UnidentifiedImageError: cannot identify image file
Any idea how can I solve this?
I have not seen this error before, sorry.
same error, any idea how to resolve?
Hello, I get this error.how can I solve it?
ValueError: Input 0 of layer dense_18 is incompatible with the layer: expected axis -1 of input shape to have value 4096 but received input with shape [1, 1000]
These tips may help:
https://machinelearningmastery.com/faq/single-faq/why-does-the-code-in-the-tutorial-not-work-for-me
@Md Shihab Uddin, I am facing the same error. Did you solve it?
@Jason Brownlee, Could you help me to solve this error?
The code works as is, see this:
https://machinelearningmastery.com/faq/single-faq/why-does-the-code-in-the-tutorial-not-work-for-me
@Jason Brownlee, I am still facing the same issue. Please help me to solve this issue.
Hi,
You noted the following in your article regarding evaluating the models:
“Note: Your results may vary given the stochastic nature of the algorithm or evaluation procedure, or differences in numerical precision. Consider running the example a few times and compare the average outcome.”
I can understand how the final model during training i.e. weights, loss etc may vary as you’ve stated. However, when I run the same test image through the trained model, I obtain a different prediction every time – is this due to the same reason as above? or some other reason – shouldn’t the final output always be the same for the same image?
Would appreciate your explanation.
I’m using the evaluation procedure from here: https://www.tensorflow.org/tutorials/text/image_captioning#caption
Thanks!
A trained model should make the same prediction each time. If it does not, check your code – perhaps you are accidentally training or there is a bug.
Thanks. I’ve spotted the issue.
The evaluation procedure from the TensorFlow tutorial uses the line below to convert the probability to an integer. As it’s random, it always generates random predictions. By changing the evaluation method to argmax instead, I get consistent predictions
from tensorflow:
predicted_id = tf.random.categorical(predictions, 1)[0][0].numpy()
Update:
predicted_id = tf.expand_dims(tf.argmax(predictions, -1), 0).numpy()[0][0]
Happy to hear you solved your problems.
Hello Jason,
I’ve trained the model with progressive loading for 3 epochs. When I used a new image to generate captions, it gave me the accurate caption. But everytime I use an image that has beach in it, I get the same caption, “man in red shirt is standing on the beach”, even if there no man in the image. I tried re fitting the model. But the issue is the same. Do you have any suggestions on how to improve the accuracy?
Perhaps try retraining the model.
Perhaps try a smaller learning rate.
Do you mean use a smaller number of epochs?
No. But perhaps try that too.
How can I change the learning rate?
If you are new to tuning the learning rate, I recommend starting here:
https://machinelearningmastery.com/understand-the-dynamics-of-learning-rate-on-deep-learning-neural-networks/
model.fit([X1train, X2train], ytrain, epochs=20, verbose=2, callbacks=[checkpoint], validation_data=([X1test, X2test], ytest))
Its showing that my GPU is performing tasks but by epoch is stuck at 1st one and it isn’t showing any progress.
I have an RTX 2070 Max-Q GPU and an i7 Processor
can anyone help me out?
Perhaps some of these tips will help:
https://machinelearningmastery.com/faq/single-faq/why-does-the-code-in-the-tutorial-not-work-for-me
i’m getting this error after completing 1 epochs, while running Progressive loading code example.
ValueError: Failed to find data adapter that can handle input: ,
what should I do? please help me
ValueError: Failed to find data adapter that can handle input: , this error
Sorry to hear that, this may give you some ideas:
https://machinelearningmastery.com/faq/single-faq/why-does-the-code-in-the-tutorial-not-work-for-me
hello sir, while running the below code after some execution i am getting the error:
# extract features from each photo in the directory
def extract_features(directory):
# load the model
model = VGG16()
# re-structure the model
model = Model(inputs=model.inputs, outputs=model.layers[-2].output)
# summarize
#print(model.summary())
# extract features from each photo
features = dict()
for name in listdir(directory):
# load an image from file
filename = directory + ‘/’ + name
image = load_img(filename, target_size=(224, 224))
# convert the image pixels to a numpy array
image = img_to_array(image)
# reshape data for the model
image = image.reshape((1, image.shape[0], image.shape[1], image.shape[2]))
# prepare the image for the VGG model
image = preprocess_input(image)
# get features
feature = model.predict(image, verbose=0)
# get image id
image_id = name.split(‘.’)[0]
# store feature
features[image_id] = feature
print(‘>%s’ % name)
return features
# extract features from all images
directory = ‘/content/drive/My Drive/Flickr_Data/Images/’
features = extract_features(directory)
print(‘Extracted Features: %d’ % len(features))
# save to file
dump(features, open(‘features.pkl’, ‘wb’))
This is the error comes after some execution with my image file. I could not able to figure out. please help me!!!
UnidentifiedImageError Traceback (most recent call last)
in ()
32 # extract features from all images
33 directory = ‘/content/drive/My Drive/Flickr_Data/Images/’
—> 34 features = extract_features(directory)
35 print(‘Extracted Features: %d’ % len(features))
36 # save to file
3 frames
/usr/local/lib/python3.6/dist-packages/PIL/Image.py in open(fp, mode)
2860 warnings.warn(message)
2861 raise UnidentifiedImageError(
-> 2862 “cannot identify image file %r” % (filename if filename else fp)
2863 )
2864
UnidentifiedImageError: cannot identify image file
I’m sorry to hear that, I have some suggestions here that may help:
https://machinelearningmastery.com/faq/single-faq/why-does-the-code-in-the-tutorial-not-work-for-me
hi, have you solved this problem? i got this error too
I was unable to train the model normal way even using AWS m5.2xlarge (32gig). So I tried the generator variant but it shows the error when I’m fitting it
WARNING:tensorflow:From project1.py:339: Model.fit_generator (from tensorflow.python.keras.engine.training) is deprecated and will be removed in a future version.
Instructions for updating:
Please use the Model. fit, which supports generators.
Traceback (most recent call last):
File “project1.py”, line 339, in
model.fit_generator(generator, epochs=1, steps_per_epoch=steps, verbose=1)
File “/home/ubuntu/.local/lib/python3.6/site-packages/tensorflow/python/util/deprecation.py”, line 324, in new_func
return func(*args, **kwargs)
File “/home/ubuntu/.local/lib/python3.6/site-packages/tensorflow/python/keras/engine/training.py”, line 1829, in fit_generator
initial_epoch=initial_epoch)
File “/home/ubuntu/.local/lib/python3.6/site-packages/tensorflow/python/keras/engine/training.py”, line 108, in _method_wrapper
return method(self, *args, **kwargs)
File “/home/ubuntu/.local/lib/python3.6/site-packages/tensorflow/python/keras/engine/training.py”, line 1098, in fit
tmp_logs = train_function(iterator)
File “/home/ubuntu/.local/lib/python3.6/site-packages/tensorflow/python/eager/def_function.py”, line 780, in __call__
result = self._call(*args, **kwds)
File “/home/ubuntu/.local/lib/python3.6/site-packages/tensorflow/python/eager/def_function.py”, line 823, in _call
self._initialize(args, kwds, add_initializers_to=initializers)
File “/home/ubuntu/.local/lib/python3.6/site-packages/tensorflow/python/eager/def_function.py”, line 697, in _initialize
*args, **kwds))
File “/home/ubuntu/.local/lib/python3.6/site-packages/tensorflow/python/eager/function.py”, line 2855, in _get_concrete_function_internal_garbage_collected
graph_function, _, _ = self._maybe_define_function(args, kwargs)
File “/home/ubuntu/.local/lib/python3.6/site-packages/tensorflow/python/eager/function.py”, line 3213, in _maybe_define_function
graph_function = self._create_graph_function(args, kwargs)
File “/home/ubuntu/.local/lib/python3.6/site-packages/tensorflow/python/eager/function.py”, line 3075, in _create_graph_function
capture_by_value=self._capture_by_value),
File “/home/ubuntu/.local/lib/python3.6/site-packages/tensorflow/python/framework/func_graph.py”, line 986, in func_graph_from_py_func
func_outputs = python_func(*func_args, **func_kwargs)
File “/home/ubuntu/.local/lib/python3.6/site-packages/tensorflow/python/eager/def_function.py”, line 600, in wrapped_fn
return weak_wrapped_fn().__wrapped__(*args, **kwds)
File “/home/ubuntu/.local/lib/python3.6/site-packages/tensorflow/python/framework/func_graph.py”, line 973, in wrapper
raise e.ag_error_metadata.to_exception(e)
ValueError: in user code:
/home/ubuntu/.local/lib/python3.6/site-packages/tensorflow/python/keras/engine/training.py:806 train_function *
return step_function(self, iterator)
/home/ubuntu/.local/lib/python3.6/site-packages/tensorflow/python/keras/engine/training.py:796 step_function **
outputs = model.distribute_strategy.run(run_step, args=(data,))
/home/ubuntu/.local/lib/python3.6/site-packages/tensorflow/python/distribute/distribute_lib.py:1211 run
return self._extended.call_for_each_replica(fn, args=args, kwargs=kwargs)
/home/ubuntu/.local/lib/python3.6/site-packages/tensorflow/python/distribute/distribute_lib.py:2585 call_for_each_replica
return self._call_for_each_replica(fn, args, kwargs)
/home/ubuntu/.local/lib/python3.6/site-packages/tensorflow/python/distribute/distribute_lib.py:2945 _call_for_each_replica
return fn(*args, **kwargs)
/home/ubuntu/.local/lib/python3.6/site-packages/tensorflow/python/keras/engine/training.py:789 run_step **
outputs = model.train_step(data)
/home/ubuntu/.local/lib/python3.6/site-packages/tensorflow/python/keras/engine/training.py:757 train_step
self.trainable_variables)
/home/ubuntu/.local/lib/python3.6/site-packages/tensorflow/python/keras/engine/training.py:2737 _minimize
trainable_variables))
/home/ubuntu/.local/lib/python3.6/site-packages/tensorflow/python/keras/optimizer_v2/optimizer_v2.py:562 _aggregate_gradients
filtered_grads_and_vars = _filter_grads(grads_and_vars)
/home/ubuntu/.local/lib/python3.6/site-packages/tensorflow/python/keras/optimizer_v2/optimizer_v2.py:1271 _filter_grads
([v.name for _, v in grads_and_vars],))
ValueError: No gradients provided for any variable: [’embedding/embeddings:0′, ‘dense/kernel:0’, ‘dense/bias:0’, ‘lstm/lstm_cell/kernel:0’, ‘lstm/lstm_cell/recurrent_kernel:0’, ‘lstm/lstm_cell/bias:0’, ‘dense_1/kernel:0’, ‘dense_1/bias:0’, ‘dense_2/kernel:0’, ‘dense_2/bias:0’].
Please give me a solution…….. I have to meet deadlines
Sorry to hear that you are having trouble, I can confirm the code works as described. Here are some suggestions:
https://machinelearningmastery.com/faq/single-faq/why-does-the-code-in-the-tutorial-not-work-for-me
you can moddify the code of data generators return from
this yield [[in_img, in_seq], out_word)
to
yield ([in_img, in_seq], out_word)
How can I get flickr30k dataset? I searched a lot but couldn’t find it. The link they provide after filling up the form is broken and says forbidden. Can anyone have the zip file that I can get directly
Sorry, I only have a copy of the Flickr8k Dataset
I found one on GitHub but I have to create text files by converting them from CSV
hai dont worry it is vvv simple
this is the link for the dataset
https://www.kaggle.com/ming666/flicker8k-dataset
go through that link and download the 2gb sized data file …
The dataset download is linked directly in the tutorial.
Hi Jason. This tutorial is fantastic thank you. You also have the patience of a saint responding to all of these. Keep up the great work!
I’ve adapted this tutorial to run on some images that are pretty difficult to classify anyway (they are similar).
I’m getting an output but it is the same words for every image. Does this mean the model is overfit or underfit? What are the most likely parameters I should look at changing?
Thanks.
Thanks!
It does sound like the model is overfit.
Perhaps try fitting the model again and compare results.
Perhaps try early stopping.
Perhaps try more capacity.
Perhaps try some of the ideas here:
https://machinelearningmastery.com/introduction-to-regularization-to-reduce-overfitting-and-improve-generalization-error/
Thanks Jason. I’ll give it a go.
Let me know how you go.
hai jason i got this error when i running the progresive loading on my lap which has 8gb ram
ValueError: No gradients provided for any variable: [’embedding_1/embeddings:0′, ‘dense_3/kernel:0’, ‘dense_3/bias:0’, ‘lstm_1/lstm_cell_1/kernel:0’, ‘lstm_1/lstm_cell_1/recurrent_kernel:0’, ‘lstm_1/lstm_cell_1/bias:0’, ‘dense_4/kernel:0’, ‘dense_4/bias:0’, ‘dense_5/kernel:0’, ‘dense_5/bias:0’].
can u please suggest methe any solution
Perhaps try the “progressive loading” section of the tutorial.
tahnk u vvv much for u jason for suchh an awsome project
You’re welcome.
Is this project independent of tensorflow version?
Yes, it works with many different version, although I recommend using the latest version.
Please Help
ValueError: Layer model expects 2 input(s), but it received 3 input tensors. Inputs received: [, , ]
This occured when i was using progressive loading (less RAM)
Perhaps these tips will help:
https://machinelearningmastery.com/faq/single-faq/why-does-the-code-in-the-tutorial-not-work-for-me
Is there a latest (optimized) version of this program, because it has low accuracy. I need help how to fine tune the model, how to reduce vocabulary, and how to use inception instead of vgg16? some snippets would be really helpful, specially the code snippet to use inception instead of vgg16. Thanks any help would be appreciated. This is a great post thanks
Thanks for the suggestion, I look into preparing an updated version.
Hello, I followed every single step but I am getting this error when I fit the model:
ValueError: Layer model expects 2 input(s), but it received 3 input tensors. Inputs received: [, , ]
I don’t understand the reason, as inputs and outputs to the model , this was supplied:
model = Model(inputs=[inputs1, inputs2], outputs=outputs)
Then What is the problem here?
I am running on google colab here.
Perhaps try running on your workstation instead of colab? or on AWS EC2?
Sorry, the error did not come for some reason, here it is again:
ValueError: Layer model expects 2 input(s), but it received 3 input tensors. Inputs received: [, , ]
Yes i faced same error. You faced it because you may be using latest tensorflow (v.24). Whereas this code only works with tensorflow 1.x.
To overcome this problem i used Tensorflow 1.13.1 and keras 2.2.4.
We really need a latest version which works on tensorflow 2
This is incorrect.
All code examples have been updated and tested on TensorFlow 2.
I have updated the progressive loading example and changed
To
I have also re-run all examples this morning with the latest version of Keras and Tensorflow without incident.
Please check your library versions using the script in the above tutorial, and ensure you have copied the code correctly.
hey Jason, I followed your tutorial to train a model using progressive loading on the Flickr 30k dataset. I’m using several VMs to train the model using 10 epochs and batch size of 3.
Train time ETA is 48 hours. Even if I decrease number of epochs or change batch size, ETA stays the same! Any explanation or tips to decrease training time?
Thank you in advance for any help you can offer!
It’s training very slowly and not very well at that. After about 30 hours the current loss is 5.66. I’ve even converted the features dataframe into a Delta Lake table to be read in through the generator, so I’m not quite sure what else I could do to make it better.
Try an AWS EC2 instance with lots of RAM and then load the entire training dataset into RAM and fit the model. It will be dramatically faster.
Yes, these tips may help:
https://machinelearningmastery.com/faq/single-faq/how-do-i-speed-up-the-training-of-my-model
Hello, I am having some trouble with the model.fit_generator method.
# train the model, run epochs manually and save after each epoch
epochs = 20
steps = len(train_descriptions)
for i in range(epochs):
# create the data generator
generator = data_generator(train_descriptions, train_features, tokenizer, max_length)
# fit for one epoch
model.fit_generator(generator, epochs=1, steps_per_epoch=steps, verbose=1)
# save model
model.save(‘/content/drive/Shareddrives/AITrust/model_’ + str(i) + ‘.h5’)
while running this cell, the following output is generated
/usr/local/lib/python3.6/dist-packages/tensorflow/python/keras/engine/training.py:1844: UserWarning:
Model.fit_generatoris deprecated and will be removed in a future version. Please useModel.fit, which supports generators.warnings.warn(‘
Model.fit_generatoris deprecated and ‘—————————————————————————
TypeError Traceback (most recent call last)
in ()
6 generator = data_generator(train_descriptions, train_features, tokenizer, max_length)
7 # fit for one epoch
—-> 8 model.fit_generator(generator, epochs=1, steps_per_epoch=steps, verbose=1)
9 # save model
10 model.save(‘/content/drive/Shareddrives/AITrust/model_’ + str(i) + ‘.h5′)
9 frames
/usr/local/lib/python3.6/dist-packages/numpy/core/numeric.py in full(shape, fill_value, dtype, order)
312 if dtype is None:
313 dtype = array(fill_value).dtype
–> 314 a = empty(shape, dtype, order)
315 multiarray.copyto(a, fill_value, casting=’unsafe’)
316 return a
TypeError: ‘function’ object cannot be interpreted as an integer
I am using tensorflow 2.4.0 and keras 2.4.3. I have also changed
out_seq = to_categorical([out_seq], num_classes=vocab_size)[0]
to
out_seq = to_categorical([out_seq], num_classes=vocab_size)
Sorry to hear that.
Perhaps trying copying the complete code example from the end of the section?
i have given data like csv consist of descriptions,imgpath, ,which tokenizer i use
Perhaps start wit the tokenizer used above as a starting point.
InvalidArgumentError: 2 root error(s) found.
(0) Invalid argument: Matrix size-incompatible: In[0]: [47,1000], In[1]: [4096,256]
[[node model_2/dense_6/MatMul (defined at :170) ]]
[[gradient_tape/model_2/embedding_2/embedding_lookup/Reshape/_34]]
sanity is not maintained in code, how to resove this?
Sorry to hear that, perhaps these tips will help:
https://machinelearningmastery.com/faq/single-faq/why-does-the-code-in-the-tutorial-not-work-for-me
Hi Ayush, can you solve this error is yes then please provide the solution.
Dataset: 6000
Descriptions: train=6000
Photos: train=6000
Vocabulary Size: 7507
—————————————————————————
TypeError Traceback (most recent call last)
in ()
30 print(‘Vocabulary Size: %d’ % vocab_size)
31 # determine the maximum sequence length
—> 32 max_length = max_length(train_descriptions)
33 print(‘Description Length: %d’ % max_length)
34 # prepare sequences
TypeError: ‘int’ object is not callable
why I am getting this error even though I have copy-pasted the code. How to resolve this issue?
Sorry to hear that, perhaps these tips will help:
https://machinelearningmastery.com/faq/single-faq/why-does-the-code-in-the-tutorial-not-work-for-me
# define the model
model = define_model(vocab_size, max_length)
# train the model, run epochs manually and save after each epoch
epochs = 20
steps = len(train_descriptions)
for i in range(epochs):
# create the data generator
generator = data_generator(train_descriptions, train_features, tokenizer, max_length, vocab_size)
# fit for one epoch
model.fit(generator,epochs=20,verbose=1,steps_per_epoch=steps)
# save model
model.save(‘model_’ + str(i) + ‘.h5’)
Model: “model_4”
__________________________________________________________________________________________________
Layer (type) Output Shape Param # Connected to
==================================================================================================
input_10 (InputLayer) [(None, 34)] 0
__________________________________________________________________________________________________
input_9 (InputLayer) [(None, 4096)] 0
__________________________________________________________________________________________________
embedding_4 (Embedding) (None, 34, 256) 1940224 input_10[0][0]
__________________________________________________________________________________________________
dropout_8 (Dropout) (None, 4096) 0 input_9[0][0]
__________________________________________________________________________________________________
dropout_9 (Dropout) (None, 34, 256) 0 embedding_4[0][0]
__________________________________________________________________________________________________
dense_12 (Dense) (None, 256) 1048832 dropout_8[0][0]
__________________________________________________________________________________________________
lstm_4 (LSTM) (None, 256) 525312 dropout_9[0][0]
__________________________________________________________________________________________________
add_4 (Add) (None, 256) 0 dense_12[0][0]
lstm_4[0][0]
__________________________________________________________________________________________________
dense_13 (Dense) (None, 256) 65792 add_4[0][0]
__________________________________________________________________________________________________
dense_14 (Dense) (None, 7579) 1947803 dense_13[0][0]
==================================================================================================
Total params: 5,527,963
Trainable params: 5,527,963
Non-trainable params: 0
__________________________________________________________________________________________________
Epoch 1/20
—————————————————————————
InvalidArgumentError Traceback (most recent call last)
in ()
9 generator = data_generator(train_descriptions, train_features, tokenizer, max_length, vocab_size)
10 # fit for one epoch
—> 11 model.fit(generator,epochs=20,verbose=1,steps_per_epoch=steps)
12 # save model
13 model.save(‘model_’ + str(i) + ‘.h5’)
6 frames
/usr/local/lib/python3.6/dist-packages/tensorflow/python/eager/execute.py in quick_execute(op_name, num_outputs, inputs, attrs, ctx, name)
58 ctx.ensure_initialized()
59 tensors = pywrap_tfe.TFE_Py_Execute(ctx._handle, device_name, op_name,
—> 60 inputs, attrs, num_outputs)
61 except core._NotOkStatusException as e:
62 if name is not None:
InvalidArgumentError: 2 root error(s) found.
(0) Invalid argument: Can not squeeze dim[2], expected a dimension of 1, got 7579
[[node categorical_crossentropy/remove_squeezable_dimensions/Squeeze (defined at :11) ]]
[[gradient_tape/model_4/embedding_4/embedding_lookup/Reshape/_34]]
(1) Invalid argument: Can not squeeze dim[2], expected a dimension of 1, got 7579
[[node categorical_crossentropy/remove_squeezable_dimensions/Squeeze (defined at :11) ]]
0 successful operations.
0 derived errors ignored. [Op:__inference_train_function_36733]
Function call stack:
train_function -> train_function
sir please help
Perhaps these tips will help:
https://machinelearningmastery.com/faq/single-faq/why-does-the-code-in-the-tutorial-not-work-for-me
Sir all libraries are seems to update becuase I use google colab.Sir please help me i stuck on this since 15 days
The above tutorial works on the latest version of libraries.
I don’t know about colab, sorry.
Perhaps try running on your own machine or on AWS EC2 where you can control the environment.
No sir you use “model.fit_generator” but as per the latest update have model.fit. That’s why most of student facing error.
InvalidArgumentError Traceback (most recent call last)
in ()
9 generator = data_generator(train_descriptions, train_features, tokenizer, max_length, vocab_size)
10 # fit for one epoch
—> 11 model.fit(generator,epochs=1,verbose=1,steps_per_epoch=steps)
12 # save model
13 model.save(‘model_’ + str(i) + ‘.h5’)
/usr/local/lib/python3.7/dist-packages/tensorflow/python/keras/engine/training.py:1844: UserWarning:
Model.fit_generatoris deprecated and will be removed in a future version. Please useModel.fit, which supports generators.warnings.warn(‘
Model.fit_generatoris deprecated and ‘—————————————————————————
ValueError Traceback (most recent call last)
in ()
6 generator = data_generator(train_descriptions, train_features, tokenizer, max_length, vocab_size)
7 # fit for one epoch
—-> 8 model.fit_generator(generator, epochs=1, steps_per_epoch=steps, verbose=1)
9 # save model
10 model.save(‘model_’ + str(i) + ‘.h5’)
Thank you so much for u Jason for such an awsome project
You’re welcome!
Sir, thanks for your explanation. Can I use this embedding (cnn-rnn) for custom Stack GAN training?
Perhaps try it and see?
Okay sir. I will try it soon & let you know the results.
I am getting memory error? how to overcome this one
Perhaps try the progressive loading section.
Could you tell me what is “FF” short for in the graph?
FF == Feed-forward, e.g. dense layers used to interpret input and make a prediction.
Can we run the code in 8 GB ram without using progressive loading code?
Probably not.
Hello, I think the line:
max_length = max_length(train_descriptions)
found in several places in the text contains an error – how can the variable and the function have the same name?
That apart, this is a brilliant tutorial, thank you!
Yes, that does look like a bad idea. It can work fine if the function is called before the variable is defined – as it is in this case.
Hi,
when I try out code, I get follow error:
File “/Library/Frameworks/Python.framework/Versions/3.8/lib/python3.8/site-packages/plaidml/keras/backend.py”, line 1529, in rnn
raise NotImplementedError(‘rnn is not implemented with mask support’)
NotImplementedError: rnn is not implemented with mask support
Can you tell me where the problem is?
many thanks
Sorry to hear that, these tips will help:
https://machinelearningmastery.com/faq/single-faq/why-does-the-code-in-the-tutorial-not-work-for-me
Hello Sir, i want to plot the graph between training and testing or dev loss but with model.fit_generator i could not able to do so. i have to go with model.fit_generator because while using model.fit i am getting RAM issues so anyhow i have to go with model.fit_generator,
Please tell me how to implement the graph between training and testing.
Thanking youin advance
You may have to write some custom code, I’m not sure off the cuff sorry.
Hey Jason,
Thank you for all the posts. They’re heavily informative.
How can I use checkpoints whilst using progressive loading?
I mean the model.fit is inside a loop
so I’m confused.
Thanks again
You’re welcome.
Perhaps experiment with using a callback to save checkpoints?
okay, thanks a lot. worked it out.
Just a thing more, I tried to use a batch size of 64. The accuracy increased but the bleu scores dropped in comparison to when using the batch size of 6000.
Could you please guide me to the possible reason?
I would expect accuracy is not an appropriate measure to use on this dataset, ignore it.
yes, I read that in your post. Should I not be using batch training then? Since the higher the batch size the lower my bleu score goes. Just wanted to know why is this happening. couldnt get an answer anywhere.
Perhaps try different configurations and compare the result.
Hi,
Iam trying to run the code in “Prepare Photo Data” section and when I run I get the following error that says model.fit() require model.compile(), however, there is no model compilation in this code fragment.
Traceback (most recent call last):
File "extract_image_features.py", line 39, in
features = compute_features(IMAGE_DIR)
File "extract_image_features.py", line 31, in compute_features
feature = model.fit(img, verbose=0)
File "/Users/saratk/envs/tf/lib/python3.8/site-packages/tensorflow/python/keras/engine/training.py", line 1032, in fit
self._assert_compile_was_called()
File "/Users/saratk/envs/tf/lib/python3.8/site-packages/tensorflow/python/keras/engine/training.py", line 2592, in _assert_compile_was_called
raise RuntimeError('You must compile your model before '
RuntimeError: You must compile your model before training/testing. Use
.
I have
tensorflow: 2.4.1
keras: 2.4.0
Thanks,
SK
Sorry to hear that, these tips may help:
https://machinelearningmastery.com/faq/single-faq/why-does-the-code-in-the-tutorial-not-work-for-me
Sir I’m getting this error can’t resolve it.
ValueError: Layer model_4 expects 2 input(s), but it received 3 input tensors. Inputs received: [, , ]
This might help:
https://machinelearningmastery.com/faq/single-faq/why-does-the-code-in-the-tutorial-not-work-for-me
Hi Jason,
I am running above example and from section – Photo and Caption Dataset, getting the below error
NotFoundError Traceback (most recent call last)
in
1 #extract features from all images
2 directory=’Flicker8k_Dataset’
—-> 3 features=extract_features(directory)
4
5 print (“Extracted features : “, len(features))
in extract_features(directory)
34
35 #get features
—> 36 feature=model.predict(image, verbose=0)
37
38 #get image id
~\AppData\Roaming\Python\Python37\site-packages\tensorflow\python\keras\engine\training.py in predict(self, x, batch_size, verbose, steps, callbacks, max_queue_size, workers, use_multiprocessing)
1627 for step in data_handler.steps():
1628 callbacks.on_predict_batch_begin(step)
-> 1629 tmp_batch_outputs = self.predict_function(iterator)
1630 if data_handler.should_sync:
1631 context.async_wait()
~\AppData\Roaming\Python\Python37\site-packages\tensorflow\python\eager\def_function.py in __call__(self, *args, **kwds)
826 tracing_count = self.experimental_get_tracing_count()
827 with trace.Trace(self._name) as tm:
–> 828 result = self._call(*args, **kwds)
829 compiler = “xla” if self._experimental_compile else “nonXla”
830 new_tracing_count = self.experimental_get_tracing_count()
~\AppData\Roaming\Python\Python37\site-packages\tensorflow\python\eager\def_function.py in _call(self, *args, **kwds)
893 # If we did not create any variables the trace we have is good enough.
894 return self._concrete_stateful_fn._call_flat(
–> 895 filtered_flat_args, self._concrete_stateful_fn.captured_inputs) # pylint: disable=protected-access
896
897 def fn_with_cond(inner_args, inner_kwds, inner_filtered_flat_args):
~\AppData\Roaming\Python\Python37\site-packages\tensorflow\python\eager\function.py in _call_flat(self, args, captured_inputs, cancellation_manager)
1917 # No tape is watching; skip to running the function.
1918 return self._build_call_outputs(self._inference_function.call(
-> 1919 ctx, args, cancellation_manager=cancellation_manager))
1920 forward_backward = self._select_forward_and_backward_functions(
1921 args,
~\AppData\Roaming\Python\Python37\site-packages\tensorflow\python\eager\function.py in call(self, ctx, args, cancellation_manager)
558 inputs=args,
559 attrs=attrs,
–> 560 ctx=ctx)
561 else:
562 outputs = execute.execute_with_cancellation(
~\AppData\Roaming\Python\Python37\site-packages\tensorflow\python\eager\execute.py in quick_execute(op_name, num_outputs, inputs, attrs, ctx, name)
58 ctx.ensure_initialized()
59 tensors = pywrap_tfe.TFE_Py_Execute(ctx._handle, device_name, op_name,
—> 60 inputs, attrs, num_outputs)
61 except core._NotOkStatusException as e:
62 if name is not None:
NotFoundError: No algorithm worked!
[[node model_1/block1_conv1/Relu (defined at :36) ]] [Op:__inference_predict_function_1219]
Function call stack:
predict_function
Could you please give some pointers to resolve the same
Thanks,
Ankit
Sorry to hear that, perhaps some of these tips will help:
https://machinelearningmastery.com/faq/single-faq/why-does-the-code-in-the-tutorial-not-work-for-me
Hi,
Please ignore the above issue.
It is resolved now.
Thanks,
Ankit
I’m happy to hear that.
hi Jason, here is the link to my code, see the last cell
I have done the same as mentioned in the blog, can you plz help, error coming in the last step only
https://colab.research.google.com/drive/10A4y0t_QO9VWW18D3mNRlD8qpXU4bYNw?usp=sharing
the error coming is : ValueError: Layer model_3 expects 2 input(s), but it received 3 input tensors. Inputs received: [, , ]
This is a common question that I answer here:
https://machinelearningmastery.com/faq/single-faq/can-you-read-review-or-debug-my-code
Hi Jason Sir I was hoping you could help me, I am using progressive overloading method to get the best model I get the following error stack
File "Basic_model.py", line 357, inmodel = define_model(vocab_size, max_length)
File "Basic_model.py", line 310, in define_model
se3 = LSTM(256)(se2)
File "/home/aditya/miniconda3/envs/tf/lib/python3.7/site-packages/tensorflow/python/keras/layers/recurrent.py", line 660, in __call__
return super(RNN, self).__call__(inputs, **kwargs)
File "/home/aditya/miniconda3/envs/tf/lib/python3.7/site-packages/tensorflow/python/keras/engine/base_layer.py", line 952, in __call__
input_list)
File "/home/aditya/miniconda3/envs/tf/lib/python3.7/site-packages/tensorflow/python/keras/engine/base_layer.py", line 1091, in _functional_construction_call
inputs, input_masks, args, kwargs)
File "/home/aditya/miniconda3/envs/tf/lib/python3.7/site-packages/tensorflow/python/keras/engine/base_layer.py", line 822, in _keras_tensor_symbolic_call
return self._infer_output_signature(inputs, args, kwargs, input_masks)
File "/home/aditya/miniconda3/envs/tf/lib/python3.7/site-packages/tensorflow/python/keras/engine/base_layer.py", line 863, in _infer_output_signature
outputs = call_fn(inputs, *args, **kwargs)
File "/home/aditya/miniconda3/envs/tf/lib/python3.7/site-packages/tensorflow/python/keras/layers/recurrent_v2.py", line 1157, in call
inputs, initial_state, _ = self._process_inputs(inputs, initial_state, None)
File "/home/aditya/miniconda3/envs/tf/lib/python3.7/site-packages/tensorflow/python/keras/layers/recurrent.py", line 859, in _process_inputs
initial_state = self.get_initial_state(inputs)
File "/home/aditya/miniconda3/envs/tf/lib/python3.7/site-packages/tensorflow/python/keras/layers/recurrent.py", line 643, in get_initial_state
inputs=None, batch_size=batch_size, dtype=dtype)
File "/home/aditya/miniconda3/envs/tf/lib/python3.7/site-packages/tensorflow/python/keras/layers/recurrent.py", line 2507, in get_initial_state
self, inputs, batch_size, dtype))
File "/home/aditya/miniconda3/envs/tf/lib/python3.7/site-packages/tensorflow/python/keras/layers/recurrent.py", line 2987, in _generate_zero_filled_state_for_cell
return _generate_zero_filled_state(batch_size, cell.state_size, dtype)
File "/home/aditya/miniconda3/envs/tf/lib/python3.7/site-packages/tensorflow/python/keras/layers/recurrent.py", line 3003, in _generate_zero_filled_state
return nest.map_structure(create_zeros, state_size)
File "/home/aditya/miniconda3/envs/tf/lib/python3.7/site-packages/tensorflow/python/util/nest.py", line 659, in map_structure
structure[0], [func(*x) for x in entries],
File "/home/aditya/miniconda3/envs/tf/lib/python3.7/site-packages/tensorflow/python/util/nest.py", line 659, in
structure[0], [func(*x) for x in entries],
File "/home/aditya/miniconda3/envs/tf/lib/python3.7/site-packages/tensorflow/python/keras/layers/recurrent.py", line 3000, in create_zeros
return array_ops.zeros(init_state_size, dtype=dtype)
File "/home/aditya/miniconda3/envs/tf/lib/python3.7/site-packages/tensorflow/python/util/dispatch.py", line 201, in wrapper
return target(*args, **kwargs)
File "/home/aditya/miniconda3/envs/tf/lib/python3.7/site-packages/tensorflow/python/ops/array_ops.py", line 2819, in wrapped
tensor = fun(*args, **kwargs)
File "/home/aditya/miniconda3/envs/tf/lib/python3.7/site-packages/tensorflow/python/ops/array_ops.py", line 2868, in zeros
output = _constant_if_small(zero, shape, dtype, name)
File "/home/aditya/miniconda3/envs/tf/lib/python3.7/site-packages/tensorflow/python/ops/array_ops.py", line 2804, in _constant_if_small
if np.prod(shape) < 1000:
File "", line 6, in prod
File "/home/aditya/miniconda3/envs/tf/lib/python3.7/site-packages/numpy/core/fromnumeric.py", line 3031, in prod
keepdims=keepdims, initial=initial, where=where)
File "/home/aditya/miniconda3/envs/tf/lib/python3.7/site-packages/numpy/core/fromnumeric.py", line 87, in _wrapreduction
return ufunc.reduce(obj, axis, dtype, out, **passkwargs)
File "/home/aditya/miniconda3/envs/tf/lib/python3.7/site-packages/tensorflow/python/framework/ops.py", line 855, in __array__
" a NumPy call, which is not supported".format(self.name))
NotImplementedError: Cannot convert a symbolic Tensor (lstm/strided_slice:0) to a numpy array. This error may indicate that you're trying to pass a Tensor to a NumPy call, which is not supported
Sorry to hear that, perhaps some of these tips will help:
https://machinelearningmastery.com/faq/single-faq/why-does-the-code-in-the-tutorial-not-work-for-me
Hi Jason,
I have followed the steps you mentioned in your blog. After some trials, I am able to run the entire project.
But the issue I am facing is that for whatever image I provide, my model always says either ‘A man in red t-shirt standing on street’ or ‘Two dogs are playing on ground’.
I am unable to understand which section is creating this problem. I am very new in this area. Can you please suggest in which areas might create this problem?
I can share my entire code, if you want to check.
You may need to re-fit the model or tune the model hyperparameters.
Hi Jason!
First of all, thanks for this fruitful tutorial, it has helped me a lot and I’ve learnt a lot from this. I want to make an extension by changing the CNN model from VGG16 to InceptionV3. Will it be a better choice? The output of Inception V3 is (None, 2048). Please help me in this regard.
Also, I want to use BERT Transformers Model for word embeddings. Will it be a better choice?
You’re welcome.
It may, perhaps test it and discover it these changes result in better performance.
Can you please upload the model that you trained and used in the example? My system is not really powerful and the progressive loading method is giving out really bad models.So I would really appreciate if you could share your model ‘model-ep002-loss3.245-val_loss3.612.h5’.
Thank You!
Sorry, I cannot.
Hi Jason nice article and thank you for giving us something to learn !
a few question tho
1. can this used to video for the captioning?
2. how much photos that it need to take for the sequence to make the caption?
thank you so much
bless you !
Perhaps you can apply the method to frames of a video.
You may need to experiment to discover how much data is required and the best model for your specific dataset.
currently got 23k frames data that i got from around 200 videos, i did apply it to it and it works for making model train and evaluating, didnt try the model to the video yet since i didnt see any description for how much frames could it take to make a caption in your article
any suggestion or clue which or where should i look from your code in your article to modified it if my data are video and make the system process the caption after looking from a few frames ?
Once again Thanks a lot !
The example expects images, so perhaps you can provide video frames, or a subset of video frames to the model for prediction.
i did use this example with my video frames data with my own token etc, but i havent tried the model to video yet since i didnt see how much images(or frames because i input the data with my frames/images from my video) sequence it takes to predict and i am a little bit confused at that part.
but for trying to make the model with my own data(frames from my video), i already did and it works fine,
Great!
thanks a lot for your tutorial. it helped me a lot but excuse me when i print (actual and predicted sentences ) i got the same sentence every time i got the actual from test descriptions . i need to get the new captions that used the model h5 . Thanks a lot
Perhaps re-fitting the model or using a different saved model as the final model?
Thanks a lot for replying .. yes the model needs more training but I’m using coco dataset and used the same model with number of epochs 100 and learning rate 3e-4 and delete the first dropout layer and got this result
1 loss: 4.5090 – accuracy: 0.2570 – val_loss: 3.8487 – val_accuracy: 0.3179
2 loss: 3.7380 – accuracy: 0.3306 – val_loss: 3.6578 – val_accuracy: 0.3398
3 loss: 3.5954 – accuracy: 0.3449 – val_loss: 3.6016 – val_accuracy: 0.3481
4 loss: 3.5336 – accuracy: 0.3519 – val_loss: 3.5808 – val_accuracy: 0.3527
5 loss: 3.4969 – accuracy: 0.3563 – val_loss: 3.5751 – val_accuracy: 0.3555
6 loss: 3.4720 – accuracy: 0.3595 – val_loss: 3.5733 – val_accuracy: 0.3574
7 loss: 3.4528 – accuracy: 0.3619 – val_loss: 3.5809 – val_accuracy: 0.3585
8 loss: 3.4388 – accuracy: 0.3638 – val_loss: 3.5888 – val_accuracy: 0.3595
9 loss: 3.4283 – accuracy: 0.3655 – val_loss: 3.5965 – val_accuracy: 0.3606
10 loss: 3.4207 – accuracy: 0.3666 – val_loss: 3.6070 – val_accuracy: 0.3612
11 loss: 3.4155 – accuracy: 0.3675 – val_loss: 3.6225 – val_accuracy: 0.3615
12 loss: 3.4112 – accuracy: 0.3688 – val_loss: 3.6362 – val_accuracy: 0.3622
13 loss: 3.4085 – accuracy: 0.3696 – val_loss: 3.6467 – val_accuracy: 0.3623
14 loss: 3.4024 – accuracy: 0.3697 – val_loss: 3.6510 – val_accuracy: 0.3617
15 loss: 3.3850 – accuracy: 0.3702 – val_loss: 3.6485 – val_accuracy: 0.3622
16 loss: 3.3729 – accuracy: 0.3709 – val_loss: 3.6563 – val_accuracy: 0.3622
Should I wait or the model needs to change ?
We cannot know what to change to best configure a model, this is a whole area of study, see this:
https://machinelearningmastery.com/start-here/#better
Hi Just wondering if anyone came across this error
TypeError: Dimension value must be integer or None or have an __index__ method, got value ” with type ”
Sorry, I have not seen this before, perhaps this will help:
https://machinelearningmastery.com/faq/single-faq/why-does-the-code-in-the-tutorial-not-work-for-me
Hi, Jason, I followed through the tutorial from beginning to end. So my best model was the one with val-loss 3.882, and test BLEU-1 score was 0.5461!
I have learned that BLEU-1 score of 0.5 is a state-of-the-art performance, but when I try generating captions with new images of people and animal from the internet, the phrase “man in black shirt is sitting on the sidewalk” keeps coming up for random images. Does this mean that for these images the model does not recognize them at all?
Perhaps the model has overfit, you could try using a different model saved during training or try re-training the model.
All right! Thanks for the reply! I’ll try using different options!
You’re welcome.
Hi Dr. Brownlee
Would you please guide us on how to perform image captioning for a custom dataset? The problem is assigning unique identifiers to the labels of each image. Any kind of help will be appreciated…. thank you
Yes, that’s a boring part but you must spend time to do this tagging before you can do anything else.
While running the code in Google Colab I my runtime stops working because of this message: “Your session crashed after using all available RAM” . does anyone know what might be the reason for it or how to fix it?
You exhausted the memory. You either need to use a paid version of Colab, or use another way to run your code.
Hi
I have given the flickr dataset without the train, test and val datasets separately. So how do I do the training. Please help
Usually the dataset does not do the split. You have to split the train/test/validation split by yourself. See, for example, sklearn for a utility function: https://scikit-learn.org/stable/modules/generated/sklearn.model_selection.train_test_split.html
Hi Adrian,
Am getting an error ‘TypeError: ‘int’ object is not callable’ for the line :
# determine the maximum sequence length
max_length = max_length(train_descriptions)
What might be causing this.
max_length is a variable or max_length is a function? You are reusing the same name for two purposes.
Thank you for the great tutorial. It’s beneficial for me. 🙂
I tried using another model, progressive loading, and added a data validation set using the generator.
Hi! Thank you so much for this post!
First, I’m using this code to make some tests on a translated Flickr8k dataset, I intend to publish my findings later, how can I cite you and your website? Standard latex citing the site would be ok?
Second, as told on the article, val_loss reaches minimum values on the very first epochs, but comparing BLEU score, the latest epoch showed better numbers, why do you think this might be happening?
(1) Please see: https://machinelearningmastery.com/faq/single-faq/how-do-i-reference-or-cite-a-book-or-blog-post
(2) These are different metrics. Do you think this can help? https://machinelearningmastery.com/calculate-bleu-score-for-text-python/
Hey Jason, is there any work done on image captioning using conventional machine learning. I am working on report generation for medical images. can you suggest me some literature that i should i review for my thesis?
How do you think about this paper? http://proceedings.mlr.press/v37/xuc15.pdf
Hello Jason,
Thanks for this article. when I am trying to pretrain my inception v3 model using the existing 8k flicker dataset that I have. I am getting error:
image_model = og_tf.keras.applications.InceptionV3(include_top=False,weights=’imagenet’)
new_input = image_model.input
hidden_layer = image_model.layers[-1].output
image_features_extract_model = og_tf.keras.Model(new_input,hidden_layer)
for img,path in img_data:
fv = image_features_extract_model(img)
Below is the ERROR:
—————————————————————————
NotFoundError Traceback (most recent call last)
~\AppData\Local\Temp/ipykernel_81952/3499706949.py in
—-> 1 for img,path in img_data:
2 fv = image_features_extract_model(img)
~\miniconda3\envs\tensor\lib\site-packages\tensorflow\python\data\ops\iterator_ops.py in __next__(self)
759 def __next__(self):
760 try:
–> 761 return self._next_internal()
762 except errors.OutOfRangeError:
763 raise StopIteration
~\miniconda3\envs\tensor\lib\site-packages\tensorflow\python\data\ops\iterator_ops.py in _next_internal(self)
745 self._iterator_resource,
746 output_types=self._flat_output_types,
–> 747 output_shapes=self._flat_output_shapes)
748
749 try:
~\miniconda3\envs\tensor\lib\site-packages\tensorflow\python\ops\gen_dataset_ops.py in iterator_get_next(iterator, output_types, output_shapes, name)
2725 return _result
2726 except _core._NotOkStatusException as e:
-> 2727 _ops.raise_from_not_ok_status(e, name)
2728 except _core._FallbackException:
2729 pass
~\miniconda3\envs\tensor\lib\site-packages\tensorflow\python\framework\ops.py in raise_from_not_ok_status(e, name)
6895 message = e.message + (” name: ” + name if name is not None else “”)
6896 # pylint: disable=protected-access
-> 6897 six.raise_from(core._status_to_exception(e.code, message), None)
6898 # pylint: enable=protected-access
6899
~\miniconda3\envs\tensor\lib\site-packages\six.py in raise_from(value, from_value)
NotFoundError: NewRandomAccessFile failed to Create/Open: \Images\1000268201_693b08cb0e.jpg : The system cannot find the path specified.
; No such process
[[{{node ReadFile}}]] [Op:IteratorGetNext]
Any idea why the system is not able to access the path.
No idea. Are you messing up the path separators “\” with “/” ?
Hello sir, I am getting same caption for all nre images that is “startseq man in blue shirt is standing on the street endseq”.
what is the problem and how can I fix it.
Was there a problem on training? I believe the model is degenerated, but not sure what caused it.
Hi Jason
Thank you for your perfect article
I successfully train and evaluate model but I get this result:
startseq rushed rushed rushed rushed rushed rushed rushed rushed rushed rushed rushed rushed rushed rushed rushed rushed rushed rushed rushed rushed rushed rushed rushed rushed rushed rushed rushed rushed rushed rushed rushed rushed rushed rushed
how can I fix it?
Hi Homak…Thanks for asking.
I’m eager to help, but I just don’t have the capacity to debug code for you.
I am happy to make some suggestions:
Consider aggressively cutting the code back to the minimum required. This will help you isolate the problem and focus on it.
Consider cutting the problem back to just one or a few simple examples.
Consider finding other similar code examples that do work and slowly modify them to meet your needs. This might expose your misstep.
Consider posting your question and code to StackOverflow.
Thanks a lot dear Jason for your answering.
I will follow your recommendations and post the results.
Your website is like a book which I learn many thing from even comments.
best wishes
Is it possible for you to share the h5 file?
Hi Vahid…We do not share h5 files, however you may feel free to create one from the source code we provide.
Such a great information. This is really very helpful for bloggers
Thank you for the feedback!
Hi James. Thank you for this beautiful tutorial.
I am trying to use the same code with Flickr30K dataset. And also I am computing Bleu and Cider score. It works fine with Flickr8K. I split the the Flickr30K dataset to 29000 train, 1000 validation and 1000 test images. and trained the model. But the model generates the same two sentence for every image in the list. Why does this happen. How can I fix it. Also the Bleu scores are higher the Flickr8K, but the Cider score is too low. I tried to reduce the vocabulary size like in the ” What is the Role of Recurrent Neural Networks (RNNs) in an Image
Caption Generator?” paper. But it doesn’t work. Thank you so much.
Hi Didem…I have never encountered this issue. The following may help by providing another approach:
https://www.youtube.com/watch?v=fUSTbGrL1tc
OK. I will try this approach. Thank you so much.
Hey how can we identify colors of the object present in the image through captions
Thank you for this excellent example of image captioning!
I am currently working on a project where I need to caption images of playing cards. Importantly, the model needs to capture the ORDER of the playing cards (from left to right).
If I train a CNN LSTM, as in your example, and the captions are correctly formatted (left-right), will this model capture such as spatial relationship?
I.e. is an image captioning model the correct approach for this task?
Hi JayC…You are very welcome! Explain further what you mean by “capture such as spatial relationship”.
Sorry, my question was not very clear.
I train a model, like you described above, on images of playing cards. Each image is captioned, describing the cards in strictly left-to-right order. E.g.
5 of Diamonds — 3 of Clubs — Ace of Hearts
I use the trained model to make a prediction on a new image of 3 playing cards. Will the predicted caption have the correct left-to-right ordering?
I.e. can the image captioning approach you describe learn (in this case left-to-right) spatial relationships?
Hi JayC…The answer is yes. I would recommend that you proceed with the model for your application and let us know your findings.
Hi Jason, this is a very well-written tutorial on caption generation, thank you! All procedures, including data preparation, model architecture, training and evaluation are thoroughly explained in detail using simple terms. For me, it has been a good refreshment for the encoder-decoder architecture. I also appreciate the provided code, from which I learn a lot, especially the code for recursively generating output text.
Now looking back from the end of 2022, I’m curious whether the following could increase the performance of the caption generator:
• Plug in the photo feature extractor and let it be fine-tuned along with training the decoder
• Use a transformer for the decoder
Great feedback Xuan! We greatly appreciate your support!
Hi Jason, Hi all
Thanks Jason for this very helpful tutorial!
Could anyone please send a link for downloading their trained model and tokenizer? Then we can try directly the last part (Generate New Captions) without training and saving..
So, I searched for pre-trained models and found and tried this one, which looks very impressive (not only) for captioning: https://github.com/salesforce/LAVIS
Just wanted to share this with all here, as I always benefit from this very helpful website.
hello, can you please tell me if these codes are updated to the latest evolutions in image captioning field , or there are other recouse that are up to date 2023?
please reply to me
thank you.
Hi tounes…Our content is up to date with stable library levels. Are you having any particular issues with executing the code that we can assist you with?