How to Use Interpolation and Vector Arithmetic to Explore the GAN Latent Space.
Generative Adversarial Networks, or GANs, are an architecture for training generative models, such as deep convolutional neural networks for generating images.
The generative model in the GAN architecture learns to map points in the latent space to generated images. The latent space has no meaning other than the meaning applied to it via the generative model. Yet, the latent space has structure that can be explored, such as by interpolating between points and performing vector arithmetic between points in latent space which have meaningful and targeted effects on the generated images.
In this tutorial, you will discover how to develop a generative adversarial network for face generation and explore the structure of latent space and the effect on generated faces.
After completing this tutorial, you will know:
How to develop a generative adversarial network for generating faces.
How to interpolate between points in latent space and generate images that morph from one face to another.
How to perform vector arithmetic in latent space and achieve targeted results in the resulting generated faces.
Update Nov/2019: Updated for TensorFlow v2.0 and MTCNN v0.1.0.
How to Interpolate and Perform Vector Arithmetic With Faces Using a Generative Adversarial Network. Photo by Intermountain Forest Service, some rights reserved.
Tutorial Overview
This tutorial is divided into five parts; they are:
Vector Arithmetic in Latent Space
Large-Scale CelebFaces Dataset (CelebA)
How to Prepare CelebA Faces Dataset
How to Develop a Generative Adversarial Network
How to Explore the Latent Space for Generated Faces
Vector Arithmetic in Latent Space
The generator model in the GAN architecture takes a point from the latent space as input and generates a new image.
The latent space itself has no meaning. Typically it is a 100-dimensional hypersphere with each variable drawn from a Gaussian distribution with a mean of zero and a standard deviation of one. Through training, the generator learns to map points into the latent space with specific output images and this mapping will be different each time the model is trained.
The latent space has structure when interpreted by the generator model, and this structure can be queried and navigated for a given model.
Typically, new images are generated using random points in the latent space. Taken a step further, points in the latent space can be constructed (e.g. all 0s, all 0.5s, or all 1s) and used as input or a query to generate a specific image.
A series of points can be created on a linear path between two points in the latent space, such as two generated images. These points can be used to generate a series of images that show a transition between the two generated images.
Finally, the points in the latent space can be kept and used in simple vector arithmetic to create new points in the latent space that, in turn, can be used to generate images. This is an interesting idea, as it allows for the intuitive and targeted generation of images.
In the paper, the authors explored the latent space for GANs fit on a number of different training datasets, most notably a dataset of celebrity faces. They demonstrated two interesting aspects.
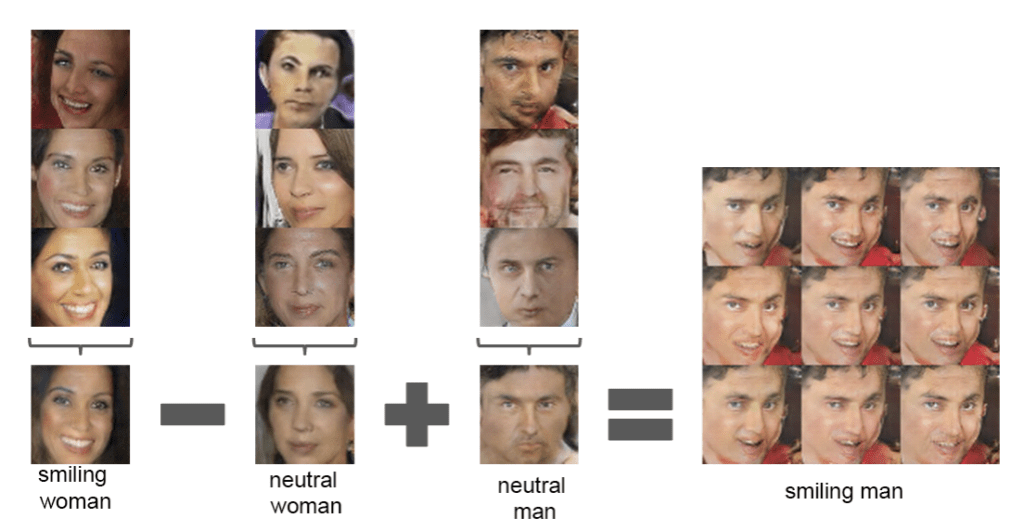
The first was the vector arithmetic with faces. For example, a face of a smiling woman minus the face of a neutral woman plus the face of a neutral man resulted in the face of a smiling man.
1
smiling woman - neutral woman + neutral man = smiling man
Specifically, the arithmetic was performed on the points in the latent space for the resulting faces. Actually on the average of multiple faces with a given characteristic, to provide a more robust result.
Example of Vector Arithmetic on Points in the Latent Space for Generating Faces With a GAN. Taken from Unsupervised Representation Learning with Deep Convolutional Generative Adversarial Networks.
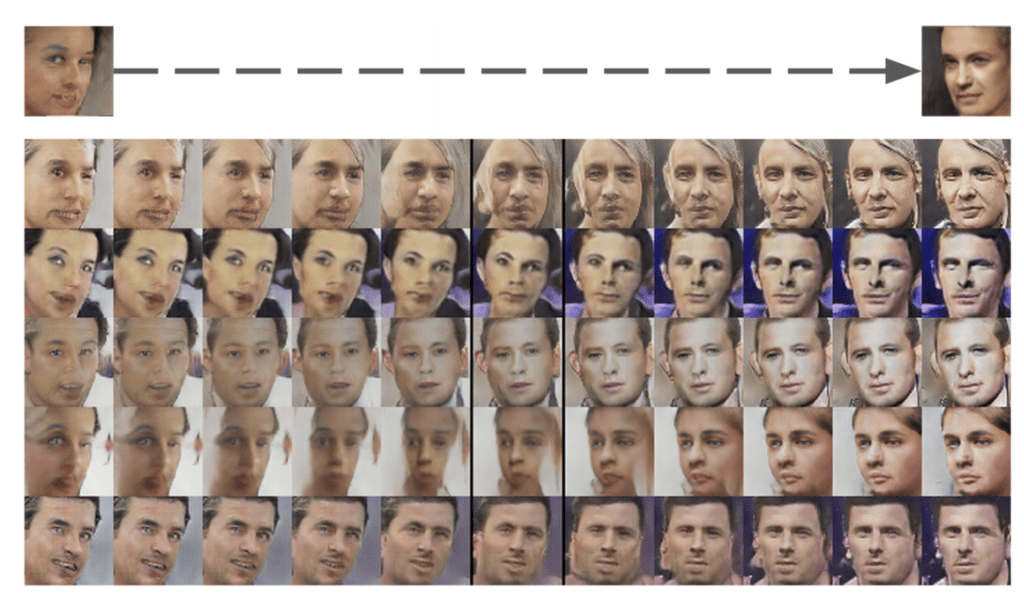
The second demonstration was the transition between two generated faces, specifically by creating a linear path through the latent dimension between the points that generated two faces and then generating all of the faces for the points along the path.
Example of Faces on a Path Between Two GAN Generated Faces. Taken from Unsupervised Representation Learning with Deep Convolutional Generative Adversarial Networks.
Exploring the structure of the latent space for a GAN model is both interesting for the problem domain and helps to develop an intuition for what has been learned by the generator model.
In this tutorial, we will develop a GAN for generating photos of faces, then explore the latent space for the model with vector arithmetic.
Want to Develop GANs from Scratch?
Take my free 7-day email crash course now (with sample code).
Click to sign-up and also get a free PDF Ebook version of the course.
The dataset provides about 200,000 photographs of celebrity faces along with annotations for what appears in given photos, such as glasses, face shape, hats, hair type, etc. As part of the dataset, the authors provide a version of each photo centered on the face and cropped to the portrait with varying sizes around 150 pixels wide and 200 pixels tall. We will use this as the basis for developing our GAN model.
The dataset can be easily downloaded from the Kaggle webpage. Note: this may require an account with Kaggle.
Specifically, download the file “img_align_celeba.zip” which is about 1.3 gigabytes. To do this, click on the filename on the Kaggle website and then click the download icon.
The download might take a while depending on the speed of your internet connection.
After downloading, unzip the archive.
This will create a new directory named “img_align_celeba” that contains all of the images with filenames like 202599.jpg and 202598.jpg.
Next, we can look at preparing the raw images for modeling.
How to Prepare CelebA Faces Dataset
The first step is to develop code to load the images.
We can use the Pillow library to load a given image file, convert it to RGB format (if needed) and return an array of pixel data. The load_image() function below implements this.
1
2
3
4
5
6
7
8
9
# load an image as an rgb numpy array
def load_image(filename):
# load image from file
image=Image.open(filename)
# convert to RGB, if needed
image=image.convert('RGB')
# convert to array
pixels=asarray(image)
returnpixels
Next, we can enumerate the directory of images, load each as an array of pixels in turn, and return an array with all of the images.
There are 200K images in the dataset, which is probably more than we need so we can also limit the number of images to load with an argument. The load_faces() function below implements this.
1
2
3
4
5
6
7
8
9
10
11
12
13
# load images and extract faces for all images in a directory
def load_faces(directory,n_faces):
faces=list()
# enumerate files
forfilename inlistdir(directory):
# load the image
pixels=load_image(directory+filename)
# store
faces.append(pixels)
# stop once we have enough
iflen(faces)>=n_faces:
break
returnasarray(faces)
Finally, once the images are loaded, we can plot them using the imshow() function from the matplotlib library.
The plot_faces() function below does this, plotting images arranged into in a square.
1
2
3
4
5
6
7
8
9
10
# plot a list of loaded faces
def plot_faces(faces,n):
foriinrange(n *n):
# define subplot
pyplot.subplot(n,n,1+i)
# turn off axis
pyplot.axis('off')
# plot raw pixel data
pyplot.imshow(faces[i])
pyplot.show()
Tying this together, the complete example is listed below.
1
2
3
4
5
6
7
8
9
10
11
12
13
14
15
16
17
18
19
20
21
22
23
24
25
26
27
28
29
30
31
32
33
34
35
36
37
38
39
40
41
42
43
44
45
46
47
48
# load and plot faces
from os import listdir
from numpy import asarray
from PIL import Image
from matplotlib import pyplot
# load an image as an rgb numpy array
def load_image(filename):
# load image from file
image=Image.open(filename)
# convert to RGB, if needed
image=image.convert('RGB')
# convert to array
pixels=asarray(image)
returnpixels
# load images and extract faces for all images in a directory
def load_faces(directory,n_faces):
faces=list()
# enumerate files
forfilename inlistdir(directory):
# load the image
pixels=load_image(directory+filename)
# store
faces.append(pixels)
# stop once we have enough
iflen(faces)>=n_faces:
break
returnasarray(faces)
# plot a list of loaded faces
def plot_faces(faces,n):
foriinrange(n *n):
# define subplot
pyplot.subplot(n,n,1+i)
# turn off axis
pyplot.axis('off')
# plot raw pixel data
pyplot.imshow(faces[i])
pyplot.show()
# directory that contains all images
directory='img_align_celeba/'
# load and extract all faces
faces=load_faces(directory,25)
print('Loaded: ',faces.shape)
# plot faces
plot_faces(faces,5)
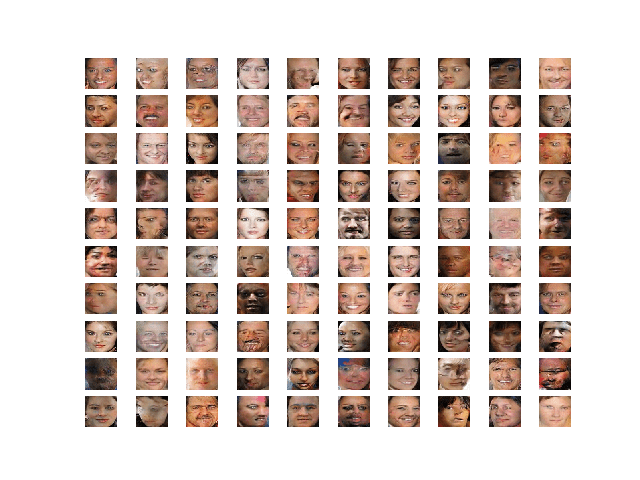
Running the example loads a total of 25 images from the directory, then summarizes the size of the returned array.
1
Loaded: (25, 218, 178, 3)
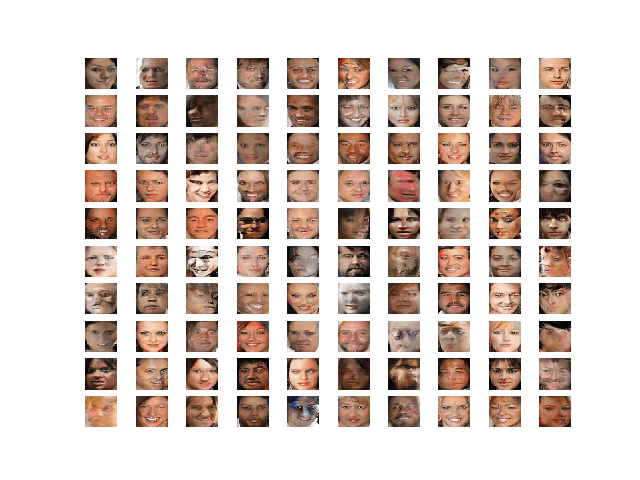
Finally, the 25 images are plotted in a 5×5 square.
Plot of a Sample of 25 Faces from the Celebrity Faces Dataset
When working with a GAN, it is easier to model a dataset if all of the images are small and square in shape.
Further, as we are only interested in the face in each photo, and not the background, we can perform face detection and extract only the face before resizing the result to a fixed size.
There are many ways to perform face detection. In this case, we will use a pre-trained Multi-Task Cascaded Convolutional Neural Network, or MTCNN. This is a state-of-the-art deep learning model for face detection, described in the 2016 paper titled “Joint Face Detection and Alignment Using Multitask Cascaded Convolutional Networks.”
We will use the implementation provided by Iván de Paz Centeno in the ipazc/mtcnn project. This library can be installed via pip as follows:
1
sudo pip install mtcnn
We can confirm that the library was installed correctly by importing the library and printing the version; for example:
1
2
3
4
# confirm mtcnn was installed correctly
import mtcnn
# print version
print(mtcnn.__version__)
Running the example prints the current version of the library.
1
0.1.0
The MTCNN model is very easy to use.
First, an instance of the MTCNN model is created, then the detect_faces() function can be called passing in the pixel data for one image. The result is a list of detected faces, with a bounding box defined in pixel offset values.
1
2
3
4
5
6
7
...
# prepare model
model=MTCNN()
# detect face in the image
faces=model.detect_faces(pixels)
# extract details of the face
x1,y1,width,height=faces[0]['box']
We can update our example to extract the face from each loaded photo and resize the extracted face pixels to a fixed size. In this case, we will use the square shape of 80×80 pixels.
The extract_face() function below implements this, taking the MTCNN model and pixel values for a single photograph as arguments and returning an 80x80x3 array of pixel values with just the face, or None if no face was detected (which can happen rarely).
Running the example may take a few minutes given the larger number of faces to be loaded.
At the end of the run, the array of extracted and resized faces is saved as a compressed NumPy array with the filename ‘img_align_celeba.npz‘.
The prepared dataset can then be loaded any time, as follows.
1
2
3
4
5
6
# load the prepared dataset
from numpy import load
# load the face dataset
data=load('img_align_celeba.npz')
faces=data['arr_0']
print('Loaded: ',faces.shape)
Loading the dataset summarizes the shape of the array, showing 50K images with the size of 80×80 pixels and three color channels.
1
Loaded: (50000, 80, 80, 3)
We are now ready to develop a GAN model to generate faces using this dataset.
How to Develop a Generative Adversarial Network
In this section, we will develop a GAN for the faces dataset that we have prepared.
The first step is to define the models.
The discriminator model takes as input one 80×80 color image an outputs a binary prediction as to whether the image is real (class=1) or fake (class=0). It is implemented as a modest convolutional neural network using best practices for GAN design such as using the LeakyReLU activation function with a slope of 0.2, using a 2×2 stride to downsample, and the adam version of stochastic gradient descent with a learning rate of 0.0002 and a momentum of 0.5
The define_discriminator() function below implements this, defining and compiling the discriminator model and returning it. The input shape of the image is parameterized as a default function argument in case you want to re-use the function for your own image data later.
The generator model takes as input a point in the latent space and outputs a single 80×80 color image.
This is achieved by using a fully connected layer to interpret the point in the latent space and provide sufficient activations that can be reshaped into many copies (in this case 128) of a low-resolution version of the output image (e.g. 5×5). This is then upsampled four times, doubling the size and quadrupling the area of the activations each time using transpose convolutional layers. The model uses best practices such as the LeakyReLU activation, a kernel size that is a factor of the stride size, and a hyperbolic tangent (tanh) activation function in the output layer.
The define_generator() function below defines the generator model but intentionally does not compile it as it is not trained directly, then returns the model. The size of the latent space is parameterized as a function argument.
Next, a GAN model can be defined that combines both the generator model and the discriminator model into one larger model. This larger model will be used to train the model weights in the generator, using the output and error calculated by the discriminator model. The discriminator model is trained separately, and as such, the model weights are marked as not trainable in this larger GAN model to ensure that only the weights of the generator model are updated. This change to the trainability of the discriminator weights only has an effect when training the combined GAN model, not when training the discriminator standalone.
This larger GAN model takes as input a point in the latent space, uses the generator model to generate an image, which is fed as input to the discriminator model, then output or classified as real or fake.
The define_gan() function below implements this, taking the already-defined generator and discriminator models as input.
1
2
3
4
5
6
7
8
9
10
11
12
13
14
# define the combined generator and discriminator model, for updating the generator
Now that we have defined the GAN model, we need to train it. But, before we can train the model, we require input data.
The first step is to load and scale the pre-processed faces dataset. The saved NumPy array can be loaded, as we did in the previous section, then the pixel values must be scaled to the range [-1,1] to match the output of the generator model.
The load_real_samples() function below implements this, returning the loaded and scaled image data ready for modeling.
1
2
3
4
5
6
7
8
9
10
# load and prepare training images
def load_real_samples():
# load the face dataset
data=load('img_align_celeba.npz')
X=data['arr_0']
# convert from unsigned ints to floats
X=X.astype('float32')
# scale from [0,255] to [-1,1]
X=(X-127.5)/127.5
returnX
We will require one batch (or a half) batch of real images from the dataset each update to the GAN model. A simple way to achieve this is to select a random sample of images from the dataset each time.
The generate_real_samples() function below implements this, taking the prepared dataset as an argument, selecting and returning a random sample of face images and their corresponding class label for the discriminator, specifically class=1, indicating that they are real images.
The generate_latent_points() function implements this, taking the size of the latent space as an argument and the number of points required and returning them as a batch of input samples for the generator model.
1
2
3
4
5
6
7
# generate points in latent space as input for the generator
def generate_latent_points(latent_dim,n_samples):
# generate points in the latent space
x_input=randn(latent_dim *n_samples)
# reshape into a batch of inputs for the network
x_input=x_input.reshape(n_samples,latent_dim)
returnx_input
Next, we need to use the points in the latent space as input to the generator in order to generate new images.
The generate_fake_samples() function below implements this, taking the generator model and size of the latent space as arguments, then generating points in the latent space and using them as input to the generator model. The function returns the generated images and their corresponding class label for the discriminator model, specifically class=0 to indicate they are fake or generated.
1
2
3
4
5
6
7
8
9
# use the generator to generate n fake examples, with class labels
The model is fit for 100 training epochs, which is arbitrary, as the model begins generating plausible faces after perhaps the first few epochs. A batch size of 128 samples is used, and each training epoch involves 50,000/128 or about 390 batches of real and fake samples and updates to the model.
First, the discriminator model is updated for a half batch of real samples, then a half batch of fake samples, together forming one batch of weight updates. The generator is then updated via the combined GAN model. Importantly, the class label is set to 1 or real for the fake samples. This has the effect of updating the generator toward getting better at generating real samples on the next batch.
The train() function below implements this, taking the defined models, dataset, and size of the latent dimension as arguments and parameterizing the number of epochs and batch size with default arguments.
You will note that every 10 training epochs, the summarize_performance() function is called.
There is currently no reliable way to automatically evaluate the quality of generated images. Therefore, we must generate images periodically during training and save the model at these times. This both provides a check-point that we can later load and use to generate images, and a way to safeguard against the training process failing, which can happen.
Below defines the summarize_performance() and save_plot() functions.
The summarize_performance() function generates samples and evaluates the performance of the discriminator on real and fake samples. The classification accuracy is reported and might provide insight into model performance. The save_plot() is called to create and save a plot of the generated images, and then the model is saved to a file.
1
2
3
4
5
6
7
8
9
10
11
12
13
14
15
16
17
18
19
20
21
22
23
24
25
26
27
28
29
30
31
32
33
34
# create and save a plot of generated images
def save_plot(examples,epoch,n=10):
# scale from [-1,1] to [0,1]
examples=(examples+1)/2.0
# plot images
foriinrange(n *n):
# define subplot
pyplot.subplot(n,n,1+i)
# turn off axis
pyplot.axis('off')
# plot raw pixel data
pyplot.imshow(examples[i])
# save plot to file
filename='generated_plot_e%03d.png'%(epoch+1)
pyplot.savefig(filename)
pyplot.close()
# evaluate the discriminator, plot generated images, save generator model
Running the example may take a long time on modest hardware.
I recommend running the example on GPU hardware. If you need help, you can get started quickly by using an AWS EC2 instance to train the model. See the tutorial:
Note: Your results may vary given the stochastic nature of the algorithm or evaluation procedure, or differences in numerical precision. Consider running the example a few times and compare the average outcome.
The loss for the discriminator on real and fake samples, as well as the loss for the generator, is reported after each batch.
1
2
3
4
5
6
>1, 1/390, d1=0.699, d2=0.696 g=0.692
>1, 2/390, d1=0.541, d2=0.702 g=0.686
>1, 3/390, d1=0.213, d2=0.742 g=0.656
>1, 4/390, d1=0.013, d2=0.806 g=0.656
>1, 5/390, d1=0.012, d2=0.772 g=0.682
...
The discriminator loss may crash down to values of 0.0 for real and generated samples.
If this happens, it is an example of a training failure from which the model is likely to not recover and you should restart the training process.
1
2
3
4
5
6
7
8
...
>34, 130/390, d1=0.844, d2=8.434 g=3.450
>34, 131/390, d1=1.233, d2=12.021 g=3.541
>34, 132/390, d1=1.183, d2=15.759 g=0.000
>34, 133/390, d1=0.000, d2=15.942 g=0.006
>34, 134/390, d1=0.081, d2=15.942 g=0.000
>34, 135/390, d1=0.000, d2=15.942 g=0.000
...
Review the generated plots and select a model based on the best quality images.
The model should begin to generate faces after about 30 training epochs.
The faces are not completely clear, but it is obvious that they are faces, with all the right things (hair, eyes, nose, mouth) in roughly the right places.
Example of Celebrity Faces Generated by a Generative Adversarial Network
How to Explore the Latent Space for Generated Faces
In this section, we will use our trained GAN model as the basis for exploring the latent space.
How to Load Model and Generate Faces
The first step is to load the saved model and confirm that it can generate plausible faces.
The model can be loaded using the load_model() function in the Keras API. We can then generate a number of random points in the latent space and use them as input to the loaded model to generate new faces. The faces can then be plotted.
The complete example is listed below.
1
2
3
4
5
6
7
8
9
10
11
12
13
14
15
16
17
18
19
20
21
22
23
24
25
26
27
28
29
30
31
32
33
34
35
36
37
# example of loading the generator model and generating images
from numpy import asarray
from numpy.random import randn
from numpy.random import randint
from keras.models import load_model
from matplotlib import pyplot
# generate points in latent space as input for the generator
Note: Your results may vary given the stochastic nature of the algorithm or evaluation procedure, or differences in numerical precision. Consider running the example a few times and compare the average outcome.
Then, 25 random points in the 100-dimensional latent space are created, provided to the generator model to create 25 images of faces, which are then plotted in a 5×5 grid.
Plot of Randomly Generated Faces Using the Loaded GAN Model
How to Interpolate Between Generated Faces
Next, we can create an interpolation path between two points in the latent space and generate faces along this path.
The simplest interpolation we can use is a linear or uniform interpolation between two points in the latent space. We can achieve this using the linspace() NumPy function to calculate ratios of the contribution from two points, then enumerate these ratios and construct a vector for each ratio.
The interpolate_points() function below implements this and returns a series of linearly interpolated vectors between two points in latent space, including the first and last point.
1
2
3
4
5
6
7
8
9
10
# uniform interpolation between two points in latent space
def interpolate_points(p1,p2,n_steps=10):
# interpolate ratios between the points
ratios=linspace(0,1,num=n_steps)
# linear interpolate vectors
vectors=list()
forratio inratios:
v=(1.0-ratio)*p1+ratio *p2
vectors.append(v)
returnasarray(vectors)
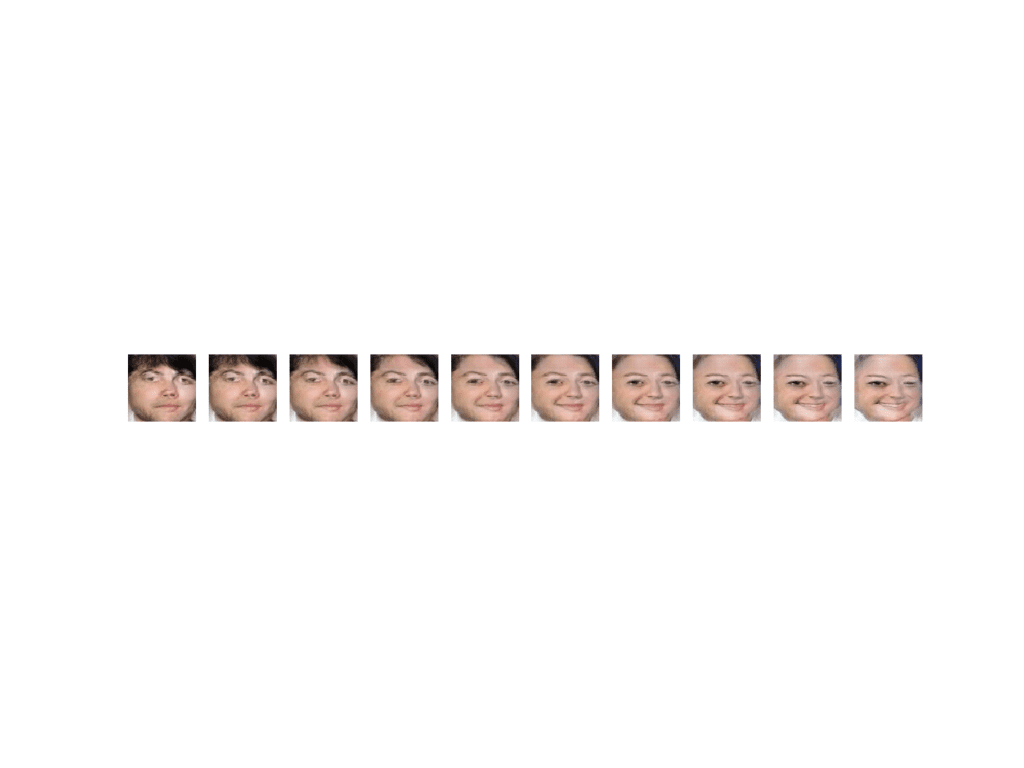
We can then generate two points in the latent space, perform the interpolation, then generate an image for each interpolated vector.
The result will be a series of images that transition between the two original images. The example below demonstrates this for two faces.
1
2
3
4
5
6
7
8
9
10
11
12
13
14
15
16
17
18
19
20
21
22
23
24
25
26
27
28
29
30
31
32
33
34
35
36
37
38
39
40
41
42
43
44
45
46
47
48
49
50
51
# example of interpolating between generated faces
from numpy import asarray
from numpy.random import randn
from numpy.random import randint
from numpy import linspace
from keras.models import load_model
from matplotlib import pyplot
# generate points in latent space as input for the generator
# uniform interpolation between two points in latent space
def interpolate_points(p1,p2,n_steps=10):
# interpolate ratios between the points
ratios=linspace(0,1,num=n_steps)
# linear interpolate vectors
vectors=list()
forratio inratios:
v=(1.0-ratio)*p1+ratio *p2
vectors.append(v)
returnasarray(vectors)
# create a plot of generated images
def plot_generated(examples,n):
# plot images
foriinrange(n *n):
# define subplot
pyplot.subplot(n,n,1+i)
# turn off axis
pyplot.axis('off')
# plot raw pixel data
pyplot.imshow(examples[i,:,:])
pyplot.show()
# load model
model=load_model('generator_model_030.h5')
# generate points in latent space
n=20
pts=generate_latent_points(100,n)
# interpolate pairs
results=None
foriinrange(0,n,2):
# interpolate points in latent space
interpolated=interpolate_points(pts[i],pts[i+1])
# generate images
X=model.predict(interpolated)
# scale from [-1,1] to [0,1]
X=(X+1)/2.0
ifresults isNone:
results=X
else:
results=vstack((results,X))
# plot the result
plot_generated(results,10)
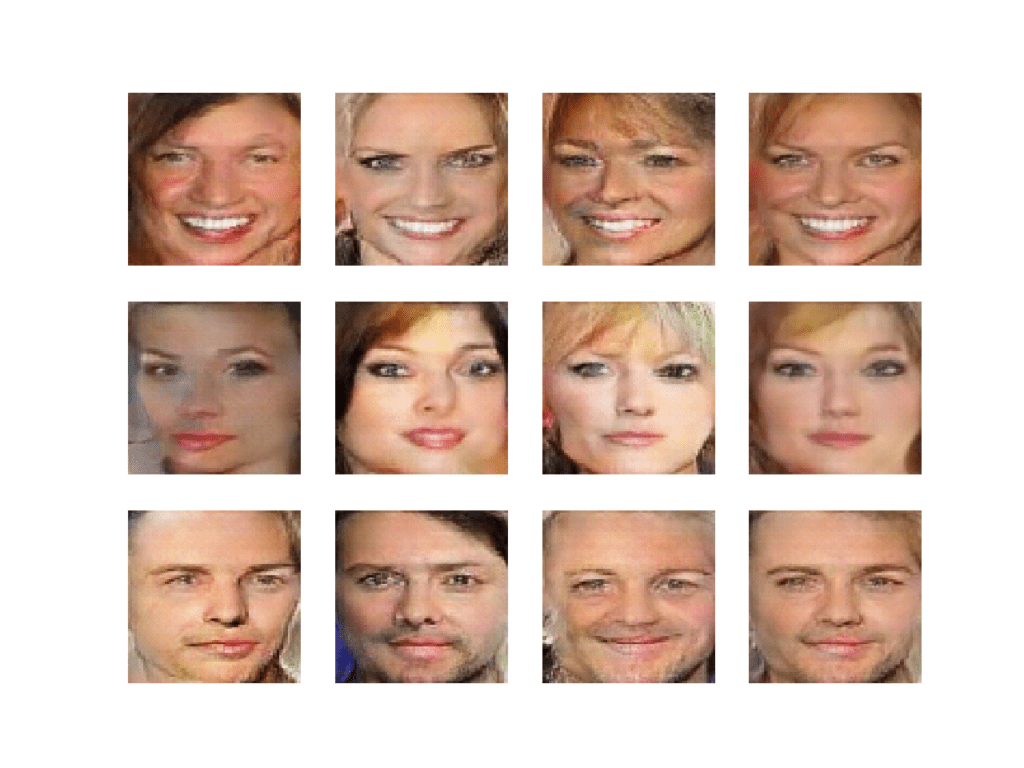
Running the example creates 10 different face starting points and 10 matching face endpoints, and the linear interpolation between each.
Note: Your results may vary given the stochastic nature of the algorithm or evaluation procedure, or differences in numerical precision. Consider running the example a few times and compare the average outcome.
Plot Showing Multiple Linear Interpolations Between Two GAN Generated Faces
In these cases, we have performed a linear interpolation which assumes that the latent space is uniformly distributed hypercube. Technically, our chosen latent space is a 100-dimension hypersphere or multimodal Gaussian distribution.
There is a mathematical function called the spherical linear interpolation function, or ‘Slerp,’ that should be used when interpolating this space to ensure the curving of the space is taken into account. For more details, I recommend reading the Issue on Linear Interpolation in Soumith Chintala’s dcgan.torch project. In that project, an implementation of the Slerp function for Python is provided that we can use as the basis for our own Slerp function, provided below:
# uniform interpolation between two points in latent space
def interpolate_points(p1,p2,n_steps=10):
# interpolate ratios between the points
ratios=linspace(0,1,num=n_steps)
# linear interpolate vectors
vectors=list()
forratio inratios:
v=slerp(ratio,p1,p2)
vectors.append(v)
returnasarray(vectors)
# create a plot of generated images
def plot_generated(examples,n):
# plot images
foriinrange(n *n):
# define subplot
pyplot.subplot(n,n,1+i)
# turn off axis
pyplot.axis('off')
# plot raw pixel data
pyplot.imshow(examples[i,:,:])
pyplot.show()
# load model
model=load_model('generator_model_030.h5')
# generate points in latent space
n=20
pts=generate_latent_points(100,n)
# interpolate pairs
results=None
foriinrange(0,n,2):
# interpolate points in latent space
interpolated=interpolate_points(pts[i],pts[i+1])
# generate images
X=model.predict(interpolated)
# scale from [-1,1] to [0,1]
X=(X+1)/2.0
ifresults isNone:
results=X
else:
results=vstack((results,X))
# plot the result
plot_generated(results,10)
The result is 10 more transitions between generated faces, this time using the correct Slerp interpolation method.
Note: Your results may vary given the stochastic nature of the algorithm or evaluation procedure, or differences in numerical precision. Consider running the example a few times and compare the average outcome.
The difference is subtle but somehow visually more correct.
Plot Showing Multiple Seraphically Linear Interpolation Between Two GAN Generated Faces
How to Perform Vector Arithmetic With Faces
Finally, we can explore the latent space by performing vector arithmetic with the generated faces
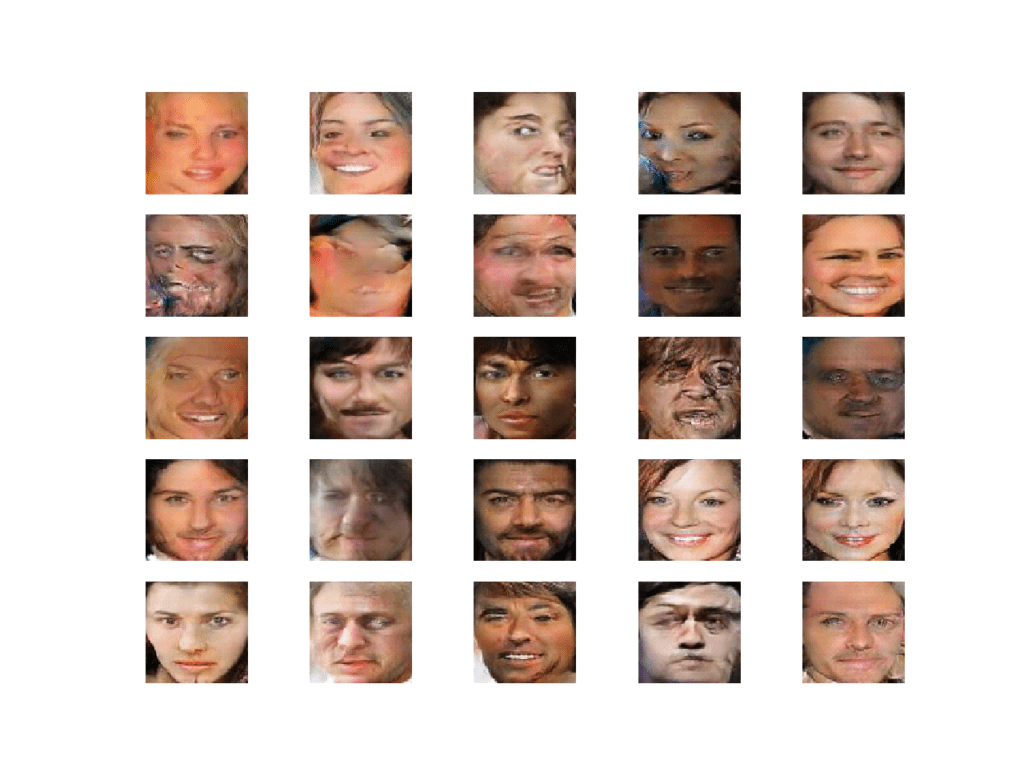
First, we must generate a large number of faces and save both the faces and their corresponding latent vectors. We can then review the plot of generated faces and select faces with features we’re interested in, note their index (number), and retrieve their latent space vectors for manipulation.
The example below will load the GAN model and use it to generate 100 random faces.
1
2
3
4
5
6
7
8
9
10
11
12
13
14
15
16
17
18
19
20
21
22
23
24
25
26
27
28
29
30
31
32
33
34
35
36
37
38
39
40
41
# example of loading the generator model and generating images
from numpy import asarray
from numpy.random import randn
from numpy.random import randint
from keras.models import load_model
from matplotlib import pyplot
from numpy import savez_compressed
# generate points in latent space as input for the generator
Running the example loads the model, generates faces, and saves the latent vectors and generated faces.
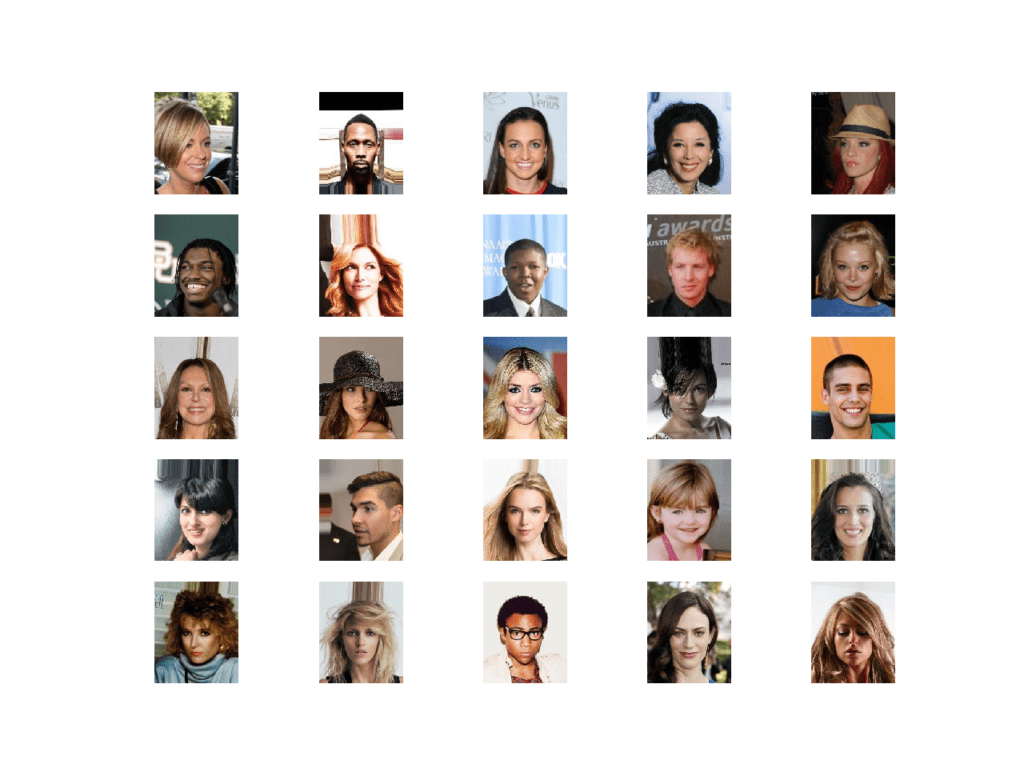
The latent vectors are saved to a compressed NumPy array with the filename ‘latent_points.npz‘. The 100 generated faces are plotted in a 10×10 grid and saved in a file named ‘generated_faces.png‘.
In this case, we have a good collection of faces to work with. Each face has an index that we can use to retrieve the latent vector. For example, the first face is 1, which corresponds to the first vector in the saved array (index 0).
We will perform the operation:
1
smiling woman - neutral woman + neutral man = smiling man
Therefore, we need three faces for each of smiling woman, neutral woman, and neutral man.
In this case, we will use the following indexes in the image:
Smiling Woman: 92, 98, 99
Neutral Woman: 9, 21, 79
Neutral Man: 10, 30, 45
Plot of 100 Generated Faces Used as the Basis for Vector Arithmetic with Faces
Now that we have latent vectors to work with and a target arithmetic, we can get started.
First, we can specify our preferred images and load the saved NumPy array of latent points.
1
2
3
4
5
6
7
# retrieve specific points
smiling_woman_ix=[92,98,99]
neutral_woman_ix=[9,21,79]
neutral_man_ix=[10,30,45]
# load the saved latent points
data=load('latent_points.npz')
points=data['arr_0']
Next, we can retrieve each vector and calculate the average for each vector type (e.g. smiling woman). We could perform vector arithmetic with single images directly, but we will get a more robust result if we work with an average of a few faces with the desired property.
The average_points() function below takes the loaded array of latent space points, retrieves each, calculates the average, and returns all of the vectors.
1
2
3
4
5
6
7
8
9
10
11
# average list of latent space vectors
def average_points(points,ix):
# convert to zero offset points
zero_ix=[i-1foriinix]
# retrieve required points
vectors=points[zero_ix]
# average the vectors
avg_vector=mean(vectors,axis=0)
# combine original and avg vectors
all_vectors=vstack((vectors,avg_vector))
returnall_vectors
We can now use this function to retrieve all of the required points in latent space and generate images.
Running the example first loads the points in latent space for our specific images, calculates the average of the points, and generates the faces for the points.
Note: Your results may vary given the stochastic nature of the algorithm or evaluation procedure, or differences in numerical precision. Consider running the example a few times and compare the average outcome.
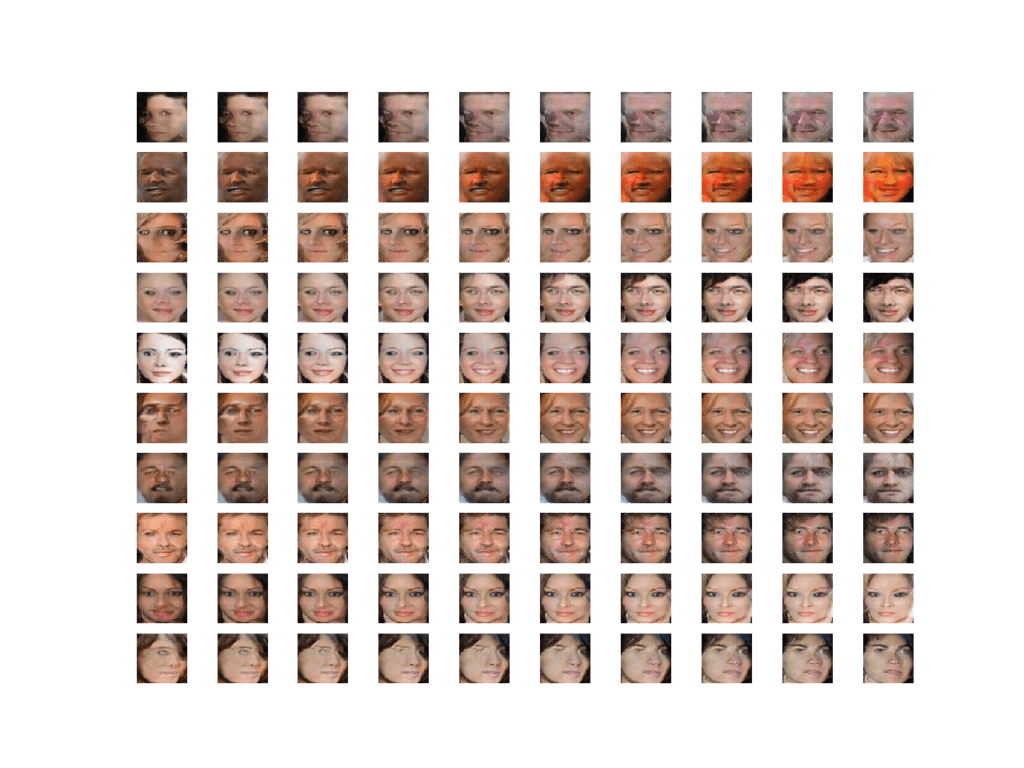
We can see that, indeed, our selected faces were retrieved correctly and that the average of the points in the vector space captures the salient feature we are going for on each line (e.g. smiling woman, neutral woman, etc.).
Plot of Selected Generated Faces and the Average Generated Face for Each Row
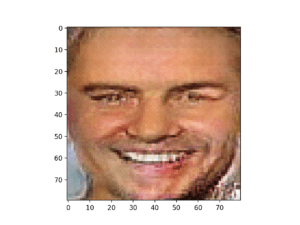
Next, vector arithmetic is performed and the result is a smiling man, as we would expect.
Plot of the Resulting Generated Face Based on Vector Arithmetic in Latent Space
Extensions
This section lists some ideas for extending the tutorial that you may wish to explore.
Additional Arithmetic. Try arithmetic with different image features or different arithmetic and review the results of the generated faces.
Additional Interpolation. Try interpolating between three or more points in latent space and review the results of the generated faces.
Tune Model. Update the GAN model configuration so that training is more stable and better quality faces can be generated.
If you explore any of these extensions, I’d love to know.
Post your findings in the comments below.
Further Reading
This section provides more resources on the topic if you are looking to go deeper.
Books
Chapter 20. Deep Generative Models, Deep Learning, 2016.
In this tutorial, you discovered how to develop a generative adversarial network for face generation and explore the structure of latent space and the effect on generated faces.
Specifically, you learned:
How to develop a generative adversarial network for generating faces.
How to interpolate between points in latent space and generate images that morph from one face to another.
How to perform vector arithmetic in latent space and achieve targeted results in the resulting generated faces.
Do you have any questions?
Ask your questions in the comments below and I will do my best to answer.
I met some troubles using MTCNN after doing a pip install . I got the message “no module named cv2”
I had to install it by typing :
python -m pip install opencv-python
best
I took inspiration from your teaching and developed A gan model for flowers. I am using plotly’s scatter plots to plot the latent points in a 2d graph. But when I see those images, they are clustering together but not based on some feature one could see. Is there a way to tweak something so that similar images are clustered together like with similar colour or similar shape, etc.
Thank you for this.
I have such a hard time wrapping my mind around what latent space is? I have gone through a few of your GAN tutorials as well as other tutorials. I feel that I have a good empirical understanding of what latent space is, and why it is used, but I have no idea how one decides on the shape. Why is it that in DCGAN the latent space is a 100D vector? WHy not 50D or 20D or 1000D?
This also stems from another tutorial you have where you use a GAN network for simple 1D function modeling, there you use a 5D latent space. I also read in some of the comments in your other article, that you said it becomes arbitrary to choose a different latent space shape? I hope I am asking the right question here.
If you could please give an ELI5 version, I would greatly appreciate it! Thanks
The size/shape is arbitrary. Larger may give more freedom, too large or too small may lead to an unstable model.
It is not a real thing, instead the model learns to apply meaning to it – to draw inspiration if you will, but in a consistent way so that it is ordered and different parts of the space map to different specific outputs – although it is a different structure/mapping each time the model is trained.
It is a crazy thing to understand. You’re not alone 🙂
Hello, I am quite a new to this field and your articles are being really helpful.
However, since it is difficult to understand fully, May I ask a few specific questions?
First, I know train on batch function makes gan_model to improve its performance.
But, I do not get that why generating latent_points always use randn function to make random noise.
I am guessing that value of noise is not important because the gan model generates image are making better images as training process keeps going on even though the noise is always random.
Is that right..?
Second, Can you briefly tell me what is ‘arr_0’ in every process of loading npz files such as points = data[‘arr_0′]?
Third, vector arithmetic parts comes real hard to me and cannot figure out what is going on in this part.
”’
# average vectors
smiling_woman = average_points(points, smiling_woman_ix)
neutral_woman = average_points(points, neutral_woman_ix)
neutral_man = average_points(points, neutral_man_ix)
# combine all vectors
all_vectors = vstack((smiling_woman, neutral_woman, neutral_man))
# smiling woman – neutral woman + neutral man = smiling man
result_vector = smiling_woman[-1] – neutral_woman[-1] + neutral_man[-1]
”’
Could you please tell us a little more details? I understand ‘average_points’ are making averages between vectors of dif images but cannot understand the inner part of average_point function and why the last element of vectors make the result_vector.
Have you also explored the possibility to reduce the dimension of the latent space? Here it is 100-dimensional, but it could be useful for some application to understand if there’s a lower bound that can’t be crossed. Or if there are effects on the training and which.
I am finally putting a description and code up on Github using what I learned from a couple of your wonderful Internet tutorials and I want to make certain I reference your work appropriately. What I’m putting up is a cGAN with embedding using modifications of your work and Centeno’s work and I do some housekeeping such as illustrating how to restart a cGAN from where it is interrupted, automatically correcting for learning rates which aren’t too far out of line, and other housekeeping processes. It’s the kinds of things a person might want to try to do when making “minor” modifications to what other people publish on the Internet and then discovering their “minor” modifications cause problems for convergence. It is presently ‘private’ under https://github.com/tvtaerum/cGans_with_embedding—housekeeping but I want to make certain I reference both you and your work appropriately. I’ve barely begun putting stuff up but I’ve found it pays to do things correctly from the start. If I, or other people, wish to do something like that, what is most appropriate? Do you, by chance, even have an illustration?
I am trying to save a tensorflow kersa model, with this summary: Model: “sequential_2” etc. using the following command: model.save(‘my_model.h5’) I got the following error: ImportError:save_modelrequires h5py. So, I installed h5py, using conda install h5py After the installation, I got the version of h5py: h5py.__version__ ‘2.8.0’ Still, I got the same error. Even though, I imported h5py manually.
import h5py
import tensorflow as tf
from tensorflow import keras
from tensorflow.keras import layers
filename = ‘g_model.h5’
model.save(filename)
Thanks again for the awesome material. I started off with your CNN MNIST tutorial and I’ve learned so much since. I have one question about this one:
In the function where you define the full gan, you set d_model.trainable = False. But I couldn’t find anywhere else in the code where you toggle it back to True before updating d_model weights in the training loop. Am I missing something here?
Hi Jason,
I bought your book on GANs quite shortly after it came out, and have to say it (along with posts like these) are fantastic and very helpful.
Throughout the book/posts, however, ive begun to notice something and was wondering:
All the common applications of GANs work with square images… How would you recomend going about working with rectangular ones?
While i get that reshaping and cropping is an easy way to get around this, what if you arent able to reshape the image?
Ive been planning a study into the use of GANs for data augmentation applications in some datasets I handle at work, but when I begin to look at the available bibliography I notice that almost everyone works with data represented by square matrices (whether this be images or otherwise). Im working with different types of matrices at the moment for different applications, and not all matrices are related to images and above all they are NOT square. In most cases the data i obtain and work with are matrices represented by quite a few rows and only three columns. In some cases i have more columns but in general my datasets are aprox 13×3, 17×3 or 30×3, depending on the application im working with.
Do you know of papers or applications of people who work with rectangular data? Or could you recomend a starting point of where i could search for some inspiration?
Thank you for a great book, having a lot of fun with this. Since you asked for feedback, if we are explore extensions, here goes….
I noticed that the quality of images in CelebA is varying. There are quite a lot of images where face is from side or very turned. Since MTCNN also provides position of nose and eyes I tried making a small change to the dataprep algorithm. Instead of picking 50K out of the 200K CelebA images by random I favor the ones where the vertical distance from nose center to center of eyes is short. This picks images where people are looking more straight ahead (and a few with crooked noses 🙂
Giving the model a bit less variety and fewer outliers in poses generates more consistent results
Thanks for your very good tutorial in detail. I have a question here, as you mentioned in the article that “The discriminator loss may crash down to values of 0.0 for real and generated samples.” I met this problem, but how does this happen? Could you explain the reason for this phenomenon?
Because i spend about 3 day for discovering WHY import cv2 is not working, I’ll share my solution, for those of You, that could have this same type of problem.
For W10 N / pro N You need to install media feature pack.
Without this, any fancy method of instaling and importing cv2 will not work…
—
Thanks for this incredible blog Jason, I’m on way to use C-GAN in my mechanical PhD work, and You make many of this net secret much more clear for non direct AI/DL reserchers, as myself.
I planning to buy next month Your GAN book.
Thanks for your very good tutorial in detail. pixel values must be scaled to the range [-1,1] to match the output of the generator model. Why we need to do this ??
In this example, when updating the parameters of the generator, the discriminator variables will also be updated since the train_on_batch method is called on a sequential model containing both the generator and the discriminator. Should the generator parameters not be updated independently of that of the discriminator?
Hi thank you for your tutorial.
I have an error. Plz help me
‘tensorflow.python.framework.errors_impl.ResourceExhaustedError:
OOM when allocating tensor with shape[128,128,80,80] and type float on/job:localhost/replica:0/task:0/device:GPU:0 by allocator GPU_0_bfc
[[node gradients_1/sequential_1/conv2d_2/convolution_grad/Conv2DBackpropInput (defined at \Users\HP\miniconda3\envs\Tensorflow_v2_py3\lib\site-packages\keras\backend\tensorflow_backend.py:3009) ]]’
Your tutorial is so fantastic. I tried to use x-ray chest dataset. Because it is different from RGB containing datasets, it hasn’t worked. What could you recommend to do in this case? thank you in advance
Hello Sir, great tutorial.
I am working on a human faces InfoGAN model for an academic research, and I was wondering if I can use your model as a base code since it is stable, and generates good figures.
Thank you.
GANs can be very tricky to run. You have to build up experience and confidence by building/training many different models – e.g. the approach taken in the book.
Sorry, I don’t understand your question. This tutorial is about a generator for generating pictures of faces, not mnist digits, and not transforms of other images.
Thank you for the explicit tutorial.
Instead of interpolating generated data from latent space, how can I interpolate faces of the original celebA faces?
I guess I would need some kind of encoder for that but don’t see how to map original face to the latent space!
Dear Jason Brownlee,
Thanks for sharing your good work. can you please help with the implementation of basic face generation on 80×80 image sizes using Hinge loss function instead of Binary cross entropy loss in the same model. I tried using hinge loss by scaling data to range{-1 to 1}, but there is no progress in outputs generated(only blank grey images generated).
Hi! Thank you very much for the article. I have a question: I decided to output the desriminator’s accuracy, every 5 training epochs for 10.000 images (in exactly the same way as in the article). That is, I saved the discriminator after every fifth epoch and ran its accuracy over 10,000 images. The fact is that the accuracy on real images jumps a lot: after the 5th epoch – the accuracy is 99 percent, after 15 – 75 percent, and after 20 again it is 92. The quality of the images improves after each epoch. Can you please tell me what is the reason for this spread?
Hello, thank you very much for this informative article. I had a question regarding custom training. Instead of training on images, can I instead train and test the GAN using custom ’embedding’ that might have been generated from the images using some separate encoder network? That is, first I generate some embedding on my custom dataset using a separate network and then feed those vectors into the GAN. Do you have any suggestions? thanks!
This is a fantastic tutorial, but when I tried to use load_faces, it would have some warning like this:
triggered tf.function retracing. Tracing is expensive and the excessive number of tracings could be due to (1) creating @tf.function repeatedly in a loop, (2) passing tensors with different shapes, (3) passing Python objects instead of tensors. For (1), please define your @tf.function outside of the loop. For (2), @tf.function has experimental_relax_shapes=True option that relaxes argument shapes that can avoid unnecessary retracing. For (3), please refer to https://www.tensorflow.org/guide/function#controlling_retracing and https://www.tensorflow.org/api_docs/python/tf/function for more details.
This is a fantastic tutorial, noticed that for the two blocks of code under the heading How to Interpolate Between Generated Faces. np.Linspace supports interpolation between vectors so you don’t
need those two paragraphs of code
instead just input your vector that you want to interpolate into np.linspace e.g.
Hi Jason! Your code works great.
Thank you very much for publishing excellent and didactic notes about ML…!
Yes, training can last for many hours. I was only able to train the model for 40 epochs (about 3 and a half hours), in Google Colab.
I have saved the three models, d_model, g_model and gan_model, but I can NOT continue with the training.
Any suggestion how to do it? Thank you in advance!
I took inspiration from your teaching and developed A gan model for flowers. I am using plotly’s scatter plots to plot the latent points in a 2d graph. But when I see those images, they are clustering together but not based on some feature one could see. Is there a way to tweak something so that similar images are clustered together like with similar colour or similar shape, etc.
Your articles are easy to understand and thank you. I want to know more about the latent space and vectors and how it works in GAN. I am looking forward to theory and mathematical explanations. I hope you can help me with this. Thank You…


Excellently detailed post ! Eagerly waiting for your book on GANs.
Thanks!
Yes, this was a really fun tutorial to write 🙂
The new book should be ready in a week or two. I’m really excited about it.
Hello Jason
I met some troubles using MTCNN after doing a pip install . I got the message “no module named cv2”
I had to install it by typing :
python -m pip install opencv-python
best
Thanks for sharing.
Yes, OpenCV is required.
I am getting this value
Loaded: (50000, 218, 178, 3)
what might be the problem?
Is it possible that you skipped a step?
Yes, it was silly mistake in one of the function. It’s fine now. Thanks.
Happy to hear that.
Hi!
I took inspiration from your teaching and developed A gan model for flowers. I am using plotly’s scatter plots to plot the latent points in a 2d graph. But when I see those images, they are clustering together but not based on some feature one could see. Is there a way to tweak something so that similar images are clustered together like with similar colour or similar shape, etc.
Thank you for this amazing tutorial , I wonder how to do the same with Cycle Gans while generating faces , i.e creating angry face , smiling face, …
It may not make sense with a cyclegan as it for image translation, not generating new images, like faces.
Thank you for this.
I have such a hard time wrapping my mind around what latent space is? I have gone through a few of your GAN tutorials as well as other tutorials. I feel that I have a good empirical understanding of what latent space is, and why it is used, but I have no idea how one decides on the shape. Why is it that in DCGAN the latent space is a 100D vector? WHy not 50D or 20D or 1000D?
This also stems from another tutorial you have where you use a GAN network for simple 1D function modeling, there you use a 5D latent space. I also read in some of the comments in your other article, that you said it becomes arbitrary to choose a different latent space shape? I hope I am asking the right question here.
If you could please give an ELI5 version, I would greatly appreciate it! Thanks
The size/shape is arbitrary. Larger may give more freedom, too large or too small may lead to an unstable model.
It is not a real thing, instead the model learns to apply meaning to it – to draw inspiration if you will, but in a consistent way so that it is ordered and different parts of the space map to different specific outputs – although it is a different structure/mapping each time the model is trained.
It is a crazy thing to understand. You’re not alone 🙂
I think I gave a good intro to “latent space” in this post:
https://machinelearningmastery.com/what-are-generative-adversarial-networks-gans/
Hello, I am quite a new to this field and your articles are being really helpful.
However, since it is difficult to understand fully, May I ask a few specific questions?
First, I know train on batch function makes gan_model to improve its performance.
But, I do not get that why generating latent_points always use randn function to make random noise.
I am guessing that value of noise is not important because the gan model generates image are making better images as training process keeps going on even though the noise is always random.
Is that right..?
Second, Can you briefly tell me what is ‘arr_0’ in every process of loading npz files such as points = data[‘arr_0′]?
Third, vector arithmetic parts comes real hard to me and cannot figure out what is going on in this part.
”’
# average vectors
smiling_woman = average_points(points, smiling_woman_ix)
neutral_woman = average_points(points, neutral_woman_ix)
neutral_man = average_points(points, neutral_man_ix)
# combine all vectors
all_vectors = vstack((smiling_woman, neutral_woman, neutral_man))
# smiling woman – neutral woman + neutral man = smiling man
result_vector = smiling_woman[-1] – neutral_woman[-1] + neutral_man[-1]
”’
Could you please tell us a little more details? I understand ‘average_points’ are making averages between vectors of dif images but cannot understand the inner part of average_point function and why the last element of vectors make the result_vector.
Thank you always for your articles.
We generate random points in the latent space to generate new synthetic images.
The generator learns how to structure the latent space.
npz file format saves a list of arrays, we just access the first array saved.
Perhaps start with this much simpler example:
https://machinelearningmastery.com/how-to-develop-a-generative-adversarial-network-for-a-1-dimensional-function-from-scratch-in-keras/
Why isn’t it classified as DCGAN even though it contains CNN in both discriminator and generator model?
It is a type of DCGAN.
Have you also explored the possibility to reduce the dimension of the latent space? Here it is 100-dimensional, but it could be useful for some application to understand if there’s a lower bound that can’t be crossed. Or if there are effects on the training and which.
Yes I have experimented. Small and very small spaces results on mode collapse all the time.
I am finally putting a description and code up on Github using what I learned from a couple of your wonderful Internet tutorials and I want to make certain I reference your work appropriately. What I’m putting up is a cGAN with embedding using modifications of your work and Centeno’s work and I do some housekeeping such as illustrating how to restart a cGAN from where it is interrupted, automatically correcting for learning rates which aren’t too far out of line, and other housekeeping processes. It’s the kinds of things a person might want to try to do when making “minor” modifications to what other people publish on the Internet and then discovering their “minor” modifications cause problems for convergence. It is presently ‘private’ under https://github.com/tvtaerum/cGans_with_embedding—housekeeping but I want to make certain I reference both you and your work appropriately. I’ve barely begun putting stuff up but I’ve found it pays to do things correctly from the start. If I, or other people, wish to do something like that, what is most appropriate? Do you, by chance, even have an illustration?
Well done.
This can help you cite work:
https://machinelearningmastery.com/faq/single-faq/how-do-i-reference-or-cite-a-book-or-blog-post
0
I am trying to save a tensorflow kersa model, with this summary: Model: “sequential_2” etc. using the following command: model.save(‘my_model.h5’) I got the following error: ImportError:save_modelrequires h5py. So, I installed h5py, using conda install h5py After the installation, I got the version of h5py: h5py.__version__ ‘2.8.0’ Still, I got the same error. Even though, I imported h5py manually.
import h5py
import tensorflow as tf
from tensorflow import keras
from tensorflow.keras import layers
filename = ‘g_model.h5’
model.save(filename)
**ImportError:**
save_modelrequires h5py.See the example here:
https://machinelearningmastery.com/tensorflow-tutorial-deep-learning-with-tf-keras/
Otherwise, perhaps post your error on stackoverflow.
Hi!
Thanks again for the awesome material. I started off with your CNN MNIST tutorial and I’ve learned so much since. I have one question about this one:
In the function where you define the full gan, you set d_model.trainable = False. But I couldn’t find anywhere else in the code where you toggle it back to True before updating d_model weights in the training loop. Am I missing something here?
Best,
Alex
Well done.
We don’t set it back. The G is trained via the D without updating the D, learn more here:
https://machinelearningmastery.com/how-to-code-the-generative-adversarial-network-training-algorithm-and-loss-functions/
Hi Jason,
I bought your book on GANs quite shortly after it came out, and have to say it (along with posts like these) are fantastic and very helpful.
Throughout the book/posts, however, ive begun to notice something and was wondering:
All the common applications of GANs work with square images… How would you recomend going about working with rectangular ones?
While i get that reshaping and cropping is an easy way to get around this, what if you arent able to reshape the image?
Ive been planning a study into the use of GANs for data augmentation applications in some datasets I handle at work, but when I begin to look at the available bibliography I notice that almost everyone works with data represented by square matrices (whether this be images or otherwise). Im working with different types of matrices at the moment for different applications, and not all matrices are related to images and above all they are NOT square. In most cases the data i obtain and work with are matrices represented by quite a few rows and only three columns. In some cases i have more columns but in general my datasets are aprox 13×3, 17×3 or 30×3, depending on the application im working with.
Do you know of papers or applications of people who work with rectangular data? Or could you recomend a starting point of where i could search for some inspiration?
Thanks Lloyd!
Yes, I expect the results will hold for rectangular images, but as you say the network config will need adjustment.
Papers work with square images for simplicity.
Not off hand, sorry. I recommend experimenting.
Thank you for a great book, having a lot of fun with this. Since you asked for feedback, if we are explore extensions, here goes….
I noticed that the quality of images in CelebA is varying. There are quite a lot of images where face is from side or very turned. Since MTCNN also provides position of nose and eyes I tried making a small change to the dataprep algorithm. Instead of picking 50K out of the 200K CelebA images by random I favor the ones where the vertical distance from nose center to center of eyes is short. This picks images where people are looking more straight ahead (and a few with crooked noses 🙂
Giving the model a bit less variety and fewer outliers in poses generates more consistent results
Thanks.
Well done, thanks for sharing!
Thanks for your very good tutorial in detail. I have a question here, as you mentioned in the article that “The discriminator loss may crash down to values of 0.0 for real and generated samples.” I met this problem, but how does this happen? Could you explain the reason for this phenomenon?
Yes, the model becomes unstable and fails.
GANs are very unstable, which makes them challenging to train:
https://machinelearningmastery.com/practical-guide-to-gan-failure-modes/
We don’t have good theories about their behaviour yet, so we focus on empirical methods – so called “gan hacks” or heuristics to stop them from failing:
https://machinelearningmastery.com/how-to-train-stable-generative-adversarial-networks/
Because i spend about 3 day for discovering WHY import cv2 is not working, I’ll share my solution, for those of You, that could have this same type of problem.
For W10 N / pro N You need to install media feature pack.
Without this, any fancy method of instaling and importing cv2 will not work…
—
Thanks for this incredible blog Jason, I’m on way to use C-GAN in my mechanical PhD work, and You make many of this net secret much more clear for non direct AI/DL reserchers, as myself.
I planning to buy next month Your GAN book.
Best regards!
What is a “media feature pack”?
We did not even use opencv in this tutorial!
Yes did not use it, but…MTCNN need it to work 🙂
“media feature pack” is a pack with some features of OS system in W10 N series.
Sorry, I have never heard of it.
Thanks for your very good tutorial in detail. pixel values must be scaled to the range [-1,1] to match the output of the generator model. Why we need to do this ??
The generator performs better when generating pixels in the range -1 and 1.
To match the output of the generator model so both real and generated images have the same scale.
Hi,
In this example, when updating the parameters of the generator, the discriminator variables will also be updated since the train_on_batch method is called on a sequential model containing both the generator and the discriminator. Should the generator parameters not be updated independently of that of the discriminator?
Not quite, we set the discriminator to not be trainable when it is part of the generator.
Hi thank you for your tutorial.
I have an error. Plz help me
‘tensorflow.python.framework.errors_impl.ResourceExhaustedError:
OOM when allocating tensor with shape[128,128,80,80] and type float on/job:localhost/replica:0/task:0/device:GPU:0 by allocator GPU_0_bfc
[[node gradients_1/sequential_1/conv2d_2/convolution_grad/Conv2DBackpropInput (defined at \Users\HP\miniconda3\envs\Tensorflow_v2_py3\lib\site-packages\keras\backend\tensorflow_backend.py:3009) ]]’
It looks like you ran out of memory.
Try running on an AWS EC2 instance with more RAM:
https://machinelearningmastery.com/develop-evaluate-large-deep-learning-models-keras-amazon-web-services/
Thank you. I solved this by reducing batch_size to 64(it was 128):)
Nice work!
Your tutorial is so fantastic. I tried to use x-ray chest dataset. Because it is different from RGB containing datasets, it hasn’t worked. What could you recommend to do in this case? thank you in advance
Thank you!
Good question, I don’t have good advice off the cuff. You might have to experiment with a RGB encoding of your data.
Greetings Sir!
Can I use your code for and InfoGAN human faces generation?
Perhaps try it and see?
Hello Sir, great tutorial.
I am working on a human faces InfoGAN model for an academic research, and I was wondering if I can use your model as a base code since it is stable, and generates good figures.
Thank you.
Try it and see.
Ow, I already did. It worked perfectly. I am writing the report and I wanted to make sure that I have the permission to use your code and modify it.
Well done!
Yes, as long as you clearly cite and link to the source:
https://machinelearningmastery.com/faq/single-faq/can-i-use-your-code-in-my-own-project
Of course! thank you.
Dear Jason,
thanks for your excellent books. This is the 7th book of you that I am reading and it is always a great pleasure. I almost spend all of my week end having fun with GAN. This week-end I wrote a review of Part III and Part IV of your book about GAN.
http://questioneurope.blogspot.com/2020/09/generative-adversarial-network-with.html
I also run in the same kind of network failure as people in the community when running cGAN, but after a second run it seems better.
Kind regards,
Dominique
Thanks! Well done on your impressive progress.
GANs can be very tricky to run. You have to build up experience and confidence by building/training many different models – e.g. the approach taken in the book.
Wonderful tutorial Jason. However, how can I interpolate between MNIST data that are used for the training?
I mean instead of using generated data.
Since the code doesn’t contain encoder and only contains generator as a decoder I guess not.
Sorry, I don’t understand your question. This tutorial is about a generator for generating pictures of faces, not mnist digits, and not transforms of other images.
Perhaps you are more interested in image translation GANs like pix2pix:
https://machinelearningmastery.com/how-to-implement-pix2pix-gan-models-from-scratch-with-keras/
Thank you for the explicit tutorial.
Instead of interpolating generated data from latent space, how can I interpolate faces of the original celebA faces?
I guess I would need some kind of encoder for that but don’t see how to map original face to the latent space!
If the model is trained on the celebA dataset then interpolating the latent space will interpolate the celebA dataset.
Dear Jason Brownlee,
Thanks for sharing your good work. can you please help with the implementation of basic face generation on 80×80 image sizes using Hinge loss function instead of Binary cross entropy loss in the same model. I tried using hinge loss by scaling data to range{-1 to 1}, but there is no progress in outputs generated(only blank grey images generated).
Best wishes
Perhaps try adjusting the learning parametres of your model?
Perhaps try adjusting the network architecture for your model?
Hi! Thank you very much for the article. I have a question: I decided to output the desriminator’s accuracy, every 5 training epochs for 10.000 images (in exactly the same way as in the article). That is, I saved the discriminator after every fifth epoch and ran its accuracy over 10,000 images. The fact is that the accuracy on real images jumps a lot: after the 5th epoch – the accuracy is 99 percent, after 15 – 75 percent, and after 20 again it is 92. The quality of the images improves after each epoch. Can you please tell me what is the reason for this spread?
real – is d1, fake – is d2.
{
‘descriminator_model_005.h5’: {‘real’: 99.98000264167786, ‘fake’: 100.0},
‘descriminator_model_010.h5’: {‘real’: 99.40000176429749, ‘fake’: 100.0},
‘descriminator_model_015.h5’: {‘real’: 75.51000118255615, ‘fake’: 90.85999727249146},
‘descriminator_model_020.h5’: {‘real’: 92.91999936103821, ‘fake’: 97.50000238418579},
‘descriminator_model_025.h5’: {‘real’: 94.0999984741211, ‘fake’: 97.97000288963318},
‘descriminator_model_030.h5’: {‘real’: 91.86000227928162, ‘fake’: 97.61999845504761},
‘descriminator_model_035.h5’: {‘real’: 84.42999720573425, ‘fake’: 98.83000254631042},
‘descriminator_model_040.h5’: {‘real’: 78.43999862670898, ‘fake’: 97.36999869346619},
‘descriminator_model_050.h5’: {‘real’: 86.82000041007996, ‘fake’: 100.0},
‘descriminator_model_055.h5’: {‘real’: 80.95999956130981, ‘fake’: 99.55999851226807},
‘descriminator_model_060.h5’: {‘real’: 82.56000280380249, ‘fake’: 100.0}
}
Accuracy is a bad metric for gans. It is not reliable, instead see this:
https://machinelearningmastery.com/how-to-evaluate-generative-adversarial-networks/
Hello, thank you very much for this informative article. I had a question regarding custom training. Instead of training on images, can I instead train and test the GAN using custom ’embedding’ that might have been generated from the images using some separate encoder network? That is, first I generate some embedding on my custom dataset using a separate network and then feed those vectors into the GAN. Do you have any suggestions? thanks!
You’re welcome.
I’m not sure off the cuff, perhaps not. You may need to think this through or even prototype it to see if it is viable.
This is a fantastic tutorial, but when I tried to use load_faces, it would have some warning like this:
triggered tf.function retracing. Tracing is expensive and the excessive number of tracings could be due to (1) creating @tf.function repeatedly in a loop, (2) passing tensors with different shapes, (3) passing Python objects instead of tensors. For (1), please define your @tf.function outside of the loop. For (2), @tf.function has experimental_relax_shapes=True option that relaxes argument shapes that can avoid unnecessary retracing. For (3), please refer to https://www.tensorflow.org/guide/function#controlling_retracing and https://www.tensorflow.org/api_docs/python/tf/function for more details.
Could you please tell me how to solve this?
Thanks.
Perhaps you can safely ignore the warning?
This is a fantastic tutorial, noticed that for the two blocks of code under the heading How to Interpolate Between Generated Faces. np.Linspace supports interpolation between vectors so you don’t
need those two paragraphs of code
instead just input your vector that you want to interpolate into np.linspace e.g.
print(np.linspace([0,5],[1,6],num=10))
[[0. 5. ]
[0.11111111 5.11111111]
[0.22222222 5.22222222]
[0.33333333 5.33333333]
[0.44444444 5.44444444]
[0.55555556 5.55555556]
[0.66666667 5.66666667]
[0.77777778 5.77777778]
[0.88888889 5.88888889]
[1. 6. ]]
Thanks for pointing that out!
Hi Jason! Your code works great.
Thank you very much for publishing excellent and didactic notes about ML…!
Yes, training can last for many hours. I was only able to train the model for 40 epochs (about 3 and a half hours), in Google Colab.
I have saved the three models, d_model, g_model and gan_model, but I can NOT continue with the training.
Any suggestion how to do it? Thank you in advance!
Hi Wilfredo…You are very welcome! Please elaborate on what is occurring such that training does not continue. This will allow us to better assist you.
Thanks a lot for this article! Can you please tell me the best way to visualise the latent space? I mean points in 3d maybe?
Hi Jucris…You may find the following resource beneficial:
https://towardsdatascience.com/understanding-latent-space-in-machine-learning-de5a7c687d8d
Hi!
I took inspiration from your teaching and developed A gan model for flowers. I am using plotly’s scatter plots to plot the latent points in a 2d graph. But when I see those images, they are clustering together but not based on some feature one could see. Is there a way to tweak something so that similar images are clustered together like with similar colour or similar shape, etc.
Hi James,
Your articles are easy to understand and thank you. I want to know more about the latent space and vectors and how it works in GAN. I am looking forward to theory and mathematical explanations. I hope you can help me with this. Thank You…