In this article, you will learn how to build multimodal AI capabilities — image classification, image captioning, and speech transcription — that run entirely in the browser using Transformers.js, with no server, no API key, and no data leaving the user’s device.
Topics we will cover include:
- How to set up and run image classification and image captioning pipelines using Vision Transformer models in the browser.
- How to implement browser-based speech transcription using OpenAI’s Whisper architecture via the Web Audio API.
- How to combine all three pipelines into a single multimodal media analyzer that loads models in parallel and presents results in a unified dashboard.
Multimodal Browser AI with Transformers.js for Images and Speech
Introduction
Most browser AI tutorials cover text because it is a natural starting point, but the applications people actually want to build are rarely text-only. Users take photos, record voice notes, upload screenshots. The data is multimodal and the AI should be too.
Transformers.js handles this natively. It supports computer vision (image classification, object detection, segmentation), audio (automatic speech recognition, audio classification, text-to-speech), and multimodal tasks, all running locally in the browser, with no server, no API key, and no data leaving the user’s device.
This tutorial builds three capabilities in sequence: image classification, image captioning, and speech transcription. Each is a self-contained HTML file you can open in a browser. The final section combines all three into a single multimodal media analyzer.
What You Need
- A modern browser: Chrome 109+, Edge 109+, or Firefox 90+. These versions support ES modules and WebAssembly, both of which Transformers.js requires.
- A local web server: Browser security policies block ES module imports from
file://URLs — opening the HTML files directly by double-clicking will not work. You need to serve them over HTTP.
You do not need Node.js, npm, or any build tools. The CDN import handles the library.
Starting a Local Server
Pick whichever option matches what you already have installed:
|
1 2 3 4 5 6 7 8 |
# Python -- pre-installed on macOS and most Linux systems python3 -m http.server 8080 # Node.js npx serve . # VS Code -- install the Live Server extension, then right-click any HTML file # and choose "Open with Live Server" |
Once the server is running, open http://localhost:8080 in your browser.
Project Structure
Create one folder for the project. Each task gets its own HTML file:
|
1 2 3 4 5 |
multimodal-demo/ ├── image-classifier.html ├── image-captioner.html ├── speech-transcriber.html └── media-analyzer.html |
Models and Download Sizes
Every model downloads once on the first run and caches in the browser. Subsequent loads are instant and work offline. Here is what to expect on the first run:
| Task | Model | Pipeline task | First-run download |
|---|---|---|---|
| Image Classification | Xenova/vit-base-patch16-224 | image-classification | ~88 MB |
| Image Captioning | Xenova/vit-gpt2-image-captioning | image-to-text | ~246 MB |
| Speech Transcription | Xenova/whisper-tiny.en | automatic-speech-recognition | ~78 MB |
The combined app loads all three, roughly 400 MB total on first run. A progress indicator for each model is non-negotiable UX.
Task 1: Image Classification
Image classification assigns labels from a fixed set to an input image. The model used here is ViT-Base/16, a Vision Transformer trained by Google on ImageNet-21k and fine-tuned on ImageNet-1k, converted to ONNX format for browser use. It classifies images into 1,000 ImageNet categories and returns a ranked list with confidence scores.
What the output looks like:
|
1 2 3 4 5 6 7 |
// Output from classifier(imageUrl) [ { label: 'golden retriever', score: 0.9421 }, { label: 'Labrador retriever', score: 0.0312 }, { label: 'Sussex spaniel', score: 0.0098 }, // ... top_k results total ] |
Each object has a label string (the ImageNet class name) and a score float between 0 and 1. By default, the pipeline returns 5 results. Set top_k in the call to get more or fewer.
Full Working Demo
Save this file as image-classifier.html in your project folder. Copy the code below and open it on your localhost.
|
1 2 3 4 5 6 7 8 9 10 11 12 13 14 15 16 17 18 19 20 21 22 23 24 25 26 27 28 29 30 31 32 33 34 35 36 37 38 39 40 41 42 43 44 45 46 47 48 49 50 51 52 53 54 55 56 57 58 59 60 61 62 63 64 65 66 67 68 69 70 71 72 73 74 75 76 77 78 79 80 81 82 83 84 85 86 87 88 89 90 91 92 93 94 95 96 97 98 99 100 101 102 103 104 105 106 107 108 109 110 111 112 113 114 115 116 117 118 119 120 121 122 123 124 125 126 127 128 129 130 131 132 133 134 135 136 137 138 139 140 141 142 143 144 145 146 147 148 149 150 151 152 153 154 155 156 157 158 159 160 161 162 163 164 165 166 167 168 169 170 171 172 173 174 175 176 177 178 179 180 181 182 183 184 185 |
<title>Image Classifier</title> * { box-sizing: border-box; margin: 0; padding: 0; } body { font-family: system-ui, sans-serif; max-width: 700px; margin: 2rem auto; padding: 0 1rem; background: #f8fafc; color: #1e293b; } h1 { margin-bottom: 0.25rem; font-size: 1.4rem; } .subtitle { color: #64748b; font-size: 0.9rem; margin-bottom: 1.5rem; } #status { font-size: 0.85rem; color: #64748b; margin-bottom: 1rem; } .upload-area { border: 2px dashed #cbd5e1; border-radius: 8px; padding: 2rem; text-align: center; cursor: pointer; background: white; transition: border-color 0.2s; } .upload-area:hover { border-color: #2563eb; } .upload-area input { display: none; } #preview { margin-top: 1rem; max-width: 100%; border-radius: 8px; display: none; } .result-row { display: flex; align-items: center; gap: 0.75rem; margin-top: 0.6rem; } .result-label { min-width: 200px; font-size: 0.9rem; } .bar-bg { flex: 1; background: #e2e8f0; border-radius: 4px; height: 16px; } .bar-fill { background: #2563eb; height: 100%; border-radius: 4px; transition: width 0.4s ease; } .result-score { min-width: 48px; text-align: right; font-size: 0.85rem; color: #475569; } #results { margin-top: 1.25rem; } #results h3 { font-size: 0.95rem; color: #374151; margin-bottom: 0.5rem; } <h1>Image Classifier</h1> <p class="subtitle"> Upload any image -- ViT classifies it into ImageNet categories. Runs entirely in your browser. </p> <div id="status">Downloading model (~88 MB on first run)...</div> <div class="upload-area" id="drop-zone"> <p>Click to upload or drag an image here</p> <p style="font-size:0.8rem;color:#94a3b8;margin-top:0.4rem"> JPG, PNG, WebP, GIF supported </p> </div> <img id="preview" alt="Preview" /> <div id="results"></div> import { pipeline } from 'https://cdn.jsdelivr.net/npm/@huggingface/transformers@3.0.2'; const statusEl = document.getElementById('status'); const dropZone = document.getElementById('drop-zone'); const fileInput = document.getElementById('file-input'); const preview = document.getElementById('preview'); const resultsEl = document.getElementById('results'); // ── Load the image classification pipeline ────────────────────────── // Task: 'image-classification' // Model: Xenova/vit-base-patch16-224 -- ViT trained on ImageNet-1k // dtype: 'q8' -- 8-bit quantized for smaller download, good accuracy let classifier; pipeline('image-classification', 'Xenova/vit-base-patch16-224', { dtype: 'q8', progress_callback: (p) => { if (p.status === 'progress') { statusEl.textContent = `Downloading model: ${Math.round(p.progress ?? 0)}%`; } } }).then(pipe => { classifier = pipe; statusEl.textContent = 'Model ready. Upload an image to classify it.'; dropZone.style.borderColor = '#22c55e'; }).catch(err => { statusEl.textContent = `Error loading model: ${err.message}`; }); // ── Classify an image from a data URL ─────────────────────────────── async function classifyImage(dataUrl) { statusEl.textContent = 'Classifying...'; resultsEl.innerHTML = ''; try { // Pass the data URL directly -- the pipeline handles image decoding // top_k: 5 returns the 5 highest-scoring ImageNet labels const results = await classifier(dataUrl, { top_k: 5 }); statusEl.textContent = 'Done.'; // Build a bar chart of results let html = '<h3>Top predictions</h3>'; results.forEach(({ label, score }) => { const pct = (score * 100).toFixed(1); const bar = (score * 100).toFixed(0); html += ` <div class="result-row"> <span class="result-label">${label}</span> <div class="bar-bg"> <div class="bar-fill" style="width:${bar}%"></div> </div> <span class="result-score">${pct}%</span> </div>`; }); resultsEl.innerHTML = html; } catch (err) { statusEl.textContent = `Classification error: ${err.message}`; } } // ── File handling ──────────────────────────────────────────────────── function handleFile(file) { if (!file || !file.type.startsWith('image/')) return; const reader = new FileReader(); reader.onload = (e) => { const dataUrl = e.target.result; // Show the image preview preview.src = dataUrl; preview.style.display = 'block'; // Classify only if the model has finished loading if (classifier) { classifyImage(dataUrl); } else { statusEl.textContent = 'Model still loading -- please wait a moment and try again.'; } }; // Read as a base64 data URL -- works as pipeline input reader.readAsDataURL(file); } // Click to browse dropZone.addEventListener('click', () => fileInput.click()); fileInput.addEventListener('change', (e) => handleFile(e.target.files[0])); // Drag and drop dropZone.addEventListener('dragover', (e) => { e.preventDefault(); dropZone.style.borderColor = '#2563eb'; }); dropZone.addEventListener('dragleave', () => { dropZone.style.borderColor = '#cbd5e1'; }); dropZone.addEventListener('drop', (e) => { e.preventDefault(); dropZone.style.borderColor = '#cbd5e1'; handleFile(e.dataTransfer.files[0]); }); |
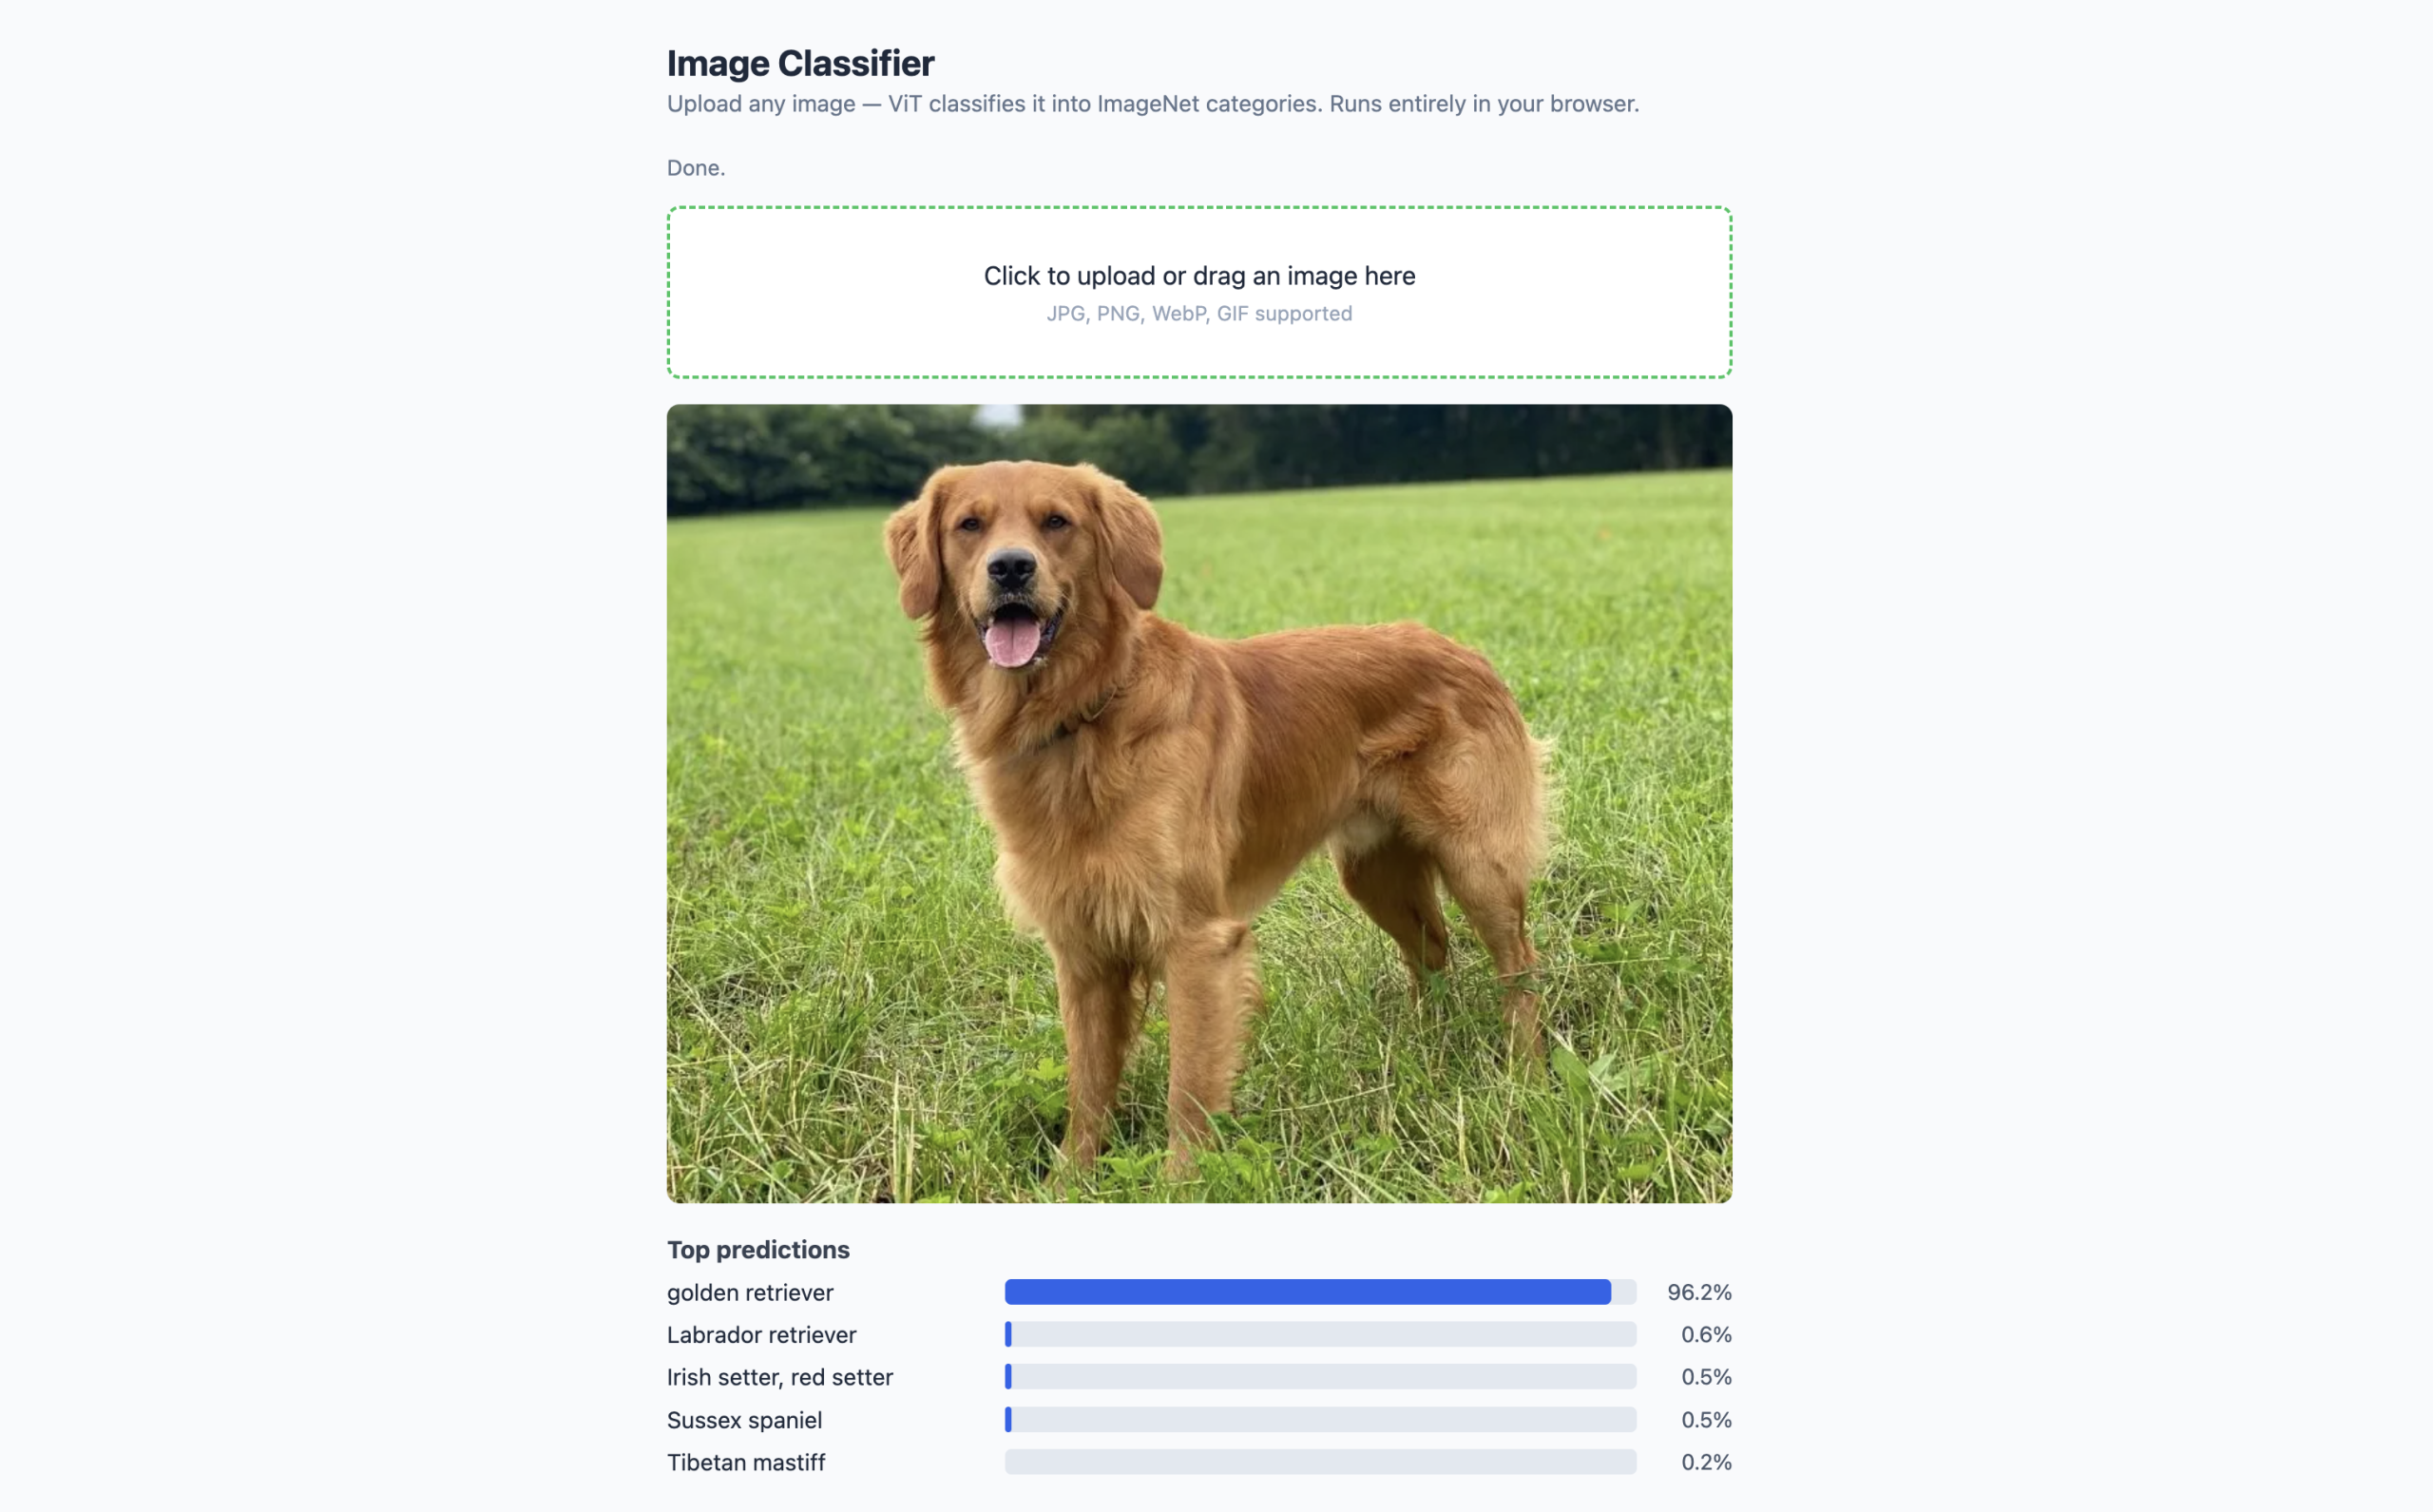
Browser mockup of the image classifier running at localhost (click to enlarge)
What this code does:
- The pipeline() call starts downloading the model immediately when the page opens.
- The progress callback updates the status text so the user can see the download progressing.
- Once classifier is assigned, the drop zone border turns green as a visual cue.
- When a file is dropped or selected, FileReader converts it to a base64 data URL, which the pipeline accepts directly as image input — no manual preprocessing needed.
- The classifier returns an array of { label, score } objects, which the rendering loop converts into a horizontal bar chart. The top_k: 5 option limits results to the five most likely classes.
Task 2: Image Captioning
Image captioning generates a natural language sentence describing what is in an image. It is meaningfully different from classification: instead of picking from 1,000 fixed labels, the model generates free-form text. “A golden retriever running through a field of tall grass” versus just “golden retriever.” More descriptive, more flexible, larger model.
The model used here is Xenova/vit-gpt2-image-captioning, a Vision Transformer encoder that reads the image paired with a GPT-2 decoder that generates the caption. The ONNX version weighs in at 246 MB, noticeably larger than the classifier, because the generative decoder is a full language model.
What the output looks like:
|
1 2 |
// Output from captioner(imageUrl) [{ generated_text: 'a dog is playing on a tennis court' }] |
The output is an array with one object containing a generated_text string. It is always an array even for a single image, because the pipeline supports batching.
Full Working Demo
Save this file as image-captioner.html. Run it on http://localhost.
|
1 2 3 4 5 6 7 8 9 10 11 12 13 14 15 16 17 18 19 20 21 22 23 24 25 26 27 28 29 30 31 32 33 34 35 36 37 38 39 40 41 42 43 44 45 46 47 48 49 50 51 52 53 54 55 56 57 58 59 60 61 62 63 64 65 66 67 68 69 70 71 72 73 74 75 76 77 78 79 80 81 82 83 84 85 86 87 88 89 90 91 92 93 94 95 96 97 98 99 100 101 102 103 104 105 106 107 108 109 110 111 112 113 114 115 116 117 118 119 120 121 122 123 124 125 126 127 128 129 130 131 132 133 134 135 136 137 138 139 140 141 142 143 144 145 146 147 148 149 150 151 152 153 154 155 156 157 158 159 160 161 162 163 164 165 166 167 168 169 170 171 172 173 174 175 176 177 178 179 180 181 182 183 184 185 186 187 188 189 190 191 192 |
<title>Image Captioner</title> * { box-sizing: border-box; margin: 0; padding: 0; } body { font-family: system-ui, sans-serif; max-width: 700px; margin: 2rem auto; padding: 0 1rem; background: #f8fafc; color: #1e293b; } h1 { margin-bottom: 0.25rem; font-size: 1.4rem; } .subtitle { color: #64748b; font-size: 0.9rem; margin-bottom: 1.5rem; } #status { font-size: 0.85rem; color: #64748b; margin-bottom: 1rem; } .upload-area { border: 2px dashed #cbd5e1; border-radius: 8px; padding: 2rem; text-align: center; cursor: pointer; background: white; } .upload-area input { display: none; } #preview { margin-top: 1rem; max-width: 100%; border-radius: 8px; display: none; } .comparison { display: grid; grid-template-columns: 1fr 1fr; gap: 1rem; margin-top: 1.25rem; } .result-card { background: white; border: 1px solid #e2e8f0; border-radius: 8px; padding: 1rem; } .result-card h3 { font-size: 0.8rem; text-transform: uppercase; letter-spacing: 0.05em; color: #64748b; margin-bottom: 0.5rem; } .caption-text { font-size: 1rem; color: #1e293b; line-height: 1.5; font-style: italic; } .label-list { list-style: none; } .label-list li { font-size: 0.9rem; padding: 0.2rem 0; border-bottom: 1px solid #f1f5f9; display: flex; justify-content: space-between; } @media (max-width: 500px) { .comparison { grid-template-columns: 1fr; } } <h1>Image Captioner</h1> <p class="subtitle"> Generates a natural language description of any image. Runs classification and captioning in parallel for comparison. </p> <div id="status">Downloading models (~334 MB on first run)...</div> <div class="upload-area" id="drop-zone"> <p>Click to upload or drag an image here</p> </div> <img id="preview" alt="Preview" /> <div class="comparison" id="comparison" style="display:none"> <div class="result-card"> <h3>Classification (fixed labels)</h3> <ul class="label-list" id="label-list"></ul> </div> <div class="result-card"> <h3>Caption (generated text)</h3> <p class="caption-text" id="caption-text">--</p> </div> </div> import { pipeline } from 'https://cdn.jsdelivr.net/npm/@huggingface/transformers@3.0.2'; const statusEl = document.getElementById('status'); const dropZone = document.getElementById('drop-zone'); const fileInput = document.getElementById('file-input'); const preview = document.getElementById('preview'); const comparisonEl = document.getElementById('comparison'); const labelListEl = document.getElementById('label-list'); const captionEl = document.getElementById('caption-text'); // ── Load both pipelines in parallel ───────────────────────────────── // Using Promise.all starts both downloads simultaneously, // which is faster than loading them one after the other. let classifier, captioner; let loadedCount = 0; function onLoaded(name) { loadedCount++; statusEl.textContent = `${loadedCount}/2 models ready (${name} loaded). ` + (loadedCount < 2 ? 'Waiting for the other...' : 'Upload an image.'); } Promise.all([ pipeline('image-classification', 'Xenova/vit-base-patch16-224', { dtype: 'q8', progress_callback: p => p.status === 'done' && onLoaded('Classifier') }), pipeline('image-to-text', 'Xenova/vit-gpt2-image-captioning', { dtype: 'q8', progress_callback: p => p.status === 'done' && onLoaded('Captioner') }) ]).then(([cls, cap]) => { classifier = cls; captioner = cap; statusEl.textContent = 'Both models ready. Upload an image.'; }).catch(err => { statusEl.textContent = `Error: ${err.message}`; }); // ── Run both models on the same image ──────────────────────────────── async function analyzeImage(dataUrl) { if (!classifier || !captioner) { statusEl.textContent = 'Models still loading -- please wait.'; return; } statusEl.textContent = 'Running classification and captioning...'; comparisonEl.style.display = 'none'; try { // Run both inferences simultaneously -- no reason to wait for one // before starting the other since they use different model weights const [classResults, captionResults] = await Promise.all([ classifier(dataUrl, { top_k: 3 }), // max_new_tokens controls how long the generated caption can be // 50 tokens is enough for descriptive sentences about typical images captioner(dataUrl, { max_new_tokens: 50 }) ]); // Render classification results as a simple label list labelListEl.innerHTML = classResults .map(({ label, score }) => `<li><span>${label}</span> <span style="color:#64748b">${(score * 100).toFixed(1)}%</span></li>`) .join(''); // The caption comes as an array with one object -- access generated_text captionEl.textContent = captionResults[0]?.generated_text ?? 'No caption generated.'; comparisonEl.style.display = 'grid'; statusEl.textContent = 'Done.'; } catch (err) { statusEl.textContent = `Error: ${err.message}`; } } // ── File handling ──────────────────────────────────────────────────── function handleFile(file) { if (!file?.type.startsWith('image/')) return; const reader = new FileReader(); reader.onload = (e) => { preview.src = e.target.result; preview.style.display = 'block'; analyzeImage(e.target.result); }; reader.readAsDataURL(file); } dropZone.addEventListener('click', () => fileInput.click()); fileInput.addEventListener('change', e => handleFile(e.target.files[0])); dropZone.addEventListener('dragover', e => e.preventDefault()); dropZone.addEventListener('drop', (e) => { e.preventDefault(); handleFile(e.dataTransfer.files[0]); }); |

Browser mockup of the image captioning running at localhost (click to enlarge)
What this code does:
- Both pipelines load in parallel using Promise.all — the downloads overlap, saving time compared to sequential loading.
- The onLoaded counter updates the status line as each model finishes, so users know which is still downloading.
- When an image is uploaded, both inferences also run in parallel: classification and captioning use different model weights and do not share any state, so there is no reason to wait for one before starting the other.
- The side-by-side comparison layout makes the difference between the two tasks immediately visible on the same image. Classification returns labels like “golden retriever, 94.2%” while captioning might return “a dog is playing on a tennis court.”
Task 3: Speech Transcription
Speech transcription converts audio to text using OpenAI’s Whisper architecture. Browser-based Whisper implementations use WebAssembly to run the transformer architecture directly in JavaScript, with the Transformers.js library handling model loading, WASM compilation, and tensor operations. The model used here is Xenova/whisper-tiny.en — English-only, ~78 MB quantized, designed specifically for browser deployment.
How Audio Input Works
The automatic-speech-recognition pipeline expects a Float32Array of audio samples at 16,000 Hz. The browser’s Web Audio API handles the conversion:
AudioContext.decodeAudioData() accepts any supported audio format (WAV, MP3, MP4, OGG, FLAC) and returns an AudioBuffer, and audioBuffer.getChannelData(0) extracts the raw PCM samples from the first channel. If the audio was recorded or stored at a different sample rate, you need to resample to 16,000 Hz. The AudioContext constructor accepts a sampleRate parameter that does this automatically.
Full Working Demo
Save this as speech-transcriber.html. To test, I used this sample audio file. For microphone access, the page must be served over HTTP (localhost counts) — opening the file directly will not work.
|
1 2 3 4 5 6 7 8 9 10 11 12 13 14 15 16 17 18 19 20 21 22 23 24 25 26 27 28 29 30 31 32 33 34 35 36 37 38 39 40 41 42 43 44 45 46 47 48 49 50 51 52 53 54 55 56 57 58 59 60 61 62 63 64 65 66 67 68 69 70 71 72 73 74 75 76 77 78 79 80 81 82 83 84 85 86 87 88 89 90 91 92 93 94 95 96 97 98 99 100 101 102 103 104 105 106 107 108 109 110 111 112 113 114 115 116 117 118 119 120 121 122 123 124 125 126 127 128 129 130 131 132 133 134 135 136 137 138 139 140 141 142 143 144 145 146 147 148 149 150 151 152 153 154 155 156 157 158 159 160 161 162 163 164 165 166 167 168 169 170 171 172 173 174 175 176 177 178 179 180 181 182 183 184 185 186 187 188 189 190 191 192 193 194 195 196 197 198 199 200 201 202 203 204 205 206 207 208 209 210 211 212 213 214 215 216 217 218 219 220 221 222 223 224 225 226 227 228 229 230 231 232 233 234 235 236 237 238 239 240 241 242 243 244 245 246 247 248 249 250 251 252 253 254 255 256 257 258 259 260 261 262 263 264 265 266 267 268 269 270 271 272 273 274 275 276 277 278 279 280 281 282 283 284 285 286 287 288 289 290 291 292 293 294 295 296 297 298 299 300 301 302 303 304 305 306 307 308 309 310 311 312 313 314 315 316 317 318 319 320 321 322 323 324 325 326 327 328 329 330 331 332 333 334 335 336 337 338 339 340 341 342 343 344 345 346 347 348 349 350 351 352 353 354 |
<title>Speech Transcriber</title> * { box-sizing: border-box; margin: 0; padding: 0; } body { font-family: system-ui, sans-serif; max-width: 680px; margin: 2rem auto; padding: 0 1rem; background: #f8fafc; color: #1e293b; } h1 { margin-bottom: 0.25rem; font-size: 1.4rem; } .subtitle { color: #64748b; font-size: 0.9rem; margin-bottom: 1.5rem; } #status { font-size: 0.85rem; color: #64748b; margin-bottom: 1rem; } .tabs { display: flex; gap: 0; margin-bottom: 1rem; border-bottom: 2px solid #e2e8f0; } .tab { padding: 0.5rem 1.25rem; cursor: pointer; font-size: 0.9rem; color: #64748b; border-bottom: 2px solid transparent; margin-bottom: -2px; } .tab.active { color: #2563eb; border-bottom-color: #2563eb; font-weight: 600; } .panel { display: none; } .panel.active { display: block; } .upload-area { border: 2px dashed #cbd5e1; border-radius: 8px; padding: 2rem; text-align: center; cursor: pointer; background: white; } .upload-area input { display: none; } .mic-area { text-align: center; padding: 1rem 0; } #record-btn { width: 80px; height: 80px; border-radius: 50%; border: none; background: #dc2626; color: white; font-size: 1.8rem; cursor: pointer; display: flex; align-items: center; justify-content: center; margin: 0 auto 0.75rem; transition: background 0.2s, transform 0.1s; } #record-btn:hover { background: #b91c1c; } #record-btn.recording { background: #374151; animation: pulse 1.2s infinite; } @keyframes pulse { 0%, 100% { transform: scale(1); } 50% { transform: scale(1.06); } } #record-btn:disabled { background: #94a3b8; cursor: not-allowed; } #timer { font-size: 1.1rem; font-weight: 600; color: #374151; margin-bottom: 0.5rem; } #mic-status { font-size: 0.85rem; color: #64748b; } canvas { display: block; margin: 0.75rem auto; border-radius: 6px; } #transcript-box { margin-top: 1.25rem; background: white; border: 1px solid #e2e8f0; border-radius: 8px; padding: 1rem; min-height: 80px; font-size: 0.95rem; line-height: 1.6; position: relative; } #transcript-box h3 { font-size: 0.8rem; text-transform: uppercase; letter-spacing: 0.05em; color: #64748b; margin-bottom: 0.5rem; } #transcript-text { color: #1e293b; white-space: pre-wrap; } #transcript-text.empty { color: #94a3b8; font-style: italic; } #copy-btn { position: absolute; top: 0.75rem; right: 0.75rem; padding: 0.25rem 0.75rem; font-size: 0.8rem; background: #f1f5f9; border: 1px solid #e2e8f0; border-radius: 4px; cursor: pointer; } #copy-btn:hover { background: #e2e8f0; } <h1>Speech Transcriber</h1> <p class="subtitle"> Transcribes audio files or microphone recordings using Whisper. Runs entirely in your browser. </p> <div id="status">Downloading Whisper model (~78 MB on first run)...</div> <div class="tabs"> <div class="tab active" data-tab="file">Upload File</div> <div class="tab" data-tab="mic">Record Microphone</div> </div> <!-- File upload panel --> <div class="panel active" id="panel-file"> <div class="upload-area" id="drop-zone"> <p>Click to upload or drag an audio file here</p> <p style="font-size:0.8rem;color:#94a3b8;margin-top:0.4rem"> WAV, MP3, MP4, OGG, FLAC supported </p> </div> </div> <!-- Microphone panel --> <div class="panel" id="panel-mic"> <div class="mic-area"> <button id="record-btn" disabled>🎙</button> <div id="timer">0:00</div> <div id="mic-status">Waiting for model...</div> </div> </div> <!-- Transcription output --> <div id="transcript-box"> <h3>Transcription</h3> <button id="copy-btn" style="display:none">Copy</button> <p id="transcript-text" class="empty"> Transcription will appear here after processing. </p> </div> import { pipeline } from 'https://cdn.jsdelivr.net/npm/@huggingface/transformers@3.0.2'; const statusEl = document.getElementById('status'); const transcriptEl = document.getElementById('transcript-text'); const copyBtn = document.getElementById('copy-btn'); const recordBtn = document.getElementById('record-btn'); const timerEl = document.getElementById('timer'); const micStatusEl = document.getElementById('mic-status'); const canvas = document.getElementById('waveform'); const ctx2d = canvas.getContext('2d'); // ── Load Whisper ───────────────────────────────────────────────────── let transcriber; pipeline( 'automatic-speech-recognition', 'Xenova/whisper-tiny.en', { dtype: 'q8', progress_callback: (p) => { if (p.status === 'progress') { statusEl.textContent = `Downloading Whisper: ${Math.round(p.progress ?? 0)}%`; } } } ).then(pipe => { transcriber = pipe; statusEl.textContent = 'Whisper ready. Upload audio or use the microphone.'; recordBtn.disabled = false; micStatusEl.textContent = 'Click the button to start recording.'; }).catch(err => { statusEl.textContent = `Error: ${err.message}`; }); // ── Convert browser audio to Float32Array at 16 kHz ───────────────── // This is the core audio preprocessing step. // AudioContext.decodeAudioData handles format differences (MP3, WAV, etc.) // and resampling to the target sample rate. async function decodeAudio(arrayBuffer) { // Request 16000 Hz -- Whisper requires exactly this sample rate // Setting it on AudioContext resamples automatically if needed const audioCtx = new AudioContext({ sampleRate: 16000 }); const audioBuffer = await audioCtx.decodeAudioData(arrayBuffer); // getChannelData(0) extracts mono PCM samples as a Float32Array // For stereo files, we take only the left channel -- sufficient for speech return audioBuffer.getChannelData(0); } // ── Run Whisper transcription ───────────────────────────────────────── async function transcribe(audioData) { statusEl.textContent = 'Transcribing...'; transcriptEl.textContent = ''; transcriptEl.classList.remove('empty'); try { // audioData must be a Float32Array at 16000 Hz -- decodeAudio handles this // chunk_length_s: process audio in 30-second windows (Whisper's max) // For audio under 30 seconds, this option has no effect const result = await transcriber(audioData, { chunk_length_s: 30, stride_length_s: 5 // Overlap between chunks to avoid cut-off words }); transcriptEl.textContent = result.text.trim(); copyBtn.style.display = 'block'; statusEl.textContent = 'Transcription complete.'; } catch (err) { statusEl.textContent = `Transcription error: ${err.message}`; transcriptEl.textContent = 'Error during transcription.'; transcriptEl.classList.add('empty'); } } // ── File upload handler ─────────────────────────────────────────────── const dropZone = document.getElementById('drop-zone'); const fileInput = document.getElementById('file-input'); async function handleAudioFile(file) { if (!file || !transcriber) return; statusEl.textContent = `Reading file: ${file.name}`; const arrayBuffer = await file.arrayBuffer(); const audioData = await decodeAudio(arrayBuffer); await transcribe(audioData); } dropZone.addEventListener('click', () => fileInput.click()); fileInput.addEventListener('change', e => handleAudioFile(e.target.files[0])); dropZone.addEventListener('dragover', e => e.preventDefault()); dropZone.addEventListener('drop', (e) => { e.preventDefault(); handleAudioFile(e.dataTransfer.files[0]); }); // ── Microphone recording ────────────────────────────────────────────── let mediaRecorder; let audioChunks = []; let timerInterval; let secondsElapsed = 0; let analyser, animFrame; function formatTime(s) { return `${Math.floor(s / 60)}:${String(s % 60).padStart(2, '0')}`; } // Draw a waveform visualizer on the canvas during recording function drawWaveform() { const buffer = new Uint8Array(analyser.frequencyBinCount); analyser.getByteTimeDomainData(buffer); ctx2d.clearRect(0, 0, canvas.width, canvas.height); ctx2d.beginPath(); ctx2d.strokeStyle = '#2563eb'; ctx2d.lineWidth = 2; const sliceWidth = canvas.width / buffer.length; let x = 0; buffer.forEach((v, i) => { const y = (v / 128.0) * (canvas.height / 2); i === 0 ? ctx2d.moveTo(x, y) : ctx2d.lineTo(x, y); x += sliceWidth; }); ctx2d.lineTo(canvas.width, canvas.height / 2); ctx2d.stroke(); animFrame = requestAnimationFrame(drawWaveform); } recordBtn.addEventListener('click', async () => { if (mediaRecorder?.state === 'recording') { // ── Stop recording ──────────────────────────────────────────── mediaRecorder.stop(); recordBtn.classList.remove('recording'); recordBtn.textContent = '🎙'; clearInterval(timerInterval); cancelAnimationFrame(animFrame); ctx2d.clearRect(0, 0, canvas.width, canvas.height); micStatusEl.textContent = 'Processing recording...'; } else { // ── Start recording ─────────────────────────────────────────── try { const stream = await navigator.mediaDevices.getUserMedia({ audio: true }); // Set up the waveform analyser const audioCtx = new AudioContext(); analyser = audioCtx.createAnalyser(); audioCtx.createMediaStreamSource(stream).connect(analyser); analyser.fftSize = 256; // MediaRecorder captures audio from the microphone stream mediaRecorder = new MediaRecorder(stream); audioChunks = []; mediaRecorder.ondataavailable = (e) => { if (e.data.size > 0) audioChunks.push(e.data); }; mediaRecorder.onstop = async () => { // Combine all recorded chunks into a single Blob const blob = new Blob(audioChunks, { type: 'audio/webm' }); const arrayBuffer = await blob.arrayBuffer(); const audioData = await decodeAudio(arrayBuffer); // Clean up the microphone stream stream.getTracks().forEach(t => t.stop()); await transcribe(audioData); micStatusEl.textContent = 'Click to record again.'; }; // Start recording and update the timer every second mediaRecorder.start(); recordBtn.classList.add('recording'); recordBtn.textContent = '⏹'; secondsElapsed = 0; timerEl.textContent = '0:00'; timerInterval = setInterval(() => { secondsElapsed++; timerEl.textContent = formatTime(secondsElapsed); }, 1000); micStatusEl.textContent = 'Recording... click again to stop.'; drawWaveform(); } catch (err) { micStatusEl.textContent = `Microphone error: ${err.message}. Check browser permissions.`; } } }); // ── Copy button ─────────────────────────────────────────────────────── copyBtn.addEventListener('click', () => { navigator.clipboard.writeText(transcriptEl.textContent); copyBtn.textContent = 'Copied!'; setTimeout(() => { copyBtn.textContent = 'Copy'; }, 1500); }); // ── Tab switching ───────────────────────────────────────────────────── document.querySelectorAll('.tab').forEach(tab => { tab.addEventListener('click', () => { document.querySelectorAll('.tab').forEach(t => t.classList.remove('active')); document.querySelectorAll('.panel').forEach(p => p.classList.remove('active')); tab.classList.add('active'); document.getElementById(`panel-${tab.dataset.tab}`).classList.add('active'); }); }); |

Browser mockup of the speech transcriber at localhost (click to enlarge)
What this code does:
- The decodeAudio function is the key step most tutorials skip explaining. new AudioContext({ sampleRate: 16000 }) tells the Web Audio API to resample whatever audio it decodes to 16,000 Hz — Whisper’s required input rate.
- decodeAudioData handles WAV, MP3, MP4, OGG, and FLAC transparently.
- getChannelData(0) extracts the left channel as a Float32Array, which is exactly what the transcription pipeline needs.
- The chunk_length_s: 30 option tells Whisper to process audio in 30-second windows with a 5-second overlap between chunks, which prevents words at chunk boundaries from being cut off.
- The waveform visualizer uses AnalyserNode from the Web Audio API to read live frequency data and draws it to a canvas during recording.
The Combined App: Multimodal Media Analyzer
With all three pipelines individually working, this section combines them into a single-page application. It accepts either an image or microphone audio, runs the appropriate AI pipelines, and presents the results in a unified dashboard. All three models load in parallel on page open.
Save this as media-analyzer.html and open it on your localhost:
|
1 2 3 4 5 6 7 8 9 10 11 12 13 14 15 16 17 18 19 20 21 22 23 24 25 26 27 28 29 30 31 32 33 34 35 36 37 38 39 40 41 42 43 44 45 46 47 48 49 50 51 52 53 54 55 56 57 58 59 60 61 62 63 64 65 66 67 68 69 70 71 72 73 74 75 76 77 78 79 80 81 82 83 84 85 86 87 88 89 90 91 92 93 94 95 96 97 98 99 100 101 102 103 104 105 106 107 108 109 110 111 112 113 114 115 116 117 118 119 120 121 122 123 124 125 126 127 128 129 130 131 132 133 134 135 136 137 138 139 140 141 142 143 144 145 146 147 148 149 150 151 152 153 154 155 156 157 158 159 160 161 162 163 164 165 166 167 168 169 170 171 172 173 174 175 176 177 178 179 180 181 182 183 184 185 186 187 188 189 190 191 192 193 194 195 196 197 198 199 200 201 202 203 204 205 206 207 208 209 210 211 212 213 214 215 216 217 218 219 220 221 222 223 224 225 226 227 228 229 230 231 232 233 234 235 236 237 238 239 240 241 242 243 244 245 246 247 248 249 250 251 252 253 254 255 256 257 258 259 260 261 262 263 264 265 266 267 268 269 270 271 272 273 274 275 276 277 278 279 280 281 282 283 284 285 286 287 288 289 290 291 292 293 294 295 296 297 298 299 300 301 302 303 304 305 306 307 308 309 310 311 312 313 314 315 316 317 318 319 320 321 322 323 324 325 326 327 328 329 330 331 332 333 334 335 336 337 338 339 340 341 342 343 344 345 346 347 348 349 350 351 352 353 354 355 356 357 358 359 360 361 362 363 364 365 366 367 368 369 370 371 372 373 374 375 376 377 378 379 380 381 382 383 384 385 386 387 388 389 390 391 392 393 394 395 396 397 398 399 400 401 402 403 404 405 406 407 408 409 410 411 412 413 414 415 416 417 418 419 420 421 422 423 424 425 426 427 428 429 430 431 432 433 434 435 436 437 438 439 440 441 442 443 444 |
<title>Multimodal Media Analyzer</title> * { box-sizing: border-box; margin: 0; padding: 0; } body { font-family: system-ui, sans-serif; max-width: 820px; margin: 0 auto; padding: 1.5rem 1rem; background: #f1f5f9; color: #1e293b; } header { margin-bottom: 1.5rem; } header h1 { font-size: 1.5rem; } header p { color: #64748b; font-size: 0.9rem; margin-top: 0.2rem; } /* Model status indicators */ .model-status-bar { display: flex; gap: 0.5rem; flex-wrap: wrap; margin-top: 0.75rem; } .model-badge { font-size: 0.78rem; padding: 0.2rem 0.6rem; border-radius: 12px; background: #fef3c7; color: #92400e; } .model-badge.ready { background: #dcfce7; color: #15803d; } /* Tab bar */ .tabs { display: flex; background: white; border-radius: 8px; padding: 0.25rem; gap: 0.25rem; margin-bottom: 1.25rem; border: 1px solid #e2e8f0; } .tab { flex: 1; padding: 0.5rem; text-align: center; border-radius: 6px; cursor: pointer; font-size: 0.9rem; color: #64748b; transition: all 0.15s; } .tab.active { background: #2563eb; color: white; font-weight: 600; } /* Input panels */ .panel { display: none; } .panel.active { display: block; } .upload-area { background: white; border: 2px dashed #cbd5e1; border-radius: 8px; padding: 2rem; text-align: center; cursor: pointer; } .upload-area input { display: none; } #img-preview { margin-top: 1rem; max-width: 100%; max-height: 320px; border-radius: 8px; display: none; object-fit: cover; } .mic-center { text-align: center; padding: 1rem 0; } #rec-btn { width: 72px; height: 72px; border-radius: 50%; border: none; background: #dc2626; color: white; font-size: 1.6rem; cursor: pointer; display: flex; align-items: center; justify-content: center; margin: 0 auto 0.5rem; } #rec-btn.recording { background: #374151; } #rec-btn:disabled { background: #94a3b8; cursor: not-allowed; } #rec-timer { font-weight: 600; color: #374151; margin-bottom: 0.25rem; } #rec-hint { font-size: 0.85rem; color: #64748b; } #wave-canvas { display: block; margin: 0.5rem auto; border-radius: 4px; } /* Results grid */ .results-grid { display: grid; grid-template-columns: repeat(auto-fit, minmax(220px, 1fr)); gap: 1rem; margin-top: 1.25rem; } .result-card { background: white; border: 1px solid #e2e8f0; border-radius: 8px; padding: 1rem; } .result-card h3 { font-size: 0.75rem; text-transform: uppercase; letter-spacing: 0.06em; color: #64748b; margin-bottom: 0.6rem; } .label-item { display: flex; justify-content: space-between; align-items: center; padding: 0.25rem 0; font-size: 0.875rem; border-bottom: 1px solid #f1f5f9; } .label-score { font-size: 0.8rem; color: #64748b; background: #f1f5f9; padding: 0.1rem 0.4rem; border-radius: 4px; } .caption-body { font-size: 0.95rem; line-height: 1.5; font-style: italic; color: #334155; } .transcript-body { font-size: 0.95rem; line-height: 1.6; color: #334155; white-space: pre-wrap; } .placeholder-text { color: #94a3b8; font-style: italic; font-size: 0.9rem; } #global-status { font-size: 0.85rem; color: #64748b; margin-bottom: 1rem; } @media (max-width: 500px) { .results-grid { grid-template-columns: 1fr; } } <header> <h1>Multimodal Media Analyzer</h1> <p>Image classification, captioning, and speech transcription -- all in your browser.</p> <div class="model-status-bar"> <span class="model-badge" id="badge-cls">Classifier: loading...</span> <span class="model-badge" id="badge-cap">Captioner: loading...</span> <span class="model-badge" id="badge-asr">Whisper: loading...</span> </div> </header> <div id="global-status">Loading models in parallel -- first run downloads ~400 MB total.</div> <div class="tabs"> <div class="tab active" data-tab="image">🖼 Image Analysis</div> <div class="tab" data-tab="speech">🎙 Speech Transcription</div> </div> <!-- Image panel --> <div class="panel active" id="panel-image"> <div class="upload-area" id="img-drop"> <p>Click or drag an image to analyze</p> <p style="font-size:0.8rem;color:#94a3b8;margin-top:0.3rem"> JPG, PNG, WebP, GIF supported </p> </div> <img id="img-preview" alt="Preview" /> </div> <!-- Speech panel --> <div class="panel" id="panel-speech"> <div class="mic-center"> <button id="rec-btn" disabled>🎙</button> <div id="rec-timer">0:00</div> <div id="rec-hint">Waiting for Whisper model...</div> </div> </div> <!-- Results - shown for both modes --> <div class="results-grid" id="results-grid" style="display:none"> <!-- Image results (shown in image mode) --> <div class="result-card" id="card-cls" style="display:none"> <h3>Classification</h3> <div id="cls-content"> <p class="placeholder-text">No results yet.</p> </div> </div> <div class="result-card" id="card-cap" style="display:none"> <h3>Caption</h3> <div id="cap-content"> <p class="placeholder-text">No caption yet.</p> </div> </div> <!-- Speech results (shown in speech mode) --> <div class="result-card" id="card-asr" style="display:none"> <h3>Transcription</h3> <div id="asr-content"> <p class="placeholder-text">Record audio to see the transcription.</p> </div> </div> </div> import { pipeline } from 'https://cdn.jsdelivr.net/npm/@huggingface/transformers@3.0.2'; // ── Pipeline references ─────────────────────────────────────────────── let classifier, captioner, transcriber; let readyCount = 0; // Update a model badge to "ready" state function markReady(badgeId, label) { const badge = document.getElementById(badgeId); badge.textContent = `${label}: ready`; badge.classList.add('ready'); readyCount++; if (readyCount === 3) { globalStatus.textContent = 'All models ready. Upload an image or record audio.'; recBtn.disabled = false; recHint.textContent = 'Click to start recording.'; } } // Load all three pipelines simultaneously Promise.all([ pipeline('image-classification', 'Xenova/vit-base-patch16-224', { dtype: 'q8', progress_callback: p => p.status === 'done' && markReady('badge-cls', 'Classifier') }), pipeline('image-to-text', 'Xenova/vit-gpt2-image-captioning', { dtype: 'q8', progress_callback: p => p.status === 'done' && markReady('badge-cap', 'Captioner') }), pipeline('automatic-speech-recognition', 'Xenova/whisper-tiny.en', { dtype: 'q8', progress_callback: p => p.status === 'done' && markReady('badge-asr', 'Whisper') }) ]).then(([cls, cap, asr]) => { classifier = cls; captioner = cap; transcriber = asr; }).catch(err => { globalStatus.textContent = `Error loading models: ${err.message}`; }); // ── UI references ───────────────────────────────────────────────────── const globalStatus = document.getElementById('global-status'); const resultsGrid = document.getElementById('results-grid'); const recBtn = document.getElementById('rec-btn'); const recHint = document.getElementById('rec-hint'); const recTimer = document.getElementById('rec-timer'); const waveCanvas = document.getElementById('wave-canvas'); const waveCtx = waveCanvas.getContext('2d'); // ── Image analysis ──────────────────────────────────────────────────── async function analyzeImage(dataUrl) { if (!classifier || !captioner) { globalStatus.textContent = 'Models still loading. Please wait.'; return; } globalStatus.textContent = 'Running classification and captioning...'; // Show image result cards, hide speech card document.getElementById('card-cls').style.display = 'block'; document.getElementById('card-cap').style.display = 'block'; document.getElementById('card-asr').style.display = 'none'; resultsGrid.style.display = 'grid'; document.getElementById('cls-content').innerHTML = '<p class="placeholder-text">Classifying...</p>'; document.getElementById('cap-content').innerHTML = '<p class="placeholder-text">Generating caption...</p>'; try { // Run classification and captioning in parallel const [classResults, captionResults] = await Promise.all([ classifier(dataUrl, { top_k: 4 }), captioner(dataUrl, { max_new_tokens: 60 }) ]); // Render classification labels document.getElementById('cls-content').innerHTML = classResults.map(({ label, score }) => ` <div class="label-item"> <span>${label}</span> <span class="label-score">${(score * 100).toFixed(1)}%</span> </div>`).join(''); // Render generated caption document.getElementById('cap-content').innerHTML = `<p class="caption-body">"${captionResults[0]?.generated_text ?? 'No caption.'}"</p>`; globalStatus.textContent = 'Analysis complete.'; } catch (err) { globalStatus.textContent = `Error: ${err.message}`; } } // File upload handler for images const imgDrop = document.getElementById('img-drop'); const imgInput = document.getElementById('img-input'); const imgPrev = document.getElementById('img-preview'); function handleImageFile(file) { if (!file?.type.startsWith('image/')) return; const reader = new FileReader(); reader.onload = e => { imgPrev.src = e.target.result; imgPrev.style.display = 'block'; analyzeImage(e.target.result); }; reader.readAsDataURL(file); } imgDrop.addEventListener('click', () => imgInput.click()); imgInput.addEventListener('change', e => handleImageFile(e.target.files[0])); imgDrop.addEventListener('dragover', e => e.preventDefault()); imgDrop.addEventListener('drop', e => { e.preventDefault(); handleImageFile(e.dataTransfer.files[0]); }); // ── Audio decoding helper ───────────────────────────────────────────── async function decodeAudio(arrayBuffer) { const audioCtx = new AudioContext({ sampleRate: 16000 }); const audioBuffer = await audioCtx.decodeAudioData(arrayBuffer); return audioBuffer.getChannelData(0); // Mono Float32Array at 16kHz } // ── Speech transcription ────────────────────────────────────────────── async function runTranscription(audioData) { // Show speech result card, hide image cards document.getElementById('card-cls').style.display = 'none'; document.getElementById('card-cap').style.display = 'none'; document.getElementById('card-asr').style.display = 'block'; resultsGrid.style.display = 'grid'; document.getElementById('asr-content').innerHTML = '<p class="placeholder-text">Transcribing...</p>'; globalStatus.textContent = 'Running Whisper transcription...'; try { const result = await transcriber(audioData, { chunk_length_s: 30, stride_length_s: 5 }); document.getElementById('asr-content').innerHTML = `<p class="transcript-body">${result.text.trim()}</p>`; globalStatus.textContent = 'Transcription complete.'; } catch (err) { globalStatus.textContent = `Error: ${err.message}`; } } // ── Microphone recording ────────────────────────────────────────────── let mediaRecorder, audioChunks = [], timerInterval, analyserNode, animId; let secs = 0; function drawWave() { const buf = new Uint8Array(analyserNode.frequencyBinCount); analyserNode.getByteTimeDomainData(buf); waveCtx.clearRect(0, 0, waveCanvas.width, waveCanvas.height); waveCtx.beginPath(); waveCtx.strokeStyle = '#2563eb'; waveCtx.lineWidth = 1.5; buf.forEach((v, i) => { const x = (i / buf.length) * waveCanvas.width; const y = (v / 128.0) * (waveCanvas.height / 2); i === 0 ? waveCtx.moveTo(x, y) : waveCtx.lineTo(x, y); }); waveCtx.stroke(); animId = requestAnimationFrame(drawWave); } recBtn.addEventListener('click', async () => { if (mediaRecorder?.state === 'recording') { mediaRecorder.stop(); recBtn.classList.remove('recording'); recBtn.textContent = '🎙'; clearInterval(timerInterval); cancelAnimationFrame(animId); waveCtx.clearRect(0, 0, waveCanvas.width, waveCanvas.height); recHint.textContent = 'Processing...'; } else { try { const stream = await navigator.mediaDevices.getUserMedia({ audio: true }); const actx = new AudioContext(); analyserNode = actx.createAnalyser(); actx.createMediaStreamSource(stream).connect(analyserNode); analyserNode.fftSize = 256; mediaRecorder = new MediaRecorder(stream); audioChunks = []; mediaRecorder.ondataavailable = e => e.data.size && audioChunks.push(e.data); mediaRecorder.onstop = async () => { const blob = new Blob(audioChunks, { type: 'audio/webm' }); const arrayBuffer = await blob.arrayBuffer(); const audioData = await decodeAudio(arrayBuffer); stream.getTracks().forEach(t => t.stop()); await runTranscription(audioData); recHint.textContent = 'Click to record again.'; }; mediaRecorder.start(); recBtn.classList.add('recording'); recBtn.textContent = '⏹'; secs = 0; recTimer.textContent = '0:00'; timerInterval = setInterval(() => { secs++; recTimer.textContent = `${Math.floor(secs / 60)}:${String(secs % 60).padStart(2, '0')}`; }, 1000); recHint.textContent = 'Recording... click to stop.'; drawWave(); } catch (err) { recHint.textContent = `Mic error: ${err.message}`; } } }); // ── Tab switching ───────────────────────────────────────────────────── document.querySelectorAll('.tab').forEach(tab => { tab.addEventListener('click', () => { document.querySelectorAll('.tab, .panel').forEach(el => el.classList.remove('active')); tab.classList.add('active'); document.getElementById(`panel-${tab.dataset.tab}`).classList.add('active'); }); }); |
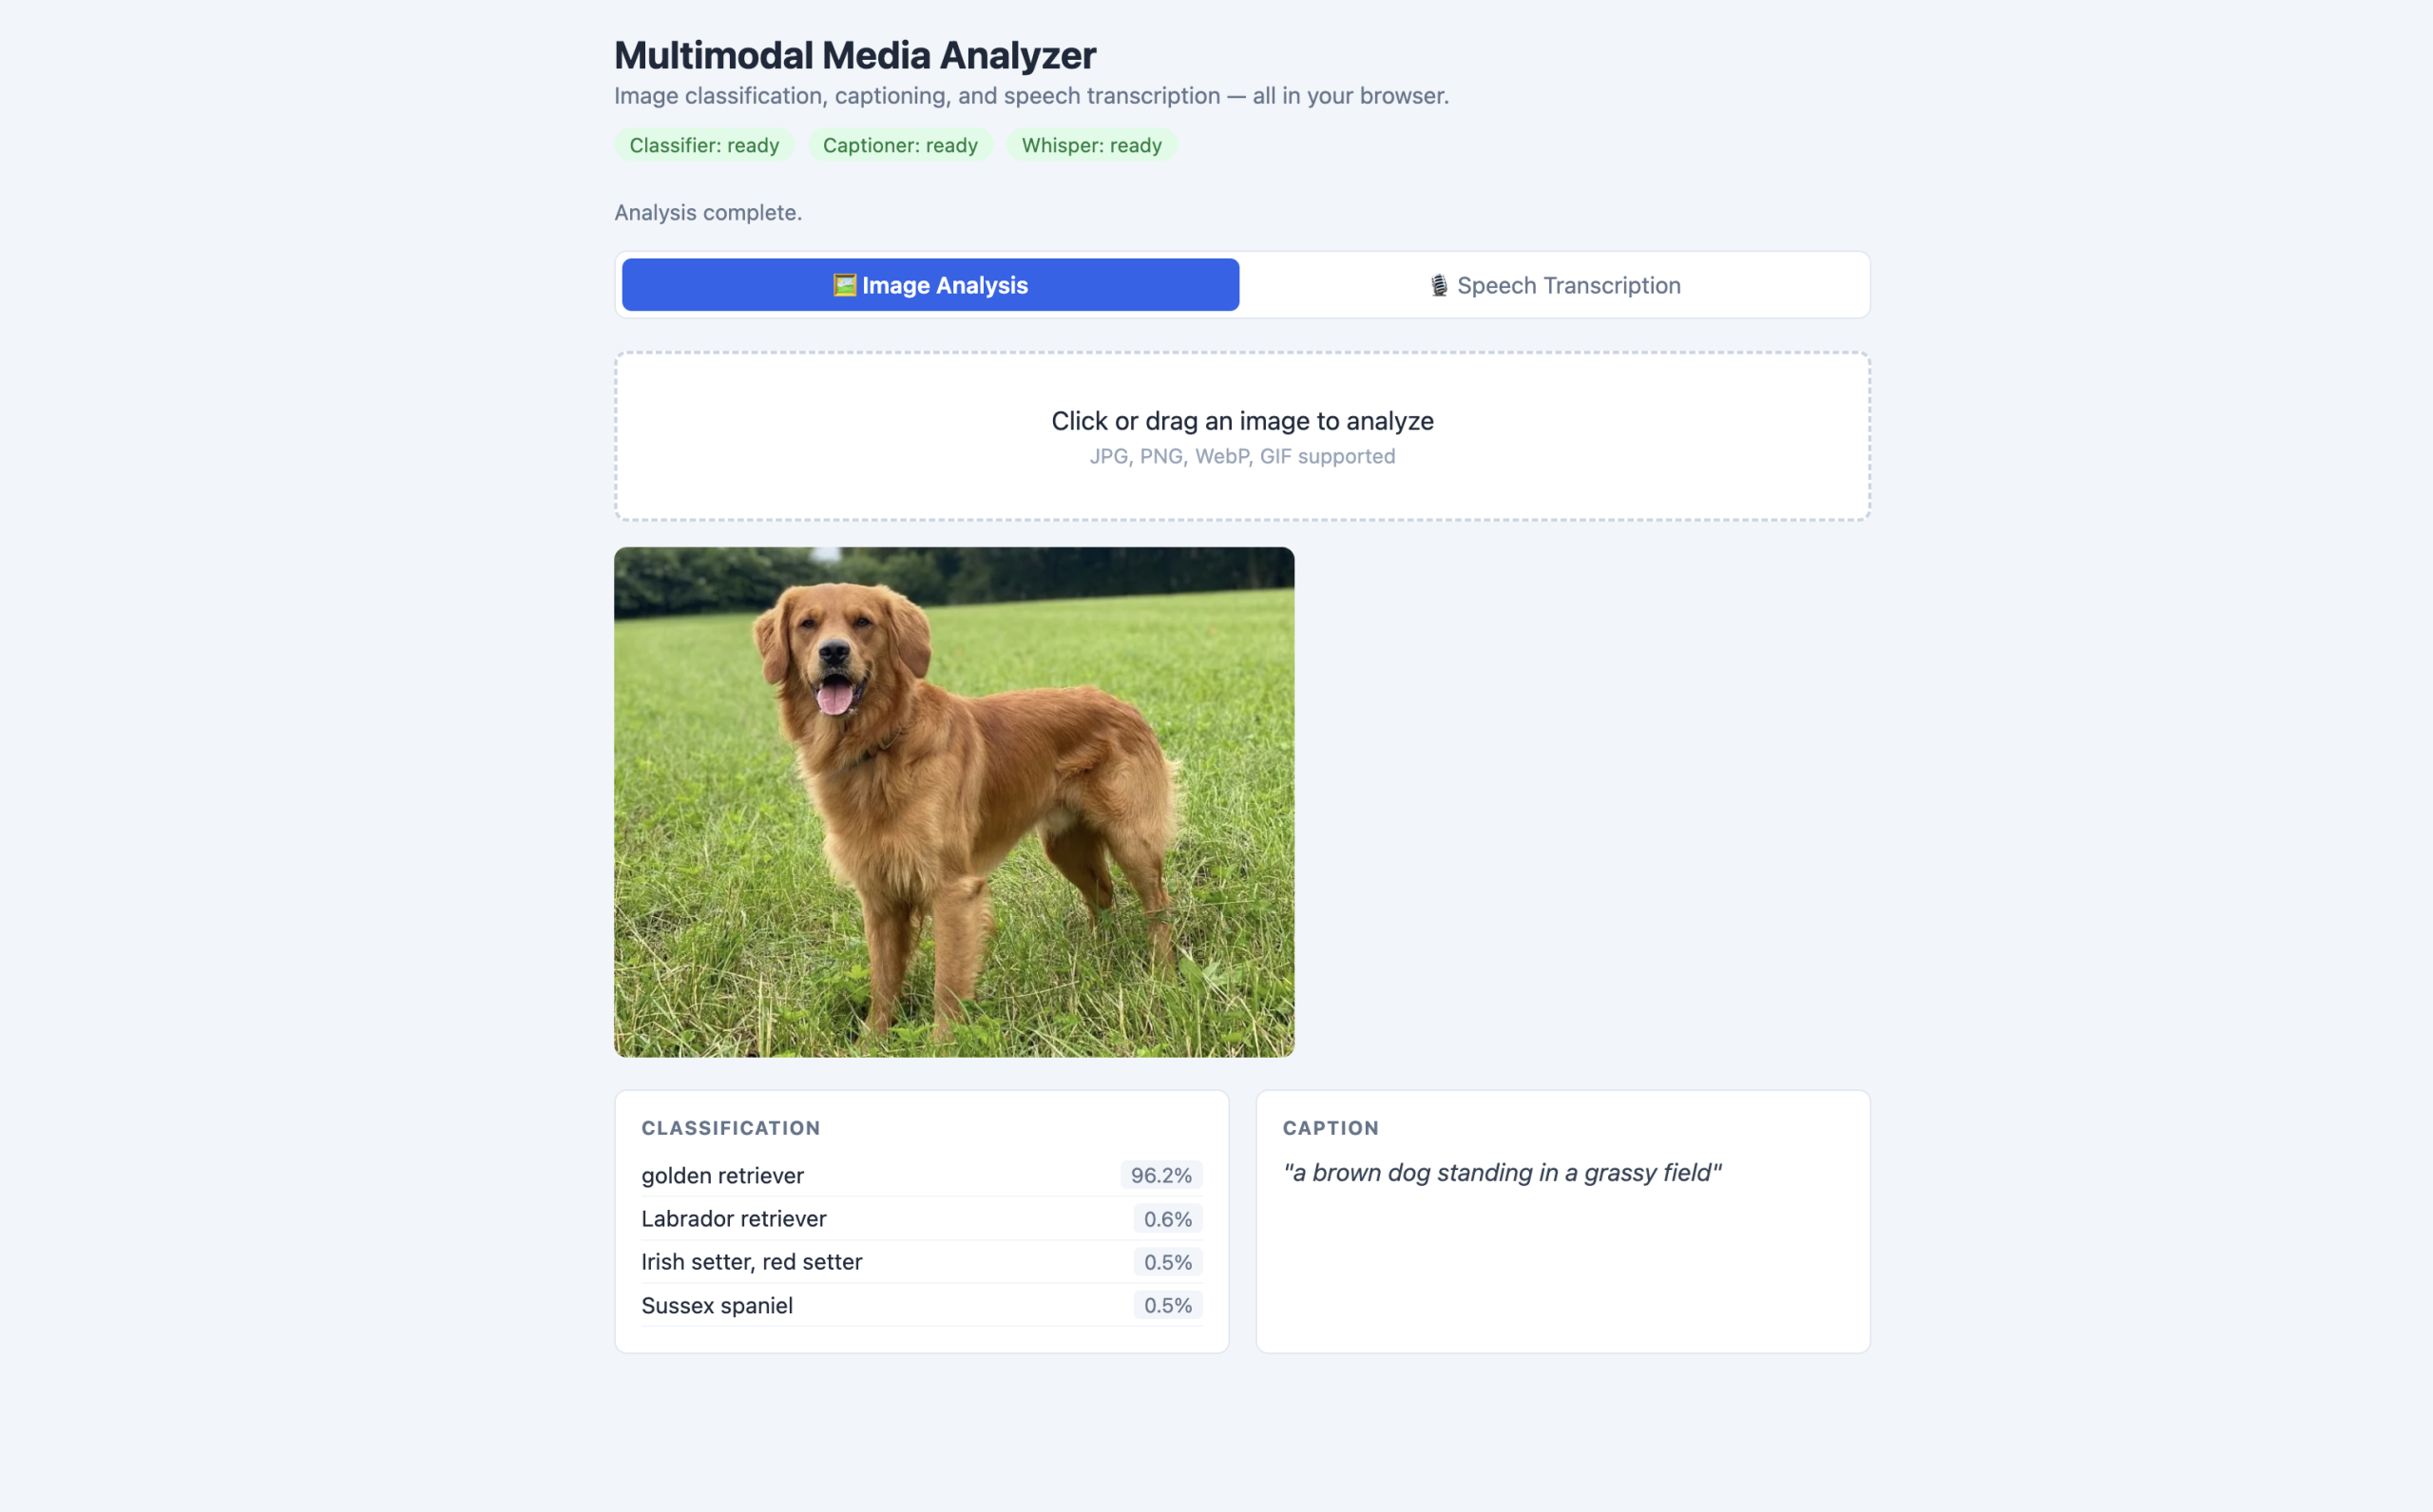
Browser mockup of the media-analyzer.html page (click to enlarge)
What this code does:
- All three pipelines start loading simultaneously on page open, downloading in parallel.
- The badge system in the header gives the user a clear visual of which models are ready.
- markReady increments a counter and enables the record button only when all three are loaded, preventing partial-state errors.
- Image and speech modes share the same results grid but show different cards — the image mode shows classification and caption cards, the speech mode shows the transcription card. This keeps the layout consistent without duplicating DOM.
- The analyzeImage function runs classification and captioning in parallel, same as the standalone demo, because there is no dependency between the two inferences.
Performance, Limits, and Next Steps
The application is not perfect, and some parts warrant improvement before a production deployment.
1. Realistic Inference Speed on WASM
Running on CPU via WebAssembly is usable but not instant. On a modern laptop (Apple M2 or equivalent Intel):
- ViT image classification: 200–500ms per image after model load.
- ViT-GPT2 captioning: 2–5 seconds per image (text generation is iterative — each token requires one forward pass).
- Whisper tiny: approximately 2–5x real-time on WASM, meaning a 10-second audio clip takes 20–50 seconds to transcribe.
WebGPU reduces this significantly. On Chrome 113+ with a capable GPU, adding device: ‘webgpu’ to any pipeline can cut inference time by 3–5x. Check support before enabling:
|
1 2 3 4 5 6 7 |
// Check WebGPU availability before using it const supportsWebGPU = 'gpu' in navigator; const pipe = await pipeline('image-classification', 'Xenova/vit-base-patch16-224', { device: supportsWebGPU ? 'webgpu' : 'wasm', dtype: supportsWebGPU ? 'fp16' : 'q8' // fp16 is preferred on WebGPU }); |
2. Web Workers for Production
All three demos run inference on the main thread. For production, move model loading and inference into Web Workers to keep the UI responsive during heavy computation. The pattern is the same for all three pipelines: send the input via postMessage, receive results in the main thread. Transformers.js tensors are not transferable, so convert them to plain arrays before posting.
3. Model Size Trade-offs
If 246 MB for the captioner is too large for your use case, Xenova/vit-base-patch16-224 (88 MB) for classification is substantially faster and lighter. For speech, Xenova/whisper-base.en (145 MB) produces noticeably better transcription than whisper-tiny.en on accented speech and technical vocabulary — worth the extra 67 MB if accuracy matters.
Only models that have ONNX-compatible weights work with Transformers.js. Many popular architectures like DistilBERT, Whisper, and T5 already have ONNX versions on the Hugging Face Hub. To check which models are available, filter by the transformers.js library tag on the Hub.
Wrapping Up
Multimodal AI in the browser is not experimental. It runs today, on hardware your users already have, using an API that fits in four lines of JavaScript per task. Image classification, captioning, and speech transcription cover a meaningful range of real applications: accessibility tools that describe images for screen readers, voice-driven interfaces that work offline, content moderation pre-screening that never sends data to a server, and media analysis dashboards that run entirely client-side.
Every demo in this article is a single HTML file. Start the local server, open any of them, wait for the first-run download, and they work. Extend the corpus, swap the models, and add the Web Worker pattern when you are ready for production. The Transformers.js documentation and the examples repository are the best next stops — every task listed there follows the same pipeline() pattern you just built.


No comments yet.