When working with images, some of the most basic operations that are essential to get a grip on include reading the images from disk, displaying them, accessing their pixel values, and converting them from one color space to another.
This tutorial explains these basic operations, starting first with a description of how a digital image is formulated in terms of its spatial coordinates and intensity values.
In this tutorial, you will familiarise yourself with the most basic OpenCV operations that are essential when working with images.
After completing this tutorial, you will know:
How a digital image is formulated in terms of its spatial coordinates and intensity values.
How an image is read and displayed in OpenCV.
How an image’s pixel values can be accessed.
How an image may be converted from one color space to another.
Kick-start your project with my book Machine Learning in OpenCV. It provides self-study tutorials with working code.
Let’s get started.
Reading and Displaying Images, and Converting Between Color Spaces Using OpenCV Photo by Andrew Ridley, some rights reserved.
Tutorial Overview
This tutorial is divided into three parts; they are:
Formulation of an Image
Reading and Displaying Images in OpenCV
Converting Between Color Spaces
Formulation of an Image
A digital image is made up of pixels, where each pixel is characterised by its spatial coordinates inside the image space, and its intensity or gray level value.
Essentially, an image can be described by a 2D function, I(x, y), where x and y denote the aforementioned spatial coordinates, and the value of I at any image position (x, y) denotes the pixel intensity. In a digital image, the spatial coordinates as well as the intensity values are all finite, discrete quantities.
The type of digital image that we have just described is referred to as a grayscale image, and that is because it comprises a single channel where the pixel values carry only intensity information. The pixel intensities are commonly represented by integer values in the range [0, 255], which means that each pixel can take any of 256 discrete values.
An RGB image, on the other hand, is composed of three channels, namely the Red, Green and Blue.
The RGB colour model is not the only one in existence, but it is possibly the most commonly used in many computer vision applications. It is an additive colour model, which refers to the process of creating colour by mixing (or adding) the light spectra of differently coloured sources.
Since an RGB image is composed of three channels, then we need three functions to describe it: IR(x, y), IG(x, y) and IB(x, y), corresponding to the Red, Green and Blue channels, respectively. Consequently, in an RGB image each pixel value is expressed by a triplet of intensity values.
Reading and Displaying Images in OpenCV
Let’s start by first importing the imread method from the OpenCV library in Python:
Python
1
fromcv2 importimread
Then proceed to read an RGB image. For this purpose, I have downloaded this image and saved it to disk with the name, Dog.jpg, in a folder called, Images.
Python
1
img=imread('Images/Dog.jpg')
The imread method returns a NumPy array, img, that contains the image pixel values. We can check out the array’s data type and dimensions as follows:
The returned information tells us that the array is of data type uint8, which means that we are working with 8-bit unsigned integer values. This means that the pixels in each channel of the image can take any of 28 = 256 values, within a range from 0 to 255. This tallies exactly with the image formulation that we have reviewed above. We have also learned that the dimensions of the array are 4000 × 6000 × 3, which correspond to the number of image rows, columns and channels, respectively.
The image is a 3-dimensional NumPy array. Hence you can manipulate the array using NumPy syntax.
Let’s now try to access the values of the very first pixel situated at the upper left hand corner of the image. Keep in mind that arrays in Python are zero-indexed, and hence the coordinates of this pixel are (0, 0).
Python
1
print(img[0,0])
Python
1
[173 186 232]
You may see from the output that, as expected, each pixel carries three values, one for each of the three channels that make up the image. We will discover to which specific channel each of these three values corresponds in the next section.
NOTE: An important point to keep in mind is that, if the imread method fails to load the input image (because the provided image name does not exist or its path is invalid) it will not generate an error itself, but rather returns a NoneType object. Hence, the following check can be included before proceeding to run further code that eventually makes use of the img values:
Python
1
2
ifimg isnotNone:
...
Next we shall display the image using the Matplotlib package, as well as OpenCV’s imshow method. The latter takes as its first argument the name of the window that will contain the image, and the image to be displayed as its second argument. We will also be calling OpenCV’s waitkey function after the image is displayed, which waits for a keyboard event for a specified amount of milliseconds. If a value of 0 is, otherwise, provided as input, the waitkey function will wait indefinitely, allowing us to see the displayed window until a keyboard event is generated.
Using Matplotlib:
Python
1
2
3
4
5
importmatplotlib.pyplot asplt
plt.imshow(img)
plt.title('Displaying image using Matplotlib')
plt.show()
Displaying a BGR image using Matplotlib.
Using OpenCV:
Python
1
2
3
4
fromcv2 importimshow,waitKey
imshow('Displaying image using OpenCV',img)
waitKey(0)
Displaying a BGR image using OpenCV.
If you are surprised with the output produced by Matplotlib and are wondering how this happened, the reason for this is that OpenCV reads and displays the image in BGR rather than RGB order.
Initial developers at OpenCV chose the BGR color format (instead of the RGB one) because at the time, the BGR color format was very popular among software providers and camera manufacturers.
Matplotlib, on the other hand, uses the RGB color format and, hence, requires that the BGR image is first converted to RGB before it can be displayed well.
Want to Get Started With Machine Learning with OpenCV?
Take my free email crash course now (with sample code).
Click to sign-up and also get a free PDF Ebook version of the course.
With OpenCV, you can also write a NumPy array as an image into a file, as follows:
1
2
from cv2 import imwrite
imwrite("output.jpg",img)
When you write an image with imwrite() function in OpenCV, you have to make sure the NumPy array is in the format that OpenCV expects, namely, it is a 3-dimensional array of uint8 in row × column × channel in BGR channel order.
Converting Between Color Spaces
Conversion of an image from one color space to another can be achieved by means of OpenCV’s cvtColor method, which takes the source image as an input argument together with a color space conversion code.
In order to convert between the BGR and RGB color spaces, we may use the following code:
Python
1
2
3
fromcv2 importcvtColor,COLOR_BGR2RGB
img_rgb=cvtColor(img,COLOR_BGR2RGB)
If we had to retry displaying the image using Matplotlib, we may now see that it is displayed correctly:
Python
1
2
plt.imshow(img_rgb)
plt.show()
Converting a BGR image to RGB and displaying it using Matplotlib.
If we also had to access the values of the very first pixel of the newly converted RGB image:
Python
1
print(img_rgb[0,0])
Python
1
[232 186 173]
and compare them to the values, [173 186 232], that we had printed earlier for the BGR image, we may notice the first and third values have now been swapped. What this tells us is that the order of the values, therefore, corresponds to the order of the image channels.
BGR to RGB is not the only color conversion that may be achieved by this method. Indeed, there are many color space conversion codes to choose from, such as COLOR_RGB2HSV that converts between the RGB and the HSV (Hue, Saturation, Value) color spaces.
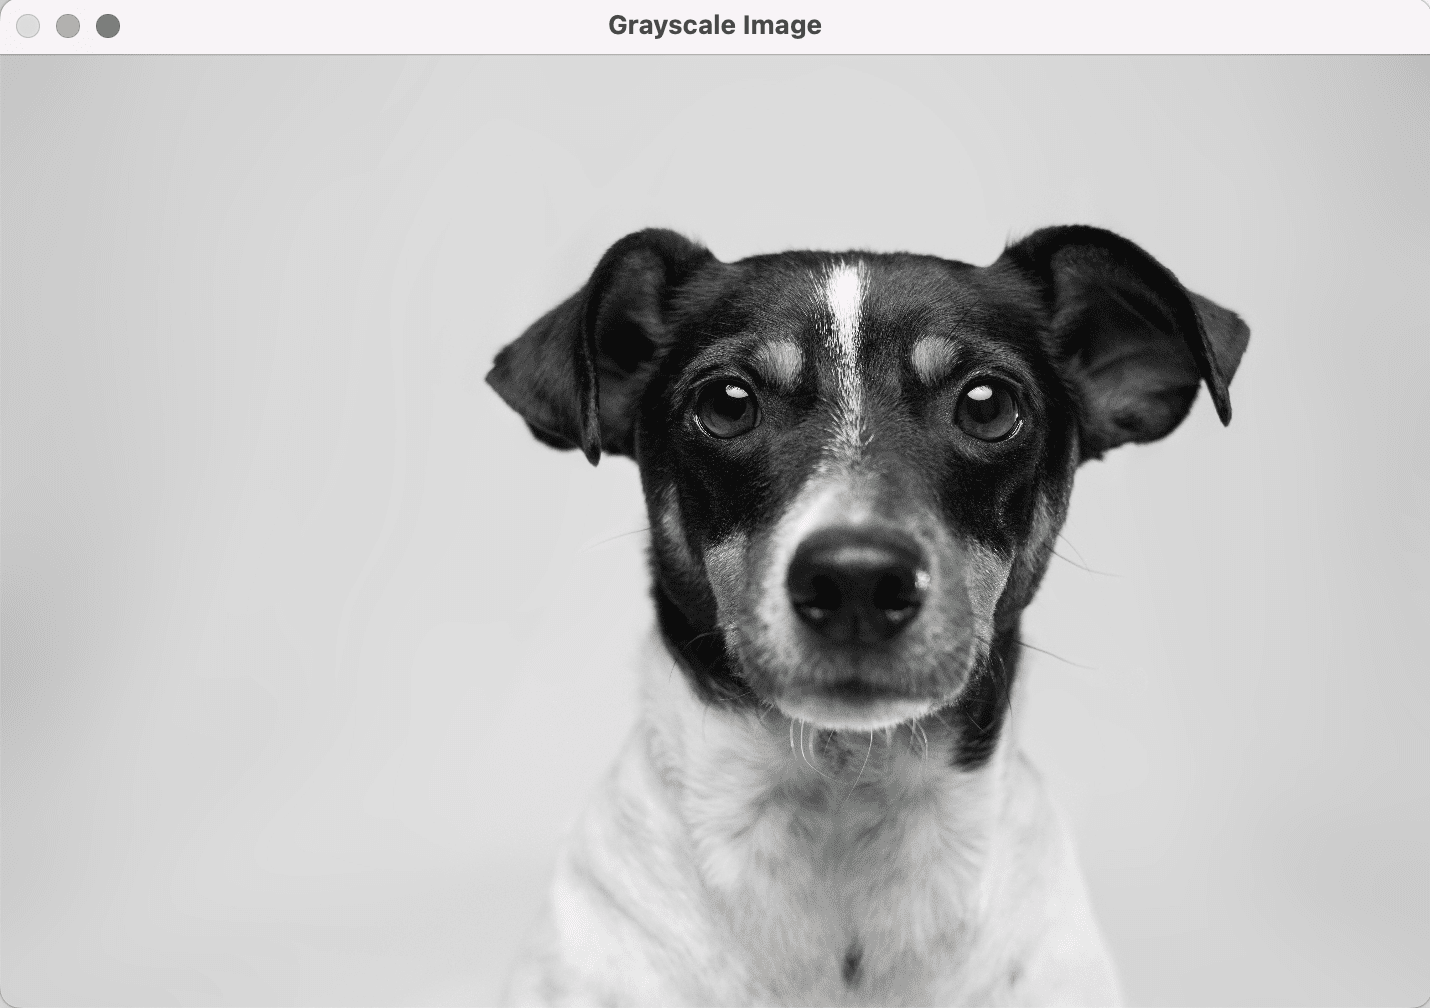
Another popular conversion is from RGB to grayscale where, as we have mentioned earlier, the resulting output is expected to be a single channel image. Let’s try it out:
Python
1
2
3
4
5
6
fromcv2 importCOLOR_RGB2GRAY
img_gray=cvtColor(img_rgb,COLOR_RGB2GRAY)
imshow(‘Grayscale Image',img_gray)
waitKey(0)
Converting an RGB image to grayscale and displaying it using OpenCV.
The conversion appears to have been carried out well, but let’s also try to access the value of the very first pixel at coordinates, (0, 0):
Python
1
print(img_gray[0,0])
Python
1
198
As expected, only a single number is printed out that corresponds to the pixel’s intensity value.
It is worth noting that this is not the only method by which the image may be converted to grayscale. Indeed, if we had to be working with an application that only requires the use of a grayscale (rather than an RGB) image, then we can also choose to read the image in grayscale straight away:
NOTE: The OpenCV documentation here warns that using IMREAD_GRAYSCALE will make use of the codec’s internal grayscale conversion when available, which may result in a different output to that of cvtColor().
The imread method also supports several other flag values, two of which are IMREAD_COLOR and IMREAD_UNCHANGED. The IMREAD_COLOR flag is the default option that converts an image to BGR color, ignoring any transparency. The IMREAD_UNCHANGED, on the other hand, reads an image that may also include an alpha channel.
Further Reading
This section provides more resources on the topic if you are looking to go deeper.
It provides self-study tutorials with all working code in Python to turn you from a novice to expert. It equips you with logistic regression, random forest, SVM, k-means clustering, neural networks,
and much more...all using the machine learning module in OpenCV
Kick-start your deep learning journey with hands-on exercises


Thankyou
Dear Dr Stefania,
In the article you mentioned the various coulr spaces such as RGB, BGR, HSV and CMYK.
Are any of the colour spaces computationally more efficient than others when doing image processing?
Thank you
Anthony, Sydney