The XGBoost library provides an implementation of gradient boosting designed for speed and performance.
It is implemented to make best use of your computing resources, including all CPU cores and memory.
In this post you will discover how you can setup a server on Amazon’s cloud service to quickly and cheaply create very large models.
After reading this post you will know:
- How to setup and configure an Amazon EC2 server instance for use with XGBoost.
- How to confirm the parallel capabilities of XGBoost are working on your server.
- How to transfer data and code to your server and train a very large model.
Kick-start your project with my new book XGBoost With Python, including step-by-step tutorials and the Python source code files for all examples.
Let’s get started.
- Update May/2020: Updated instructions.

How to Train XGBoost Models in the Cloud with Amazon Web Services
Photo by Dennis Jarvis, some rights reserved.
Need help with XGBoost in Python?
Take my free 7-day email course and discover xgboost (with sample code).
Click to sign-up now and also get a free PDF Ebook version of the course.
Tutorial Overview
The process is quite simple. Below is an overview of the steps we are going to complete in this tutorial.
- Setup Your AWS Account (if needed).
- Launch Your AWS Instance.
- Login and Run Your Code.
- Train an XGBoost Model.
- Close Your AWS Instance.
Note, it costs money to use a virtual server instance on Amazon. The cost is very low for ad hoc model development (e.g. less than one US dollar per hour), which is why this is so attractive, but it is not free.
The server instance runs Linux. It is desirable although not required that you know how to navigate Linux or a Unix-like environment. We’re just running our Python scripts, so no advanced skills are needed.
1. Setup Your AWS Account (if needed)
You need an account on Amazon Web Services.
- 1. You can create an account using the Amazon Web Services portal by clicking “Sign in to the Console”. From there you can sign in using an existing Amazon account or create a new account.

AWS Sign-in Button
- 2. If creating an account, you will need to provide your details as well as a valid credit card that Amazon can charge. The process is a lot quicker if you are already an Amazon customer and have your credit card on file.
Note: If you have created a new account, you may have to request to Amazon support in order to be approved to use larger (non-free) server instance in the rest of this tutorial.
2. Launch Your Server Instance
Now that you have an AWS account, you want to launch an EC2 virtual server instance on which you can run XGBoost.
Launching an instance is as easy as selecting the image to load and starting the virtual server.
We will use an existing Fedora Linux image and install Python and XGBoost manually.
- 1. Login to your AWS console if you have not already.
AWS Console
- 2. Click on EC2 for launching a new virtual server.
- 3. Select “N. California” from the drop-down in the top right hand corner. This is important otherwise you may not be able to find the image (called an AMI) that we plan to use.
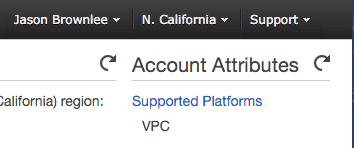
Select N California
- 4. Click the “Launch Instance” button.
- 5. Click “Community AMIs”. An AMI is an Amazon Machine Image. It is a frozen instance of a server that you can select and instantiate on a new virtual server.

Community AMIs
- 6. Enter AMI: “Fedora-Cloud-Base-24” in the “Search community AMIs” search box and press enter. You should be presented with a single result.
This is an image for a base installation of Fedora Linux version 24. A very easy to use Linux distribution.
- 7. Click “Select” to choose the AMI in the search result.
- 8. Now you need to select the hardware on which to run the image. Scroll down and select the “c3.8xlarge” hardware.
This is a large instance that includes 32 CPU cores, 60 Gigabytes of RAM and a 2 large SSD disks.

Select the c3.8xlarge Instance Type
- 9. Click “Review and Launch” to finalize the configuration of your server instance.
You will see a warning like “Your instance configuration is not eligible for the free usage tier”. This is just indicating that you will be charged for your time on this server. We know this, ignore this warning.

Your instance configuration is not eligible for the free usage tier
- 10. Click the “Launch” button.
- 11. Select your SSH key pair.
- If you have a key pair because you have used EC2 before, select “Choose an existing key pair” and choose your key pair from the list. Then check “I acknowledge…”.
- If you do not have a key pair, select the option “Create a new key pair” and enter a “Key pair name” such as “xgboost-keypair”. Click the “Download Key Pair” button.
- 12. Open a Terminal and change directory to where you downloaded your key pair.
- 13. If you have not already done so, restrict the access permissions on your key pair file. This is required as part of the SSH access to your server. For example, on your console you can type:
|
1 2 |
cd Downloads chmod 600 xgboost-keypair.pem |
- 14. Click “Launch Instances.
Note: If this is your first time using AWS, Amazon may have to validate your request and this could take up to 2 hours (often just a few minutes).
- 15. Click “View Instances” to review the status of your instance.
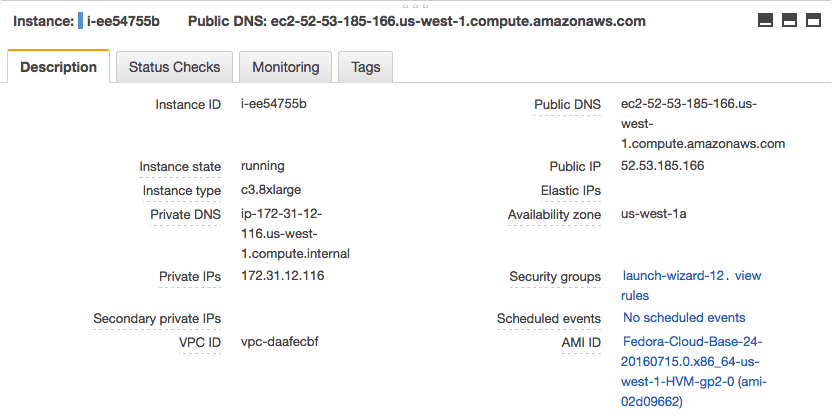
Review Your Running Instance and Note its IP Address
Your server is now running and ready for you to log in.
3. Login and Configure
Now that you have launched your server instance, it is time to login and configure it for use.
You will need to configure your server each time you launch it. Therefore, it is a good idea to batch all work so you can make good use of your configured server.
Configuring the server will not take long, perhaps 10 minutes total.
- 1. Click “View Instances” in your Amazon EC2 console if you have not already.
- 2. Copy “Public IP” (down the bottom of the screen in Description) to clipboard.
In this example my IP address is 52.53.185.166.
Do not use this IP address, your IP address will be different.
- 3. Open a Terminal and change directory to where you downloaded your key pair. Login in to your server using SSH, for example you can type:
|
1 |
ssh -i xgboost-keypair.pem fedora@52.53.185.166 |
- 4. You may be prompted with a warning the first time you log into your server instance. You can ignore this warning, just type “yes” and press enter.
You are now logged into your server.
Double check the number of CPU cores on your instance, by typing
|
1 |
cat /proc/cpuinfo | grep processor | wc -l |
You should see:
|
1 |
32 |
3a. Install Supporting Packages
The first step is to install all of the packages to support XGBoost.
This includes GCC, Python and the SciPy stack. We will use the Fedora package manager dnf (the new yum).
Note: We will be using Python 2 and some older versions of the libraries. This is intentional as these instructions do not appear to work for the very latest versions of the libraries and Python 3.
This is a single line:
|
1 |
sudo dnf install gcc gcc-c++ make git unzip python python2-numpy python2-scipy python2-scikit-learn python2-pandas python2-matplotlib |
Type “y” and press Enter when prompted to confirm the packages to install.
This will take a few minutes to download and install all of the required packages.
Once completed, we can confirm the environment was installed successfully.
i) Check GCC
Type:
|
1 |
gcc --version |
You should see:
|
1 2 3 4 |
gcc (GCC) 6.3.1 20161221 (Red Hat 6.3.1-1) Copyright (C) 2016 Free Software Foundation, Inc. This is free software; see the source for copying conditions. There is NO warranty; not even for MERCHANTABILITY or FITNESS FOR A PARTICULAR PURPOSE. |
ii) Check Python
Type:
|
1 |
python --version |
You should see:
|
1 |
Python 2.7.13 |
iii) Check SciPy
Type:
|
1 2 3 4 |
python -c "import scipy;print(scipy.__version__)" python -c "import numpy;print(numpy.__version__)" python -c "import pandas;print(pandas.__version__)" python -c "import sklearn;print(sklearn.__version__)" |
You should see something like:
|
1 2 3 4 |
0.16.1 1.11.0 0.18.0 0.17.1 |
Note: If any of these checks failed, stop and correct any errors. You must have a complete working environment before moving on.
We are now ready to install XGBoost.
3b. Build and Install XGBoost
The installation instructions for XGBoost are complete and we can follow them directly.
First we need to download the project on the server.
|
1 2 3 |
git clone --recursive https://github.com/dmlc/xgboost cd xgboost git checkout tags/v0.90 |
Next we need to compile it. The -j argument can be used to specify the number of cores to expect. We can set this to 32 for the 32 cores on our AWS instance.
If you chose different AWS hardware, you can set this appropriately.
|
1 |
make -j32 |
The XGBoost project should build successfully (e.g. no errors).
We are now ready to install the Python version of the library.
|
1 2 |
cd python-package sudo python setup.py install |
That is it.
We can confirm the installation was successful by typing:
|
1 |
python -c "import xgboost;print(xgboost.__version__)" |
This should print something like:
|
1 |
0.90 |
4. Train an XGBoost Model
Let’s test out your large AWS instance by running XGBoost with a lot of cores.
In this tutorial we will use the Otto Group Product Classification Challenge dataset.
This dataset is available for free from Kaggle (you will need to sign-up to Kaggle to be able to download this dataset). It describes the 93 obfuscated details of more than 61,000 products grouped into 10 product categories (e.g. fashion, electronics, etc.). Input variables are counts of different events of some kind.
The goal is to make predictions for new products as an array of probabilities for each of the 10 categories and models are evaluated using multiclass logarithmic loss (also called cross entropy).
This competition was completed in May 2015 and this dataset is a good challenge for XGBoost because of the nontrivial number of examples, the difficulty of the problem and the fact that little data preparation is required (other than encoding the string class variables as integers).
Create a new directory called work/ on your workstation.
You can download the training dataset train.csv.zip from the Data page and place it in your work/ directory on your workstation.
We will evaluate the time taken to train an XGBoost on this dataset using different numbers of cores.
We will try 1 core, half the cores 16 and all of the 32 cores. We can specify the number of cores used by the XGBoost algorithm by setting the nthread parameter in the XGBClassifier class (the scikit-learn wrapper for XGBoost).
The complete example is listed below. Save it in a file with the name work/script.py.
|
1 2 3 4 5 6 7 8 9 10 11 12 13 14 15 16 17 18 19 20 21 22 23 |
# Otto multi-core test from pandas import read_csv from xgboost import XGBClassifier from sklearn.preprocessing import LabelEncoder import time # load data data = read_csv('train.csv') dataset = data.values # split data into X and y X = dataset[:,0:94] y = dataset[:,94] # encode string class values as integers label_encoded_y = LabelEncoder().fit_transform(y) # evaluate the effect of the number of threads results = [] num_threads = [1, 16, 32] for n in num_threads: start = time.time() model = XGBClassifier(nthread=n) model.fit(X, label_encoded_y) elapsed = time.time() - start print(n, elapsed) results.append(elapsed) |
Now, we can copy your work/ directory with the data and script to your AWS server.
From your workstation in the current directory where the work/ directory is located, type:
|
1 |
scp -r -i xgboost-keypair.pem work fedora@52.53.185.166:/home/fedora/ |
Of course, you will need to use your key file and the IP address of your server.
This will create a new work/ directory in your home directory on your server.
Log back onto your server instance (if needed):
|
1 |
ssh -i xgboost-keypair.pem fedora@52.53.185.166 |
Change directory to your work directory and unzip the training data.
|
1 2 |
cd work unzip ./train.csv.data |
Now we can run the script and train our XGBoost models and calculate how long it takes using different numbers of cores:
|
1 |
python script.py |
Note: Your results may vary given the stochastic nature of the algorithm or evaluation procedure, or differences in numerical precision. Consider running the example a few times and compare the average outcome.
You should see output as follows.
|
1 2 3 |
(1, 96.34455895423889) (16, 8.31994891166687) (32, 7.604229927062988) |
You can see little difference between 16 and 32 cores.
I believe the reason for this is that AWS is giving access to 16 physical cores with hyperthreading, offering an additional virtual cores. Nevertheless, building a large XGBoost model in 7 seconds is great.
You can use this as a template for your copying your own data and scripts to your AWS instance.
A good tip is to run your scripts as a background process and forward any output to a file. This is just in case your connection to the server is interrupted or you want to close it down and let the server run your code all night.
You can run your code as a background process and redirect output to a file by typing:
|
1 |
nohup python script.py >script.py.out 2>&1 & |
Now that we are done, we can shut down the AWS instance.
5. Close Your AWS Instance
When you are finished with your work you must close your instance.
Remember you are charged by the amount of time that you use the instance. It is cheap, but you do not want to leave an instance on if you are not using it.
- 1. Log out of your instance at the terminal, for example you can type:
|
1 |
exit |
- 2. Log in to your AWS account with your web browser.
- 3. Click EC2.
- 4. Click “Instances” from the left-hand side menu.
- 5. Select your running instance from the list (it may already be selected if you only have one running instance).
- 6. Click the “Actions” button and select “Instance State” and choose “Terminate”. Confirm that you want to terminate your running instance.
It may take a number of seconds for the instance to close and to be removed from your list of instances.
That’s it.
Summary
In this post you discovered how to train large XGBoost models on Amazon cloud infrastructure.
Specifically, you learned:
- How to start and configure a Linux server instance on Amazon EC2 for XGBoost.
- How to install all of the required software needed to run the XGBoost library in Python.
- How to transfer data and code to your server and train a large model making use of all of the cores on the server.
Do you have any questions about training XGBoost models on Amazon Web Services or about this post? Ask your questions in the comments and I will do my best to answer.
Discover The Algorithm Winning Competitions!
Develop Your Own XGBoost Models in Minutes
...with just a few lines of Python
Discover how in my new Ebook:
XGBoost With Python
It covers self-study tutorials like:
Algorithm Fundamentals, Scaling, Hyperparameters, and much more...
Bring The Power of XGBoost To Your Own Projects
Skip the Academics. Just Results.


Nice and detailed article. Can you give me an estimate of how much does it cost, say for running stuff for a competition like you did.
Not much at all. I think a whole day of me trying different configs maybe cost $10. It’s less than $1 per hour from memory.
When I install xgboost with Anaconda in aws, there is always a error when I import xgboost.
OSError: /home/fedora/anaconda3/bin/../lib/libgomp.so.1: version `GOMP_4.0′ not found (required by /home/fedora/xgboost/python-package/xgboost/../../lib/libxgboost.so)
Perhaps try without Anaconda?
Hi Jason,
another problem is more severe to me. I follow your procedures and just changed the version of instance, where I choose c3.xlarge, 4 vCPU and 7.5 RAM.
Everything is okay, but when I run your sample code, the speed is very slow. So I changed the number of row to train.
1) nthread = 4
X = dataset[0:3000,0:94]
y = dataset[0:3000,94]
Time:
(4, 9.494154930114746)
2) nthread = 4
X = dataset[0:10000,0:94]
y = dataset[0:10000,94]
Time:
(4, 33.41064381599426)
3) nthread = 4
X = dataset[0:30000,0:94]
y = dataset[0:30000,94]
(4, 1365.8062710762024)
The computing speed is smaller than my macbook air, in which running the whole train set need 70 seconds. I am confused whether I installed some packages incorrectly, or the speed of x3.xlarge is low indeed.
Jason, thank you for the tutorial!
Would installing R (rather than Python) into your EC2 virtual server be a similar process – type “sudo dnf install R” in Step 3a?
Did you open a separate S3 account to store your data, or was that not necessary? It looks like you uploaded the data directly into your EC2 instance.
Robert
Sorry, I don’t use R on EC2, I don’t have good advice.
My data is usually no larger than a few gig. I upload it once and keep the instance to the end of the project (e.g. a few hundred bucks, no big deal). I would recommend S3 for longer projects or bigger data.
Thanks Jason. I read a post recommending having RAM at least 3x the size of your dataset to avoid an analysis taking hours or days to run. So if datasets are < 20 GB I can see it's preferable to load into EC2.
Perhaps.
You can also try flowing data from file as needed instead of keeping it all in ram (e.g. neural nets can do this).
Thanks Jason. Is there a way to close the AWS instance automatically once the model training completes — not time based shutdown?
There may be, but I’m not across it sorry.
If you discover some tricks along these lines let me know!
I’m having an issue where I get this error pasted below; following some stack overflow advice, I added the option low_memory = False to pd.read_csv, but the error persists and seems related to this datetime field. Any advice would be appreciated, thanks! Great walkthrough BTW.
sys:1: DtypeWarning: Columns (8,9,10,11,12,43,157,196,214,225,228,229,231,235,238) have mixed types. Specify dtype option on import or set low_memory=False.
Traceback (most recent call last):
File “script.py”, line 31, in
model.fit(X, label_encoded_y)
File “/anaconda3/lib/python3.6/site-packages/xgboost/sklearn.py”, line 439, in fit
missing=self.missing)
File “/anaconda3/lib/python3.6/site-packages/xgboost/core.py”, line 268, in __init__
self._init_from_npy2d(data, missing)
File “/anaconda3/lib/python3.6/site-packages/xgboost/core.py”, line 315, in _init_from_npy2d
data = np.array(mat.reshape(mat.size), dtype=np.float32)
ValueError: could not convert string to float: ’19SEP12:00:00:00′
Exception ignored in: <bound method DMatrix.__del__ of >
Traceback (most recent call last):
File “/anaconda3/lib/python3.6/site-packages/xgboost/core.py”, line 324, in __del__
_check_call(_LIB.XGDMatrixFree(self.handle))
AttributeError: ‘DMatrix’ object has no attribute ‘handle’
Perhaps try loading using numpy?
Perhaps try loading less data?
Hi Jason-
Thanks for all the great tutorials. I just started this one and I’m on AWS for the first time. I do not see c3.8xlarge Instance Type. I do see c4.8xlarge. Ok to use that instead? The storage is EBS only and not SSD.
Thanks!
That looks fine.
Hi Jason,
As always, thank you for everything you do. Best resource on the web.
When following the instructions for building the xgboost package, after I run the ‘make -j32’ command, I receive a sequence of errors that look like:
———
Makefile:141: recipe for target ‘build/metric/elementwise_metric.o’ failed
make: *** [build/metric/elementwise_metric.o] Error 1
Makefile:141: recipe for target ‘build/metric/multiclass_metric.o’ failed
make: *** [build/metric/multiclass_metric.o] Error 1
In file included from include/xgboost/metric.h:16:0,
from src/metric/metric.cc:6:
include/xgboost/./data.h:12:25: fatal error: rabit/rabit.h: No such file or directory
#include
^
compilation terminated.
————–
I ran through the steps multiple times and kept running into this issue. I confirmed the instance has 32 CPUs. Not sure if you know what might be causing this. Appreciate any help!
Thank you!
Sorry to hear that.
Perhaps try to checkout a specific version of the library? E.g. 1.0.2 or 0.9. It is possible that the most recent version no longer compiles easily.
E.g.:
https://github.com/dmlc/xgboost/releases/tag/v1.0.2
I got the same error and try the some other versions but still same error.
include/xgboost/./data.h:12:25: fatal error: rabit/rabit.h: No such file or directory
#include
^
compilation terminated.
$ cat /etc/os-release
NAME=”Amazon Linux”
VERSION=”2″
ID=”amzn”
ID_LIKE=”centos rhel fedora”
VERSION_ID=”2″
PRETTY_NAME=”Amazon Linux 2″
ANSI_COLOR=”0;33″
CPE_NAME=”cpe:2.3:o:amazon:amazon_linux:2″
HOME_URL=”https://amazonlinux.com/”
Perhaps try checking out an older snapshot of the code base, e.g. 1.0.1
Following
https://xgboost.readthedocs.io/en/latest/build.html#building-on-linux-distributions with cmake3 and python3/pip3 seems solve this issue
Nice work!