Launching the Stable Diffusion Web UI can be done in one command. After that, you can control the image generation pipeline from a browser. The pipeline has a lot of moving parts and all are important in one way or another. To effectively command Stable Diffusion to generate images, you should recognize the widgets from your browser and know what they can do. In this post, you will learn the many components in the Stable Diffusion Web UI and how they affect the image you create.
Kick-start your project with my book Mastering Digital Art with Stable Diffusion. It provides self-study tutorials with working code.
Let’s get started.
How to Create Images Using Stable Diffusion Web UI
Photo by Kelly Sikkema. Some rights reserved.
Overview
This post is in four parts; they are:
- Launching the Web UI
- The txt2img Tab
- The img2img Tab
- Other Functions
Launching the Web UI
After you prepared your Python environment, downloaded the web UI code, and stored the model checkpoints in the appropriate directory, you can launch the web UI using the following command:
|
1 |
./webui.sh |
The web UI can be customized by editing the variables in webui-user.sh. One example is to allow the web UI server to run from one computer while you launch your browser from another, which you need to add the following line to webui-user.sh to allow the server to be accessed over the network:
|
1 |
export COMMANDLINE_ARGS="--listen" |
Running ./webui.sh will launch a server for Stable Diffusion
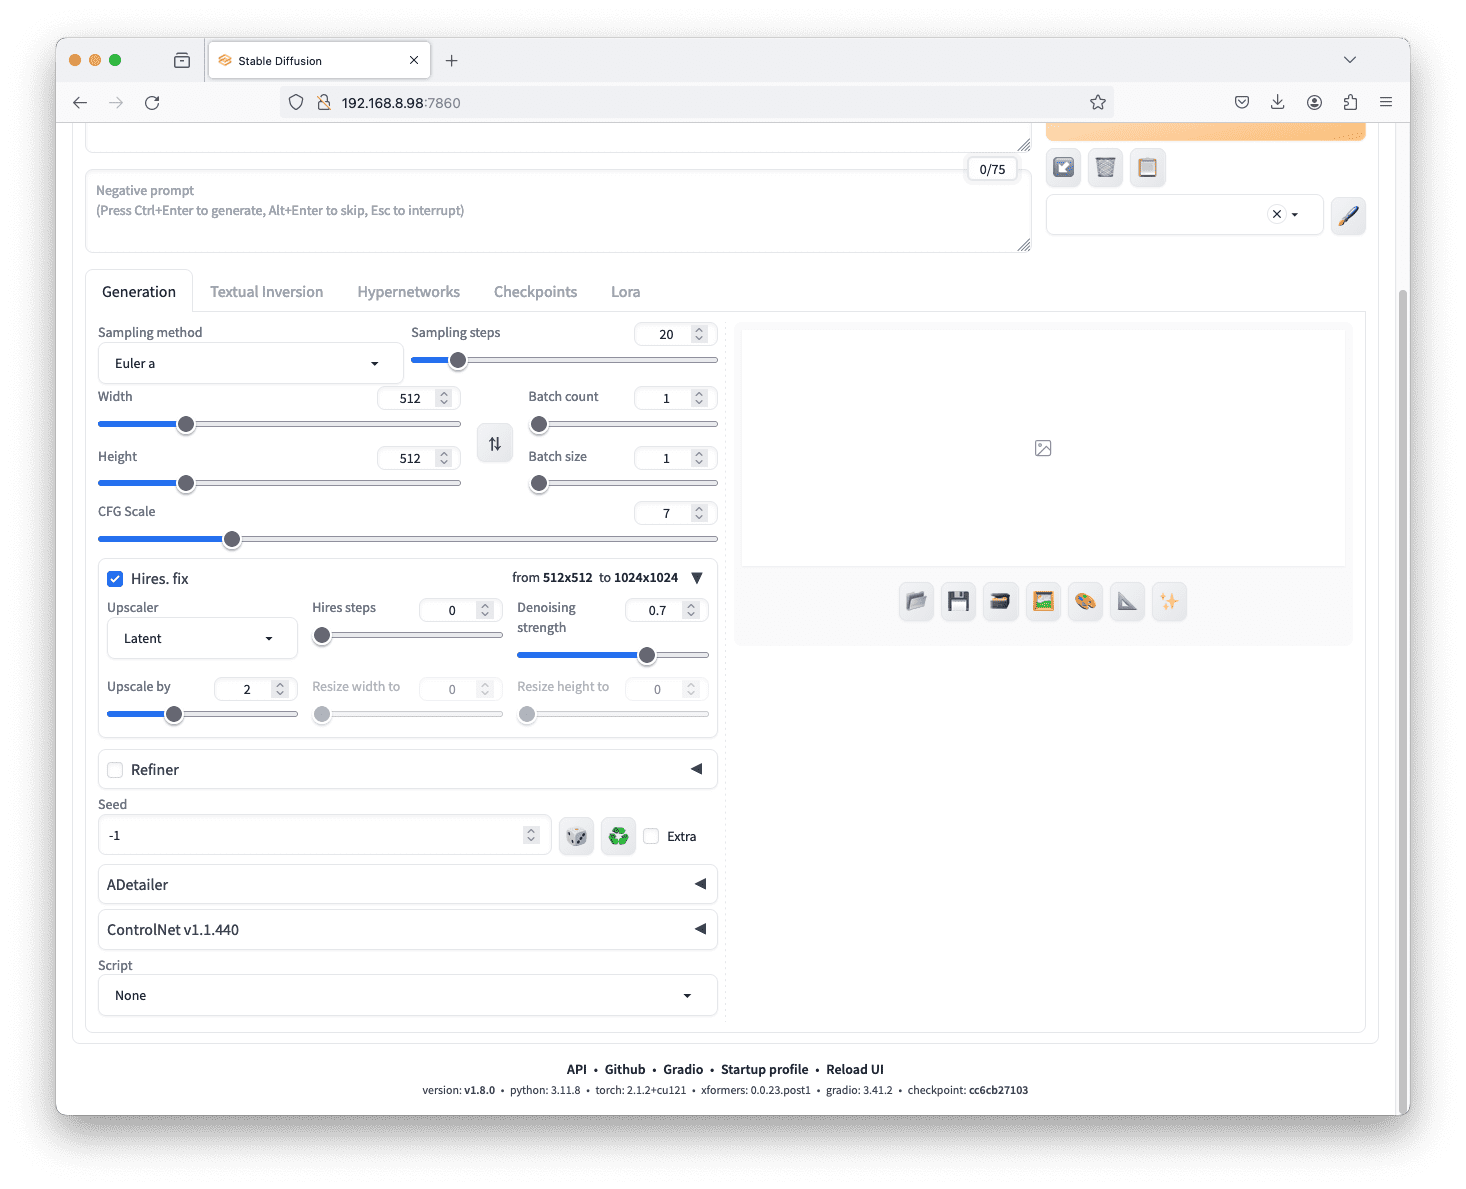
By default, the command ./webui.sh will launch a server at port 7860, and you can access it from your browser. If you run it from your desktop, you can use the URL http://127.0.0.1:7860; but if it is from another computer, you need to use that computer’s IP address instead of 127.0.0.1. Your browser should show an UI like the following:

The Stable Diffusion web UI
At the top left corner, you can see a dropdown box to select the checkpoint. The checkpoint provide different style of drawing, such as more realistic like a photograph or more like a cartoon. You can store multiple checkpoints in the model directory but only one is used in the pipeline. Below the dropdown, you have multiple “tabs” that you can generate image differently. Each tab has different set of widgets. Most of them are to provide parameters to a generation pipeline.
Let’s understand what knobs and parameters are available to generate a desired image. These parameters, together, help nudge the algorithm in the right direction.
The txt2img Tab
The launch page of the UI shows the txt2img tab—a fundamental feature of Stable Diffusion for transforming text prompts into images. As the name suggests, this allows us to describe the image we want or don’t want as text to the algorithm, which then converts it into an embedding vector to generate the image. Refer to the screenshot above, you have the widgets as explained as the following.
- Checkpoint as labeled by ①. This dropdown menu lets us select models. Ensure that model files are placed in the correct folder, as detailed in the model installation guidelines (covered in the last chapter). A buffet of checkpoints and safe-tensors is available at https://civitai.com/.
- Refresh Button as labeled by ②. Found next to the checkpoint dropdown, this button updates the list of available models. It is used to refresh the list if you added a new model to the checkpoint folder but do not want to restart the web UI server.
- Prompt Text Box as labeled by ③. This is the place where the description of the expected image goes. Providing detailed and specific prompts (which will be covered in detail in the next post), along with keywords, enhances the generation process.
- Negative Prompt Text Box as labeled by ④. Optional but important when employing v2 models, the negative prompt helps specify what should not be a part of the images. In general, what we don’t want is less specific and can be saved for many use cases.
- Sampling Method and Steps as labeled by ⑤ and ⑥. The first diffusion algorithm requires more than a hundred steps to create an image but we found ways to speed up. These parameters determine the denoising process algorithm and the number of sampling steps. The choice of sampling method influences the balance between speed and quality.
To balance speed, quality, and having good convergence, DPM++ 2M Karras with 20 – 30 steps or UniPC with 20-30 steps are some good options. On the other hand, DPM++ SDE Karras with 10-15 steps or DDIM with 10-15 steps offer one of the best quality images but with slower convergence. - Width and Height as labeled by ⑦ and ⑧. They specify the output image size, ensuring compatibility with the chosen model. Adjustments are recommended based on whether v1 or v2 models are used. Usually you keep the default of 512×512 pixels and you change it only if you want a different aspect ratio.
- Batch Count and Size as labeled by ⑨ and ⑩. These settings control the times the image generation pipeline runs and the number of images generated per run. The batch size is how many images are generated in one single generation. The batch count is the number of generations.
A batch size of one with a higher batch count is recommended to generate multiple higher-resolution images with the least consumption of peak resources. It’s slower, but the quality of the images is much higher than just running batches of 512×512 images.
Since the image generation is a random process, generating multiple images in batches allows you to select the best outcome from several. - Classifier Free Guidance Scale as labeled by ⑪. The Classifier Free Guidance (CFG) scale parameter allows us to control how much the model should adhere to the prompt, ranging from mostly ignoring it (value of 1) to strictly following it (value of 30). Talking about extremes, a very low value of CFG score would mean that the prompt is mostly disregarded and the image generated is random. This might not serve the purpose of using txt2img. On the other hand, a high value of CFG forces the system to stick to the prompt but might distort the image itself. This is analogous to overfitting the prompt.
- Random seed as labeled by ⑫. The seed value influences the initial random tensor in the latent space, controlling the image’s content. Fixing the seed is useful for maintaining reproducibility while tweaking prompts.
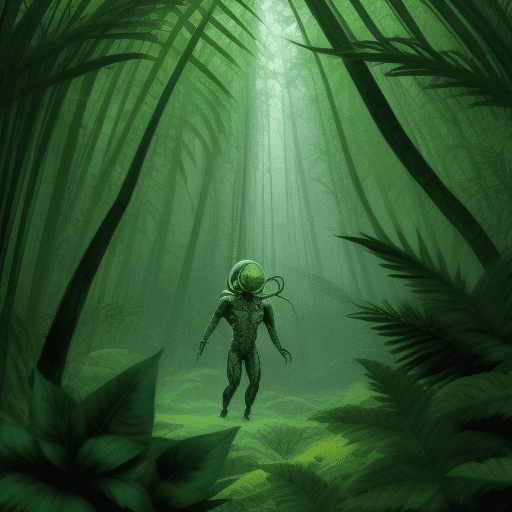
You can try it out by describing what you want to generate in the prompt box (in plain English unless you replaced the default embedding model). Once you set up these and click the “Generate” button at top right, you can see the Stable Diffusion model create images for you gradually. Below an an example for the prompt “Extraterrestrial exploring a jungle”, with all other parameters as default.
As mentioned above, the image generated is in the size as specified by the width and height parameters. If you need an image bigger than that, you can check the “Hires. fix” (high-resolution fix) box, and click one the triangle to expand the box for more options:
Parameters under “Hires. fix”
This applies a super-resolution deep learning model to the output of Stable Diffusion. It addresses the native resolution limitation of Stable Diffusion, providing an upscaling feature for images generated at a smaller size. We can choose from various upscaling and adjustment parameters such as “upscale by” (the multiple for width and height of the image) to achieve the desired results.
Choosing the best images from the batch and then resizing from the img2img tab to upscale the resolution is generally recommended, rather than asking the Stable Diffusion model to generate a giant output directly.
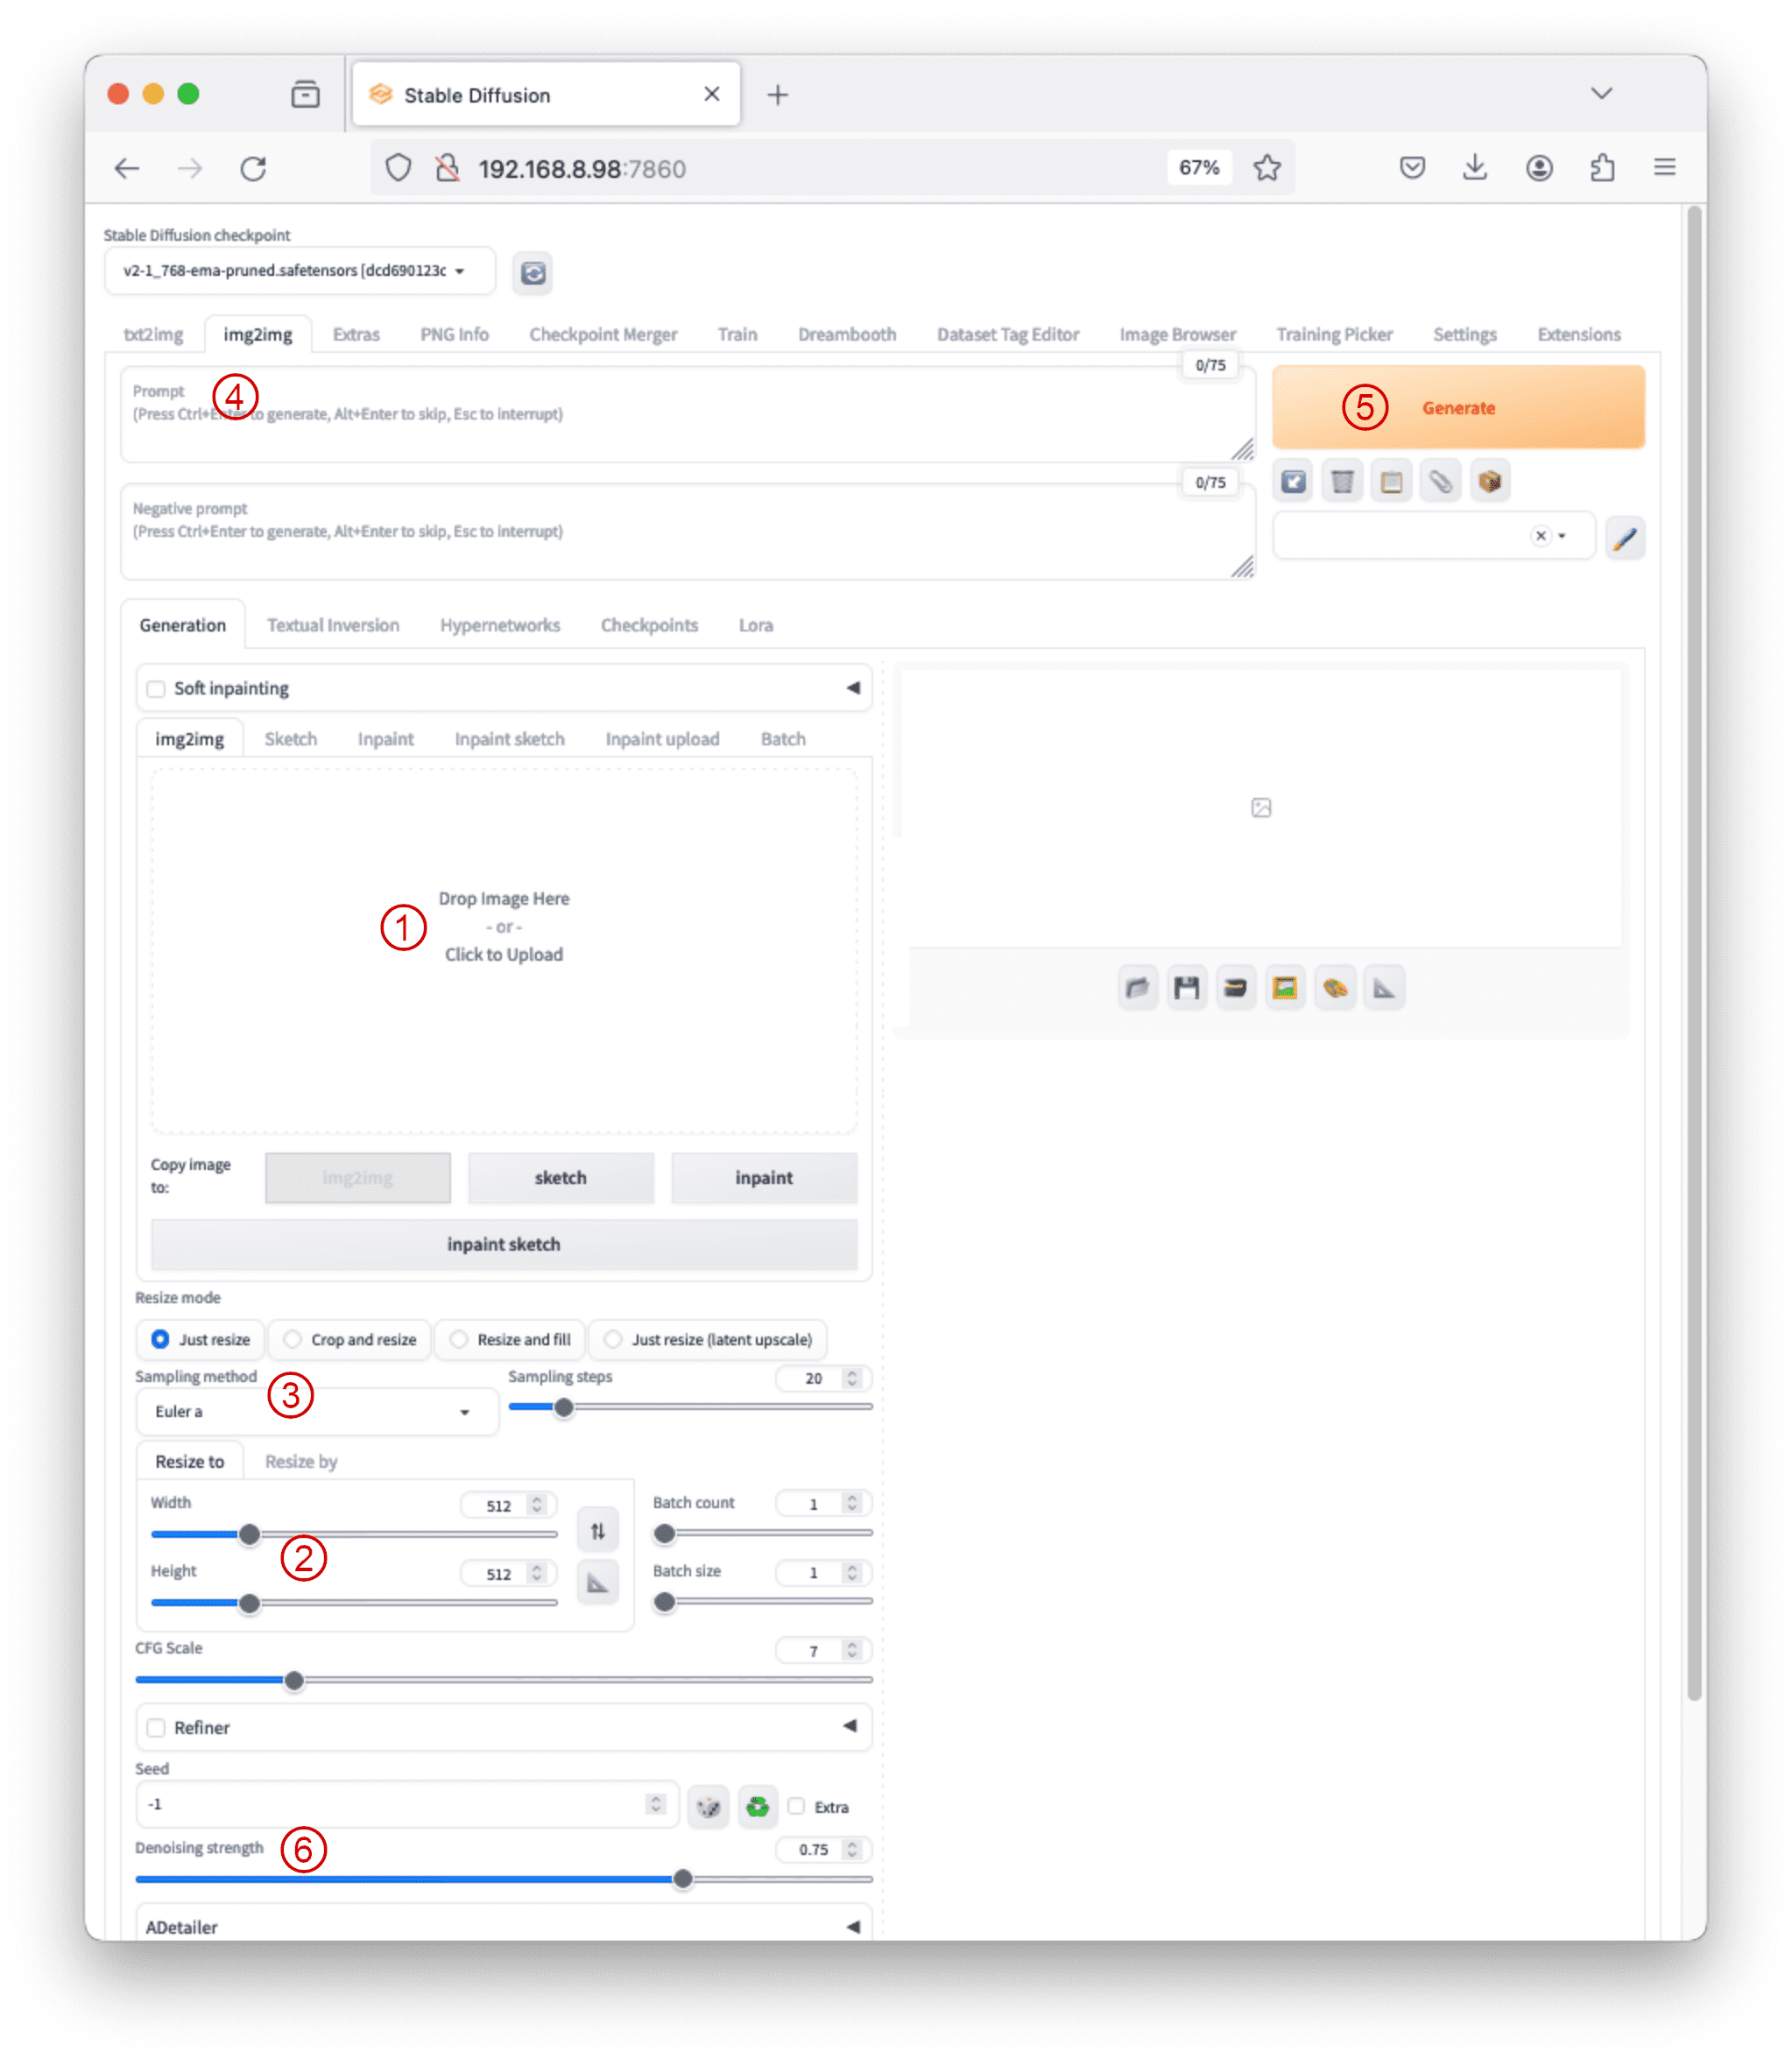
The img2img Tab
Next to the txt2img tab, the img2img tab is where users leverage image-to-image functions. Common use cases include inpainting, sketching, and transforming one image into another.
While you still see the prompt and negative prompt text box, the img2img tab allows users to perform image-to-image transformations. A typical process involves:
- Dragging and dropping a base image onto the img2img subtab under “Generation” section
- Adjusting width or height to maintain the aspect ratio of the new image.
- Setting sampling method, sampling steps, and batch size.
- Writing a prompt for the new image.
- Pressing the Generate button to create images, with denoising strength adjustments.
- Other parameters in the img2img tab include resizing mode and denoising strength, controlling how much the image changes during the transformation.
A typical workflow with img2img
One of the most important settings is the denoising strength. It signifies the amount of artistic freedom the model has over the input image. A low value of this parameter means that the style of the image must be retained while a higher value means the least restriction in terms of styling, colors, etc.
Let us understand this better using two examples with the same input prompt “woman wearing sunglasses” below:
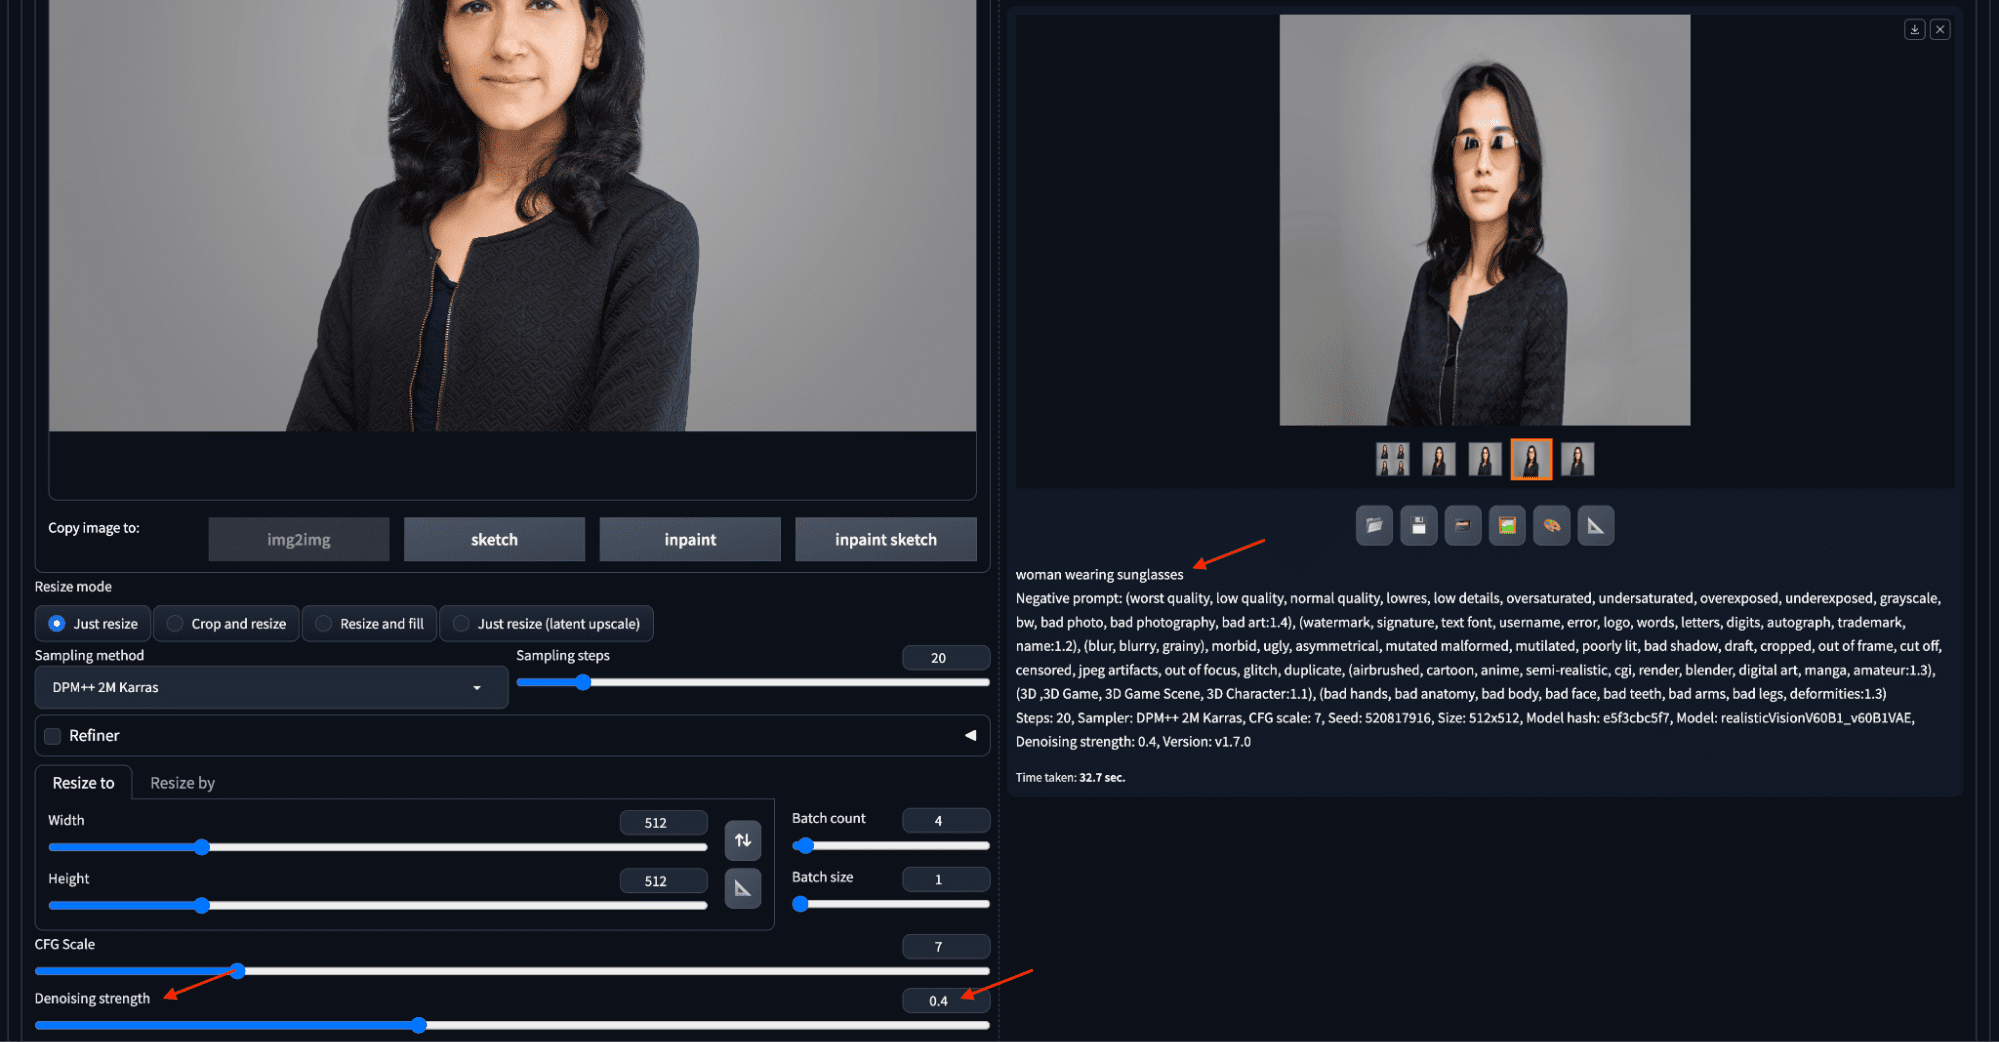
Using img2img to make a headshot to wear sunglasses.
In the first example, an image is uploaded to the img2img subtab, the denoising strength is set to 0.4, entered the prompt, then clicked “Generate”. The image generated will show at the right. The generated image retained almost everything except the face, including the input image’s color and style. It accurately reflects the instruction on the prompt: wearing sunglasses.
The second example has a higher value of denoising strength of 0.7, thus allowing the algorithm to generate more random images. Let’s also set the batch count to 4 so to create more outputs. The color, pose, and style are all different in the four candidate images on the right, as follows:
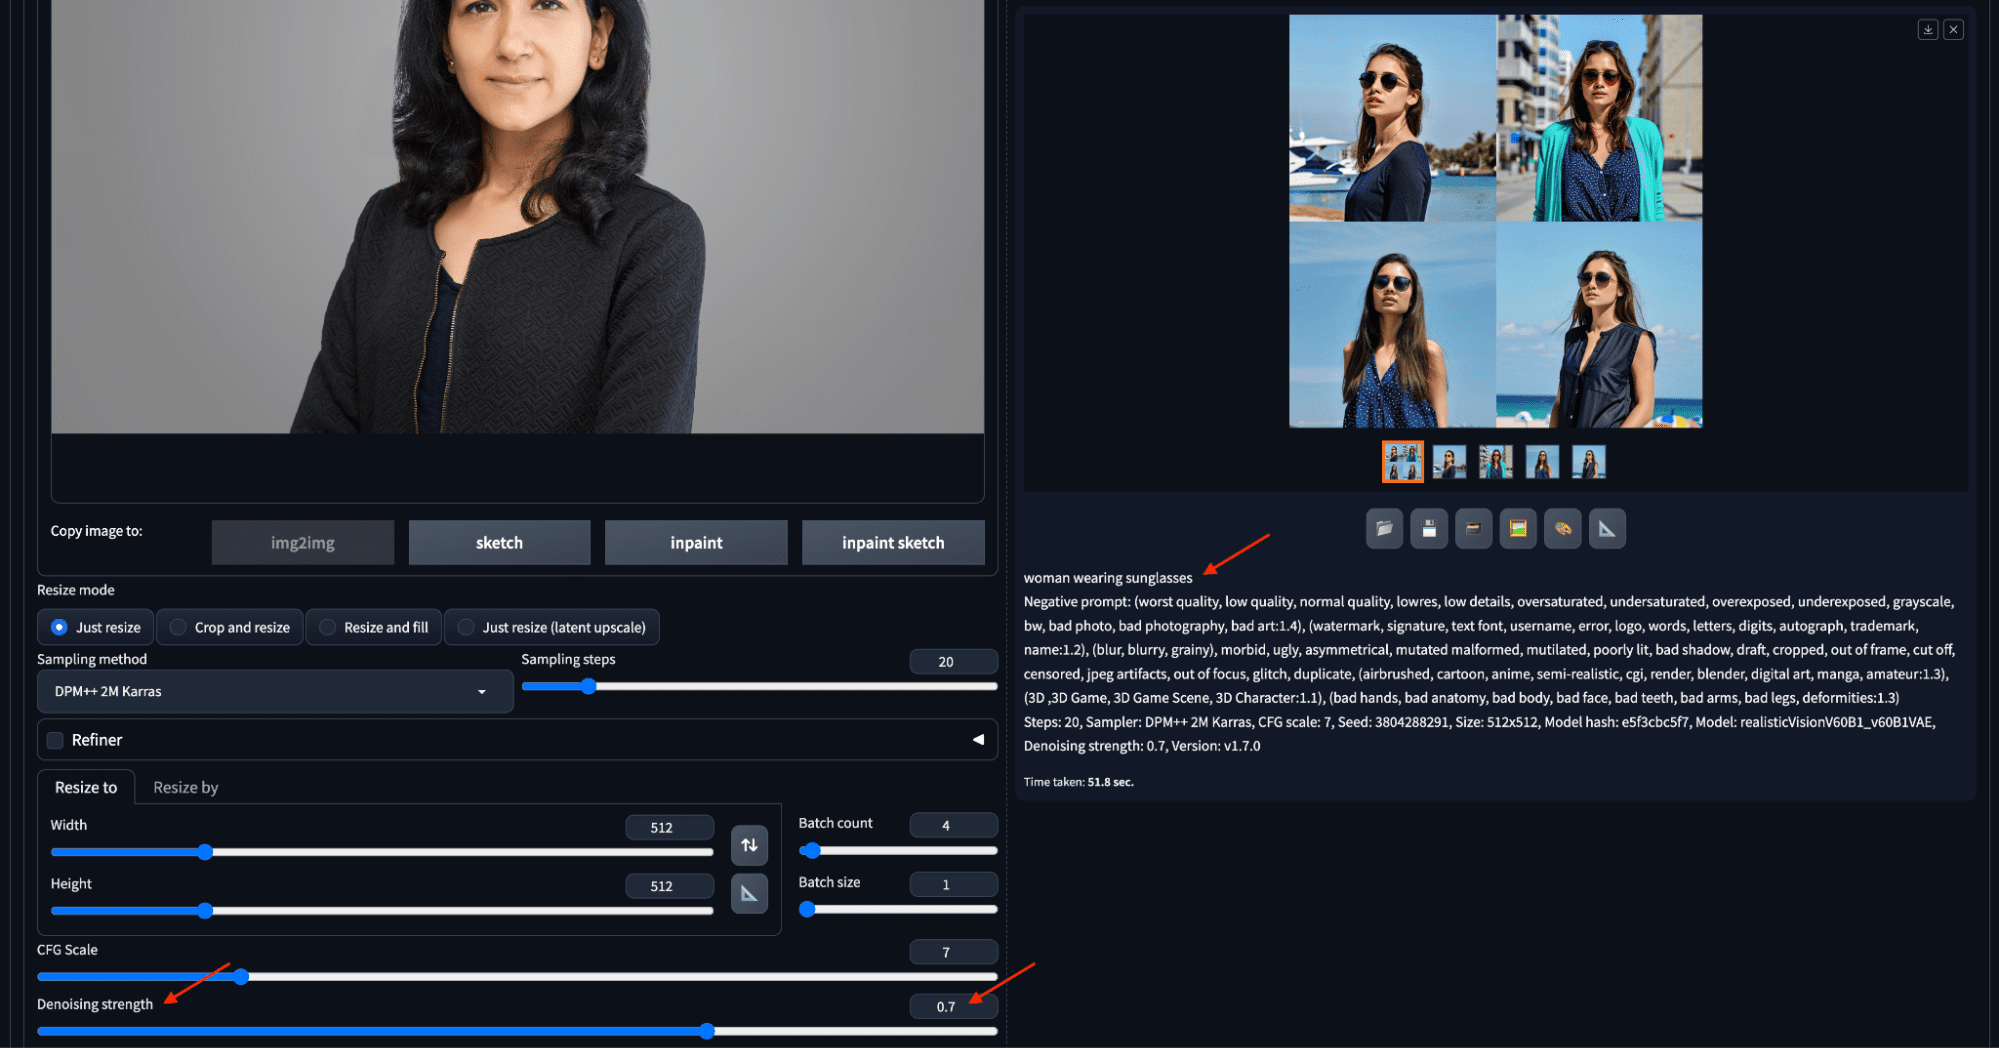
Increasing the denoising strength will generate images more deviated from the input.
Sketch and Inpainting
In addition to uploading an image, users can sketch the initial picture using the color sketch tool, enabling creative modifications or entirely new compositions. The sketch function allows users to input a background image, sketch in color, and generate images based on the sketch and accompanying prompt.
A widely used function in the img2img tab is inpaint, which addresses minor defects in generated images. Besides uploading an image, you can also send an image generated from the txt2img tab to the img2img tab for inpainting. Afterward, you can draw on the image to create a mask. Adjustments to denoising strength, mask content, and batch size influence the inpainting process, too. An example is as follows:
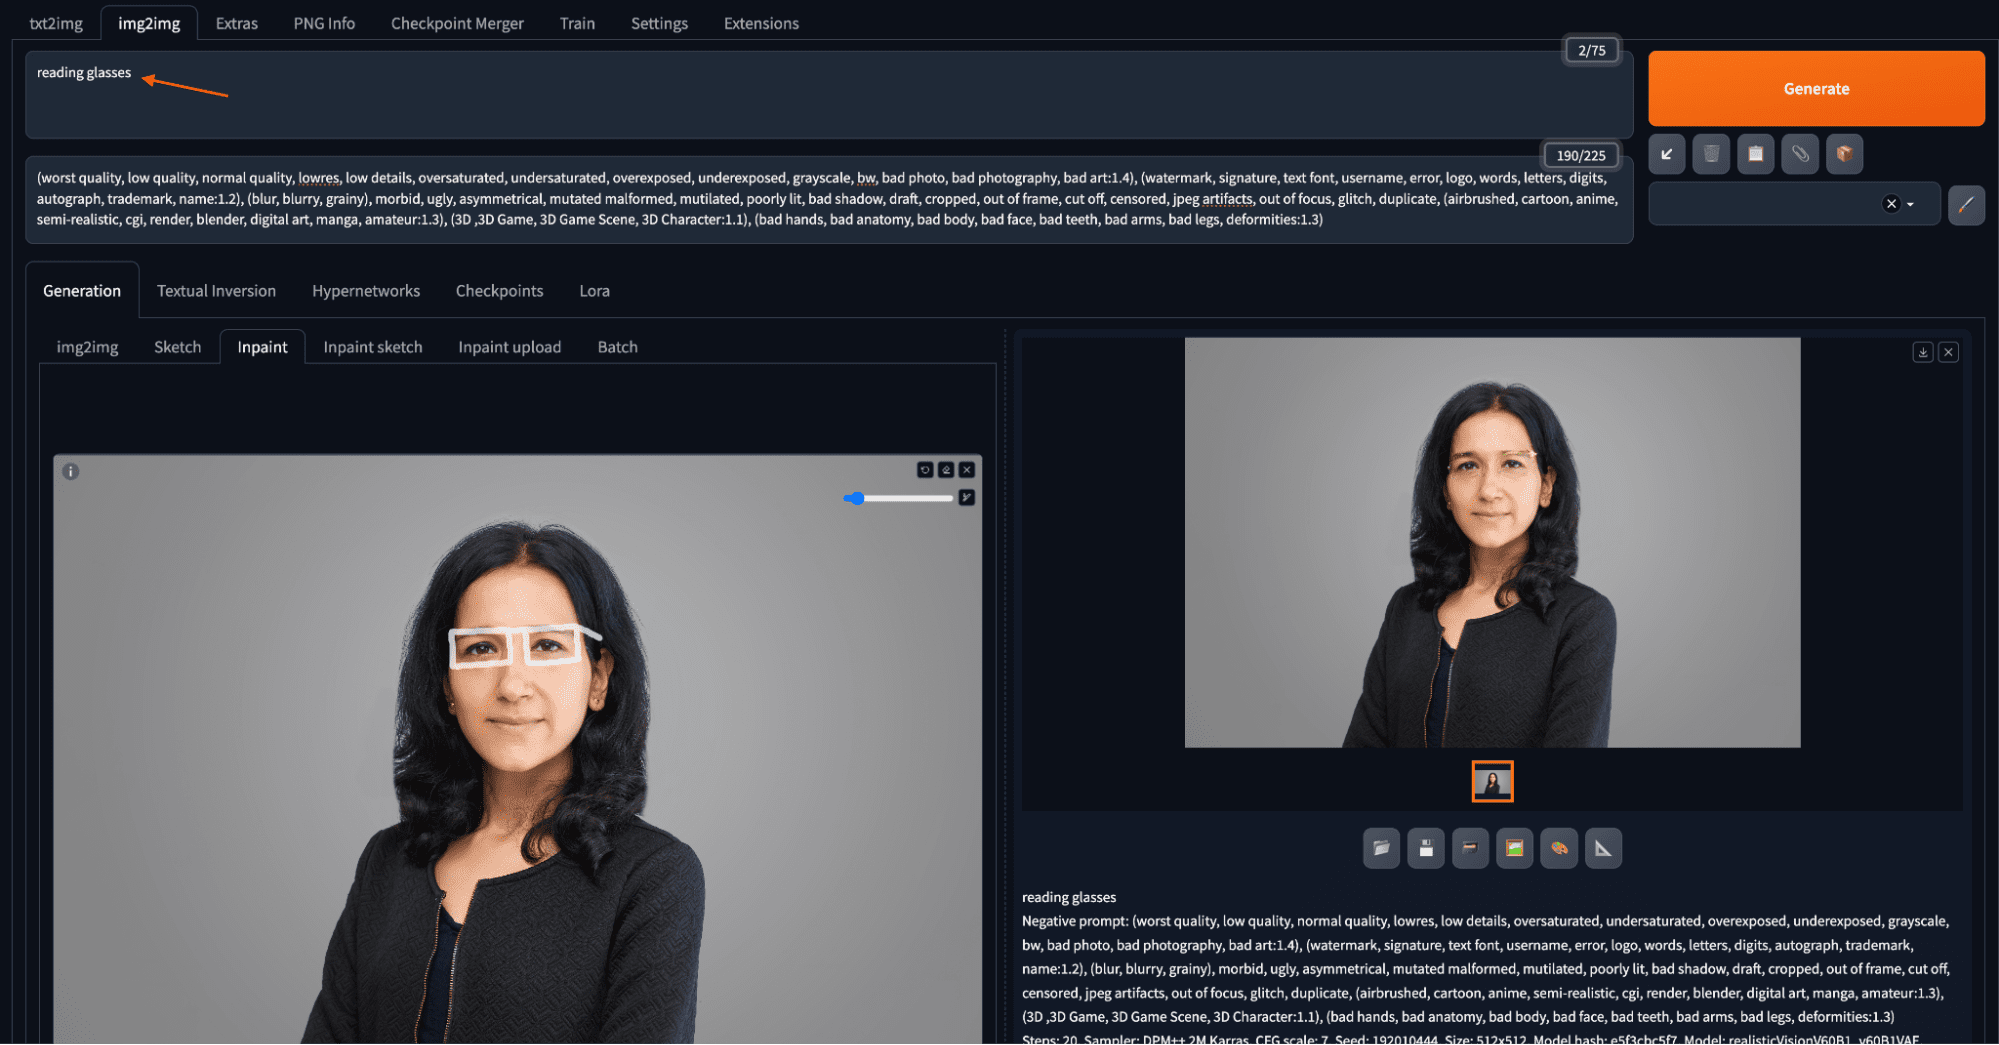
Add a reading glass to a portrait by inpainting
You draw a mask on the input image for where the reading glass should be. When you draw, you can zoom and pan using keyboard shortcuts, enhancing precision when working on smaller areas. Keyboard shortcuts include Alt+Wheel (Option+Wheel in macOS) for zooming, Ctrl+Wheel for adjusting brush size, “R” for resetting zoom, “S” for entering/exiting the full screen, and holding “F” while moving the cursor to pan. Once you finished creating the mask, you say “reading glasses” in the prompt text box and click “Generate”.
If you think drawing a mask on the browser is too difficult, you can use other drawing tools such as Photoshop to create a mask image. Then on the “Inpaint upload” tab to upload the image and the mask separately.
You can also set the batch size to create multiple images at once, all based on the same prompt and input. This allows you to select the best output from a bulk of variations.
The above example retains the original image but adds reading glasses using the inpainting feature by drawing roughly a structure of the glasses over the masked area of the image. Some of the notable settings for inpainting include the mask blur (how far the pixels outside the mask can be changed), inpaint area (whether the mask means to keep or to change), and denoising strength signifying the surrounding area for producing the change.
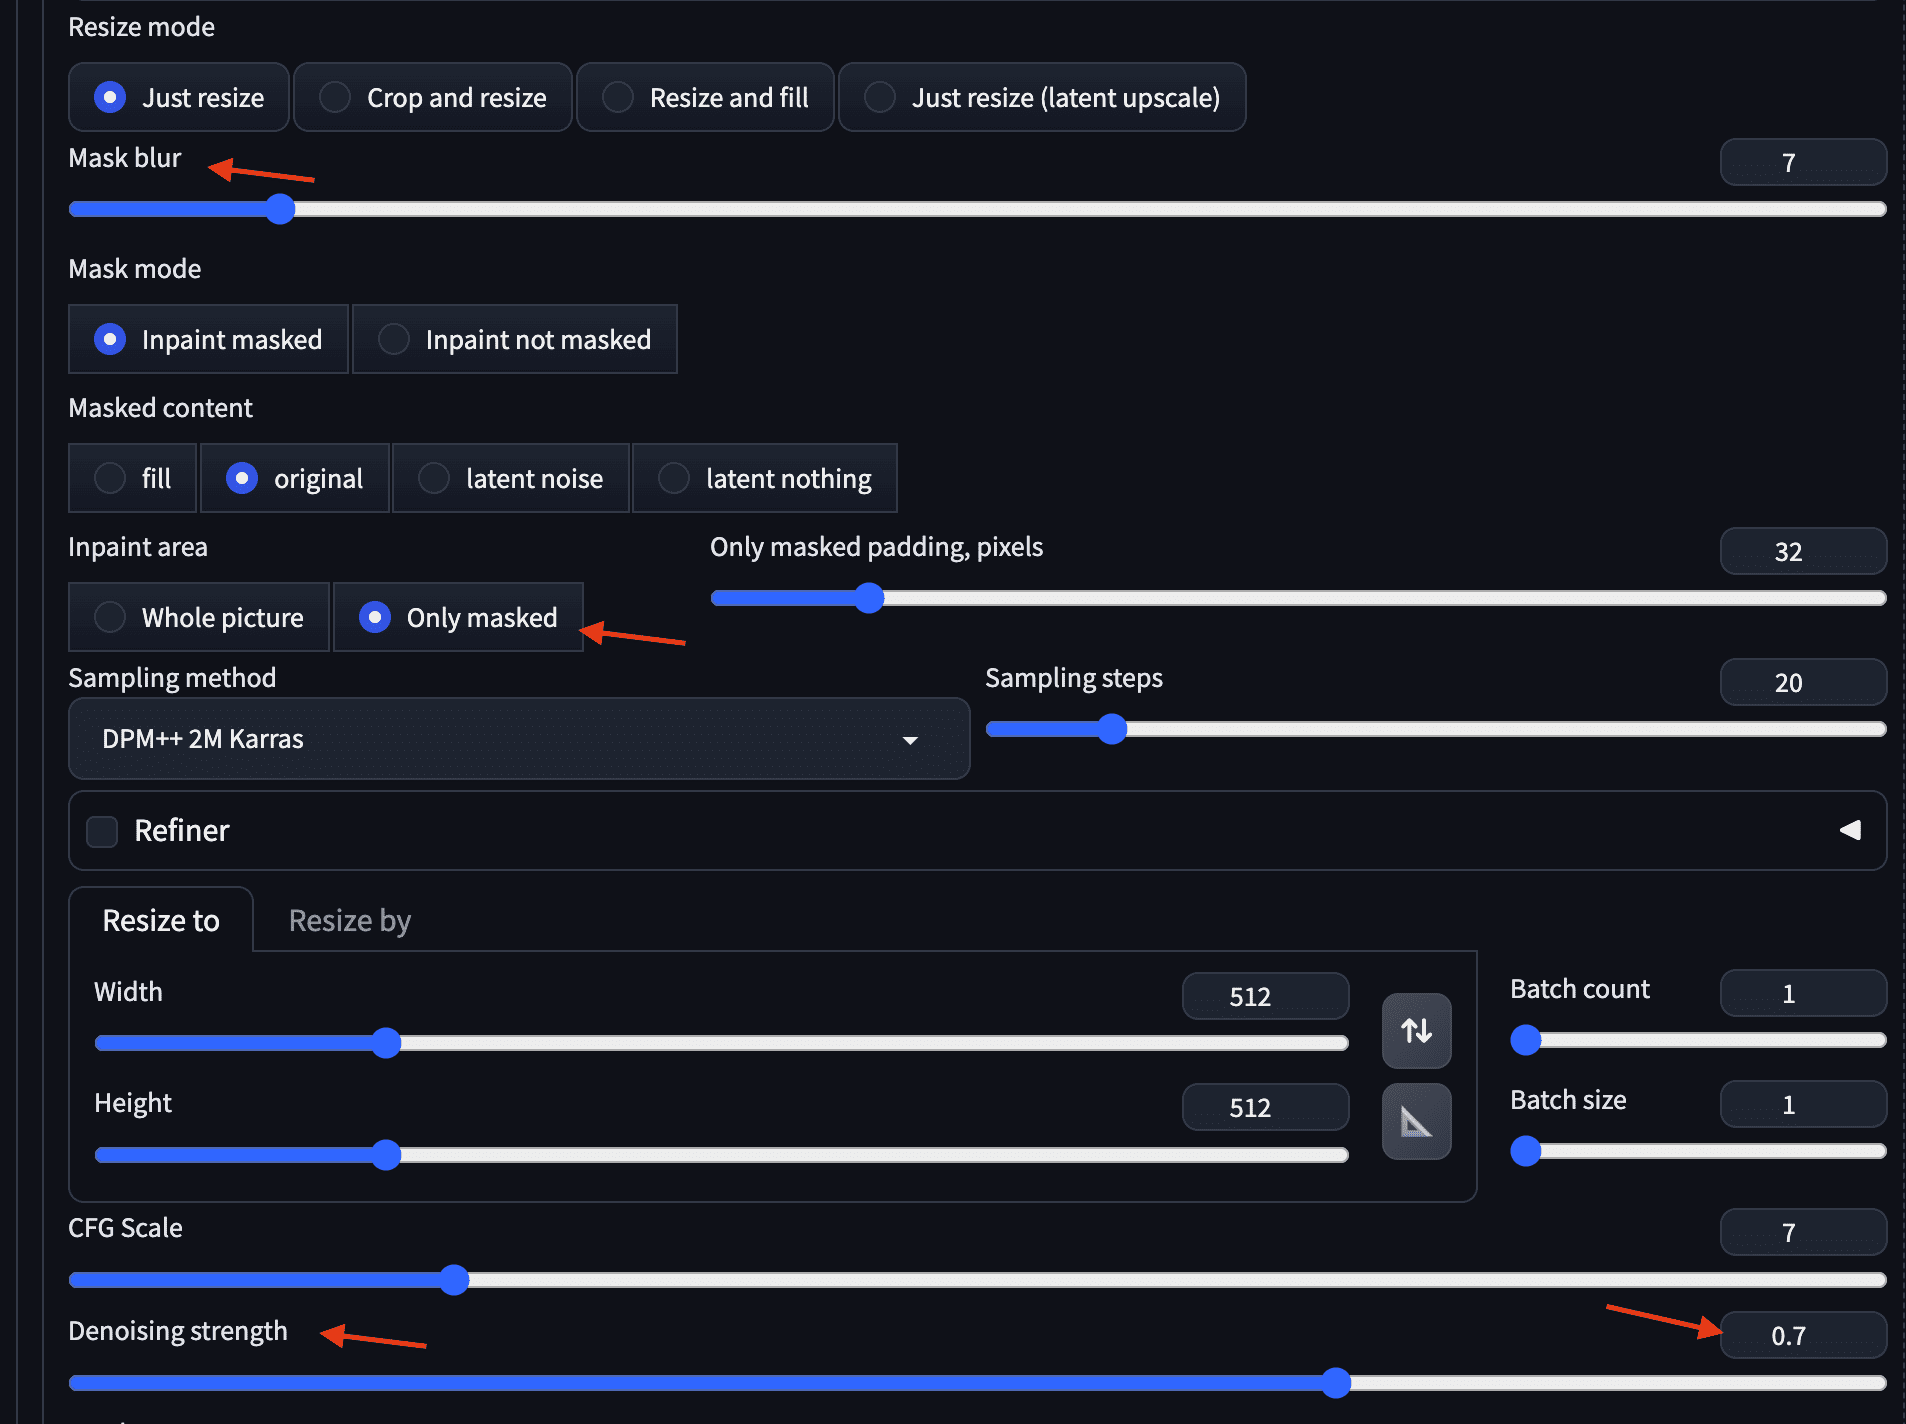
Some useful parameters for inpainting
A more advanced version of inpainting is inpaint sketch. While inpainting, you create a mask and only the masked part of the image is regenerated based on the prompt. In inpaint sketch, you draw on the image with color pencils such that what you drew together with the prompt controls the output. As an example, the same reading glasses prompt generates a pair of glasses in red frame because the sketch was in red:
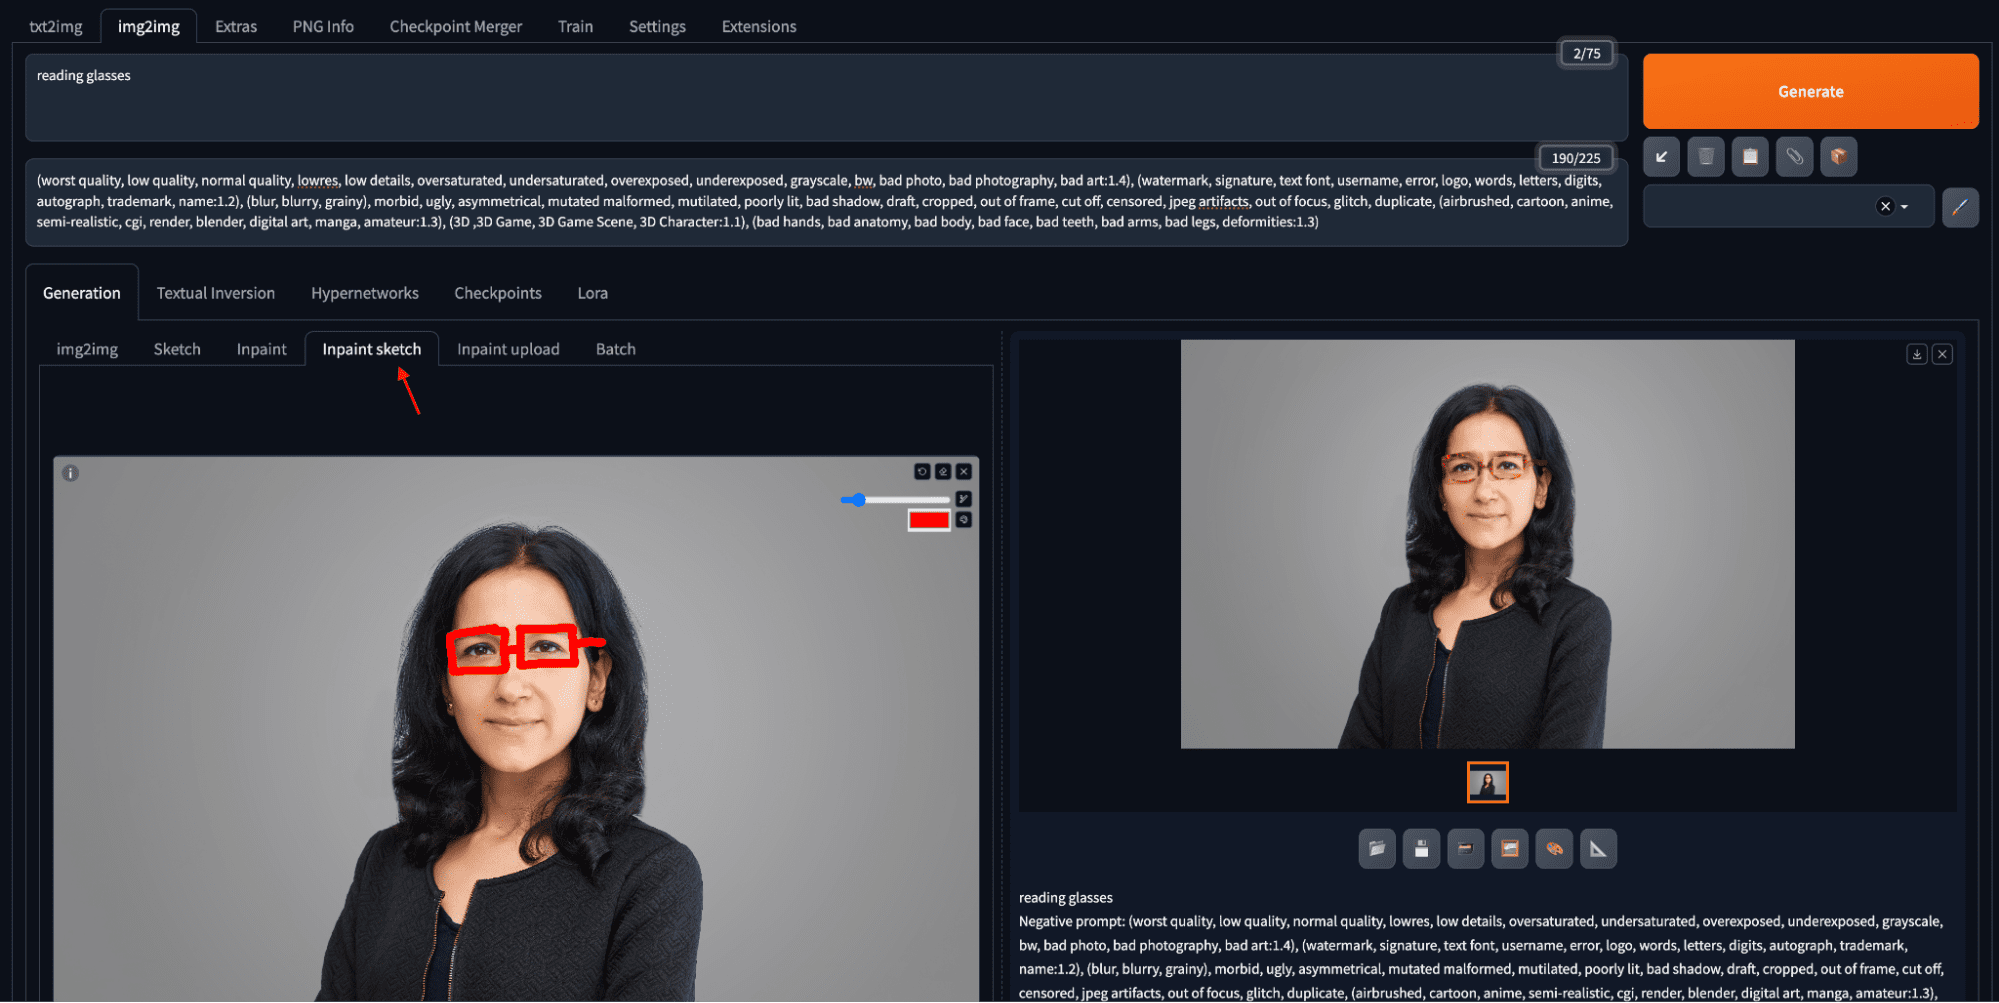
Reading glasses with red frame is creating using inpaint sketch
Other Functions
As you already noticed, the web UI has more than txt2img and img2img. In fact, you can add more features to the web UI by installing extensions. In the following, some of the top-level tabs are:
- Extras Tab: It allow you to provide an image for resizing. Technically, you are invoking only the superresolution step of the pipeline.
- PNG Info: If you generated an image and saved it as PNG file on your disk, the details of how this image was generated are stored in the EXIF data of the image. This tool helps to retrieve parameter values such as prompts and settings from the generated images that you upload.
- Settings Tab: A lot of settings can be adjusted in this tab, including the directory to models and outputs. One of the most useful setting is “Face restoration”. This feature applies an additional model designed to restore defects on faces. Users can select a face restoration model in the Settings tab and apply it to every generated image in the txt2img tab. Adjustments to the CodeFormer weight parameter can fine-tune the restoration effect.
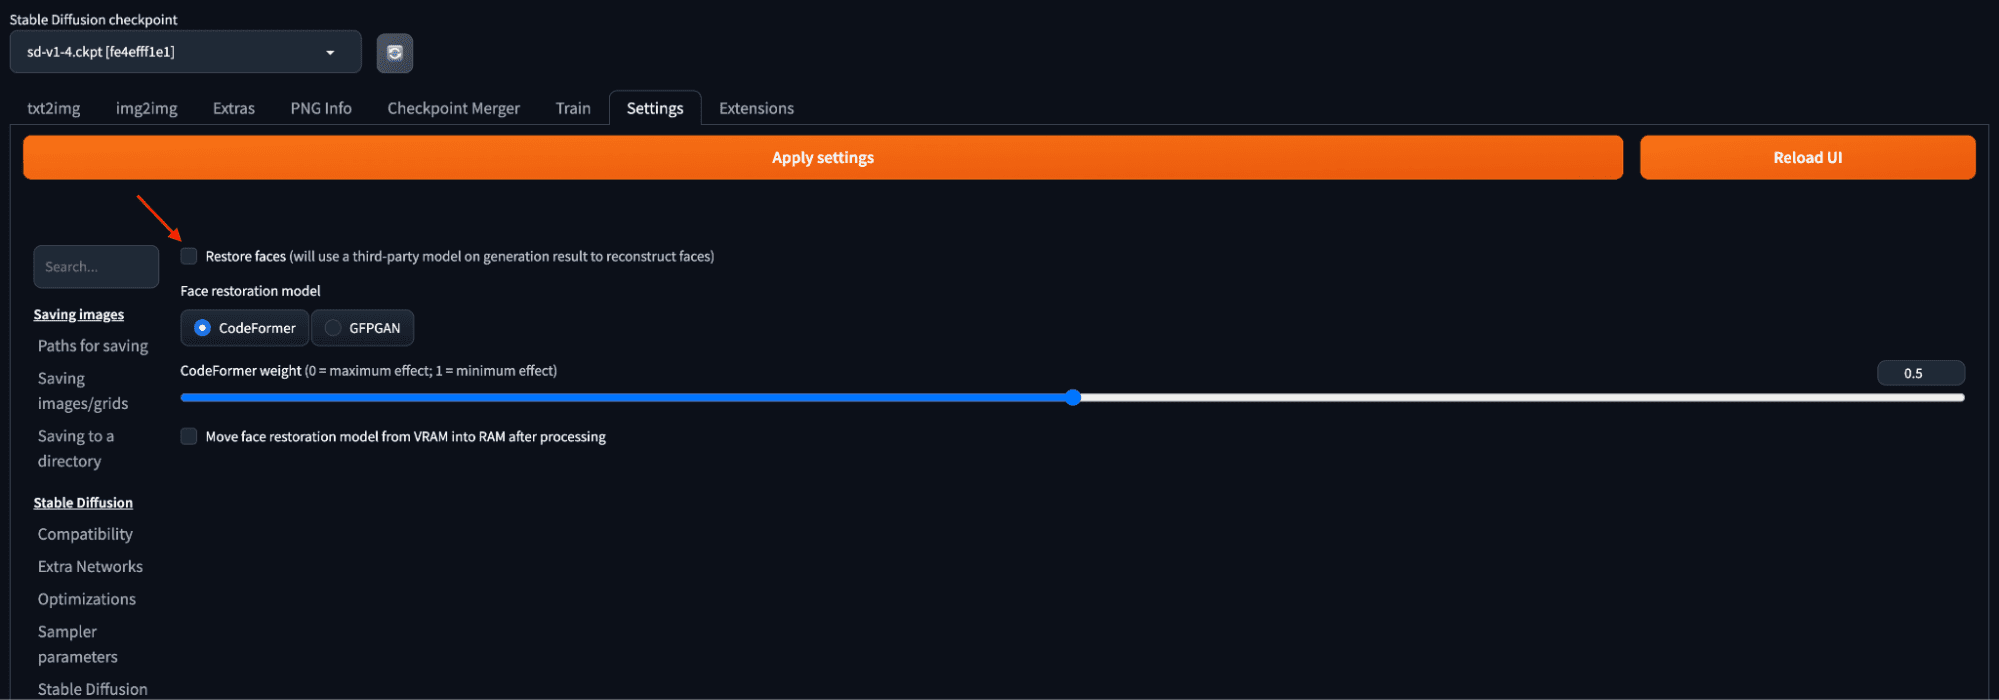
Face restoration settings using CodeFormer model.
Further Readings
The best resources for learning about the web UI is the wiki page of the tool on GitHub:
Summary
In this post, you learned how to invoke the Stable Diffusion Web UI from your browser.
While Stable Diffusion is such a powerful tool, it still lacks precise control over certain attributes of the output. It faces issues surrounding degraded image quality and inaccurate colors in certain scenarios. You should bear in mind of its limitation when you use it. The world of AI-generated imagery is getting better each day and faster than ever. In the next post, let us understand some powerful prompting techniques to stretch the limits of the generated images.
Get Started on Mastering Digital Art with Stable Diffusion!
Learn how to make Stable Diffusion work for you
...by learning some key elements in the image generation process
Discover how in my new Ebook:
Mastering Digital Art with Stable Diffusion
This book offers self-study tutorials complete with all the working code in Python, guiding you from a novice to an expert in image generation. It teaches you how to set up Stable Diffusion, fine-tune models, automate workflows, adjust key parameters, and much more...all to help you create stunning digital art.


No comments yet.