Transformer is a recent breakthrough in neural machine translation. Natural languages are complicated. A word in one language can be translated into multiple words in another, depending on the context. But what exactly a context is, and how you can teach the computer to understand the context was a big problem to solve. The invention of the attention mechanism solved the problem of how to encode a context into a word, or in other words, how you can present a word and its context together in a numerical vector. Transformer brings this to one level higher so that we can build a neural network for natural language translation using only the attention mechanism but no recurrent structure. This not only makes the network simpler, easier to train, and parallelizable in algorithm but also allows a more complicated language model to be built. As a result, we can see computer-translated sentences almost flawlessly.
Indeed, such a powerful deep learning model is not difficult to build. In TensorFlow and Keras, you have almost all the building blocks readily available, and training a model is only a matter of several hours. It is fun to see a transformer model built and trained. It is even more fun to see a trained model to translate sentences from one language to another.
In this crash course, you will build a transformer model in the similar design as the original research paper.
This is a big and important post. You might want to bookmark it.
Let’s get started.
Building Transformer Models with Attention (12-day Mini-Course). Photo by Norbert Braun, some rights reserved.
Who Is This Crash-Course For?
Before you get started, let’s make sure you are in the right place.
This course is for developers who are already familiar with TensorFlow/Keras. The lessons in this course do assume a few things about you, such as:
You know how to build a custom model, including the Keras functional API
You know how to train a deep learning model in Keras
You know how to use a trained model for inference
You do NOT need to be:
A natural language processing expert
A speaker of many languages
This crash course can help you get a deeper understanding of what a transformer model is and what it can do.
This crash course assumes you have a working TensorFlow 2.10 environment installed. If you need help with your environment, you can follow the step-by-step tutorial here:
You could complete one lesson per day (recommended) or complete all of the lessons in one day (hardcore). It really depends on the time you have available and your level of enthusiasm.
Below is a list of the 12 lessons that will get you started and learn about the construction of a transformer model.
Lesson 01: Obtaining Data
Lesson 02: Text Normalization
Lesson 03: Vectorization and Making Datasets
Lesson 04: Positional Encoding Matrix
Lesson 05: Positional Encoding Layer
Lesson 06: Transformer Building Blocks
Lesson 07: Transformer Encoder and Decoder
Lesson 08: Building a Transformer
Lesson 09: Preparing the Transformer Model for Training
Lesson 10: Training the Transformer
Lesson 11: Inference from the Transformer Model
Lesson 12: Improving the Model
Each lesson could take you between 15 and up to 60 minutes. Take your time and complete the lessons at your own pace. Ask questions, and even post results in the comments online.
The lessons might expect you to go off and find out how to do things. This guide will give you hints, but even if you just follow the code in the lesson, you can finish a transformer model that works quite well.
Post your results in the comments; I’ll cheer you on!
Hang in there; don’t give up.
Lesson 01: Obtaining Data
As you are building a neural machine translator, you need data for training and testing. Let’s build a sentence-based English-to-French translator. There are many resources on the Internet. An example would be the user-contributed data for the flash card app Anki. You can download some data files at https://ankiweb.net/shared/decks/french. The data file would be a ZIP file containing a SQLite database file, from which you can extract the English-French sentence pairs.
However, you may find it more convenient to have a text file version, which you can find it at https://www.manythings.org/anki/. Google hosts a mirror of this file as
well, which we will be using.
The code below will download the compressed data file and extract it:
1
2
3
4
5
6
7
8
9
10
11
12
13
import pathlib
import tensorflow astf
# download dataset provided by Anki: https://www.manythings.org/anki/
Try to run the above code and open the file extracted. You should verify that the format of each line is like the above.
In the next lesson, you will process this file and prepare the dataset suitable for training and testing.
Lesson 02: Text Normalization
Just like all NLP tasks, you need to normalize the text before you use it. French letters have accents which would be represented as Unicode characters, but such representation is not unique in Unicode. Therefore, you will convert the string into NFKC (compatibility and composition normal form).
Next, you will tokenize the sentences. Each word should be a separate token as well as each punctuation mark. However, the punctuation used in contractions such as don’t, va-t-il, or c’est are not separated from the words. Also, convert everything into lowercase in the expectation that this will reduce the number of distinct words in the vocabulary.
Normalization and tokenization can go a lot deeper, such as subword tokenization, stemming, and lemmatization. But to keep things simple, you do not do these in this project.
Starting from scratch, the code to normalize the text is below. You will use the Python module unicodedata to convert a Unicode string into NFKC normal form. Then you will use regular expression to add space around punctuation marks. Afterward, you will wrap the French sentences (i.e., the target language) with sentinels [start] and [end]. You will see the purpose of the sentinels in later lessons.
1
2
3
4
5
6
7
8
9
10
11
12
13
14
15
16
17
18
19
20
21
22
23
24
25
26
27
28
29
30
31
32
33
34
35
36
37
import pathlib
import pickle
import random
import re
import unicodedata
import tensorflow astf
# download dataset provided by Anki: https://www.manythings.org/anki/
# normalize each line and separate into English and French
with open(text_file)asfp:
text_pairs=[normalize(line)forline infp]
# print some samples
for_inrange(5):
print(random.choice(text_pairs))
with open("text_pairs.pickle","wb")asfp:
pickle.dump(text_pairs,fp)
When you run this, you should see the result from a few samples, such as these:
1
2
3
4
5
('where did you put your key ?', '[start] où est-ce tu as mis ta clé ? [end]')
('you missed a spot .', '[start] tu as loupé une tache . [end]')
("i think we're being followed .", '[start] je pense que nous sommes suivis . [end]')
('i bought a cactus .', "[start] j'ai acheté un cactus . [end]")
('i have more than enough .', "[start] j'en ai plus que marre . [end]")
We saved the normalized sentence pairs in a pickle file, so we can reuse it in subsequent steps.
When you use it for your model, you want to know some statistics about this dataset. In particular, you want to see how many distinct tokens (words) in each language and how long the sentences are. You can figure these out as follows:
1
2
3
4
5
6
7
8
9
10
11
12
13
14
15
16
17
18
19
import pickle
with open("text_pairs.pickle","rb")asfp:
text_pairs=pickle.load(fp)
# count tokens
eng_tokens,fra_tokens=set(),set()
eng_maxlen,fra_maxlen=0,0
foreng,fra intext_pairs:
eng_tok,fra_tok=eng.split(),fra.split()
eng_maxlen=max(eng_maxlen,len(eng_tok))
fra_maxlen=max(fra_maxlen,len(fra_tok))
eng_tokens.update(eng_tok)
fra_tokens.update(fra_tok)
print(f"Total English tokens: {len(eng_tokens)}")
print(f"Total French tokens: {len(fra_tokens)}")
print(f"Max English length: {eng_maxlen}")
print(f"Max French length: {fra_maxlen}")
print(f"{len(text_pairs)} total pairs")
Your Task
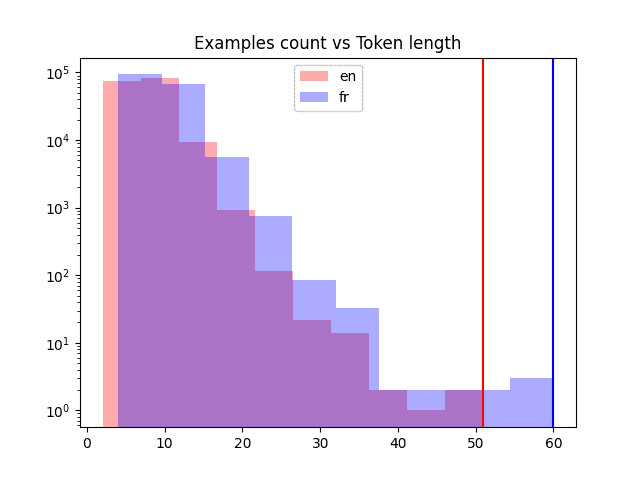
Run the above code. See not only the sample sentences but also the statistics you collected. Remember the output as they will be useful for your next lesson. Besides, knowing the maximum length of sentences is not as useful as knowing their distribution. You should plot a histogram for that. Try out this to produce the following chart:
In the next lesson, you will vectorize this normalized text data and create datasets.
Lesson 03: Vectorization and Making Datasets
In the previous lesson, you cleaned up the sentences, but they are still text. Neural networks can handle only numbers. One way to convert the text into numbers is through vectorization. What this means is to transform the tokens from the text into an integer. Hence a sentence with $n$ tokens (words) will become a vector of $n$ integers.
You can build your own vectorizer. Simply build a mapping table of each unique token to a unique integer. When it is used, you look up the token one by one in the table and return the integers in the form of a vector.
In Keras, you have TextVectorization layer to save us the effort of building a vectorizer. It supports padding, i.e., integer 0 is reserved to mean “empty.” This is useful when you give a sentence of $m < n$ tokens but want the vectorizer always to return a fixed length $n$ vector.
You will first split the sentence pair into training, validation, and testing sets as you need them for the model training. Then, create a TextVectorization layer and adapt it to the training set only (because you should not peek into the validation or testing dataset until the model training is completed).
1
2
3
4
5
6
7
8
9
10
11
12
13
14
15
16
17
18
19
20
21
22
23
24
25
26
27
28
29
30
31
32
33
34
35
36
37
38
39
40
41
42
43
44
45
46
47
48
49
50
51
52
53
54
55
56
import pickle
import random
from tensorflow.keras.layers import TextVectorization
# Load normalized sentence pairs
with open("text_pairs.pickle","rb")asfp:
text_pairs=pickle.load(fp)
# train-test-val split of randomized sentence pairs
random.shuffle(text_pairs)
n_val=int(0.15*len(text_pairs))
n_train=len(text_pairs)-2*n_val
train_pairs=text_pairs[:n_train]
val_pairs=text_pairs[n_train:n_train+n_val]
test_pairs=text_pairs[n_train+n_val:]
# Parameter determined after analyzing the input data
vocab_size_en=10000
vocab_size_fr=20000
seq_length=20
# Create vectorizer
eng_vectorizer=TextVectorization(
max_tokens=vocab_size_en,
standardize=None,
split="whitespace",
output_mode="int",
output_sequence_length=seq_length,
)
fra_vectorizer=TextVectorization(
max_tokens=vocab_size_fr,
standardize=None,
split="whitespace",
output_mode="int",
output_sequence_length=seq_length+1
)
# train the vectorization layer using training dataset
train_eng_texts=[pair[0]forpair intrain_pairs]
train_fra_texts=[pair[1]forpair intrain_pairs]
eng_vectorizer.adapt(train_eng_texts)
fra_vectorizer.adapt(train_fra_texts)
# save for subsequent steps
with open("vectorize.pickle","wb")asfp:
data={
"train":train_pairs,
"val":val_pairs,
"test":test_pairs,
"engvec_config":eng_vectorizer.get_config(),
"engvec_weights":eng_vectorizer.get_weights(),
"fravec_config":fra_vectorizer.get_config(),
"fravec_weights":fra_vectorizer.get_weights(),
}
pickle.dump(data,fp)
Note that the parameter max_tokens to TextVectorization object can be omitted to let the vectorizer figure it out. But if you set them to a value smaller than the total vocabulary (such as this case), you limit the the vectorizer to learn only the more frequent words and make the rare words as out-of-vocabulary (OOV). This may be useful to skip the words of little value or with spelling mistakes. You also fix the output length of the vectorizer. We assumed that a sentence should have no more than 20 tokens in the above.
The next step would be to make use of the vectorizer and create a TensorFlow Dataset object. This will be helpful in your later steps to train our model.
1
2
3
4
5
6
7
8
9
10
11
12
13
14
15
16
17
18
19
20
21
22
23
24
25
26
27
28
29
30
31
32
33
34
35
36
37
38
39
40
41
42
43
44
45
46
47
48
49
50
51
52
53
54
55
56
57
58
import pickle
import tensorflow astf
from tensorflow.keras.layers import TextVectorization
The exact vector may not be the same, but you should see that the shape should all be (batch size, sequence length). Some code above is borrowed from the tutorial by François Chollet, English-to-Spanish translation with a sequence-to-sequence Transformer. You may also want to see how his implementation of transformer is different from this mini-course.
In the next lesson, you will move to the topic of position encoding.
Lesson 04: Positional Encoding Matrix
When a sentence is vectorized, you get a vector of integers, where each integer represents a word. The integer here is only a label. We cannot assume two integers closer to each other means the words they represent are related.
In order to understand the meaning of words and hence quantify how two words are related to each other, you will use the technique word embeddings. But to understand the context, you also need to know the position of each word in a sentence. This is done by positional encoding.
In the paper Attention Is All You Need, positional encoding represents each token position with a vector. The elements of the vector are values of the different phase and frequency of sine waves. Precisely, at position $k=0, 1, \cdots, L-1$, the positional encoding vector (of length $d$) is
Implementing the positional encoding is not difficult, especially if you can use vector functions from NumPy.
1
2
3
4
5
6
7
8
9
10
11
12
13
14
15
16
17
18
19
20
21
22
23
24
25
26
27
28
29
30
31
32
33
34
35
36
37
38
39
40
41
import pickle
import matplotlib.pyplot asplt
import numpy asnp
def pos_enc_matrix(L,d,n=10000):
"""Create positional encoding matrix
Args:
L: Input dimension (length)
d: Output dimension (depth), even only
n: Constant for the sinusoidal functions
Returns:
numpy matrix of floats of dimension L-by-d. At element (k,2i) the value
is sin(k/n^(2i/d)) while at element (k,2i+1) the value is cos(k/n^(2i/d))
"""
assertd%2==0,"Output dimension needs to be an even integer"
d2=d//2
P=np.zeros((L,d))
k=np.arange(L).reshape(-1,1)# L-column vector
i=np.arange(d2).reshape(1,-1)# d-row vector
denom=np.power(n,-i/d2)# n**(-2*i/d)
args=k *denom# (L,d) matrix
P[:,::2]=np.sin(args)
P[:,1::2]=np.cos(args)
returnP
# Plot the positional encoding matrix
pos_matrix=pos_enc_matrix(L=2048,d=512)
assertpos_matrix.shape==(2048,512)
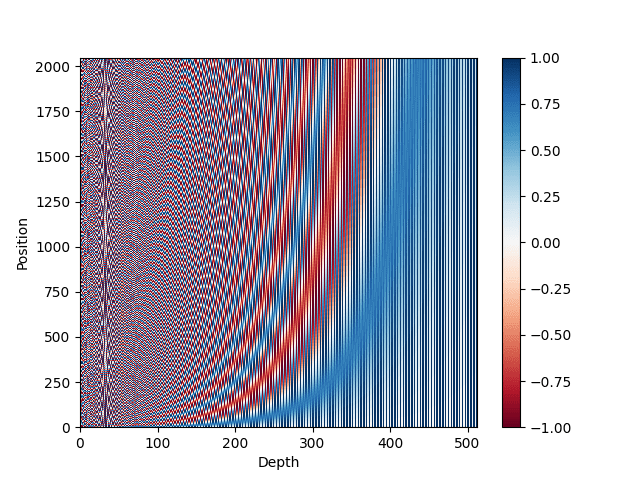
plt.pcolormesh(pos_matrix,cmap='RdBu')
plt.xlabel('Depth')
plt.ylabel('Position')
plt.colorbar()
plt.show()
with open("posenc-2048-512.pickle","wb")asfp:
pickle.dump(pos_matrix,fp)
You can see that we created a function to generate the positional encoding. We tested it out with $L=2048$ and $d=512$ above. The output would be a $2048\times 512$ matrix. We also plot the encoding in a heatmap. This should look like the following.
Heatmap representation of the positional encoding matrix
Your Task
The heatmap above may not be very appealing to you. A better way to visualize it is to separate the sine curves from the cosine curves. Try out the code below to reuse the pickled positional encoding matrix and obtain a clearer visualization:
1
2
3
4
5
6
7
8
9
10
11
12
13
14
15
import pickle
import matplotlib.pyplot asplt
import numpy asnp
with open("posenc-2048-512.pickle","rb")asfp:
pos_matrix=pickle.load(fp)
assertpos_matrix.shape==(2048,512)
# Plot the positional encoding matrix, alternative way
If you wish, you may check that the different “depth” in the matrix represents a sine curve of different frequency. An example to visualize them is the following:
1
2
3
4
5
...
plt.plot(pos_matrix[:,155],label="high freq")
plt.plot(pos_matrix[:,300],label="low freq")
plt.legend()
plt.show()
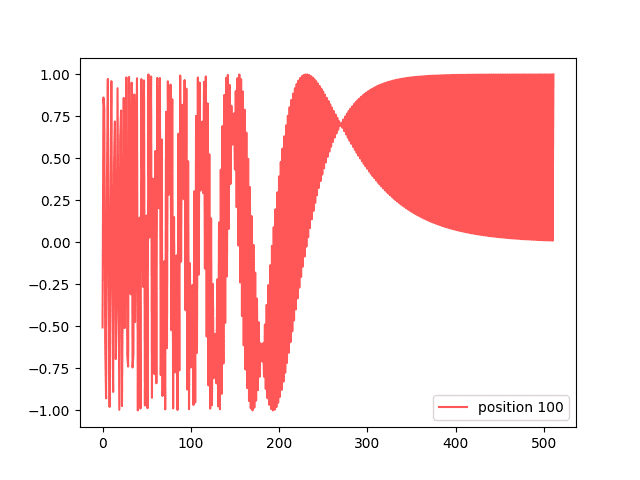
But if you visualize one “position” of the matrix, you see an interesting curve:
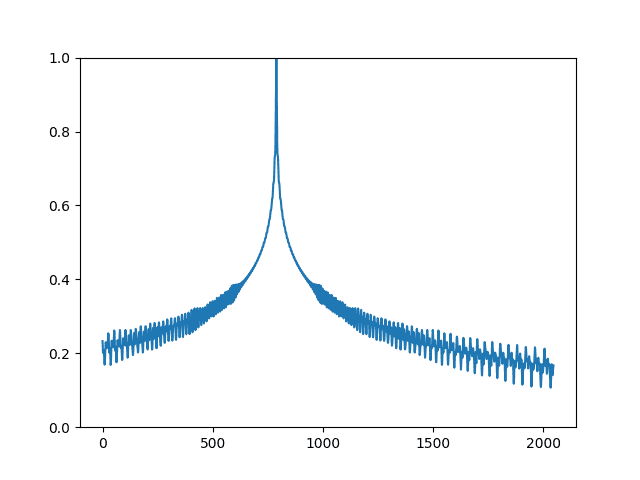
The encoding matrix is useful in the sense that, when you compare two encoding vectors, you can tell how far apart their positions are. The dot-product of two normalized vectors is 1 if they are identical and drops quickly as they move apart. This relationship can be visualized below:
1
2
3
4
5
6
7
8
9
10
11
12
13
14
15
16
import pickle
import matplotlib.pyplot asplt
import numpy asnp
with open("posenc-2048-512.pickle","rb")asfp:
pos_matrix=pickle.load(fp)
assertpos_matrix.shape==(2048,512)
# Show the dot product between different normalized positional vectors
The positional encoding layer is at the entry point of a transformer model. However, the Keras library does not provide us one. You can create a custom layer to implement the positional encoding, as follows.
1
2
3
4
5
6
7
8
9
10
11
12
13
14
15
16
17
18
19
20
21
22
23
24
25
26
27
28
29
30
31
32
33
34
35
36
37
38
39
40
41
42
43
44
45
46
47
48
49
50
51
52
53
54
55
56
57
58
59
60
61
62
63
64
65
66
67
68
import numpy asnp
import tensorflow astf
def pos_enc_matrix(L,d,n=10000):
"""Create positional encoding matrix
Args:
L: Input dimension (length)
d: Output dimension (depth), even only
n: Constant for the sinusoidal functions
Returns:
numpy matrix of floats of dimension L-by-d. At element (k,2i) the value
is sin(k/n^(2i/d)) while at element (k,2i+1) the value is cos(k/n^(2i/d))
"""
assertd%2==0,"Output dimension needs to be an even integer"
d2=d//2
P=np.zeros((L,d))
k=np.arange(L).reshape(-1,1)# L-column vector
i=np.arange(d2).reshape(1,-1)# d-row vector
denom=np.power(n,-i/d2)# n**(-2*i/d)
args=k *denom# (L,d) matrix
P[:,::2]=np.sin(args)
P[:,1::2]=np.cos(args)
returnP
classPositionalEmbedding(tf.keras.layers.Layer):
"""Positional embedding layer. Assume tokenized input, transform into
embedding and returns positional-encoded output."""
# to make save and load a model using custom layer possible
config=super().get_config()
config.update({
"sequence_length":self.sequence_length,
"vocab_size":self.vocab_size,
"embed_dim":self.embed_dim,
})
returnconfig
This layer is indeed combining an embedding layer with position encoding. The embedding layer creates word embeddings, namely, converting an integer token label from the vectorized sentence into a vector that can carry the meaning of the word. With the embedding, you can tell how close in meaning the two different words are.
The embedding output depends on the tokenized input sentence. But the positional encoding is a constant matrix as it depends only on the position. Hence you create a constant tensor for that at the time you created this layer. TensorFlow is smart enough to match the dimensions when you add the embedding output to the positional encoding matrix, in the call() function.
Two additional functions are defined in the layer above. The compute_mask() function is passed on to the embedding layer. This is needed to tell which positions of the output are padded. This will be used internally by Keras. The get_config() function is defined to remember all the config parameters of this layer. This is a standard practice in Keras so that you remember all the parameters you passed on to the constructor and return them in get_config(), so the model can be saved and loaded.
Your Task
Combine the above code together with the dataset train_ds created in Lesson 03 and the code snippet below:
You can see that the first tensor printed above is one batch (64 samples) of the vectorized input sentences, padded with zero to length 20. Each token is an integer but will be converted into an embedding of dimension 512. Hence the shape of en_emb above is (64, 20, 512).
The last tensor printed above is the mask used. This essentially matches the input where the position is not zero. When you compute the accuracy, you have to remember the padded locations should not be counted.
In the next lesson, you will complete the other building block of the transformer model.
Lesson 06: Transformer Building Blocks
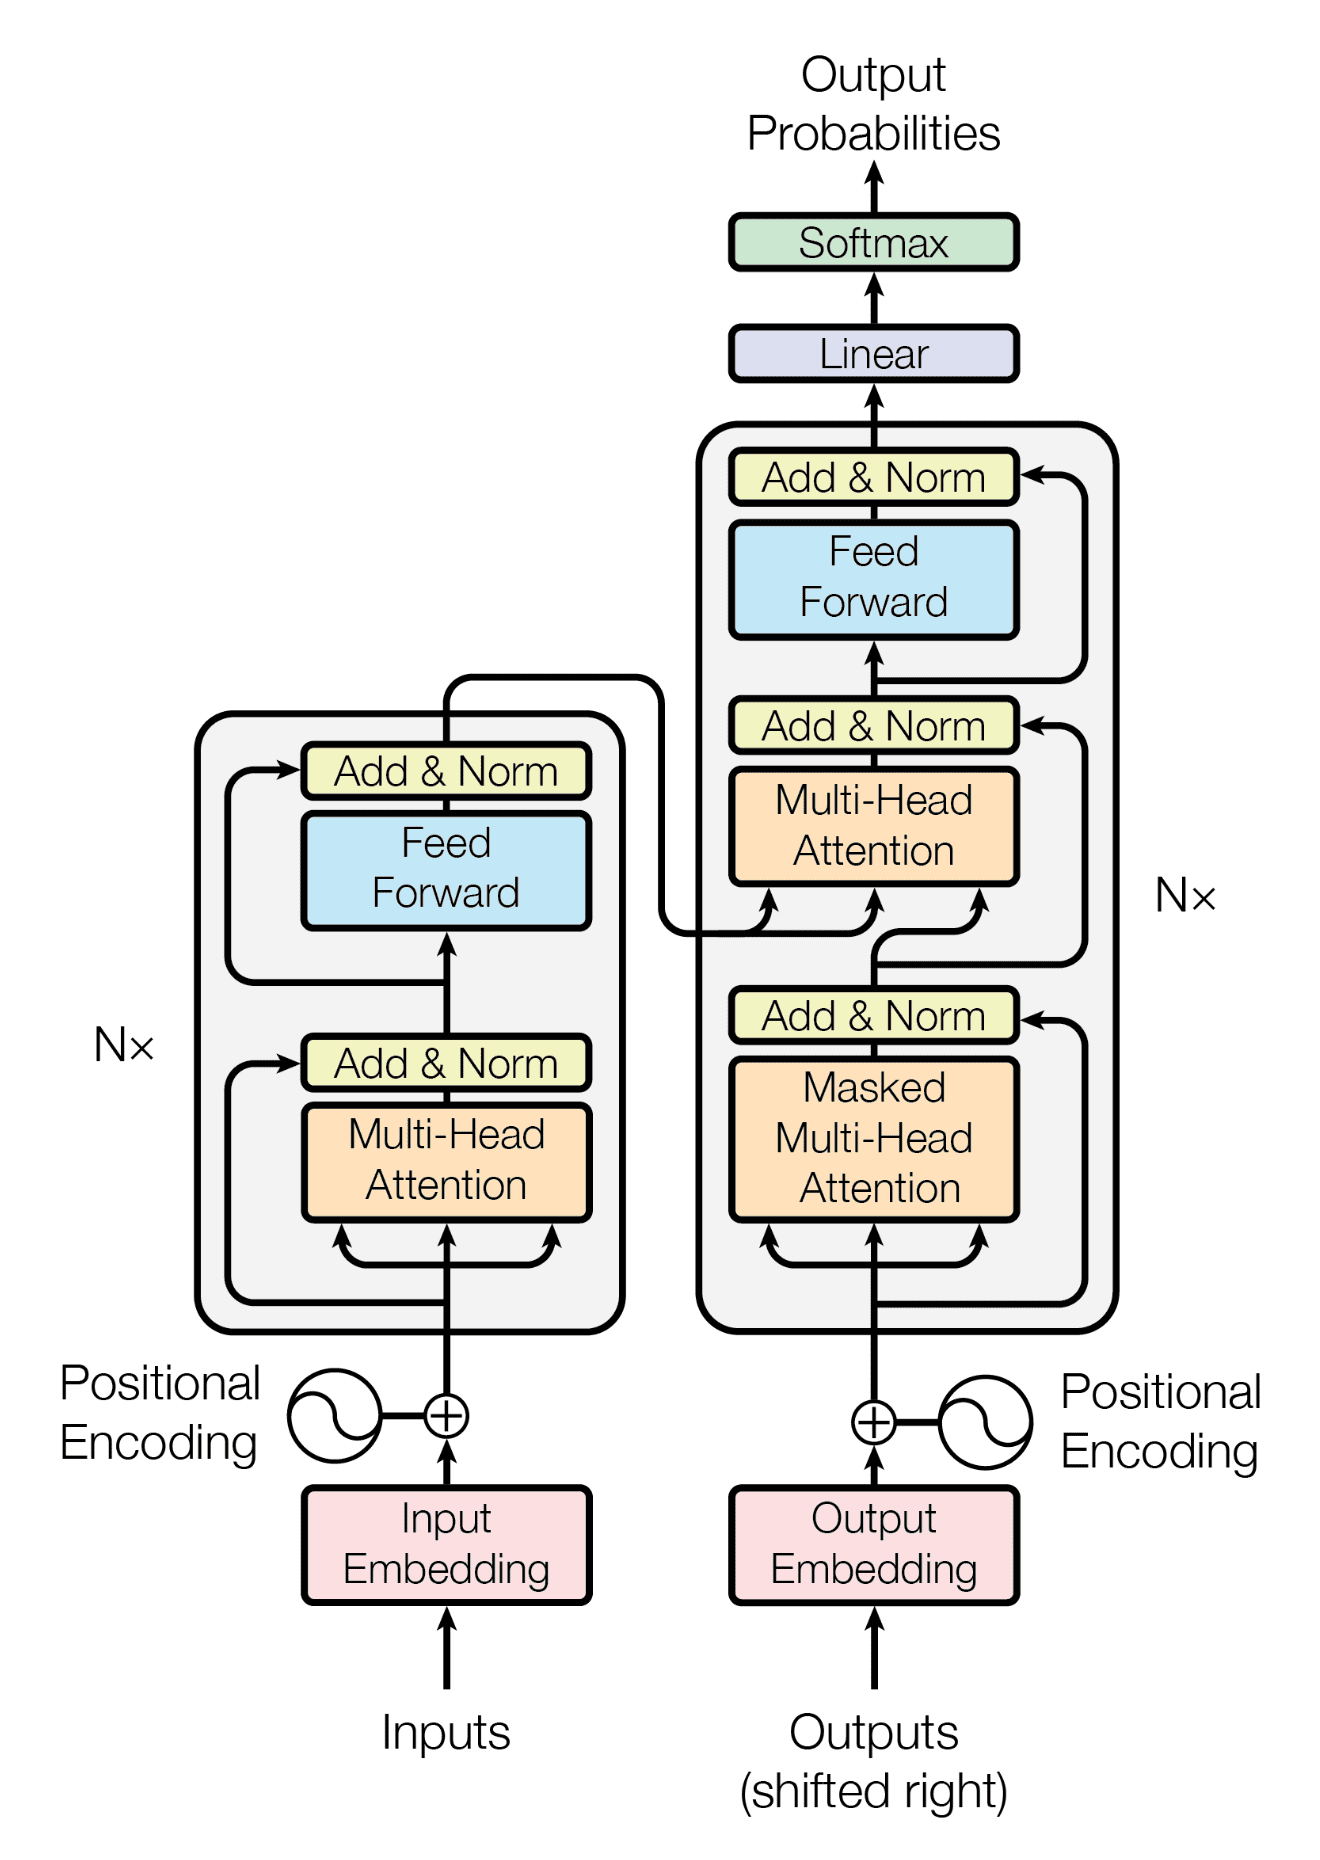
Reviewing the diagram of transformer in Lesson 05, you will see that beyond the embedding and positional encoding, you have the encoder (left half of the figure) and decoder (right half of the figure). They share some similarities. Most notably, they have a multi-head attention block at the beginning and a feed forward block at the end.
It would be easier if you create each building block as separate submodels and later combine them into a bigger model.
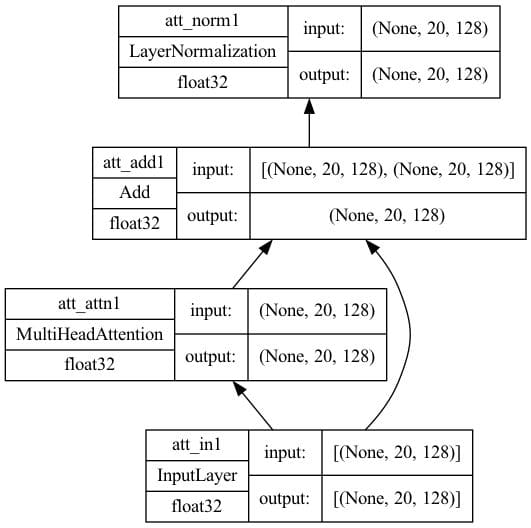
First, you create the self-attention model. It is in the part of the diagram that is at the bottom of both encoder and decoder. A multi-head attention layer will take three inputs, namely, the key, the value, and the query. If all three inputs are the same, we call this multi-head attention layer self-attention. This submodel will have an add & norm layer with skip connection to normalize the output of the attention layer. Its implementation is as follows:
The function defined above is generic for both encoder and decoder. The decoder will set the option mask=True to apply causal mask to the input.
Set some parameters and create a model. The model plotted would look like the following.
Self-attention architecture with key dimension=128
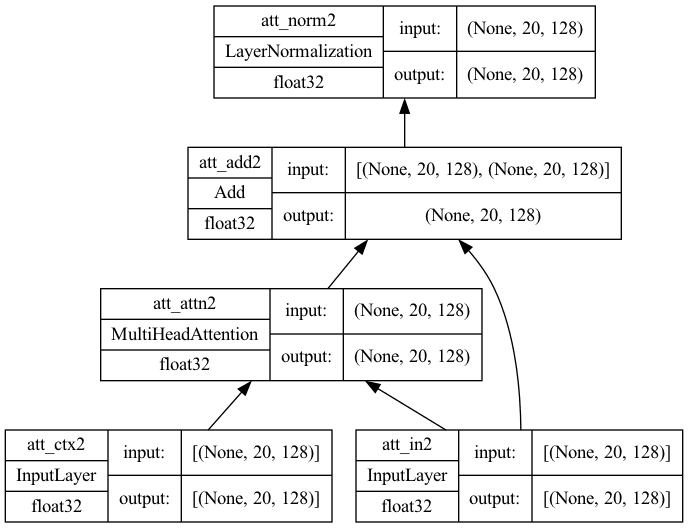
In the decoder, you have a cross-attention model that takes input from the self-attention model as well as the encoder. In this case, the value and key are the output from the encoder whereas the query is the output from the self-attention model. At the high level, it is based on what the encoder understands about the context of the source sentence, and takes the partial sentence at the decoder’s input as the query (which can be empty), to predict how to complete the sentence. This is the only difference from the self-attention model; hence the code is very similar:
The model plotted would look like the following. Note that there are two inputs in this model, one for the context and another for the input from self-attention.
Cross-attention architecture with key dimension=128
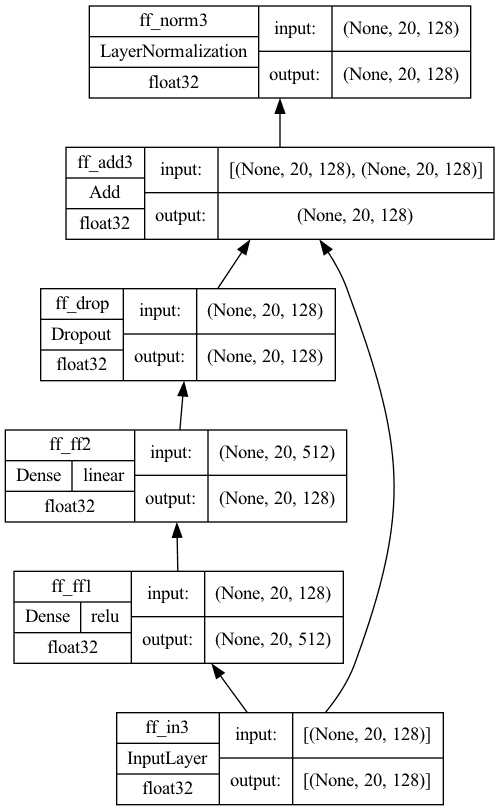
Finally, there are feed forward models at the output of both encoder and decoder. It is implemented as Dense layers in Keras:
The model plotted would look like the following. Note that the first Dense layer uses ReLU activation and the second has no activation. A dropout layer is then appended for regularization.
Feed-forward submodel
Your Task
Run the above code and verify you see the same model diagram. It is important you match the layout as the final transformer model depends on them.
In the code above, Keras functional API is used. In Keras, you can build a model using sequential API, functional API, or subclass the Model class. Subclassing can also be used here, but sequential API cannot. Can you tell why?
In the next lesson, you will make use of these building block to create the encoder and decoder.
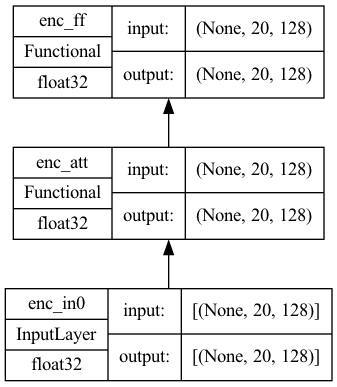
Lesson 07: Transformer Encoder and Decoder
Look again at the diagram of the transformer in Lesson 05. You will see that the encoder is the self-attention submodel connected to the feed-forward submodel. The decoder, on the other hand, is a self-attention submodel, a cross-attention submodel, and a feed-forward submodel connected in tandem.
Making an encoder and a decoder is therefore not difficult once you have these submodels as building blocks. Firstly, you have the encoder. It is simple enough that you can build an encoder model using Keras sequential API.
Plotting the model would see that it is simple as the following:
Encoder submodel
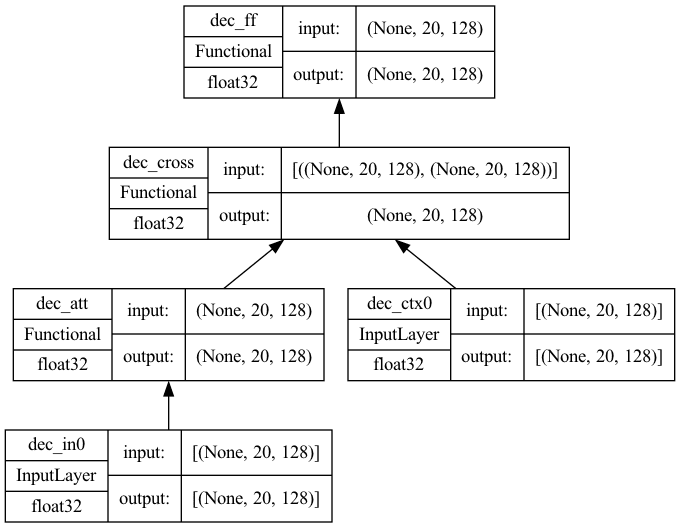
The decoder is a bit complicated because the cross-attention block takes input from the encoder as well; hence it is a model that takes two input. It is implemented as follows:
1
2
3
4
5
6
7
8
9
10
11
12
13
14
15
16
17
18
19
20
21
22
23
24
25
26
27
28
29
30
31
32
33
34
35
import tensorflow astf
# the three building block functions from Lesson 06
from lesson_06 import self_attention,cross_attention,feed_forward
Copy over the three building block functions from Lesson 06 and run the above code to make sure you see the same layout as shown, in both the encoder and decoder.
In the next lesson, you will complete the transformer model with the building block you have created so far.
Lesson 08: Building a Transformer
Indeed, a transformer has encoder and decoder parts, and each part is not one but a series of encoders or decoders. It sounds complicated but not if you have the building block submodels to hide the details.
Refer to the figure in Lesson 05, and you see the encoder and decoder parts are just a chain of encoder and decoder blocks. Only the output of the final encoder block is used as input to the decoder blocks.
Therefore, the complete transformer model can be built as follows:
The try–except block in the code is to handle a bug in certain versions of TensorFlow that may cause the training error calculated erroneously. The model plotted above would be like the following. Not very simple, but the architecture is still tractable.
Transformer with 4 layers in encoder and 4 layers in decoder
Your Task
Copy over the three building block functions from Lessons 05, 06, and 07, so you can run the above code and generate the same diagram. You will reuse this model in the subsequent lessons.
In the next lesson, you will set up the other training parameters for this model.
Lesson 09: Prepare the Transformer Model for Training
Before you can train your transformer, you need to decide how you should train it.
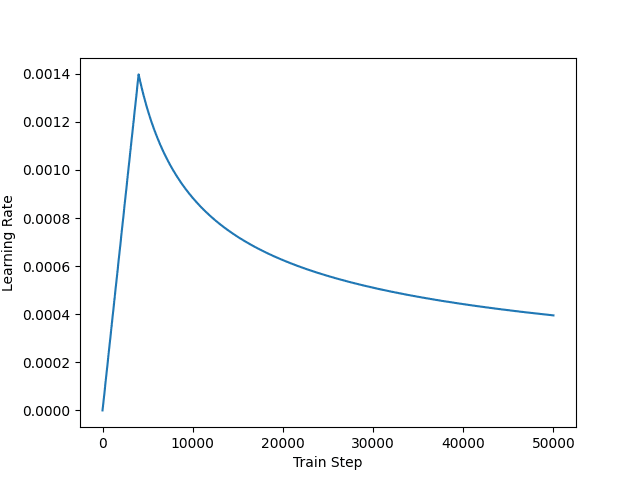
According to the paper Attention Is All You Need, you are using Adam as the optimizer but with a custom learning rate schedule,
The learning rate schedule is designed in such a way that it learns slowly at the beginning but accelerates as it learns. This helps because the model is totally random at the beginning, and you cannot even trust the output much. But as you train the model enough, the result should be sufficiently sensible and thus you can learn faster to help convergence. The learning rate as plotted would look like the following:
Customized learning rate schedule
Next, you also need to define the loss metric and accuracy metric for training. This model is special because you need to apply a mask to the output to calculate the loss and accuracy only on the non-padding elements. Borrow the implementation from TensorFlow’s tutorial Neural machine translation with a Transformer and Keras:
If you have implemented everything correctly, you should be able to provide all building block functions to make the above code run. Try to keep everything you made so far in one Python script or one Jupyter notebook and run it once to ensure no errors produced and no exceptions are raised.
If everything run smoothly, you should see the summary() above prints the following:
Moreover, when you look at the diagram of the transformer model and your implementation here, you should notice the diagram shows a softmax layer at the output, but we omitted that. The softmax is indeed added in this lesson. Do you see where is it?
In the next lesson, you will train this compiled model, on 14 million parameters as we can see in the summary above.
Lesson 10: Training the Transformer
Training the transformer depends on everything you created in all previous lessons. Most importantly, the vectorizer and dataset from Lesson 03 must be saved as they will be reused in this and the next lessons.
1
2
3
4
5
6
7
8
9
10
11
12
13
14
15
16
17
18
19
20
21
22
23
24
25
26
27
28
29
30
31
32
33
34
35
36
37
38
39
40
41
42
43
44
45
import matplotlib.pyplot asplt
import tensorflow astf
# the dataset objects from Lesson 03
from lesson_03 import train_ds,val_ds
# the building block functions from Lesson 08
from lesson_08 import transformer
# the learning rate schedule, loss, and accuracy functions from Lesson 09
from lesson_09 import CustomSchedule,masked_loss,masked_accuracy
Running this script will take several hours, but once it is finished, you will have the model saved and the loss and accuracy plotted. It should look like the following:
Loss and accuracy history from the training
Your Task
In the training set up above, we did not make use of the early stopping and checkpoint callbacks in Keras. Before you run it, try to modify the code above to add these callbacks.
The early stopping callback can help you interrupt the training when no progress is made. The checkpoint callback can help you keep the best-score model rather than return to you only the final model at the last epoch.
In the next lesson, you will load this trained model and test it out.
Lesson 11: Inference from the Transformer Model
In Lesson 03, you split the original dataset into training, validation, and test sets in the ratio of 70%-15%-15%. You used the training and validation dataset in the training of the transformer model in Lesson 10. And in this lesson, you are going to use the test set to see how good your trained model is.
You saved your transformer model in the previous lesson. Because you have some custom made layers and functions in the model, you need to create a custom object scope to load your saved model.
The transformer model can give you a token index. You need the vectorizer to look up the word that this index represents. You have to reuse the same vectorizer that you used in creating the dataset to maintain consistency.
Create a loop to scan the generated tokens. In other words, do not use the model to generate the entire translated sentence but consider only the next generated word in the sentence until you see the end sentinel. The first generated word would be the one generated by the start sentinel. It is the reason you processed the target sentences this way in Lesson 02.
The code is as follows:
1
2
3
4
5
6
7
8
9
10
11
12
13
14
15
16
17
18
19
20
21
22
23
24
25
26
27
28
29
30
31
32
33
34
35
36
37
38
39
40
41
42
43
44
45
46
47
48
49
50
51
52
53
54
55
56
import pickle
import random
import numpy asnp
import tensorflow astf
# the dataset objects from Lesson 03
from lesson_03 import test_pairs,eng_vectorizer,fra_vectorizer
# the positional embedding layer from Lesson 05
from lesson_05 import PositionalEmbedding
# the learning rate schedule, loss, and accuracy functions from Lesson 09
from lesson_09 import CustomSchedule,masked_loss,masked_accuracy
First, try to run this code and observe the inference result. Some examples are below:
1
2
3
4
5
6
7
8
9
10
11
12
13
14
15
16
17
18
19
Test 2:
it rained for three days .
== [start] il a plu pendant trois jours . [end]
-> [start] il a plu pendant trois jours . [end]
Test 3:
two people say they heard a gunshot .
== [start] deux personnes disent qu'elles ont entendu une détonation . [end]
-> [start] deux personnes disent qu'ils ont entendu un coup de feu . [end]
Test 4:
i'm not dead yet .
== [start] je ne suis pas encore mort . [end]
-> [start] je ne suis pas encore mort . [end]
Test 5:
i want us to get back together .
== [start] je veux que nous nous remettions ensemble . [end]
-> [start] je veux que nous nous [UNK] ensemble . [end]
The second line of each test is the expected output while the third line is the output from the transformer.
The token [UNK] means “unknown” or out-of-vocabulary, which should appear rarely. Comparing the output, you should see the result is quite accurate. It will not be perfect. For example, they in English can map to ils or elles in French depending on the gender, and the transformer cannot always distinguish that.
You generated the translated sentence word by word, but indeed the transformer outputs the entire sentence in one shot. You should try to modify the program to decode the entire transformer output pred in the for-loop to see how the transformer gives you a better sentence as you provide more leading words in dec_tokens.
In the next lesson, you will review what you did so far and see if any improvements can be made.
Lesson 12: Improving the Model
You did it!
Let’s go back and review what you did and what can be improved. You made a transformer model that takes an entire English sentence and a partial French sentence (up to the $k$-th token) to predict the next (the $(k+1)$-th) token.
In training, you observed that the accuracy is at 70% to 80% at the best. How can you improve it? Here are some ideas, but surely, not exhaustive:
You used a simple tokenizer for your text input. Libraries such as NLTK can provide better tokenizers. Also, you didn’t use subword tokenization. It is less a problem for English but problematic for French. That’s why you have vastly larger vocabulary size in French in your model (e.g., l’air (the air) and d’air (of air) would become distinct tokens).
You trained your own word embeddings with an embedding layer. There are pre-trained embeddings (such as GloVe) readily available, and they usually provide better quality embeddings. This may help your model to understand the context better.
You designed the transformer with some parameters. You used 8 heads for multi-head attention, output vector dimension is 128, sentence length was limited to 20 tokens, drop out rate is 0.1, and so on. Tuning these parameters will surely impact the transformer one way or another. Similarly important are the training parameters such as number of epochs, learning rate schedule, and loss function.
Your Task
Figure out how to change the code to accomodate the above changes. But if we test it out, do you know the right way to tell if one model is better than another?
Post your answer in the comments below. I would love to see what you come up with.
This was the final lesson.
The End! (Look How Far You Have Come)
You made it. Well done!
Take a moment and look back at how far you have come.
You learned how to take a plaintext sentence, process it, and vectorize it
You analyzed the building block of a transformer model according to the paper Attention Is All You Need, and implemented each building block using Keras
You connected the building blocks into a complete transformer model, and train it
Finally, you can witness the trained model to translate English sentences into French with high accuracy
Summary
How did you do with the mini-course?
Did you enjoy this crash course?
Do you have any questions? Were there any sticking points?
Let me know. Leave a comment below.
It provides self-study tutorials with working code to guide you into building a fully-working transformer models that can translate sentences from one language to another...
Give magical power of understanding human language for Your Projects
For the first lesson, you set:
vocab_size_en = 10000
vocab_size_fr = 20000
seq_length = 20
But the tokens analysis shows:
Total english tokens: 14969
Total french tokens: 31271
Max English length: 51
Max french length: 58
which means you set a much lower count of vocabulary sizes than actual token counts in the text, and ‘seq_length=20’ is much smaller than max token lengths 51 & 58. What type of tokens will be thrown away when sentence token length exceeds 20?
Correct. That’s on purpose to discard the less frequently used words and ignore the longer but rare case of long sentences. This trade off is to allow us to focus on the common use cases and produce a better translator.
Hi James, I run into the same issue. I am using tensorflow v2.14. I don’t get what to do from that blog. Any suggestion on what I may change for the code in this course to work? Thanks
I have the same issue with Tensorflow/keras 2.9, in which “use_causal_mask” wasn’t supported. This argument was added after 2.10. If I can’t update my Tensorflow version, if there a easy way to fix this issue? I can remove this argument without changing anything else in the code and the code runs fine. However, the last part of the course doesn’t generate expected French output. Instead it always generated an incorrect string for each run in the test data. For example:
do as i tell you .
== [start]fais comme je te dis .[end]
-> [start] 40 40 programmeur programmeur programmeur prendrais programmeur programmeur patiner patiner patiner c’était erreur .[end] ? ? ? ? ? ?
Test 1:
i suggested that we go fishing .
== [start]j’ai proposé que nous allions pêcher .[end]
-> [start] 40 40 programmeur programmeur programmeur prendrais programmeur programmeur patiner patiner patiner c’était erreur .[end] ? ? ? ? ? ?
I suspect that this is due to the removal of the argument “use_causal_mask”. @Adrian, is there an easy way to fix this for Tensorflow 2.9?
I think that’s a bit difficult, although not impossible. The causal mask is important here because the way inference is run. We would give you a complete English sentence, and a partial French sentence (at least the start sentinel), and the model should predict the next word to the French sentence. The causal mask is to hide out the later half of a sentence which is to be predicted during training.
If you cannot use TensorFlow 2.10, the only way out is to avoid the default training loop provided by fit() function, but to write your own training loop using Gradient Tape. That’s more code to write.
When I run the following task in Lesson 5 , it gives error:
# From Lesson 03:
# train_ds = make_dataset(train_pairs)
vocab_size_en = 10000
seq_length = 20
# test the dataset
for inputs, targets in train_ds.take(1):
print(inputs[“encoder_inputs”])
embed_en = PositionalEmbedding(seq_length, vocab_size_en, embed_dim=512)
en_emb = embed_en(inputs[“encoder_inputs”])
print(en_emb.shape)
print(en_emb._keras_mask)
~\.conda\envs\Tensorflow2\lib\site-packages\keras\utils\traceback_utils.py in error_handler(*args, **kwargs)
65 except Exception as e: # pylint: disable=broad-except
66 filtered_tb = _process_traceback_frames(e.__traceback__)
—> 67 raise e.with_traceback(filtered_tb) from None
68 finally:
69 del filtered_tb
~\AppData\Local\Temp\ipykernel_41016\1506590554.py in call(self, inputs)
51 with position vectors”””
52 embedded_tokens = self.token_embeddings(inputs)
—> 53 return embedded_tokens + self.position_embeddings
54
55 # this layer is using an Embedding layer, which can take a mask
InvalidArgumentError: Exception encountered when calling layer “positional_embedding” (type PositionalEmbedding).
Expected ‘tf.Tensor(False, shape=(), dtype=bool)’ to be true. Summarized data: b’Unable to broadcast: dimension size mismatch in dimension’
Hi N Prinja…Did you type the code in or copy and paste it? Also, please try it in Google Colab to rule out any issues with your local Python environment.
Good job. Excellent idea… You and your team need to keep this going…. I know this takes a lot of time, so what do you think about the idea of launching a friendly priced membership/subscription for new projects, where the mentoring for the current project would be recorded where those joining later could use them????? I believe that today there are several problems to be solved and maybe even the contribution of subscribers with masses of data would help in current projects. It would be something like kaggle, but more interactive with a focus on knowledge dissemination.
To confirm, would this code and model be appropriate for training a “custom language” model? In other words, i’d like to train my own “language.” For context, the “language” will be a propriety encoding of numeric data into English alpha characters. My current models predict the overall average data well, but struggle with the random outliers that occur less often. I’m interested in accurate prediction of the outliers.
Thank you!
And I just want to add, I’ve purchased a past version of your library, maybe 5 years ago, it was and is a fantastic resource. Thanks again!
Appropriate as it should be. But don’t expect to fit all outliers. In fact, no machine learning model can be perfect and it is a hard problem on how to draw the line on which outlier can we tolerate. Besides, it is not a very big model but it does it job on many language pairs (you can try English vs Italian on the same code, for example). If you custom language is not very sophisticated, it may work too.
Thank you for the reply! I’ve made it through the tutorial and am getting responses. Feeling excited and relieved…whew!
Question please: Is there a blog post or resource that would show me how to save this model to something I could include with an application on other machines? The two I’m thinking of are h5 and converting to onnx, but I’d like to see what you all say. Or is this the “final” format/structure of the model.
I have used your crash course as a reference to build a transformer for machine translation of English texts into Bengali. There aren’t any errors but my model keeps on overfitting, with increasing validation loss and very low validation accuracy. I tried increasing the dropout value to 0.5, reducing the batch size to 32, and increasing the dataset size but to no avail.
I was wondering whether you could provide some insights on this?
I’ve used this reference and building a Transformer to predict output sequence which is of fixed length. However my input is of length 10 and output is of length 4. I did try changing the transformer by passing different lengths for input and output but I’m getting the warning saying
“WARNING:tensorflow:Model was constructed with shape (None, 4, 128) for input KerasTensor(type_spec=TensorSpec(shape=(None, 4, 128), dtype=tf.float32, name=’dec0_ctx0′), name=’dec0_ctx0′, description=”created by layer ‘dec0_ctx0′”), but it was called on an input with incompatible shape (None, 10, 128) ”
But the model is able to train, so I’m not sure what I’m doing is right or wrong?
Hey James,
I successfully executed the code snippets but somehow I’m unable to get the desired accuracy and also the transformer output is blank as copied below. Could you advise the possibility of this issue?
Test 19:
i believe he is coming tomorrow .
== [start] je crois qu’il vient demain . [end]
-> [start] . . . . . [end]
I would like to first thank you for this wonderful lesson.
While reading this tutorial, I noticed that padding_mask is only used when we are calculating loss and accuracy (if I’m not mistaken). So my question here:
Why didn’t we use it in the encoder to prevent the padding from affecting the attention scores, is it a technical reason or just to simplify the model for the reader?
Hello, thank you for a great transformer example! I have a question: How to produce the confidence of the prediction returned by the transformer model? On the example of translation: is it possible to have per word confidence of the returned text? How to approach this?
Thank you in advance for response!
please sir, i made some changes on the code to be able to translate from arabic language to english language.
i replaced every english_label variable with arabic_variable_label and every french_label variable with english_variable_label
also i have followed the same preprocessing and saved the new arabic-t-english data in text-pair.pickle file and used that file in the code.
i also changed the vocab size after study the data:
#Total Arabic tokens: 261806
#Total English tokens: 389653
#Max Arabic length: 2
#Max English length: 11
#262142 total pairs
to be with values:
# Parameter determined after analyzing the input data
vocab_size_ara = 100000
vocab_size_eng = 200000
seq_length = 10
the code worked fine on colab, but google colab take so long time to train and always the session colses before the train finished.
so i tried to run the code on remote server, i got that error while running:
2023-08-24 09:36:16.841001: W tensorflow/core/kernels/data/cache_dataset_ops.cc:768] The calling iterator did not fully read the dataset being cached. In order to avoid unexpected truncation of the dataset, the partially cached contents of the dataset will be discarded. This can happen if you have an input pipeline similar to dataset.cache().take(k).repeat(). You should use dataset.take(k).cache().repeat() instead.
Traceback (most recent call last):
File “/app/app.py”, line 363, in
en_emb = embed_en(inputs[“encoder_inputs”])
File “/opt/conda/envs/opence-cuda/lib/python3.9/site-packages/keras/utils/traceback_utils.py”, line 67, in error_handler
raise e.with_traceback(filtered_tb) from None
File “/app/app.py”, line 336, in call
return embedded_tokens + self.position_embeddings
tensorflow.python.framework.errors_impl.InvalidArgumentError: Exception encountered when calling layer “positional_embedding” (type PositionalEmbedding).
Expected ‘tf.Tensor(False, shape=(), dtype=bool)’ to be true. Summarized data: b’Unable to broadcast: dimension size mismatch in dimension’
1
b’lengths=’
10
b’dim_size=’
1, 1, 1, 1, 1, 1, 1, 1, 1, 1, …
that error produced when i runned that block of code:
# Parameter determined after analyzing the input data
vocab_size_ara = 100000
seq_length = 10
# test the dataset
for inputs, targets in train_ds.take(1):
#print(inputs[“encoder_inputs”])
embed_en = PositionalEmbedding(seq_length, vocab_size_ara, embed_dim=512)
en_emb = embed_en(inputs[“encoder_inputs”])
#print(en_emb.shape)
#print(en_emb._keras_mask)
it is strange that it wrked fine on google colab, and taking it copy paste on the server and run it.
do you know why that error produces?
can i use that code for transliteration task that does not depend on the meaning of words , it just phonetics capturing?
what iam thinking of is to work on the character li=evel instead of working with a word level.
what do you think?
Hi! I followed the tutorial and got the correct output at each step. The final training epoch gave validation accuracy similar to the examples, and graphs look almost identical. For example:
But when I run the inference in lesson 11 the translations appear to be completely random and nonsensical. What could cause this behavior? Any help greatly appreciated.
Some examples:
Test 0:
she can speak french fluently .
== [start] elle sait couramment parler le français . [end]
-> [start] toujours là , je sais impressionnée . [end]
Test 1:
they’re too fat .
== [start] ils sont trop gros . [end]
-> [start] pas beaucoup de l’histoire . [end]
Test 2:
i’ve never ridden a horse .
== [start] je ne suis jamais monté sur un cheval . [end]
-> [start] j’ai se avec appareil . [end]
I also have a similar prob, with nearly 80% val accuracy, the predictions are completely random event on train set. Can anyone explain this?
i want to believe that everything’s all right .
Test 0:
i want to believe that everything’s all right .
== [start] je veux croire que tout va bien . [end]
-> [start] monde monde monde monde monde monde monde monde monde monde monde monde monde monde monde monde monde monde monde monde
hi , I want to predict time series using transformers and then compare it with other neural networks. Is this course suitable for me to learn Transformers?
Thanks for the reply sir, i saw the question and the answers in the link but it does not provide any discussion for how to make the model get more than one outcome.
is there any other resources you can recommend about that point?
Hi James,
thank you for the quick response.
I have copied the code to my environment but it gave me the above error,
I have also customized with my input languages but it shows same error. I haven’t tried on google Colab.
I can share you my entire code if needed.
FYI, on the reference project “English-to-Spanish translation with a sequence-to-sequence Transformer”, the developer didn’t save the vectorization.
ex. ### save for subsequent steps
with open(“vectorize.pickle”, “wb”) as fp:
Hi James,
I am following the whole procedure and working fine. I am working on English and amharic languages which uses UTF-8. When i try to customize “Lesson 03: Vectorization and Making Datasets parts”, when i try to save vectorize.pickle it says with with open(“vectorize.pickle”, “wb”) as fp: code it shows an error. The error is as below:
“amharicvec_weights”: amharic_vectorizer.get_weights()
return bytes_or_text.decode(encoding)
UnicodeDecodeError: ‘utf-8′ codec can’t decode bytes in position 2-3: unexpected end of data”
For your information i can normalize,split, save and retrieve text pairs
“with open(text_file,encoding=’utf8′,errors=’ignore’) as fp:
text_pairs = [normalize(line) for line in fp]
# print some samples
for _ in range(20):
print(random.choice(text_pairs))”
Hi, James,
When I ran Lesson 7, I got the following error message
—> 5 from lesson_06 import self_attention, feed_forward
ModuleNotFoundError: No module named ‘lesson_06’
I had successfully ran through to Lesson 6 with Colab, but their packages did not get seem saved.
Please help.
thanks,
Kam
Hi, James,
When I ran Lesson 7, I got the following error message
—> 5 from lesson_06 import self_attention, feed_forward
ModuleNotFoundError: No module named ‘lesson_06’
I had sucessfully ran through to Lesson 6 with Colab, but their packages did not get seem saved.
Please help.
thanks,
Kam
Great tutorial, thank you. The question is: is it possible to create a simple interface in streamlit or gradio using the model .h5 file we got after training and test the model there inputting our own sentences? please give some hint on this
thank you for tutorial, It would be very helpful if you give any hint to use ready model .h5 file to use it further and test with our own input, lets say in gradio interface. is it possible?
hi james,
i got a error in the following code: history = model.fit(train_ds, epochs=epochs, validation_data=val_ds),
the error message is: cannot mix tensors and non-tensors
I dont know why it gives this error, so i am ask if you know how to solve this error.
Hi Vini…The error message “cannot mix tensors and non-tensors” that you are seeing in the context of using model.fit typically indicates that there’s a mismatch in the type of data being passed to the model during training and validation. This can happen if one of the datasets (train_ds or val_ds) is a TensorFlow Dataset object and the other is not properly formatted as such.
Here are a few steps and checks you can perform to troubleshoot and hopefully resolve this issue:
1. **Check Data Types**: Ensure that both train_ds and val_ds are instances of tf.data.Dataset. You can check this by printing their types:
python

   print(type(train_ds))

   print(type(val_ds))
Both should output or something similar.
2. **Consistent Data Format**: Make sure that the structure and format of the data in both datasets are consistent. Both datasets should yield batches in the same format, typically as tuples of (inputs, labels).
3. **Data Pipeline Check**: Review the steps you use to create train_ds and val_ds. If you are applying transformations (like batching, shuffling, mapping functions for preprocessing), ensure these are applied similarly to both datasets. Differences in how datasets are batched or preprocessed can lead to errors during training.
4. **Directly Define the Datasets**: If you’re unsure about the consistency or creation of your datasets, you might want to redefine them or create a small dummy dataset to ensure everything works as expected. Here’s an example using synthetic data:
python

   import tensorflow as tf

   import numpy as np
# Creating a simple dataset
def make_dataset(data_size, batch_size):
# Generate synthetic data
x = np.random.random((data_size, 224, 224, 3)) # Example image input
y = np.random.randint(2, size=(data_size, 1)) # Example binary labels
dataset = tf.data.Dataset.from_tensor_slices((x, y))
dataset = dataset.batch(batch_size).prefetch(tf.data.AUTOTUNE)
return dataset
# Fit the model
history = model.fit(train_ds, epochs=10, validation_data=val_ds)
5. **Error in the Model Definition**: Double-check your model’s input and output specifications to make sure they align with the data being fed from your datasets.
By following these steps, you should be able to identify the source of the problem. If the issue persists, consider providing more details about how train_ds and val_ds are defined, as there might be specific issues in the data preparation or model configuration steps.
This might be a trivial query at the beginning of this course:
when I use the input dataset eng-fra.zip copying the same code in google colab as well as jupyter notebook on anaconda.
I get an error indicating the tab space delimiter issue: (even though I am not able to see visually any delimiter problem when I open the txt file in notepad)
The error message “ValueError: not enough values to unpack (expected 2, got 1)” arises from the line eng, fra = line.split(“\t”). This indicates that the split method is returning only one value instead of the expected two. This is likely happening because some lines in the file do not contain the tab character (\t) used for splitting.
In continuation to my earlier message, i would like to add that tab delimiter is recognised for all lines without regular expressions normalisation but not after normalisation..i feel tab characters in the input file are disturbed..


Hi, Adrian:
For the first lesson, you set:
vocab_size_en = 10000
vocab_size_fr = 20000
seq_length = 20
But the tokens analysis shows:
Total english tokens: 14969
Total french tokens: 31271
Max English length: 51
Max french length: 58
which means you set a much lower count of vocabulary sizes than actual token counts in the text, and ‘seq_length=20’ is much smaller than max token lengths 51 & 58. What type of tokens will be thrown away when sentence token length exceeds 20?
Is this understanding correct?
Correct. That’s on purpose to discard the less frequently used words and ignore the longer but rare case of long sentences. This trade off is to allow us to focus on the common use cases and produce a better translator.
Hi Adrian,
Running the model on my computer is difficult , is possible to have the model file “eng-fra-transformer.h5” ?
Thanks in advance.
Hi Furio…Have you tried Google Colab? There is even a GPU option available.
Hi Adrian!
Great stuff as always!
Maybe you can help me with this issue:
when calling the function to create the self-attention layers, namely:
> model = self_attention(input_shape=(seq_length, key_dim),
> num_heads=num_heads, key_dim=key_dim)
I receive this error message:
TypeError: call() got an unexpected keyword argument ‘use_causal_mask’
If I remove ‘use_causal_mask’ argument from
> attout = attention(query=inputs, value=inputs, key=inputs, use_causal_mask=mask)
the model works fine.
However, as far as I understand this argument has to be set to True for the decoder.
Do you know how I could solve this issue?
I have updated tensorflow to the latest version but it didn’t help.
Thank you very much!
Hi Tom…You may find the following resource of interest:
https://github.com/tensorflow/nmt/issues/471
Hi James, I run into the same issue. I am using tensorflow v2.14. I don’t get what to do from that blog. Any suggestion on what I may change for the code in this course to work? Thanks
Hi Ming…What are some specific error messages are you encountering? That will better enable us to guide you.
I have the same issue with Tensorflow/keras 2.9, in which “use_causal_mask” wasn’t supported. This argument was added after 2.10. If I can’t update my Tensorflow version, if there a easy way to fix this issue? I can remove this argument without changing anything else in the code and the code runs fine. However, the last part of the course doesn’t generate expected French output. Instead it always generated an incorrect string for each run in the test data. For example:
do as i tell you .
== [start]fais comme je te dis .[end]
-> [start] 40 40 programmeur programmeur programmeur prendrais programmeur programmeur patiner patiner patiner c’était erreur .[end] ? ? ? ? ? ?
Test 1:
i suggested that we go fishing .
== [start]j’ai proposé que nous allions pêcher .[end]
-> [start] 40 40 programmeur programmeur programmeur prendrais programmeur programmeur patiner patiner patiner c’était erreur .[end] ? ? ? ? ? ?
I suspect that this is due to the removal of the argument “use_causal_mask”. @Adrian, is there an easy way to fix this for Tensorflow 2.9?
I think that’s a bit difficult, although not impossible. The causal mask is important here because the way inference is run. We would give you a complete English sentence, and a partial French sentence (at least the start sentinel), and the model should predict the next word to the French sentence. The causal mask is to hide out the later half of a sentence which is to be predicted during training.
If you cannot use TensorFlow 2.10, the only way out is to avoid the default training loop provided by
fit()function, but to write your own training loop using Gradient Tape. That’s more code to write.When I run the following task in Lesson 5 , it gives error:
# From Lesson 03:
# train_ds = make_dataset(train_pairs)
vocab_size_en = 10000
seq_length = 20
# test the dataset
for inputs, targets in train_ds.take(1):
print(inputs[“encoder_inputs”])
embed_en = PositionalEmbedding(seq_length, vocab_size_en, embed_dim=512)
en_emb = embed_en(inputs[“encoder_inputs”])
print(en_emb.shape)
print(en_emb._keras_mask)
The error messages are:
—————————————————————————
InvalidArgumentError Traceback (most recent call last)
~\AppData\Local\Temp\ipykernel_41016\2379217237.py in
9 print(inputs[“encoder_inputs”])
10 embed_en = PositionalEmbedding(seq_length, vocab_size_en, embed_dim=512)
—> 11 en_emb = embed_en(inputs[“encoder_inputs”])
12 print(en_emb.shape)
13 print(en_emb._keras_mask)
~\.conda\envs\Tensorflow2\lib\site-packages\keras\utils\traceback_utils.py in error_handler(*args, **kwargs)
65 except Exception as e: # pylint: disable=broad-except
66 filtered_tb = _process_traceback_frames(e.__traceback__)
—> 67 raise e.with_traceback(filtered_tb) from None
68 finally:
69 del filtered_tb
~\AppData\Local\Temp\ipykernel_41016\1506590554.py in call(self, inputs)
51 with position vectors”””
52 embedded_tokens = self.token_embeddings(inputs)
—> 53 return embedded_tokens + self.position_embeddings
54
55 # this layer is using an Embedding layer, which can take a mask
InvalidArgumentError: Exception encountered when calling layer “positional_embedding” (type PositionalEmbedding).
Expected ‘tf.Tensor(False, shape=(), dtype=bool)’ to be true. Summarized data: b’Unable to broadcast: dimension size mismatch in dimension’
Please help.
Hi N Prinja…Did you type the code in or copy and paste it? Also, please try it in Google Colab to rule out any issues with your local Python environment.
Please see if your
inputs["encoder_inputs"]and thePositionalEmbedding()match in the dimension. It seems to be the error is about this.Hello Adrian Tam,
Good job. Excellent idea… You and your team need to keep this going…. I know this takes a lot of time, so what do you think about the idea of launching a friendly priced membership/subscription for new projects, where the mentoring for the current project would be recorded where those joining later could use them????? I believe that today there are several problems to be solved and maybe even the contribution of subscribers with masses of data would help in current projects. It would be something like kaggle, but more interactive with a focus on knowledge dissemination.
good job,
thanks.
Thank you Fabio for your feedback, support and suggestions!
To confirm, would this code and model be appropriate for training a “custom language” model? In other words, i’d like to train my own “language.” For context, the “language” will be a propriety encoding of numeric data into English alpha characters. My current models predict the overall average data well, but struggle with the random outliers that occur less often. I’m interested in accurate prediction of the outliers.
Thank you!
And I just want to add, I’ve purchased a past version of your library, maybe 5 years ago, it was and is a fantastic resource. Thanks again!
Appropriate as it should be. But don’t expect to fit all outliers. In fact, no machine learning model can be perfect and it is a hard problem on how to draw the line on which outlier can we tolerate. Besides, it is not a very big model but it does it job on many language pairs (you can try English vs Italian on the same code, for example). If you custom language is not very sophisticated, it may work too.
Thank you for the reply! I’ve made it through the tutorial and am getting responses. Feeling excited and relieved…whew!
Question please: Is there a blog post or resource that would show me how to save this model to something I could include with an application on other machines? The two I’m thinking of are h5 and converting to onnx, but I’d like to see what you all say. Or is this the “final” format/structure of the model.
Thanks again!
See if these helps:
– https://machinelearningmastery.com/web-frameworks-for-your-python-projects/
– https://machinelearningmastery.com/save-load-keras-deep-learning-models/
Hi,
I can’t see where the softmax is used. Can you explain ?
Thanks for the turorial.
Hi Mohammed…The following resource may provide some insight on its usage:
https://machinelearningmastery.com/softmax-activation-function-with-python/
Hi there! Thanks for the crash course!
I have used your crash course as a reference to build a transformer for machine translation of English texts into Bengali. There aren’t any errors but my model keeps on overfitting, with increasing validation loss and very low validation accuracy. I tried increasing the dropout value to 0.5, reducing the batch size to 32, and increasing the dataset size but to no avail.
I was wondering whether you could provide some insights on this?
Hi Andre…The following resource may be of interest:
https://medium.datadriveninvestor.com/challenging-and-improving-nlp-model-in-proper-manner-ec2ed2d7629d
Hidden softmax -> logits=True . But when you to apply beam search in inference you need softmax on output.
Thank you for your reply orhan!
Dear orhan, could you please provide more information about how could i apply beam search to the output of the model instead of using greedy method?
where exactly you see i could change in the code to get more than one possible translation in order to get the most probable ones?
i replaced the argmax with argsort and filtering on the highest probable outputs
pred = model([enc_tokens, dec_tokens])
pred = np.argsort(pred)[::-1]
but i want more sophisticated solution to apply the beam search here.
any thoughts or hints?
thanks in advance.
or
pred = model([enc_tokens, dec_tokens])
pred = tf.nn.softmax(pred, 2)
Hi James,
I have a question that i think is very important for machine translation. How can i get alignment information between source and target?
I’ve used this reference and building a Transformer to predict output sequence which is of fixed length. However my input is of length 10 and output is of length 4. I did try changing the transformer by passing different lengths for input and output but I’m getting the warning saying
“WARNING:tensorflow:Model was constructed with shape (None, 4, 128) for input KerasTensor(type_spec=TensorSpec(shape=(None, 4, 128), dtype=tf.float32, name=’dec0_ctx0′), name=’dec0_ctx0′, description=”created by layer ‘dec0_ctx0′”), but it was called on an input with incompatible shape (None, 10, 128) ”
But the model is able to train, so I’m not sure what I’m doing is right or wrong?
Hi Heverson…An error has not occurred. It is a warning so it is likely there is no major issue.
The following may be of interest:
https://stackoverflow.com/questions/61656444/warning-warningtensorflowmodel-was-constructed-with-shape-none-150-but-i
Hey James,
I successfully executed the code snippets but somehow I’m unable to get the desired accuracy and also the transformer output is blank as copied below. Could you advise the possibility of this issue?
Test 19:
i believe he is coming tomorrow .
== [start] je crois qu’il vient demain . [end]
-> [start] . . . . . [end]
Hi Farhat…What environment did you execute your code? You may wish to try Google Colab.
Hi James,
Please can you answer? How can i get alignment information between source and target?
Hi Professor Jason,
I would like to first thank you for this wonderful lesson.
While reading this tutorial, I noticed that padding_mask is only used when we are calculating loss and accuracy (if I’m not mistaken). So my question here:
Why didn’t we use it in the encoder to prevent the padding from affecting the attention scores, is it a technical reason or just to simplify the model for the reader?
Thank you
Hi Ali…You are very welcome! Your understanding is correct! In general the padding_mask would be used.
The following discussion provides some additional insight:
https://stats.stackexchange.com/questions/422890/why-do-we-use-masking-for-padding-in-the-transformers-encoder
Thanks, I love your articles and hope you continue!
Hello again,
I’ve a new question; Isn’t it better to apply
tf.minimum(padding_mask, causal_mask)insted ofcausal_maskinattenation_1?class TransformerDecoder(layers.Layer):
def __init__(self, embed_dim, latent_dim, num_heads, **kwargs):
super().__init__(**kwargs)
self.embed_dim = embed_dim
self.latent_dim = latent_dim
self.num_heads = num_heads
self.attention_1 = layers.MultiHeadAttention(
num_heads=num_heads, key_dim=embed_dim
)
self.attention_2 = layers.MultiHeadAttention(
num_heads=num_heads, key_dim=embed_dim
)
self.dense_proj = keras.Sequential(
[layers.Dense(latent_dim, activation="relu"), layers.Dense(embed_dim),]
)
self.layernorm_1 = layers.LayerNormalization()
self.layernorm_2 = layers.LayerNormalization()
self.layernorm_3 = layers.LayerNormalization()
self.supports_masking = True
def call(self, inputs, encoder_outputs, mask=None):
causal_mask = self.get_causal_attention_mask(inputs)
if mask is not None:
padding_mask = tf.cast(mask[:, tf.newaxis, :], dtype="int32")
padding_mask = tf.minimum(padding_mask, causal_mask)
attention_output_1 = self.attention_1(
query=inputs, value=inputs, key=inputs, attention_mask=causal_mask
)
out_1 = self.layernorm_1(inputs + attention_output_1)
attention_output_2 = self.attention_2(
query=out_1,
value=encoder_outputs,
key=encoder_outputs,
attention_mask=padding_mask,
)
out_2 = self.layernorm_2(out_1 + attention_output_2)
proj_output = self.dense_proj(out_2)
return self.layernorm_3(out_2 + proj_output)
Thanks!
I get it..
Thanks!
which model is best for create a chatbot?
Hello, thank you for a great transformer example! I have a question: How to produce the confidence of the prediction returned by the transformer model? On the example of translation: is it possible to have per word confidence of the returned text? How to approach this?
Thank you in advance for response!
please sir, i made some changes on the code to be able to translate from arabic language to english language.
i replaced every english_label variable with arabic_variable_label and every french_label variable with english_variable_label
also i have followed the same preprocessing and saved the new arabic-t-english data in text-pair.pickle file and used that file in the code.
i also changed the vocab size after study the data:
#Total Arabic tokens: 261806
#Total English tokens: 389653
#Max Arabic length: 2
#Max English length: 11
#262142 total pairs
to be with values:
# Parameter determined after analyzing the input data
vocab_size_ara = 100000
vocab_size_eng = 200000
seq_length = 10
the code worked fine on colab, but google colab take so long time to train and always the session colses before the train finished.
so i tried to run the code on remote server, i got that error while running:
2023-08-24 09:36:16.841001: W tensorflow/core/kernels/data/cache_dataset_ops.cc:768] The calling iterator did not fully read the dataset being cached. In order to avoid unexpected truncation of the dataset, the partially cached contents of the dataset will be discarded. This can happen if you have an input pipeline similar to
dataset.cache().take(k).repeat(). You should usedataset.take(k).cache().repeat()instead.Traceback (most recent call last):
File “/app/app.py”, line 363, in
en_emb = embed_en(inputs[“encoder_inputs”])
File “/opt/conda/envs/opence-cuda/lib/python3.9/site-packages/keras/utils/traceback_utils.py”, line 67, in error_handler
raise e.with_traceback(filtered_tb) from None
File “/app/app.py”, line 336, in call
return embedded_tokens + self.position_embeddings
tensorflow.python.framework.errors_impl.InvalidArgumentError: Exception encountered when calling layer “positional_embedding” (type PositionalEmbedding).
Expected ‘tf.Tensor(False, shape=(), dtype=bool)’ to be true. Summarized data: b’Unable to broadcast: dimension size mismatch in dimension’
1
b’lengths=’
10
b’dim_size=’
1, 1, 1, 1, 1, 1, 1, 1, 1, 1, …
Call arguments received:
• inputs=
(opence-cuda) [root@8a4be40a32a6 app]# python app.py -f –tail all
that error produced when i runned that block of code:
# Parameter determined after analyzing the input data
vocab_size_ara = 100000
seq_length = 10
# test the dataset
for inputs, targets in train_ds.take(1):
#print(inputs[“encoder_inputs”])
embed_en = PositionalEmbedding(seq_length, vocab_size_ara, embed_dim=512)
en_emb = embed_en(inputs[“encoder_inputs”])
#print(en_emb.shape)
#print(en_emb._keras_mask)
it is strange that it wrked fine on google colab, and taking it copy paste on the server and run it.
do you know why that error produces?
can i use that code for transliteration task that does not depend on the meaning of words , it just phonetics capturing?
what iam thinking of is to work on the character li=evel instead of working with a word level.
what do you think?
Hi ReemOsama…Please clarify your question so that we may better assist you. The following resource may be of interest:
https://machinelearningmastery.com/transformer-models-with-attention/
do the targets advanced by one token because of the start sentinel?
Hi uxdiin…Yes! Your understanding is correct! Let us know if we can help answer any additional questions regarding the tutorial.
is that possible to get more than on translation for the same input arranged from the highest probable translation to the least probable one ?
is that possible to get more than on translation for the same input arranged from the highest probable translation to the least probable one ?
is that possible to get more than one translation for the same input arranged from the highest probable translation to the least probable one ?
Hi ReemOsama…This is a great question! Perhaps considering the opposite problem will provide some insight into your query:
https://stackoverflow.com/questions/72465086/transformers-model-keep-giving-the-same-translation-result
Hi! I followed the tutorial and got the correct output at each step. The final training epoch gave validation accuracy similar to the examples, and graphs look almost identical. For example:
Epoch 20/20
1828/1828 [==============================] – 110s 60ms/step – loss: 0.9417 – masked_accuracy: 0.8322 – val_loss: 1.3322 – val_masked_accuracy: 0.7618
But when I run the inference in lesson 11 the translations appear to be completely random and nonsensical. What could cause this behavior? Any help greatly appreciated.
Some examples:
Test 0:
she can speak french fluently .
== [start] elle sait couramment parler le français . [end]
-> [start] toujours là , je sais impressionnée . [end]
Test 1:
they’re too fat .
== [start] ils sont trop gros . [end]
-> [start] pas beaucoup de l’histoire . [end]
Test 2:
i’ve never ridden a horse .
== [start] je ne suis jamais monté sur un cheval . [end]
-> [start] j’ai se avec appareil . [end]
Thank you for your feedback Ludwig! Let us know if we can help answer any questions.
I also have a similar prob, with nearly 80% val accuracy, the predictions are completely random event on train set. Can anyone explain this?
i want to believe that everything’s all right .
Test 0:
i want to believe that everything’s all right .
== [start] je veux croire que tout va bien . [end]
-> [start] monde monde monde monde monde monde monde monde monde monde monde monde monde monde monde monde monde monde monde monde
hi , I want to predict time series using transformers and then compare it with other neural networks. Is this course suitable for me to learn Transformers?
Hi ammireza…Absolutely! Additionally, the following resource is a great starting point:
https://machinelearningmastery.com/transformer-models-with-attention/
Thanks for the reply sir, i saw the question and the answers in the link but it does not provide any discussion for how to make the model get more than one outcome.
is there any other resources you can recommend about that point?
Good Afternoon,
I have faced issue when i run the command under Lesson 03: Vectorization and Making Datasets parts
Command:
def make_dataset(pairs, batch_size=64):
“””Create TensorFlow Dataset for the sentence pairs”””
# aggregate sentences using zip(*pairs)
eng_texts, fra_texts = zip(*pairs)
Result:
eng_texts, fra_texts = zip(*pairs)
ValueError: too many values to unpack (expected 2)
Please help me on this regards.
Thank you.
Hi Yatabena…Did you copy and paste the code or type it in? Also, have you tried your code in Google Colab?
Hi James,
thank you for the quick response.
I have copied the code to my environment but it gave me the above error,
I have also customized with my input languages but it shows same error. I haven’t tried on google Colab.
I can share you my entire code if needed.
FYI, on the reference project “English-to-Spanish translation with a sequence-to-sequence Transformer”, the developer didn’t save the vectorization.
ex. ### save for subsequent steps
with open(“vectorize.pickle”, “wb”) as fp:
Hi james,
I think i have got the error. It was due to missing punctuation(:) on the below part. I have done like this.
random.shuffle(text_pairs)
n_val = int(0.15*len(text_pairs))
n_train = len(text_pairs) – 2*n_val
train_pairs = text_pairs[n_train]
val_pairs = text_pairs[n_train:n_train+n_val]
test_pairs = text_pairs[n_train+n_val]
Different from the posted code.
Thank you for everything you have done related to NLP.
Hi James,
I am following the whole procedure and working fine. I am working on English and amharic languages which uses UTF-8. When i try to customize “Lesson 03: Vectorization and Making Datasets parts”, when i try to save vectorize.pickle it says with with open(“vectorize.pickle”, “wb”) as fp: code it shows an error. The error is as below:
“amharicvec_weights”: amharic_vectorizer.get_weights()
return bytes_or_text.decode(encoding)
UnicodeDecodeError: ‘utf-8′ codec can’t decode bytes in position 2-3: unexpected end of data”
For your information i can normalize,split, save and retrieve text pairs
“with open(text_file,encoding=’utf8′,errors=’ignore’) as fp:
text_pairs = [normalize(line) for line in fp]
# print some samples
for _ in range(20):
print(random.choice(text_pairs))”
Please help me on this regards.
Thank you.
Hi James,
please help me on uni-code characters vectorizer like Chinese language on below code.
“sourcelanguagevec_weights”: sourcelanguage_vectorizer.get_weights(), it gave me the below error messages:
———
return bytes_or_text.decode(encoding)
UnicodeDecodeError: ‘utf-8′ codec can’t decode bytes in position: unexpected end of data”
————–
Hi Mr. X…The following resource is a great starting point:
https://intapi.sciendo.com/pdf/10.2478/jazcas-2022-0023
Hi, James,
When I ran Lesson 7, I got the following error message
—> 5 from lesson_06 import self_attention, feed_forward
ModuleNotFoundError: No module named ‘lesson_06’
I had successfully ran through to Lesson 6 with Colab, but their packages did not get seem saved.
Please help.
thanks,
Kam
Hi Kam…The following resource will help with saving models.
https://machinelearningmastery.com/save-load-keras-deep-learning-models/
Hi, James,
When I ran Lesson 7, I got the following error message
—> 5 from lesson_06 import self_attention, feed_forward
ModuleNotFoundError: No module named ‘lesson_06’
I had sucessfully ran through to Lesson 6 with Colab, but their packages did not get seem saved.
Please help.
thanks,
Kam
Great tutorial, thank you. The question is: is it possible to create a simple interface in streamlit or gradio using the model .h5 file we got after training and test the model there inputting our own sentences? please give some hint on this
Hi Sara…You are very welcome! Absolutely! You can find out more about more here:
https://www.analyticsvidhya.com/blog/2023/02/streamlit-vs-gradio-a-guide-to-building-dashboards-in-python/
thank you for tutorial, It would be very helpful if you give any hint to use ready model .h5 file to use it further and test with our own input, lets say in gradio interface. is it possible?
hi james,
i got a error in the following code: history = model.fit(train_ds, epochs=epochs, validation_data=val_ds),
the error message is: cannot mix tensors and non-tensors
I dont know why it gives this error, so i am ask if you know how to solve this error.
Hi Vini…The error message “cannot mix tensors and non-tensors” that you are seeing in the context of using
model.fittypically indicates that there’s a mismatch in the type of data being passed to the model during training and validation. This can happen if one of the datasets (train_dsorval_ds) is a TensorFlowDatasetobject and the other is not properly formatted as such.Here are a few steps and checks you can perform to troubleshoot and hopefully resolve this issue:
1. **Check Data Types**: Ensure that both
train_dsandval_dsare instances oftf.data.Dataset. You can check this by printing their types:python
print(type(train_ds))
print(type(val_ds))
Both should output
2. **Consistent Data Format**: Make sure that the structure and format of the data in both datasets are consistent. Both datasets should yield batches in the same format, typically as tuples of
(inputs, labels).3. **Data Pipeline Check**: Review the steps you use to create
train_dsandval_ds. If you are applying transformations (like batching, shuffling, mapping functions for preprocessing), ensure these are applied similarly to both datasets. Differences in how datasets are batched or preprocessed can lead to errors during training.4. **Directly Define the Datasets**: If you’re unsure about the consistency or creation of your datasets, you might want to redefine them or create a small dummy dataset to ensure everything works as expected. Here’s an example using synthetic data:
pythonimport tensorflow as tf
import numpy as np
# Creating a simple dataset
def make_dataset(data_size, batch_size):
# Generate synthetic data
x = np.random.random((data_size, 224, 224, 3)) # Example image input
y = np.random.randint(2, size=(data_size, 1)) # Example binary labels
dataset = tf.data.Dataset.from_tensor_slices((x, y))
dataset = dataset.batch(batch_size).prefetch(tf.data.AUTOTUNE)
return dataset
# Define datasets
train_ds = make_dataset(1000, 32)
val_ds = make_dataset(200, 32)
# Define a simple model
model = tf.keras.models.Sequential([
tf.keras.layers.Conv2D(32, (3, 3), activation='relu', input_shape=(224, 224, 3)),
tf.keras.layers.MaxPooling2D((2, 2)),
tf.keras.layers.Flatten(),
tf.keras.layers.Dense(1, activation='sigmoid')
])
model.compile(optimizer='adam', loss='binary_crossentropy', metrics=['accuracy'])
# Fit the model
history = model.fit(train_ds, epochs=10, validation_data=val_ds)
5. **Error in the Model Definition**: Double-check your model’s input and output specifications to make sure they align with the data being fed from your datasets.
By following these steps, you should be able to identify the source of the problem. If the issue persists, consider providing more details about how
train_dsandval_dsare defined, as there might be specific issues in the data preparation or model configuration steps.how can i perform a bulk inferring?if i have different batches to be translated how can i achieve that ?
This might be a trivial query at the beginning of this course:
when I use the input dataset eng-fra.zip copying the same code in google colab as well as jupyter notebook on anaconda.
I get an error indicating the tab space delimiter issue: (even though I am not able to see visually any delimiter problem when I open the txt file in notepad)
The error message “ValueError: not enough values to unpack (expected 2, got 1)” arises from the line eng, fra = line.split(“\t”). This indicates that the split method is returning only one value instead of the expected two. This is likely happening because some lines in the file do not contain the tab character (\t) used for splitting.
Any advise on this?
Hi Shirina…did you copy and paste the code or type it in?
In continuation to my earlier message, i would like to add that tab delimiter is recognised for all lines without regular expressions normalisation but not after normalisation..i feel tab characters in the input file are disturbed..
I trained and saved the model as explained in this tutorial …but I am facing issues while loading the model and making predictions…with custom objects
with tf.keras.utils.custom_object_scope(custom_objects):
—> model = tf.keras.models.load_model(“eng-fra-transformer.h5”)
TypeError: Missing required positional argument
Kindly explain.. I tried all possible changes as suggested by Gemini in Colab but it does not work