Softmax classifier is a type of classifier in supervised learning. It is an important building block in deep learning networks and the most popular choice among deep learning practitioners.
Softmax classifier is suitable for multiclass classification, which outputs the probability for each of the classes.
This tutorial will teach you how to build a softmax classifier for images data. You will learn how to prepare the dataset, and then learn how to implement softmax classifier using PyTorch. Particularly, you’ll learn:
- About the Fashion-MNIST dataset.
- How you can use a Softmax classifier for images in PyTorch.
- How to build and train a multi-class image classifier in PyTorch.
- How to plot the results after model training.
Kick-start your project with my book Deep Learning with PyTorch. It provides self-study tutorials with working code.
Let’s get started.

Building a Softmax Classifier for Images in PyTorch.
Picture by Joshua J. Cotten. Some rights reserved.
Overview
This tutorial is in three parts; they are
-
- Preparing the Dataset
- Build the Model
- Train the Model
Preparing the Dataset
The dataset you will use here is Fashion-MNIST. It is a pre-processed and well-organized dataset consisting of 70,000 images, with 60,000 images for training data and 10,000 images for testing data.
Each example in the dataset is a $28\times 28$ pixels grayscale image with a total pixel count of 784. The dataset has 10 classes, and each image is labelled as a fashion item, which is associated with an integer label from 0 through 9.
This dataset can be loaded from torchvision. To make the training faster, we limit the dataset to 4000 samples:
|
1 2 3 4 |
from torchvision import datasets train_data = datasets.FashionMNIST('data', train=True, download=True) train_data = list(train_data)[:4000] |
At the first time you fetch the fashion-MNIST dataset, you will see PyTorch downloading it from Internet and saving to a local directory named data:
|
1 2 3 4 5 6 7 8 9 10 11 12 13 14 15 16 17 18 |
Downloading http://fashion-mnist.s3-website.eu-central-1.amazonaws.com/train-images-idx3-ubyte.gz Downloading http://fashion-mnist.s3-website.eu-central-1.amazonaws.com/train-images-idx3-ubyte.gz to data/FashionMNIST/raw/train-images-idx3-ubyte.gz 0%| | 0/26421880 [00:00<?, ?it/s] Extracting data/FashionMNIST/raw/train-images-idx3-ubyte.gz to data/FashionMNIST/raw Downloading http://fashion-mnist.s3-website.eu-central-1.amazonaws.com/train-labels-idx1-ubyte.gz Downloading http://fashion-mnist.s3-website.eu-central-1.amazonaws.com/train-labels-idx1-ubyte.gz to data/FashionMNIST/raw/train-labels-idx1-ubyte.gz 0%| | 0/29515 [00:00<?, ?it/s] Extracting data/FashionMNIST/raw/train-labels-idx1-ubyte.gz to data/FashionMNIST/raw Downloading http://fashion-mnist.s3-website.eu-central-1.amazonaws.com/t10k-images-idx3-ubyte.gz Downloading http://fashion-mnist.s3-website.eu-central-1.amazonaws.com/t10k-images-idx3-ubyte.gz to data/FashionMNIST/raw/t10k-images-idx3-ubyte.gz 0%| | 0/4422102 [00:00<?, ?it/s] Extracting data/FashionMNIST/raw/t10k-images-idx3-ubyte.gz to data/FashionMNIST/raw Downloading http://fashion-mnist.s3-website.eu-central-1.amazonaws.com/t10k-labels-idx1-ubyte.gz Downloading http://fashion-mnist.s3-website.eu-central-1.amazonaws.com/t10k-labels-idx1-ubyte.gz to data/FashionMNIST/raw/t10k-labels-idx1-ubyte.gz 0%| | 0/5148 [00:00<?, ?it/s] Extracting data/FashionMNIST/raw/t10k-labels-idx1-ubyte.gz to data/FashionMNIST/raw |
The dataset train_data above is a list of tuples, which each tuple is an image (in the form of a Python Imaging Library object) and an integer label.
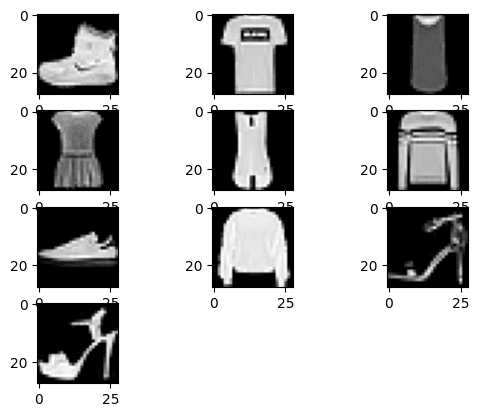
Let’s plot the first 10 images in the dataset with matplotlib.
|
1 2 3 4 5 6 7 8 |
import matplotlib.pyplot as plt # plot the first 10 images in the training data for i, (img, label) in enumerate(train_data[:10]): plt.subplot(4, 3, i+1) plt.imshow(img, cmap="gray") plt.show() |
You should see an image like the following:
PyTorch needs the dataset in PyTorch tensors. Hence you will convert this data by applying the transforms, using the ToTensor() method from PyTorch transforms. This transform can be done transparently in torchvision’s dataset API:
|
1 2 3 4 5 |
from torchvision import datasets, transforms # download and apply the transform train_data = datasets.FashionMNIST('data', train=True, download=True, transform=transforms.ToTensor()) train_data = list(train_data)[:4000] |
Before proceeding to the model, let’s also split our data into train and validation sets in such a way that the first 3500 images is the training set and the rest is for validation. Normally we want to shuffle the data before the split but we can skip this step to make our code concise.
|
1 2 |
# splitting the dataset into train and validation sets train_data, val_data = train_data[:3500], train_data[3500:] |
Want to Get Started With Deep Learning with PyTorch?
Take my free email crash course now (with sample code).
Click to sign-up and also get a free PDF Ebook version of the course.
Build the Model
In order to build a custom softmax module for image classification, we’ll use nn.Module from the PyTorch library. To keep things simple, we build a model of just one layer.
|
1 2 3 4 5 6 7 8 9 10 11 |
import torch # build custom softmax module class Softmax(torch.nn.Module): def __init__(self, n_inputs, n_outputs): super().__init__() self.linear = torch.nn.Linear(n_inputs, n_outputs) def forward(self, x): pred = self.linear(x) return pred |
Now, let’s instantiate our model object. It takes a one-dimensional vector as input and predicts for 10 different classes. Let’s also check how parameters are initialized.
|
1 2 3 |
# call Softmax Classifier model_softmax = Softmax(784, 10) print(model_softmax.state_dict()) |
You should see the model’s weight are randomly initialized but it should be in the shape like the following:
|
1 2 3 4 5 6 7 8 9 10 11 |
OrderedDict([('linear.weight', tensor([[-0.0344, 0.0334, -0.0278, ..., -0.0232, 0.0198, -0.0123], [-0.0274, -0.0048, -0.0337, ..., -0.0340, 0.0274, -0.0091], [ 0.0078, -0.0057, 0.0178, ..., -0.0013, 0.0322, -0.0219], ..., [ 0.0158, -0.0139, -0.0220, ..., -0.0054, 0.0284, -0.0058], [-0.0142, -0.0268, 0.0172, ..., 0.0099, -0.0145, -0.0154], [-0.0172, -0.0224, 0.0016, ..., 0.0107, 0.0147, 0.0252]])), ('linear.bias', tensor([-0.0156, 0.0061, 0.0285, 0.0065, 0.0122, -0.0184, -0.0197, 0.0128, 0.0251, 0.0256]))]) |
Train the Model
You will use stochastic gradient descent for model training along with cross-entropy loss. Let’s fix the learning rate at 0.01. To help training, let’s also load the data into a dataloader for both training and validation sets, and set the batch size at 16.
|
1 2 3 4 5 6 7 8 9 |
class Softmax(torch.nn.Module): "custom softmax module" def __init__(self, n_inputs, n_outputs): super().__init__() self.linear = torch.nn.Linear(n_inputs, n_outputs) def forward(self, x): pred = self.linear(x) return pred |
Now, let’s put everything together and train our model for 200 epochs.
|
1 2 3 4 5 6 7 8 9 10 11 12 13 14 15 16 17 18 19 20 21 |
epochs = 200 Loss = [] acc = [] for epoch in range(epochs): for i, (images, labels) in enumerate(train_loader): optimizer.zero_grad() outputs = model_softmax(images.view(-1, 28*28)) loss = criterion(outputs, labels) # Loss.append(loss.item()) loss.backward() optimizer.step() Loss.append(loss.item()) correct = 0 for images, labels in val_loader: outputs = model_softmax(images.view(-1, 28*28)) _, predicted = torch.max(outputs.data, 1) correct += (predicted == labels).sum() accuracy = 100 * (correct.item()) / len(val_data) acc.append(accuracy) if epoch % 10 == 0: print('Epoch: {}. Loss: {}. Accuracy: {}'.format(epoch, loss.item(), accuracy)) |
You should see the progress printed once every 10 epochs:
|
1 2 3 4 5 6 7 8 9 10 11 12 13 14 15 16 17 18 19 20 |
Epoch: 0. Loss: 1.0223602056503296. Accuracy: 67.2 Epoch: 10. Loss: 0.5806267857551575. Accuracy: 78.4 Epoch: 20. Loss: 0.5087125897407532. Accuracy: 81.2 Epoch: 30. Loss: 0.46658074855804443. Accuracy: 82.0 Epoch: 40. Loss: 0.4357391595840454. Accuracy: 82.4 Epoch: 50. Loss: 0.4111904203891754. Accuracy: 82.8 Epoch: 60. Loss: 0.39078089594841003. Accuracy: 83.4 Epoch: 70. Loss: 0.37331104278564453. Accuracy: 83.4 Epoch: 80. Loss: 0.35801735520362854. Accuracy: 83.4 Epoch: 90. Loss: 0.3443795442581177. Accuracy: 84.2 Epoch: 100. Loss: 0.33203184604644775. Accuracy: 84.2 Epoch: 110. Loss: 0.32071244716644287. Accuracy: 84.0 Epoch: 120. Loss: 0.31022894382476807. Accuracy: 84.2 Epoch: 130. Loss: 0.30044111609458923. Accuracy: 84.4 Epoch: 140. Loss: 0.29124370217323303. Accuracy: 84.6 Epoch: 150. Loss: 0.28255513310432434. Accuracy: 84.6 Epoch: 160. Loss: 0.2743147313594818. Accuracy: 84.4 Epoch: 170. Loss: 0.26647457480430603. Accuracy: 84.2 Epoch: 180. Loss: 0.2589966356754303. Accuracy: 84.2 Epoch: 190. Loss: 0.2518490254878998. Accuracy: 84.2 |
As you can see, the accuracy of the model increases after every epoch and its loss decreases. Here, the accuracy you achieved for the softmax images classifier is around 85 percent. If you use more data and increase the number of epochs, the accuracy may get a lot better. Now let’s see how the plots for loss and accuracy look like.
First the loss plot:
|
1 2 3 4 |
plt.plot(Loss) plt.xlabel("no. of epochs") plt.ylabel("total loss") plt.show() |
which should look like the following: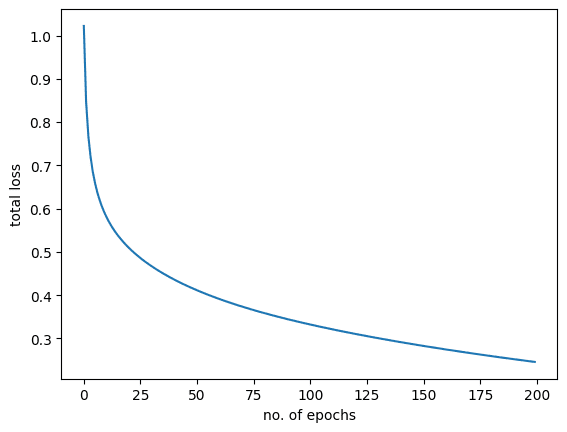
Here is the model accuracy plot:
|
1 2 3 4 |
plt.plot(acc) plt.xlabel("no. of epochs") plt.ylabel("total accuracy") plt.show() |
which is like the one below: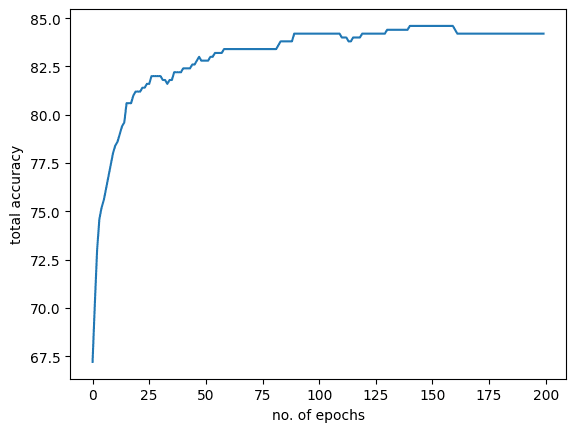
Putting everything together, the following is the complete code:
|
1 2 3 4 5 6 7 8 9 10 11 12 13 14 15 16 17 18 19 20 21 22 23 24 25 26 27 28 29 30 31 32 33 34 35 36 37 38 39 40 41 42 43 44 45 46 47 48 49 50 51 52 53 54 55 56 57 58 59 60 61 62 63 64 65 |
import torch import matplotlib.pyplot as plt from torch.utils.data import DataLoader from torchvision import datasets, transforms from torchvision import datasets # download and apply the transform train_data = datasets.FashionMNIST('data', train=True, download=True, transform=transforms.ToTensor()) train_data = list(train_data)[:4000] # splitting the dataset into train and validation sets train_data, val_data = train_data[:3500], train_data[3500:] # build custom softmax module class Softmax(torch.nn.Module): def __init__(self, n_inputs, n_outputs): super(Softmax, self).__init__() self.linear = torch.nn.Linear(n_inputs, n_outputs) def forward(self, x): pred = self.linear(x) return pred # call Softmax Classifier model_softmax = Softmax(784, 10) model_softmax.state_dict() # define loss, optimizier, and dataloader for train and validation sets optimizer = torch.optim.SGD(model_softmax.parameters(), lr = 0.01) criterion = torch.nn.CrossEntropyLoss() batch_size = 16 train_loader = DataLoader(dataset = train_data, batch_size = batch_size) val_loader = DataLoader(dataset = val_data, batch_size = batch_size) epochs = 200 Loss = [] acc = [] for epoch in range(epochs): for i, (images, labels) in enumerate(train_loader): optimizer.zero_grad() outputs = model_softmax(images.view(-1, 28*28)) loss = criterion(outputs, labels) # Loss.append(loss.item()) loss.backward() optimizer.step() Loss.append(loss.item()) correct = 0 for images, labels in val_loader: outputs = model_softmax(images.view(-1, 28*28)) _, predicted = torch.max(outputs.data, 1) correct += (predicted == labels).sum() accuracy = 100 * (correct.item()) / len(val_data) acc.append(accuracy) if epoch % 10 == 0: print('Epoch: {}. Loss: {}. Accuracy: {}'.format(epoch, loss.item(), accuracy)) plt.plot(Loss) plt.xlabel("no. of epochs") plt.ylabel("total loss") plt.show() plt.plot(acc) plt.xlabel("no. of epochs") plt.ylabel("total accuracy") plt.show() |
Summary
In this tutorial, you learned how to build a softmax classifier for images data. Particularly, you learned:
- About the Fashion-MNIST dataset.
- How you can use a softmax classifier for images in PyTorch.
- How to build and train a multiclass image classifier in PyTorch.
- How to plot the results after model training.
Get Started on Deep Learning with PyTorch!

Learn how to build deep learning models
...using the newly released PyTorch 2.0 library
Discover how in my new Ebook:
Deep Learning with PyTorch
It provides self-study tutorials with hundreds of working code to turn you from a novice to expert. It equips you with
tensor operation, training, evaluation, hyperparameter optimization,
and much more...


Nicely written and explained
Yes, well said
I’ a little confused: unless I am mistaken, this is not a softmax classifier, it is an SVM trained with BCE loss. There is no softmax layer here, i.e. no actual normalization to make the outputs of the linear layer a probability distribution. But maybe I a wrong, and perhaps the softmax layer is not a firm requirement. Does anybody know?
Hi Andrew…The following resource may add clarity:
https://machinelearningmastery.com/introduction-to-softmax-classifier-in-pytorch/