Neural networks are built with layers connected to each other. There are many different kind of layers. For image related applications, you can always find convolutional layers. It is a layer with very few parameters but applied over a large sized input. It is powerful because it can preserve the spatial structure of the image. Therefore it is used to produce state-of-the-art results on computer vision neural networks. In this post, you will learn about the convolutional layer and the network it built. After completing this post, you will know:
What are convolutional layers and pooling layers
How they fit together in a neural network
How a neural network using convolutional layers is designed
Kick-start your project with my book Deep Learning with PyTorch. It provides self-study tutorials with working code.
Let’s get started.
Building a Convolutional Neural Network in PyTorch Photo by Donna Elliot. Some rights reserved.
Overview
This post is divided into four parts; they are
The Case for Convolutional Neural Networks
Building Blocks of Convolutional Neural Networks
An Example of Convolutional Neural Network
What Are in Feature Maps?
The Case for Convolutional Neural Networks
Let’s consider to make a neural network to process grayscale image as input, which is the simplest use case in deep learning for computer vision.
A grayscale image is an array of pixels. Each pixel is usually a value in a range of 0 to 255. An image with size 32×32 would have 1024 pixels. Taking it as input to a neural network would mean the first layer to have at least 1024 input weights.
Looking at the pixel value has little use to understanding the picture, because data is hiding in the spatial structure (e.g., whether there is a horizontal line or a vertical line on the picture). Hence the traditional neural network will find it difficult to find out information from image input.
Convolutional neural network is to use convolutional layers to preserve spatial information of pixels. It learns how alike are the neighboring pixels and generating feature representations. What the convolutional layers see from the picture is invariant to distortion in some degree. For example, a convolutional neural network could predict the same result even if the input image has shift in color, rotated or rescaled. Moreover, convolutional layers has fewer weights, thus easier to train.
Building Blocks of Convolutional Neural Networks
The simplest use case of a convolutional neural network is for classification. You will find it to contain three types of layers:
Convolutional layers
Pooling layers
Fully-connected layers
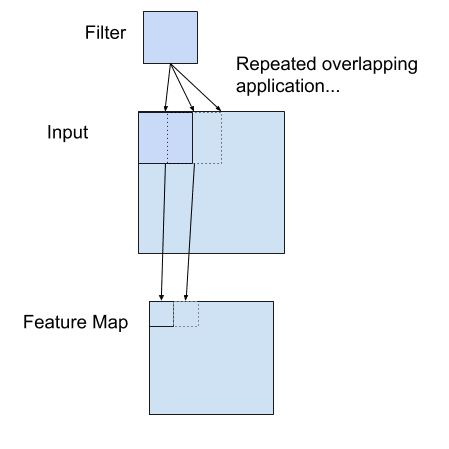
Neurons on a convolutional layer is called the filter. Usually it is a 2D convolutional layer in image application. The filter is a 2D patch (e.g., 3×3 pixels) that is applied on the input image pixels. The size of this 2D patch is also called the receptive field, meaning how large a portion of the image it can see at a time.
The filter of a convolutional layer is to multiply with the input pixels, and then sum up the result. This result is one pixel value at the output. The filter will move around the input image to fill out all pixel values at the output. Usually multiple filters are applied to the same input, producing multiple output tensors. These output tensors are called the feature maps produced by this layer. They are stacked together as one tensor and pass on to the next layer as input.
Example of a Filter Applied to a Two-Dimensional Input to Create a Feature Map
The output of a convolutional layer is called feature maps because usually it learned about the features of the input image. For example, whether there are vertical lines at the position. Learning the features from pixels is to help understanding the image at a higher level. Multiple convolutional layers are stacked together in order to infer higher level features from lower level details.
Pooling layer is to downsample the previous layer’s feature map. It is usually used after a convolutional layer to consolidate features learned. It can compress and generalize the feature representations. A pooling layer also has a receptive field and usually it is to take the average (average pooling) or the maximum (max pooling) over all values on the receptive field.
Fully connected layers are usually the final layers in a network. It is to take the features consolidated by previous convolutional and pooling layers as input to produce prediction. There might be multiple fully connected layers stacked together. In the case of classification, you usually see the output of the final fully connected layer applied with a softmax function to produce probability-like classification.
Want to Get Started With Deep Learning with PyTorch?
Take my free email crash course now (with sample code).
Click to sign-up and also get a free PDF Ebook version of the course.
An Example of Convolutional Neural Network
The following is a program to do image classification on the CIFAR-10 dataset.
print("Epoch %d: model accuracy %.2f%%"%(epoch,acc*100))
torch.save(model.state_dict(),"cifar10model.pth")
The CIFAR-10 dataset provides images in 32×32 pixels in RGB color (i.e., 3 color channels). There are 10 classes, labelled in integers 0 to 9. Whenever you are working on PyTorch neural network models for images, you will find the sister library torchvision useful. In the above, you used it to download the CIFAR-10 dataset from the Internet and transform it into a PyTorch tensor:
You also used a DataLoader in PyTorch to help creating batches for training. Training is to optimize the cross entropy loss of the model, using stochastic gradient descent. It is a classification model, hence accuracy of classification is more intuitive than cross entropy, which is computed at the end of each epoch, by comparing the maximum value in the output logit to the dataset’s labels:
It takes time to run the program above to train the network. This network should be able to achieve above 70% accuracy in classification.
It is typical in a network for image classification to be comprised of convolutional layers at an early stage, with dropout and pooling layers interleaved. Then, at a later stage, the output from convolutional layers is flattened and processed by some fully connected layers.
What Are in Feature Maps?
There are two convolutional layers in the network defined above. They are both defined with kernel size of 3×3, hence it is looking at 9 pixels at a time to produce one output pixel. Note that the first convolutional layer is taking the RGB image as input. Hence each pixel has three channels. The second convolutional layer is taking a feature map with 32 channels as input. Each “pixel” as it sees will have 32 values. Thus the second convolutional layer has more parameters even they have the same receptive field.
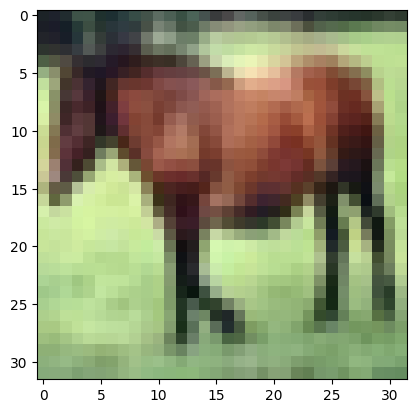
Let’s see what is in the feature map. Let’s say we pick one input sample from the training set:
1
2
3
4
import matplotlib.pyplot asplt
plt.imshow(trainset.data[7])
plt.show()
You should see that this is an image of a horse, in 32×32 pixels with RGB channels:
First, you need to convert this into a PyTorch tensor and make it a batch of one image. PyTorch models expect each image as a tensor in the format of (channel, height, width) but the data you read is in the format of (height, width, channel). If you use torchvision to transform the image into PyTorch tensors, this format conversion is done automatically. Otherwise, you need to permute the dimensions before use.
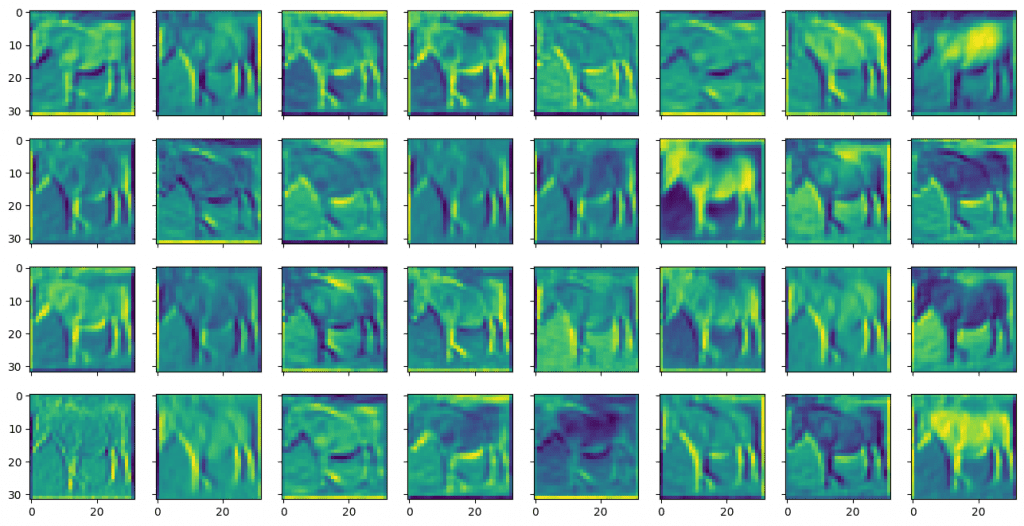
Afterward, pass it on through the model’s first convolution layer and capture the output. You need to tell PyTorch that no gradient is needed for this calculation as you are not going to optimize the model weight:
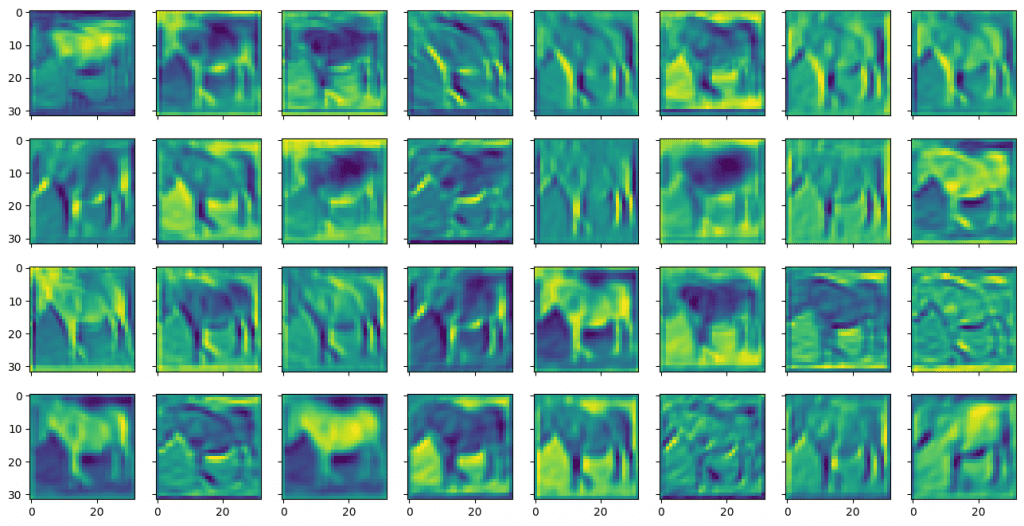
You can see that they are called feature maps because they are highlighting certain features from the input image. A feature is identified using a small window (in this case, over a 3×3 pixels filter). The input image has three color channels. Each channel has a different filter applied, and their results are combined for an output feature.
You can similarly display the feature map from the output of the second convolutional layer as follows:
Compared to the output of the first convolutional layer, the feature maps from the second convolutional layer looks blurry and more abstract. But these are more useful for the model to identify the objects.
Putting everything together, the code below loads the saved model from the previous section and generate the feature maps:
It provides self-study tutorials with hundreds of working code to turn you from a novice to expert. It equips you with tensor operation, training, evaluation, hyperparameter optimization,
and much more...
Kick-start your deep learning journey with hands-on exercises
4 Responses to Building a Convolutional Neural Network in PyTorch
Prashanth Reddy NimmakayalaMarch 29, 2023 at 4:19 pm#
In the code section “An Example of Convolutional Neural Network” we find in the line #L13
testloader = torch.utils.data.DataLoader( #here => trainset, batch_size=batch_size, shuffle=True)
we should be having testset instead of trainset right?
You don’t explain or mention the class at all. As a beginner it was hard to understand and follow the whole guide with a giant hole being present within the process.

")


In the code section “An Example of Convolutional Neural Network” we find in the line #L13
testloader = torch.utils.data.DataLoader( #here => trainset, batch_size=batch_size, shuffle=True)
we should be having testset instead of trainset right?
Hi Prashanth…Yes. Thank you for your feedback!
You don’t explain or mention the class at all. As a beginner it was hard to understand and follow the whole guide with a giant hole being present within the process.
Thank you for your feedback!