PyTorch is a deep learning library. You can build very sophisticated deep learning models with PyTorch. However, there are times you want to have a graphical representation of your model architecture. In this post, you will learn:
How to save your PyTorch model in an exchange format
How to use Netron to create a graphical representation.
Kick-start your project with my book Deep Learning with PyTorch. It provides self-study tutorials with working code.
Let’s get started.
Visualizing a PyTorch Model Photo by Ken Cheung. Some rights reserved.
Overview
This post is divided into two parts; they are
Why Graphical Representation of a PyTorch Model is Hard
How to Use Netron to Create a Model Graph
Why Graphical Represetnation of a PyTorch Model is Hard
PyTorch is a very flexible library for deep learning. Strictly speaking, it never mandates how you should build your model as long as it works like a function that can transform an input tensor into output tensor. This is a problem: With a model, you never knows how it works unless you follows the input tensor and collect the trace until you get the output tensor. Therefore it is not trivial to convert a PyTorch model into a picture.
There are multiple libraries to solve this problem. But in general, there are only two ways to solve it: You can follow a tensor on the forward pass and see what operation (i.e., layers) are applied, or follow a tensor on the backward pass and see how the gradient propagated to the input. You can only find clues about the structure inside a model in this manner.
Want to Get Started With Deep Learning with PyTorch?
Take my free email crash course now (with sample code).
Click to sign-up and also get a free PDF Ebook version of the course.
How to Use Netron to Create a Model Graph
When you save a PyTorch model, you are saving its states. You can get the model states using model.state_dict(). While the weight tensors have names so it helps you to restore them to a model, you do not have the clues on how the weights are connected to each other. The only way you can connect tensors and find out their relationship is to get the tensor gradient: When you run a model and get an output, the calculations involved, including the dependencies to other tensors, are remembered by each intermediate tensors so automatic differentiation can be performed.
Indeed, if you want to know the algorithm behind a PyTorch model, this is also the way to go. There are only a few tools to create graphics from a PyTorch model. In below, you will learn about the tool Netron. It is a “deep learning model viewer”. It is a software that you can install and run on macOS, Linux, and Windows. You can visit the page below and download the software for your platform:
There is also an online version available, that you can see your model by uploading a model file.
Netron cannot visualize a PyTorch model from the saved states because there’s not enough clues to tell about the structure of the model. However, PyTorch allows you to convert the model to an exchange format, ONNX, that Netron can understand.
Let’s start with an example. In below you created a simple model to classify the iris dataset. It is a classification problem with three classes. Therefore the model should output a vector of three values. A complete code that you would create for this problem is as follows, which the dataset is obtained from scikit-learn:
1
2
3
4
5
6
7
8
9
10
11
12
13
14
15
16
17
18
19
20
21
22
23
24
25
26
27
28
29
30
31
32
33
34
35
36
37
38
39
40
41
42
43
44
45
46
47
48
49
50
51
52
53
54
55
56
57
import torch
import torch.nn asnn
import torch.optim asoptim
from sklearn.datasets import load_iris
from sklearn.model_selection import train_test_split
Running the above produces the following, for example:
1
Model accuracy: 97.78%
So you know that model is a PyTorch model that can take a tensor and return a tensor. You can convert this model into ONNX format using the torch.onnx.export() function:
Running this will create a file iris.onnx at the local directory. You need to provide a sample tensor that works with the model as input (X_test in the example above). This is because during the conversion, it needs to follow this sample tensor to understand what operations shall be applied so you can convert the algorithm step by step into ONNX format. Every weight in a PyTorch model is a tensor and there is a name assigned to them. But the input and output tensors are not named usually, hence you need to provide a name to them when you run export(). These names should be provided as a list of strings because in general, a model can take multiple tensors and return multiple tensors.
Usually you should run export() after the training loop. It is because the ONNX model created contains a complete model that you can run without the PyTorch library. You want to save the optimized weight to it. However, for the purpose of visualizing a model in Netron, the quality of the model is not a concern. You can run export() as soon as the PyTorch model is created.
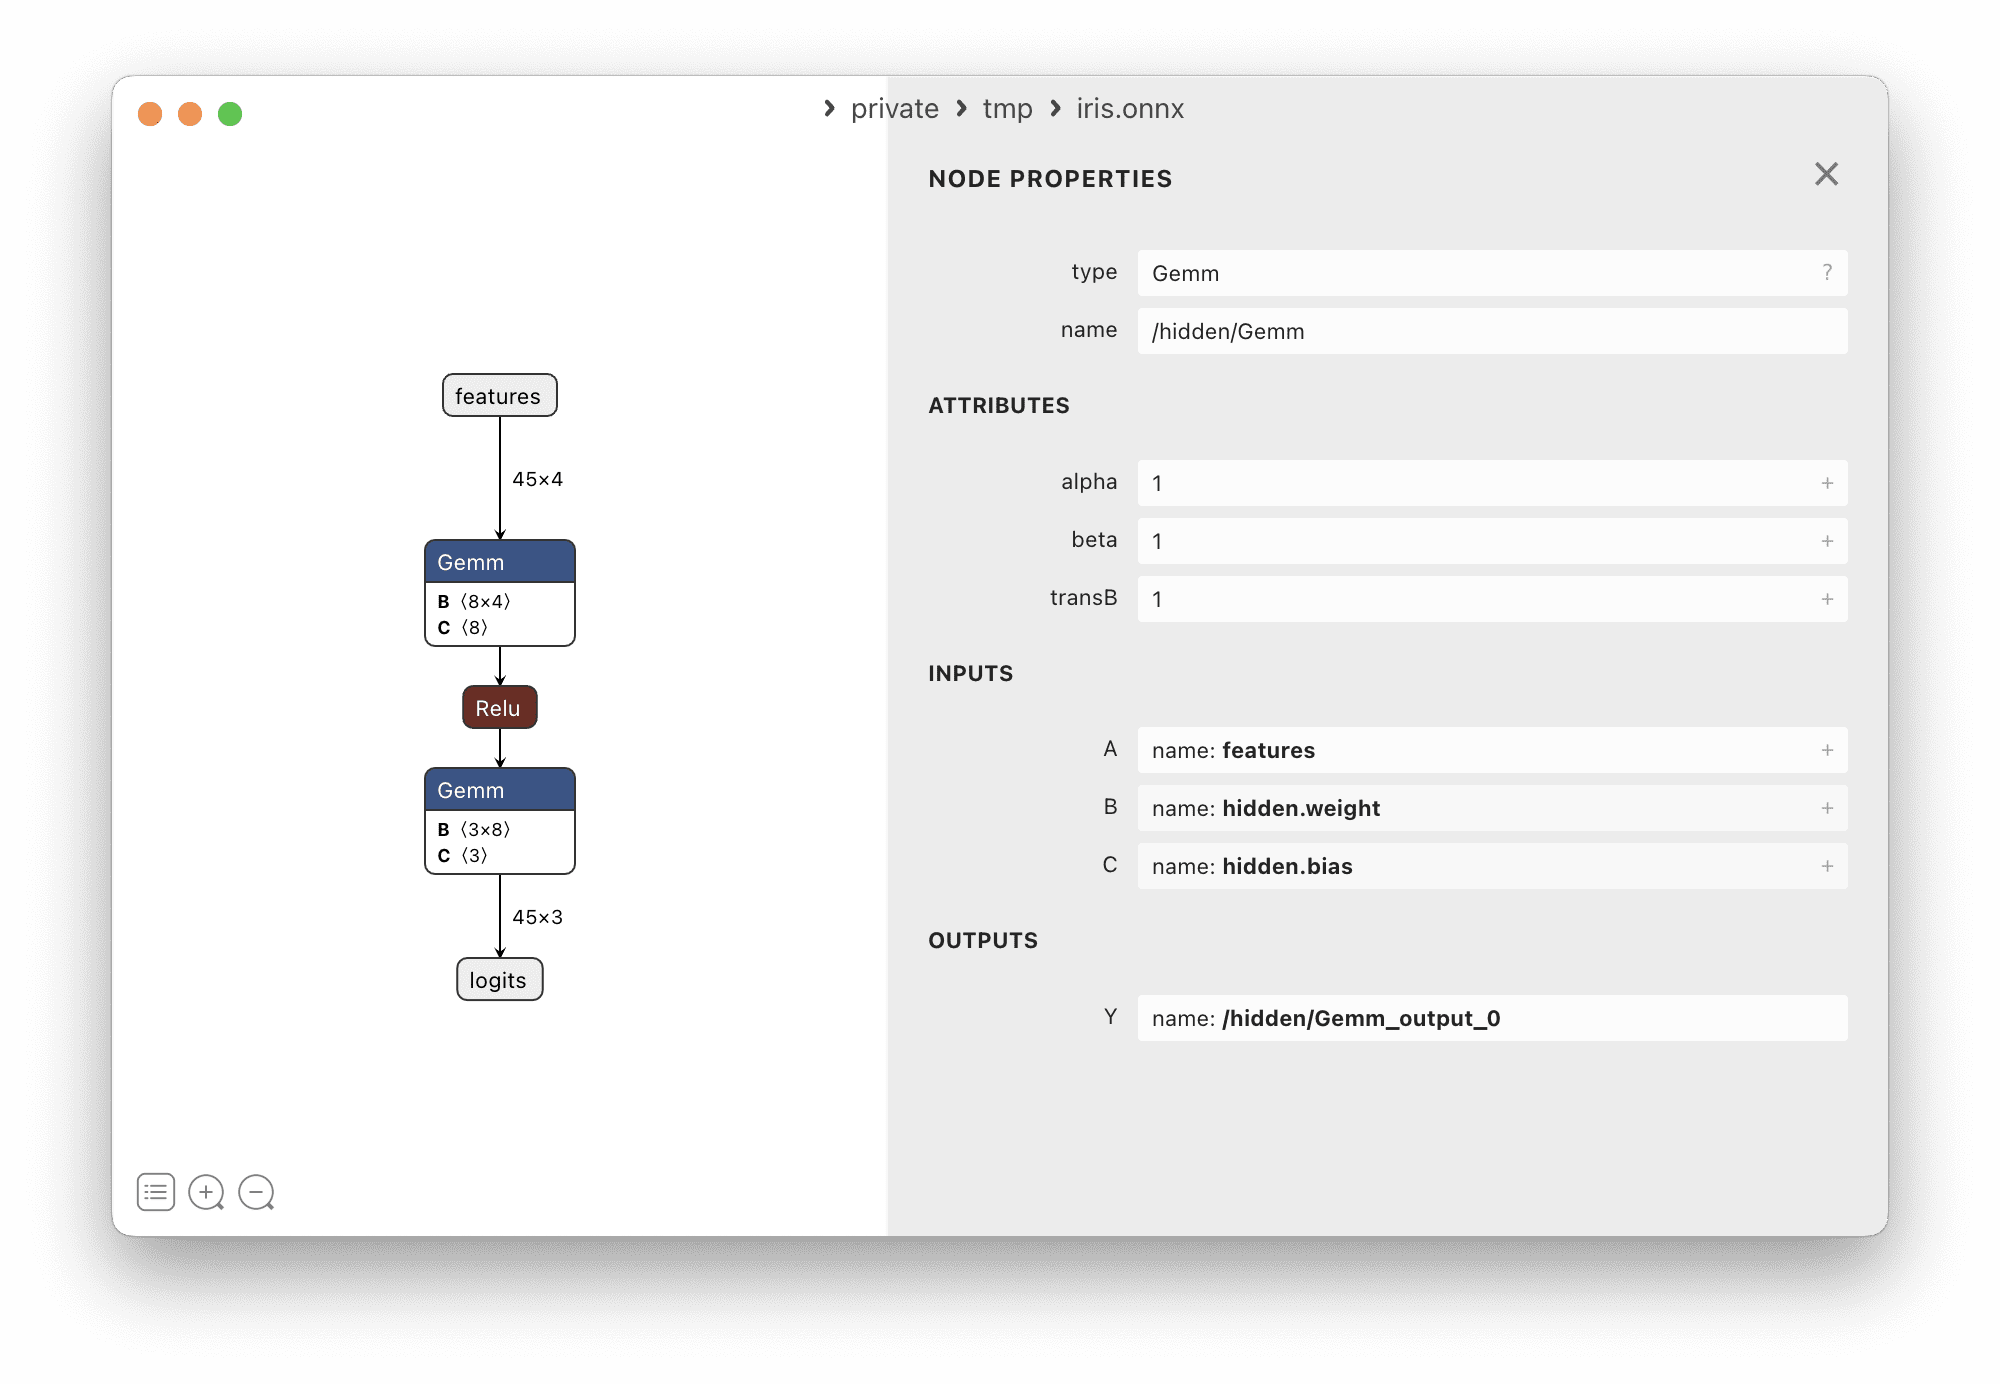
After you launched Netron, you can open the saved ONNX file. In this example, you should see the following screen:
It shows how the input tensor connected to the output tensor via different operations in the deep learning model. The name of the input and output tensors you provided to the export() function is used in the visualization. Clicking on a box will give you more details about that particular tensor or operation. The names of operations as you can see in Netron may be different from what you call them in PyTorch, however. In the screen above, you see the nn.Linear() layer becomes “Gemm”, which stands for “general matrix multiply” operation. You can even examine the weights on a layer with Netron by a few points and clicks.
If you would like to keep a copy of this visualization, you can export it into PNG format in Netron.
Further Readings
Netron is an open source project which you can find its source code in Github:
It provides self-study tutorials with hundreds of working code to turn you from a novice to expert. It equips you with tensor operation, training, evaluation, hyperparameter optimization,
and much more...
Kick-start your deep learning journey with hands-on exercises
Sweet! Would that work with TensorFlow and Keras? I’ve been using StellarGraph, a Graph Neural Network Library built upon TensorFlow. Tensorflow also supports exporting models to ONYXs.


Sweet! Would that work with TensorFlow and Keras? I’ve been using StellarGraph, a Graph Neural Network Library built upon TensorFlow. Tensorflow also supports exporting models to ONYXs.
Hi Truong…Absolutely! The following is a great starting point using TensorFlow and Keras.
https://machinelearningmastery.com/tensorflow-tutorial-deep-learning-with-tf-keras/