Convolutional neural networks have been found successful in computer vision applications. Various network architectures are proposed, and they are neither magical nor hard to understand.
In this tutorial, you will make sense of the operation of convolutional layers and their role in a larger convolutional neural network.
After finishing this tutorial, you will learn:
- How convolutional layers extract features from an image
- How different convolutional layers can stack up to build a neural network
Let’s get started.

Understanding the design of a convolutional neural network
Photo by Kin Shing Lai. Some rights reserved.
Overview
This article is divided into three sections; they are:
- An Example Network
- Showing the Feature Maps
- Effect of the Convolutional Layers
An Example Network
The following is a program to do image classification on the CIFAR-10 dataset:
|
1 2 3 4 5 6 7 8 9 10 11 12 13 14 15 16 17 18 19 20 21 22 23 24 25 26 27 28 29 30 31 |
import matplotlib.pyplot as plt import numpy as np import tensorflow as tf from tensorflow.keras.models import Sequential from tensorflow.keras.layers import Conv2D, Dropout, MaxPooling2D, Flatten, Dense from tensorflow.keras.constraints import MaxNorm from tensorflow.keras.datasets.cifar10 import load_data (X_train, y_train), (X_test, y_test) = load_data() # rescale image X_train_scaled = X_train / 255.0 X_test_scaled = X_test / 255.0 model = Sequential([ Conv2D(32, (3,3), input_shape=(32, 32, 3), padding="same", activation="relu", kernel_constraint=MaxNorm(3)), Dropout(0.3), Conv2D(32, (3,3), padding="same", activation="relu", kernel_constraint=MaxNorm(3)), MaxPooling2D(), Flatten(), Dense(512, activation="relu", kernel_constraint=MaxNorm(3)), Dropout(0.5), Dense(10, activation="sigmoid") ]) model.compile(optimizer="adam", loss="sparse_categorical_crossentropy", metrics="sparse_categorical_accuracy") model.fit(X_train_scaled, y_train, validation_data=(X_test_scaled, y_test), epochs=25, batch_size=32) |
This network should be able to achieve around 70% accuracy in classification. The images are in 32×32 pixels in RGB color. They are in 10 different classes, and the labels are integers from 0 to 9.
You can print the network using Keras’s summary() function:
|
1 2 |
... model.summary() |
In this network, the following will be shown on the screen:
|
1 2 3 4 5 6 7 8 9 10 11 12 13 14 15 16 17 18 19 20 21 22 23 24 25 26 |
Model: "sequential" _________________________________________________________________ Layer (type) Output Shape Param # ================================================================= conv2d (Conv2D) (None, 32, 32, 32) 896 dropout (Dropout) (None, 32, 32, 32) 0 conv2d_1 (Conv2D) (None, 32, 32, 32) 9248 max_pooling2d (MaxPooling2D (None, 16, 16, 32) 0 ) flatten (Flatten) (None, 8192) 0 dense (Dense) (None, 512) 4194816 dropout_1 (Dropout) (None, 512) 0 dense_1 (Dense) (None, 10) 5130 ================================================================= Total params: 4,210,090 Trainable params: 4,210,090 Non-trainable params: 0 _________________________________________________________________ |
It is typical in a network for image classification to be comprised of convolutional layers at an early stage, with dropout and pooling layers interleaved. Then, at a later stage, the output from convolutional layers is flattened and processed by some fully connected layers.
Showing the Feature Maps
In the above network, there are two convolutional layers (Conv2D). The first layer is defined as follows:
|
1 |
Conv2D(32, (3,3), input_shape=(32, 32, 3), padding="same", activation="relu", kernel_constraint=MaxNorm(3)) |
This means the convolutional layer will have a 3×3 kernel and apply on an input image of 32×32 pixels and three channels (the RGB colors). Therefore, the output of this layer will be 32 channels.
In order to make sense of the convolutional layer, you can check out its kernel. The variable model holds the network, and you can find the kernel of the first convolutional layer with the following:
|
1 2 |
... print(model.layers[0].kernel) |
This prints:
|
1 2 3 4 5 6 7 8 |
<tf.Variable 'conv2d/kernel:0' shape=(3, 3, 3, 32) dtype=float32, numpy= array([[[[-2.30068922e-01, 1.41024575e-01, -1.93124503e-01, -2.03153938e-01, 7.71819279e-02, 4.81446862e-01, -1.11971676e-01, -1.75487325e-01, -4.01797555e-02, ... 4.64215249e-01, 4.10646647e-02, 4.99733612e-02, -5.22711873e-02, -9.20209661e-03, -1.16479330e-01, 9.25614685e-02, -4.43541892e-02]]]], dtype=float32)> |
You can tell that model.layers[0] is the correct layer by comparing the name conv2d from the above output to the output of model.summary(). This layer has a kernel of the shape (3, 3, 3, 32), which are the height, width, input channels, and output feature maps, respectively.
Assume the kernel is a NumPy array k. A convolutional layer will take its kernel k[:, :, 0, n] (a 3×3 array) and apply on the first channel of the image. Then apply k[:, :, 1, n] on the second channel of the image, and so on. Afterward, the result of the convolution on all the channels is added up to become the feature map n of the output, where n, in this case, will run from 0 to 31 for the 32 output feature maps.
In Keras, you can extract the output of each layer using an extractor model. In the following, you will create a batch with one input image and send it to the network. Then look at the feature maps of the first convolutional layer:
|
1 2 3 4 5 6 7 8 9 10 11 12 13 14 15 |
... # Extract output from each layer extractor = tf.keras.Model(inputs=model.inputs, outputs=[layer.output for layer in model.layers]) features = extractor(np.expand_dims(X_train[7], 0)) # Show the 32 feature maps from the first layer l0_features = features[0].numpy()[0] fig, ax = plt.subplots(4, 8, sharex=True, sharey=True, figsize=(16,8)) for i in range(0, 32): row, col = i//8, i%8 ax[row][col].imshow(l0_features[..., i]) plt.show() |
The above code will print the feature maps like the following: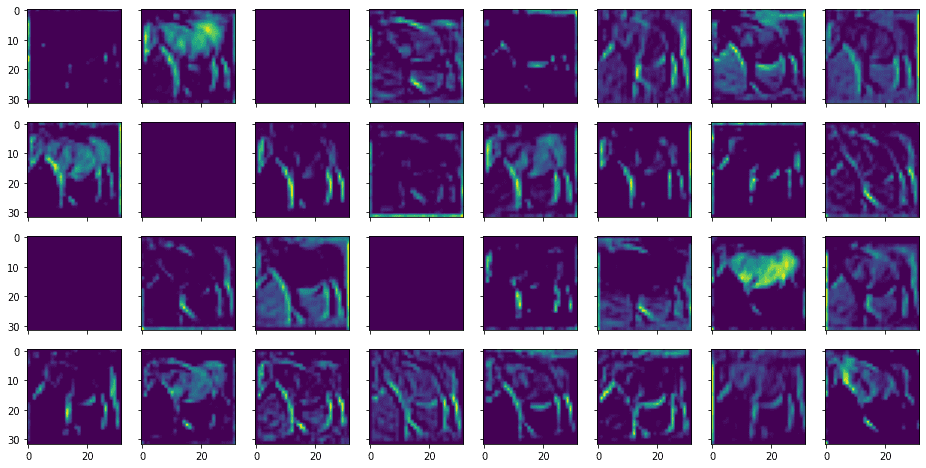
This corresponds to the following input image: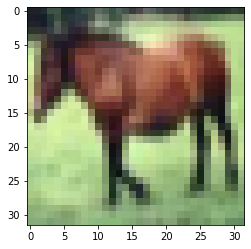
You can see that they are called feature maps because they are highlighting certain features from the input image. A feature is identified using a small window (in this case, over a 3×3 pixels filter). The input image has three color channels. Each channel has a different filter applied, and their results are combined for an output feature.
You can similarly display the feature map from the output of the second convolutional layer as follows:
|
1 2 3 4 5 6 7 8 9 10 |
... # Show the 32 feature maps from the third layer l2_features = features[2].numpy()[0] fig, ax = plt.subplots(4, 8, sharex=True, sharey=True, figsize=(16,8)) for i in range(0, 32): row, col = i//8, i%8 ax[row][col].imshow(l2_features[..., i]) plt.show() |
This shows the following: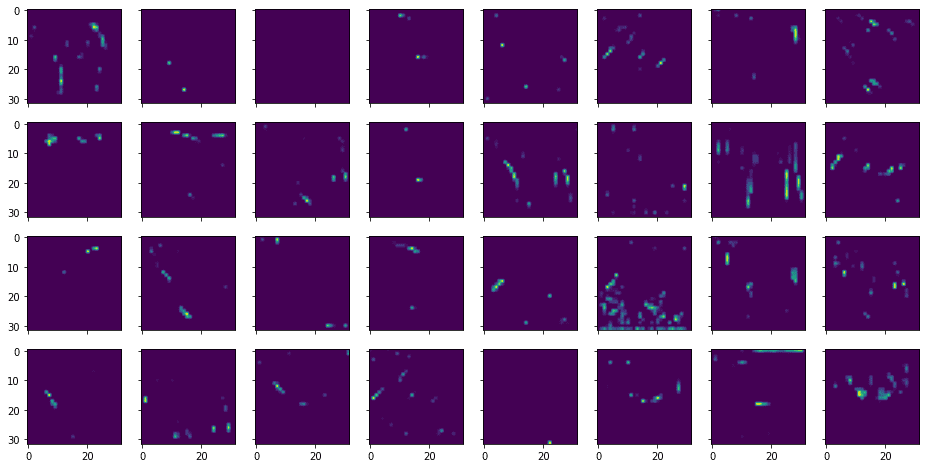
From the above, you can see that the features extracted are more abstract and less recognizable.
Effect of the Convolutional Layers
The most important hyperparameter to a convolutional layer is the size of the filter. Usually, it is in a square shape, and you can consider that as a window or receptive field to look at the input image. Therefore, the higher resolution of the image, then you can expect a larger filter.
On the other hand, a filter too large will blur the detailed features because all pixels from the receptive field through the filter will be combined into one pixel at the output feature map. Therefore, there is a trade-off for the appropriate size of the filter.
Stacking two convolutional layers (without any other layers in between) is equivalent to a single convolutional layer with a larger filter. But a typical design to use nowadays is two layers with small filters stacked together rather than one larger with a larger filter, as there are fewer parameters to train.
The exception would be a convolutional layer with a 1×1 filter. This is usually found as the beginning layer of a network. The purpose of such a convolutional layer is to combine the input channels into one rather than transforming the pixels. Conceptually, this can convert a color image into grayscale, but usually, you can use multiple ways of conversion to create more input channels than merely RGB for the network.
Also, note that in the above network, you are using Conv2D for a 2D filter. There is also a Conv3D layer for a 3D filter. The difference is whether you apply the filter separately for each channel or feature map or consider the input feature maps stacked up as a 3D array and apply a single filter to transform it altogether. Usually, the former is used as it is more reasonable to consider no particular order in which the feature maps should be stacked.
Further Reading
This section provides more resources on the topic if you are looking to go deeper.
Articles
- Convolutional Neural Networks (CNNs / ConvNets) from the Stanford Course CS231n
Tutorials
- How Do Convolutional Layers Work in Deep Learning Neural Networks?
- A Gentle Introduction to 1×1 Convolutions to Manage Model Complexity
- A Gentle Introduction to Padding and Stride for Convolutional Neural Networks
Summary
In this post, you have seen how to visualize the feature maps from a convolutional neural network and how it works to extract the feature maps.
Specifically, you learned:
- The structure of a typical convolutional neural network
- What is the effect of the filter size on a convolutional layer
- What is the effect of stacking convolutional layers in a network


")

No comments yet.