Deep learning is a fascinating field of study and the techniques are achieving world class results in a range of challenging machine learning problems.
It can be hard to get started in deep learning.
Which library should you use and which techniques should you focus on?
In this post you will discover a 14-part crash course into deep learning in Python with the easy to use and powerful Keras library.
This mini-course is intended for python machine learning practitioners that are already comfortable with scikit-learn on the SciPy ecosystem for machine learning.
Kick-start your project with my new book Deep Learning With Python, including step-by-step tutorials and the Python source code files for all examples.
Let’s get started.
(Tip: you might want to print or bookmark this page so that you can refer back to it later.)
- Update Mar/2018: Added alternate link to download the dataset as the original appears to have been taken down.
- Update Oct/2019: Updated for Keras 2.3.0.

Applied Deep Learning in Python Mini-Course
Photo by darkday, some rights reserved.
Who Is This Mini-Course For?
Before we get started, let’s make sure you are in the right place. The list below provides some general guidelines as to who this course was designed for.
Don’t panic if you don’t match these points exactly, you might just need to brush up in one area or another to keep up.
- Developers that know how to write a little code. This means that it is not a big deal for you to get things done with Python and know how to setup the SciPy ecosystem on your workstation (a prerequisite). It does not mean your a wizard coder, but it does mean you’re not afraid to install packages and write scripts.
- Developers that know a little machine learning. This means you know about the basics of machine learning like cross validation, some algorithms and the bias-variance trade-off. It does not mean that you are a machine learning PhD, just that you know the landmarks or know where to look them up.
This mini-course is not a textbook on Deep Learning.
It will take you from a developer that knows a little machine learning in Python to a developer who can get results and bring the power of Deep Learning to your own projects.
Mini-Course Overview (what to expect)
This mini-course is divided into 14 parts.
Each lesson was designed to take the average developer about 30 minutes. You might finish some much sooner and other you may choose to go deeper and spend more time.
You can can complete each part as quickly or as slowly as you like. A comfortable schedule may be to complete one lesson per day over a two week period. Highly recommended.
The topics you will cover over the next 14 lessons are as follows:
- Lesson 01: Introduction to Theano.
- Lesson 02: Introduction to TensorFlow.
- Lesson 03: Introduction to Keras.
- Lesson 04: Crash Course in Multi-Layer Perceptrons.
- Lesson 05: Develop Your First Neural Network in Keras.
- Lesson 06: Use Keras Models With Scikit-Learn.
- Lesson 07: Plot Model Training History.
- Lesson 08: Save Your Best Model During Training With Checkpointing.
- Lesson 09: Reduce Overfitting With Dropout Regularization.
- Lesson 10: Lift Performance With Learning Rate Schedules.
- Lesson 11: Crash Course in Convolutional Neural Networks.
- Lesson 12: Handwritten Digit Recognition.
- Lesson 13: Object Recognition in Small Photographs.
- Lesson 14: Improve Generalization With Data Augmentation.
This is going to be a lot of fun.
You’re going to have to do some work though, a little reading, a little research and a little programming. You want to learn deep learning right?
(Tip: All of the answers these lessons can be found on this blog, use the search feature)
Any questions at all, please post in the comments below.
Share your results in the comments.
Hang in there, don’t give up!
Need help with Deep Learning in Python?
Take my free 2-week email course and discover MLPs, CNNs and LSTMs (with code).
Click to sign-up now and also get a free PDF Ebook version of the course.
Lesson 01: Introduction to Theano
Theano is a Python library for fast numerical computation to aid in the development of deep learning models.
At it’s heart Theano is a compiler for mathematical expressions in Python. It knows how to take your structures and turn them into very efficient code that uses NumPy and efficient native libraries to run as fast as possible on CPUs or GPUs.
The actual syntax of Theano expressions is symbolic, which can be off-putting to beginners used to normal software development. Specifically, expression are defined in the abstract sense, compiled and later actually used to make calculations.
In this lesson your goal is to install Theano and write a small example that demonstrates the symbolic nature of Theano programs.
For example, you can install Theano using pip as follows:
|
1 |
sudo pip install Theano |
A small example of a Theano program that you can use as a starting point is listed below:
|
1 2 3 4 5 6 7 8 9 10 11 12 13 |
import theano from theano import tensor # declare two symbolic floating-point scalars a = tensor.dscalar() b = tensor.dscalar() # create a simple expression c = a + b # convert the expression into a callable object that takes (a,b) # values as input and computes a value for c f = theano.function([a,b], c) # bind 1.5 to 'a', 2.5 to 'b', and evaluate 'c' result = f(1.5, 2.5) print(result) |
Learn more about Theano on the Theano homepage.
Lesson 02: Introduction to TensorFlow
TensorFlow is a Python library for fast numerical computing created and released by Google. Like Theano, TensorFlow is intended to be used to develop deep learning models.
With the backing of Google, perhaps used in some of it’s production systems and used by the Google DeepMind research group, it is a platform that we cannot ignore.
Unlike Theano, TensorFlow does have more of a production focus with a capability to run on CPUs, GPUs and even very large clusters.
In this lesson your goal is to install TensorFlow become familiar with the syntax of the symbolic expressions used in TensorFlow programs.
For example, you can install TensorFlow using pip:
|
1 |
sudo pip install TensorFlow |
A small example of a TensorFlow program that you can use as a starting point is listed below:
|
1 2 3 4 5 6 7 8 9 10 11 12 13 14 |
# Example of TensorFlow library import tensorflow as tf import tensorflow.compat.v1 as tf tf.disable_v2_behavior() # declare two symbolic floating-point scalars a = tf.placeholder(tf.float32) b = tf.placeholder(tf.float32) # create a simple symbolic expression using the add function add = tf.add(a, b) # bind 1.5 to 'a', 2.5 to 'b', and evaluate 'c' sess = tf.Session() binding = {a: 1.5, b: 2.5} c = sess.run(add, feed_dict=binding) print(c) |
Learn more about TensorFlow on the TensorFlow homepage.
Lesson 03: Introduction to Keras
A difficulty of both Theano and TensorFlow is that it can take a lot of code to create even very simple neural network models.
These libraries were designed primarily as a platform for research and development more than for the practical concerns of applied deep learning.
The Keras library addresses these concerns by providing a wrapper for both Theano and TensorFlow. It provides a clean and simple API that allows you to define and evaluate deep learning models in just a few lines of code.
Because of the ease of use and because it leverages the power of Theano and TensorFlow, Keras is quickly becoming the go-to library for applied deep learning.
The focus of Keras is the concept of a model. The life-cycle of a model can be summarized as follows:
- Define your model. Create a Sequential model and add configured layers.
- Compile your model. Specify loss function and optimizers and call the compile()
function on the model. - Fit your model. Train the model on a sample of data by calling the fit() function on
the model. - Make predictions. Use the model to generate predictions on new data by calling functions such as evaluate() or predict() on the model.
Your goal for this lesson is to install Keras.
For example, you can install Keras using pip:
|
1 |
sudo pip install keras |
Start to familiarize yourself with the Keras library ready for the upcoming lessons where we will implement our first model.
You can learn more about the Keras library on the Keras homepage.
Lesson 04: Crash Course in Multi-Layer Perceptrons
Artificial neural networks are a fascinating area of study, although they can be intimidating
when just getting started.
The field of artificial neural networks is often just called neural networks or multi-layer
Perceptrons after perhaps the most useful type of neural network.
The building block for neural networks are artificial neurons. These are simple computational
units that have weighted input signals and produce an output signal using an activation function.
Neurons are arranged into networks of neurons. A row of neurons is called a layer and one
network can have multiple layers. The architecture of the neurons in the network is often called the network topology.
Once configured, the neural network needs to be trained on your dataset. The classical and still preferred training algorithm for neural networks is called stochastic
gradient descent.
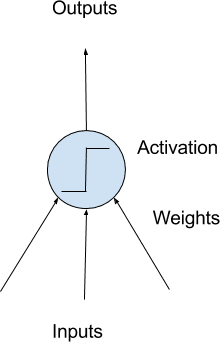
Model of a Simple Neuron
Your goal for this lesson is to become familiar with neural network terminology.
Dig a little deeper into terms like neuron, weights, activation function, learning rate and more.
Lesson 05: Develop Your First Neural Network in Keras
Keras allows you to develop and evaluate deep learning models in very few lines of code.
In this lesson your goal is to develop your first neural network using the Keras library.
Use a standard binary (two-class) classification dataset from the UCI Machine Learning Repository, like the Pima Indians onset of diabetes or the ionosphere datasets.
Piece together code to achieve the following:
- Load your dataset using NumPy or Pandas.
- Define your neural network model and compile it.
- Fit your model to the dataset.
- Estimate the performance of your model on unseen data.
To give you a massive kick start, below is a complete working example that you can use as a starting point.
Download the dataset and place it in your current working directory.
|
1 2 3 4 5 6 7 8 9 10 11 12 13 14 15 16 17 |
from keras.models import Sequential from keras.layers import Dense # Load the dataset dataset = numpy.loadtxt("pima-indians-diabetes.csv", delimiter=",") X = dataset[:,0:8] Y = dataset[:,8] # Define and Compile model = Sequential() model.add(Dense(12, input_dim=8, activation='relu')) model.add(Dense(8, activation='relu')) model.add(Dense(1, activation='sigmoid')) model.compile(loss='binary_crossentropy' , optimizer='adam', metrics=['accuracy']) # Fit the model model.fit(X, Y, epochs=150, batch_size=10) # Evaluate the model scores = model.evaluate(X, Y) print("%s: %.2f%%" % (model.metrics_names[1], scores[1]*100)) |
Now develop your own model on a different dataset, or adapt this example.
Learn more about the Keras API for simple model development.
Lesson 06: Use Keras Models With Scikit-Learn
The scikit-learn library is a general purpose machine learning framework in Python built on top of SciPy.
Scikit-learn excels at tasks such as evaluating model performance and optimizing model hyperparameters in just a few lines of code.
Keras provides a wrapper class that allows you to use your deep learning models with scikit-learn. For example, an instance of KerasClassifier class in Keras can wrap your deep learning model and be used as an Estimator in scikit-learn.
When using the KerasClassifier class, you must specify the name of a function that the class can use to define and compile your model. You can also pass additional parameters to the constructor of the KerasClassifier class that will be passed to the model.fit() call later, like the number of epochs and batch size.
In this lesson your goal is to develop a deep learning model and evaluate it using k-fold cross validation.
For example, you can define an instance of the KerasClassifier and the custom function to create your model as follows:
|
1 2 3 4 5 6 7 8 9 10 11 12 13 14 |
# Function to create model, required for KerasClassifier def create_model(): # Create model model = Sequential() ... # Compile model model.compile(...) return model # create classifier for use in scikit-learn model = KerasClassifier(build_fn=create_model, nb_epoch=150, batch_size=10) # evaluate model using 10-fold cross validation in scikit-learn kfold = StratifiedKFold(n_splits=10, shuffle=True, random_state=seed) results = cross_val_score(model, X, Y, cv=kfold) |
Learn more about using your Keras deep learning models with scikit-learn on the Wrappers for the Sciki-Learn API webpage.
Lesson 07: Plot Model Training History
You can learn a lot about neural networks and deep learning models by observing their performance over time during training.
Keras provides the capability to register callbacks when training a deep learning model.
One of the default callbacks that is registered when training all deep learning models is the History callback. It records training metrics for each epoch. This includes the loss and the accuracy (for classification problems) as well as the loss and accuracy for the validation dataset, if one is set.
The history object is returned from calls to the fit() function used to train the model. Metrics are stored in a dictionary in the history member of the object returned.
Your goal for this lesson is to investigate the history object and create plots of model performance during training.
For example, you can print the list of metrics collected by your history object as follows:
|
1 2 3 |
# list all data in history history = model.fit(...) print(history.history.keys()) |
You can learn more about the History object and the callback API in Keras.
Lesson 08: Save Your Best Model During Training With Checkpointing
Application checkpointing is a fault tolerance technique for long running processes.
The Keras library provides a checkpointing capability by a callback API. The ModelCheckpoint
callback class allows you to define where to checkpoint the model weights, how the file should
be named and under what circumstances to make a checkpoint of the model.
Checkpointing can be useful to keep track of the model weights in case your training run is stopped prematurely. It is also useful to keep track of the best model observed during training.
In this lesson, your goal is to use the ModelCheckpoint callback in Keras to keep track of the best model observed during training.
You could define a ModelCheckpoint that saves network weights to the same file each time an improvement is observed. For example:
|
1 2 3 4 5 6 |
from keras.callbacks import ModelCheckpoint ... checkpoint = ModelCheckpoint('weights.best.hdf5', monitor='val_accuracy', save_best_only=True, mode='max') callbacks_list = [checkpoint] # Fit the model model.fit(..., callbacks=callbacks_list) |
Learn more about using the ModelCheckpoint callback in Keras.
Lesson 09: Reduce Overfitting With Dropout Regularization
A big problem with neural networks is that they can overlearn your training dataset.
Dropout is a simple yet very effective technique for reducing dropout and has proven useful in large deep learning models.
Dropout is a technique where randomly selected neurons are ignored during training. They are dropped-out randomly. This means that their contribution to the activation of downstream neurons is temporally removed on the forward pass and any weight updates are not applied to the neuron on the backward pass.
You can add a dropout layer to your deep learning model using the Dropout layer class.
In this lesson your goal is to experiment with adding dropout at different points in your neural network and set to different probability of dropout values.
For example, you can create a dropout layer with the probability of 20% and add it to your model as follows:
|
1 2 3 |
from keras.layers import Dropout ... model.add(Dropout(0.2)) |
You can learn more about dropout in Keras.
Lesson 10: Lift Performance With Learning Rate Schedules
You can often get a boost in the performance of your model by using a learning rate schedule.
Often called an adaptive learning rate or an annealed learning rate, this is a technique where the learning rate used by stochastic gradient descent changes while training your model.
Keras has a time-based learning rate schedule built into the implementation of the stochastic gradient descent algorithm in the SGD class.
When constructing the class, you can specify the decay which is the amount that your learning rate (also specified) will decrease each epoch. When using learning rate decay you should bump up your initial learning rate and consider adding a large momentum value such as 0.8 or 0.9.
Your goal in this lesson is to experiment with the time-based learning rate schedule built into Keras.
For example, you can specify a learning rate schedule that starts at 0.1 and drops by 0.0001 each epoch as follows:
|
1 2 3 4 |
from keras.optimizers import SGD ... sgd = SGD(lr=0.1, momentum=0.9, decay=0.0001, nesterov=False) model.compile(..., optimizer=sgd) |
You can learn more about the SGD class in Keras here.
Lesson 11: Crash Course in Convolutional Neural Networks
Convolutional Neural Networks are a powerful artificial neural network technique.
They expect and preserve the spatial relationship between pixels in images by learning internal feature representations using small squares of input data.
Feature are learned and used across the whole image, allowing for the objects in your images to be shifted or translated in the scene and still detectable by the network. It is this reason why this type of network is so useful for object recognition in photographs, picking out digits, faces, objects and so on with varying orientation.
There are three types of layers in a Convolutional Neural Network:
- Convolutional Layers comprised of filters and feature maps.
- Pooling Layers that down sample the activations from feature maps.
- Fully-Connected Layers that plug on the end of the model and can be used to make predictions.
In this lesson you are to familiarize yourself with the terminology used when describing convolutional neural networks.
This may require a little research on your behalf.
Don’t worry too much about how they work just yet, just learn the terminology and configuration of the various layers used in this type of network.
Lesson 12: Handwritten Digit Recognition
Handwriting digit recognition is a difficult computer vision classification problem.
The MNIST dataset is a standard problem for evaluating algorithms on the problem of handwriting digit recognition. It contains 60,000 images of digits that can be used to train a model, and 10,000 images that can be used to evaluate its performance.

Example MNIST images
State of the art results can be achieved on the MNIST problem using convolutional neural networks. Keras makes loading the MNIST dataset dead easy.
In this lesson, your goal is to develop a very simple convolutional neural network for the MNIST problem comprised of one convolutional layer, one max pooling layer and one dense layer to make predictions.
For example, you can load the MNIST dataset in Keras as follows:
|
1 2 3 |
from keras.datasets import mnist ... (X_train, y_train), (X_test, y_test) = mnist.load_data() |
It may take a moment to download the files to your computer.
As a tip, the Keras Conv2D layer that you will use as your first hidden layer expects image data in the format width x height x channels, where the MNIST data has 1 channel because the images are gray scale and a width and height of 28 pixels. You can easily reshape the MNIST dataset as follows:
|
1 2 |
X_train = X_train.reshape((X_train.shape[0], 28, 28, 1)) X_test = X_test.reshape((X_test.shape[0], 28, 28, 1)) |
You will also need to one-hot encode the output class value, that Keras also provides a handy helper function to achieve:
|
1 2 3 4 |
from keras.utils import np_utils ... y_train = np_utils.to_categorical(y_train) y_test = np_utils.to_categorical(y_test) |
As a final tip, here is a model definition that you can use as a starting point:
|
1 2 3 4 5 6 7 8 |
model = Sequential() model.add(Conv2D(32, (3, 3), padding='valid', input_shape=(28, 28, 1), activation='relu')) model.add(MaxPooling2D()) model.add(Flatten()) model.add(Dense(128, activation='relu')) model.add(Dense(num_classes, activation='softmax')) model.compile(loss='categorical_crossentropy', optimizer='adam', metrics=['accuracy']) |
Lesson 13: Object Recognition in Small Photographs
Object recognition is a problem where your model must indicate what is in a photograph.
Deep learning models achieve state of the art results in this problem using deep convolutional neural networks.
A popular standard dataset for evaluating models on this type of problem is called CIFAR-10. It contains 60,000 small photographs, each of one of 10 objects, like a cat, ship or airplane.
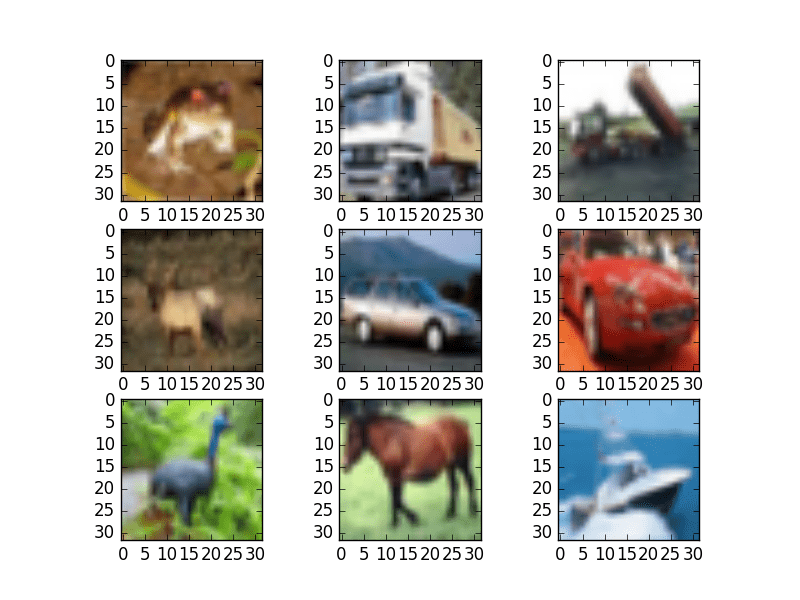
Small Sample of CIFAR-10 Images
As with the MNIST dataset, Keras provides a convenient function that you can use to load the dataset, and it will download it to your computer the first time you try to load it. The dataset is a 163 MB so it may take a few minutes to download.
Your goal in this lesson is to develop a deep convolutional neural network for the CIFAR-10 dataset. I would recommend a repeated pattern of convolution and pooling layers. Consider experimenting with drop-out and long training times.
For example, you can load the CIFAR-10 dataset in Keras and prepare it for use with a convolutional neural network as follows:
|
1 2 3 4 5 6 7 8 9 10 11 |
from keras.datasets import cifar10 from keras.utils import np_utils # load data (X_train, y_train), (X_test, y_test) = cifar10.load_data() # normalize inputs from 0-255 to 0.0-1.0 X_train = X_train.astype('float32') X_test = X_test.astype('float32') X_train = X_train / 255.0 X_test = X_test / 255.0 # one hot encode outputs y_train = np_utils.to_categorical(y_train) y_test = np_utils.to_categorical(y_test) |
Lesson 14: Improve Generalization With Data Augmentation
Data preparation is required when working with neural network and deep learning models.
Increasingly data augmentation is also required on more complex object recognition tasks. This is where images in your dataset are modified with random flips and shifts. This in essence makes your training dataset larger and helps your model to generalize the position and orientation of objects in images.
Keras provides an image augmentation API that will create modified versions of images in your dataset just-in-time. The ImageDataGenerator class can be used to define the image augmentation operations to perform which can be fit to a dataset and then used in place of your dataset when training your model.
Your goal with this lesson is to experiment with the Keras image augmentation API using a dataset you are already familiar with from a previous lesson like MNIST or CIFAR-10.
For example, the example below creates random rotations of up to 90 degrees of images in the MNIST dataset.
|
1 2 3 4 5 6 7 8 9 10 11 12 13 14 15 16 17 18 19 20 21 22 23 24 25 |
# Random Rotations from keras.datasets import mnist from keras.preprocessing.image import ImageDataGenerator from matplotlib import pyplot # load data (X_train, y_train), (X_test, y_test) = mnist.load_data() # reshape to be [samples][pixels][width][height] X_train = X_train.reshape((X_train.shape[0], 28, 28, 1)) X_test = X_test.reshape((X_test.shape[0], 28, 28, 1)) # convert from int to float X_train = X_train.astype('float32') X_test = X_test.astype('float32') # define data preparation datagen = ImageDataGenerator(rotation_range=90) # fit parameters from data datagen.fit(X_train) # configure batch size and retrieve one batch of images for X_batch, y_batch in datagen.flow(X_train, y_train, batch_size=9): # create a grid of 3 * 3 images for i in range(0, 9): pyplot.subplot(330 + 1 + i) pyplot.imshow(X_batch[i].reshape(28, 28), cmap=pyplot.get_cmap('gray')) # show the plot pyplot.show() break |
You can learn more about the Keras image augmentation API.
Deep Learning Mini-Course Review
Congratulations, you made it. Well done!
Take a moment and look back at how far you have come:
- You discovered deep learning libraries in python including the powerful numerical libraries Theano and TensorFlow and the easy to use Keras library for applied deep learning.
- You built your first neural network using Keras and learned how to use your deep learning models with scikit-learn and how to retrieve and plot the training history for your models.
- You learned about more advanced techniques such as dropout regularization and learning rate schedules and how you can use these techniques in Keras.
- Finally, you took the next step and learned about and developed convolutional neural networks for complex computer vision tasks and learned about augmentation of image data.
Don’t make light of this, you have come a long way in a short amount of time. This is just the beginning of your journey with deep learning in python. Keep practicing and developing your skills.
Did you enjoy this mini-course? Do you have any questions or sticking points?
Leave a comment and let me know.


Very less content in each lesson
Well, it is a mini course not a university course.
dear Jason.
I highly appreciate you effort. the course is great .i have one question regarding the part which is missing in the course . it is about to use the model. i built models based on lesson 6. i trained and adjust the model . my question what function i have to use to ask model to predict the values if i have new feed data. usually model predict should work. but what this model it did not work. can you advice me! how we can do it.
thanks
Thanks.
You can call model.predict() to make predictions on new data, learn more here:
https://machinelearningmastery.com/make-predictions-scikit-learn/
Hi Jason, what hardware do you use ? Do you use a power laptop ?
For big models I use GPUs on AWS:
https://machinelearningmastery.com/develop-evaluate-large-deep-learning-models-keras-amazon-web-services/
My workstations and laptops are mac running OS X.
I thought a beefier local machine with i7, 16GB RAM, 4 GB CUDA GPU would do, So I shud be ok without it ? even if I dont use AWS ?
That looks great.
AWS is always there if you need more RAM or want to run two models at the same time or in a few years they offer larger GPU instances that you may need access to.
Hi Dear
Unfortunately, I could not Download the Deep Learning Mini-Course file and others. what should I do?
Sorry to hear that Seyed, normally it is emailed to you immediately. Perhaps it landed in another folder?
I have just sent you a direct email with the PDF attached.
Dear Dr. Brownlee
Why do we evaluate the model on the same training set (X,Y). Is that somewhat different from other Machine Learning models which never use training data as evaluation ?
It’s just an example.
In Lesson 02: Introduction to TensorFlow
result is not defined
change result to c
Thanks, fixed!
Jason,
I am working through the code in Chp.7 DeepLearning Book. I am encountering two problems.
1. when loading data using np.loadtxt() function I encounter the following error: ValueError: could not convert string to float: ‘column_a’.
I loaded the data instead using np.genfromtxt() function and went through the code until I encountered a second error when training the model
2. the acc: nan
Epoch 28/150
768/768 [==============================] – 0s 122us/step – loss: nan – acc: 0.0000e+00
Epoch 29/150
768/768 [==============================] – 0s 125us/step – loss: nan – acc: 0.0000e+00
Epoch 30/150
768/768 [==============================] – 0s 159us/step – loss: nan – acc: 0.0000e+00
Not sure what the problem is. Any comments where I went wrong.
thanking you,
RA
Perhaps you need to update your libraries?
Perhaps you could try running the code files provided with the book?
Let me know how you go here or via email (contact page).
In lesson 12 you wrote that the Conv2D expects data in the format channels x width x height. But here https://keras.io/layers/convolutional/#conv2d the channel parameter comes at last. Am i correct?
Yes.
Thank you for the quick response! Furthermore i thank you so much for this site. It helps me a lot!
You’re welcome.
Hello i’m a high school student trying to learn about parallel processing and computer science, how does Applied deep learning relate to Hypercubes?
Deep learning is a field of study.
A hypercube is a concept from geometry, e.g. a cube in more than 3 dimensions.
Hi,
Is there a tensorflow 2 similar material?
Thanks!
I mainly use standalone keras, but you can adapt all the examples to tf.keras if you like.
Thank you for sending the course details.
I have installed theano & execute the code also.
It works.
Thank you.
Well done!
Hi Jason, in Lesson 04 I have a problem.
I have copied the content of the link of the pima-indians-diabetes database into an excel file and saved it as .csv (in 4 different .csv formats it allows) and when I run the code in the Anaconda prompt it always gives me an error:
File “neuralnetwork_keras.py”, line 5, in
dataset = numpy.loadtxt(“pima-indians-diabetes.csv”, delimiter=’,’)
NameError: name ‘numpy’ is not defined
I have numpy installed (I have checked it via pip install numpy). Why it says “name ‘numpy’ is not defined?
The error suggests that numpy is not installed or if it is installed it is not available at your anaconda promopt.
From this same prompt, perhaps try installing it again, then reboot the machine?
Dear Jason ,
First I would like to thank you for the online course.
I have question , I have built an model based on lesson 6 , i trained with data etc . Now I want to use it to predict the values for new set of data , which function I should use ,
I tried with model predict , it did not work .
………………………………………
Here is the script
from keras.models import Sequential
from keras.layers import Dense
from keras.wrappers.scikit_learn import KerasRegressor
from sklearn.model_selection import cross_val_score
from sklearn.model_selection import KFold
from sklearn.preprocessing import StandardScaler
from sklearn.pipeline import Pipeline
import numpy
import timeit
import pandas as pd
start = timeit.default_timer()
names = [‘WOB’, ‘RPM’, ‘ROP’, ‘SPP’,’Flow’ ,’Flow2′]
inputdata = pd.read_csv(“Input5.csv”, names=names)
dataset = inputdata.values
X = dataset[:,0:5]
Y = dataset[:,5]
test_data= dataset[:,0:5]
seed = None
numpy.random.seed(seed)
def baseline_model():
# create model
model = Sequential()
model.add(Dense(10, input_dim=5, kernel_initializer=’normal’, activation=’relu’))
model.add(Dense(10, kernel_initializer=’normal’, activation=’relu’))
model.add(Dense(1, kernel_initializer=’normal’))
# Compile model
model.compile(loss=’mean_squared_error’, optimizer=’adam’)
return model
estimator = KerasRegressor(build_fn=baseline_model, nb_epoch=100, batch_size=10, verbose=0)
kfold = KFold(n_splits=2, random_state=seed)
results = cross_val_score(estimator, X, Y, cv=kfold)
Predicted_Value=model.predict(test_data)
print(“Baseline: %.2f (%.2f) MSE” % (results.mean(), results.std()))
stop = timeit.default_timer()
print(‘Time: ‘, stop – start)
……………………………………………………..
Hope I can get your help
This will help you to make predictions for new data:
https://machinelearningmastery.com/make-predictions-scikit-learn/
768/768 [==============================] – 0s 32us/step
accuracy: 73.31%
THANKS
Well done!
Greetings of the day sir
How to predict Uncertainty in neural networks?
Neural nets will predict the probability of a class label (uncertainty) by default.
To predict uncertainty for a numeric value in a regression problem, you can fit multiple final models and use them to get a distribution of expected values – a quick and dirty prediction interval.
lesson 02 example give me a warning that point here:
https://www.tensorflow.org/api_docs/python/tf/compat/v1/disable_resource_variables
suggestions to avoid it?
Great work!
“Great work!” …was only a note….. mmmm … ????
… maybe you trained an LSTM to answer some common comments? ????
anyway,
thanks
Hahah, not yet!
Hi Jason,
I am running the code examples of Chapter 7 “Evaluate The performance of Deep Learning Models” of your book “Deep Learning With Python.
I get the following results:
a) for automatic verification: val_accuracy: 0.7717
b) for manual verification: val_accuracy: 0.7874
c) for manual k-fold Cross validation: 70.30% (+/- 6.05%)
You write in your book that “The gold standard for machine learning model evaluation is k-fold cross-validation”.
So I don’t understand why it’s with k-fold cross validation that I get the worst result :=(
Do you have any idea why I get the opposite results to your statement?
Thanks,
Kind regards,
Dominique
It may be a worse result, but it is likely a better estimate of the true performance of the model compared to other methods.
Hi Jason,
Thank you very much for your answer that makes sense now.
Dominique
You’re welcome.
Hi Jason,
In chapter 8 “Use Keras Models with Scikit-Learn For General Machine Learning” of your book “Deep Learning With Python”.
When I run the Grid search Neural network, the time of execution is 42 minutes. That’s a bit long as you say in your book it should take 5 minutes.
I am running the code on a recent iMac with a CPU 3Ghz Intel core i5 6 coeurs with macOS Catalina.
It’s true that when the program starts I get the message “Your CPU supports instructions that this TensorFlow binary was not compile to use: AX2 FMA.”
I have installed TensorFlow with anaconda: conda install -c conda-forge tensor flow
Do you have any suggestion for having a better speed of execution?
Thanks,
Kind regards,
Dominique
One approach might be to run it on AWS EC2 with GPU support.
Hi Jason,
thanks for your answer. I will try.
Good luck!
Hi Jason,
In Chapter 11 “Project: Regression Of Boston House Prices” of you book “Deep Learning With Python”, I got the following results:
I do not see any major differences between Larger and Wider but a clear improvement with the Standardization.
Thanks for these very didactic examples.
But I note that the examples with HostonHousing or Iris already take time to execute and I consider them as small set of data. So for biggest dataset obviously the need for more CPU/GPU/TFU hardware is mandatory.
May I ask you a question?
I would like to know if it is worthwhile to invest, as an individual, in renting AWS EC2 GPU power to run your examples in the book? isn’t it too costly?
Thanks,
Kind regards,
Dominique
Nice work!
I recommend start by renting time, it is very cheap when getting started. You don’t need a large/powerful instance to get a lot of improvement.
Also, many readers use google colab which is free. I don’t know much about it.
Hi Jason,
Thanks for the Colab tip.
I had a quick try for the wider example.
On Colab: 1’27”
On my iMac: 58″
I will compare later for more complex examples. I have no doubt that Google GPUs are faster than my iMac :=) By the way there is a link on how to upload the local file like the data set for example:
https://medium.com/@master_yi/importing-datasets-in-google-colab-c816fc654f97
Kind regards,
Dominique
Nice work!
Hi Jason,
For lesson 9 “Reduce Overfitting with Dropout regularization” of your Book “Deep Learning with Python”, I got the following results with the code provide in your book:
Baseline: a) 84,05% (8,23%) b) 85,50% (10,07%)
Dropout on visible layer a) 87,95% (7,20%) b) 87,00% (6,12%)
Dropout hidden layers a) 83,60% (8,51%) b) 87,52% (5,25%)
It seems dropout has the best effect when used only on the visible layer.
Kind regards,
Dominique
Nice work!
Hi Jason,
About Chapter 18 “Project Handwritten Digit Recognition” of your Book “Deep Learning with Python”, I got the following results:
Your book is very cool. We can progress steadily and see concrete results.
Thanks,
Dominique
Well done!
Hi Jason,
About Chapter 20 “Project Object Recognition in Photographs” of your book “Deep Learning with Python”, I got the following results:
Better accuracy comes at the expense of execution time :=) I will have to move to Colab or AWS.
I have a question that I think I am not the only one on this planet that is asking for: I have a full set of photographies on my computer for which I would like to regroup by classification based on face recognition. Do you have any suggestion for a source of information?
Thanks,
Kind regards,
Dominique
Yes, you can use face detection and then train a face recognition system. I show exactly how in this book:
https://machinelearningmastery.com/deep-learning-for-computer-vision/
Also, I think this type of feature is probably built into photo management software these days.
Hi Jason,
Thanks.
I had a try on Google Colab for the “Large CNN CIFAR 10” and it’s amazing. The test runs in 6 minutes (after selection of GPU in the notebook parameter) compared to 1 hour on my iMac (which is recent). With an accuracy of 77,80%.
But with the TFU option Google Colab, the test is too long from the very first epoch.
Do you have an idea why TFU is of any help?
Thanks,
Kind regards,
Dominique
Sorry, I don’t know about colab or tpus.
Hi Jason:
Just tried lesson number 5, and it goes very well.
Trying to do some of my own I built a database with two coluns
First column secuencial numbers from 1 to 500, second column 3 times first column
The answer to this is obvius y= 3 *x
Modified the program and obtained the following, that seems to me it i not working:
Loss = 753758,9960
accuracy = 0.00%
What is it that I am doing wrong ?
The modified program is:
# -*- coding: utf-8 -*-
“””
Spider Editor
Created on Thu May 21 12:04:05 2020
@author: Caro Sertorio
DATABASE USEDbuilt as follows
X data is correlative number 500
Y data is correlative 3 times column x
a csv table with functio y=f(x) being y=3*x
np.shape(dataset) is tuple dimension = (499,2)
“””
from keras.models import Sequential
from keras.layers import Dense
import numpy as np
import pandas as pd
# Load the dataset
dataset= pd.read_csv(‘C:/Neural/Data/Tabla x 3.csv’,sep=’;’,header=0)
dataset = dataset.values
X = dataset[:,0]
Y = dataset[:,1]
# Define and Compile
model = Sequential()
model.add(Dense(1, input_dim=1, activation=’relu’))
# model.add(Dense(10, activation=’relu’))
model.add(Dense(1, activation=’relu’))
model.compile(loss=’mean_squared_error’ , optimizer=’adam’, metrics=[‘accuracy’])
# Fit the model
model.fit(X, Y, epochs=10, batch_size=5)
# Evaluate the model
scores = model.evaluate(X, Y)
print(“%s: %.2f%%” % (model.metrics_names[1], scores[1]*100))
Hope you can comment
Regards
Well done!
You cannot use relu in the activation function for the output layer. For regression use linear. Also, you cannot use accuracy for regression.
Hi Jason,
i have just finished your book “Deep Learning With Python”. I found it excellent as the previous one I read “Machine Learning Mastery with R”. I would advise any reader of your blog to buy those books. For me it speeds up my learning curve.
I published a post on my blog summarizing my experience of your book.
http://questioneurope.blogspot.com/2020/05/deep-learning-with-python-jason-brownlee.html
Thanks very much for all the progress I got up to your books.
Kind regards,
Dominique
Thanks Dominique!
Writing summaries like you have done is the best way to crystallize what you have learned, great work!
Hi Jason,
Today I run your example of code “Text Generation With Alice in Wonderland” you provide in your book “Deep Learning With Python”.
In fact I replace “Alice in Wonderland” with a famous title from Victor Hugo (a famous French writer) “Les misérables”.
The total number of characters was 625 332. It took about 6h30 to train the model on my iMAC. But I admit that I was really surprised by the results!
I published a post to summarize my findings:
http://questioneurope.blogspot.com/2020/05/les-miserables-de-victor-hugo-la-sauce.html
Again thanks for your book,
Kind regards,
Dominique
Well done, very impressive!
lesson 2
In this lesson, your goal is to install TensorFlow become familiar with the syntax of the symbolic expressions used in TensorFlow programs.
For example, you can install TensorFlow using pip. There are many different versions of TensorFlow, specialized for each platform. Select the right version for your platform on the TensorFlow installation webpage.
A small example of a TensorFlow program that you can use as a starting point is listed below:
When I tried after installing tensorflow, warning message has appeared as follows:
n error ocurred while starting the kernel
Warning! ***HDF5 library version mismatched error***
The HDF5 header files used to compile this application do not match
the version used by the HDF5 library to which this application is linked.
Data corruption or segmentation faults may occur if the application continues.
This can happen when an application was compiled by one version of HDF5 but
linked with a different version of static or shared HDF5 library.
You should recompile the application or check your shared library related
settings such as ‘LD_LIBRARY_PATH’.
You can, at your own risk, disable this warning by setting the environment
variable ‘HDF5_DISABLE_VERSION_CHECK’ to a value of ‘1’.
Setting it to 2 or higher will suppress the warning messages totally.
Headers are 1.10.4, library is 1.10.5
SUMMARY OF THE HDF5 CONFIGURATION
=================================
General Information:
‑‑‑‑‑‑‑‑‑‑‑‑‑‑‑‑‑‑‑
HDF5 Version: 1.10.5
Configured on: 2019????????
Configured by: Visual Studio 15 2017 Win64
Host system: Windows????.0.17763
Uname information: Windows
Byte sex: little‑endian
Installation point: C:/Program Files/HDF5
Compiling Options:
‑‑‑‑‑‑‑‑‑‑‑‑‑‑‑‑‑‑
Build Mode:
Debugging Symbols:
Asserts:
Profiling:
Optimization Level:
Linking Options:
‑‑‑‑‑‑‑‑‑‑‑‑‑‑‑‑
Libraries:
Statically Linked Executables: OFF
LDFLAGS: /machine:x64
H5_LDFLAGS:
AM_LDFLAGS:
Extra libraries:
Archiver:
Ranlib:
Languages:
‑‑‑‑‑‑‑‑‑‑
C: yes
C Compiler: C:/Program Files (x86)/Microsoft Visual Studio/2017/Community/VC/Tools/MSVC/14.16.27023/bin/Hostx86/x64/cl.exe 19.16.27027.1
CPPFLAGS:
H5_CPPFLAGS:
AM_CPPFLAGS:
CFLAGS: /DWIN32 /D_WINDOWS /W3
H5_CFLAGS:
AM_CFLAGS:
Shared C Library: YES
Static C Library: YES
Fortran: OFF
Fortran Compiler:
Fortran Flags:
H5 Fortran Flags:
AM Fortran Flags:
Shared Fortran Library: YES
Static Fortran Library: YES
C++: ON
C++ Compiler: C:/Program Files (x86)/Microsoft Visual Studio/2017/Community/VC/Tools/MSVC/14.16.27023/bin/Hostx86/x64/cl.exe 19.16.27027.1
C++ Flags: /DWIN32 /D_WINDOWS /W3 /GR /EHsc
H5 C++ Flags:
AM C++ Flags:
Shared C++ Library: YES
Static C++ Library: YES
JAVA: OFF
JAVA Compiler:
Features:
‑‑‑‑‑‑‑‑‑
Parallel HDF5: OFF
Parallel Filtered Dataset Writes:
Large Parallel I/O:
High‑level library: ON
Threadsafety: OFF
Default API mapping: v110
With deprecated public symbols: ON
I/O filters (external): DEFLATE DECODE ENCODE
MPE:
Direct VFD:
dmalloc:
Packages w/ extra debug output:
API Tracing: OFF
Using memory checker: OFF
Memory allocation sanity checks: OFF
Function Stack Tracing: OFF
Strict File Format Checks: OFF
Optimization Instrumentation:
Bye…
Can you please help me.
Perhaps this will help:
https://www.tensorflow.org/install
Hi,
Lesson 5: am getting error numpy is not defined
Can anyone help me
You need to install numpy:
https://machinelearningmastery.com/setup-python-environment-machine-learning-deep-learning-anaconda/
Lesson 01: Introduction to Theano
the output for the result variable is 4.0
Nice work!
Lesson 02: Introduction to TensorFlow
output for c : 4.0
Nice work!
Hi Jason,
its my first day to start with theano.
I have run the code in colab and found the result of two variables sum of a and b is 4 .
kind regards
mamun
Well done!
Hi Jason,
I got the error below in Lesson 06. Could you help me, please?
Thanks.
NameError Traceback (most recent call last)
in
10
11 # create classifier for use in scikit-learn
—> 12 model = KerasClassifier(build_fn=create_model, epochs=150, batch_size=10)
13 # evaluate model using 10-fold cross validation in scikit-learn
14 kfold = StratifieldKFolder(n_splits=10, shuffle=True, randon_state=seed)
NameError: name ‘KerasClassifier’ is not defined
The error suggest that Keras is not installed or that you have not imported the class (e.g. skipped some lines).
Thanks.
Hi Jason,
Here you can see the output of lesson 6:
0.7267259001731873
The result appear with some delay. Is it normal?
Thanks,
Francisco
Nice work.
Yes. It may take time to complete the model evaluation.
Installing Theano
I typed pip installed Theano into the Anaconda powershell and it seemed to work
Then in Anaconda, I typed
import theano
from theano import tensor
and received the following warning
WARNING (theano.configdefaults): g++ not available, if using conda:
conda install m2w64-toolchainC:\Program Files\Anaconda3\lib\site-packages\theano\configdefaults.py:560: UserWarning: DeprecationWarning: there is no c++ compiler.This is deprecated and with Theano 0.11 a c++ compiler will be mandatory
warnings.warn(“DeprecationWarning: there is no c++ compiler.”
WARNING (theano.configdefaults): g++ not detected ! Theano will be unable to execute optimized C-implementations (for both CPU and GPU) and will default to Python implementations. Performance will be severely degraded. To remove this warning, set Theano flags cxx to an empty string.
“dot” with args [‘-Tps’, ‘C:\\Users\\gpautsch\\AppData\\Local\\Temp\\tmpuavj5jyx’] returned code: 1
stdout, stderr:
b”
b”
WARNING (theano.tensor.blas): Using NumPy C-API based implementation for BLAS functions.
I then typed in the rest of your suggested code and it worked
# declare two symbolic floating-point scalars
a = tensor.dscalar()
b = tensor.dscalar()
# create a simple expression
c = a + b
# convert the expression into a callable object that takes (a,b)
# values as input and computes a value for c
f = theano.function([a,b], c)
# bind 1.5 to ‘a’, 2.5 to ‘b’, and evaluate ‘c’
result = f(1.5, 2.5)
print(result)
The result was 4.0
Should I be doing anything with the warning?
Perhaps ignore the warnings for now.
A lot of these new libs dump a lot of stuff to console – I think it is a terrible practice.
Hi Jason,
Here you can see the output of lesson 6:
0.7267259001731873
The result appear with some delay. Is it normal?
Thanks,
Francisco
Hi Jason,
Lesson2:Introduction to TensorFlow
Answer is 4.0
For lesson 1 I met the error that wrote:
Traceback (most recent call last):
File “theano.py”, line 1, in
import theano
File “C:\Users\Azerul Azlan\pillow\theano.py”, line 2, in
from theano import tensor
ImportError: cannot import name ‘tensor’ from ‘theano’
How to fix it?
Perhaps you need to update your version of theano?
How to update theano?
As follows:
Numpy Error in Lesson 05: Develop Your First Neural Network in Keras
below lines will solve it
import numpy as np
# Load the dataset
dataset = np.loadtxt(“pima-indians-diabetes.csv”, delimiter=”,”)
Sorry to hear you got an error.
Thanks for sharing.
4.0
Lesson 2: The answer I got is
again 4.0
Well done.
Hi Jason,
I also got the following with the output of Lesson 2 in addition to 4.0
2021-01-29 11:15:29.911385: I tensorflow/core/platform/cpu_feature_guard.cc:142] Your CPU supports instructions that this TensorFlow binary was not compiled to use: AVX2 FMA
2021-01-29 11:15:29.917569: I tensorflow/core/platform/profile_utils/cpu_utils.cc:94] CPU Frequency: 1996245000 Hz
2021-01-29 11:15:29.919781: I tensorflow/compiler/xla/service/service.cc:168] XLA service 0x4699070 executing computations on platform Host. Devices:
2021-01-29 11:15:29.919852: I tensorflow/compiler/xla/service/service.cc:175] StreamExecutor device (0): ,
2021-01-29 11:15:29.924075: W tensorflow/compiler/jit/mark_for_compilation_pass.cc:1412] (One-time warning): Not using XLA:CPU for cluster because envvar TF_XLA_FLAGS=–tf_xla_cpu_global_jit was not set. If you want XLA:CPU, either set that envvar, or use experimental_jit_scope to enable XLA:CPU. To confirm that XLA is active, pass –vmodule=xla_compilation_cache=1 (as a proper command-line flag, not via TF_XLA_FLAGS) or set the envvar XLA_FLAGS=–xla_hlo_profile.
Nice work.
You can ignore the warnings for now.
Hi Jason,
I tried a few examples at the following website, before I follow the lesson 3.
https://keras.io/examples/
I should say it was quite interesting, as I learnt a bit about defining Keras models and adding configured layers.
Thank you for asking to try it before following the lesson 3.
Kapila
Thanks.
Dea Jason,
I did the lesson 5. I will also try it with an idea I have. I got 79.56% as accuracy. However, I included the following line to import numpy and of course I edited the line nump.loadtxt to np.loadtxt. Oh I almost forgot I had to modified the following two lines as shown further below:
from keras.models import Sequential
from keras.layers import Dense
from tensorflow.keras.models import Sequential
from tensorflow.keras.layers import Dense
Best regards
Kapila
Those changes are not required, but will work just fine.
Hi Jason,
I worked on lesson two (TensorFlow)
import tensorflow as tf
import tensorflow.compat.v1 as tf
(No module named ‘compat’)
I replaced with:
import tensorflow._api.v2.compat.v1 as tf
Now I have got it working only with the warning “Access to a protected member _api of a class”
Do you have any tip on “No module named ‘compat'” ?
Thanks!
Sorry to hear that, are you able to check which version of tensorflow you are using?
The TensorFlow version is 2.4.1.
Thanks for the help.
Nice work!
Hi Jason,
The link recieved in Day 2 for Tensor TensorFlow installation webpage is giving 404 error.
https://www.tensorflow.org/versions/r0.9/get_started/os_setup.html?__s=9xcgqo9bstyw6m69ilwy
Can you please help.
The link appears to work fine.
Try this:
https://www.tensorflow.org/
Both Day 1 and Day 2 are completed..
Day 2 took some time to install tensor flow… Finally Succeded.
Well done!
Day 1 completed.Thanks
Well done!
Hello Jason,
I put my code and result log on: https://github.com/CBrauer/Jason-Brownlee-Class-code
Charles
Well done!
Hi Jason,
In Lesson #1, on running Python 3.9 in IDLE, I get a Warning that there is no c++ compiler:
WARNING (theano.configdefaults): g++ not available, if using conda:
conda install m2w64-toolchainWarning (from warnings module):
File “C:\Users\Ramseys Laptop\AppData\Local\Programs\Python\Python39\lib\site-packages\theano\configdefaults.py”, line 560
warnings.warn(“DeprecationWarning: there is no c++ compiler.”
UserWarning: DeprecationWarning: there is no c++ compiler.This is deprecated and with Theano 0.11 a c++ compiler will be mandatory
WARNING (theano.configdefaults): g++ not detected ! Theano will be unable to execute optimized C-implementations (for both CPU and GPU) and will default to Python implementations. Performance will be severely degraded. To remove this warning, set Theano flags cxx to an empty string.
WARNING (theano.tensor.blas): Using NumPy C-API based implementation for BLAS functions.
Any ideas? regards, Ramsey.
Perhaps the warnings are safe to ignore?
Hi Jason,
L#1: On ignoring my earlier warnings, I think I get the expected answer. Thanks.
L#2: Using your link “TensorFlow installation webpage” I get an http 404 error.
Link is: https://www.tensorflow.org/versions/r0.9/get_started/os_setup.html?__s=og671j1sv022kbpymsk5 but the TensorFlow web site has no r0.9 version.
Until I hear from you, I will try and use r1.15 (the lowest available).
Regards, Ramsey (In 1975 I worked in Melbourne for a year).
Thanks, this may help:
https://machinelearningmastery.com/setup-python-environment-machine-learning-deep-learning-anaconda/
I got below message before getting the result of 4. Seem something wrong. Can you give comments?
python: can’t open file ‘anntensorflow.py’: [Errno 2] No such file or directory
(base) jupitersitorus@jupiters-MacBook-Air ~ % cd kodepython
(base) jupitersitorus@jupiters-MacBook-Air kodepython % python anntensorflow.py
WARNING:tensorflow:From /Users/jupitersitorus/opt/anaconda3/lib/python3.8/site-packages/tensorflow/python/compat/v2_compat.py:96: disable_resource_variables (from tensorflow.python.ops.variable_scope) is deprecated and will be removed in a future version.
Instructions for updating:
non-resource variables are not supported in the long term
2021-04-23 19:44:56.315571: I tensorflow/compiler/jit/xla_cpu_device.cc:41] Not creating XLA devices, tf_xla_enable_xla_devices not set
2021-04-23 19:44:56.318623: I tensorflow/core/platform/cpu_feature_guard.cc:142] This TensorFlow binary is optimized with oneAPI Deep Neural Network Library (oneDNN) to use the following CPU instructions in performance-critical operations: AVX2 FMA
To enable them in other operations, rebuild TensorFlow with the appropriate compiler flags.
2021-04-23 19:44:56.324443: I tensorflow/compiler/mlir/mlir_graph_optimization_pass.cc:196] None of the MLIR optimization passes are enabled (registered 0 passes)
4.0
Perhaps try posting your error and code to stackoverflow?
Very good and excellent …. in a short time, but a good result ….
Thanks.
Very good and excellent …. in a short time, but a good result..but I ran in Google Club … the answer to the first lesson was equal to …………… .. 4.0
Well done.
Read and executed code from Lesson 01 and 02, the answer is 4.0
Well done.
Oddly enough – 4 🙂
However I have some warnings:
UserWarning: DeprecationWarning: there is no c++ compiler. This is deprecated and with Theano 0.11 a c++ compiler will be mandatory
warnings.warn(“DeprecationWarning: there is no c++ compiler.”
WARNING (theano.configdefaults): g++ not detected ! Theano will be unable to execute optimized C-implementations (for both CPU and GPU) and will default to Python implementations. Performance will be severely degraded. To remove this warning, set Theano flags cxx to an empty string.
WARNING (theano.tensor.blas): Using NumPy C-API based implementation for BLAS functions.
What I have to do?
You can probably ignore those warnings for now.
It will be great if you can show how to run CNN using own dataset, not the MNIST dataset?
Yes, there are many on the blog, start here:
https://machinelearningmastery.com/start-here/#dlfcv
Hi Jason,
Thank you for this quick review of the foundation of deep learning. It’s well structured and clear to read and follow.
It iwould be great also to add in the next mini-course a chapter on RNN.
Thanks
Thanks.
Here is a course on LSTMs:
https://machinelearningmastery.com/long-short-term-memory-recurrent-neural-networks-mini-course/
Here is another:
https://machinelearningmastery.com/how-to-get-started-with-deep-learning-for-time-series-forecasting-7-day-mini-course/
My Result for Lesson_01-Introduction-to-Theano
Result seems correct but full of warnings!! My Run is based on Python 3.7 via PyCharm
Any Help?
WARNING (theano.configdefaults): g++ not available, if using conda:
conda install m2w64-toolchainWARNING (theano.configdefaults): g++ not detected ! Theano will be unable to execute optimized C-implementations (for both CPU and GPU) and will default to Python implementations. Performance will be severely degraded. To remove this warning, set Theano flags cxx to an empty string.
WARNING (theano.tensor.blas): Using NumPy C-API based implementation for BLAS functions.
4.0
Process finished with exit code 0
Should be just fine. These warnings are not causing any adverse effect to your results.
My Result for Lesson_02-introduction-to-tensorflow
Result seems correct but full of warnings!! My Run is based on Python 3.7 via PyCharm
Any Help?
2021-11-05 13:44:06.853373: W tensorflow/stream_executor/platform/default/dso_loader.cc:64] Could not load dynamic library ‘cudart64_110.dll’; dlerror: cudart64_110.dll not found
2021-11-05 13:44:06.853726: I tensorflow/stream_executor/cuda/cudart_stub.cc:29] Ignore above cudart dlerror if you do not have a GPU set up on your machine.
WARNING:tensorflow:From C:\Users\cveig\AppData\Local\Programs\Python\Python37\lib\site-packages\tensorflow\python\compat\v2_compat.py:101: disable_resource_variables (from tensorflow.python.ops.variable_scope) is deprecated and will be removed in a future version.
Instructions for updating:
non-resource variables are not supported in the long term
2021-11-05 13:44:09.547652: W tensorflow/stream_executor/platform/default/dso_loader.cc:64] Could not load dynamic library ‘nvcuda.dll’; dlerror: nvcuda.dll not found
2021-11-05 13:44:09.548111: W tensorflow/stream_executor/cuda/cuda_driver.cc:269] failed call to cuInit: UNKNOWN ERROR (303)
2021-11-05 13:44:09.552603: I tensorflow/stream_executor/cuda/cuda_diagnostics.cc:169] retrieving CUDA diagnostic information for host: DESKTOP-F6P25NL
2021-11-05 13:44:09.552918: I tensorflow/stream_executor/cuda/cuda_diagnostics.cc:176] hostname: DESKTOP-F6P25NL
2021-11-05 13:44:09.553501: I tensorflow/core/platform/cpu_feature_guard.cc:142] This TensorFlow binary is optimized with oneAPI Deep Neural Network Library (oneDNN) to use the following CPU instructions in performance-critical operations: AVX AVX2
To enable them in other operations, rebuild TensorFlow with the appropriate compiler flags.
4.0
Process finished with exit code 0
That’s fine. It just means your tensorflow is not fully utilizing the potential of your machine. For example, it cannot use your GPU to speed up.
I bought your Ebook Deep Learning With Python. On Page 12 Section 2.5 More Theano Resources, you mentioed the link http:// deeplearning .net which is down. Please let me know whether there is a new link available. Thanks.
Hello Alice…Please see the following:
https://anaconda.org/anaconda/theano
Thanks James.
You are very welcome Alice!
Hey thank you for your help.
I have run the code below and seen the result.
# Example of TensorFlow library
import tensorflow as tf
import tensorflow.compat.v1 as tf
tf.disable_v2_behavior()
# declare two symbolic floating-point scalars
a = tf.placeholder(tf.float32)
b = tf.placeholder(tf.float32)
# create a simple symbolic expression using the add function
add = tf.add(a, b)
# bind 1.5 to ‘a’, 2.5 to ‘b’, and evaluate ‘c’
sess = tf.Session()
binding = {a: 1.5, b: 2.5}
c = sess.run(add, feed_dict=binding)
print(c)
when we run the above code snipper, we will get the output of 4.0 which is the sum of the given variables values(a and b)
Good.
Hello
Introduction too tensorflow.
# Example of TensorFlow library
import tensorflow as tf
import tensorflow.compat.v1 as tf
tf.disable_v2_behavior()
# declare two symbolic floating-point scalars
a = tf.placeholder(tf.float32)
b = tf.placeholder(tf.float32)
# create a simple symbolic expression using the add function
add = tf.add(a, b)
# bind 1.5 to ‘a’, 2.5 to ‘b’, and evaluate ‘c’
sess = tf.Session()
binding = {a: 1.5, b: 2.5}
c = sess.run(add, feed_dict=binding)
print(c)
when we run the above code snipper, we will get the output of 4.0 which is the sum of the given variables values(a and b)
Good.
Thank you for the feedback, Sefineh! Keep up the great work!
I tried Lesson 1. I got an error after running the code:
AttributeError: module ‘numpy.distutils.__config__’ has no attribute ‘blas_opt_info’
Sorry, I’m a beginner.
I tried Lesson 2. The result is following:
WARNING:tensorflow:From C:\Users\BHOGAYATA\DeepLearningenv\lib\site-packages\tensorflow\python\compat\v2_compat.py:107: disable_resource_variables (from tensorflow.python.ops.variable_scope) is deprecated and will be removed in a future version.
Instructions for updating:
non-resource variables are not supported in the long term
4.0
accuracy: 76.82%
Lesson 06 : The findings
[0.72727273 0.74025974 0.75324675 0.75324675 0.67532468 0.5974026
0.74025974 0.63636364 0.73684211 0.77631579]
0.7136534518113465
I saved one weights-best and 12 weights-improvement HDF5 files in the folder of the virtual environment for deep learning.
Lesson 09: Accuracy before and after Dropouts )0.2): 75.39% and 73.18% based on the Pima Indians diabetes dataset.
Lesson 10
In my case, the performance (in terms of accuracy) fell down from 75.39% to 65.10% at epochs=150, learning rate=0.1, and momentum=0.8 with SGD.
Hi,
It is understood that we need to import tensorflow with :
import tensorflow as tf
Then what is the meaning of the lines:
import tensorflow.compat.v1 as tf
tf.disable_v2_behavior()
Running the code got the result 4.0, but unable to understand the above lines.
Hi Sumanata…The following resource may be of interest to you:
https://docs.w3cub.com/tensorflow~2.3/compat/v1/disable_v2_behavior
Downloading data from https://storage.googleapis.com/tensorflow/tf-keras-datasets/mnist.npz
11490434/11490434 [==============================] – 2s 0us/step
> 98.675
> 98.775
> 98.583
> 98.825
> 98.675
Accuracy: mean=98.707 standard deviation=0.085, n=5
Loss Accuracy
Training 0.9935 0.6550
Validation 1.0250 0.6373
Outputs in Lesson 13
Dear Jason,
First I would like to thank you for the online course.
I have a question, I have built a model based on Lesson 06: Use Keras Models With Scikit-Learn. I get an accuracy of 0.7123547505126452 with KerasClassifiers. And in Lesson 05 I get
Epoch 150/150
768/768 [==============================] – 0s 112us/sample – loss: 0.4945 – acc: 0.7721
acc: 76.95%
What difference between these two accuracies? why?
You are very welcome Thinzar! Slight differences in accuracies are to be expected between multiple runs of the same model. The following resource explains this concept:
https://machinelearningmastery.com/stochastic-in-machine-learning/
Thank you, sir! Should we get average accuracies for multiple runs? And how about bias or overfitting over the training model?
lesson1: 4
lesson 2:
4
Hi,
I have a question about lessons 1 and 2.
How are the variables a and b given values?
How is the value of a variable determined?
a=1.5
b=2.5
?
Why don’t we add the two variables directly instead of the complex code used in Lessons 1 and 2:
a=1.5
b=2.5
print(a+b)
Thank you very much and appreciation
Hi Najla…Please see the following:
https://towardsai.net/p/l/what-is-tensorflow-and-how-does-it-work
hi,
ans of lesson 1: Theano
4.0
Thank you for your feedback Zaibunnisa! Keep up the great work!
I got these errors and a bing explanantion: The error message indicates that there is no C++ compiler available, which is required by Theano 0.11 and later versions. The warning message suggests that Theano will default to Python implementations, which will severely degrade performance. To remove this warning, you can set Theano flags cxx to an empty string 1.
The error message also indicates that there is no section named ‘blas’ in the configuration file 2. This could be due to a missing or incorrect installation of the required libraries.
To fix the issue, you can try installing the m2w64-toolchain package using conda 3. If that doesn’t work, you can try installing a C++ compiler such as MinGW GCC/G++ 1. You can also check if the required libraries are installed correctly and if the configuration file is set up correctly 2.
Please note that the error message is quite long and complex, so it may be helpful to seek additional support from a community forum or a technical expert.
WARNING (theano.configdefaults): g++ not available, if using conda:
conda install m2w64-toolchainC:\Users\court\AppData\Local\Packages\PythonSoftwareFoundation.Python.3.11_qbz5n2kfra8p0\LocalCache\local-packages\Python311\site-packages\theano\configdefaults.py:560: UserWarning: DeprecationWarning: there is no c++ compiler.This is deprecated and with Theano 0.11 a c++ compiler will be mandatory
warnings.warn(“DeprecationWarning: there is no c++ compiler.”
WARNING (theano.configdefaults): g++ not detected ! Theano will be unable to execute optimized C-implementations (for both CPU and GPU) and will default to Python implementations. Performance will be severely degraded. To remove this warning, set Theano flags cxx to an empty string.
Traceback (most recent call last):
File “C:\Users\court\AppData\Local\Packages\PythonSoftwareFoundation.Python.3.11_qbz5n2kfra8p0\LocalCache\local-packages\Python311\site-packages\theano\configparser.py”, line 168, in fetch_val_for_key
return theano_cfg.get(section, option)
^^^^^^^^^^^^^^^^^^^^^^^^^^^^^^^
File “C:\Program Files\WindowsApps\PythonSoftwareFoundation.Python.3.11_3.11.1776.0_x64__qbz5n2kfra8p0\Lib\configparser.py”, line 797, in get
d = self._unify_values(section, vars)
^^^^^^^^^^^^^^^^^^^^^^^^^^^^^^^^^
File “C:\Program Files\WindowsApps\PythonSoftwareFoundation.Python.3.11_3.11.1776.0_x64__qbz5n2kfra8p0\Lib\configparser.py”, line 1168, in _unify_values
raise NoSectionError(section) from None
configparser.NoSectionError: No section: ‘blas’
During handling of the above exception, another exception occurred:
Traceback (most recent call last):
File “C:\Users\court\AppData\Local\Packages\PythonSoftwareFoundation.Python.3.11_qbz5n2kfra8p0\LocalCache\local-packages\Python311\site-packages\theano\configparser.py”, line 327, in __get__
val_str = fetch_val_for_key(self.fullname,
^^^^^^^^^^^^^^^^^^^^^^^^^^^^^^^^
File “C:\Users\court\AppData\Local\Packages\PythonSoftwareFoundation.Python.3.11_qbz5n2kfra8p0\LocalCache\local-packages\Python311\site-packages\theano\configparser.py”, line 172, in fetch_val_for_key
raise KeyError(key)
KeyError: ‘blas.ldflags’
During handling of the above exception, another exception occurred:
Traceback (most recent call last):
File “”, line 1, in
File “C:\Users\court\AppData\Local\Packages\PythonSoftwareFoundation.Python.3.11_qbz5n2kfra8p0\LocalCache\local-packages\Python311\site-packages\theano\__init__.py”, line 124, in
from theano.scan_module import (scan, map, reduce, foldl, foldr, clone,
File “C:\Users\court\AppData\Local\Packages\PythonSoftwareFoundation.Python.3.11_qbz5n2kfra8p0\LocalCache\local-packages\Python311\site-packages\theano\scan_module\__init__.py”, line 41, in
from theano.scan_module import scan_opt
File “C:\Users\court\AppData\Local\Packages\PythonSoftwareFoundation.Python.3.11_qbz5n2kfra8p0\LocalCache\local-packages\Python311\site-packages\theano\scan_module\scan_opt.py”, line 60, in
from theano import tensor, scalar
File “C:\Users\court\AppData\Local\Packages\PythonSoftwareFoundation.Python.3.11_qbz5n2kfra8p0\LocalCache\local-packages\Python311\site-packages\theano\tensor\__init__.py”, line 17, in
from theano.tensor import blas
File “C:\Users\court\AppData\Local\Packages\PythonSoftwareFoundation.Python.3.11_qbz5n2kfra8p0\LocalCache\local-packages\Python311\site-packages\theano\tensor\blas.py”, line 155, in
from theano.tensor.blas_headers import blas_header_text
File “C:\Users\court\AppData\Local\Packages\PythonSoftwareFoundation.Python.3.11_qbz5n2kfra8p0\LocalCache\local-packages\Python311\site-packages\theano\tensor\blas_headers.py”, line 987, in
if not config.blas.ldflags:
^^^^^^^^^^^^^^^^^^^
File “C:\Users\court\AppData\Local\Packages\PythonSoftwareFoundation.Python.3.11_qbz5n2kfra8p0\LocalCache\local-packages\Python311\site-packages\theano\configparser.py”, line 332, in __get__
val_str = self.default()
^^^^^^^^^^^^^^
File “C:\Users\court\AppData\Local\Packages\PythonSoftwareFoundation.Python.3.11_qbz5n2kfra8p0\LocalCache\local-packages\Python311\site-packages\theano\configdefaults.py”, line 1284, in default_blas_ldflags
blas_info = np.distutils.__config__.blas_opt_info
^^^^^^^^^^^^^^^^^^^^^^^^^^^^^^^^^^^^^
AttributeError: module ‘numpy.distutils.__config__’ has no attribute ‘blas_opt_info’
>>> from theano import tensor
Traceback (most recent call last):
File “C:\Users\court\AppData\Local\Packages\PythonSoftwareFoundation.Python.3.11_qbz5n2kfra8p0\LocalCache\local-packages\Python311\site-packages\theano\configparser.py”, line 168, in fetch_val_for_key
return theano_cfg.get(section, option)
^^^^^^^^^^^^^^^^^^^^^^^^^^^^^^^
File “C:\Program Files\WindowsApps\PythonSoftwareFoundation.Python.3.11_3.11.1776.0_x64__qbz5n2kfra8p0\Lib\configparser.py”, line 797, in get
d = self._unify_values(section, vars)
^^^^^^^^^^^^^^^^^^^^^^^^^^^^^^^^^
File “C:\Program Files\WindowsApps\PythonSoftwareFoundation.Python.3.11_3.11.1776.0_x64__qbz5n2kfra8p0\Lib\configparser.py”, line 1168, in _unify_values
raise NoSectionError(section) from None
configparser.NoSectionError: No section: ‘blas’
During handling of the above exception, another exception occurred:
Traceback (most recent call last):
File “C:\Users\court\AppData\Local\Packages\PythonSoftwareFoundation.Python.3.11_qbz5n2kfra8p0\LocalCache\local-packages\Python311\site-packages\theano\configparser.py”, line 327, in __get__
val_str = fetch_val_for_key(self.fullname,
^^^^^^^^^^^^^^^^^^^^^^^^^^^^^^^^
File “C:\Users\court\AppData\Local\Packages\PythonSoftwareFoundation.Python.3.11_qbz5n2kfra8p0\LocalCache\local-packages\Python311\site-packages\theano\configparser.py”, line 172, in fetch_val_for_key
raise KeyError(key)
KeyError: ‘blas.ldflags’
During handling of the above exception, another exception occurred:
Traceback (most recent call last):
File “”, line 1, in
File “C:\Users\court\AppData\Local\Packages\PythonSoftwareFoundation.Python.3.11_qbz5n2kfra8p0\LocalCache\local-packages\Python311\site-packages\theano\__init__.py”, line 124, in
from theano.scan_module import (scan, map, reduce, foldl, foldr, clone,
File “C:\Users\court\AppData\Local\Packages\PythonSoftwareFoundation.Python.3.11_qbz5n2kfra8p0\LocalCache\local-packages\Python311\site-packages\theano\scan_module\__init__.py”, line 41, in
from theano.scan_module import scan_opt
File “C:\Users\court\AppData\Local\Packages\PythonSoftwareFoundation.Python.3.11_qbz5n2kfra8p0\LocalCache\local-packages\Python311\site-packages\theano\scan_module\scan_opt.py”, line 60, in
from theano import tensor, scalar
File “C:\Users\court\AppData\Local\Packages\PythonSoftwareFoundation.Python.3.11_qbz5n2kfra8p0\LocalCache\local-packages\Python311\site-packages\theano\tensor\__init__.py”, line 17, in
from theano.tensor import blas
File “C:\Users\court\AppData\Local\Packages\PythonSoftwareFoundation.Python.3.11_qbz5n2kfra8p0\LocalCache\local-packages\Python311\site-packages\theano\tensor\blas.py”, line 155, in
from theano.tensor.blas_headers import blas_header_text
File “C:\Users\court\AppData\Local\Packages\PythonSoftwareFoundation.Python.3.11_qbz5n2kfra8p0\LocalCache\local-packages\Python311\site-packages\theano\tensor\blas_headers.py”, line 987, in
if not config.blas.ldflags:
^^^^^^^^^^^^^^^^^^^
File “C:\Users\court\AppData\Local\Packages\PythonSoftwareFoundation.Python.3.11_qbz5n2kfra8p0\LocalCache\local-packages\Python311\site-packages\theano\configparser.py”, line 332, in __get__
val_str = self.default()
^^^^^^^^^^^^^^
File “C:\Users\court\AppData\Local\Packages\PythonSoftwareFoundation.Python.3.11_qbz5n2kfra8p0\LocalCache\local-packages\Python311\site-packages\theano\configdefaults.py”, line 1284, in default_blas_ldflags
blas_info = np.distutils.__config__.blas_opt_info
^^^^^^^^^^^^^^^^^^^^^^^^^^^^^^^^^^^^^
AttributeError: module ‘numpy.distutils.__config__’ has no attribute ‘blas_opt_info’
>>>
I got these errors and a bing explanantion: The error message indicates that there is no C++ compiler available, which is required by Theano 0.11 and later versions. The warning message suggests that Theano will default to Python implementations, which will severely degrade performance. To remove this warning, you can set Theano flags cxx to an empty string 1.
The error message also indicates that there is no section named ‘blas’ in the configuration file 2. This could be due to a missing or incorrect installation of the required libraries.
To fix the issue, you can try installing the m2w64-toolchain package using conda 3. If that doesn’t work, you can try installing a C++ compiler such as MinGW GCC/G++ 1. You can also check if the required libraries are installed correctly and if the configuration file is set up correctly 2.
Please note that the error message is quite long and complex, so it may be helpful to seek additional support from a community forum or a technical expert.
WARNING (theano.configdefaults): g++ not available, if using conda:
conda install m2w64-toolchainC:\Users\court\AppData\Local\Packages\PythonSoftwareFoundation.Python.3.11_qbz5n2kfra8p0\LocalCache\local-packages\Python311\site-packages\theano\configdefaults.py:560: UserWarning: DeprecationWarning: there is no c++ compiler.This is deprecated and with Theano 0.11 a c++ compiler will be mandatory
warnings.warn(“DeprecationWarning: there is no c++ compiler.”
WARNING (theano.configdefaults): g++ not detected ! Theano will be unable to execute optimized C-implementations (for both CPU and GPU) and will default to Python implementations. Performance will be severely degraded. To remove this warning, set Theano flags cxx to an empty string.
Traceback (most recent call last):
File “C:\Users\court\AppData\Local\Packages\PythonSoftwareFoundation.Python.3.11_qbz5n2kfra8p0\LocalCache\local-packages\Python311\site-packages\theano\configparser.py”, line 168, in fetch_val_for_key
return theano_cfg.get(section, option)
^^^^^^^^^^^^^^^^^^^^^^^^^^^^^^^
File “C:\Program Files\WindowsApps\PythonSoftwareFoundation.Python.3.11_3.11.1776.0_x64__qbz5n2kfra8p0\Lib\configparser.py”, line 797, in get
d = self._unify_values(section, vars)
^^^^^^^^^^^^^^^^^^^^^^^^^^^^^^^^^
File “C:\Program Files\WindowsApps\PythonSoftwareFoundation.Python.3.11_3.11.1776.0_x64__qbz5n2kfra8p0\Lib\configparser.py”, line 1168, in _unify_values
raise NoSectionError(section) from None
configparser.NoSectionError: No section: ‘blas’
During handling of the above exception, another exception occurred:
Traceback (most recent call last):
File “C:\Users\court\AppData\Local\Packages\PythonSoftwareFoundation.Python.3.11_qbz5n2kfra8p0\LocalCache\local-packages\Python311\site-packages\theano\configparser.py”, line 327, in __get__
val_str = fetch_val_for_key(self.fullname,
^^^^^^^^^^^^^^^^^^^^^^^^^^^^^^^^
File “C:\Users\court\AppData\Local\Packages\PythonSoftwareFoundation.Python.3.11_qbz5n2kfra8p0\LocalCache\local-packages\Python311\site-packages\theano\configparser.py”, line 172, in fetch_val_for_key
raise KeyError(key)
KeyError: ‘blas.ldflags’
During handling of the above exception, another exception occurred:
Traceback (most recent call last):
File “”, line 1, in
File “C:\Users\court\AppData\Local\Packages\PythonSoftwareFoundation.Python.3.11_qbz5n2kfra8p0\LocalCache\local-packages\Python311\site-packages\theano\__init__.py”, line 124, in
from theano.scan_module import (scan, map, reduce, foldl, foldr, clone,
File “C:\Users\court\AppData\Local\Packages\PythonSoftwareFoundation.Python.3.11_qbz5n2kfra8p0\LocalCache\local-packages\Python311\site-packages\theano\scan_module\__init__.py”, line 41, in
from theano.scan_module import scan_opt
File “C:\Users\court\AppData\Local\Packages\PythonSoftwareFoundation.Python.3.11_qbz5n2kfra8p0\LocalCache\local-packages\Python311\site-packages\theano\scan_module\scan_opt.py”, line 60, in
from theano import tensor, scalar
File “C:\Users\court\AppData\Local\Packages\PythonSoftwareFoundation.Python.3.11_qbz5n2kfra8p0\LocalCache\local-packages\Python311\site-packages\theano\tensor\__init__.py”, line 17, in
from theano.tensor import blas
File “C:\Users\court\AppData\Local\Packages\PythonSoftwareFoundation.Python.3.11_qbz5n2kfra8p0\LocalCache\local-packages\Python311\site-packages\theano\tensor\blas.py”, line 155, in
from theano.tensor.blas_headers import blas_header_text
File “C:\Users\court\AppData\Local\Packages\PythonSoftwareFoundation.Python.3.11_qbz5n2kfra8p0\LocalCache\local-packages\Python311\site-packages\theano\tensor\blas_headers.py”, line 987, in
if not config.blas.ldflags:
^^^^^^^^^^^^^^^^^^^
File “C:\Users\court\AppData\Local\Packages\PythonSoftwareFoundation.Python.3.11_qbz5n2kfra8p0\LocalCache\local-packages\Python311\site-packages\theano\configparser.py”, line 332, in __get__
val_str = self.default()
^^^^^^^^^^^^^^
File “C:\Users\court\AppData\Local\Packages\PythonSoftwareFoundation.Python.3.11_qbz5n2kfra8p0\LocalCache\local-packages\Python311\site-packages\theano\configdefaults.py”, line 1284, in default_blas_ldflags
blas_info = np.distutils.__config__.blas_opt_info
^^^^^^^^^^^^^^^^^^^^^^^^^^^^^^^^^^^^^
AttributeError: module ‘numpy.distutils.__config__’ has no attribute ‘blas_opt_info’
>>> from theano import tensor
Traceback (most recent call last):
File “C:\Users\court\AppData\Local\Packages\PythonSoftwareFoundation.Python.3.11_qbz5n2kfra8p0\LocalCache\local-packages\Python311\site-packages\theano\configparser.py”, line 168, in fetch_val_for_key
return theano_cfg.get(section, option)
^^^^^^^^^^^^^^^^^^^^^^^^^^^^^^^
File “C:\Program Files\WindowsApps\PythonSoftwareFoundation.Python.3.11_3.11.1776.0_x64__qbz5n2kfra8p0\Lib\configparser.py”, line 797, in get
d = self._unify_values(section, vars)
^^^^^^^^^^^^^^^^^^^^^^^^^^^^^^^^^
File “C:\Program Files\WindowsApps\PythonSoftwareFoundation.Python.3.11_3.11.1776.0_x64__qbz5n2kfra8p0\Lib\configparser.py”, line 1168, in _unify_values
raise NoSectionError(section) from None
configparser.NoSectionError: No section: ‘blas’
During handling of the above exception, another exception occurred:
Traceback (most recent call last):
File “C:\Users\court\AppData\Local\Packages\PythonSoftwareFoundation.Python.3.11_qbz5n2kfra8p0\LocalCache\local-packages\Python311\site-packages\theano\configparser.py”, line 327, in __get__
val_str = fetch_val_for_key(self.fullname,
^^^^^^^^^^^^^^^^^^^^^^^^^^^^^^^^
File “C:\Users\court\AppData\Local\Packages\PythonSoftwareFoundation.Python.3.11_qbz5n2kfra8p0\LocalCache\local-packages\Python311\site-packages\theano\configparser.py”, line 172, in fetch_val_for_key
raise KeyError(key)
KeyError: ‘blas.ldflags’
During handling of the above exception, another exception occurred:
Traceback (most recent call last):
File “”, line 1, in
File “C:\Users\court\AppData\Local\Packages\PythonSoftwareFoundation.Python.3.11_qbz5n2kfra8p0\LocalCache\local-packages\Python311\site-packages\theano\__init__.py”, line 124, in
from theano.scan_module import (scan, map, reduce, foldl, foldr, clone,
File “C:\Users\court\AppData\Local\Packages\PythonSoftwareFoundation.Python.3.11_qbz5n2kfra8p0\LocalCache\local-packages\Python311\site-packages\theano\scan_module\__init__.py”, line 41, in
from theano.scan_module import scan_opt
File “C:\Users\court\AppData\Local\Packages\PythonSoftwareFoundation.Python.3.11_qbz5n2kfra8p0\LocalCache\local-packages\Python311\site-packages\theano\scan_module\scan_opt.py”, line 60, in
from theano import tensor, scalar
File “C:\Users\court\AppData\Local\Packages\PythonSoftwareFoundation.Python.3.11_qbz5n2kfra8p0\LocalCache\local-packages\Python311\site-packages\theano\tensor\__init__.py”, line 17, in
from theano.tensor import blas
File “C:\Users\court\AppData\Local\Packages\PythonSoftwareFoundation.Python.3.11_qbz5n2kfra8p0\LocalCache\local-packages\Python311\site-packages\theano\tensor\blas.py”, line 155, in
from theano.tensor.blas_headers import blas_header_text
File “C:\Users\court\AppData\Local\Packages\PythonSoftwareFoundation.Python.3.11_qbz5n2kfra8p0\LocalCache\local-packages\Python311\site-packages\theano\tensor\blas_headers.py”, line 987, in
if not config.blas.ldflags:
^^^^^^^^^^^^^^^^^^^
File “C:\Users\court\AppData\Local\Packages\PythonSoftwareFoundation.Python.3.11_qbz5n2kfra8p0\LocalCache\local-packages\Python311\site-packages\theano\configparser.py”, line 332, in __get__
val_str = self.default()
^^^^^^^^^^^^^^
File “C:\Users\court\AppData\Local\Packages\PythonSoftwareFoundation.Python.3.11_qbz5n2kfra8p0\LocalCache\local-packages\Python311\site-packages\theano\configdefaults.py”, line 1284, in default_blas_ldflags
blas_info = np.distutils.__config__.blas_opt_info
^^^^^^^^^^^^^^^^^^^^^^^^^^^^^^^^^^^^^
AttributeError: module ‘numpy.distutils.__config__’ has no attribute ‘blas_opt_info’
>>> from theano import tensor
Traceback (most recent call last):
File “C:\Users\court\AppData\Local\Packages\PythonSoftwareFoundation.Python.3.11_qbz5n2kfra8p0\LocalCache\local-packages\Python311\site-packages\theano\configparser.py”, line 168, in fetch_val_for_key
return theano_cfg.get(section, option)
^^^^^^^^^^^^^^^^^^^^^^^^^^^^^^^
File “C:\Program Files\WindowsApps\PythonSoftwareFoundation.Python.3.11_3.11.1776.0_x64__qbz5n2kfra8p0\Lib\configparser.py”, line 797, in get
d = self._unify_values(section, vars)
^^^^^^^^^^^^^^^^^^^^^^^^^^^^^^^^^
File “C:\Program Files\WindowsApps\PythonSoftwareFoundation.Python.3.11_3.11.1776.0_x64__qbz5n2kfra8p0\Lib\configparser.py”, line 1168, in _unify_values
raise NoSectionError(section) from None
configparser.NoSectionError: No section: ‘blas’
During handling of the above exception, another exception occurred:
Traceback (most recent call last):
File “C:\Users\court\AppData\Local\Packages\PythonSoftwareFoundation.Python.3.11_qbz5n2kfra8p0\LocalCache\local-packages\Python311\site-packages\theano\configparser.py”, line 327, in __get__
val_str = fetch_val_for_key(self.fullname,
^^^^^^^^^^^^^^^^^^^^^^^^^^^^^^^^
File “C:\Users\court\AppData\Local\Packages\PythonSoftwareFoundation.Python.3.11_qbz5n2kfra8p0\LocalCache\local-packages\Python311\site-packages\theano\configparser.py”, line 172, in fetch_val_for_key
raise KeyError(key)
KeyError: ‘blas.ldflags’
During handling of the above exception, another exception occurred:
Traceback (most recent call last):
File “”, line 1, in
File “C:\Users\court\AppData\Local\Packages\PythonSoftwareFoundation.Python.3.11_qbz5n2kfra8p0\LocalCache\local-packages\Python311\site-packages\theano\__init__.py”, line 124, in
from theano.scan_module import (scan, map, reduce, foldl, foldr, clone,
File “C:\Users\court\AppData\Local\Packages\PythonSoftwareFoundation.Python.3.11_qbz5n2kfra8p0\LocalCache\local-packages\Python311\site-packages\theano\scan_module\__init__.py”, line 41, in
from theano.scan_module import scan_opt
File “C:\Users\court\AppData\Local\Packages\PythonSoftwareFoundation.Python.3.11_qbz5n2kfra8p0\LocalCache\local-packages\Python311\site-packages\theano\scan_module\scan_opt.py”, line 60, in
from theano import tensor, scalar
File “C:\Users\court\AppData\Local\Packages\PythonSoftwareFoundation.Python.3.11_qbz5n2kfra8p0\LocalCache\local-packages\Python311\site-packages\theano\tensor\__init__.py”, line 17, in
from theano.tensor import blas
File “C:\Users\court\AppData\Local\Packages\PythonSoftwareFoundation.Python.3.11_qbz5n2kfra8p0\LocalCache\local-packages\Python311\site-packages\theano\tensor\blas.py”, line 155, in
from theano.tensor.blas_headers import blas_header_text
File “C:\Users\court\AppData\Local\Packages\PythonSoftwareFoundation.Python.3.11_qbz5n2kfra8p0\LocalCache\local-packages\Python311\site-packages\theano\tensor\blas_headers.py”, line 987, in
if not config.blas.ldflags:
^^^^^^^^^^^^^^^^^^^
File “C:\Users\court\AppData\Local\Packages\PythonSoftwareFoundation.Python.3.11_qbz5n2kfra8p0\LocalCache\local-packages\Python311\site-packages\theano\configparser.py”, line 332, in __get__
val_str = self.default()
^^^^^^^^^^^^^^
File “C:\Users\court\AppData\Local\Packages\PythonSoftwareFoundation.Python.3.11_qbz5n2kfra8p0\LocalCache\local-packages\Python311\site-packages\theano\configdefaults.py”, line 1284, in default_blas_ldflags
blas_info = np.distutils.__config__.blas_opt_info
^^^^^^^^^^^^^^^^^^^^^^^^^^^^^^^^^^^^^
AttributeError: module ‘numpy.distutils.__config__’ has no attribute ‘blas_opt_info’
>>> C:\Users\court>pip3 install theano
Collecting theano
Downloading Theano-1.0.5.tar.gz (2.8 MB)
━━━━━━━━━━━━━━━━━━━━━━━━━━━━━━━━━━━━━━━━ 2.8/2.8 MB 8.6 MB/s eta 0:00:00
Preparing metadata (setup.py) … done
Requirement already satisfied: numpy>=1.9.1 in c:\users\court\appdata\local\packages\pythonsoftwarefoundation.python.3.11_qbz5n2kfra8p0\localcache\local-packages\python311\site-packages (from theano) (1.23.5)
Requirement already satisfied: scipy>=0.14 in c:\users\court\appdata\local\packages\pythonsoftwarefoundation.python.3.11_qbz5n2kfra8p0\localcache\local-packages\python311\site-packages (from theano) (1.11.2)
Requirement already satisfied: six>=1.9.0 in c:\users\court\appdata\local\packages\pythonsoftwarefoundation.python.3.11_qbz5n2kfra8p0\localcache\local-packages\python311\site-packages (from theano) (1.16.0)
Building wheels for collected packages: theano
Building wheel for theano (setup.py) … done
Created wheel for theano: filename=Theano-1.0.5-py3-none-any.whl size=2668148 sha256=718e629f46561b5ec6f963799d509428159db7a0f8fe6f95f54bdecfd6fc1053
Stored in directory: c:\users\court\appdata\local\pip\cache\wheels\26\1f\2f\02d738022626461828148150c0354e712c4ad74f1a60f10933
Successfully built theano
Installing collected packages: theano
WARNING: The scripts theano-cache.exe and theano-nose.exe are installed in ‘C:\Users\court\AppData\Local\Packages\PythonSoftwareFoundation.Python.3.11_qbz5n2kfra8p0\LocalCache\local-packages\Python311\Scripts’ which is not on PATH.
Consider adding this directory to PATH or, if you prefer to suppress this warning, use –no-warn-script-location.
Successfully installed theano-1.0.5
I’m also getting this “No section: ‘blas'” error in Google Colab.
Hi Bart…The following resource may be of interest to you:
https://stackoverflow.com/questions/48673863/anaconda-theano-installation-error
The error message “No section: ‘blas'” typically occurs in a Python environment and is related to configuration settings, particularly when using libraries that rely on BLAS (Basic Linear Algebra Subprograms) for numerical computations. This error often occurs when the program tries to read configuration settings for BLAS from a file (like a
.inifile), but the specified section is missing.Here are some steps to correct this error:
1. **Check Configuration File**: Ensure that the configuration file (often a
.inifile) your program is trying to read exists and is correctly formatted. The file should have a section titled[blas].2. **Install Required Libraries**: If your project requires specific BLAS libraries (like OpenBLAS, MKL, or ATLAS), make sure they are properly installed in your environment.
3. **Environment Variables**: Some Python libraries (like NumPy) use environment variables to find the correct BLAS implementation. Ensure these are correctly set.
4. **Correct Library Paths**: If the BLAS libraries are installed but not being found, ensure the paths are correctly set in the configuration file or in your environment variables.
5. **Update or Reinstall Dependencies**: Sometimes, simply updating or reinstalling the Python libraries that depend on BLAS can solve the issue.
6. **Python Virtual Environment**: If you are using a virtual environment, make sure the environment is properly set up and all necessary packages are installed within it.
7. **Consult Documentation**: Check the documentation of the library you are using. It may have specific instructions for setting up BLAS or dealing with such errors.
8. **Seek Community Help**: If the issue persists, consider seeking help from the community or forums related to the library you are using.
If you have more specific details about the context in which this error occurs, such as the Python library you are using or the contents of your configuration file, I can provide more targeted advice.
# Example of TensorFlow library
import tensorflow as tf
import tensorflow.compat.v1 as tf
tf.disable_v2_behavior()
# declare two symbolic floating-point scalars
a = tf.placeholder(tf.float32)
b = tf.placeholder(tf.float32)
# create a simple symbolic expression using the add function
add = tf.add(a, b)
# bind 1.5 to ‘a’, 2.5 to ‘b’, and evaluate ‘c’
sess = tf.Session()
binding = {a: 1.5, b: 2.5}
c = sess.run(add, feed_dict=binding)
print(c)
Answer: 4.0