The image diffusion model, in its simplest form, generates an image from the prompt. The prompt can be a text prompt or an image as long as a suitable encoder is available to convert it into a tensor that the model can use as a condition to guide the generation process. Text prompts are probably the easiest way to provide conditioning. It is easy to provide, but you may not find it easy enough to generate a picture that matches your expectations. In this post, you will learn:
- How to construct your prompt
- Elements of an effective prompt
Kick-start your project with my book Mastering Digital Art with Stable Diffusion. It provides self-study tutorials with working code.
Let’s get started.
More Prompting Techniques for Stable Diffusion
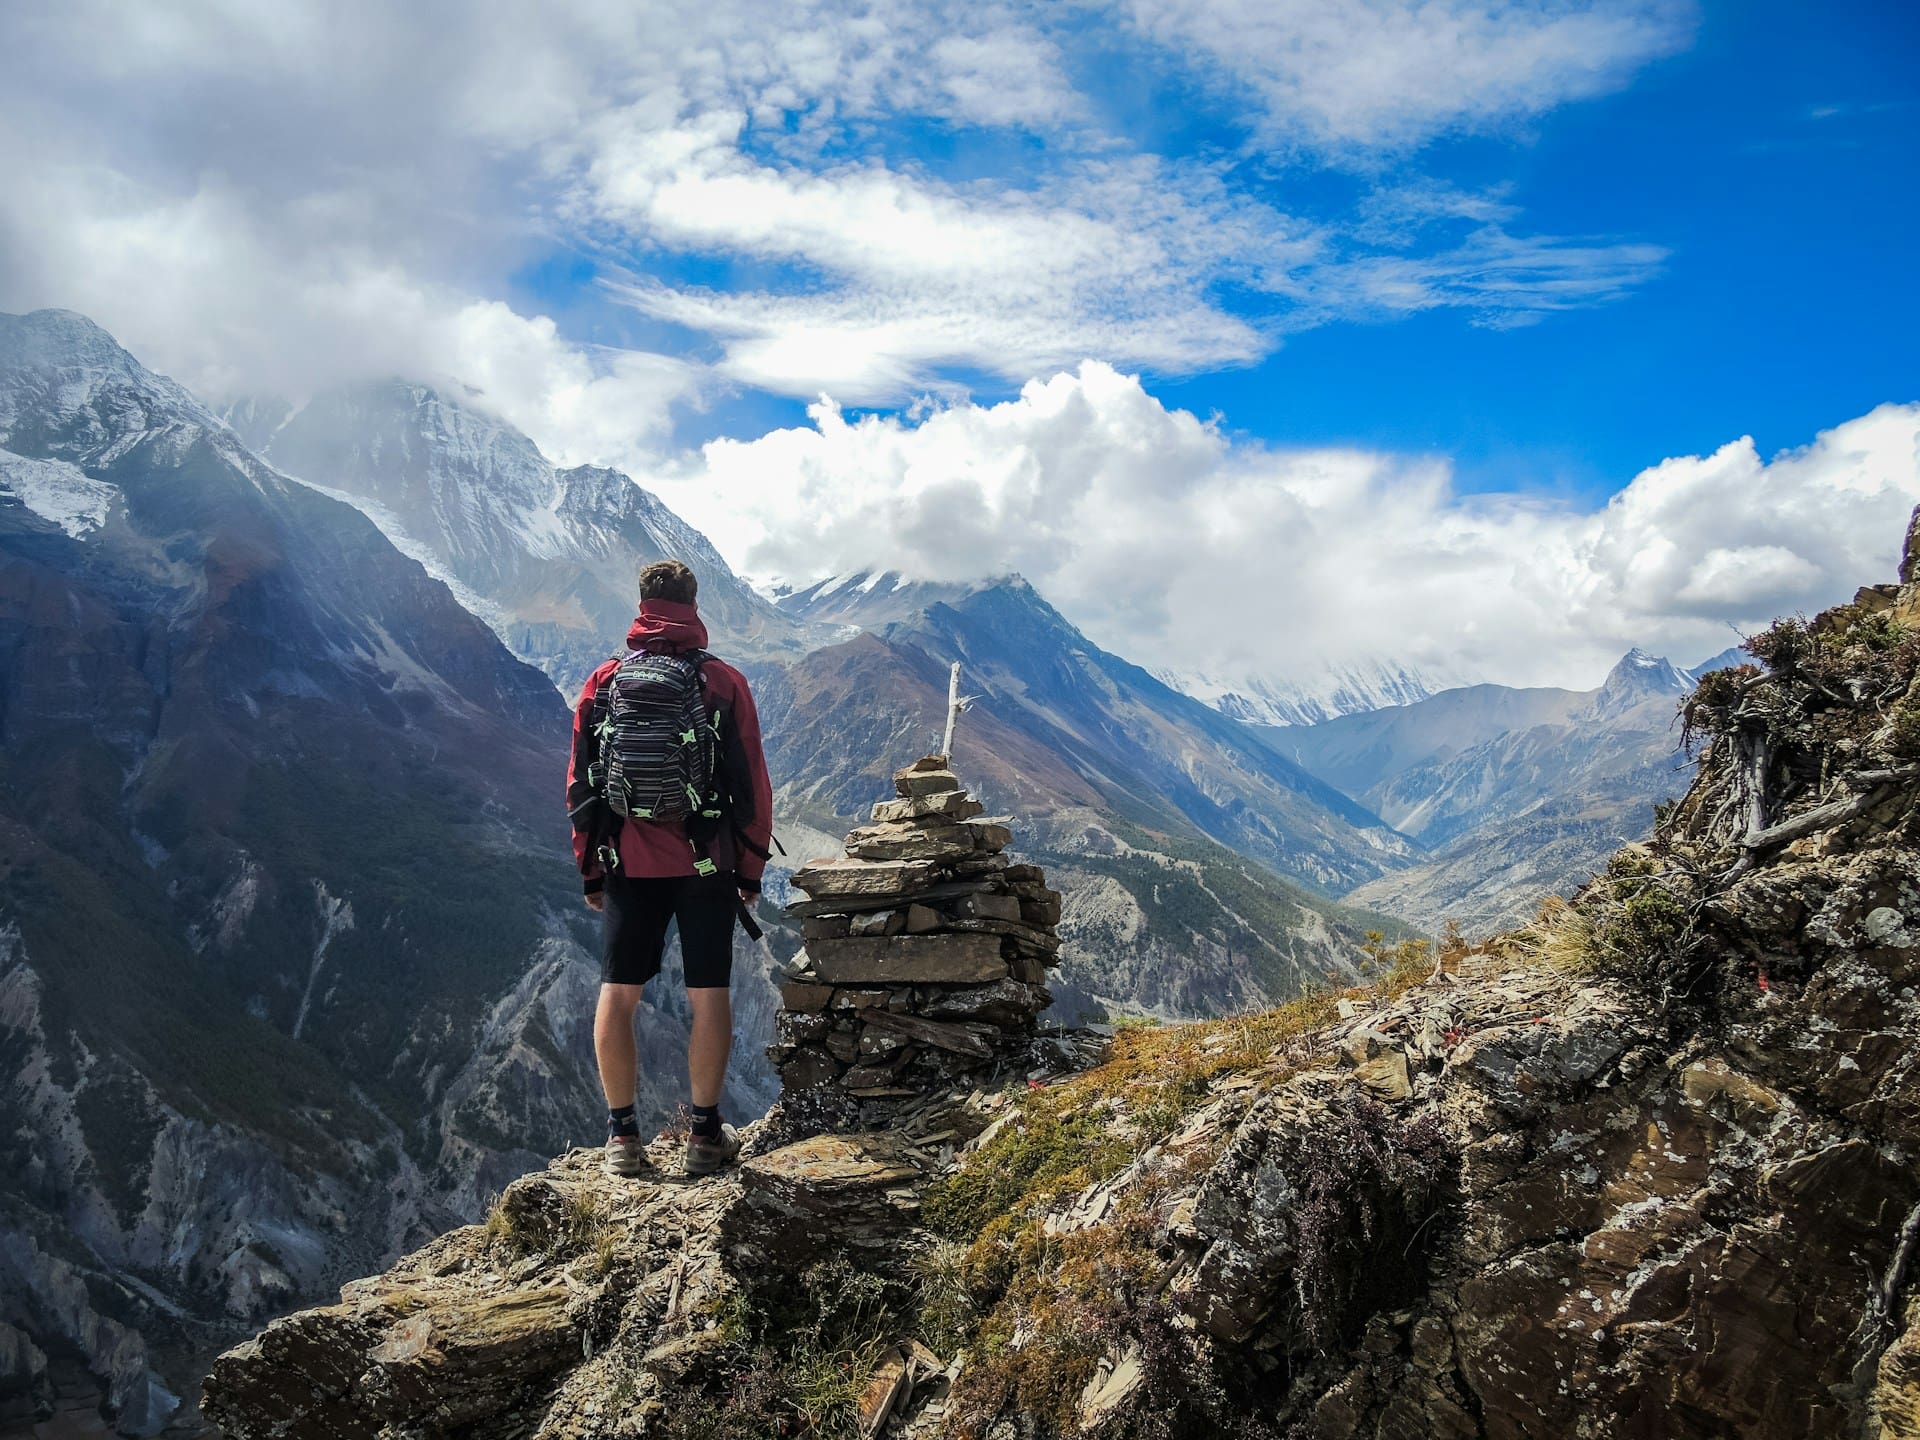
Photo by Simon English. Some rights reserved.
Overview
This post is in three parts; they are:
- Using an Interrogator
- Creating an Effective Prompt
- Experimenting with Prompts
Using an Interrogator
If you start from scratch, it may not be easy to describe the picture in your mind. It is not easy because not everyone can effectively convey their idea in words. Moreover, the Stable Diffusion model may also not understand your prompt as you expected.
Undeniably, starting with something and modifying it would be easier. You can copy the prompt from other people’s success stories online. You can also provide a sample picture and let the Stable Diffusion Web UI build a prompt. This feature is called the “interrogator”.
Let’s download an image to the hard disk. Go to the “img2img” tab on Web UI, upload that image, and click the “Interrogate CLIP” button with a paperclip icon.
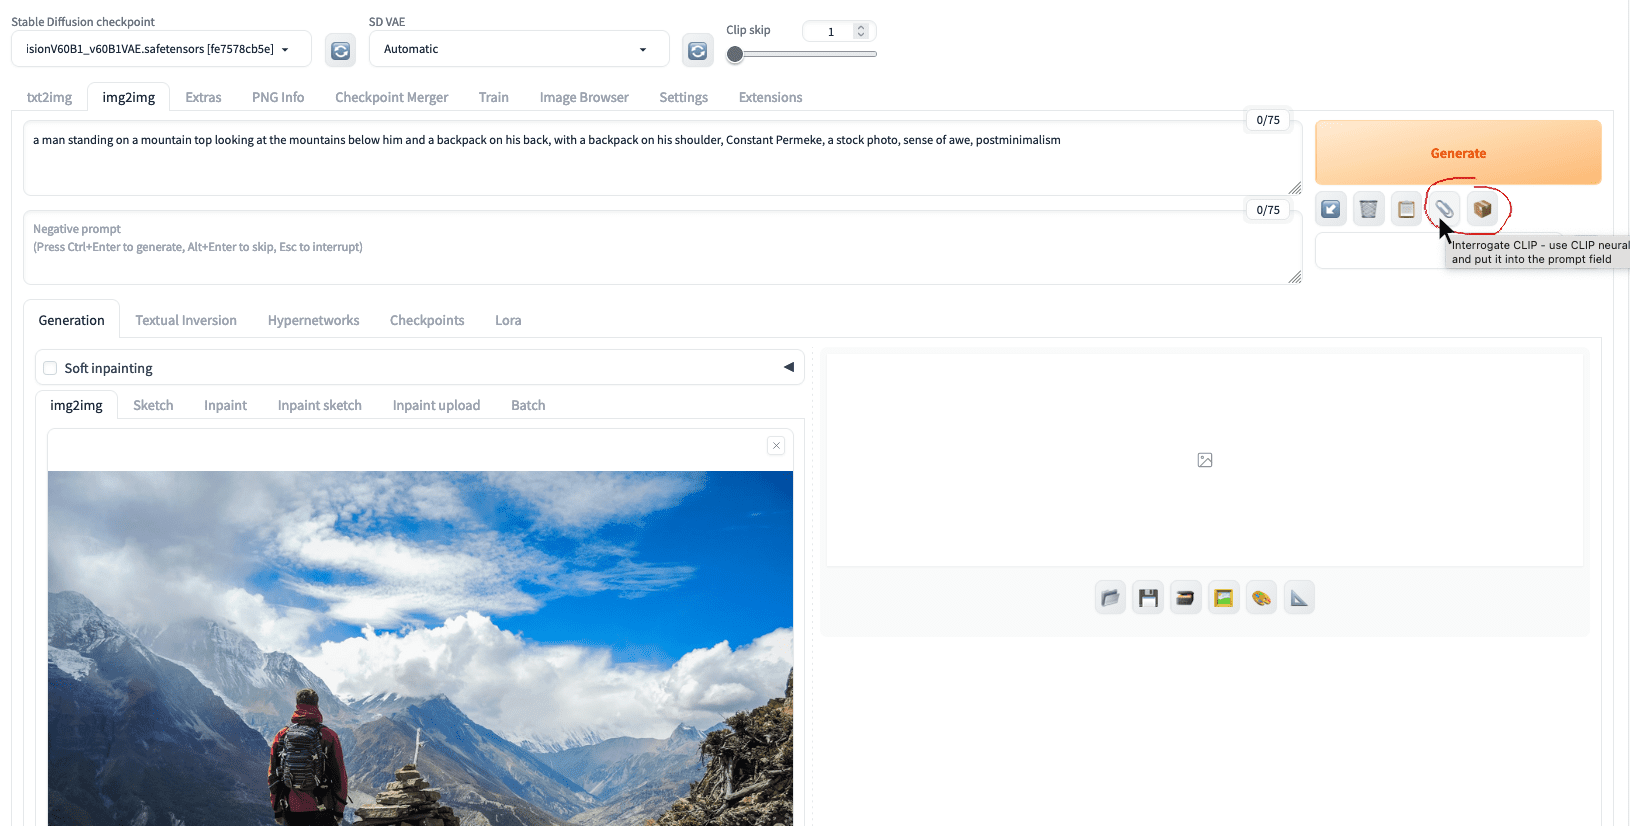
The interrogate buttons at the img2img tab in the Web UI
You should see a prompt is generated as:
a man standing on a mountain top looking at the mountains below him and a backpack on his back, with a backpack on his shoulder, Constant Permeke, a stock photo, sense of awe, postminimalism
This helps a lot to let you kickstart your prompt engineering. You can see that the first part of the prompt describes the picture. Then “Constant Permeke” was a painter. “Postminimalism” is an art movement. Together with “a stock photo”, their roles are to control the style. The term “sense of awe” controls the feeling, which hints the man is back to the camera and facing the wonder of nature.
Indeed, next to “Interrogate CLIP,” there’s another interrogate button on Web UI. The one with a cardboard box icon is “Interrogate Deepbooru”, based on a different image captioning model. For the same picture, you would see the prompt generated as:
1boy, backpack, bag, blue_sky, boots, building, city, cityscape, cliff, cloud, cloudy_sky, day, facing_away, field, from_behind, grass, hill, horizon, house, island, lake, landscape, male_focus, mountain, mountainous_horizon, ocean, outdoors, river, rock, scenery, sky, snow, solo, standing, tree, water, waterfall, waves
You have a sequence of keywords rather than a sentence. You can edit the prompts for your use, or use the generated prompt as your inspiration.
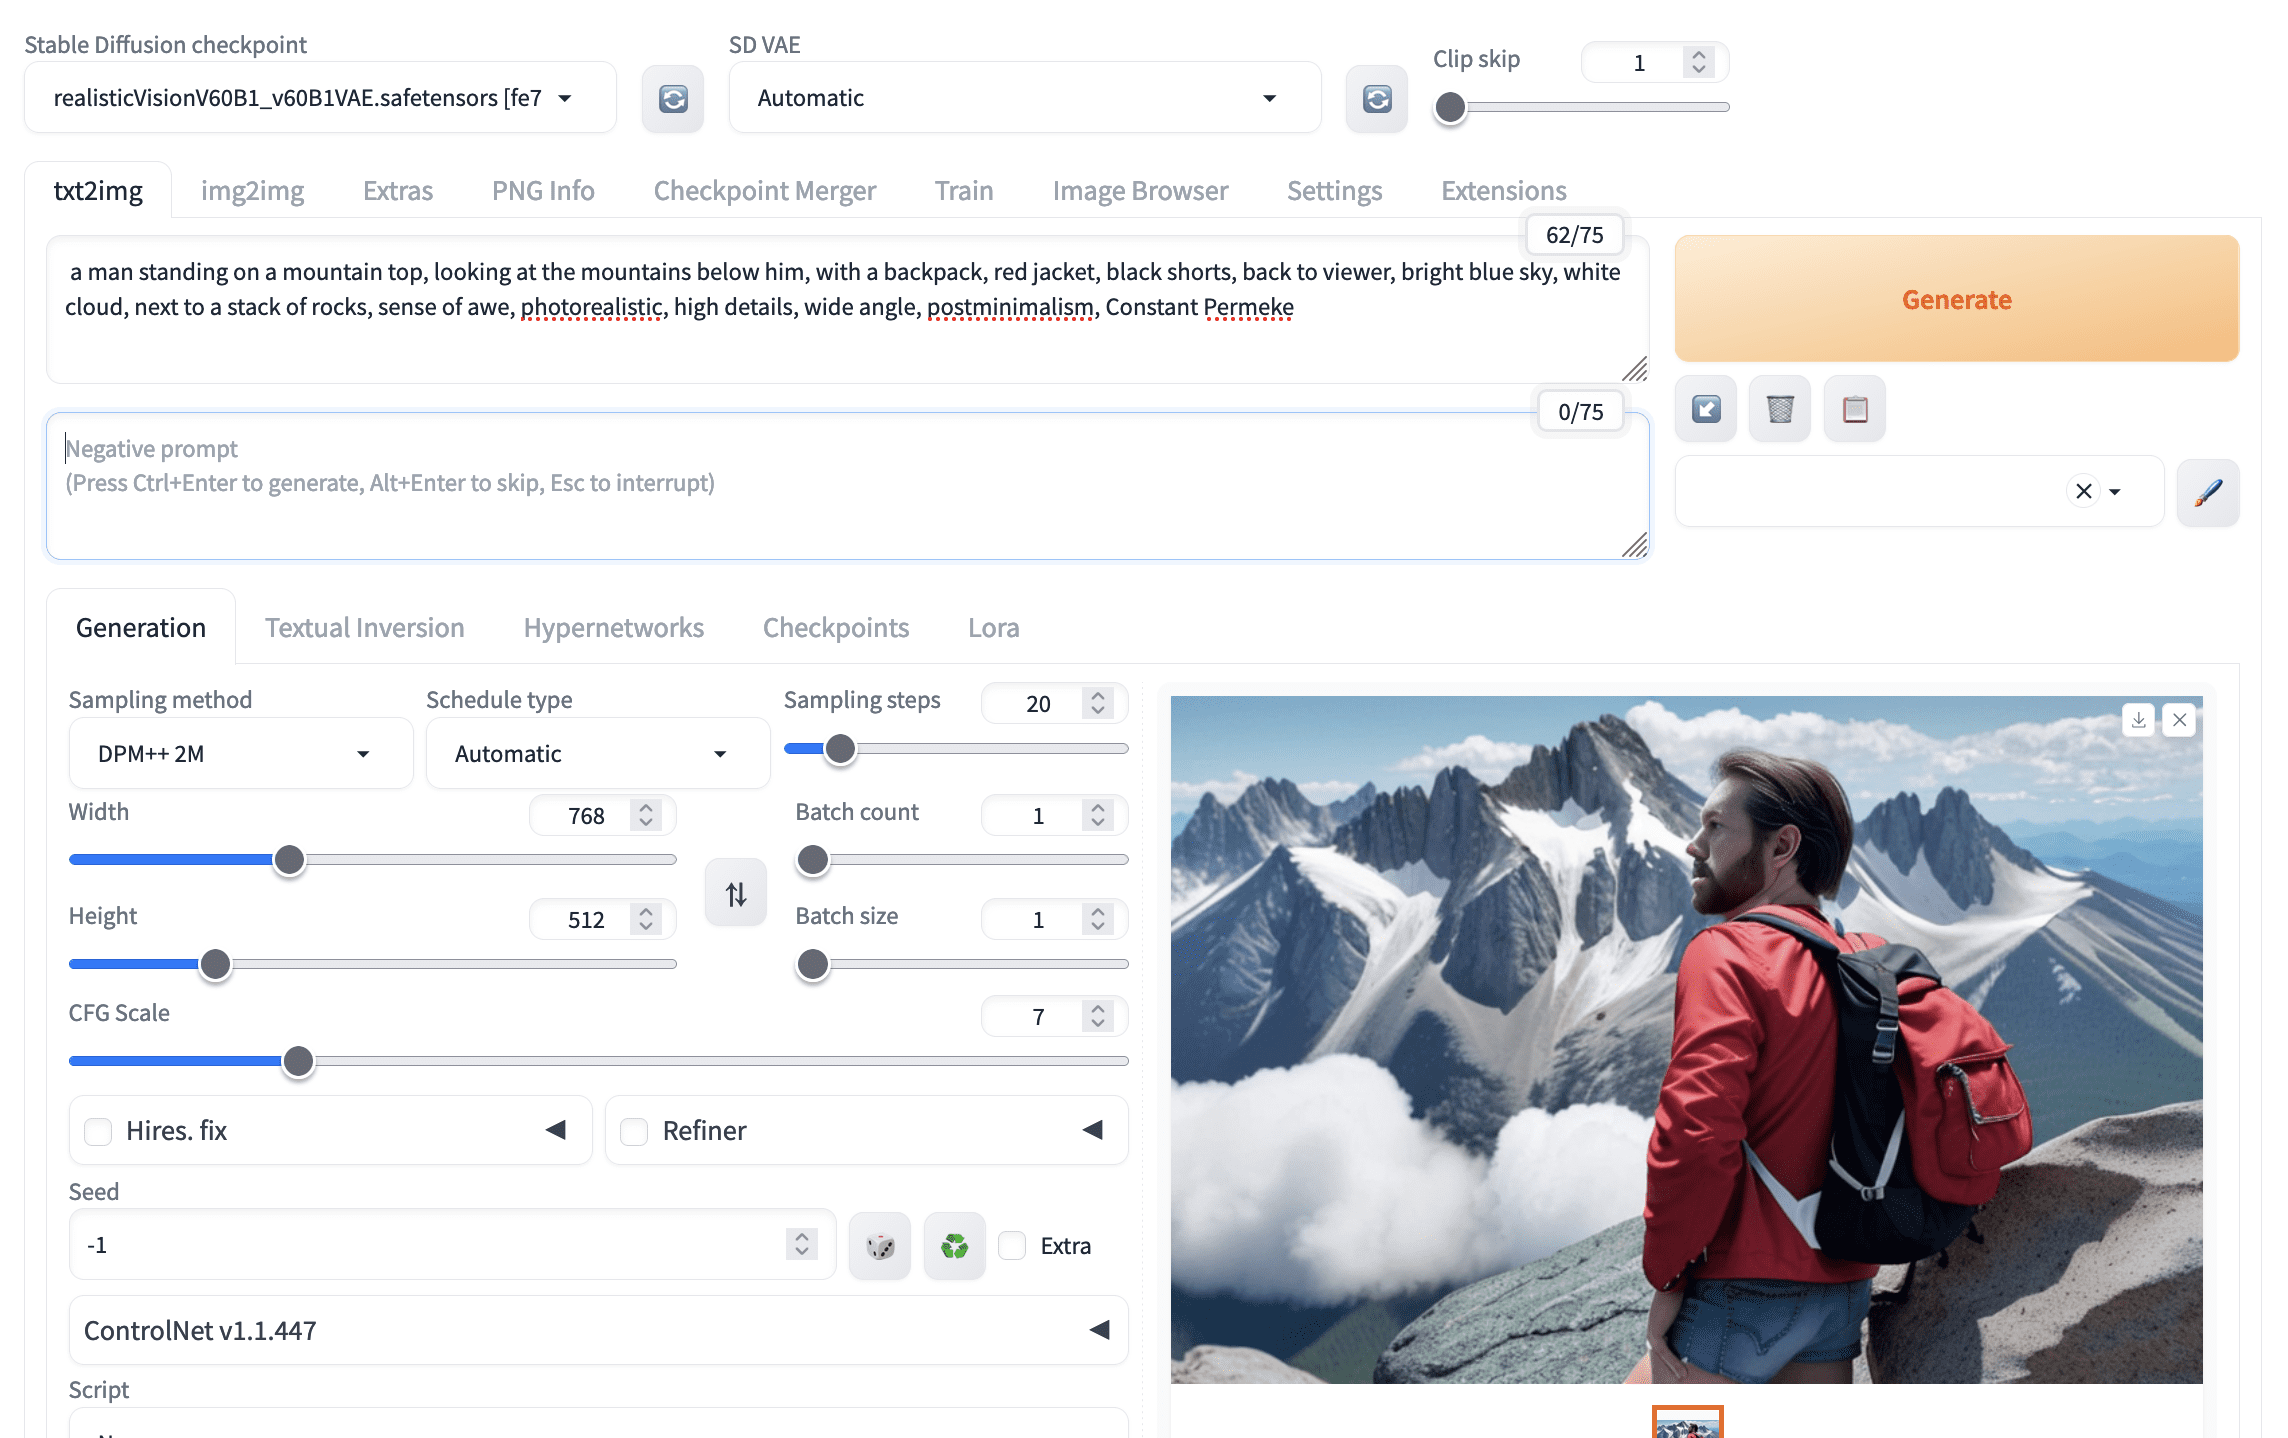
How good are the interrogate models? You should not expect to get back the original image from the prompt, but close. Repeating the prompt at the txt2img tab would give you this:

Picture generated using the prompt suggested by CLIP interrogator
Not too bad. But if you use the prompt created by Deepbooru, you probably see it less accurate:

Picture generated using the prompt suggested by Deepbooru interrogator
Creating an Effective Prompt
The CLIP model works well for photographs, while the Deepbooru model is for illustration, anime, and comics. However, using the prompt with an appropriate model is important. For example, if you are intended to produce anime-style pictures, using an anime checkpoint such as Counterfeit is helpful.
Let’s revisit the prompt generated by the CLIP model. Why is the original picture not generated?
A good prompt should mention three S:
- Subject: What is in the foreground, and its setting
- Scene: What is in the background, including the composition and the use of color
- Style: The abstract description of the picture, including the medium
Indeed, there’s the fourth S: be specific. You should mention in detail what you see but not what you know. You should not say what is not shown in the picture. For example, do not mention what is in the backpack because you cannot see from the photo. You should mention not just a man but also his outfit. Describing the invisible and intangible (such as the man’s emotion) is usually unhelpful. If you need a thesaurus to help you, you can try an online prompt builder or even ChatGPT.

Using ChatGPT to help brainstorm about a text prompt for image generation
Let’s try to enrich the prompt:
- Subject: a man standing on a mountain top, looking at the mountains below him, with a backpack, red jacket, shorts, back to viewer
- Scene: bright blue sky, white cloud, next to a stack of rocks, sense of awe
- Style: photorealistic, high details, wide angle, postminimalism, Constant Permeke
Combining all these, you may find the output to be like:
A picture generated by Stable Diffusion but not accurately following the prompt
Not perfect. The prompt provided many details, but the model doesn’t match everything. Of course, increasing the parameter “CFG Scale” can help since this asks the model to follow your prompt more closely. The other way to improve is to see what your model produces and emphasize the keywords that your model missed. You can use the syntax (keyword:weight) to adjust the weight; the default weight is 1.0.
Several issues are missing in the picture above. The picture is a close-up of the man, so it is not a wide-angle shot. The man did not wear black shorts. Let’s emphasize both of these. Usually, increasing the weight from 1.0 to 1.1 helps. You would try a heavier weight only when you confirm you need that.

A better picture after adjusting the weights of keywords in the prompt
The picture above shows that the prompt (black_shorts:1.1) is used. The underscore is intentional since it would be interpreted as space, but to enforce that the two words are interpreted together. Hence, it is more likely that “black” is known as an adjective for the noun “shorts”.
Sometimes, you try very hard, but the model does not follow your prompt accurately. You can work on the negative prompt to enforce what you do not want. For example, you see the man is not fully back to you. You can say “face” as a negative prompt, meaning you do not want to see his face.

Using negative prompts helps generate a better picture
Experimenting with Prompts
Creating pictures with stable diffusion may require patience and a lot of experimentation. This is because different models may work differently to the same prompt, and there is randomness in the image diffusion process. You may want to try different models, try different prompts, or even repeat the generation multiple times.
Some tools may save you time in this experimenting process. The easiest is to generate multiple pictures at once, each with a different random seed. If you set the batch size to greater than 1 and leave the seed to $-1$ (which means to generate a new seed each time), you can create multiple pictures in one click. Note that this will consume more memory on the GPU. If you have run out of memory, you can increase the batch count instead, which is to run multiple iterations of image generation. Slower, but use less memory.

Setting batch size and batch count, while keeping the seed to -1, generates multiple images at once
Once you find a good candidate out of the many generated, you can click on the picture to find the seed used. Then, to polish the picture further, you should fix the seed while modifying the prompt. Alter the prompt slightly each time so that you can slowly steer the generation to create the image you want.

The Web UI will report the parameters used to generate a picture, from which you can find the seed.
But how should you modify the prompt? One way is to try different combinations of the keywords. In the Web UI, you can use the “prompt matrix” script to help speed up this experimentation. You set the prompt into different parts separated by the pipe character ( | ), i.e.,
a man standing on a mountain top, looking at the mountains below him, with a backpack, red jacket, (black_shorts:1.1), (back to viewer:1.1), bright blue sky, white cloud, next to a stack of rocks, sense of awe, (wide angle:1.1) | photorealistic, high details | postminimalism, Constant Permeke
Then, at the bottom of the txt2img tab, select “Prompt matrix” in the Script section. Because the above prompt is set as the positive prompt, pick “positive” in the “Select prompt” section. Click “Generate,” and you will see multiple pictures generated:
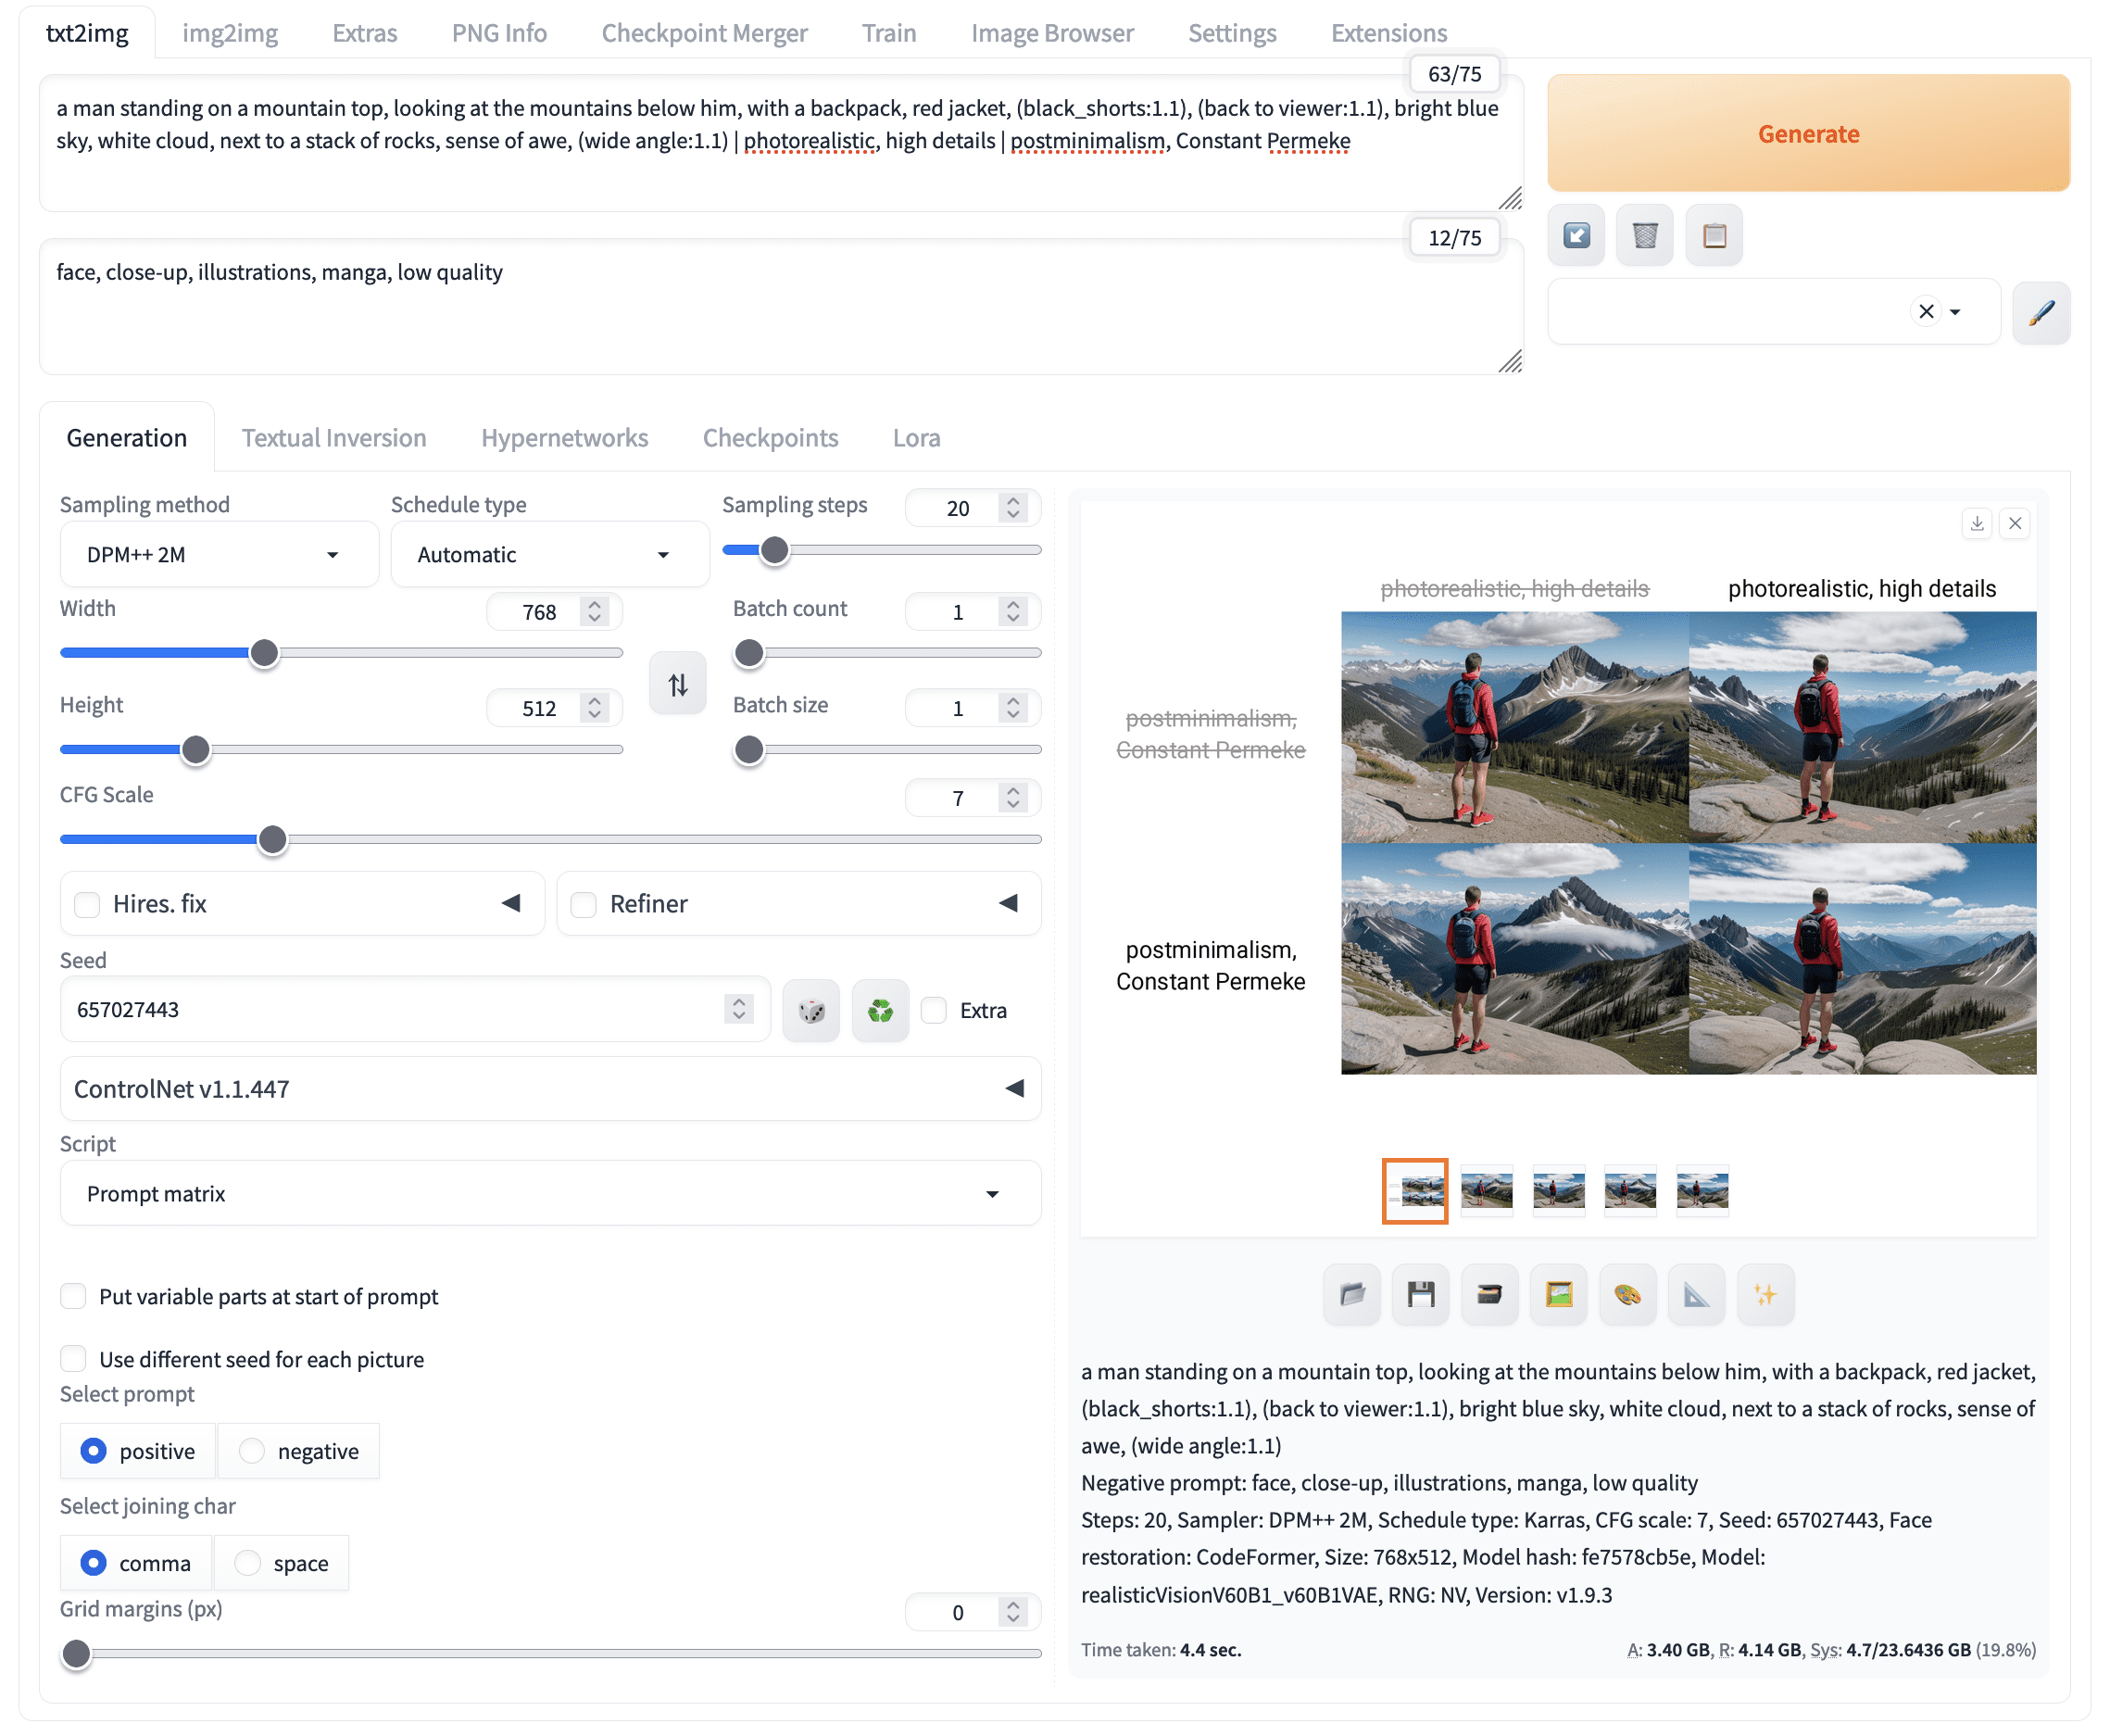
Experimentation of different prompts using the prompt matrix script
The “prompt matrix” enumerates all combinations from your prompt, with each part as a unit. Note that the seed and all other parameters were fixed; only the prompt varies. This is essential to have a fair comparison of the effect of prompts.
Further Readings
This section provides more resources on the topic if you want to go deeper.
- Counterfeit model for anime style picture: https://civitai.com/models/4468/counterfeit-v30
- Realistic Vision model for photorealistic picture: https://civitai.com/models/4201/realistic-vision-v60-b1
- Prompt builder by Promptomania, which you can learn about the different keywords useful for the prompt
- “Attention and Emphasis” section of the Features page at the Stable Diffusion Web UI wiki
Summary
In this post, you learned about some techniques that helps you create a better picture in Stable Diffusion. Specifically, you learned:
- How to use an interrogator to generate a prompt from an existing image
- The three S for an effective prompt: subject, scene, and style
- How to experiment with prompts effectively
Get Started on Mastering Digital Art with Stable Diffusion!
Learn how to make Stable Diffusion work for you
...by learning some key elements in the image generation process
Discover how in my new Ebook:
Mastering Digital Art with Stable Diffusion
This book offers self-study tutorials complete with all the working code in Python, guiding you from a novice to an expert in image generation. It teaches you how to set up Stable Diffusion, fine-tune models, automate workflows, adjust key parameters, and much more...all to help you create stunning digital art.


")


No comments yet.