Python is a neat programming language because its syntax is simple, clear, and concise. But Python would not be so successful without its rich third-party libraries. Python is so famous for data science and machine learning that it has become a de facto lingua franca just because we have so many libraries for those tasks. Without those libraries, Python is not too powerful.
After finishing this tutorial, you will learn:
-
- Where the Python libraries are installed in your system
- What is PyPI, and how a library repository can help your project
- How to use the
pipcommand to use a library from the repository
Kick-start your project with my new book Python for Machine Learning, including step-by-step tutorials and the Python source code files for all examples.
Let’s get started.
Exploring the Python Ecosystem
Photo by Vinit Srivastava. Some rights reserved.
Overview
This tutorial is in five parts; they are:
- The Python ecosystem
- Python libraries location
- The pip command
- Search for a package
- Host your own repository
The Python Ecosystem
In the old days before the Internet, the language and the libraries are separated. When you learn C from a textbook, you will not see anything to help you read a CSV file or open a PNG image. Same in the old days of Java. If you need anything not included in the official libraries, you need to search for it from various places. How to download or install the libraries would be specific to the vendor of the library.
It would be way more convenient if we had a central repository to host many libraries and let us install the library with a unified interface, which allows us to check for new versions from time to time. Even better, we may also search on the repository with keywords to discover the library that can help our project. The CPAN is an example of libraries repository for Perl. Similarly, we have CRAN for R, RubyGems for Ruby, npm for Node.js, and maven for Java. For Python, we have PyPI (Python Package Index), https://pypi.org/.
The PyPI is platform agnostic. If you installed your Python in Windows by downloading the installer from python.org, you have the pip command to access PyPI. If you used homebrew on Mac to install Python, you also have the same pip command. It is the same even if you use the built-in Python from Ubuntu Linux.
As a repository, you can find almost anything on PyPI. From large libraries like Tensorflow and PyTorch to small things like minimal. Because of the vast amount of libraries available on PyPI, you can easily find tools that implement some important components of your projects. Therefore, we have a strong and growing ecosystem of libraries in Python that makes it more powerful.
Want to Get Started With Python for Machine Learning?
Take my free 7-day email crash course now (with sample code).
Click to sign-up and also get a free PDF Ebook version of the course.
Python Libraries Location
When we need a library in our Python scripts, we use:
|
1 |
import module_name |
But how can Python know where to read the content of the module and load it for our scripts? Like how the bash shell in Linux or command prompt in Windows looks for the command to execute, Python depends on a list of paths to locate the module to load. At any time, we can check the path by printing the list sys.path (after importing the sys module). For example, in a Mac installation of Python via homebrew:
|
1 2 |
import sys print(sys.path) |
It prints the following:
|
1 2 3 4 5 |
['', '/usr/local/Cellar/python@3.9/3.9.9/Frameworks/Python.framework/Versions/3.9/lib/python39.zip', '/usr/local/Cellar/python@3.9/3.9.9/Frameworks/Python.framework/Versions/3.9/lib/python3.9', '/usr/local/Cellar/python@3.9/3.9.9/Frameworks/Python.framework/Versions/3.9/lib/python3.9/lib-dynload', '/usr/local/lib/python3.9/site-packages'] |
This means if you run import my_module, Python will look for the my_module in the same directory as your current location first (the first element, empty string). If not found, Python will check for the module located inside the zip file in the second element above. Then under the directory as the third element, and so on. The final path /usr/local/lib/python3.9/site-packages is usually where you installed your third-party libraries. The second, third, and fourth elements above are where the built-in standard libraries are located.
If you have some extra libraries installed elsewhere, you can set up your environment variable PYTHONPATH and point to it. In Linux and Mac, for example, we can run the command in the shell as follows:
|
1 |
$ PYTHONPATH="/tmp:/var/tmp" python print_path.py |
where print_path.py is the two-line code above. Running this command will print the following:
|
1 2 3 4 5 |
['', '/tmp', '/var/tmp', '/usr/local/Cellar/python@3.9/3.9.9/Frameworks/Python.framework/Versions/3.9/lib/python39.zip', '/usr/local/Cellar/python@3.9/3.9.9/Frameworks/Python.framework/Versions/3.9/lib/python3.9', '/usr/local/Cellar/python@3.9/3.9.9/Frameworks/Python.framework/Versions/3.9/lib/python3.9/lib-dynload', '/usr/local/lib/python3.9/site-packages'] |
We see Python will search from /tmp, then /var/tmp, before checking the built-in libraries and installed third-party libraries. When we set up the PYTHONPATH environment variable, we use a colon “:” to separate multiple paths to search for our import. In case you are not familiar with the shell syntax, the above command line that defines the environment variable and runs the Python script can be broken into two commands:
|
1 2 |
$ export PYTHONPATH="/tmp:/var/tmp" $ python print_path.py |
If you’re using Windows, you need to do this instead:
|
1 2 3 |
C:\> set PYTHONPATH="C:\temp;D:\temp" C:\> python print_path.py |
That is, we need to use a semicolon “;” to separate the paths.
Note: It is not recommended, but you can modify sys.path in your script before the import statement. Python will search the new locations for the import afterward, but it means to tie your script to a particular path. In other words, your script may not run on another computer.
The Pip Command
The last path in the sys.path printed above is where your third-party libraries are normally installed. The pip command is how you get the library from the Internet and install it to that location. The simplest syntax is:
|
1 |
pip install scikit-learn pandas |
This will install two packages: scikit-learn and pandas. Later, you may want to upgrade the packages when a new version is released. The syntax is:
|
1 |
pip install -U scikit-learn |
where -U means to upgrade. To know which packages are outdated, we can use the command:
|
1 |
pip list --outdated |
It will print the list of all packages with a newer version in PyPI than your system, such as the following:
|
1 2 3 4 5 6 7 |
Package Version Latest Type ---------------------------- ---------- -------- ----- absl-py 0.14.0 1.0.0 wheel anyio 3.4.0 3.5.0 wheel ... xgboost 1.5.1 1.5.2 wheel yfinance 0.1.69 0.1.70 wheel |
Without the --outdated, the pip command will show you all the installed packages and their versions. You can optionally show the location that each package is installed with the -V option, such as the following:
|
1 2 3 4 5 6 7 8 9 10 11 12 |
$ pip list -v Package Version Location Installer ---------------------------- ---------- -------------------------------------- --------- absl-py 0.14.0 /usr/local/lib/python3.9/site-packages pip aiohttp 3.8.1 /usr/local/lib/python3.9/site-packages pip aiosignal 1.2.0 /usr/local/lib/python3.9/site-packages pip anyio 3.4.0 /usr/local/lib/python3.9/site-packages pip ... word2number 1.1 /usr/local/lib/python3.9/site-packages pip wrapt 1.12.1 /usr/local/lib/python3.9/site-packages pip xgboost 1.5.1 /usr/local/lib/python3.9/site-packages pip yfinance 0.1.69 /usr/local/lib/python3.9/site-packages pip |
In case you need to check the summary of a package, you can use the pip show command, e.g.,
|
1 2 3 4 5 6 7 8 9 10 11 |
$ pip show pandas Name: pandas Version: 1.3.4 Summary: Powerful data structures for data analysis, time series, and statistics Home-page: https://pandas.pydata.org Author: The Pandas Development Team Author-email: pandas-dev@python.org License: BSD-3-Clause Location: /usr/local/lib/python3.9/site-packages Requires: numpy, python-dateutil, pytz Required-by: bert-score, copulae, datasets, pandas-datareader, seaborn, statsmodels, ta, textattack, yfinance |
This gives you some information such as the home page, where you installed it, as well as what other packages it depends on and the packages depending on it.
When you need to remove a package (e.g., to free up the disk space), you can simply run:
|
1 |
pip uninstall tensorflow |
One final note to use the pip command: There are two types of packages from pip. The packages distributed as source code and the packages distributed as binary. They are different only when part of the module is not written in Python but in some other language (e.g., C or Cython) and needs to compile before use. The source packages will be compiled on your machine, but the binary distribution is already compiled, specific to the platform (e.g., 64-bit Windows). Usually the latter is distributed as “wheel” packages, and you need to have wheel installed first to enjoy the full benefit:
|
1 2 |
pip install wheel |
A large package such as Tensorflow will take many hours to compile from scratch. Therefore, it is advisable to have wheel installed and use the wheel packages whenever they are available.
Search for a Package
The newer version of pip command disabled the search function because it imposed too much workload to the PyPI system.
The way we can look for a package on PyPI is to use the search box on its webpage.

When you type in a keyword, such as “gradient boosting,” it will show you many packages that contain the keyword somewhere:
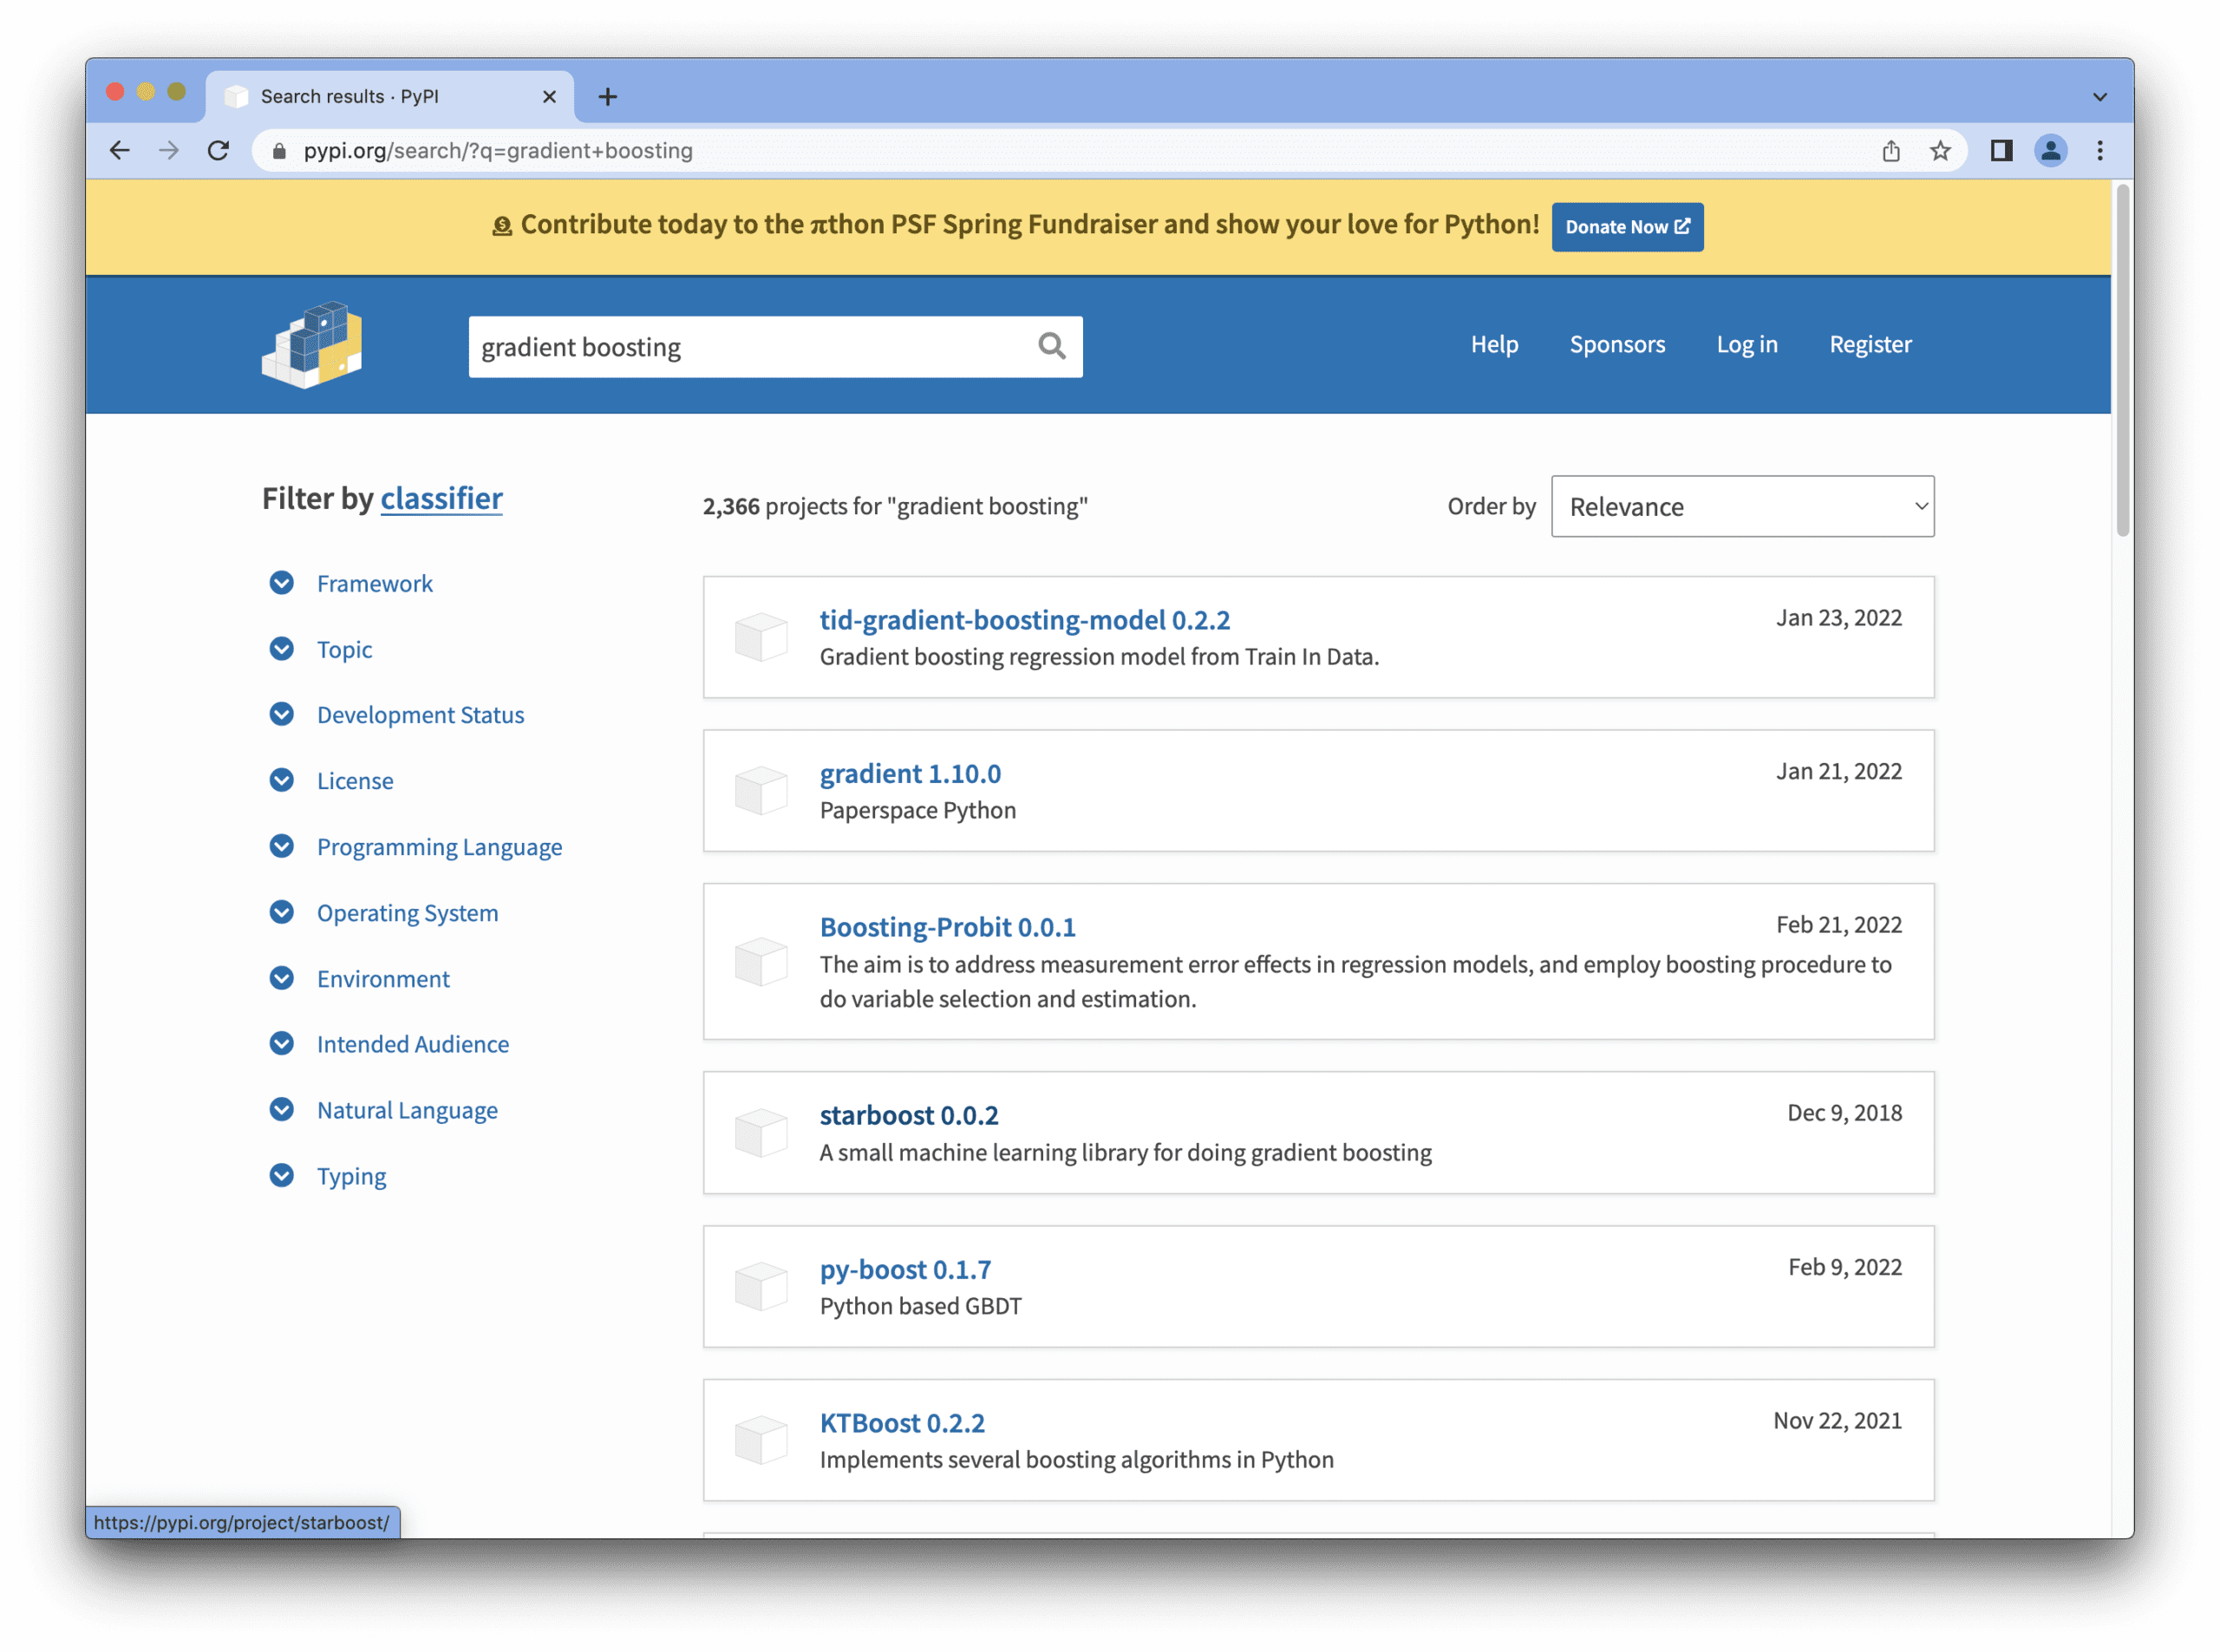
You can click on each one for more details (usually including code examples) to determine which one fits your needs.
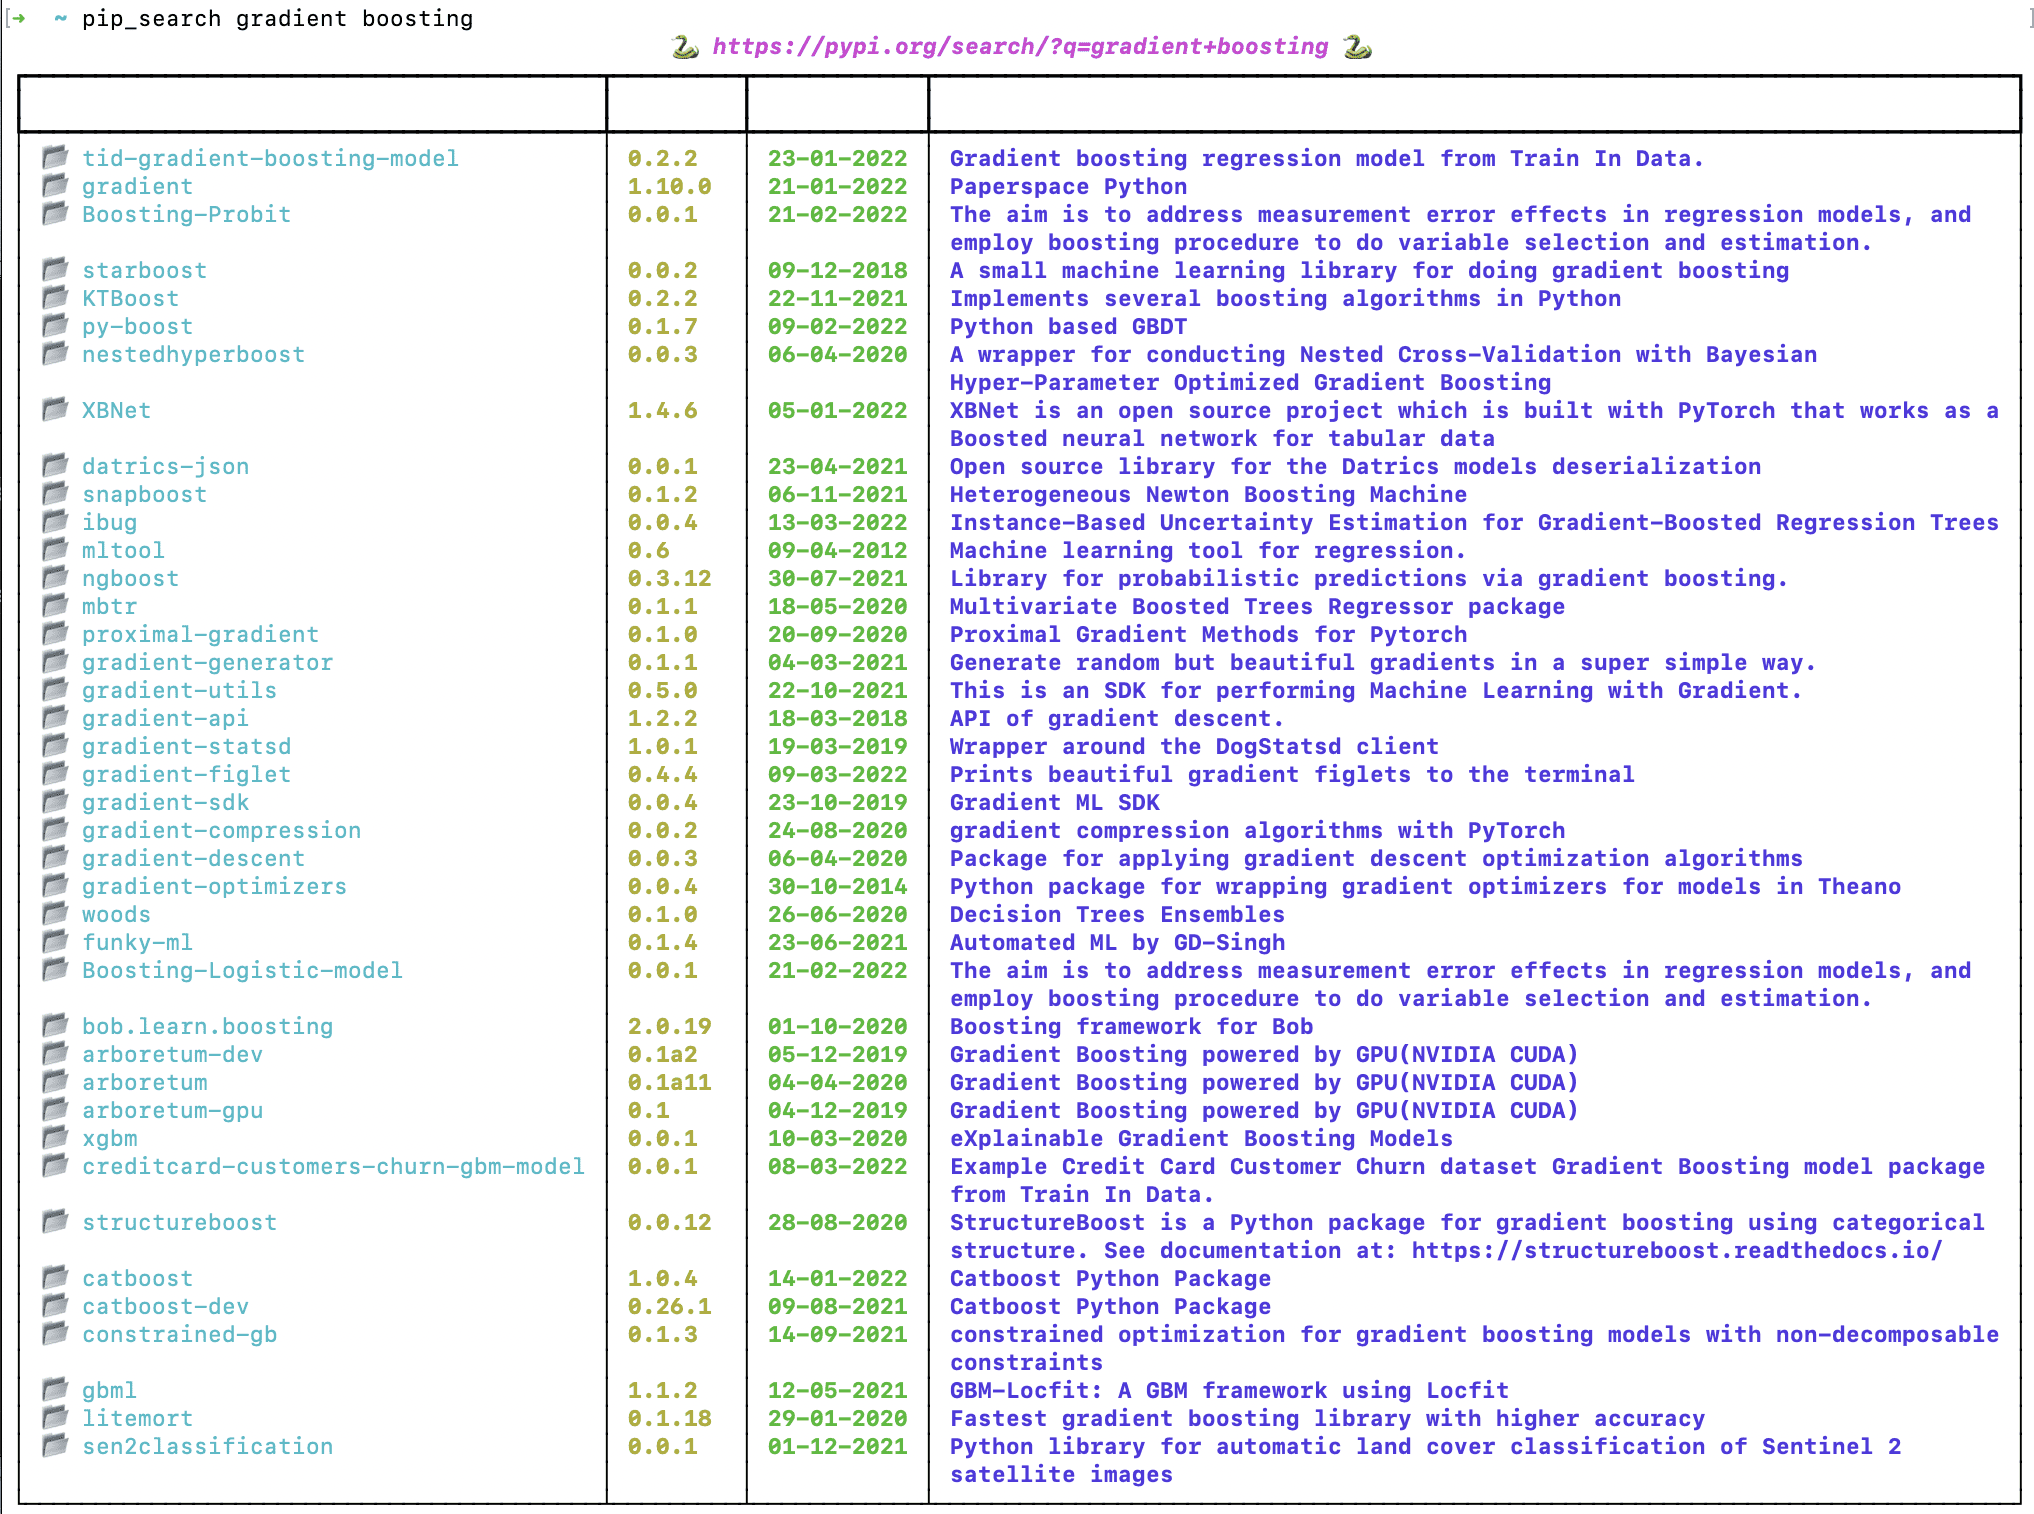
If you prefer the command line, you can install the pip-search package:
|
1 |
pip install pip-search |
Then you can run the pip_search command to search with a keyword:
|
1 |
pip_search gradient boosting |
It will not give you everything on PyPI because there would be thousands of them. But it will give you the most relevant results. Below is the result from a Mac terminal:
Host Your Own Repository
PyPI is a repository on the Internet. But the pip command does not use it exclusively. If you have some reason to want your own PyPI server (for example, hosting internally in your corporate network so your pip does not goes beyond your firewall), you can try out the pypiserver package:
|
1 |
pip install pypiserver |
Following the package’s documentation, you can set up your server using the pypi-server command. Then, you can upload the package and start serving. The details on how to configure and set up your own server would be too long to describe in detail here. But what it does is provide an index of available packages in the format that pip command can understand and provides the package for downloading when pip requests a particular one.
If you have your own server, you can install a package in pip by:
|
1 |
pip install pandas --index-url https://192.168.0.234:8080 |
Here, the address after the --index-url is the host and port number of your own server.
PyPI is not the only repository. If you installed Python with Anaconda, you have an alternative system, conda, to install packages. The syntax is similar (almost always replacing pip with conda will work as expected). However, you should be reminded that they are two different systems that work independently.
Further Reading
This section provides more resources on the topic if you are looking to go deeper.
- pip documentation, https://pip.pypa.io/en/stable/
- Python package index, https://pypi.org/
- pypiserver package, https://pypi.org/project/pypiserver/
Summary
In this tutorial, you’ve discovered the command pip and how it brings you the abundant packages from the Python ecosystem to help your project. Specifically, you learned:
- How to look for a package from PyPI
- How Python manages its libraries in your system
- How to install, upgrade, and remove a package from your system
- How we can host our own version of PyPI in our network
Get a Handle on Python for Machine Learning!
Be More Confident to Code in Python
...from learning the practical Python tricks
Discover how in my new Ebook:
Python for Machine Learning
It provides self-study tutorials with hundreds of working code to equip you with skills including:
debugging, profiling, duck typing, decorators, deployment,
and much more...


No comments yet.