Optimization is a process where we try to find the best possible set of parameters for a deep learning model. Optimizers generate new parameter values and evaluate them using some criterion to determine the best option. Being an important part of neural network architecture, optimizers help in determining best weights, biases or other hyper-parameters that will result in the desired output.
There are many kinds of optimizers available in PyTorch, each with its own strengths and weaknesses. These include Adagrad, Adam, RMSProp and so on.
In the previous tutorials, we implemented all necessary steps of an optimizer to update the weights and biases during training. Here, you’ll learn about some PyTorch packages that make the implementation of the optimizers even easier. Particularly, you’ll learn:
- How optimizers can be implemented using some packages in PyTorch.
- How you can import linear class and loss function from PyTorch’s ‘nn’ package.
- How Stochastic Gradient Descent and Adam (most commonly used optimizer) can be implemented using ‘optim’ package in PyTorch.
- How you can customize weights and biases of the model.
Note that we’ll use the same implementation steps in our subsequent tutorials of our PyTorch series.
Kick-start your project with my book Deep Learning with PyTorch. It provides self-study tutorials with working code.
Let’s get started.

Using Optimizers from PyTorch.
Picture by Jean-Daniel Calame. Some rights reserved.
Overview
This tutorial is in five parts; they are
- Preparing Data
- Build the Model and Loss Function
- Train a Model with Stochastic Gradient Descent
- Train a Model with Adam Optimizer
- Plotting Graphs
Preparing Data
Let’s start by importing the libraries we’ll use in this tutorial.
|
1 2 3 4 |
import matplotlib.pyplot as plt import numpy as np import torch from torch.utils.data import Dataset, DataLoader |
We will use a custom data class. The data is a line with values from $-5$ to $5$ having slope and bias of $-5$ and $1$ respectively. Also, we’ll add the noise with same values as x and train our model to estimate this line.
|
1 2 3 4 5 6 7 8 9 10 11 12 13 14 |
# Creating our dataset class class Build_Data(Dataset): # Constructor def __init__(self): self.x = torch.arange(-5, 5, 0.1).view(-1, 1) self.func = -5 * self.x + 1 self.y = self.func + 0.4 * torch.randn(self.x.size()) self.len = self.x.shape[0] # Getting the data def __getitem__(self, index): return self.x[index], self.y[index] # Getting length of the data def __len__(self): return self.len |
Now let’s use it to create our dataset object and plot the data.
|
1 2 3 4 5 6 7 8 9 10 11 |
# Create dataset object data_set = Build_Data() # Plot and visualizing the data points plt.plot(data_set.x.numpy(), data_set.y.numpy(), 'b+', label = 'y') plt.plot(data_set.x.numpy(), data_set.func.numpy(), 'r', label = 'func') plt.xlabel('x') plt.ylabel('y') plt.legend() plt.grid('True', color='y') plt.show() |
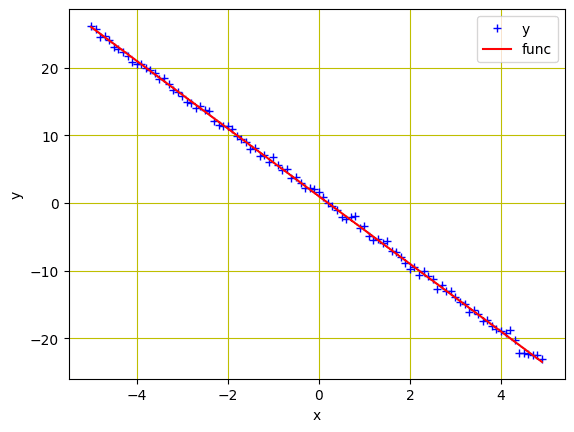
Data from the custom dataset object
Putting everything together, the following is the complete code to create the plot:
|
1 2 3 4 5 6 7 8 9 10 11 12 13 14 15 16 17 18 19 20 21 22 23 24 25 26 27 28 29 30 31 |
import matplotlib.pyplot as plt import numpy as np import torch from torch.utils.data import Dataset, DataLoader # Creating our dataset class class Build_Data(Dataset): # Constructor def __init__(self): self.x = torch.arange(-5, 5, 0.1).view(-1, 1) self.func = -5 * self.x + 1 self.y = self.func + 0.4 * torch.randn(self.x.size()) self.len = self.x.shape[0] # Getting the data def __getitem__(self, index): return self.x[index], self.y[index] # Getting length of the data def __len__(self): return self.len # Create dataset object data_set = Build_Data() # Plot and visualizing the data points plt.plot(data_set.x.numpy(), data_set.y.numpy(), 'b+', label = 'y') plt.plot(data_set.x.numpy(), data_set.func.numpy(), 'r', label = 'func') plt.xlabel('x') plt.ylabel('y') plt.legend() plt.grid('True', color='y') plt.show() |
Build the Model and Loss Function
In the previous tutorials, we created some functions for our linear regression model and loss function. PyTorch allows us to do just that with only a few lines of code. Here’s how we’ll import our built-in linear regression model and its loss criterion from PyTorch’s nn package.
|
1 2 |
model = torch.nn.Linear(1, 1) criterion = torch.nn.MSELoss() |
The model parameters are randomized at creation. We can verify this with the following:
|
1 2 |
... print(list(model.parameters())) |
which prints
|
1 2 3 |
[Parameter containing: tensor([[-5.2178]], requires_grad=True), Parameter containing: tensor([-5.5367], requires_grad=True)] |
While PyTorch will randomly initialize the model parameters, we can also customize them to use our own. We can set our weights and bias as follows. Note that we rarely need to do this in practice.
|
1 2 3 |
... model.state_dict()['weight'][0] = -10 model.state_dict()['bias'][0] = -20 |
Before we start the training, let’s create a DataLoader object to load our dataset into the pipeline.
|
1 2 3 |
... # Creating Dataloader object trainloader = DataLoader(dataset = data_set, batch_size=1) |
Want to Get Started With Deep Learning with PyTorch?
Take my free email crash course now (with sample code).
Click to sign-up and also get a free PDF Ebook version of the course.
Train a Model with Stochastic Gradient Descent
To use the optimizer of our choice, we can import the optim package from PyTorch. It includes several state-of-the-art parameter optimization algorithms that can be implemented with only a single line of code. As an example, stochastic gradient descent (SGD) is available as follows.
|
1 2 3 |
... # define optimizer optimizer = torch.optim.SGD(model.parameters(), lr=0.01) |
As an input, we provided model.parameters() to the constructor to denote what to optimize. We also defined the step size or learning rate (lr).
To help visualize the optimizer’s progress later, we create an empty list to store the loss and let our model train for 20 epochs.
|
1 2 3 4 5 6 7 8 9 10 11 12 13 14 15 16 17 18 |
... loss_SGD = [] n_iter = 20 for i in range(n_iter): for x, y in trainloader: # making a pridiction in forward pass y_hat = model(x) # calculating the loss between original and predicted data points loss = criterion(y_hat, y) # store loss into list loss_SGD.append(loss.item()) # zeroing gradients after each iteration optimizer.zero_grad() # backward pass for computing the gradients of the loss w.r.t to learnable parameters loss.backward() # updateing the parameters after each iteration optimizer.step() |
In above, we feed the data samples into the model for prediction and calculate the loss. Gradients are computed during the backward pass, and parameters are optimized. While in previous sessions we used some extra lines of code to update the parameters and zero the gradients, PyTorch features zero_grad() and step() methods from the optimizer to make the process concise.
You may increase the batch_size argument in the DataLoader object above for mini-batch gradient descent.
Together, the complete code is as follows:
|
1 2 3 4 5 6 7 8 9 10 11 12 13 14 15 16 17 18 19 20 21 22 23 24 25 26 27 28 29 30 31 32 33 34 35 36 37 38 39 40 41 42 43 44 45 46 47 48 49 |
import matplotlib.pyplot as plt import numpy as np import torch from torch.utils.data import Dataset, DataLoader # Creating our dataset class class Build_Data(Dataset): # Constructor def __init__(self): self.x = torch.arange(-5, 5, 0.1).view(-1, 1) self.func = -5 * self.x + 1 self.y = self.func + 0.4 * torch.randn(self.x.size()) self.len = self.x.shape[0] # Getting the data def __getitem__(self, index): return self.x[index], self.y[index] # Getting length of the data def __len__(self): return self.len # Create dataset object data_set = Build_Data() model = torch.nn.Linear(1, 1) criterion = torch.nn.MSELoss() # Creating Dataloader object trainloader = DataLoader(dataset = data_set, batch_size=1) # define optimizer optimizer = torch.optim.SGD(model.parameters(), lr=0.01) loss_SGD = [] n_iter = 20 for i in range(n_iter): for x, y in trainloader: # making a pridiction in forward pass y_hat = model(x) # calculating the loss between original and predicted data points loss = criterion(y_hat, y) # store loss into list loss_SGD.append(loss.item()) # zeroing gradients after each iteration optimizer.zero_grad() # backward pass for computing the gradients of the loss w.r.t to learnable parameters loss.backward() # updateing the parameters after each iteration optimizer.step() |
Train the Model with Adam Optimizer
Adam is one of the most used optimizers for training deep learning models. It is fast and quite efficient when you have a lot of data for training. Adam is an optimizer with momentum that can perform better than SGD when the model is complex, as in most cases of deep learning.
In PyTorch, replacing the SGD optimizer above with Adam optimizer is as simple as follows. While all other steps would be the same, we only need to replace SGD() method with Adam() to implement the algorithm.
|
1 2 3 |
... # define optimizer optimizer = torch.optim.Adam(model.parameters(), lr=0.01) |
Similarly, we’ll define number of iterations and an empty list to store the model loss. Then we can run our training.
|
1 2 3 4 5 6 7 8 9 10 11 12 13 14 15 16 17 18 |
... loss_Adam = [] n_iter = 20 for i in range(n_iter): for x, y in trainloader: # making a pridiction in forward pass y_hat = model(x) # calculating the loss between original and predicted data points loss = criterion(y_hat, y) # store loss into list loss_Adam.append(loss.item()) # zeroing gradients after each iteration optimizer.zero_grad() # backward pass for computing the gradients of the loss w.r.t to learnable parameters loss.backward() # updateing the parameters after each iteration optimizer.step() |
Putting everything together, the following is the complete code.
|
1 2 3 4 5 6 7 8 9 10 11 12 13 14 15 16 17 18 19 20 21 22 23 24 25 26 27 28 29 30 31 32 33 34 35 36 37 38 39 40 41 42 43 44 45 46 47 48 49 |
import matplotlib.pyplot as plt import numpy as np import torch from torch.utils.data import Dataset, DataLoader # Creating our dataset class class Build_Data(Dataset): # Constructor def __init__(self): self.x = torch.arange(-5, 5, 0.1).view(-1, 1) self.func = -5 * self.x + 1 self.y = self.func + 0.4 * torch.randn(self.x.size()) self.len = self.x.shape[0] # Getting the data def __getitem__(self, index): return self.x[index], self.y[index] # Getting length of the data def __len__(self): return self.len # Create dataset object data_set = Build_Data() model = torch.nn.Linear(1, 1) criterion = torch.nn.MSELoss() # Creating Dataloader object trainloader = DataLoader(dataset = data_set, batch_size=1) # define optimizer optimizer = torch.optim.Adam(model.parameters(), lr=0.01) loss_Adam = [] n_iter = 20 for i in range(n_iter): for x, y in trainloader: # making a pridiction in forward pass y_hat = model(x) # calculating the loss between original and predicted data points loss = criterion(y_hat, y) # store loss into list loss_Adam.append(loss.item()) # zeroing gradients after each iteration optimizer.zero_grad() # backward pass for computing the gradients of the loss w.r.t to learnable parameters loss.backward() # updateing the parameters after each iteration optimizer.step() |
Plotting Graphs
We have successfully implemented the SGD and Adam optimizers for model training. Let’s visualize how the model loss decreases in both algorithms during training process, which are stored in the lists loss_SGD and loss_Adam:
|
1 2 3 4 5 6 7 |
... plt.plot(loss_SGD,label = "Stochastic Gradient Descent") plt.plot(loss_Adam,label = "Adam Optimizer") plt.xlabel('epoch') plt.ylabel('Cost/ total loss') plt.legend() plt.show() |
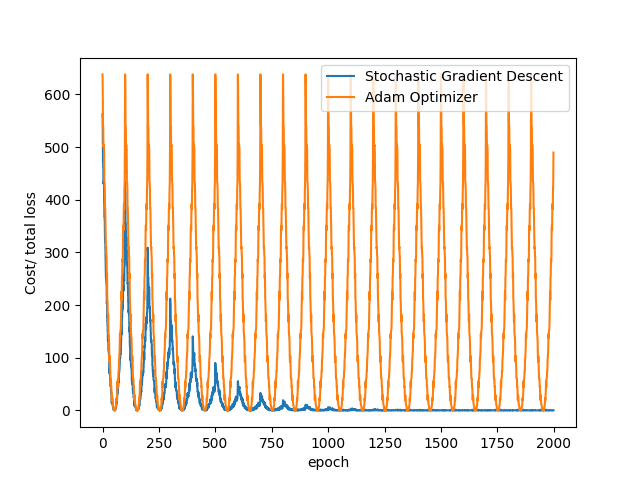
You can see that SGD converges faster than Adam in the above examples. This is because we are training a linear regression model, in which the algorithm provided by Adam is overkilled.
Putting everything together, the following is the complete code.
|
1 2 3 4 5 6 7 8 9 10 11 12 13 14 15 16 17 18 19 20 21 22 23 24 25 26 27 28 29 30 31 32 33 34 35 36 37 38 39 40 41 42 43 44 45 46 47 48 49 50 51 52 53 54 55 56 57 58 59 60 61 62 63 64 65 66 67 68 69 70 71 72 73 |
import matplotlib.pyplot as plt import numpy as np import torch from torch.utils.data import Dataset, DataLoader # Creating our dataset class class Build_Data(Dataset): # Constructor def __init__(self): self.x = torch.arange(-5, 5, 0.1).view(-1, 1) self.func = -5 * self.x + 1 self.y = self.func + 0.4 * torch.randn(self.x.size()) self.len = self.x.shape[0] # Getting the data def __getitem__(self, index): return self.x[index], self.y[index] # Getting length of the data def __len__(self): return self.len # Create dataset object data_set = Build_Data() model = torch.nn.Linear(1, 1) criterion = torch.nn.MSELoss() # Creating Dataloader object trainloader = DataLoader(dataset = data_set, batch_size=1) # define optimizer optimizer = torch.optim.Adam(model.parameters(), lr=0.01) loss_SGD = [] n_iter = 20 for i in range(n_iter): for x, y in trainloader: # making a prediction in forward pass y_hat = model(x) # calculating the loss between original and predicted data points loss = criterion(y_hat, y) # store loss into list loss_SGD.append(loss.item()) # zeroing gradients after each iteration optimizer.zero_grad() # backward pass for computing the gradients of the loss w.r.t to learnable parameters loss.backward() # updating the parameters after each iteration optimizer.step() model = torch.nn.Linear(1, 1) loss_Adam = [] for i in range(n_iter): for x, y in trainloader: # making a prediction in forward pass y_hat = model(x) # calculating the loss between original and predicted data points loss = criterion(y_hat, y) # store loss into list loss_Adam.append(loss.item()) # zeroing gradients after each iteration optimizer.zero_grad() # backward pass for computing the gradients of the loss w.r.t to learnable parameters loss.backward() # updating the parameters after each iteration optimizer.step() plt.plot(loss_SGD,label = "Stochastic Gradient Descent") plt.plot(loss_Adam,label = "Adam Optimizer") plt.xlabel('epoch') plt.ylabel('Cost/ total loss') plt.legend() plt.show() |
Summary
In this tutorial, you implemented optimization algorithms using some built-in packages in PyTorch. Particularly, you learned:
- How optimizers can be implemented using some packages in PyTorch.
- How you can import linear class and loss function from PyTorch’s
nnpackage. - How Stochastic Gradient Descent and Adam (the most commonly used optimizer) can be implemented using
optimpackage in PyTorch. - How you can customize weights and biases of the model.
Get Started on Deep Learning with PyTorch!

Learn how to build deep learning models
...using the newly released PyTorch 2.0 library
Discover how in my new Ebook:
Deep Learning with PyTorch
It provides self-study tutorials with hundreds of working code to turn you from a novice to expert. It equips you with
tensor operation, training, evaluation, hyperparameter optimization,
and much more...


")

There’s a mistake in the code – only 1 optimizer (Adam) is used for both loops.
In the full listing there’s no line:
optimizer = torch.optim.SGD(model.parameters(), lr=0.01)
So final graph – doesn’t look like the picture above