ControlNet is a neural network that can improve image generation in Stable Diffusion by adding extra conditions. This allows users to have more control over the images generated. Instead of trying out different prompts, the ControlNet models enable users to generate consistent images with just one prompt.
In this post, you will learn how to gain precise control over images generated by Stable Diffusion using ControlNet. Specifically, we will cover:
- What is ControlNet, and how it works
- How to use ControlNet with the Hugging Face Spaces
- Using ControlNet with the Stable Diffusion WebUI
Kick-start your project with my book Mastering Digital Art with Stable Diffusion. It provides self-study tutorials with working code.
Let’s get started.
Using ControlNet with Stable Diffusion
Photo by Nadine Shaabana. Some rights reserved.
Overview
This post is in four parts; they are:
- What is ControlNet?
- ControlNet in Hugging Face Space
- Scribble Interactive
- ControlNet in Stable Diffusion Web UI
What is ControlNet?
ControlNet is a neural network architecture that can be used to control diffusion models. In addition to the prompt you would usually provide to create the output image, it works by adding extra conditioning to the diffusion model with an input image as the additional constraint to guide the diffusion process.
There are many types of conditioning inputs (canny edge, user sketching, human pose, depth, etc.) that can provide a diffusion model to have more control over image generation.
Some examples of how ControlNet can control diffusion models:
- By providing a specific human pose, an image mimicking the same pose is generated.
- Make the output follow the style from another image.
- Turn scribbles into high-quality images.
- Generate a similar image using a reference image.
- Inpainting missing parts of an image.

Block diagram of how ControlNet modified the diffusion process. Figure from Zhang et al (2023)
ControlNet works by copying the weights from the original diffusion model into two sets:
- A “locked” set that preserves the original model
- A “trainable” set that learns the new conditioning.
The ControlNet model essentially produces a difference vector in the latent space, which modifies the image that the diffusion model would otherwise produce. In equation, if the original model produces output image $y$ from prompt $x$ using a function $y=F(x;\Theta)$, in the case of ControlNet would be
$$y_c = F(x;\Theta) + Z(F(x+Z(c;\Theta_{z1}); \Theta_c); \Theta_{z2})$$
in which the function $Z(\cdot;\Theta_z)$ is the zero convolution layer, and the parameters $\Theta_c, \Theta_{z1}, \Theta_{z2}$ are parameters from the ControlNet model. The zero-convolution layers have weights and biases initialized with zero, so they don’t initially cause distortion. As training happens, these layers learn to meet the conditioning constraints. This structure allows training ControlNet even on small machines. Note that the same diffusion architecture (e.g., Stable Diffusion 1.x) is used twice but with different model parameters $\Theta$ and $\Theta_c$. And now, you need to provide two inputs, $x$ and $c$ to create the output $y$.
The design of running ControlNet and the original Diffusion model in segregate allows fine-tuning on small datasets without destroying the original diffusion model. It also allows the same ControlNet to be used with different diffusion models as long as the architecture is compatible. The modular and fast-adapting nature of ControlNet makes it a versatile approach for gaining more precise control over image generation without extensive retraining.
ControlNet in Hugging Face Space
Let’s see how ControlNet do magic to the diffusion model. In this section, we will use an online ControlNet demo available on Hugging Face Spaces to generate a human pose image using the ControlNet Canny model.
We will upload Yogendra Singh’s photo from Pexels.com to ControlNet Spaces and add a simple prompt. Instead of a boy, we will generate an image of women dancing in a club. Let’s use the tab “Canny”. Set the prompt to:
a girl dancing in a club
Click run, and you will see the output as follows:
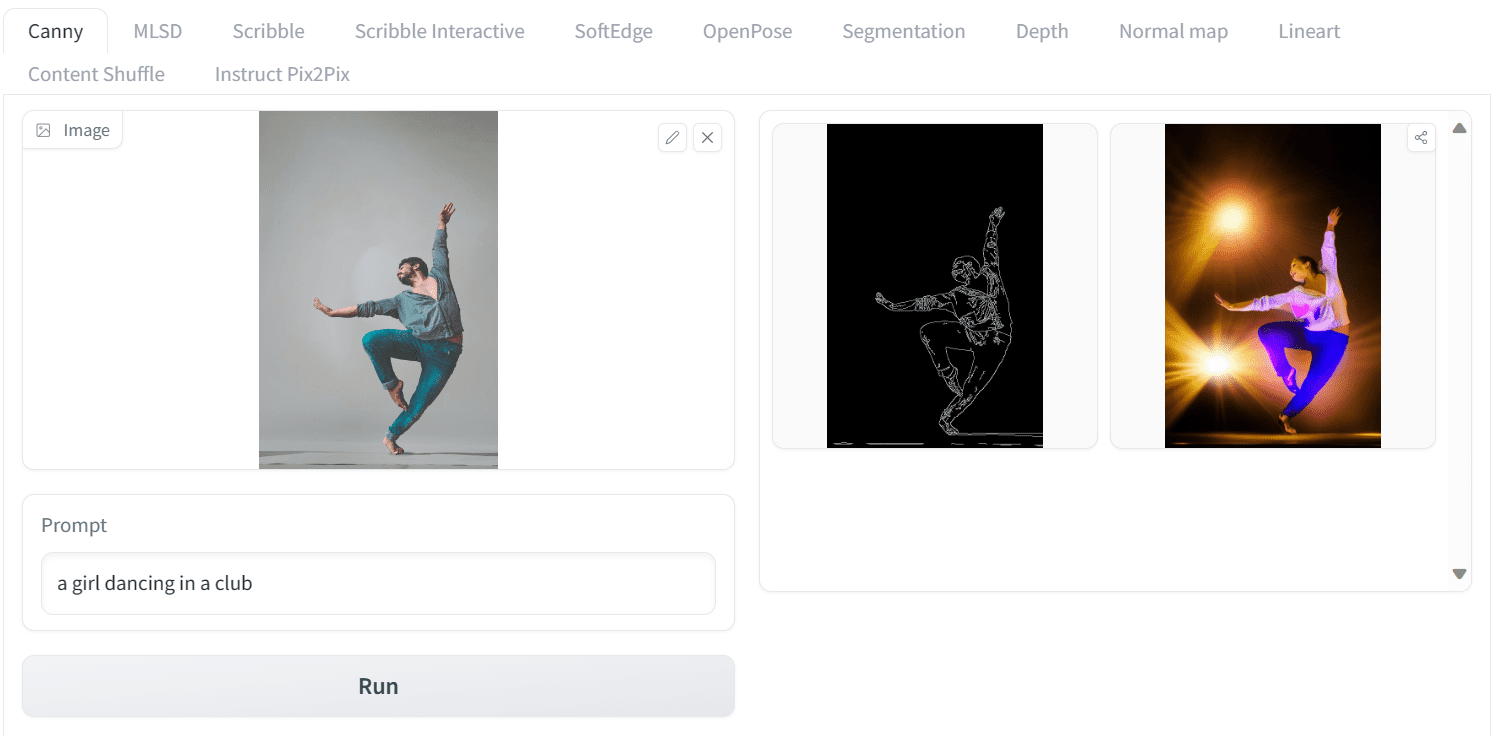
Running ControlNet on Hugging Face Space
This is amazing! “Canny” is an image processing algorithm to detect edges. Hence, you provide the edge from your uploaded image as an outline sketch. Then, provide this as the additional input $c$ to ControlNet, together with your text prompt $x$, you provided the output image $y$. In essence, you can generate a similar pose image using canny edges on the original image.
Let’s see another example. We will upload Gleb Krasnoborov’s photo and apply a new prompt that changes the background, effect, and ethnicity of the boxer to Asian. The prompt we use is
A man shadow boxing in streets of Tokyo
and this is the output:

Another example of using Canny model in ControlNet
Once again, the results are excellent. We generated an image of a boxer in a similar pose, shadowboxing on the streets of Tokyo.
Scribble Interactive
The architecture of ControlNet can accept many different kinds of input. Using Canny edge as the outline is just one model of ControlNet. There are many more models, each trained as a different conditioning for image diffusion.
On the same Hugging Face Spaces page, the different versions of ControlNet versions are available, which can be accessed through the top tab. Let’s see another example using the Scribbles model. In order to generate an image using Scribbles, simply go to the Scribble Interactive tab draw a doodle with your mouse, and write a simple prompt to generate the image, such as
A house by the river
Like the following:
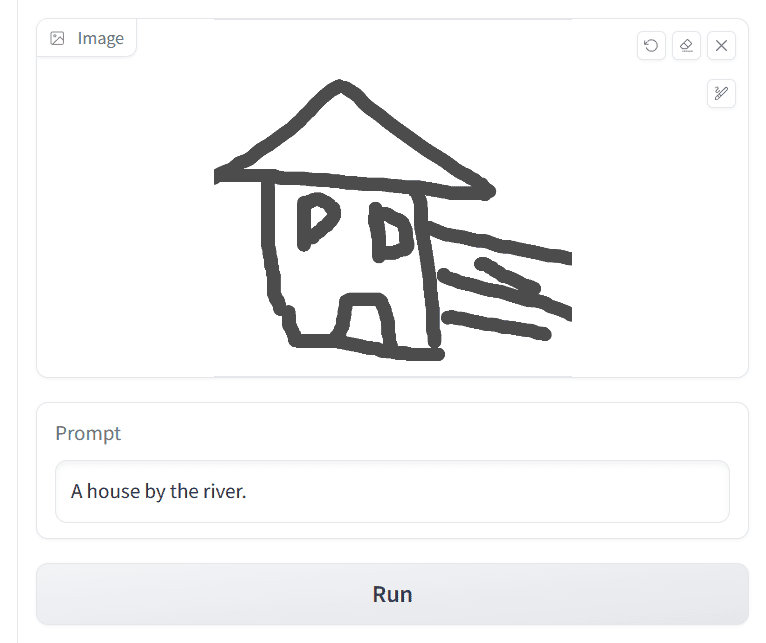
Using Scribble ControlNet: Drawing a house and providing a text prompt
Then, by setting the other parameters and pressing the “Run” button, you may get the output like the following:
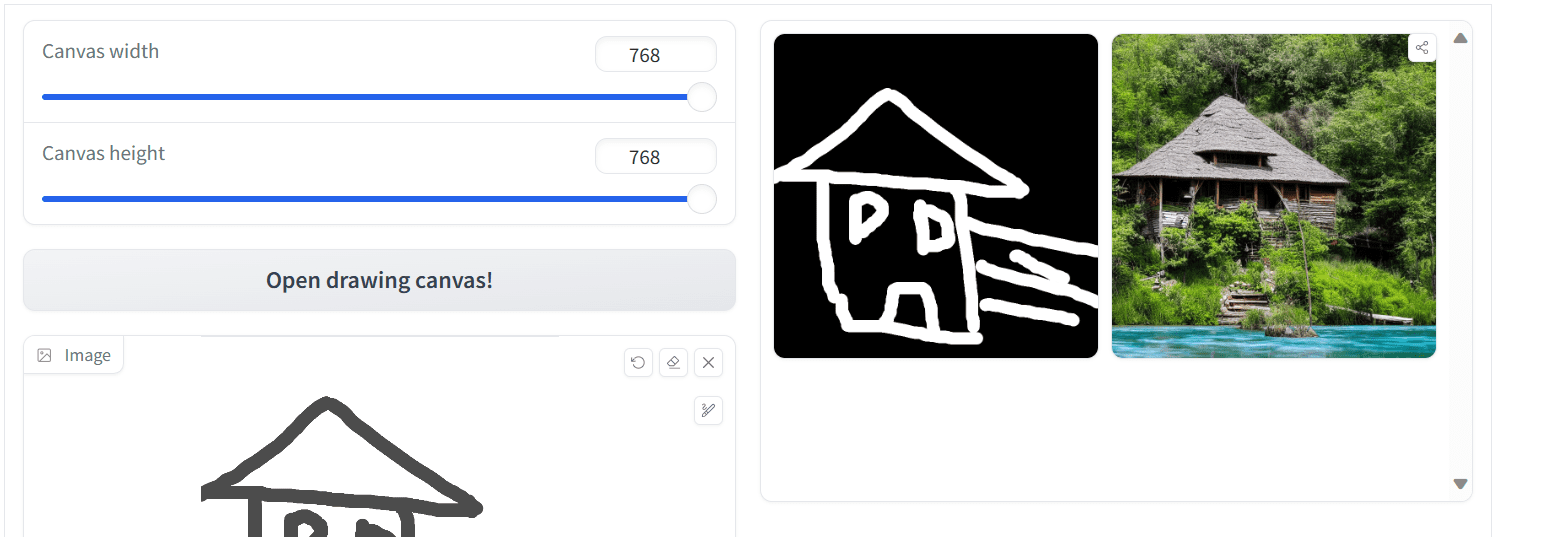
Output from Scribble ControlNet
The generated image looks good but could be better. You can try again with more details in the scribbles as well as the text prompt to get an improved result.
Using scribble and a text prompt is a trivial way to generate images, especially when you can’t think of a very accurate textual description of the image you want to create. Below is another example of creating a picture of a hot air balloon.

Creating a picture of a hot air balloon using Scribble.
ControlNet in Stable Diffusion Web UI
As you have learned about using the Stable Diffusion Web UI in the previous posts, you can expect that ControlNet can also be used on the Web UI. It is an extension. If you haven’t installed it yet, you need to launch the Stable Diffusion Web UI. Then, go to the Extensions tab, click on “Install from the URL”, and enter the link to the ControlNet repository: https://github.com/Mikubill/sd-webui-controlnet to install.

Installing ControlNet extension on Stable Diffusion Web UI
The extension you installed is only the code. Before using the ControlNet Canny version, for example, you have to download and set up the Canny model.
- Go to https://hf.co/lllyasviel/ControlNet-v1-1/tree/main
- Download the control_v11p_sd15_canny.pth
- Put the model file in the the SD WebUI directory in
stable-diffusion-webui/extensions/sd-webui-controlnet/modelsorstable-diffusion-webui/models/ControlNet
Note: You can download all models (beware each model is in several GB in size) from the above repository using git clone command. Besides, this repository collects some more ControlNet models, https://hf.co/lllyasviel/sd_control_collection
Now, you are all set up to use the model.
Let’s try it out with the Canny ControlNet. You go to the “txt2img” tab, scroll down to find the ControNet section to open it. Then, you follow these steps:
- Change the control type to Canny.

Selecting “Canny” from the ControlNet box in Web UI.
- Upload the reference image.

Upload an image to ControlNet widget in Web UI
- Work on other sections on the txt2img tab: Write positive prompt, negative prompt, and change other advanced settings. For example,
Positive prompt: “detailed, masterpiece, best quality, Astounding, Enchanting, Striking, man, natural light, beach, beach background, sunny, jungle, plants in background, beach background, beach, tropical beach, water, clear skin, perfect light, perfect shadows”
Negative prompt: “worst quality, low quality, lowres, monochrome, greyscale, multiple views, comic, sketch, bad anatomy, deformed, disfigured, watermark, multiple_views, mutation hands, watermark”
and the generation parameters:
- Sampling Steps: 30
- Sampler: DDIM
- CFG scale: 7
The output could be:
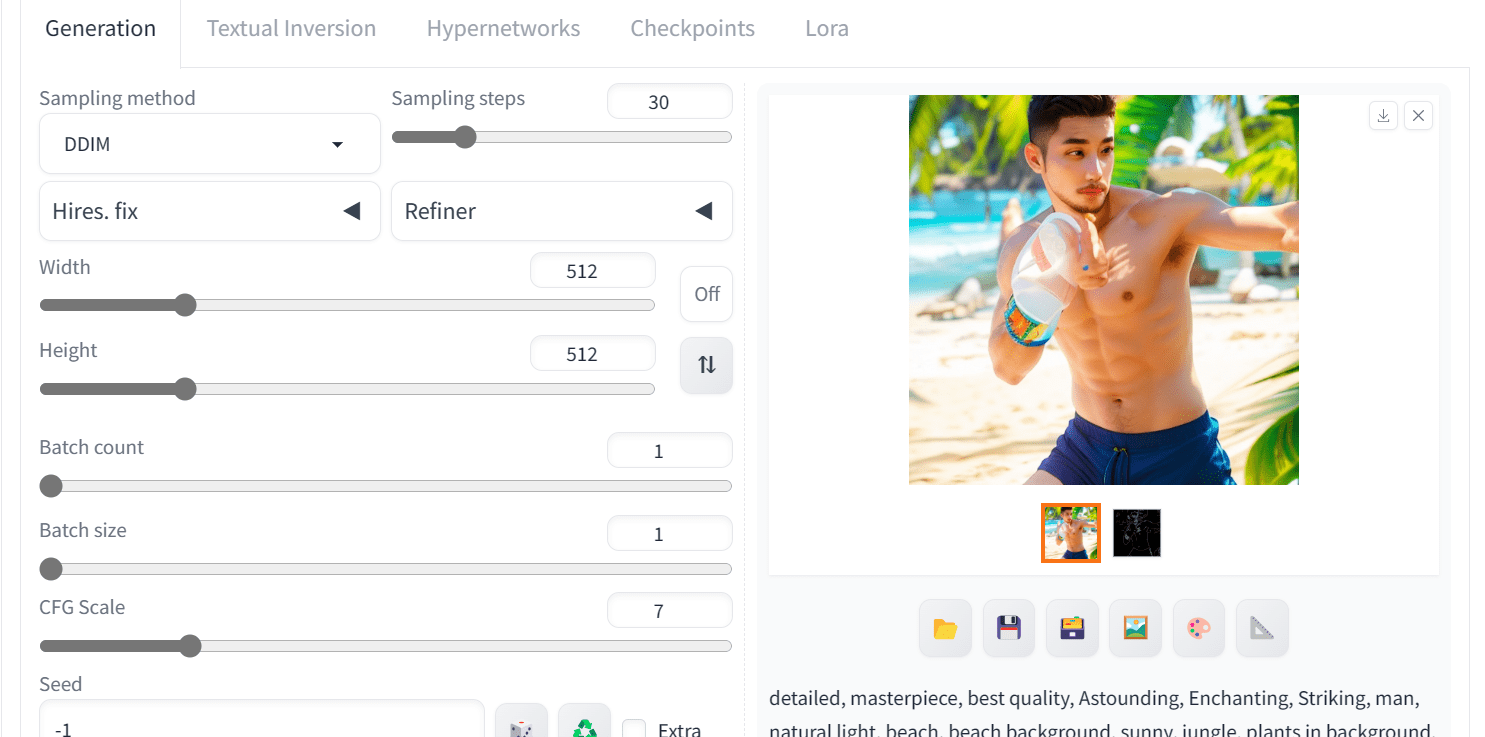
Output of image generation using ControlNet in Web UI
As you can see, we have obtained high-quality and similar images. We can improve the photo by using different ControlNet models and applying various prompt engineering techniques, but this is the best we have now.
Here is the full image generated with the Canny version of ControlNet.
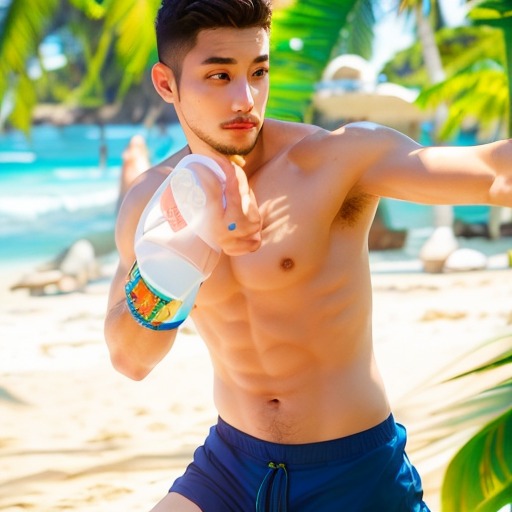
Image generated using ControlNet with image diffusion model
Further Readings
This section provides more resources on the topic if you are looking to go deeper.
- Adding Conditional Control to Text-to-Image Diffusion Models, by Zhang et al (2023)
- ControlNet on GitHub
- ControlNet v1.1 on GitHub
- Model download from the ControlNet Wiki
Summary
In this post, we learned about ControlNet, how it works, and how to use it to generate precise control images of users’ choices. Specifically, we covered:
- ControlNet online demo on Hugging Face to generate images using various reference images.
- Different versions of ControlNet and generated the image using the scribbles.
- Setting up ControlNet on Stable Diffusion WebUI and using it to generate the high-quality image of the boxer.
Get Started on Mastering Digital Art with Stable Diffusion!
Learn how to make Stable Diffusion work for you
...by learning some key elements in the image generation process
Discover how in my new Ebook:
Mastering Digital Art with Stable Diffusion
This book offers self-study tutorials complete with all the working code in Python, guiding you from a novice to an expert in image generation. It teaches you how to set up Stable Diffusion, fine-tune models, automate workflows, adjust key parameters, and much more...all to help you create stunning digital art.


No comments yet.