Inpainting and outpainting have long been popular and well-studied image processing domains. Traditional approaches to these problems often relied on complex algorithms and deep learning techniques yet still gave inconsistent outputs. However, recent advancements in the form of Stable diffusion have reshaped these domains. Stable diffusion now offers enhanced efficacy in inpainting and outpainting while maintaining a remarkably lightweight nature.
In this post, you will explore the concepts of inpainting and outpainting and see how you can do these with Stable Diffusion Web UI.
Kick-start your project with my book Mastering Digital Art with Stable Diffusion. It provides self-study tutorials with working code.
Let’s get started.
Inpainting and Outpainting with Stable Diffusion
Photo by Kelly Sikkema. Some rights reserved.
Overview
This post is in five parts; they are:
- Principles of Inpainting
- Inpainting in Stable Diffusion Web UI
- Using Inpaint Anything Extension
- Principles of Outpainting
- Outpainting with Stable Diffusion Web UI
Principles of Inpainting
Stable diffusion is a state-of-the-art Text2Image generation model.
It is a class of Latent Diffusion Models (LDM) proposed by Robin Robmach, et al. Trained initially on a subset of 512×512 images from the LAION-5B Database, this LDM demonstrates competitive results for various image generation tasks, including conditional image synthesis, inpainting, outpainting, image-image translation, super-resolution, and much more!
Unlike previous diffusion models, which operated in pixel space (original image), stable diffusion is applied in latent space (compressed image), requiring fewer computational resources while preserving details; this means you can run it on your local system quite easily!
Stable diffusion is primarily based on three components:
1. Text Encoder
The text encoder transforms the text prompt into an embedding space, which is further fed to guide the denoising process (we’ll get there shortly). Stable diffusion initially used a frozen, pre-trained CLIP ViT-L/14 to create embeddings; however, improved variants switched to OpenCLIP, which includes text models with parameter size 354M+ as compared to 63M parameters in the former CLIP. This allows the text prompt to describe the image more accurately.
2. U-Net
U-Net repeatedly transforms a flawed image into a cleaner form. It receives two types of inputs: noisy latents (which represent incomplete or distorted image data) and textual embeddings (derived from the input text). These text embeddings contain textual information that guides the U-Net’s understanding of what the final image should ideally look like. The main job of U-Net is to predict noise present in the input and subtract it to generate denoised latents. Unlike typical U-Net architectures, attention layers are also included that focus on specific parts of the image based on textual information, enhancing the denoising process.
3. Variational Auto Encoder (VAE)
The autoencoder’s decoder converts the U-Net prediction (denoised latent representation) back into the original pixel space for creating the final image. However, only during training, does the autoencoder’s encoder compress the higher-dimensional image (original) into a lower-dimensional latent representation as an input to U-Net after the noising process. This compression creates a more condensed form and ignores perceptually irrelevant details, enabling computationally efficient training.
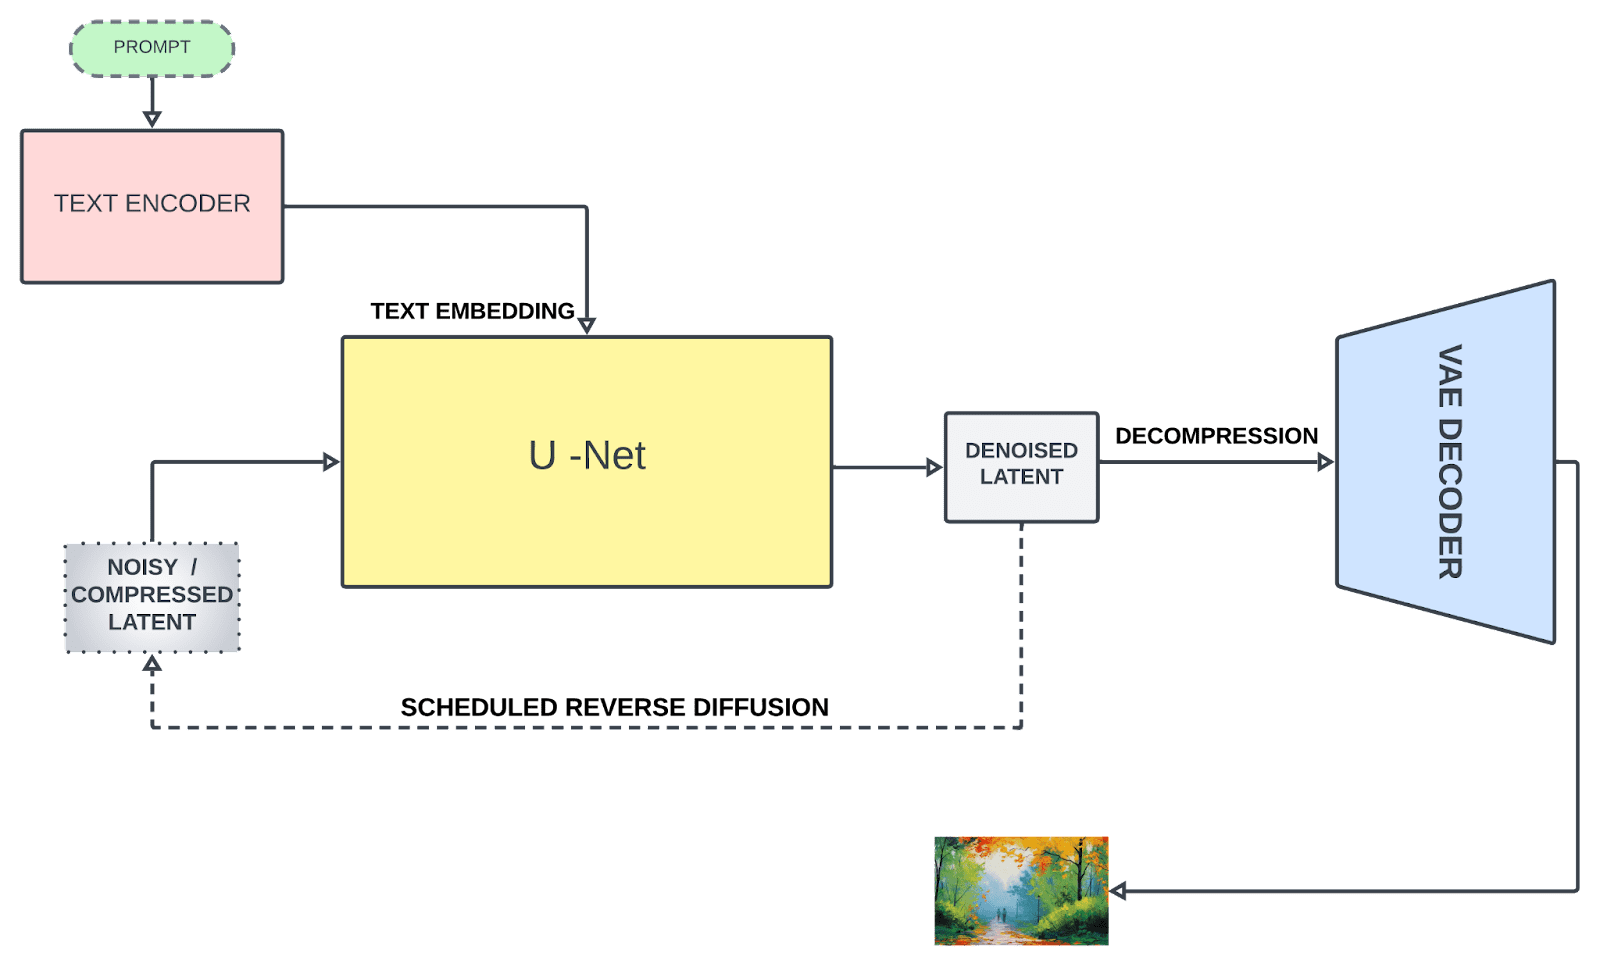
Stable diffusion architecture
Inpainting is a popular image processing technique used to restore missing pixels in an image or even reconstruct a region of the image while following the surrounding context (the healthy pixels help fix the corrupted pixels). This is an amazing feature of diffusion models. A typical inpainting process involves:
- Identifying regions to be reconstructed/fixed. The regions can be masked (by a binary image) for the algorithm to recognize them.
- The algorithm then analyzes patterns and textures from surrounding pixels to inpaint semantically plausible and consistent regions.
Let’s discuss some important inpainting techniques:
1. Texture synthesis
This method dissects the image into small patches, analyzes their structure and texture, and identifies similar patches within the image to fill the missing region. However, it demands substantial computational resources and is suitable for images with uniform and consistent textures.
2. Exemplar-based
This method involved assessing priorities for each patch, selecting the best-matching patches, and subsequently utilizing these patches to fill missing areas based on predefined priorities. It performs better for missing regions with simple texture and structure.
3. Diffusion-based
It uses a Partial Differential Equation (PDE) to diffuse the image data from surrounding pixels into the missing region. It’s a fast and effective approach but as information diffuses from the surrounding areas, it may lead to a loss of sharpness or fine details, resulting in a blurred appearance in the reconstructed regions, especially for larger missing regions.
Inpainting with Stable Diffusion Web UI
By default in the Stable Diffusion web UI, you have not only the txt2img but also the img2img feature. Recall that Stable Diffusion is to generate pictures using a stochastic process, which gradually transform noise into a recognizable picture. In the process, you can impose an condition based on a prompt. The prompt is the text in txt2img, while in img2img, it can be the combination of an image and the text prompt.
One way to do inpainting is to use the img2img tab in the Web UI. Before you start, you need to prepare an inpainting model, which is different from the ordinary Stable Diffusion model. You can, for example, download the Stable Diffusion 2 inpainting model from Hugging Face:
You can simply download the safetensors file (note, that’s 5.2GB in size) and put it to the models/Stable-diffusion directory. Another model that you may also find it useful (and smaller, of 2GB only) is the epiCRealism Inpainting model:
As you have learned the principles of how to perform inpainting. You need a way to mask regions of the image to be reconstructed and a capable model to fill the region with missing pixels. In img2img tab, you can find the “inpaint” subtab which you can upload an image.
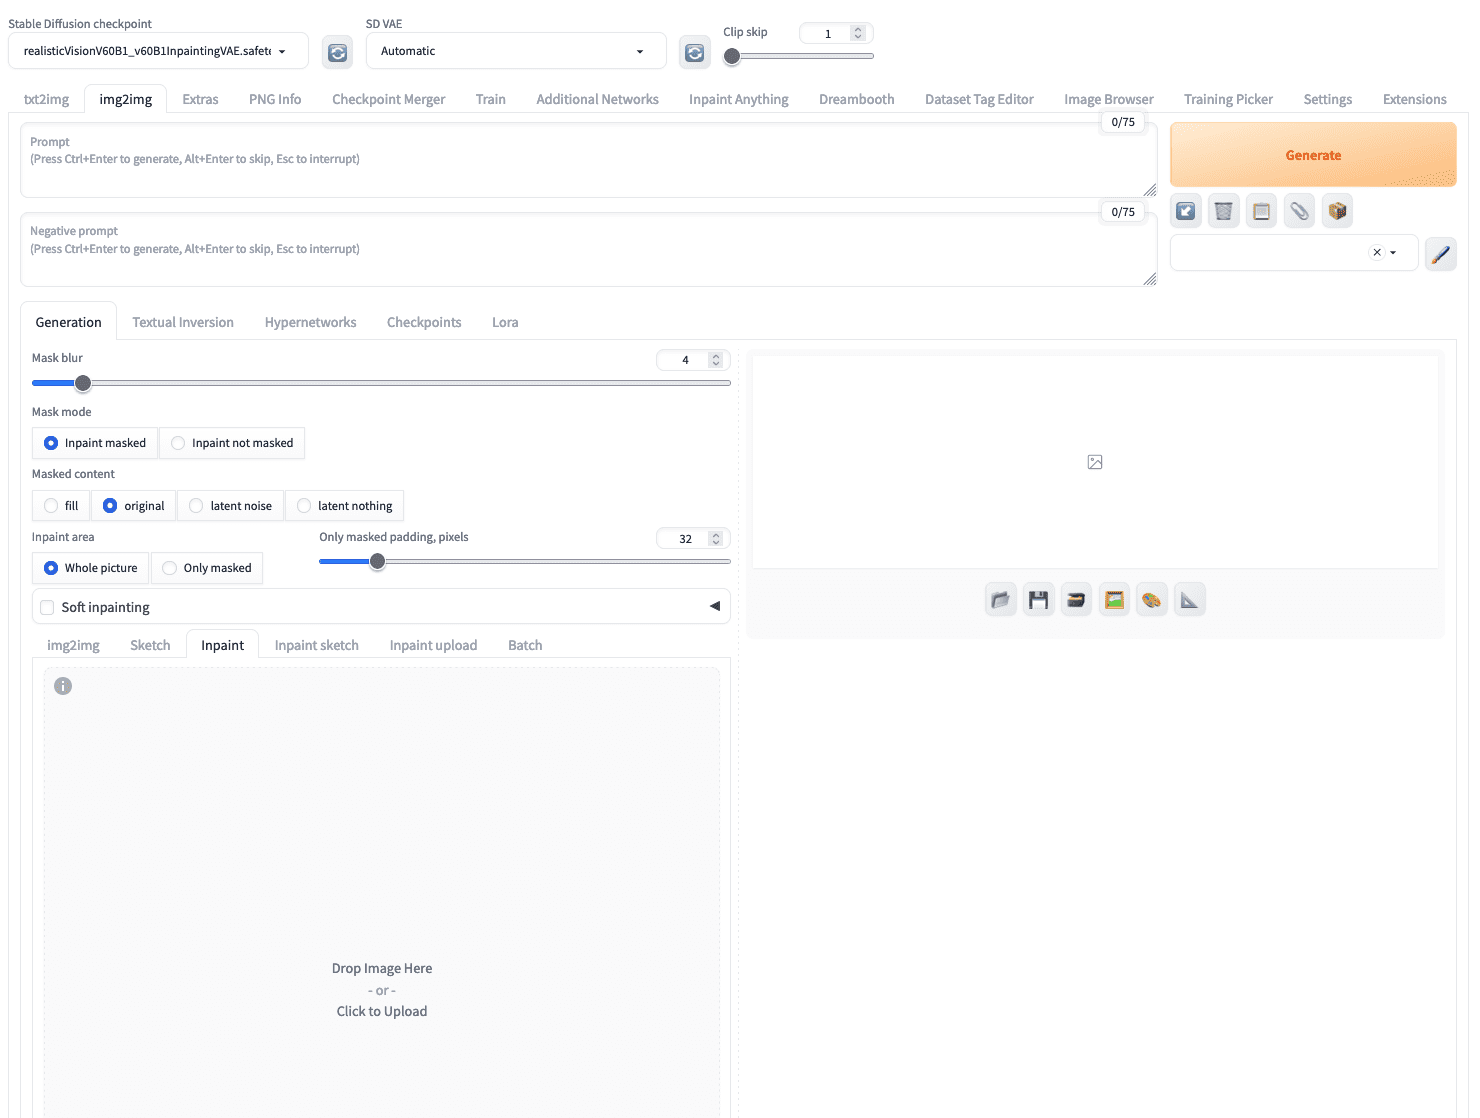
In Stable Diffusion Web UI, you can upload an image to the “inpaint” subtab under the “img2img” tab
Let’s try with the following image of a dog:
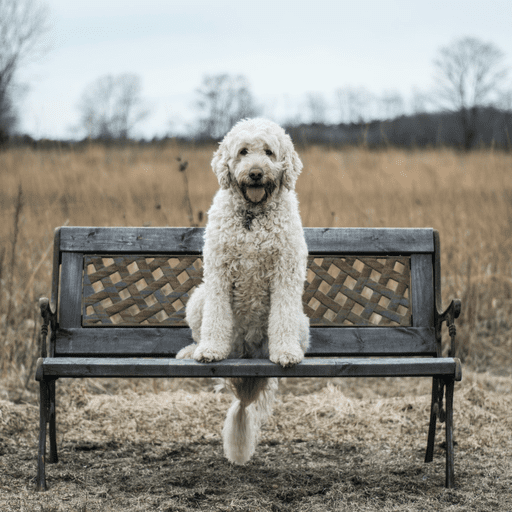
A dog image for inpainting
After you uploaded this image, you can use your mouse to “paint” the dog out of the image to create a mask. You can use the icon at the top right corner to set a larger brush. Don’t worry if you can’t mark the fine boundary of the dog in the image, a larger mask is not a problem. For example, this is what you might create:
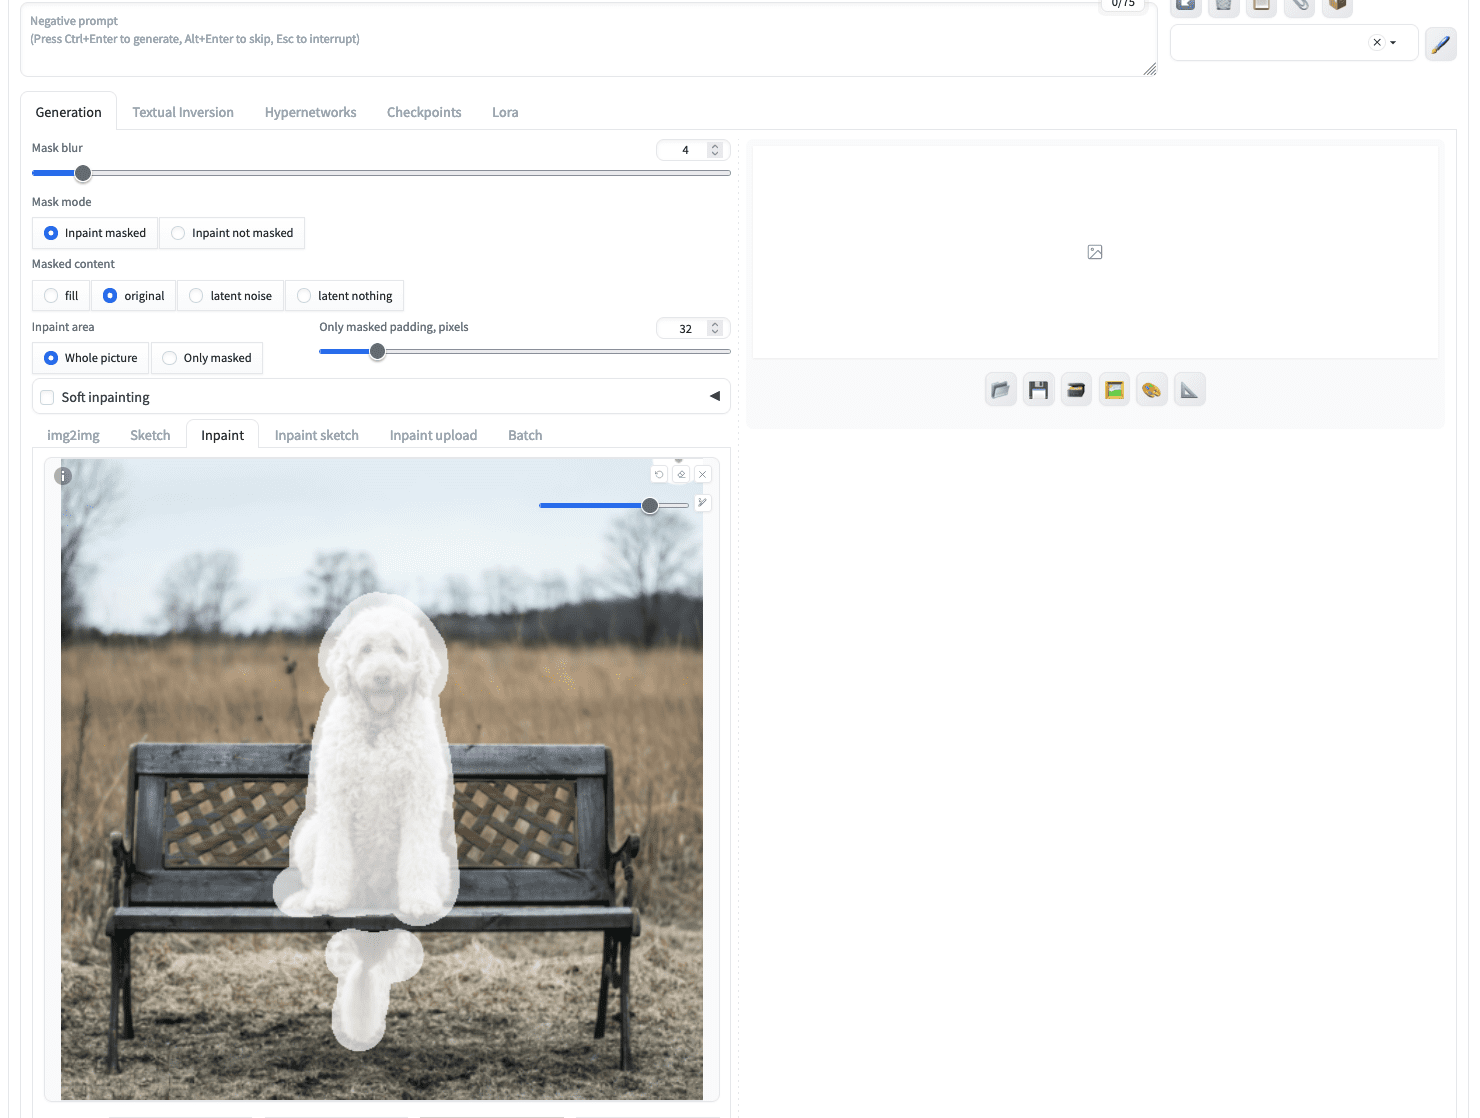
A mask created for inpainting
If you click generate immediately, you give the inpainting model a free hand to create a picture to fill in the masked area. But let’s put the following as a text prompt:
a grey cat sitting, high resolution
Not the most sophisticated prompt, but enough to tell the model what you want. Then, you should select an inpainting model from the “Stable Diffusion checkpoint” dropdown at the top left corner. Afterward, clicking on the “Generate” button will give you exactly what you described:
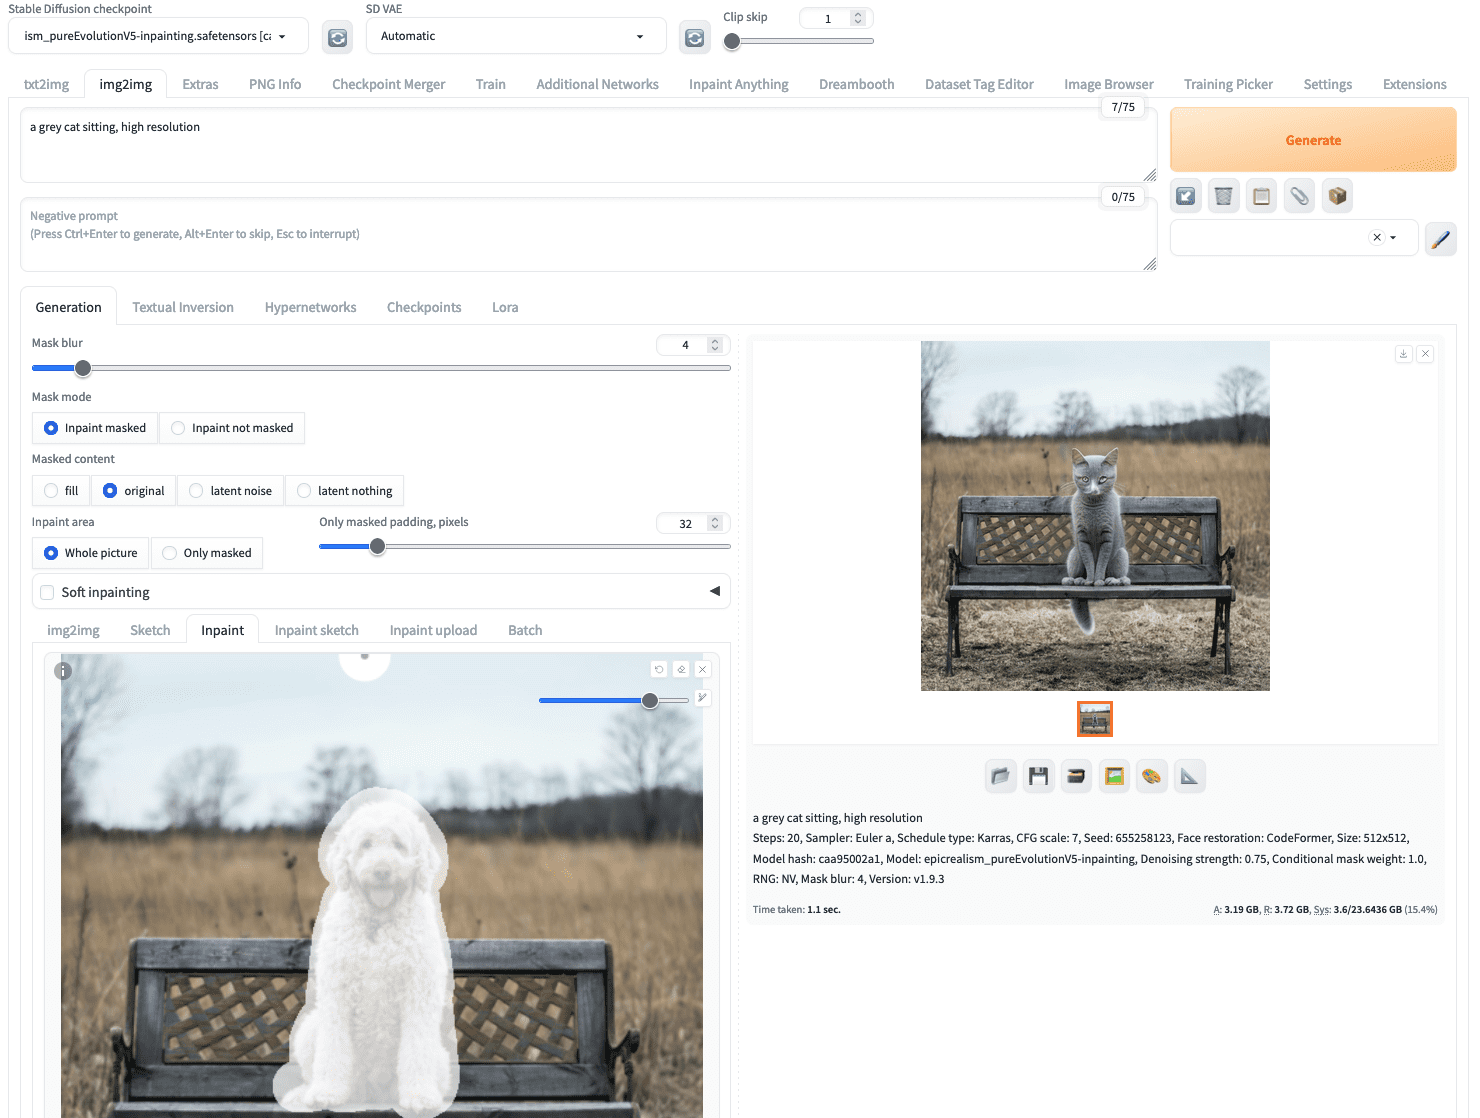
A photo of a dog inpainted to become a photo of a cat
You may see a different result because the image generation process is stochastic.
The parameters for image generation also applies here, including the sampling method (e.g., Euler) and sampling steps. But there are several additional parameters you want to pay attention to:
- The input image and the generated image may be in different aspect ratio. This affects the quality of the output if resizing is needed. You can select the resize method (e.g., “Just resize”, or “Crop and resize”). Selecting “Just resize” may distort the aspect ratio.
- A masked image is the starting point of the Stable Diffusion model. You can choose to fill the masked area with noise (“latent noise”), keep the original pixel content (“original”), or simply fill the masked area with the same color (“fill”). This is controlled by the “Masked content” option.
- How much you want your output image resemble the input is controlled by “Denoising strength”. A value of 0 will keep the input and a value of 1 gives the most freedom to the inpainting model. The effect of this option is most pronounced if you pick “original” for “Masked content” option
Using Inpaint Anything Extension
Creating a mask on the image for inpainting can be tedious, depends on how complex the mask is. You may notice there is a “Inpaint upload” subtab under “img2img” which you can upload the image and the mask as two image files. This is helpful if you used other application such as Photoshop to create a mask.
However, there’s a more advanced way to create a mask, using the “Inpaint Anything” extension. This is to utilize Meta AI’s SAM (Segment Anything Model), a very strong image segmentation model, to generate masks for input images.
To start, you go to the “Extensions” tab of the Web UI. Then at the “Available” subtab, click the “Load from” button and at the search bar above the table, type “inpaint anything”. There should be only one extension match this name and you can install it by clicking the “Install” button. You need to restart the Web UI after you installed it.

Installing the “Inpaint Anything” extension
Inpaint Anything extension will create a new top-level tab of the same name. Firstly, you need to pick a SAM model, for example sam_hq_vit_l.pth is used in this example. You need to download the model before the first run.
To start creating an inpainting, you can upload your image similar to how you work in the img2img tab. Then, you should click “Run Segment Anything” button, which will create a segment map at the right, as follows:
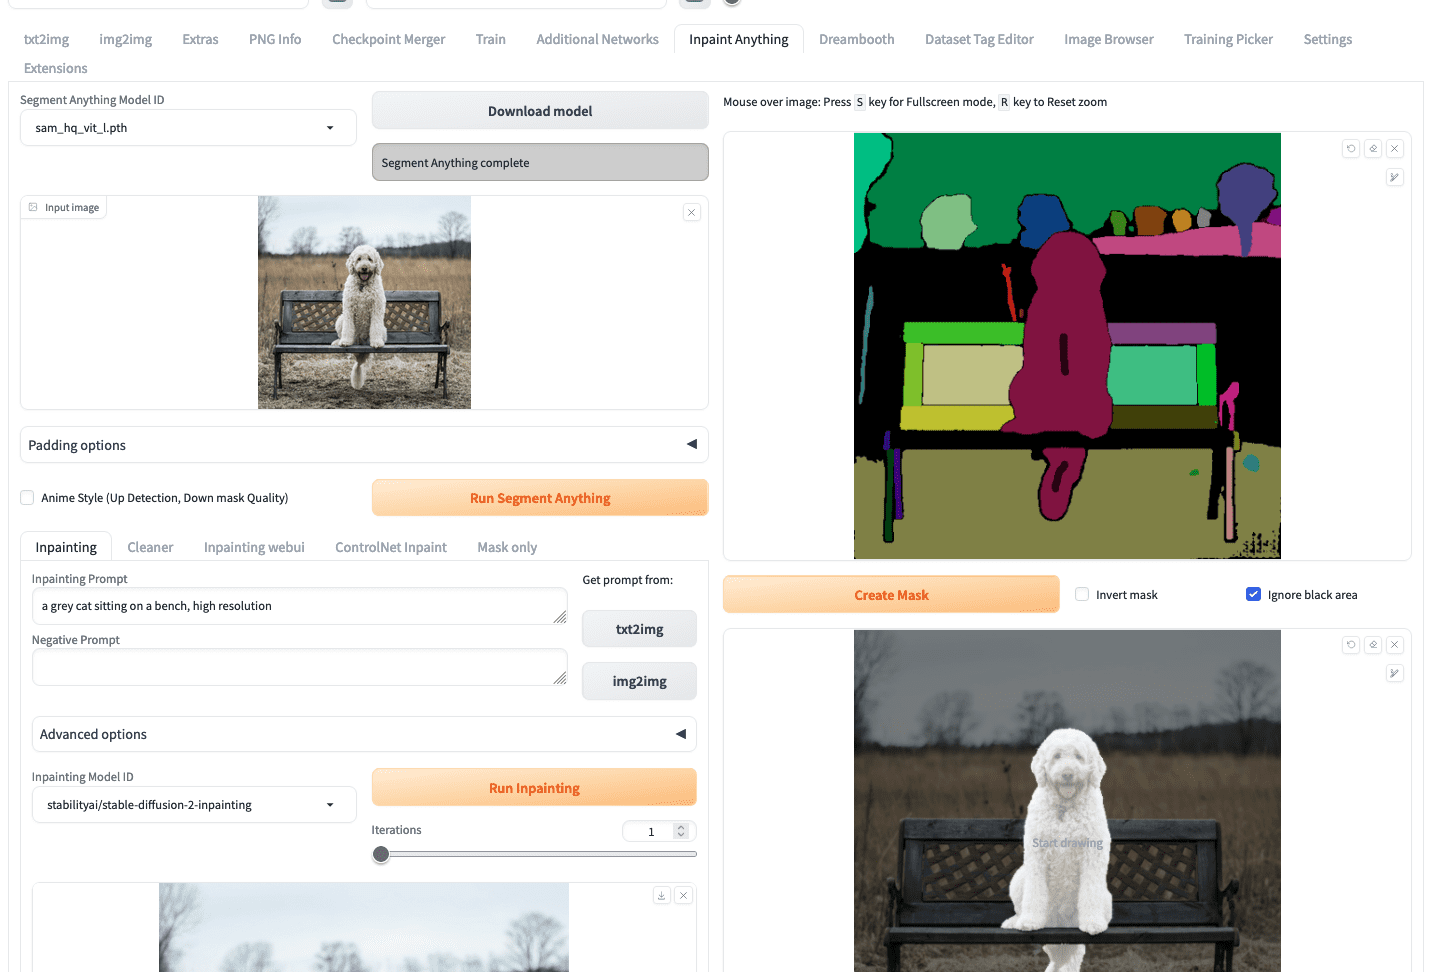
Using Inpaint Anything to create a mask
What you need to do next is to use your mouse to draw a small scratch on the segments that correspond to the dog (the short black lines at the chest and the tail of the dog as you saw in the screenshot above). Then click the “create mask” button will generate the mask beneath it. It is easier to create a mask this way then carefully outline the region of the dog in the image.
To run inpainting, you can go back to the left half of the screen, enter the prompt, and click “Run inpainting”.
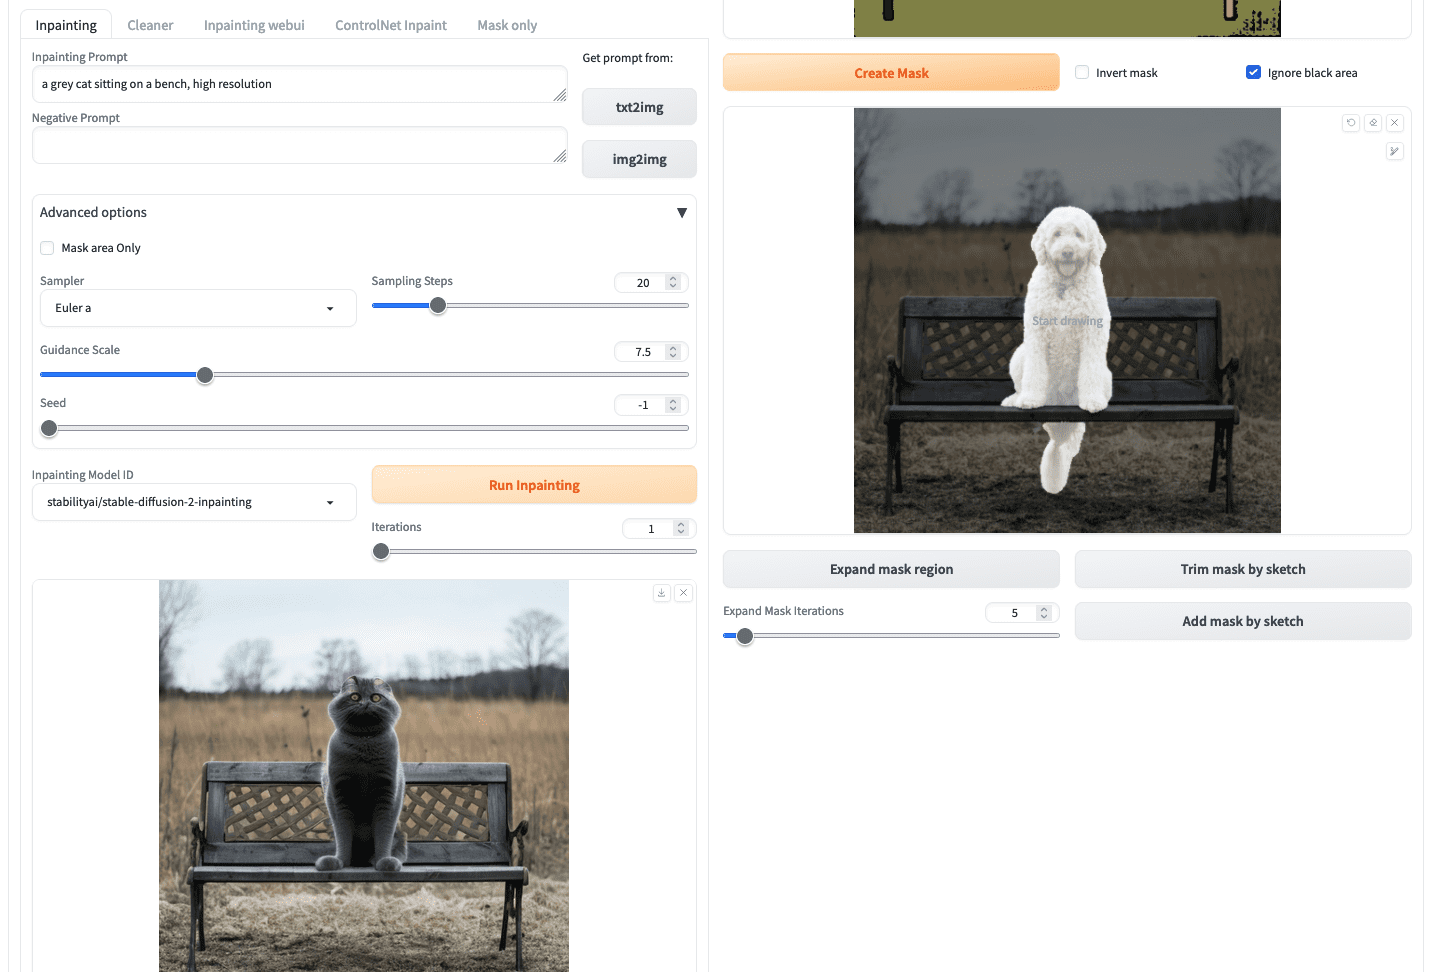
Inpainting result from “Inpaint Anything”
However, you should notice that in this case, there are only several models you can select from the dropdown “Inpainting Model ID”. The model stable-diffusion-2-inpainting is used in the example above. These models are not depend on the model files you put in the models/Stable-diffusion directory, but downloaded from the Hugging Face Hub the first time you use it. This is a limitation of using Inpaint Anything extension. If you insist to use the inpainting model you prepared, you can retrieve the mask from the “Mask only” subtab and reuse it in the “img2img” tab.
Principles of Outpainting
While inpainting fixes or reconstructs the internal pixels of the image, outpainting, an extrapolation technique is just the opposite of it as it expands the visual narrative of the image by generating new (external) pixels for an image that is contextually consistent with the original image. So now you can extend an image beyond its borders!
Image outpainting has been given less attention than inpainting, yet some CNN and GAN-based approaches are still around the corner. A Stanford researchers’ approach is quite interesting. They employed a DCGAN, for its generator network. They maintained the encoder-decoder structure with additional dilated convolutions to boost realism by increasing the local receptive field of neurons (accessible information to a neuron) because increasing the dilation factor enhances the receptive fields, whereas the discriminator network is composed of local discriminators each operating on a specific region in an image and a concatenation layer combines all local outputs to produce a final output. For more understanding, go through this resource receptive fields.
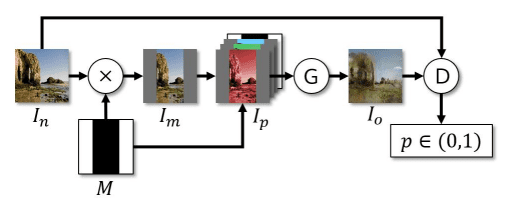
Training pipeline from Radford et al (2016)
Outpainting with Stable Diffusion
Outpainting means you provide an input image and produce an output in which the input is a subimage of the output. You can, for example, produce a half-body picture from a head shot.
Let’s try this out using Stable Diffusion Web UI. You can start your project with img2img tab as in the previous workflow. But you can also generate an image from txt2img, and transfer to img2img. Let’s try with the prompt to produce a head shot:
a detailed portrait of a woman standing in a park, intricate details
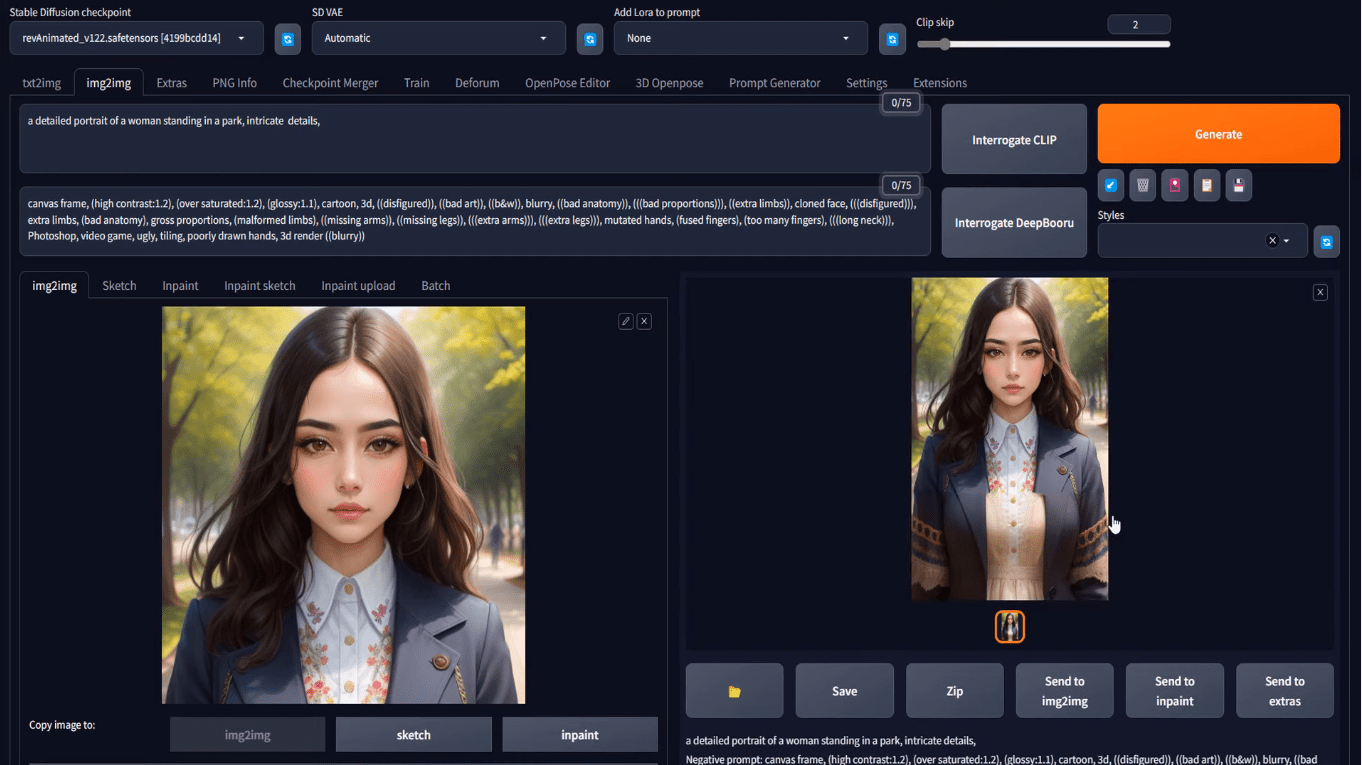
with appropriate Stable Diffusion model and other parameters, you will have your output at the txt2img tab. Beneath the generated picture, you can find a button that looks like a picture frame to mean “send image and generation parameters to img2img tab”. Click on that you will bring the generated picture to the img2img tab, like the following:

Loading the txt2img result into the img2img tab
At this point, it is same as you if uploaded your image at the img2img tab.
You can describe the expected output of outpainting via a prompt and even provide a negative prompt if needed, in the two text fields at top. You need to set the output size in the img2img tab. For example, if the input image is 512×512 pixels, you can set the output to 512×768 pixels.
Then, the most important step is to scroll down to the bottom of the page, at the “script” section, choose Poor Man’s Outpainting or any outpainting script.
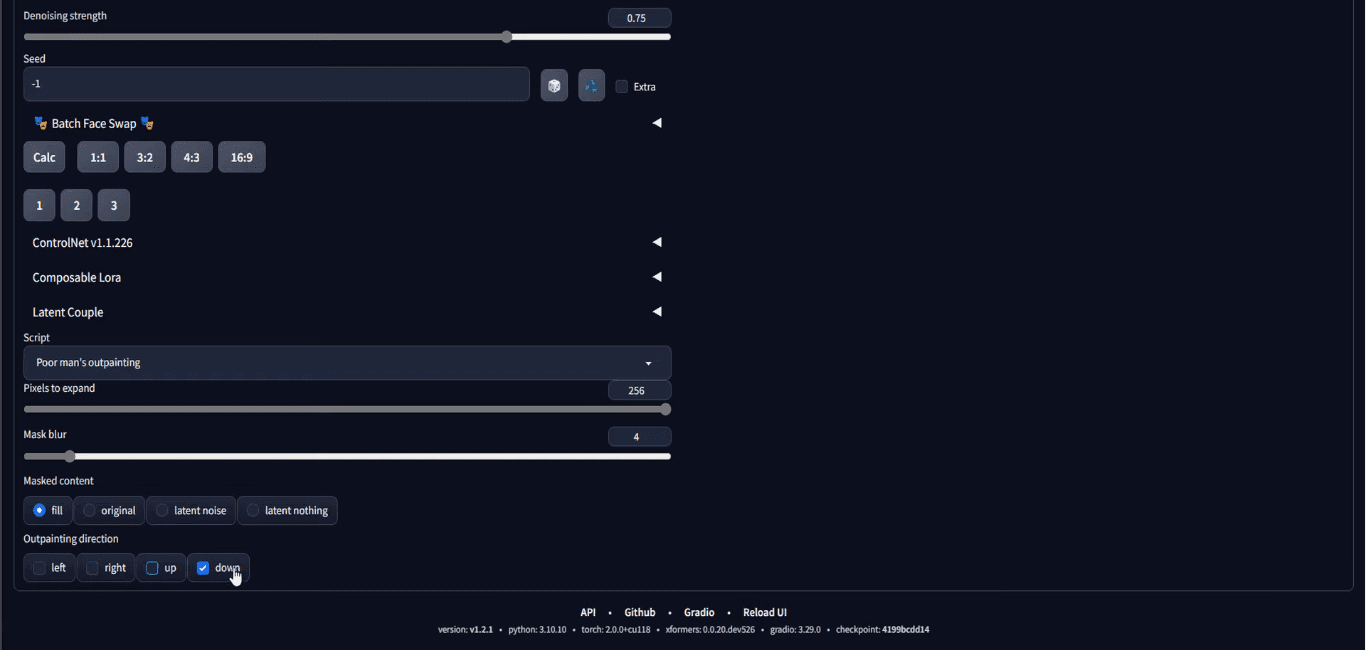
Select “Poor man’s outpainting” at “Script” dropdown
You need to set the number of pixels to draw outside of the boundary of the input image. You also need to set the outpainting direction that you want to expand your image towards. In the screenshot above, it is set to outpaint only on the downward direction for 256 pixels. Note that, since the input is 512×512 pixels and the outpainting will add 256 pixels at the bottom, the output will be 512×768 pixels, and that is why we set the output size to be such.
Once you finish with all the parameters, you can click “Generate” to get your output. Since randomness is involved in the generation process, you may need to generate the output multiple times until you’re happy with the results. This is what you may get:
Result of outpainting
Your output may not blend naturally with the original image. You should play with denoising strength and find out what works best for you.
This is your final output. But nothing stop you from running this again. (Notice the “Send to img2img” button below your output?) You can repeat this process to create a full-body, but remember you need to make the output “longer” to fit the output.
Alternatives to Outpainting
Stable Diffusion demonstrates impressive outpainting results, but in the current generative AI wave, it’s worth to mention the other two competitors before we finish this post. However, only Stable Diffusion is free!
Dall-E
Dall-E is developed by OpenAI, they’re also text2img models generating images based on input prompts, currently there are three variants Dall-E 1, Dall-E 2, and Dall-E 3. Dall-E’s outpainting maintains the context of an image by taking into account the shadow, reflections, and textures of an image.

Images by Alphr
Midjourney
Midjourney bot is another of the leading image generators released by Midjourney, an independent research lab, you can access it via their discord server. It has introduced outpainting in its V5.2 by the name of the Zoom-out feature.
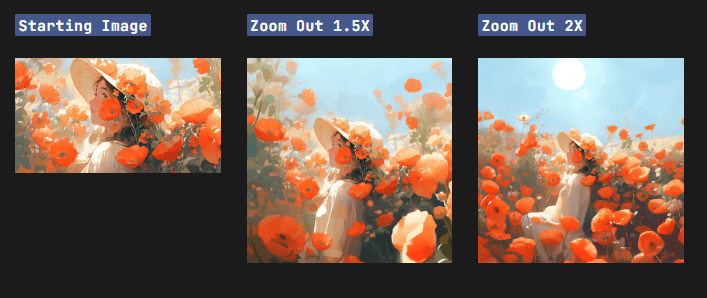
Image by Midjourney
Further Readings
This section provides more resources on the topic if you are looking to go deeper.
- High-Resolution Image Synthesis with Latent Diffusion Models, by Rombach et al (2022)
- LAION-5B dataset
- Unsupervised Representation Learning with Deep Convolutional Generative Adversarial Networks, by Redford et al (2016)
- Understanding the receptive field of deep convolutional networks
Summary
In this post, you have learned the basic architecture of stable diffusion and its building blocks, especially how they are applied to the tasks of inpainting and outpainting. Stable diffusion has proved to be a powerful tool in the generative AI domain. Besides the txt2img generation, it’s also popular for inpainting and outpainting. The web UI by automatic1111 is the go-to tool for stable diffusion, you can inpaint or outpaint with it using the img2img tab.
Get Started on Mastering Digital Art with Stable Diffusion!
Learn how to make Stable Diffusion work for you
...by learning some key elements in the image generation process
Discover how in my new Ebook:
Mastering Digital Art with Stable Diffusion
This book offers self-study tutorials complete with all the working code in Python, guiding you from a novice to an expert in image generation. It teaches you how to set up Stable Diffusion, fine-tune models, automate workflows, adjust key parameters, and much more...all to help you create stunning digital art.


No comments yet.