BigML is a fresh new and interesting machine learning as a service company based out of Corvallis, Oregon, USA.
In a previous post, we reviewed the BigML service, the key features and the ways in which you could use this service in your business, on you side project or to present to clients. In this tutorial we will walk through a step-by-step tutorial on developing a predictive model using the BigML platform and use it to make predictions on data that was not used to create the model. The model will be a decision tree.
You can follow along by signing up for a free trial BigML account. Configure your account to “development mode” and you will not require any credits to complete the tasks in this tutorial.
Iris Species Classification Problem
For this tutorial we will use the well studied Iris flower dataset. This dataset is comprised of 150 instances that describe the measurements of iris flowers, each of which is classified as one of three species of iris. The attributes are numeric and the problem is a multi-class classification problem.
Sample of the Iris flower dataset, screenshot from Wikipedia
Click the “Create” button to create the new data source.
Click on the “Iris flower data source” to review it.
BigML Data Source
You will note that the attribute data types have correctly been identified as numeric and that the class label is the last attribute (field5).
1.2. Create the Dataset
Now that we have a data source with the raw data loaded, we can create a data set view of that data source. We will then create two more datasets, one called training that we will use to train a predictive model and second called test that we will use to evaluate the created predictive model and will use as the basis to make predictions.
Click on the “Iris flower data source” in the “Sources” tab to open it, if not already open.
Click on the cloud button and select “One-click Dataset“.
This will create a new dataset from the data source. This is a view onto the data source that can be modified in preparation for modeling.
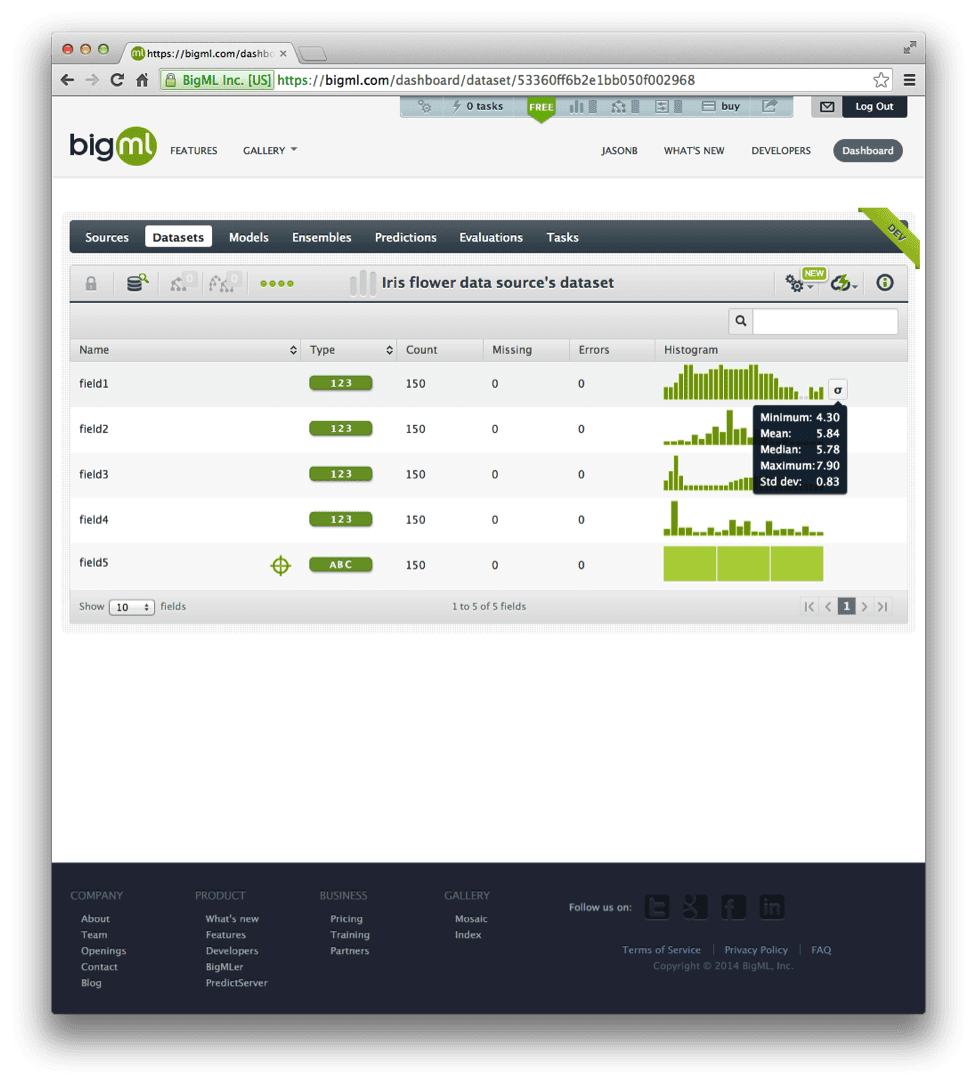
Click or hover on the small sigma to see a summary of a given attribute.
Click the cloud button and select “1 Click Training | Test“.
Click on the “Datasets” tab and review the 3 datasets that we have created.
BigML Dataset
2. Create and Evaluate Model
In this section we will create a predictive model from our prepared training dataset and evaluate the model using our prepared test dataset.
2.1. Create Predictive Model
Now you will create a predictive model from the training dataset.
Click on the “Iris flower data source’s dataset | Training (80%)” dataset in the “Datasets” tab.
Click the cloud icon and select “1-Click Model“.
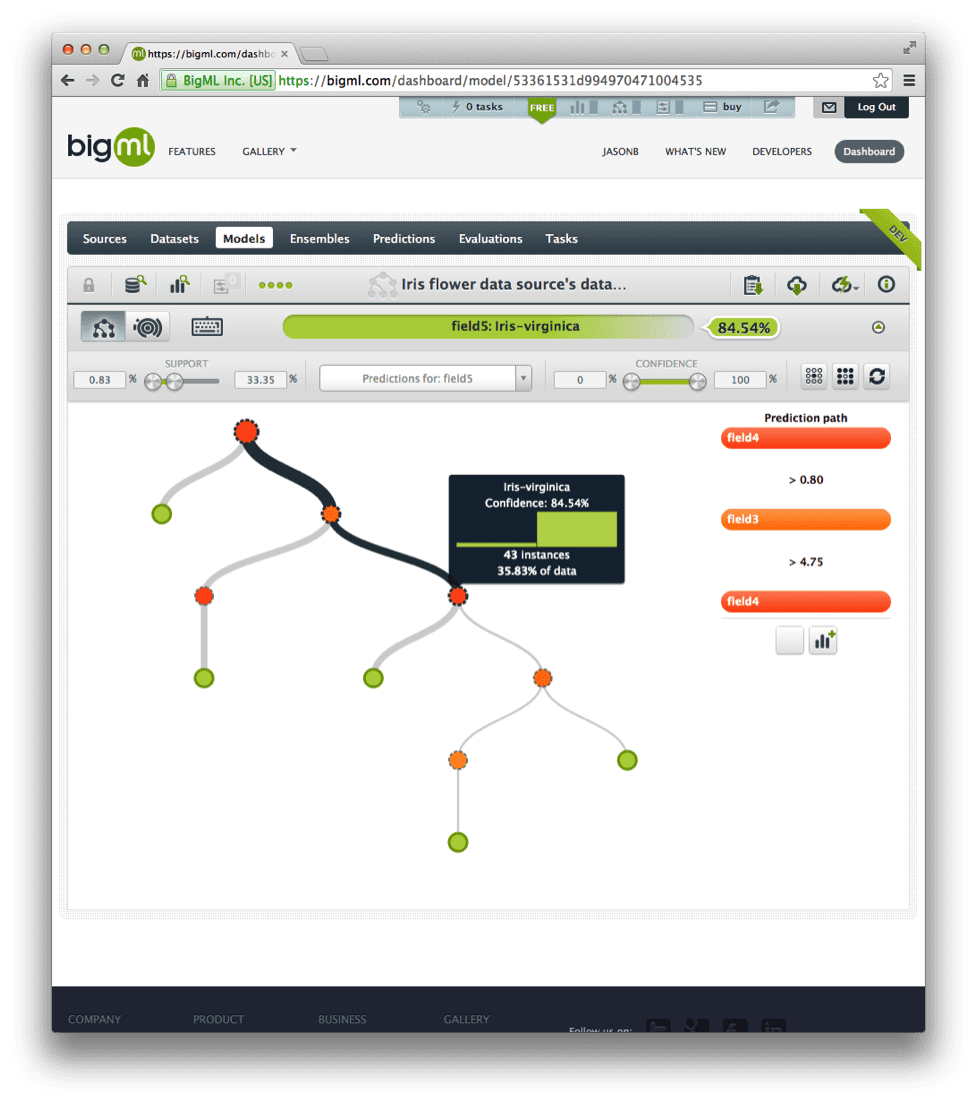
Hover on different nodes in the model to review the flow of the data through the decision tree.
Click the “Sunburst” button to open the sunburst view of the model and explore the decision tree.
Click the “Model Summary Report” button to review a text description of the rules derived from the decision tree model.
BigML Predictive Model
2.2. Evaluate Predictive Model
Now you will evaluate the predictive accuracy the predictive model you created using the test dataset.
Click on the iris flower model in the “Models” tab.
Click the cloud button and select “Evaluate“
The evaluation will automatically select the test dataset that you created previously that contains 20% of the original dataset that the predictive model has not seen before.
Click the “Evaluate” button to evaluate the model.
The accuracy of the model is summarized in terms of classification accuracy, precision, recall, F-score and phi score. We can see the accuracy is 93.33%.
Click the “Confusion Matrix” to review the confusion matrix for the model predictions.
Now you will make predictions using the predictive model on data that the model has not seen before.
Click on the iris flower model in the “Models” tab.
Click on the cloud button and select “Batch Prediction“.
Click on the “Search dataset …” drop down and type “iris“.
Select the “Iris flower data source’s dataset | Test 20%” dataset.
Click the “Predict” button
Click the “Download batch prediction” file for the predictions for each row in the test dataset.
BigML Download Model Predictions
Summary
In this tutorial you have learned how to create a data source, data set, create a predictive model, evaluate it and finally to make predictions on unseen data using the prepared predictive model. BigML is an easy to use platform and you should be able to do all of this in 5-10 minutes flat.
From here, there are a number of things you could do to extend this tutorial:
You could create a new decision tree with a different pruning method and compare its evaluation to the decision tree that you have already created to see if it is more accurate.
You could use ensembles of decision trees to model the problem and see if you can improve the classification accuracy by comparing the evaluation of the ensembles to the evaluation of the decision tree you already created.
You could write a script or use the BigML command line tool (called bigmler) to make predictions with new data as it became available.
You could could use the BigML API to integrate use of the remote model into a webpage and make predictions for new data automatically as it was made available from another source.
If you have an idea for an interesting tutorial using BigML, please leave a comment. Let your imagination go wild.


Splendid, thanks.
You’re welcome Ben.
Good tutorial, thank you!
I’d like to know which one is better in your opinion: BigML or Weka?
Thanks in advance for your time and attention!
They solve different problems. Bigml is just trees and is hosted, Weka is a full suite of methods and is local.