PyTorch is a deep-learning library. Just like some other deep learning libraries, it applies operations on numerical arrays called tensors. In the simplest terms, tensors are just multidimensional arrays. When we deal with the tensors, some operations are used very often. In PyTorch, there are some functions defined specifically for dealing with tensors.
In the following, we will give a brief overview of what PyTorch provides on tensors and how we can use them. After finishing this tutorial, you will know:
- How to create and operate on PyTorch tensors
- PyTorch’s tensor syntax is similar to NumPy
- The common functions you can use from PyTorch to manipulate a tensor
Kick-start your project with my book Deep Learning with PyTorch. It provides self-study tutorials with working code.
Let’s get started.

Manipulating tensors in PyTorch. Photo by Big Dodzy. Some rights reserved.
Overview
This tutorial is in four parts; they are:
- Creating Tensors
- Checking a Tensor
- Manipulating Tensors
- Tensor Functions
Creating Tensors
If you’re familiar with NumPy, you should recall that there are multiple ways of creating an array. The same is true in PyTorch for creating tensors. The simplest way to create a specific constant matrix like the following:
$$
\begin{bmatrix}
1 & 2 & 3 \\
4 & 5 & 6
\end{bmatrix}
$$
is by using:
|
1 2 3 |
import torch a = torch.tensor([[1,2,3], [4,5,6]], dtype=torch.int32) print(a) |
It prints:
|
1 2 |
tensor([[1, 2, 3], [4, 5, 6]], dtype=torch.int32) |
The dtype argument specifies the data type of the values in the tensor. It is optional. You can also provide the values from a NumPy array and convert it to a PyTorch tensor.
Usually, you would create a tensor for some specific purpose. For example, if you want to have ten values evenly distributed between -1 and 1, you can use the linspace() function:
|
1 2 |
a = torch.linspace(-1, 1, 10) print(a) |
It prints:
|
1 2 |
tensor([-1.0000, -0.7778, -0.5556, -0.3333, -0.1111, 0.1111, 0.3333, 0.5556, 0.7778, 1.0000]) |
However, if you want to have a tensor of random values (which is very useful in testing your functions), you can make one like the following:
|
1 2 |
a = torch.rand(3,4) print(a) |
It prints, for example:
|
1 2 3 |
tensor([[0.4252, 0.1029, 0.9858, 0.7502], [0.1993, 0.6412, 0.2424, 0.6451], [0.7878, 0.7615, 0.9170, 0.8534]]) |
This resulting tensor is of dimension $3\times 4$, and each value is uniformly distributed between 0 and 1. If you want to have the values normally distributed, just change the function to randn():
|
1 |
a = torch.randn(3,4) |
If you want to have the random values be an integer, e.g., between 3 to 10, you can use the randint() function:
|
1 2 |
a = torch.randint(3, 10, size=(3,4)) print(a) |
This will give, for example:
|
1 2 3 |
tensor([[4, 5, 7, 9], [3, 8, 8, 9], [4, 7, 7, 6]]) |
The values are in the range $3 \le x < 10$. By default, the lower bound is zero, so if you want the values to be $0 \le x < 10$, you can use:
|
1 |
a = torch.randint(10, size=(3,4)) |
The other commonly used tensors are the zero tensor and tensors with all values the same. To create a zero tensor (e.g., of dimension $2\times 3\times 4$), you can use:
|
1 2 |
a = torch.zeros(2, 3, 4) print(a) |
It prints:
|
1 2 3 4 5 6 7 |
tensor([[[0., 0., 0., 0.], [0., 0., 0., 0.], [0., 0., 0., 0.]], [[0., 0., 0., 0.], [0., 0., 0., 0.], [0., 0., 0., 0.]]]) |
And to create a tensor of all values are 5, you can use:
|
1 2 |
a = torch.full((2,3,4), 5) print(a) |
It prints:
|
1 2 3 4 5 6 7 |
tensor([[[5, 5, 5, 5], [5, 5, 5, 5], [5, 5, 5, 5]], [[5, 5, 5, 5], [5, 5, 5, 5], [5, 5, 5, 5]]]) |
But if you want all values to be one, there is a simpler function:
|
1 |
a = torch.ones(2,3,4) |
Finally, if you want an identity matrix, you can get it with diag() or eye():
|
1 2 |
a = torch.eye(4) print(a) |
It prints:
|
1 2 3 4 |
tensor([[1., 0., 0., 0.], [0., 1., 0., 0.], [0., 0., 1., 0.], [0., 0., 0., 1.]]) |
Want to Get Started With Deep Learning with PyTorch?
Take my free email crash course now (with sample code).
Click to sign-up and also get a free PDF Ebook version of the course.
Checking a Tensor
Once you have a tensor and you want to know more about it, you can simply print it to the screen using print(). But if the tensor is too big, it is easier to show its dimension by checking its shape:
|
1 2 3 |
a = torch.zeros(2, 3, 4) print(a.shape) print(a.size()) |
It prints:
|
1 2 |
torch.Size([2, 3, 4]) torch.Size([2, 3, 4]) |
The shape of a tensor can be accessed using the shape property or the size() function. If you want to see how many dimensions you have (i.e., $2\times 3\times 4$ is 3 and $3\times 4$ is 2), you can read the ndim property:
|
1 |
print(a.ndim) |
This will give you “3”. If you use len() to check a tensor, it will only give you the size of the first dimension, e.g.:
|
1 2 |
a = torch.zeros(2, 3, 4) print(len(a)) |
It prints:
|
1 |
2 |
Another property that you want to learn about a tensor is its data type. Usually, you use floating points in deep learning, but sometimes, the tensors should be in integers (e.g., in an image as pixel values). To check the data type, you can read the dtype property:
|
1 |
print(a.dtype) |
It prints:
|
1 |
torch.float32 |
If you want to change the data type, you can recreate the tensor with a new type:
|
1 2 3 |
b = a.type(torch.int32) print(a.dtype) print(b.dtype) |
The above prints:
|
1 2 |
torch.float32 torch.int32 |
Manipulating Tensors
One common operation on tensors in deep learning is to change the tensor shape. For example, you may want to convert a 2D tensor into 1D or add a dummy dimension to a tensor. You may also want to extract a sub-tensor from a larger tensor.
For example, you can create a tensor like the following:
|
1 2 |
a = torch.randn(3,4,5) print(a) |
If you get:
|
1 2 3 4 5 6 7 8 9 10 11 12 13 14 |
tensor([[[-1.1271e-01, -7.1124e-01, 1.1335e+00, -8.5644e-01, -1.4191e+00], [-1.9065e+00, -6.8386e-02, 5.8727e-01, 6.5890e-03, -2.6947e-01], [ 6.3194e-01, -7.7426e-01, 1.6546e+00, 1.2647e-01, -1.0944e+00], [ 3.7819e-01, -8.8670e-01, 5.3772e-01, 1.4985e+00, 5.8396e-01]], [[ 1.8704e+00, 2.0914e+00, -9.1604e-01, 1.2317e+00, -1.5722e-01], [ 2.4689e-01, -2.3157e-01, -3.3033e-01, 1.4021e+00, -6.9540e-01], [ 3.0298e-01, -1.4936e-01, -6.8863e-01, 1.6977e-01, 2.4682e+00], [-8.1375e-01, 4.8489e-01, -1.2024e+00, -4.9771e-01, 1.1728e-01]], [[-1.6011e+00, 1.5686e-03, -1.0560e-01, -1.2938e+00, 5.3077e-01], [-9.7636e-01, -9.1854e-01, -1.0002e+00, 1.1852e+00, 1.0328e+00], [ 9.6664e-01, 5.3752e-01, -3.1340e-02, -6.7852e-02, -7.2317e-01], [-5.5263e-01, 9.4754e-01, -5.4503e-01, 6.3850e-02, 1.2879e+00]]]) |
It allows you to take a slice using the same syntax as in NumPy:
|
1 |
print(a[1]) |
This will be:
|
1 2 3 4 |
tensor([[ 1.8704, 2.0914, -0.9160, 1.2317, -0.1572], [ 0.2469, -0.2316, -0.3303, 1.4021, -0.6954], [ 0.3030, -0.1494, -0.6886, 0.1698, 2.4682], [-0.8137, 0.4849, -1.2024, -0.4977, 0.1173]]) |
Or if you use:
|
1 |
print(a[1:, 2:4]) |
It will be:
|
1 2 3 4 5 |
tensor([[[ 0.3030, -0.1494, -0.6886, 0.1698, 2.4682], [-0.8137, 0.4849, -1.2024, -0.4977, 0.1173]], [[ 0.9666, 0.5375, -0.0313, -0.0679, -0.7232], [-0.5526, 0.9475, -0.5450, 0.0638, 1.2879]]]) |
You can also make use of the same slicing syntax to add a new dimension. For example,
|
1 |
print(a[:, None, :, None].shape) |
You will see:
|
1 |
torch.Size([3, 1, 4, 1, 5]) |
Here you use None to insert a new dimension at a specific place. This is useful if, for example, you need to convert an image into a batch of only one image. If you’re familiar with NumPy, you may recall there is a function expand_dims() for this purpose, but PyTorch doesn’t provide it. A similar function is unsqueeze(), which is demonstrated below:
|
1 2 3 |
b = torch.unsqueeze(a, dim=2) print(a.shape) print(b.shape) |
This prints:
|
1 2 |
torch.Size([3, 4, 5]) torch.Size([3, 4, 1, 5]) |
One powerful nature of NumPy slicing syntax is Boolean indexing. This is also supported with PyTorch tensors. For example:
|
1 2 3 |
a = torch.randn(3,4) print(a) print(a[:, (a > -1).all(axis=0)]) |
You may see:
|
1 2 3 4 5 6 |
tensor([[ 1.2548, 0.4078, 0.5548, -0.7016], [-0.3720, -0.5682, -0.3430, 0.0886], [ 0.2151, 0.3626, -2.0275, 1.8121]]) tensor([[ 1.2548, 0.4078, -0.7016], [-0.3720, -0.5682, 0.0886], [ 0.2151, 0.3626, 1.8121]]) |
The above selects the columns where all elements are greater than -1. You can also manipulate the tensor by selecting specific columns:
|
1 |
print(a[:, [1,0,0,1]]) |
This results in:
|
1 2 3 |
tensor([[ 0.4078, 1.2548, 1.2548, 0.4078], [-0.5682, -0.3720, -0.3720, -0.5682], [ 0.3626, 0.2151, 0.2151, 0.3626]]) |
To convert a 2D tensor into 1D, you can use:
|
1 2 3 |
a = torch.randn(3,4) print(a) print(a.ravel()) |
The result will be:
|
1 2 3 4 5 |
tensor([[-0.2718, -0.8309, 0.6263, -0.2499], [-0.1780, 1.1735, -1.3530, -1.2374], [-0.6050, -1.5524, -0.1008, -1.2782]]) tensor([-0.2718, -0.8309, 0.6263, -0.2499, -0.1780, 1.1735, -1.3530, -1.2374, -0.6050, -1.5524, -0.1008, -1.2782]) |
You may also use the reshape() function to achieve the same:
|
1 |
print(a.reshape(-1)) |
The result should be the same as that of ravel(). But usually, the reshape() function is for more complicated target shapes:
|
1 |
print(a.reshape(3,2,2)) |
This will print:
|
1 2 3 4 5 6 7 8 |
tensor([[[-0.2718, -0.8309], [ 0.6263, -0.2499]], [[-0.1780, 1.1735], [-1.3530, -1.2374]], [[-0.6050, -1.5524], [-0.1008, -1.2782]]]) |
One common case of reshaping tensors is to do matrix transpose. For a 2D matrix, it is easily done in the same way as NumPy:
|
1 |
print(a.T) |
which prints:
|
1 2 3 4 |
tensor([[-0.2718, -0.1780, -0.6050], [-0.8309, 1.1735, -1.5524], [ 0.6263, -1.3530, -0.1008], [-0.2499, -1.2374, -1.2782]]) |
But the transpose() function in PyTorch requires you to specify which axes to swap explicitly:
|
1 |
print(a.transpose(0, 1)) |
This result is same as above. If you have multiple tensors, you can combine them by stacking them (vstack() for vertically and hstack() for horizontally). For example:
|
1 2 3 4 5 |
a = torch.randn(3,3) b = torch.randn(3,3) print(a) print(b) print(torch.vstack([a,b])) |
This may print:
|
1 2 3 4 5 6 7 8 9 10 11 12 |
tensor([[ 1.1739, 1.3546, -0.2886], [ 1.0444, 0.4437, -2.7933], [ 0.6805, 0.8401, -1.2527]]) tensor([[ 1.6273, 1.2622, -0.4362], [-1.6529, 0.6457, -0.1454], [-2.0960, -1.3024, -0.1033]]) tensor([[ 1.1739, 1.3546, -0.2886], [ 1.0444, 0.4437, -2.7933], [ 0.6805, 0.8401, -1.2527], [ 1.6273, 1.2622, -0.4362], [-1.6529, 0.6457, -0.1454], [-2.0960, -1.3024, -0.1033]]) |
The concatenate function is similar:
|
1 2 |
c = torch.concatenate([a, b]) print(c) |
You will get the same tensor:
|
1 2 3 4 5 6 |
tensor([[ 1.1739, 1.3546, -0.2886], [ 1.0444, 0.4437, -2.7933], [ 0.6805, 0.8401, -1.2527], [ 1.6273, 1.2622, -0.4362], [-1.6529, 0.6457, -0.1454], [-2.0960, -1.3024, -0.1033]]) |
The reverse is to split, e.g.,
|
1 |
print(torch.vsplit(c, 2)) |
It prints
|
1 2 3 4 5 |
(tensor([[ 1.1739, 1.3546, -0.2886], [ 1.0444, 0.4437, -2.7933], [ 0.6805, 0.8401, -1.2527]]), tensor([[ 1.6273, 1.2622, -0.4362], [-1.6529, 0.6457, -0.1454], [-2.0960, -1.3024, -0.1033]])) |
This function tells how many tensors to split into, rather than what size each tensor is. The latter is indeed more useful in deep learning (e.g., to split a tensor of a large dataset into many tensors of small batches). The equivalent function would be:
|
1 |
print(torch.split(c, 3, dim=0)) |
This should give you the same result as before. So split(c, 3, dim=0) means to split on dimension 0 such that each resulting tensor will be of size 3.
Tensor Functions
PyTorch tensors can be treated as arrays. So you can often use it in a similar way as NumPy arrays. For example, you have the functions of common mathematical functions:
|
1 2 3 4 5 6 7 8 9 10 11 12 |
a = torch.randn(2,3) print(a) print(torch.exp(a)) print(torch.log(a)) print(torch.sin(a)) print(torch.arctan(a)) print(torch.abs(a)) print(torch.square(a)) print(torch.sqrt(a)) print(torch.ceil(a)) print(torch.round(a)) print(torch.clip(a, 0.1, 0.9)) |
This prints:
|
1 2 3 4 5 6 7 8 9 10 11 12 13 14 15 16 17 18 19 20 21 22 |
tensor([[ 1.0567, -1.2609, -1.0856], [-0.9633, 1.3163, -0.4325]]) tensor([[2.8770, 0.2834, 0.3377], [0.3816, 3.7298, 0.6489]]) tensor([[0.0552, nan, nan], [ nan, 0.2749, nan]]) tensor([[ 0.8708, -0.9524, -0.8846], [-0.8211, 0.9678, -0.4191]]) tensor([[ 0.8130, -0.9003, -0.8264], [-0.7667, 0.9211, -0.4082]]) tensor([[1.0567, 1.2609, 1.0856], [0.9633, 1.3163, 0.4325]]) tensor([[1.1167, 1.5898, 1.1785], [0.9280, 1.7328, 0.1871]]) tensor([[1.0280, nan, nan], [ nan, 1.1473, nan]]) tensor([[ 2., -1., -1.], [-0., 2., -0.]]) tensor([[ 1., -1., -1.], [-1., 1., -0.]]) tensor([[0.9000, 0.1000, 0.1000], [0.1000, 0.9000, 0.1000]]) |
Note that if a function is undefined (e.g., square root of negative numbers), nan will be the result, but no exception will be raised. In PyTorch, you have a function to check if the values of a tensor are nan:
|
1 2 3 |
b = torch.sqrt(a) print(b) print(torch.isnan(b)) |
You will get:
|
1 2 3 4 |
tensor([[1.0280, nan, nan], [ nan, 1.1473, nan]]) tensor([[False, True, True], [ True, False, True]]) |
Indeed, besides these defined functions, the Python operators can be applied to the tensors too:
|
1 2 3 4 5 6 7 |
a = torch.randn(2, 3) b = torch.randn(2, 3) print(a) print(b) print(a+b) print(a/b) print(a ** 2) |
You get:
|
1 2 3 4 5 6 7 8 9 10 |
tensor([[ 0.7378, -0.3469, 1.3089], [-1.9152, 0.3745, -0.7248]]) tensor([[-0.3650, -0.4768, 0.9331], [ 0.5095, 1.7169, -0.5463]]) tensor([[ 0.3729, -0.8237, 2.2421], [-1.4058, 2.0914, -1.2711]]) tensor([[-2.0216, 0.7275, 1.4027], [-3.7594, 0.2181, 1.3269]]) tensor([[0.5444, 0.1203, 1.7133], [3.6682, 0.1403, 0.5254]]) |
But among the operators, matrix multiplications are very important in deep learning. You can do this with:
|
1 2 |
print(torch.matmul(a, b.T)) print(a @ b.T) |
This prints
|
1 2 3 4 |
tensor([[ 1.1176, -0.9347], [-0.1560, 0.0632]]) tensor([[ 1.1176, -0.9347], [-0.1560, 0.0632]]) |
These two are the same. Indeed, the @ operator from Python can also be used for vector dot-product, e.g.:
|
1 2 3 4 5 6 |
a = torch.randn(3) b = torch.randn(3) print(a) print(b) print(torch.dot(a, b)) print(a @ b) |
It prints:
|
1 2 3 4 |
tensor([-0.8986, -0.6994, 1.1443]) tensor([-1.0666, 0.1455, 0.1322]) tensor(1.0081) tensor(1.0081) |
If you treat the values in a tensor as samples, you may also want to find some statistics about it. Some are provided in PyTorch too:
|
1 2 3 4 5 6 |
a = torch.randn(3,4) print(a) print(torch.mean(a, dim=0)) print(torch.std(a, dim=0)) print(torch.cumsum(a, dim=0)) print(torch.cumprod(a, dim=0)) |
It prints:
|
1 2 3 4 5 6 7 8 9 10 11 |
tensor([[ 0.3331, -0.0190, 0.4814, -1.1484], [-0.5712, 0.8430, -1.6147, -1.1664], [ 1.7298, -1.7665, -0.5918, 0.3024]]) tensor([ 0.4972, -0.3142, -0.5750, -0.6708]) tensor([1.1593, 1.3295, 1.0482, 0.8429]) tensor([[ 0.3331, -0.0190, 0.4814, -1.1484], [-0.2381, 0.8240, -1.1333, -2.3148], [ 1.4917, -0.9425, -1.7251, -2.0124]]) tensor([[ 0.3331, -0.0190, 0.4814, -1.1484], [-0.1903, -0.0160, -0.7774, 1.3395], [-0.3291, 0.0283, 0.4601, 0.4051]]) |
But for linear algebra functions, you should find it in PyTorch’s linalg submodule. For example:
|
1 |
print(torch.linalg.svd(a)) |
You will see:
|
1 2 3 4 5 6 7 8 9 |
torch.return_types.linalg_svd( U=tensor([[-0.0353, 0.1313, 0.9907], [-0.5576, 0.8201, -0.1286], [ 0.8294, 0.5569, -0.0443]]), S=tensor([2.7956, 1.9465, 1.2715]), Vh=tensor([[ 0.6229, -0.6919, 0.1404, 0.3369], [ 0.2767, -0.1515, -0.8172, -0.4824], [ 0.2570, -0.0385, 0.5590, -0.7874], [ 0.6851, 0.7048, -0.0073, 0.1840]])) |
And specifically for convolution neural networks, padding a tensor is done with the following:
|
1 2 |
b = torch.nn.functional.pad(a, (1,1,0,2), value=0) print(b) |
This prints:
|
1 2 3 4 5 |
tensor([[ 0.0000, 0.3331, -0.0190, 0.4814, -1.1484, 0.0000], [ 0.0000, -0.5712, 0.8430, -1.6147, -1.1664, 0.0000], [ 0.0000, 1.7298, -1.7665, -0.5918, 0.3024, 0.0000], [ 0.0000, 0.0000, 0.0000, 0.0000, 0.0000, 0.0000], [ 0.0000, 0.0000, 0.0000, 0.0000, 0.0000, 0.0000]]) |
This example of the pad() function is to create (1,1) padding on dimension 0 and (0,2) on dimension 1. In other words, for each dimension 0 (rows), we add one dummy value (0) at the beginning and the end. For each dimension 1 (columns), we add zero dummy values at the beginning but two dummy values at the end.
Finally, since PyTorch tensors can be considered arrays, you can use them directly with other tools such as matplotlib. Below is an example of plotting a surface using PyTorch tensors:
|
1 2 3 4 5 6 7 8 9 10 11 12 13 14 15 16 17 18 19 |
import matplotlib.pyplot as plt import torch # create tensors x = torch.linspace(-1, 1, 100) y = torch.linspace(-2, 2, 100) # create the surface xx, yy = torch.meshgrid(x, y, indexing="xy") # xy-indexing is matching numpy z = torch.sqrt(1 - xx**2 - (yy/2)**2) print(xx) fig = plt.figure(figsize=(8,8)) ax = plt.axes(projection="3d") ax.set_xlim([-2, 2]) ax.set_ylim([-2, 2]) ax.set_zlim([0, 2]) ax.plot_surface(xx, yy, z, cmap="cividis") ax.view_init(45, 35) plt.show() |
The mesh grid produced the xx tensor as:
|
1 2 3 4 5 6 7 |
tensor([[-1.0000, -0.9798, -0.9596, ..., 0.9596, 0.9798, 1.0000], [-1.0000, -0.9798, -0.9596, ..., 0.9596, 0.9798, 1.0000], [-1.0000, -0.9798, -0.9596, ..., 0.9596, 0.9798, 1.0000], ..., [-1.0000, -0.9798, -0.9596, ..., 0.9596, 0.9798, 1.0000], [-1.0000, -0.9798, -0.9596, ..., 0.9596, 0.9798, 1.0000], [-1.0000, -0.9798, -0.9596, ..., 0.9596, 0.9798, 1.0000]]) |
And the plot created is: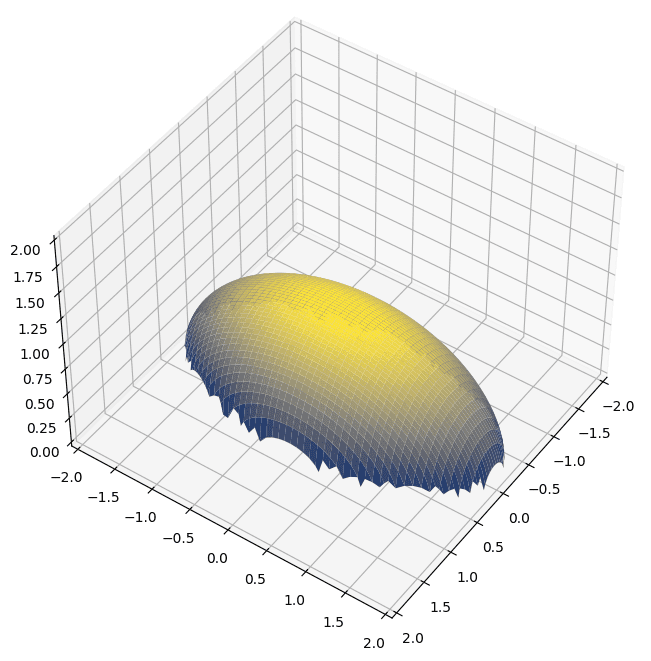
Summary
In this tutorial, you discovered how to manipulate PyTorch tensors. Specifically, you learned:
- What is a tensor
- How to create various kinds of tensors in PyTorch
- How to reshape, slice, and manipulate tensors in PyTorch
- The common functions that can be applied to PyTorch tensors
Get Started on Deep Learning with PyTorch!

Learn how to build deep learning models
...using the newly released PyTorch 2.0 library
Discover how in my new Ebook:
Deep Learning with PyTorch
It provides self-study tutorials with hundreds of working code to turn you from a novice to expert. It equips you with
tensor operation, training, evaluation, hyperparameter optimization,
and much more...


The line:
“z = torch.sqrt(1 – xx**2 – (yy/2)**2)”
returns a tensor with NaNs
Was this equation mistyped?
Hi John…We will look in to this, however it would be helpful to know if you typed the code or copied and pasted it?
Hi James,
I typed it. I played around with it a bit, as it appears that getting the square root of a negative number for the value of Z is the primary issue.
I inserted abs() inside torch.sqrt() and it gave a plot mostly similar to that shown, except with some laminar peaks at the vour corners.
Hi John…Thank you for the update! That will likely help others as well.
Hi,
Were you able to find a solution to this?