In this article, you will learn how to build a multi-agent AI research assistant using the OpenAI Agents SDK, the GPT-5.4 mini model, and the Olostep Web API, including how to wire together a manager agent, specialist sub-agents, and live web tools to produce structured, source-grounded research reports.
Topics we will cover include:
- How to define a manager agent that orchestrates a judge agent and an analyst agent to progressively gather and evaluate evidence.
- How to integrate Olostep’s Answer, Search, Search-with-Scrape, and Scrape APIs as callable tools inside the OpenAI Agents SDK workflow.
- How to expose the finished research assistant as an interactive web application built with Reflex, complete with PDF export.
How to Build a Multi-Agent Research Assistant in Python
Introduction
I have been experimenting with the OpenAI Agents SDK, and it has quickly become one of my favorite ways to build agentic AI applications. What stood out to me is how simple it is to create a multi-agent workflow: you define a manager agent, connect it with specialist sub-agents and tools, and let it decide how to complete the task.
The manager agent can delegate work to other agents, call tools directly, and coordinate the overall research process. This makes it possible to build AI applications that do more than generate text — they can search the web, gather information, organize findings, and produce grounded outputs.
In this guide, we will build a multi-agent AI research assistant using the OpenAI Agents SDK, the GPT-5.4 mini model, and the Olostep Web API. The assistant will generate a structured research report that is grounded in web data, easy to read, and produced in just a few seconds.
The guide also includes the full code, a web app, and a link to the deployed version so you can test the system yourself. By the end, you will understand how multiple agents can work together to create a practical research assistant from scratch.
1. Set Up the Environment
Before building the multi-agent research assistant, we need to set up the Python environment and configure the required API keys.
We will use four main packages:
- openai-agents for building and running the multi-agent workflow
- olostep for accessing live web data
- pydantic for defining structured outputs
- python-dotenv for loading API keys from a .env file
Run the following command to install the required packages:
|
1 |
pip install -q -U openai-agents olostep python-dotenv pydantic |
Next, create a .env file in your project directory. This file will store your API keys securely, so you do not need to hardcode them inside your notebook or application.
|
1 2 |
OPENAI_API_KEY=your_openai_api_key OLOSTEP_API_KEY=your_olostep_api_key |
You can create your OpenAI API key from the OpenAI Platform. Sign in to your OpenAI account, go to the API keys section, and generate a new key for this project. Make sure your OpenAI API account has billing enabled and at least $5 in credits available before running the examples. You may also need to complete account verification to access the latest models.
For Olostep, create a free account from the Olostep website and generate an API key from your dashboard. The free plan includes 500 successful requests with no credit card required, which is enough to test the research assistant in this guide.
Once your keys are ready, we will start in a Jupyter Notebook by importing the required libraries and loading the environment variables. This setup prepares the notebook to work with OpenAI, Olostep, structured outputs, and tracing.
|
1 2 3 4 5 6 7 8 9 10 11 12 13 14 15 16 17 18 19 20 21 22 23 24 |
import json import os from datetime import datetime from typing import Any from dotenv import load_dotenv from IPython.display import Markdown, display from olostep import Olostep from pydantic import BaseModel, Field from agents import ( Agent, Runner, custom_span, flush_traces, function_tool, gen_trace_id, trace, ) load_dotenv() OPENAI_API_KEY = os.getenv("OPENAI_API_KEY") OLOSTEP_API_KEY = os.getenv("OLOSTEP_API_KEY") |
2. Test Olostep Search with Scraping
Before building the full multi-agent workflow, it is useful to test whether Olostep can search the web and scrape the returned pages successfully. This step confirms that your API key is working and that the search results include enough page content for downstream analysis.
The Olostep Search API is especially useful because it can return search results with a built-in scraping option. Instead of only receiving page titles, snippets, and links, you can ask Olostep to scrape the returned URLs and provide the extracted content in formats such as Markdown.
This means the agent can work with high-quality page content directly, rather than relying only on search snippets. It also saves time because you do not need to build a separate search-and-scrape pipeline yourself.
|
1 2 3 4 5 6 7 8 9 10 |
client = Olostep(api_key=OLOSTEP_API_KEY) search = client.searches.create( query="What are the most important recent developments in AI agents for business research?", limit=5, scrape_options={"formats": ["markdown"], "timeout": 25}, ) for link in search.links: print(link["url"], "-", len(link.get("markdown_content") or ""), "chars") |
This tells Olostep to scrape each returned page and provide the extracted content in Markdown format. Markdown is useful because it keeps the content readable while removing unnecessary page clutter. The timeout value gives Olostep enough time to fetch and process each page.
After the search is complete, we loop through the returned links and print each URL along with the number of characters extracted from the page.
3. Add Helper Functions
Before creating the agents and tools, we need to add a few helper functions. These utilities keep the rest of the code cleaner and make the workflow easier to debug.
The helper functions will handle six things:
- Check whether the Olostep API key is available
- Create a reusable Olostep client
- Convert SDK responses into standard Python dictionaries
- Compress large JSON outputs so they are easier to inspect
- Add the current date and year as context for the agents
- Normalize search results into a simpler format for the agents
|
1 2 3 4 5 6 7 8 9 10 11 12 13 14 15 16 17 18 19 20 21 22 23 24 25 26 27 28 29 30 31 32 33 34 35 36 37 38 39 40 41 42 43 44 45 46 47 48 49 50 |
class OlostepError(RuntimeError): """Raised when an Olostep SDK request fails.""" def require_olostep_key() -> str: if not OLOSTEP_API_KEY: raise OlostepError( "OLOSTEP_API_KEY is not set. Add it to .env and rerun the setup cell." ) return OLOSTEP_API_KEY def get_olostep_client() -> Olostep: return Olostep(api_key=require_olostep_key()) def sdk_result_to_dict(result: Any) -> dict[str, Any]: if hasattr(result, "model_dump"): return result.model_dump() if hasattr(result, "__dict__"): return { key: value for key, value in vars(result).items() if not key.startswith("_") } return {"value": str(result)} def compact_json(data: Any, max_chars: int = 8000) -> str: text = json.dumps(data, ensure_ascii=False, indent=2, default=str) if len(text) <= max_chars: return text return text[:max_chars] + "\n... [truncated]" def current_date_context() -> str: return datetime.now().strftime("%B %d, %Y") def current_year_context() -> str: return str(datetime.now().year) def normalize_search_links( links: list[dict[str, Any]], limit: int = 8 ) -> list[dict[str, Any]]: rows = [] for link in links[:limit]: markdown = link.get("markdown_content") or "" rows.append( { "title": link.get("title") or "Untitled", "url": link.get("url") or "", "description": link.get("description") or "", "markdown_chars": len(markdown), "markdown_preview": markdown[:1500] if markdown else "", } ) return rows |
4. Define Structured Output Models
Next, define the structured outputs that the agents will return. These models make the workflow more reliable because each agent must return information in a consistent format.
The judge agent uses the Judgment model to decide whether the gathered evidence is strong enough. The analyst agent uses the MarkdownResearchReport model to return the final report as polished Markdown.
|
1 2 3 4 5 6 7 8 9 10 11 12 13 14 |
class Judgment(BaseModel): is_good_enough: bool = Field( description="Whether the answer is sufficient for the user query, meaning score >= 0.85." ) score: float = Field(ge=0, le=1, description="Quality score from 0 to 1.") reason: str = Field(description="Short explanation of the decision.") missing_information: list[str] = Field( default_factory=list, description="Important gaps to fix." ) class MarkdownResearchReport(BaseModel): markdown_report: str = Field( description="Complete Markdown report with polished headings, clear analysis, reader-friendly structure, and citations." ) |
Judgment works as the quality-control schema. It helps the judge agent decide whether the gathered evidence is strong enough or whether the manager agent should continue searching.
MarkdownResearchReport defines the final research output. Since the final app only needs the completed report, this model keeps a single markdown_report field instead of extra metadata fields. This makes the output simpler and easier to display in the notebook, web app, and PDF export.
5. Create Olostep Tool Functions
Now create the tools that the manager agent can call during the research process. These tools wrap Olostep’s Answer API, Search API, Search with Scrape, and Scrape API.
Each tool includes tracing spans so you can inspect what happened during execution in the OpenAI trace viewer. This is useful for debugging because you can see which tool was called, what input it received, and how the manager agent moved through the workflow.
Answer Query Tool
This tool asks Olostep for a quick answer to the user’s research question. It is used as the first step in the workflow before deciding whether more research is needed.
|
1 2 3 4 5 6 7 8 9 10 |
@function_tool async def answer_query(query: str) -> str: """Answer a natural-language research query using Olostep Answer API.""" try: with custom_span("olostep.answer_query", {"query": query}): result = get_olostep_client().answers.create(task=query) return compact_json(sdk_result_to_dict(result)) except Exception as exc: raise OlostepError(f"Olostep Answer API failed: {exc}") from exc |
Search Web Tool
This tool runs a standard web search and returns normalized results. It is useful when the assistant needs to discover additional sources before scraping specific pages.
The output is intentionally compact. Instead of returning the full raw API response, the tool returns the query and a cleaned list of search results. This makes the response easier for the manager agent to read and reduces unnecessary context.
|
1 2 3 4 5 6 7 8 9 10 11 12 13 14 15 16 17 18 19 20 21 22 23 24 |
@function_tool async def search_web(query: str, limit: int = 8) -> str: """Search the web using Olostep Search and return normalized results.""" try: with custom_span("olostep.search_web", {"query": query, "limit": limit}): search = get_olostep_client().searches.create( query=query, limit=limit, ) data = sdk_result_to_dict(search) return compact_json( { "query": query, "results": normalize_search_links( data.get("links", []), limit=limit, ), } ) except Exception as exc: raise OlostepError(f"Olostep Search API failed: {exc}") from exc |
Search with Scrape Tool
This tool searches the web and scrapes the returned pages in one step. It gives the research assistant richer evidence than search snippets alone.
This is one of the most important tools in the project because it lets the agent retrieve both links and page content from a single call. Instead of first searching the web, selecting URLs, and then scraping each one separately, the tool can return usable Markdown content directly from the discovered pages.
|
1 2 3 4 5 6 7 8 9 10 11 12 13 14 15 16 17 18 19 20 21 22 23 24 25 26 27 28 29 30 31 32 33 34 35 36 37 38 |
@function_tool async def search_with_scrape(query: str, limit: int = 5) -> str: """Search the web and scrape each returned link using Olostep Search with Scrape.""" scrape_options = { "formats": ["markdown"], "timeout": 25, } try: with custom_span( "olostep.search_with_scrape", { "query": query, "limit": limit, "scrape_options": scrape_options, }, ): search = get_olostep_client().searches.create( query=query, limit=limit, scrape_options=scrape_options, ) data = sdk_result_to_dict(search) return compact_json( { "query": query, "results": normalize_search_links( data.get("links", []), limit=limit, ), }, max_chars=12000, ) except Exception as exc: raise OlostepError(f"Olostep Search with Scrape failed: {exc}") from exc |
Scrape URL Tool
This tool scrapes a single URL and returns compact page content. The manager agent uses it when it needs deeper evidence from selected sources.
For example, the manager may first use search_web to find relevant pages, then use scrape_url to retrieve the full content from the most useful links.
|
1 2 3 4 5 6 7 8 9 10 11 12 13 14 15 16 17 18 19 20 21 22 23 24 25 26 |
@function_tool async def scrape_url(url: str) -> str: """Scrape one URL with Olostep and return compact page content.""" try: with custom_span( "olostep.scrape_url", { "url": url, "formats": ["markdown"], }, ): scrape = get_olostep_client().scrapes.create( url=url, formats=["markdown"], ) return compact_json( { "url": url, "scrape": sdk_result_to_dict(scrape), }, max_chars=10000, ) except Exception as exc: raise OlostepError(f"Olostep Scrape API failed: {exc}") from exc |
These tools give the manager agent different ways to gather evidence. It can start with a quick answer, search for more sources, use Search with Scrape for richer context, or scrape a specific URL when it needs more detail.
6. Build the Specialist Agents
The workflow uses two specialist agents: a judge agent and an analyst agent.
The judge agent checks whether the gathered evidence is strong enough to answer the user’s question. The analyst agent then turns the approved evidence into a polished Markdown research report.
First, define the model that both specialist agents will use:
|
1 |
MODEL = "gpt-5.4-mini" |
Judge Agent
The judge agent evaluates answer quality. It checks whether the answer is specific, current, source-backed, and complete enough to stop the research process.
This is important because the manager agent should not produce a final report from weak evidence. If the answer is vague, outdated, unsupported, or missing key details, the judge agent will reject it and the manager agent can continue searching.
|
1 2 3 4 5 6 7 8 9 10 11 12 13 14 15 16 17 18 19 |
judge_agent = Agent( name="Judge agent", model=MODEL, instructions=( "You judge whether the provided answer is good enough for the original research question. " "Reward direct, specific, source-backed answers. Reject vague, stale, or unsupported answers. " "Be strict: is_good_enough must be true only when score >= 0.85 and the evidence directly answers " "the question with concrete source content, topic-specific detail, and appropriate recency. " "For current events, product status, policies, pricing, or factual claims that may change, require recent " "primary or highly reputable sources. Do not mark evidence sufficient if any critical gap remains. " "Calibrate scores this way: 0.85-1.0 means sufficient to stop with strong source support and no critical gaps; " "0.75-0.84 means strong but still missing one important source, detail, recency check, or coverage area; " "0.50-0.74 means relevant partial evidence that needs more research; 0.25-0.49 means thin, vague, stale, " "or weakly related evidence; below 0.25 is only for empty, unusable, or mostly unrelated evidence. " "Do not mark evidence sufficient just because it is plausible or directionally correct. " "Return only the structured judgment." ), output_type=Judgment, ) |
The judge agent returns a Judgment object. This includes whether the evidence is good enough, a quality score, a short reason, and any missing information that still needs to be addressed.
Analyst Agent
The analyst agent writes the final Markdown report. It turns the gathered evidence into a readable research brief with clear sections, source notes, and references.
This agent is responsible for making the output useful for a professional reader. Instead of simply summarizing raw tool outputs, it organizes the findings into a complete report that explains the topic, highlights the most important evidence, and cites the sources used.
|
1 2 3 4 5 6 7 8 9 10 11 12 13 14 15 16 17 18 19 20 |
analyst_agent = Agent( name="Analyst agent", model=MODEL, instructions=( "You write a proper Markdown research report from the evidence. " "Write for a professional reader who wants a clear, polished research brief on any topic. " "Adapt the report to the user's question. The markdown_report must be substantial, easy to scan, and use these general sections only: " "Executive Summary, Key Findings, Context, Evidence Review, Detailed Analysis, Implications, Source Notes, and References. " "If the topic is event-driven, include timeline details inside Context or Detailed Analysis instead of adding a separate Timeline section. " "If the topic is comparative, include a compact comparison table inside Detailed Analysis. " "Do not include sections titled Limitations, Next Steps, Recommendations, or Action Items. " "Avoid bare caveats like 'I relied on...'. Instead, integrate source quality naturally in Source Notes. " "Use short paragraphs, bullets where helpful, and citations as Markdown links or URL bullets. " "Add enough context that a non-expert reader understands the issue, why it matters, and what evidence supports it. " "Do not use emoji, return-arrow symbols, backlink icons, or decorative icons anywhere in the report. " "In References, list only plain Markdown bullets or numbered items with the source name and URL. " "Return only the structured report." ), output_type=MarkdownResearchReport, ) |
The analyst agent returns a MarkdownResearchReport object with one field: markdown_report. This keeps the final output simple because the complete title, summary, findings, analysis, source notes, and references are all included inside the Markdown report itself.
7. Create the Manager Agent
The manager agent is the orchestrator. It controls the full research workflow and decides which tool or specialist agent should run next.
The workflow follows this pattern:
- Start with a quick answer using the Olostep Answer API
- Ask the judge agent whether the answer is good enough
- If not, run Search with Scrape for stronger evidence
- Ask the judge agent again
- If the evidence is still weak, run targeted searches and scrape the most relevant pages
- Ask the analyst agent to write the final report
First, convert the judge and analyst agents into tools. This allows the manager agent to call them during the workflow.
|
1 2 3 4 5 6 7 8 9 |
judge_tool = judge_agent.as_tool( tool_name="judge_answer_quality", tool_description="Judge whether an answer or evidence is good enough for the original research question.", ) analyst_tool = analyst_agent.as_tool( tool_name="write_markdown_research_report", tool_description="Write the final structured Markdown research report from the gathered evidence.", ) |
Now define the manager agent. This agent does not answer from memory. Instead, it follows a clear research process: answer, judge, search, judge again, scrape if needed, and then write the final report.
|
1 2 3 4 5 6 7 8 9 10 11 12 13 14 15 16 17 18 19 20 21 22 23 24 25 26 27 28 29 30 31 32 33 34 |
manager_agent = Agent( name="Manager research agent", model=MODEL, instructions=( f"Current date: {current_date_context()}\n" f"Current year: {current_year_context()}\n\n" "You are the orchestrator for a multi-agent research assistant. You must manage the workflow, " "not answer from your own memory. Follow this policy exactly:\n" "1. Always call answer_query first to get a simple initial answer for the user's question.\n" "2. Immediately call judge_answer_quality on the original question plus the answer_query result. " "If the judge returns is_good_enough=true and score >= 0.85, stop researching and call " "write_markdown_research_report with the question, answer result, and judgment.\n" "3. If the first judgment is weak, call search_with_scrape for the original question. " "Immediately call judge_answer_quality again on the original question plus the answer_query result, " "first judgment, and search_with_scrape result. If this second judge returns is_good_enough=true " "and score >= 0.85, stop researching and call write_markdown_research_report with all evidence.\n" "4. If the second judgment is still weak, do not call the judge again. Run multiple targeted " "search_web calls first, using the judge's missing_information to form the searches. Inspect the " "search results, choose at least the top 3 relevant source URLs most likely to answer the missing " "points, then call scrape_url on each of those top 3 pages. Scrape more than 3 only if clearly needed.\n" "5. Call write_markdown_research_report exactly once at the end, using every answer, judgment, " "search result, and scraped page. The analyst must produce the final MarkdownResearchReport.\n" "6. Return only the final MarkdownResearchReport. Do not return a casual chat answer, tool transcript, or plan." ), tools=[ answer_query, judge_tool, search_with_scrape, search_web, scrape_url, analyst_tool, ], output_type=MarkdownResearchReport, ) |
The manager agent is the core of the system. It decides when the first answer is enough, when more evidence is needed, and when to call the analyst agent to produce the final report.
The key idea is that the manager does not rely on a single tool call. It starts with a fast answer, checks quality, and only does deeper research when needed. This keeps the workflow efficient while still allowing the assistant to gather stronger evidence for more complex questions.
8. Run the Research Assistant with Tracing
The final function runs the manager agent and returns a structured research report. It also creates an OpenAI trace ID so you can inspect the full workflow, including manager decisions, specialist agent calls, tool usage, and Olostep spans.
Tracing is especially useful when debugging multi-agent systems because it shows exactly what happened at each step. You can see whether the manager followed the required workflow, which tools were called, what evidence was gathered, how the judge evaluated the answer, and when the analyst produced the final report.
|
1 2 3 4 5 6 7 8 9 10 11 12 13 14 15 16 17 18 19 20 21 22 23 24 25 26 27 28 29 30 31 32 33 34 35 36 37 38 39 40 41 42 43 44 45 46 47 48 49 50 51 |
def openai_trace_url(trace_id: str) -> str: return f"https://platform.openai.com/logs/trace?trace_id={trace_id}" async def run_research_assistant(query: str) -> MarkdownResearchReport: if not OPENAI_API_KEY: raise RuntimeError( "OPENAI_API_KEY is not set. Add it to .env and rerun the setup cell." ) require_olostep_key() trace_id = gen_trace_id() print("OpenAI trace ID:", trace_id) print("OpenAI trace URL:", openai_trace_url(trace_id)) current_date = current_date_context() current_year = current_year_context() prompt = f""" Current date: {current_date} Current year: {current_year} Research question: {query} Return a polished, reader-friendly Markdown research report with substantial detail for the user's specific question. Follow the required workflow exactly: - Use answer_query first for a simple initial answer. - Use the judge agent immediately after the simple answer to decide whether to stop or continue. - If the first judge says the answer is not sufficient, run search_with_scrape. - Use the judge agent immediately after search_with_scrape to decide whether to stop or continue. - If the second judge still says the evidence is weak, do not judge again. Run multiple targeted search_web calls, choose at least the top 3 relevant source URLs from the search results, and scrape those top 3 pages for context. - Analyst agent writes the final Markdown report from all answer, judge, search, and scrape evidence. Do not include Limitations or Next Steps sections. """ with trace( workflow_name="multi_agent_research_assistant_olostep", trace_id=trace_id, metadata={ "query": query, "notebook": "multi_agent_research_assistant_openai_agents_olostep", }, ): with custom_span("manager.run", {"query": query}): result = await Runner.run(manager_agent, prompt, max_turns=30) flush_traces() print( "Trace flushed. Open the URL above to inspect manager, specialist agents, tools, and Olostep spans." ) return result.final_output |
The function first checks that both API keys are available. It then creates a trace ID and prints a trace URL so you can inspect the full run in the OpenAI trace viewer.
The trace() block groups the full workflow, while custom_span() marks the manager-agent run. Since the Olostep tools also use custom spans, you can see both agent decisions and API calls in one place.
Finally, flush_traces() sends the trace data to OpenAI so the run is available for review.
9. Test the Multi-Agent Research Assistant
Now test the full workflow with a sample research question. The assistant will run the manager agent, gather evidence, judge the quality of that evidence, and return a structured Markdown report.
|
1 2 3 4 |
example_query = "What's going on with OpenAI's Sora shutting down?" report = await run_research_assistant(example_query) display(Markdown(report.markdown_report)) |
When you run this cell, the notebook prints an OpenAI trace ID and trace URL:
|
1 2 |
OpenAI trace ID: trace_45f3333363da420dbcefc8bb8819224c OpenAI trace URL: https://platform.openai.com/logs/trace?trace_id=trace_45f3333363da420dbcefc8bb8819224c |
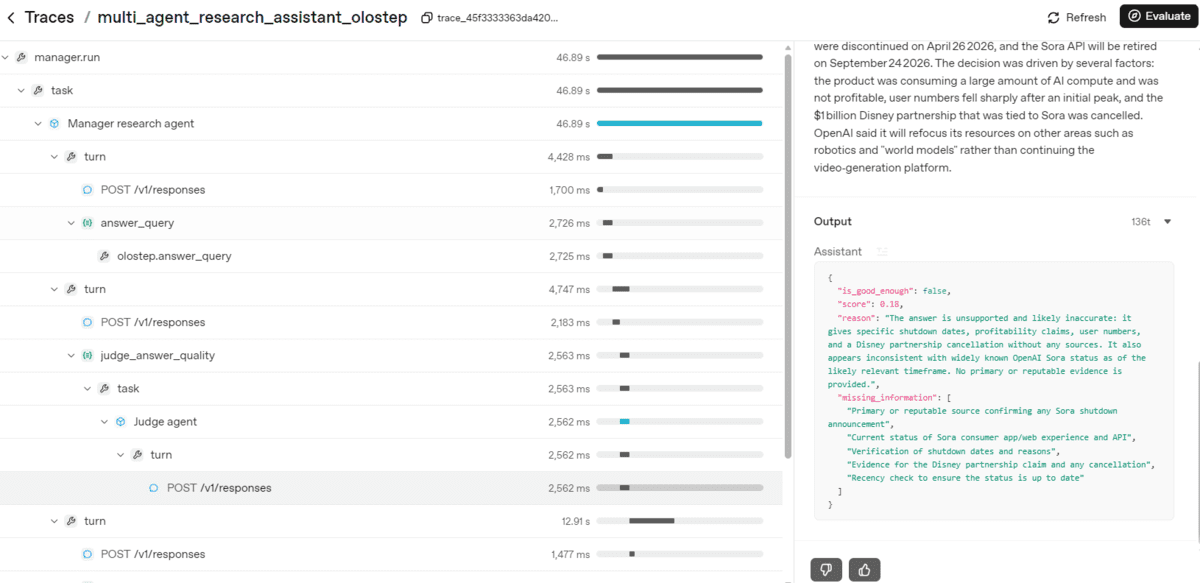
Click the trace URL to open the run in the OpenAI trace viewer. This lets you inspect the full execution path across the manager agent, judge agent, analyst agent, Olostep tools, and scraping calls.
The trace is useful because it shows the actual orchestration process. You can see when the manager agent starts with answer_query, when it sends the result to the judge agent, and how the judge decides whether the evidence is strong enough. If the first answer is not enough, the trace also shows when the manager uses search_with_scrape or targeted scraping to gather better evidence.
After the manager completes the research process, the notebook displays the final Markdown report:
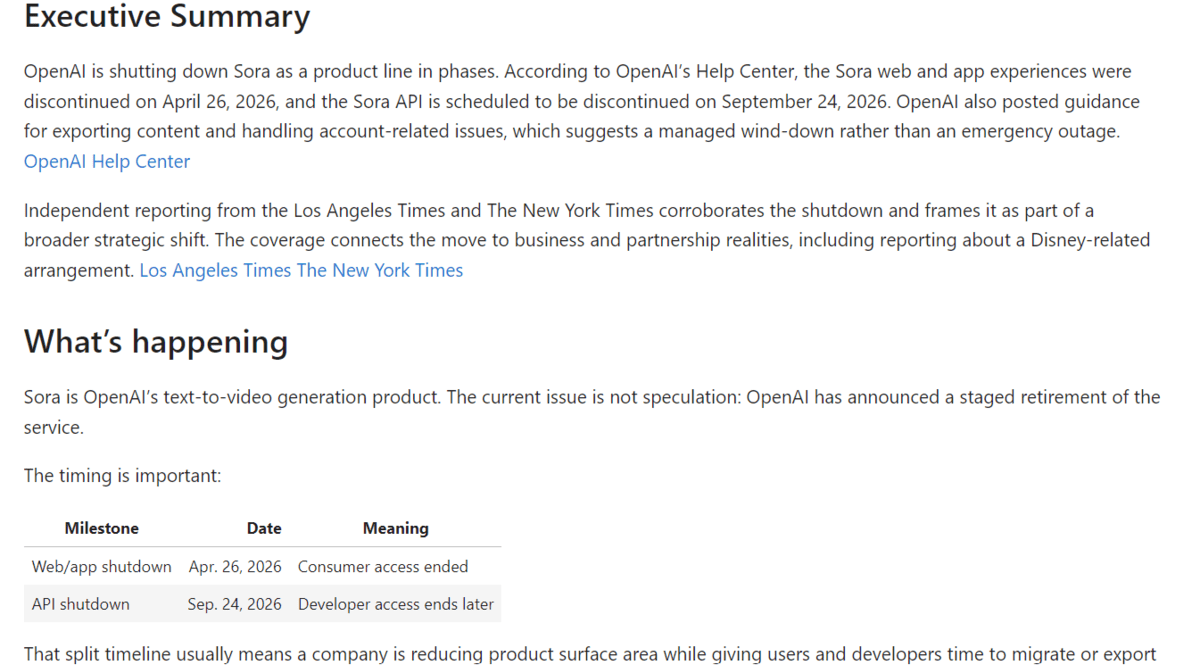
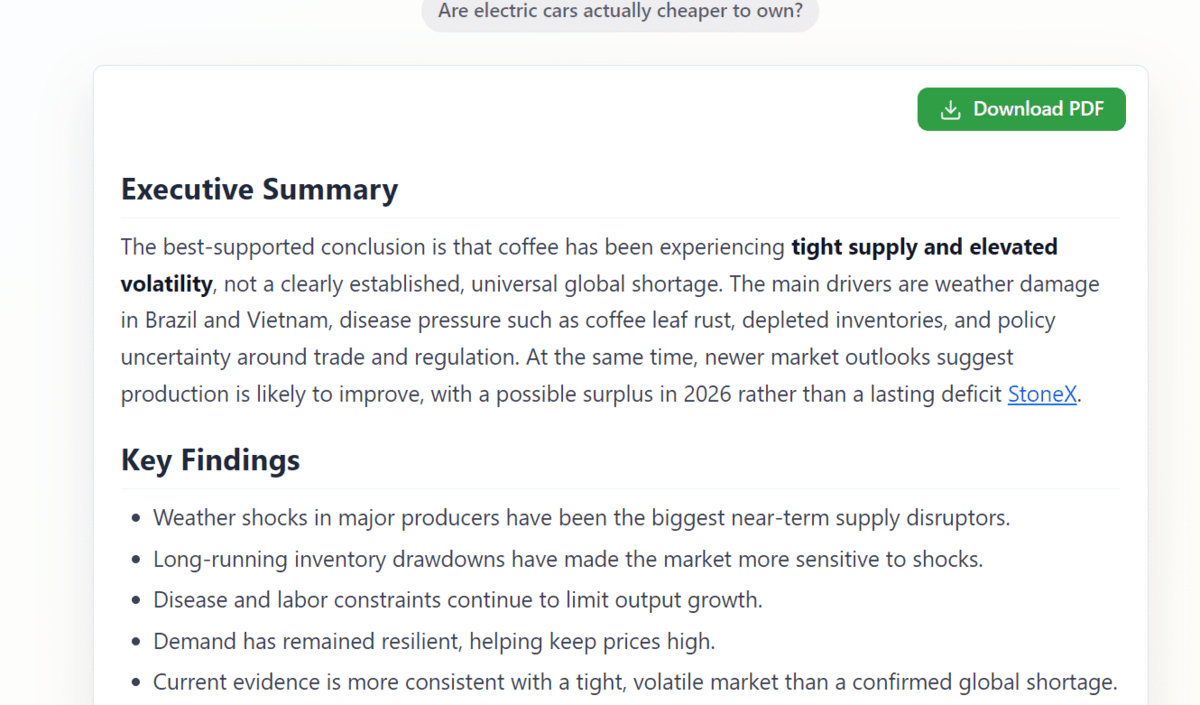
The final report is written in a clean, reader-friendly format with an executive summary, key findings, context, analysis, source notes, and references.
If you face any issues running the notebook or reproducing the results above, you can review the full Jupyter Notebook on GitHub. It includes the complete setup, helper functions, agent definitions, tool calls, tracing workflow, and example output: multi_agent_research_assistant_openai_agents_olostep.ipynb
10. Build a Web UI with Reflex
After testing the code in the notebook, you can turn the research assistant into a simple web app using Reflex, a Python web framework for building interactive user interfaces.
The web app focuses on creating a clean interface where users can:
- Enter a research question
- Run the multi-agent workflow
- View the agent activity logs
- Read the final research report
- Download the report as a PDF
You can find the app code in the project repository: Multi-Agent-Research-Assistant/app
First, clone the project repository:
|
1 |
git clone https://github.com/kingabzpro/Multi-Agent-Research-Assistant.git |
Move into the project folder and install the required dependencies:
|
1 2 |
cd Multi-Agent-Research-Assistant pip install -r requirements.txt |
Next, create a .env file from the provided template and add your API keys:
|
1 2 3 |
OPENAI_API_KEY=your_openai_api_key OLOSTEP_API_KEY=your_olostep_api_key OPENAI_MODEL=gpt-5.4-mini |
Then run the Reflex app:
|
1 |
reflex run |
Once the app starts, open the local URL printed in your terminal. It is usually:
|
1 |
http://localhost:3000 |
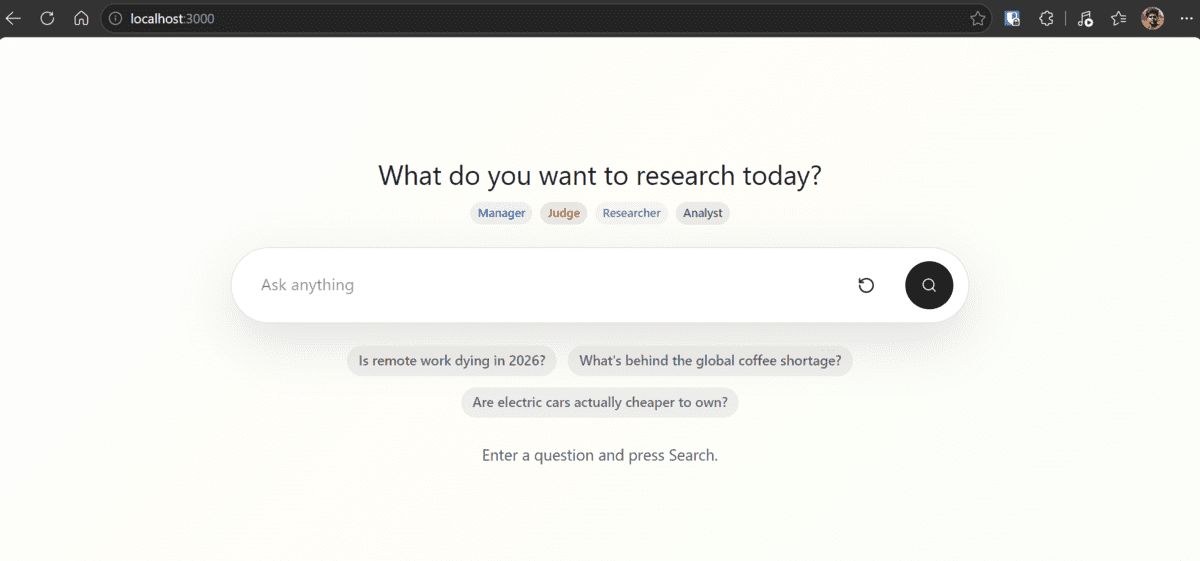
You now have a working web interface for your multi-agent research assistant.
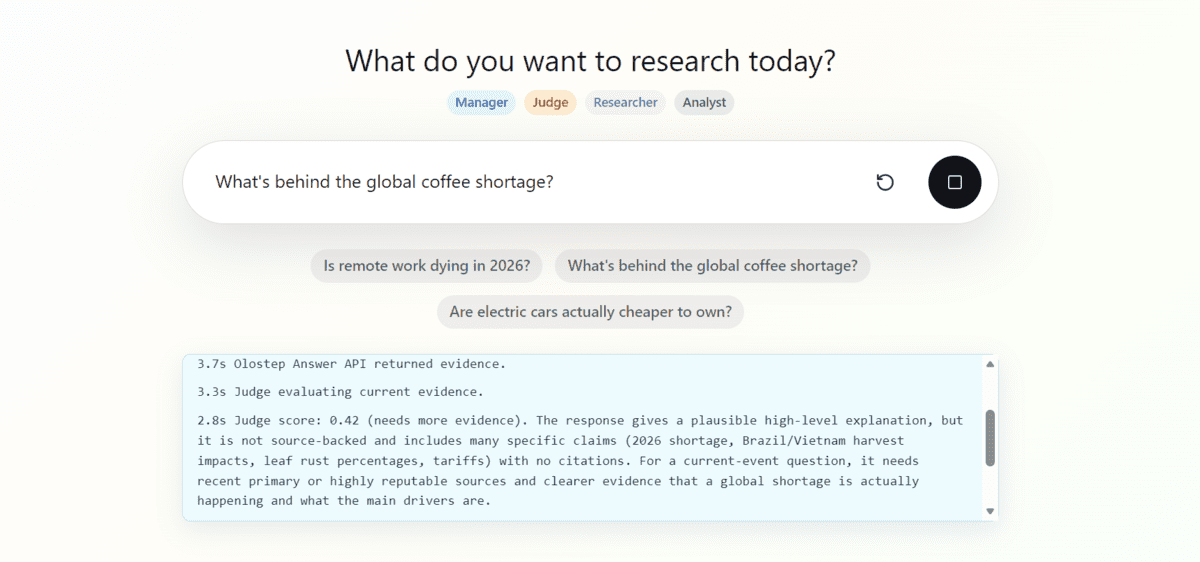
The UI is designed to be simple, fast, and practical. When you enter a question and click the search button, the app shows the workflow logs so you can follow what the assistant is doing.
The assistant starts by calling the Olostep Answer API to get an initial answer. It then sends that evidence to the judge agent to check whether the answer is strong enough. If the judge decides more evidence is needed, the manager agent continues with web search, scraping, and additional source gathering before sending everything to the analyst agent for the final report.
The final report is displayed in a clean, professional format that is easy to read. You can also download the generated research report as a PDF file, making it easier to save, share, or review later.
If you do not want to build the app locally and only want to try it quickly, you can use the deployed Hugging Face Space: Multi-Agent Research Assistant – a Hugging Face Space by kingabzpro
Final Thoughts
Building this multi-agent research assistant showed how easy it is to create a practical agentic workflow using specialist agents and multiple tools. Instead of relying on one large, expensive research run every time, the system uses a manager agent to choose the right path based on the quality of the evidence.
The workflow is designed to balance speed, cost, and accuracy. It starts with the Olostep Answer API for a fast first response. If the judge agent gives that answer a strong score, the analyst agent immediately turns it into a final report. This keeps simple research tasks fast and cost-effective.
If the judge decides the first answer is not strong enough, the manager agent moves to Search with Scrape. This gives the system richer evidence without jumping straight into a deeper and more expensive research process. The judge then checks the evidence again. If it is good enough, the analyst writes the report.
Only when the evidence is still weak does the manager agent run targeted searches and scrape selected pages. This means the system can still produce a more accurate report when the question is complex, current, or missing important context.
The best part is that every query does not cost the same or take the same amount of time. Simple questions can finish quickly, while harder questions get more research depth when needed. This makes the assistant more efficient, more reliable, and better suited for real-world research workflows.


I am reading your blog, I not yet finished but jub forward to thanking and would like to connect as I am interested n developing for my research initiative if u interested?
of course know and following Jason for a while now and the value of his forward looking too over years
regards
Would like to learn