In this article, you will learn how zero-shot text classification works and how to apply it using a pretrained transformer model.
Topics we will cover include:
The core idea behind zero-shot classification and how it reframes labeling as a reasoning task.
How to use a pretrained model to classify text without task-specific training data.
Practical techniques such as multi-label classification and hypothesis template tuning.
Let’s get started.
Getting Started with Zero-Shot Text Classification
Image by Editor
Introduction
Zero-shot text classification is a way to label text without first training a classifier on your own task-specific dataset. Instead of collecting examples for every category you want, you provide the model with a piece of text and a list of possible labels. The model then decides which label fits best based on its general language understanding.
This makes zero-shot classification especially useful when you want to test an idea quickly, work with changing label sets, or build a lightweight prototype before investing in supervised training. Rather than learning a fixed mapping from text to label IDs, the model uses language itself to reason about what each label means.
In this guide, we will understand the main idea behind zero-shot classification and run practical examples using facebook/bart-large-mnli.
How Zero-Shot Works
The core idea behind zero-shot classification is that the model does not treat labels as simple category names. Instead, it turns each label into a short natural-language statement and checks whether that statement is supported by the input text. This makes it especially useful in practical situations where you want to classify text quickly without collecting and labeling training data first, such as routing support tickets, tagging articles, detecting user intent, or organizing internal documents.
For example, suppose the input text is:
1
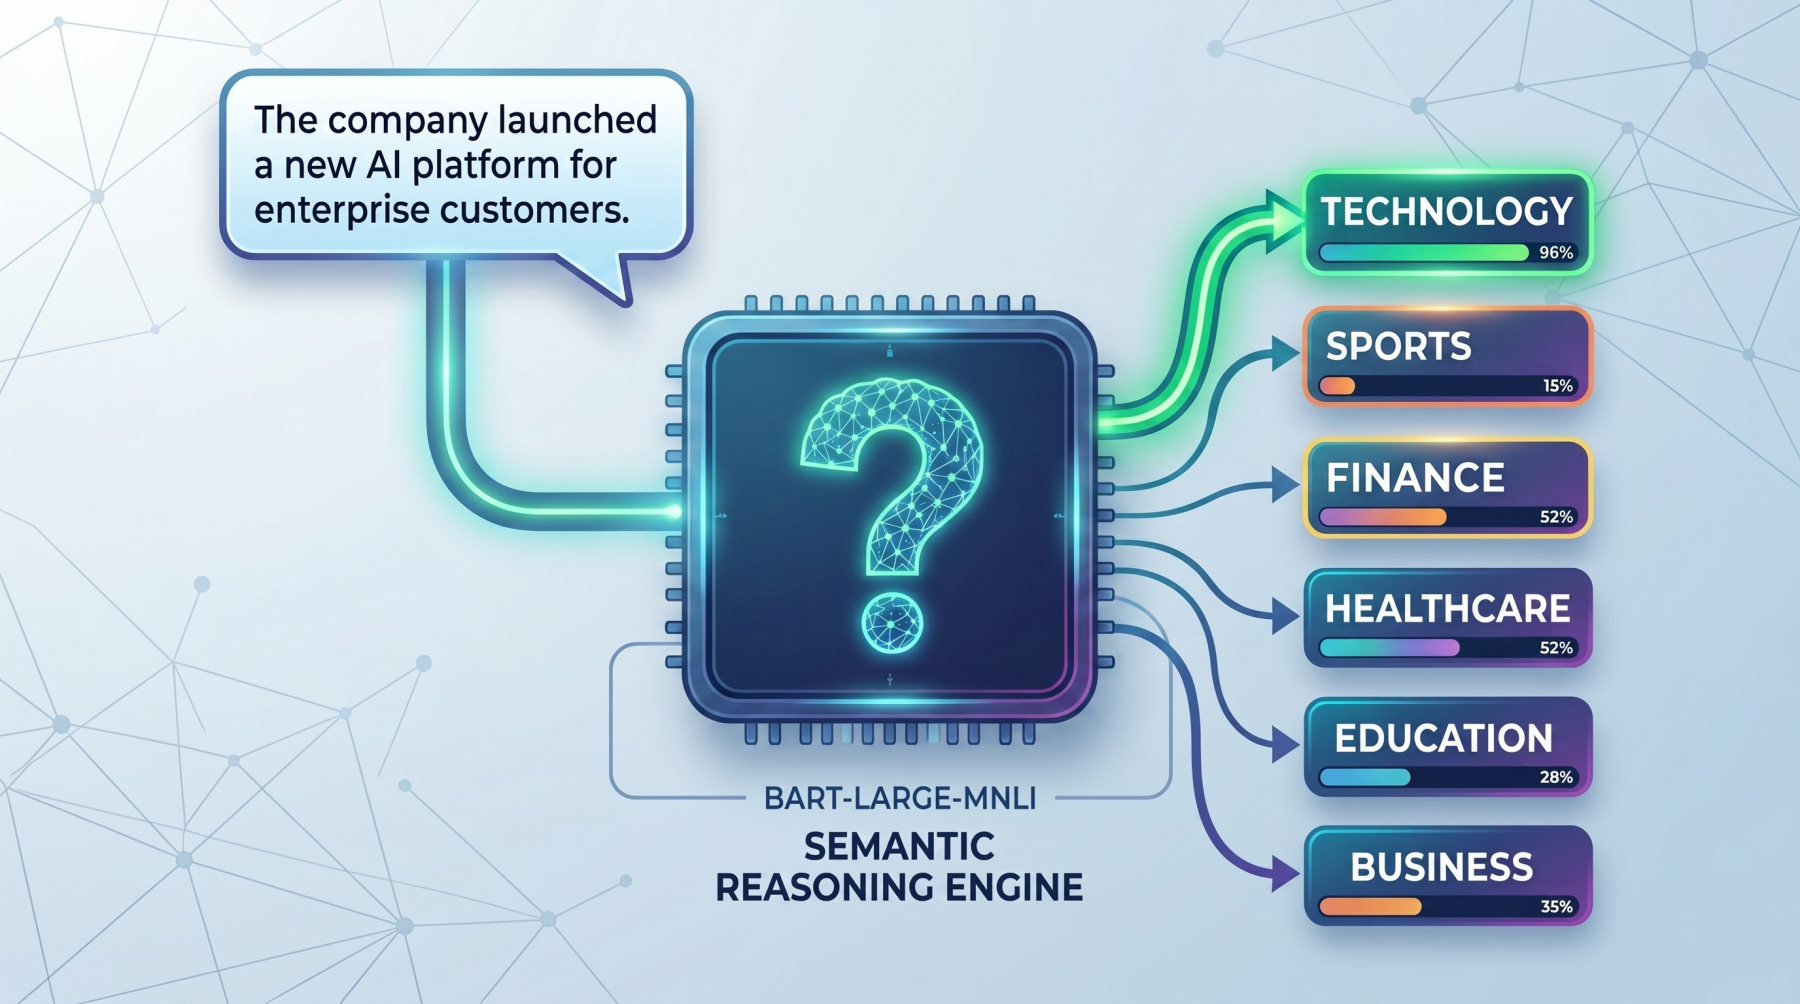
text="The company launched a new AI platform for enterprise customers."
And the candidate labels are:
1
labels=["technology","sports","finance"]
The model conceptually turns these into statements like:
This text is about technology.
This text is about sports.
This text is about finance.
It then compares the original text against each of these statements and scores how well they match. The label with the strongest score is ranked highest. The same idea can be applied to many real tasks.
Instead of broad topic labels, a company might use labels such as billing issue, technical support, or refund request for customer service messages, or spam, harassment, and safe for moderation systems.
So the important shift is this: zero-shot classification is not really treated as a traditional classification problem. It is treated more like a reasoning problem about whether a label description fits the text. That is also why it works well for fast prototyping, low-resource tasks, and domains where labeled data does not yet exist.
This is why wording matters. A label like billing issue often works better than a vague label like money, because the model has more semantic meaning to work with. In real use cases, clearer labels usually lead to better performance, whether you are classifying news topics, customer intents, moderation categories, or business workflows.
Seeing the Zero-Shot Model in Action
In this section, we will learn how to load a zero-shot classifier, run a basic example, test multi-label predictions, and improve results with a custom hypothesis template.
1. Load the Zero-Shot Classification Pipeline
First, install the required libraries:
1
pip install torch transformers
Now load the pipeline:
1
2
3
4
5
6
from transformers import pipeline
classifier=pipeline(
"zero-shot-classification",
model="facebook/bart-large-mnli"
)
Loading the Transformers pipeline
Here, the pipeline gives you an easy way to use a pretrained zero-shot model without writing lower-level inference code yourself. The model used here, facebook/bart-large-mnli, is commonly used for zero-shot classification because it is trained to determine whether one piece of text supports another.
2. Run a Simple Zero-Shot Example
Let’s start with a basic example:
1
2
3
4
text="This tutorial explains how transformer models are used in NLP."
This shows the model selecting the label that best matches the meaning of the text. Since the sentence discusses transformer models and natural language processing, technology is the strongest semantic fit among the candidate labels.
3. Classifying Text into Multiple Labels
Sometimes a text belongs to more than one category. In that case, you can enable multi_label=True:
1
2
3
4
5
6
7
8
9
10
11
12
13
14
15
16
17
18
19
text="The company launched a health app and announced strong business growth."
Top labels:healthcare(99.41%),technology(99.06%),business(98.15%)
This is useful when multiple labels can apply to the same input. In this example, the sentence is not only about technology but also about healthcare and business, so the model assigns strong scores to all three labels.
4. Customizing the Hypothesis Template
You can also change the hypothesis template. The pipeline uses a default phrasing internally, but a clearer or more natural template can sometimes improve results:
1
2
3
4
5
6
7
8
9
10
11
12
text="The user cannot access their account and keeps seeing a login error."
This is especially helpful when your labels are more specific to a real task. A good hypothesis template gives the model a clearer statement to evaluate, which can improve how well it matches the text to the intended label.
Final Thoughts
Zero-shot text classification is powerful because it removes the need for task-specific classifier training in many early-stage workflows. Instead of collecting labeled data right away, you can often get useful results simply by choosing clear candidate labels and letting the model reason about them.
The key idea is straightforward: the model is not directly predicting labels in the usual classifier sense. It is checking whether each label, written as a short hypothesis, is supported by the text. That is why MNLI-trained models like facebook/bart-large-mnli work so well for this task.
In practice, the quality of your results depends heavily on how clearly you define your labels. Strong label wording and a sensible hypothesis template often make a noticeable difference. While zero-shot classification is a great starting point, it works best when you think carefully about the semantics of the categories you want the model to choose between.


No comments yet.