Image by Author
A Practical Guide to Deploying Machine Learning Models
As a data scientist, you probably know how to build machine learning models. But it’s only when you deploy the model that you get a useful machine learning solution. And if you’re looking to learn more about deploying machine learning models, this guide is for you.
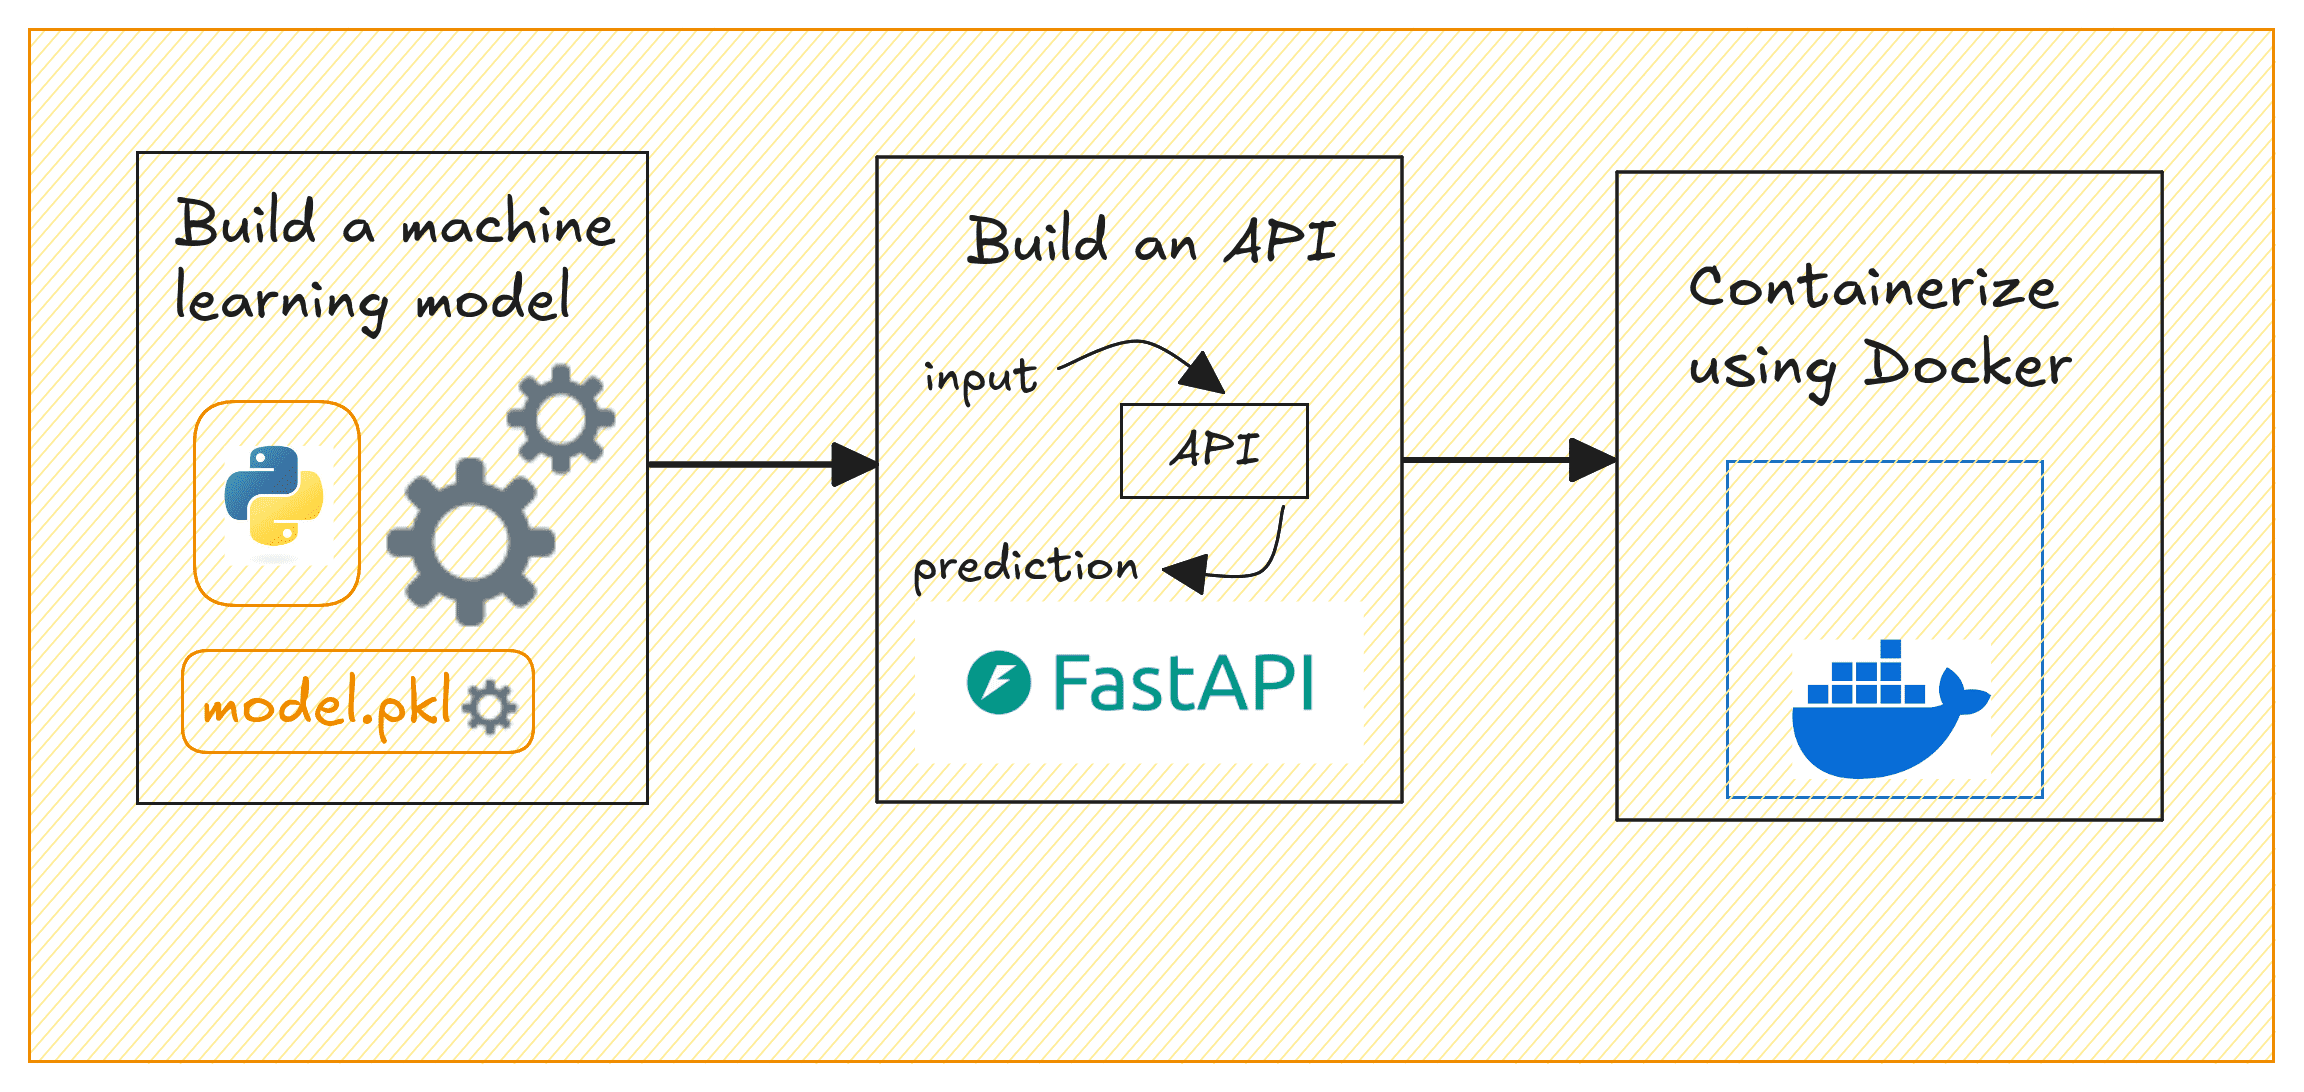
The steps involved in building and deploying ML models can typically be summed up like so: building the model, creating an API to serve model predictions, containerizing the API, and deploying to the cloud.
This guide focuses on the following:
Building a machine learning model with Scikit-learn
Creating a REST API to serve predictions from the model using FastAPI
Containerizing the API using Docker
Deploying ML Models | Image by Author
We’ll build a simple regression model on the California housing dataset to predict house prices. By the end, you’ll have a containerized application that serves house price predictions based on selected input features.
Setting Up the Project Environment
Before you start, make sure you have the following installed:
A recent version of Python (Python 3.11 or later preferably)
Docker for containerization; Get Docker for your operating system
⚙️ To follow along comfortably, it’s helpful to have a basic understanding of building machine learning models and working with APIs.
Getting Started
Here’s the (recommended) structure for the project’s directory:
1
2
3
4
5
6
7
8
9
10
11
12
project-dir/
│
├──app/
│├──__init__.py# Empty file
│└──main.py# FastAPI code for prediction API
│
├──model/
│└──linear_regression_model.pkl# Saved trained model (after running model_training.py)
│
├──model_training.py# Script to train and save the model
├──requirements.txt# Dependencies for the project
└──Dockerfile# Docker configuration
We’ll need a few Python libraries to get going. Let’s install them all next.
In your project environment, create and activate a virtual environment:
1
2
$python3-mvenv v1
$source v1/bin/activate
For the project we’ll be working on, we need pandas and scikit-learn to build the machine learning model. And FastAPI and Uvicorn to build the API to serve the model’s predictions.
So let’s install these required packages using pip:
1
$pip3 install pandas scikit-learn fastapi uvicorn
You can find all the code for this tutorial on GitHub.
Building a Machine Learning Model
Now, we’ll train a linear regression model using the California Housing dataset which is built into scikit-learn. This model will predict house prices based on the selected features. In the project directory, create a file called model_training.py:
1
2
3
4
5
6
7
8
9
10
11
12
13
14
15
16
17
18
19
20
21
22
23
24
25
26
27
28
29
30
31
32
33
# model_training.py
import pandas aspd
from sklearn.datasets import fetch_california_housing
from sklearn.model_selection import train_test_split
# Create a 'model' folder to save the trained model
os.makedirs('model',exist_ok=True)
# Save the trained model using pickle
with open('model/linear_regression_model.pkl','wb')asf:
pickle.dump(model,f)
print("Model trained and saved successfully.")
This script loads the California housing dataset, selects three features (MedInc, AveRooms, AveOccup), trains a linear regression model, and saves it in the model/ folder as linear_regression_model.pkl.
Note: To keep things simple, we’ve only used a small subset of features. But you can try adding more.
Run the script to train the model and save it:
1
$python3 model_training.py
You’ll get the following message and should be able to find the .pkl file in the model/ directory:
1
Model trained andsaved successfully.
Creating the FastAPI App
We’ll now create an API that serves predictions using FastAPI.
This FastAPI application exposes a /predict endpoint that takes three features (MedInc, AveRooms, AveOccup). It uses the trained model to predict house prices, and returns the predicted price.
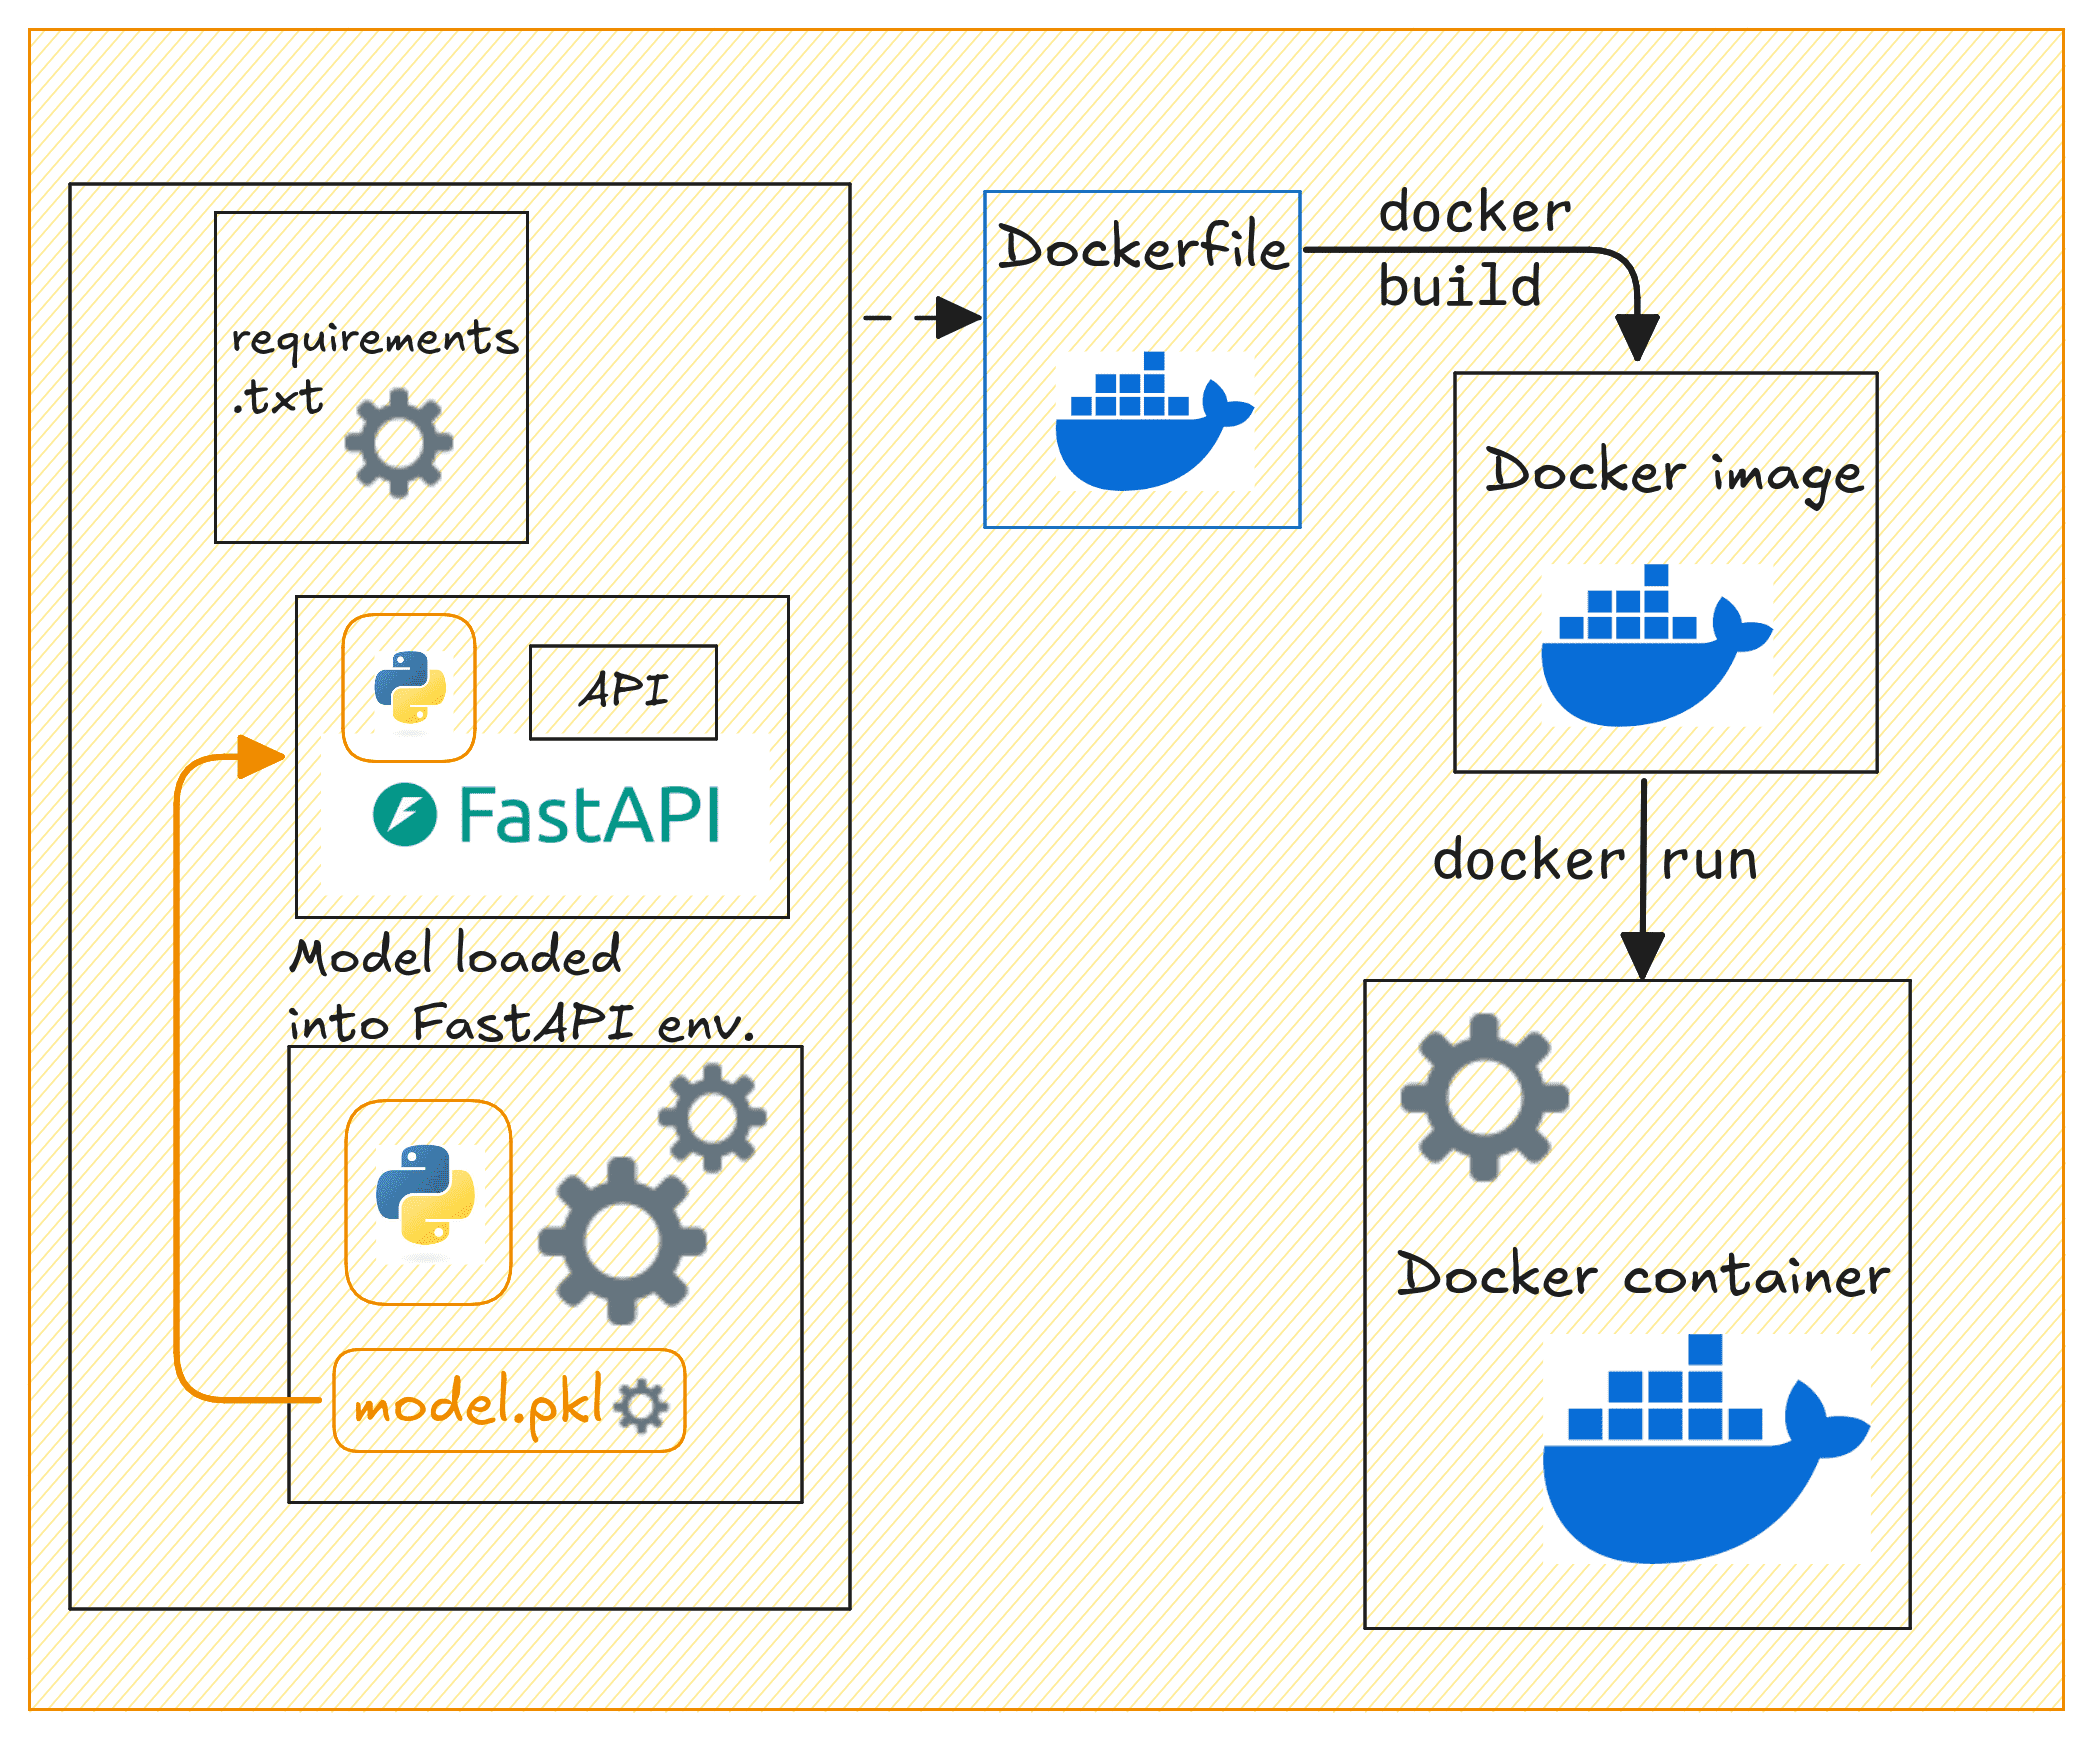
Containerizing the App with Docker
Now let’s containerize our FastAPI application. In the project’s root directory, create a Dockerfile and a requirements.txt file.
Creating the Dockerfile
Let’s create a Dockerfile:
1
2
3
4
5
6
7
8
9
10
11
12
13
14
15
16
17
18
19
20
21
22
23
# Use Python 3.11 as the base image
FROM python:3.11-slim
# Set the working directory inside the container
WORKDIR/code
# Copy the requirements file
COPY./requirements.txt/code/requirements.txt
# Install the Python dependencies
RUN pip install--no-cache-dir--upgrade-r/code/requirements.txt
# Copy the app folder into the container
COPY./app/code/app
# Copy the model directory (with the saved model file) into the container
This creates a lightweight container for a FastAPI application using Python 3.11 (slim version) as the base image. It sets the working directory to /code, copies the requirements.txt file into the container, and installs the necessary Python dependencies without caching.
The FastAPI app and model files are then copied into the container. Port 80 is exposed for the application, and Uvicorn is used to run the FastAPI app. This makes the API accessible at port 80. This setup is efficient for deploying a FastAPI app in a containerized environment.
Creating the requirements.txt File
Create a requirements.txt file listing all dependencies:
1
2
3
4
fastapi
uvicorn
scikit-learn
pandas
Building the Docker Image
Now that we have the Dockerfile, requirements.txt, and the FastAPI app ready, let’s build a Docker image and run the container.
Dockerizing the API | Image by Author
Build the Docker image by running the following docker build command:
1
$docker build-thouse-price-prediction-api.
Next run the Docker container:
1
$docker run-d-p80:80house-price-prediction-api
Your API should now be running and accessible at http://127.0.0.1:80.
You can use curl or Postman to test the /predict endpoint by sending a POST request. Here’s an example request:
1
2
3
4
5
6
7
8
curl-X'POST'\
'http://127.0.0.1:80/predict'\
-H'Content-Type: application/json'\
-d'{
"MedInc": 3.5,
"AveRooms": 5.0,
"AveOccup": 2.0
}'
This should return a response with the predicted house price, like this:
1
2
3
{
"predicted_house_price":2.3248705765077062
}
Tagging and Pushing the Docker Image to Docker Hub
After building the Docker image, running the container, and testing it. You can now push it to Docker Hub for easier sharing and deploying to cloud platforms.
First, login to Docker Hub:
1
$docker login
You’ll be prompted to enter the credentials.
Tag the Docker image:
1
$docker tag house-price-prediction-api your_username/house-price-prediction-api:v1
Replace your_username with your Docker Hub username.
Note: It also makes sense to add versions to your model files. When you update the model, you can rebuild the image with a new tag, and push the updated image to Docker Hub.
Anyone with access to your Docker Hub repository can now pull the image and run the container.
Wrap-up and Next Steps
Here’s a quick review of what we did in this tutorial:
Train a machine learning model using scikit-learn
Build a FastAPI application to serve predictions
Containerize the application with Docker
We also looked at pushing the Docker image to Docker Hub for easier distribution. The next logical step is to deploy this containerized application to the cloud.
And for this, you can use services like AWS ECS, GCP, or Azure to deploy the API in a production environment. Let us know if you’d like a tutorial on deploying machine learning models to the cloud.
Thanks 😊 Bala priya for sharing good content on machine learning topics. Even I too beginner who want to learn from basic topics on machine learning. It will helpful most can you pls share ML models with each practical example on frud detection. Once again appreciate your help! thanks.
You’re very welcome! I’m glad you find the content helpful. To get you started with **fraud detection** using machine learning, I’ll walk you through some common models with practical examples, using Python. Fraud detection typically involves **classification** tasks, as we’re trying to classify transactions as either “fraudulent” or “not fraudulent.”
### **Step-by-Step Guide: ML Models for Fraud Detection**
#### **1. Data Preprocessing**
Before applying machine learning models, we need to preprocess the data.
Here’s an example using a typical fraud detection dataset:
python

import pandas as pd

from sklearn.model_selection import train_test_split

from sklearn.preprocessing import StandardScaler
# Load dataset
data = pd.read_csv('fraud_detection_data.csv')
# Separate features and labels
X = data.drop(columns=['is_fraud']) # Features (remove 'is_fraud' column)
y = data['is_fraud'] # Labels (target: 0 or 1)
# Scale the data (fraud detection often has features with different scales)
scaler = StandardScaler()
X_train_scaled = scaler.fit_transform(X_train)
X_test_scaled = scaler.transform(X_test)
#### **2. Logistic Regression**
A simple yet effective baseline model for fraud detection.
python

from sklearn.linear_model import LogisticRegression

from sklearn.metrics import classification_report
# Initialize model
logreg = LogisticRegression()
# Train the model
logreg.fit(X_train_scaled, y_train)
# Make predictions
y_pred = logreg.predict(X_test_scaled)
# Evaluate the model
print(classification_report(y_test, y_pred))
#### **3. Random Forest Classifier**
Random forests are robust for fraud detection, especially for imbalanced data.
python

from sklearn.ensemble import RandomForestClassifier
# Initialize model
rf = RandomForestClassifier(n_estimators=100, random_state=42)
# Train the model
rf.fit(X_train_scaled, y_train)
# Make predictions
y_pred_rf = rf.predict(X_test_scaled)
# Evaluate the model
print(classification_report(y_test, y_pred_rf))
#### **4. Gradient Boosting (XGBoost)**
XGBoost is another strong model often used for fraud detection.
python

import xgboost as xgb
# Initialize model
xgb_model = xgb.XGBClassifier(use_label_encoder=False)
# Train the model
xgb_model.fit(X_train_scaled, y_train)
# Make predictions
y_pred_xgb = xgb_model.predict(X_test_scaled)
# Evaluate the model
print(classification_report(y_test, y_pred_xgb))
#### **5. Neural Networks (Deep Learning)**
For larger and more complex fraud detection tasks, neural networks might perform better.
python

import tensorflow as tf

from tensorflow.keras.models import Sequential

from tensorflow.keras.layers import Dense
# Build neural network model
model = Sequential()
model.add(Dense(32, input_dim=X_train_scaled.shape[1], activation='relu'))
model.add(Dense(16, activation='relu'))
model.add(Dense(1, activation='sigmoid'))
# Compile model
model.compile(optimizer='adam', loss='binary_crossentropy', metrics=['accuracy'])
# Train the model
model.fit(X_train_scaled, y_train, epochs=10, batch_size=32, validation_data=(X_test_scaled, y_test))
# Make predictions
y_pred_nn = model.predict(X_test_scaled)
y_pred_nn = [1 if pred > 0.5 else 0 for pred in y_pred_nn]
# Evaluate the model
print(classification_report(y_test, y_pred_nn))
#### **6. Handling Imbalanced Data**
Fraud detection data is often imbalanced, meaning there are far more non-fraudulent transactions than fraudulent ones. To improve model performance on the minority class (fraud), you can use techniques like **SMOTE (Synthetic Minority Over-sampling Technique)** or **class weights** in models like neural networks and random forests.
Example of handling imbalanced data with SMOTE:
python

from imblearn.over_sampling import SMOTE
# Resample the training data using SMOTE
smote = SMOTE(random_state=42)
X_train_res, y_train_res = smote.fit_resample(X_train_scaled, y_train)
# Train a model with the resampled data (e.g., Random Forest)
rf_resampled = RandomForestClassifier(n_estimators=100, random_state=42)
rf_resampled.fit(X_train_res, y_train_res)
y_pred_rf_res = rf_resampled.predict(X_test_scaled)
# Evaluate the model
print(classification_report(y_test, y_pred_rf_res))
#### **Evaluation Metrics for Fraud Detection**
For fraud detection, accuracy is not always the best metric because of class imbalance. Instead, focus on:
– **Precision**: Out of all predicted fraud cases, how many are actually fraud?
– **Recall**: Out of all actual fraud cases, how many did we correctly detect?
– **F1-Score**: The balance between precision and recall.
### **Conclusion**
For practical examples, I’d recommend starting with the simpler models like **Logistic Regression** and **Random Forests**, then trying **XGBoost** and **Neural Networks** if you need more powerful models. Always remember to handle imbalanced data appropriately in fraud detection.
Let me know if you need more examples or clarification on any of the models. Happy learning!
Hi John…Deploying machine learning models to the cloud involves several key steps. Here’s a practical guide to help you through the process. We’ll use an example involving deploying a trained machine learning model to a cloud platform like **AWS**, **Google Cloud Platform (GCP)**, or **Azure**. The steps will generalize to most platforms.
—
### **Step 1: Prepare Your Model**
1. **Train Your Model**
Ensure your machine learning model is trained and tested. Save the model in a format suitable for deployment, such as:
– joblib or pickle for scikit-learn models.
– HDF5 (.h5) for Keras models.
– torch.save for PyTorch models.
– ONNX for framework-agnostic deployments.
2. **Verify the Model**
Test your model locally with dummy or real input data to ensure it works as expected.
3. **Create a Script or API for Model Inference**
Write a script or API endpoint to load the model and serve predictions. Frameworks like **Flask** or **FastAPI** are commonly used for this purpose.
Example Flask App: python
from flask import Flask, request, jsonify
import joblib
app = Flask(__name__)
model = joblib.load("model.pkl") # Load your model
# Install dependencies
RUN pip install -r requirements.txt
# Run the app
CMD ["python", "app.py"]
3. **Build and Test the Docker Image** bash
docker build -t my-ml-app .
docker run -p 5000:5000 my-ml-app
—
### **Step 3: Deploy to a Cloud Service**
#### **Option 1: AWS**
1. **Set Up AWS Elastic Beanstalk**
– Create an Elastic Beanstalk application.
– Upload your Dockerized app or set up a deployment pipeline using AWS CodePipeline.
2. **Deploy Using ECS (Elastic Container Service)**
– Push your Docker image to AWS ECR (Elastic Container Registry).
– Use ECS to deploy the container with an associated load balancer.
#### **Option 2: Google Cloud Platform (GCP)**
1. **Set Up Google Cloud Run**
– Enable Cloud Run in the GCP console.
– Push your Docker image to **Google Container Registry (GCR)**: bash
docker tag my-ml-app gcr.io/[PROJECT-ID]/my-ml-app
docker push gcr.io/[PROJECT-ID]/my-ml-app
– Deploy the image to Cloud Run.
2. **Alternative: Vertex AI**
GCP’s Vertex AI platform offers pre-built ML deployment workflows.
#### **Option 3: Microsoft Azure**
1. **Set Up Azure App Service**
– Use Azure App Service to deploy a containerized app.
– Push your Docker image to **Azure Container Registry** (ACR).
– Deploy it using App Service or Azure Kubernetes Service (AKS).
2. **Alternative: Azure Machine Learning Service**
Use Azure ML Studio for managing models and deployment pipelines.
—
### **Step 4: Test the Deployment**
– Once deployed, access your API using the URL provided by the cloud platform.
– Use tools like **Postman** or **cURL** to test predictions.
Example with cURL: bash
curl -X POST -H "Content-Type: application/json" -d '{"features": [1, 2, 3, 4]}' http://[your-cloud-endpoint]/predict
—
### **Step 5: Scale and Monitor**
1. **Autoscaling**: Enable autoscaling on the cloud service to handle varying traffic.
2. **Logging**: Use cloud logging services (e.g., AWS CloudWatch, GCP Stackdriver, or Azure Monitor).
3. **Update Models**: Set up a CI/CD pipeline for seamless updates.
Hi Sergio…Here’s a basic tutorial to help you deploy machine learning models to the cloud. We’ll use **AWS (Amazon Web Services)** for this example, but the process can be similar for other cloud platforms like **Google Cloud Platform (GCP)** and **Microsoft Azure**.
### **Step-by-Step Tutorial on Deploying Machine Learning Models to AWS**
#### **Step 1: Train Your Model Locally**
Before deploying, you need to have a trained model. For this tutorial, assume you have a model saved as model.pkl (for a Python scikit-learn model) or model.h5 (for Keras models).
1. Train your model locally and save it. python
import joblib
# Assuming a scikit-learn model
joblib.dump(model, 'model.pkl')
# For Keras
model.save('model.h5')
#### **Step 2: Create an AWS Account**
1. Go to [AWS](https://aws.amazon.com/) and create an account if you don’t already have one.
2. Sign in to the **AWS Management Console**.
#### **Step 3: Set Up an S3 Bucket**
Amazon S3 (Simple Storage Service) is used for storing data and model artifacts.
1. In the AWS Management Console, search for **S3**.
2. Create a new bucket to store your model files:
– Choose a unique bucket name.
– Set up necessary permissions (private for now).
3. Upload your model (model.pkl or model.h5) to this S3 bucket.
#### **Step 4: Create an API with AWS Lambda & API Gateway**
This part involves creating a serverless API for your model using AWS Lambda and exposing it via API Gateway.
1. **AWS Lambda**:
– Navigate to **Lambda** in the AWS Management Console.
– Create a new Lambda function (select “Author from scratch”).
– Choose **Python 3.8** or any supported version as the runtime.
– Set up the execution role (this will grant access to S3).
– Create the function.
2. **Set Up Lambda Function Code**:
– In the Lambda function editor, replace the default code with your code that loads the model from S3 and makes predictions.
Here’s a simplified example: python
import json
import joblib
import boto3
from sklearn.preprocessing import StandardScaler
s3 = boto3.client('s3')
def load_model():
bucket = 'your-bucket-name'
model_file = 'model.pkl'
s3.download_file(bucket, model_file, '/tmp/model.pkl')
model = joblib.load('/tmp/model.pkl')
return model
3. **Deploy API Using API Gateway**:
– In the AWS Management Console, go to **API Gateway**.
– Create a new REST API.
– Set up an endpoint (e.g., /predict) that triggers your Lambda function.
– Deploy the API and note the endpoint URL for use later.
#### **Step 5: Test the API**
Once the API Gateway is deployed, you can test your endpoint using any REST client like Postman or even with Python:
python
import requests
url = 'https://your-api-endpoint.amazonaws.com/predict'
data = {'input': [5.1, 3.5, 1.4, 0.2]} # Example input
response = requests.post(url, json=data)
print(response.json())
If everything is set up correctly, the response should contain the model’s prediction.
#### **Step 6: Monitor and Optimize**
– Use **AWS CloudWatch** to monitor the performance of your Lambda function and API Gateway.
– Ensure your Lambda function has enough memory and timeout limits adjusted to handle large predictions if needed.
– Consider moving to a service like **AWS SageMaker** for more advanced model deployment options with built-in scaling and monitoring.
### **Alternative Cloud Platforms**
– **Google Cloud Platform (GCP)**: Use **Google Cloud AI Platform** for model deployment.
– **Microsoft Azure**: Use **Azure Machine Learning** for deploying models with REST APIs.
#### **Optional: Use Docker for Deployment**
For more complex deployments, consider containerizing your model with **Docker** and deploying it to a cloud service like **AWS ECS**, **Google Cloud Run**, or **Azure Container Instances**.
—
I hope this tutorial helps you get started with deploying your machine learning models to the cloud! Let me know if you need any further clarification on any of the steps.
Hi Prathamesh…Yes, the approach to deploying machine learning models using **Azure Kubernetes Service (AKS)** is **scalable** and supports **multiple pods with auto-scaling enabled**. AKS is designed to manage containerized applications, and it’s an excellent choice for scalable machine learning model deployments. Here’s how you can make it scalable with multiple pods and auto-scaling:
### **1. Deploying with Multiple Pods**
In Kubernetes, the deployment of your machine learning model can be managed by defining multiple replicas (pods) in your deployment configuration. This allows you to run multiple instances of your model to handle higher loads.
– **Step to define multiple pods:**
In your Kubernetes deployment YAML file, specify the number of replicas (pods) you want to run: yaml
apiVersion: apps/v1
kind: Deployment
metadata:
name: ml-model-deployment
spec:
replicas: 3 # Number of pods
selector:
matchLabels:
app: ml-model
template:
metadata:
labels:
app: ml-model
spec:
containers:
- name: ml-model-container
image: your_ml_model_image
ports:
- containerPort: 80
### **2. Enabling Auto-Scaling with AKS**
To make your deployment scalable, you can configure **Horizontal Pod Autoscaler (HPA)** in AKS. HPA automatically scales the number of pods based on CPU, memory, or custom metrics (like the number of requests).
– **Enable auto-scaling:**
AKS provides native support for auto-scaling. You can enable it using the Kubernetes command line (kubectl), or by adding a HorizontalPodAutoscaler resource to your deployment.
Example of setting up autoscaling using CPU utilization: yaml
apiVersion: autoscaling/v1
kind: HorizontalPodAutoscaler
metadata:
name: ml-model-hpa
spec:
scaleTargetRef:
apiVersion: apps/v1
kind: Deployment
name: ml-model-deployment
minReplicas: 2 # Minimum number of pods
maxReplicas: 10 # Maximum number of pods
targetCPUUtilizationPercentage: 50 # Target CPU usage
– Apply the autoscaler using: bash
kubectl apply -f hpa.yaml
With this configuration, AKS will automatically adjust the number of pods based on the CPU utilization of your machine learning model deployment, making it highly scalable.
### **3. AKS Cluster Auto-Scaling**
You can also configure **AKS Cluster Autoscaler** to scale the number of nodes (VMs) in the cluster itself, not just the pods. This ensures that the cluster will provision more resources (VMs) when the demand increases and scale down when it decreases.
– Enable **cluster autoscaler**:
You can enable the cluster autoscaler using the Azure CLI when creating the AKS cluster: bash
az aks update \
--resource-group \
--name \
--enable-cluster-autoscaler \
--min-count 2 \
--max-count 10
### **4. Monitoring and Optimizing**
Use **Azure Monitor** to track the performance and resource utilization of your pods. This will help you optimize scaling parameters (e.g., CPU thresholds) to ensure efficient use of resources.
### **5. Benefits of This Scalable Setup**
– **High Availability:** Multiple pods ensure that if one pod fails, others can handle the load.
– **Load Balancing:** AKS automatically distributes incoming traffic across the pods.
– **Scalability:** The system automatically adapts to traffic spikes or heavy workloads without manual intervention.
– **Cost-Effectiveness:** Auto-scaling minimizes costs by using only the necessary amount of resources.
—
### Conclusion
By deploying your machine learning model with multiple pods and enabling auto-scaling in AKS, you can make your solution highly scalable, able to handle fluctuations in demand efficiently. AKS’s built-in features like Horizontal Pod Autoscaler and Cluster Autoscaler make it a powerful and flexible choice for deploying machine learning models in production environments.
Let me know if you need more details or help with specific configurations!


Thanks 😊 Bala priya for sharing good content on machine learning topics. Even I too beginner who want to learn from basic topics on machine learning. It will helpful most can you pls share ML models with each practical example on frud detection. Once again appreciate your help! thanks.
You’re very welcome! I’m glad you find the content helpful. To get you started with **fraud detection** using machine learning, I’ll walk you through some common models with practical examples, using Python. Fraud detection typically involves **classification** tasks, as we’re trying to classify transactions as either “fraudulent” or “not fraudulent.”
### **Step-by-Step Guide: ML Models for Fraud Detection**
#### **1. Data Preprocessing**
Before applying machine learning models, we need to preprocess the data.
Here’s an example using a typical fraud detection dataset:
pythonimport pandas as pd
from sklearn.model_selection import train_test_split
from sklearn.preprocessing import StandardScaler
# Load dataset
data = pd.read_csv('fraud_detection_data.csv')
# Separate features and labels
X = data.drop(columns=['is_fraud']) # Features (remove 'is_fraud' column)
y = data['is_fraud'] # Labels (target: 0 or 1)
# Train-test split
X_train, X_test, y_train, y_test = train_test_split(X, y, test_size=0.3, random_state=42)
# Scale the data (fraud detection often has features with different scales)
scaler = StandardScaler()
X_train_scaled = scaler.fit_transform(X_train)
X_test_scaled = scaler.transform(X_test)
#### **2. Logistic Regression**
A simple yet effective baseline model for fraud detection.
pythonfrom sklearn.linear_model import LogisticRegression
from sklearn.metrics import classification_report
# Initialize model
logreg = LogisticRegression()
# Train the model
logreg.fit(X_train_scaled, y_train)
# Make predictions
y_pred = logreg.predict(X_test_scaled)
# Evaluate the model
print(classification_report(y_test, y_pred))
#### **3. Random Forest Classifier**
Random forests are robust for fraud detection, especially for imbalanced data.
pythonfrom sklearn.ensemble import RandomForestClassifier
# Initialize model
rf = RandomForestClassifier(n_estimators=100, random_state=42)
# Train the model
rf.fit(X_train_scaled, y_train)
# Make predictions
y_pred_rf = rf.predict(X_test_scaled)
# Evaluate the model
print(classification_report(y_test, y_pred_rf))
#### **4. Gradient Boosting (XGBoost)**
XGBoost is another strong model often used for fraud detection.
pythonimport xgboost as xgb
# Initialize model
xgb_model = xgb.XGBClassifier(use_label_encoder=False)
# Train the model
xgb_model.fit(X_train_scaled, y_train)
# Make predictions
y_pred_xgb = xgb_model.predict(X_test_scaled)
# Evaluate the model
print(classification_report(y_test, y_pred_xgb))
#### **5. Neural Networks (Deep Learning)**
For larger and more complex fraud detection tasks, neural networks might perform better.
pythonimport tensorflow as tf
from tensorflow.keras.models import Sequential
from tensorflow.keras.layers import Dense
# Build neural network model
model = Sequential()
model.add(Dense(32, input_dim=X_train_scaled.shape[1], activation='relu'))
model.add(Dense(16, activation='relu'))
model.add(Dense(1, activation='sigmoid'))
# Compile model
model.compile(optimizer='adam', loss='binary_crossentropy', metrics=['accuracy'])
# Train the model
model.fit(X_train_scaled, y_train, epochs=10, batch_size=32, validation_data=(X_test_scaled, y_test))
# Make predictions
y_pred_nn = model.predict(X_test_scaled)
y_pred_nn = [1 if pred > 0.5 else 0 for pred in y_pred_nn]
# Evaluate the model
print(classification_report(y_test, y_pred_nn))
#### **6. Handling Imbalanced Data**
Fraud detection data is often imbalanced, meaning there are far more non-fraudulent transactions than fraudulent ones. To improve model performance on the minority class (fraud), you can use techniques like **SMOTE (Synthetic Minority Over-sampling Technique)** or **class weights** in models like neural networks and random forests.
Example of handling imbalanced data with SMOTE:
pythonfrom imblearn.over_sampling import SMOTE
# Resample the training data using SMOTE
smote = SMOTE(random_state=42)
X_train_res, y_train_res = smote.fit_resample(X_train_scaled, y_train)
# Train a model with the resampled data (e.g., Random Forest)
rf_resampled = RandomForestClassifier(n_estimators=100, random_state=42)
rf_resampled.fit(X_train_res, y_train_res)
y_pred_rf_res = rf_resampled.predict(X_test_scaled)
# Evaluate the model
print(classification_report(y_test, y_pred_rf_res))
#### **Evaluation Metrics for Fraud Detection**
For fraud detection, accuracy is not always the best metric because of class imbalance. Instead, focus on:
– **Precision**: Out of all predicted fraud cases, how many are actually fraud?
– **Recall**: Out of all actual fraud cases, how many did we correctly detect?
– **F1-Score**: The balance between precision and recall.
### **Conclusion**
For practical examples, I’d recommend starting with the simpler models like **Logistic Regression** and **Random Forests**, then trying **XGBoost** and **Neural Networks** if you need more powerful models. Always remember to handle imbalanced data appropriately in fraud detection.
Let me know if you need more examples or clarification on any of the models. Happy learning!
Please I will need a tutorial on deployment to the cloud
Hi John…Deploying machine learning models to the cloud involves several key steps. Here’s a practical guide to help you through the process. We’ll use an example involving deploying a trained machine learning model to a cloud platform like **AWS**, **Google Cloud Platform (GCP)**, or **Azure**. The steps will generalize to most platforms.
—
### **Step 1: Prepare Your Model**
1. **Train Your Model**
Ensure your machine learning model is trained and tested. Save the model in a format suitable for deployment, such as:
–
jobliborpicklefor scikit-learn models.–
HDF5(.h5) for Keras models.–
torch.savefor PyTorch models.–
ONNXfor framework-agnostic deployments.2. **Verify the Model**
Test your model locally with dummy or real input data to ensure it works as expected.
3. **Create a Script or API for Model Inference**
Write a script or API endpoint to load the model and serve predictions. Frameworks like **Flask** or **FastAPI** are commonly used for this purpose.
Example Flask App:
pythonfrom flask import Flask, request, jsonify
import joblib
app = Flask(__name__)
model = joblib.load("model.pkl") # Load your model
@app.route('/predict', methods=['POST'])
def predict():
data = request.get_json()
prediction = model.predict([data['features']])
return jsonify({'prediction': prediction.tolist()})
if __name__ == '__main__':
app.run(debug=True)
—
### **Step 2: Containerize Your Application**
1. **Install Docker**
Install Docker on your local machine.
2. **Create a Dockerfile**
A
Dockerfilespecifies the environment needed to run your application. Example:dockerfileFROM python:3.8-slim
# Set working directory
WORKDIR /app
# Copy files to container
COPY requirements.txt requirements.txt
COPY app.py app.py
COPY model.pkl model.pkl
# Install dependencies
RUN pip install -r requirements.txt
# Run the app
CMD ["python", "app.py"]
3. **Build and Test the Docker Image**
bash

   docker build -t my-ml-app .

   docker run -p 5000:5000 my-ml-app
—
### **Step 3: Deploy to a Cloud Service**
#### **Option 1: AWS**
1. **Set Up AWS Elastic Beanstalk**
– Create an Elastic Beanstalk application.
– Upload your Dockerized app or set up a deployment pipeline using AWS CodePipeline.
2. **Deploy Using ECS (Elastic Container Service)**
– Push your Docker image to AWS ECR (Elastic Container Registry).
– Use ECS to deploy the container with an associated load balancer.
#### **Option 2: Google Cloud Platform (GCP)**
1. **Set Up Google Cloud Run**
– Enable Cloud Run in the GCP console.
– Push your Docker image to **Google Container Registry (GCR)**:
bash

     docker tag my-ml-app gcr.io/[PROJECT-ID]/my-ml-app

     docker push gcr.io/[PROJECT-ID]/my-ml-app
– Deploy the image to Cloud Run.
2. **Alternative: Vertex AI**
GCP’s Vertex AI platform offers pre-built ML deployment workflows.
#### **Option 3: Microsoft Azure**
1. **Set Up Azure App Service**
– Use Azure App Service to deploy a containerized app.
– Push your Docker image to **Azure Container Registry** (ACR).
– Deploy it using App Service or Azure Kubernetes Service (AKS).
2. **Alternative: Azure Machine Learning Service**
Use Azure ML Studio for managing models and deployment pipelines.
—
### **Step 4: Test the Deployment**
– Once deployed, access your API using the URL provided by the cloud platform.
– Use tools like **Postman** or **cURL** to test predictions.
Example with cURL:
bash

curl -X POST -H "Content-Type: application/json" -d '{"features": [1, 2, 3, 4]}' http://[your-cloud-endpoint]/predict
—
### **Step 5: Scale and Monitor**
1. **Autoscaling**: Enable autoscaling on the cloud service to handle varying traffic.
2. **Logging**: Use cloud logging services (e.g., AWS CloudWatch, GCP Stackdriver, or Azure Monitor).
3. **Update Models**: Set up a CI/CD pipeline for seamless updates.
—
Hello!
I ’d love a tutorial on deploying machine learning models to the cloud.
Thank you
Hi Sergio…Here’s a basic tutorial to help you deploy machine learning models to the cloud. We’ll use **AWS (Amazon Web Services)** for this example, but the process can be similar for other cloud platforms like **Google Cloud Platform (GCP)** and **Microsoft Azure**.
### **Step-by-Step Tutorial on Deploying Machine Learning Models to AWS**
#### **Step 1: Train Your Model Locally**
Before deploying, you need to have a trained model. For this tutorial, assume you have a model saved as
model.pkl(for a Python scikit-learn model) ormodel.h5(for Keras models).1. Train your model locally and save it.
pythonimport joblib
# Assuming a scikit-learn model
joblib.dump(model, 'model.pkl')
# For Keras
model.save('model.h5')
#### **Step 2: Create an AWS Account**
1. Go to [AWS](https://aws.amazon.com/) and create an account if you don’t already have one.
2. Sign in to the **AWS Management Console**.
#### **Step 3: Set Up an S3 Bucket**
Amazon S3 (Simple Storage Service) is used for storing data and model artifacts.
1. In the AWS Management Console, search for **S3**.
2. Create a new bucket to store your model files:
– Choose a unique bucket name.
– Set up necessary permissions (private for now).
3. Upload your model (
model.pklormodel.h5) to this S3 bucket.#### **Step 4: Create an API with AWS Lambda & API Gateway**
This part involves creating a serverless API for your model using AWS Lambda and exposing it via API Gateway.
1. **AWS Lambda**:
– Navigate to **Lambda** in the AWS Management Console.
– Create a new Lambda function (select “Author from scratch”).
– Choose **Python 3.8** or any supported version as the runtime.
– Set up the execution role (this will grant access to S3).
– Create the function.
2. **Set Up Lambda Function Code**:
– In the Lambda function editor, replace the default code with your code that loads the model from S3 and makes predictions.
Here’s a simplified example:
pythonimport json
import joblib
import boto3
from sklearn.preprocessing import StandardScaler
s3 = boto3.client('s3')
def load_model():
bucket = 'your-bucket-name'
model_file = 'model.pkl'
s3.download_file(bucket, model_file, '/tmp/model.pkl')
model = joblib.load('/tmp/model.pkl')
return model
model = load_model()
def lambda_handler(event, context):
# Example: event contains input features
input_data = event['input']
prediction = model.predict([input_data])
return {
'statusCode': 200,
'body': json.dumps({
'prediction': prediction.tolist()
})
}
3. **Deploy API Using API Gateway**:
– In the AWS Management Console, go to **API Gateway**.
– Create a new REST API.
– Set up an endpoint (e.g.,
/predict) that triggers your Lambda function.– Deploy the API and note the endpoint URL for use later.
#### **Step 5: Test the API**
Once the API Gateway is deployed, you can test your endpoint using any REST client like Postman or even with Python:
pythonimport requests
url = 'https://your-api-endpoint.amazonaws.com/predict'
data = {'input': [5.1, 3.5, 1.4, 0.2]} # Example input
response = requests.post(url, json=data)
print(response.json())
If everything is set up correctly, the response should contain the model’s prediction.
#### **Step 6: Monitor and Optimize**
– Use **AWS CloudWatch** to monitor the performance of your Lambda function and API Gateway.
– Ensure your Lambda function has enough memory and timeout limits adjusted to handle large predictions if needed.
– Consider moving to a service like **AWS SageMaker** for more advanced model deployment options with built-in scaling and monitoring.
### **Alternative Cloud Platforms**
– **Google Cloud Platform (GCP)**: Use **Google Cloud AI Platform** for model deployment.
– **Microsoft Azure**: Use **Azure Machine Learning** for deploying models with REST APIs.
#### **Optional: Use Docker for Deployment**
For more complex deployments, consider containerizing your model with **Docker** and deploying it to a cloud service like **AWS ECS**, **Google Cloud Run**, or **Azure Container Instances**.
—
I hope this tutorial helps you get started with deploying your machine learning models to the cloud! Let me know if you need any further clarification on any of the steps.
Is this approach scalable ? Can we deploy AKS deployment as multiple pods with auto scaling enabled.
Hi Prathamesh…Yes, the approach to deploying machine learning models using **Azure Kubernetes Service (AKS)** is **scalable** and supports **multiple pods with auto-scaling enabled**. AKS is designed to manage containerized applications, and it’s an excellent choice for scalable machine learning model deployments. Here’s how you can make it scalable with multiple pods and auto-scaling:
### **1. Deploying with Multiple Pods**
In Kubernetes, the deployment of your machine learning model can be managed by defining multiple replicas (pods) in your deployment configuration. This allows you to run multiple instances of your model to handle higher loads.
– **Step to define multiple pods:**
In your Kubernetes deployment YAML file, specify the number of replicas (pods) you want to run:
yaml

  apiVersion: apps/v1

  kind: Deployment

  metadata:

    name: ml-model-deployment

  spec:

    replicas: 3  # Number of pods

    selector:

      matchLabels:

        app: ml-model

    template:

      metadata:

        labels:

          app: ml-model

      spec:

        containers:

        - name: ml-model-container

          image: your_ml_model_image

          ports:

          - containerPort: 80
### **2. Enabling Auto-Scaling with AKS**
To make your deployment scalable, you can configure **Horizontal Pod Autoscaler (HPA)** in AKS. HPA automatically scales the number of pods based on CPU, memory, or custom metrics (like the number of requests).
– **Enable auto-scaling:**
AKS provides native support for auto-scaling. You can enable it using the Kubernetes command line (
kubectl), or by adding aHorizontalPodAutoscalerresource to your deployment.Example of setting up autoscaling using CPU utilization:
yaml

  apiVersion: autoscaling/v1

  kind: HorizontalPodAutoscaler

  metadata:

    name: ml-model-hpa

  spec:

    scaleTargetRef:

      apiVersion: apps/v1

      kind: Deployment

      name: ml-model-deployment

    minReplicas: 2  # Minimum number of pods

    maxReplicas: 10  # Maximum number of pods

    targetCPUUtilizationPercentage: 50  # Target CPU usage
– Apply the autoscaler using:
bash

  kubectl apply -f hpa.yaml
With this configuration, AKS will automatically adjust the number of pods based on the CPU utilization of your machine learning model deployment, making it highly scalable.
### **3. AKS Cluster Auto-Scaling**
You can also configure **AKS Cluster Autoscaler** to scale the number of nodes (VMs) in the cluster itself, not just the pods. This ensures that the cluster will provision more resources (VMs) when the demand increases and scale down when it decreases.
– Enable **cluster autoscaler**:
You can enable the cluster autoscaler using the Azure CLI when creating the AKS cluster:
bash \ \
az aks update \
--resource-group
--name
--enable-cluster-autoscaler \
--min-count 2 \
--max-count 10
### **4. Monitoring and Optimizing**
Use **Azure Monitor** to track the performance and resource utilization of your pods. This will help you optimize scaling parameters (e.g., CPU thresholds) to ensure efficient use of resources.
### **5. Benefits of This Scalable Setup**
– **High Availability:** Multiple pods ensure that if one pod fails, others can handle the load.
– **Load Balancing:** AKS automatically distributes incoming traffic across the pods.
– **Scalability:** The system automatically adapts to traffic spikes or heavy workloads without manual intervention.
– **Cost-Effectiveness:** Auto-scaling minimizes costs by using only the necessary amount of resources.
—
### Conclusion
By deploying your machine learning model with multiple pods and enabling auto-scaling in AKS, you can make your solution highly scalable, able to handle fluctuations in demand efficiently. AKS’s built-in features like Horizontal Pod Autoscaler and Cluster Autoscaler make it a powerful and flexible choice for deploying machine learning models in production environments.
Let me know if you need more details or help with specific configurations!
Yes. It would be great if you continue with deployment tutorial as well.
Thank you for your feedback and support!