
Inpainting and outpainting are popular image editing techniques. You have seen how to perform inpainting and outpainting using the WebUI. You can do the same using code as well.
In this post, you will see how you can use the diffusers library from Hugging Face to run Stable Diffusion pipeline to perform inpainting and outpainting.
After finishing this tutorial, you will learn
- How to perform inpainting using the corresponding pipeline from diffusers
- How to understand a outpainting problem as a special form of inpainting
Let’s get started.
Inpainting and Outpainting with Diffusers
Photo by Anna Kolosyuk. Some rights reserved.
Overview
This tutorial is in two parts; they are
- Inpainting with the Diffusers Library
- Outpainting with the Diffusers Library
Inpainting with the Diffusers Library
We covered the idea of inpainting the a previous post and showed how inpainting can be done using the WebUI. In this section, you will see how you can do the same using Python code.
You are going to use Google Colab in this post, for the convenience that you do not need to own a GPU. If you decided to run the code locally, some small modification may be needed. For example, you can call cv2.imshow() function directly instead of using Google’s patched cv2_imshow() function.
Inpainting requires you to mask regions of the image that have to be reconstructed and a capable model to fill the region with missing pixels. Instead of drawing the mask on the image, you will utilize:
- Meta AI’s SAM (Segment Anything Model), a very strong image segmentation model, you will utilize it to generate masks for input images.
StableDiffusionInpaintPipelinefrom Hugging Face library for text-guided inpainting with stable diffusion
First, you should create a notebook on Google Colab and set to use T4 GPU. At the beginning of the notebook, you should install all dependencies and load the checkpoint ViT-B (URL: https://dl.fbaipublicfiles.com/segment_anything/sam_vit_b_01ec64.pth, ) for SAM.
The code below should go first:
|
1 2 3 4 5 6 7 8 9 10 11 12 13 14 15 16 17 |
import numpy as np import torch import cv2 from PIL import Image from google.colab.patches import cv2_imshow !pip install 'git+https://github.com/facebookresearch/segment-anything.git' from segment_anything import sam_model_registry, SamPredictor !pip install diffusers accelerate from diffusers import StableDiffusionInpaintPipeline !wget -q -nc https://dl.fbaipublicfiles.com/segment_anything/sam_vit_b_01ec64.pth CHECKPOINT_PATH='/content/sam_vit_b_01ec64.pth' DEVICE = torch.device('cuda:0' if torch.cuda.is_available() else 'cpu') MODEL_TYPE = "vit_b" |
Next, you can upload an image to Colab for reconstruction. It can be done conveniently by clicking on the “File” icon on the left toolbar and then upload a file from your local computer:
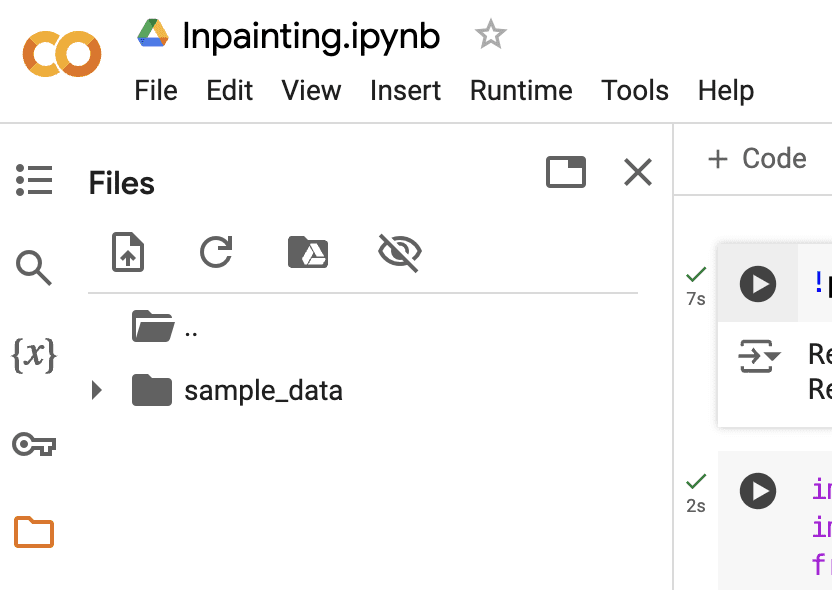
The left panel on Google Colab allows you to upload a file
The file you uploaded there is under the directory /content/ . You can load the image by providing the full path and convert it into RGB format:
|
1 2 3 4 5 6 7 |
# Give the path of your image IMAGE_PATH = '/content/Dog.png' # Read the image from the path image = cv2.imread(IMAGE_PATH) cv2_imshow(image) # Convert to RGB format image_rgb = cv2.cvtColor(image, cv2.COLOR_RGB2BGR) |
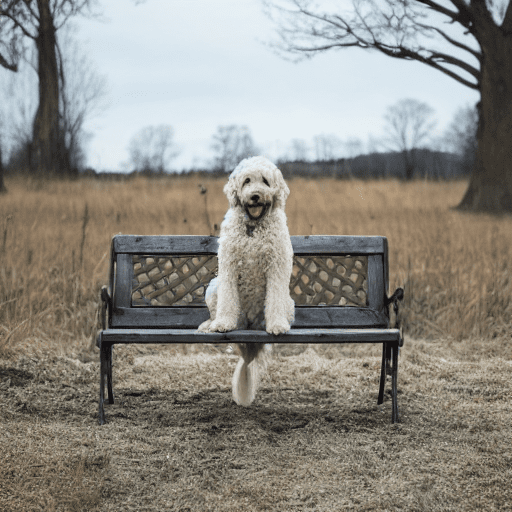
This is the sample image to start with:
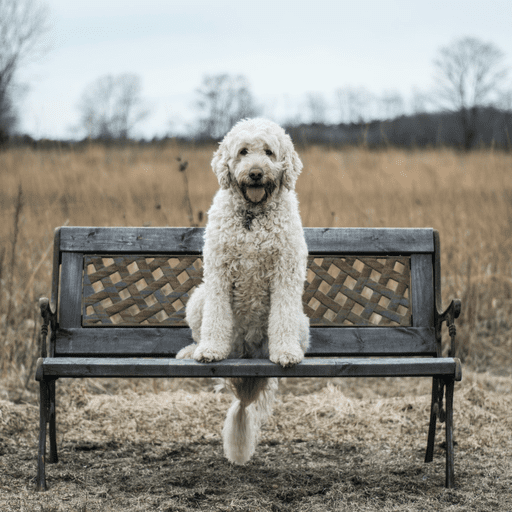
The sample picture to perform inpainting
Now load the SAM model with the checkpoint you have downloaded above. Here you are using the SamPredictor class to segment images. You provide image coordinates for the object to be masked, the model will automatically segment the image.
|
1 2 3 4 5 6 7 8 9 10 11 12 13 14 15 |
sam = sam_model_registry[MODEL_TYPE](checkpoint=CHECKPOINT_PATH) sam.to(device=DEVICE) mask_predictor = SamPredictor(sam) mask_predictor.set_image(image_rgb) # Provide points as input prompt [X, Y]-coordinates input_point = np.array([[250, 250]]) input_label = np.array([1]) # Predicting Segmentation mask masks, scores, logits = mask_predictor.predict( point_coords=input_point, point_labels=input_label, multimask_output=False, ) |
The object selected is the one with the pixel at position (250,250), i.e., at the center of the image. The array mask is a boolean array (for the binary image), we’ll convert it into pixel values, change the shape from (1,512,512) to (512,512,1), and convert it into black-and-white version.
|
1 2 3 4 5 6 |
mask = masks.astype(float) * 255 mask = np.transpose(mask, (1, 2, 0)) _ , bw_image = cv2.threshold(mask, 100, 255, cv2.THRESH_BINARY) cv2_imshow(bw_image) cv2.imwrite('mask.png', bw_image) del sam, mask_predictor # delete models to conserve GPU memory |
The mask created is as follows:
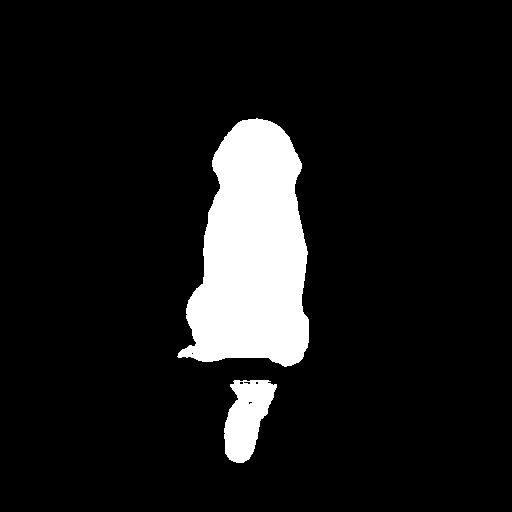
The mask created by SAM for inpainting. White pixels are to be changed and black pixels are preserved.
SAM has done its job by helping us generate a mask, now we’re ready to use Stable Diffusion for inpainting.
Create a pipeline using a Stable Diffusion model from Hugging Face repository:
|
1 2 3 4 5 6 7 8 |
# Load images using PIL init_image = Image.open(IMAGE_PATH) mask_image = Image.open('mask.png') pipe = StableDiffusionInpaintPipeline.from_pretrained( "runwayml/stable-diffusion-inpainting", torch_dtype=torch.float16 ) pipe = pipe.to(DEVICE) |
In the above, you used StableDiffusionInpaintPipeline and it works only for Stable Diffusion 1.x Inpainting models. If you are not sure your model is one, you can also try with AutoPipelineForInpainting instead and see if the correct architecture can be figured out automatically.
Now provide a prompt for the reconstruction and wait for the magic!
|
1 2 3 |
prompt = "a grey cat sitting on a bench, high resolution" image = pipe(prompt=prompt, image=init_image, mask_image=mask_image).images[0] image.save('output.png') |
This image is also created under the directory /content in Colab. You can now display the image like the previous:
|
1 2 |
image = cv2.imread('/content/output.png') cv2_imshow(image) |
This is what you may see:
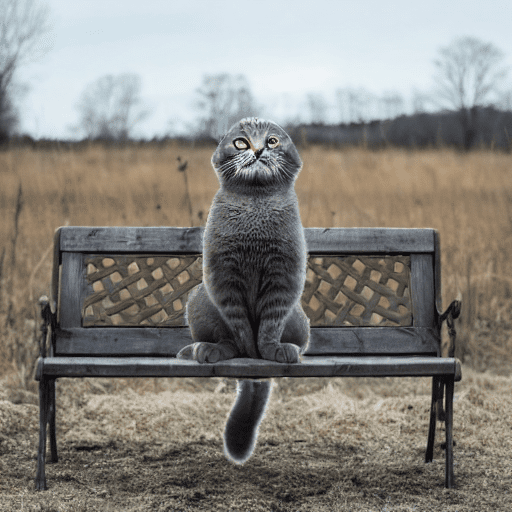
Result of inpainting
Congratulations on completing this quick tutorial! Now, here’s where the real fun begins. That’s it for this short tutorial, Note that in the example image, there’s only one main object (Dog), but if there are multiple objects or if you wanna try different masking techniques, try exploring SamAutomaticMaskGenerator or use the same SamPredictor but with bounding boxes to tackle different objects.
Outpainting with the Diffusers Library
Unlike inpainting, there is not a dedicated pipeline in diffusers library for outpainting. But in fact, outpainting is just like inpainting with some modification to the mask and the image. Let’s see how this can be done.
Same as before, you will need the same prerequisties such as set up a notebook with GPU and install the diffusers library. But instead of using SAM as a segmentation model to create a mask of an object inside the picture, you should create a mask to highlight the pixels outside the border of the picture.
|
1 2 3 4 5 6 7 8 9 10 |
# Give the path of your image IMAGE_PATH = '/content/Dog.png' # Read the image from the path image = cv2.imread(IMAGE_PATH) height, width = image.shape[:2] padding = 100 # num pixels to outpaint mask = np.ones((height+2*padding, width+2*padding), dtype=np.uint8) * 255 mask[padding:-padding, padding:-padding] = 0 cv2_imshow(mask) cv2.imwrite("mask.png", mask) |
The code above is check the original image for its size (and save into variables height and width). Then create a outpaint mask with 100 pixels border in such a way that an array of integer value 255 is created to match the size of the outpainted image, then set the center (excluding the padding) to zero value. Recall that zero value in the mask means the pixel would not change.
Next, you can create an “extended image” to match the shape of an outpainted one. Together with the mask created, you converted an outpainting problem into an inpainting problem in which the mask is along the border.
You can simply fill the pixels outside the original border with gray. You can easily do that with numpy:
|
1 2 3 4 |
# extend the original image image_extended = np.pad(image, ((padding, padding), (padding, padding), (0, 0)), mode='constant', constant_values=128) cv2_imshow(image_extended) cv2.imwrite("image_extended.png", image_extended) |
This is what the extended image looks like:

Extended image for outpainting
Now you can run the inpainting as in the previous section:
|
1 2 3 4 5 6 7 8 9 10 11 |
# Load images using PIL init_image = Image.open('image_extended.png') mask_image = Image.open('mask.png') pipe = StableDiffusionInpaintPipeline.from_pretrained( "runwayml/stable-diffusion-inpainting", torch_dtype=torch.float16 ) pipe = pipe.to("cuda") inpaint_image = pipe(prompt="a dog on a bench in a park", image=init_image, mask_image=mask_image).images[0] inpaint_image.save('output.png') |
You can check the output as follows:
|
1 2 |
image = cv2.imread('/content/output.png') cv2_imshow(image) |
and the result is the following:
Outpainting result. Note the trees are added on the side.
You may wonder why in outpainting you still need to provide a prompt. It is required by the pipeline’s API but you can provide an empty string as prompt. But describing the original picture is necessary indeed. You can try and observe the result with a different prompt such as “a framed picture of a dog on a bench”.
Further Reading
This section provides more resources on the topic if you want to go deeper.
- diffusers API manual
- StableDiffusionInpaintPipeline API
- Segment Anything Github
- Segment Anything Example Code
Summary
In this post, you have learned the building blocks to use Stable Diffusion for inpainting and outpainting with the diffusers library. In particular, you learned to use StablediffusionInpaintPipeline and SAM for image segmentation & creating masks for inpainting. You also learned how to convert an outpainting problem into an inpainting problem so you can do the same in Python code.


No comments yet.