
Stable Diffusion is trained on LAION-5B, a large-scale dataset comprising billions of general image-text pairs. However, it falls short of comprehending specific subjects and their generation in various contexts (often blurry, obscure, or nonsensical). To address this problem, fine-tuning the model for specific use cases becomes crucial. There are two important fine-tuning techniques for stable Diffusion:
- Textual inversion: This technique focuses on retraining the text embeddings of a model to inject a word as a subject.
- DreamBooth: Unlike textual inversion, DreamBooth involves the retraining of the entire model, tailored specifically to the subject, thereby enabling better personalization.
In this post, you will explore the following concepts:
- Fine-tuning challenges and recommended settings in DreamBooth
- Stable Diffusion fine-tuning with DreamBooth – Example
- Tips to use Dreambooth in Stable Diffusion effectively
Let’s get started
Training Stable Diffusion with DreamBooth
Photo by Sasha Freemind. Some rights reserved.
Overview
This post is in five parts; they are:
- What is DreamBooth?
- Fine-Tuning Challenges
- Workflow of Fine-Tuning with DreamBooth
- Using Your Trained Model
- Tips to Use DreamBooth Effectively
What is DreamBooth?
DreamBooth is a significant leap in generative AI particularly, Text2Img models. It is a specialized technique introduced by a group of Google researchers, to fine-tune pre-trained large Text2Img models such as Stable Diffusion towards specific subjects, characters, or objects. So now you can inject a custom object or a concept into the model for a more personalized and diverse generation. Here’s how Google researchers put it
It’s like a photo booth, but once the subject is captured, it can be synthesized wherever your dreams take you.
DreamBooth offers a range of exciting use cases across various fields primarily focused on enhancing image generation. This includes
- Personalization: Users can create images of loved ones, pets, or specific objects, making them suitable for gifting, social media, and personalized merchandise.
- Art and Commercial Purposes: Artists and designers can train the model with their artwork to generate diverse artistic images and visualizations. It’s also beneficial for commercial purposes, allowing tailored image generation for branding and marketing needs.
- Research and Experimentation: DreamBooth is a powerful tool for researchers. It enables exploring deep learning models, domain-specific applications, and controlled experiments. By fine-tuning models, researchers can push the boundaries of generative AI and gain new insights into its potential.
With just a few images of your subject, along with its class name during training and a specially tailored prompt during inference, you can generate personalized outputs. Let’s dive into the DreamBooth fine-tuning process:
- Create a fine-tuning image dataset
Include a few (3-5) high-quality and representative images of your subject. The model will learn to get accustomed to the subject based on the training data so it needs to be carefully designed. Further details are discussed in the fine-tuning section. - Bind a unique identifier and class name
The subject must be associated with a rare token not frequently used in the text model’s vocabulary. The model will recognize the subject through this unique identifier. To maintain the original essence of the subject, you also need to provide a class name (which the model already knows) during training. For example, you can associate a personal pet dog with an identifier “[V]” and a class name “dog,” so when prompted “a [V] dog sitting,” the model will recognize the pet dog’s identifier when generating a dog image.

Fine-tuning a model. Image from DreamBooth
The first criterion above is important for obvious reasons in image generation. The second criterion is also important because you are not training Stable Diffusion from scratch but fine-tuning the existing model to adapt to your dataset. The model already learned what a dog is. It is easier to learn that your token is a variation of a dog than to unlearn a word (i.e., reassign the meaning of a word to a totally different concept) or to learn a new word from scratch (e.g., learn what a dog is from a model that never saw any animal).
Fine-Tuning Challenges
To fine-tune a Stable Diffusion model means restarting the training from an existing model known to work. This particular type of training has some challenges:
- Overfitting
Overfitting occurs when the model memorizes training data too closely, forgetting how to generalize. It starts performing well only on training data but flops on new data. Since you only provide a handful of images to Dreambooth, it’s likely to overfit quickly. - Language drift
Language drift is a common occurrence in fine-tuning language models and extends its impact to Txt2Img models. During fine-tuning, models might lose vital information on the diverse representations of subjects within a class. This drift causes models to struggle to generate varied subjects within the same category, affecting the richness and diversity of outputs.
Here are a few DreamBooth settings, and by carefully adjusting these, you can make the model more adaptable to generate diverse outputs while also reducing the risk of overfitting and language drift:
- Optimizing learning rate and training steps
Tuning the learning rate, training steps, and batch size is crucial to overcome overfitting. A high learning rate and many training steps cause overfitting (affecting diversity). A small learning rate and fewer training steps will underfit the model (failing to capture the subject). Therefore, starting with a lower learning rate and progressively increasing training steps until generation seems satisfactory is suggested. - Prior-preservation loss
This is done by generating new samples (around 200 to 300) of the same class along with the subject’s images and then adding these to our training image set. These additional images are generated by the stable diffusion model itself via a class prompt. - GPU-efficient techniques
Techniques like 8bit-Adam (supports quantization), fp16 mixed precision training (reduces the precision of gradient calculation to 16-bit float), and gradient accumulation (computes gradients in small steps rather than for entire batch) can help optimize memory utilization and speed up training.
Workflow of Fine-Tuning with DreamBooth
We’re ready to start the fine-tuning process and use a simplified version of a diffuser-based DreamBooth training script, as below. With the above-mentioned GPU efficient techniques, you can run this script on a Tesla T4 GPU provided in the Google Colab Notebook.
Before starting, you should set up the environment. In a notebook cell, you use the following to run shell commands:
|
1 2 3 4 5 6 7 |
!wget -q https://github.com/ShivamShrirao/diffusers/raw/main/examples/dreambooth/train_dreambooth.py !wget -q https://github.com/ShivamShrirao/diffusers/raw/main/scripts/convert_diffusers_to_original_stable_diffusion.py %pip install -qq git+https://github.com/ShivamShrirao/diffusers %pip install -q -U --pre triton %pip install -q accelerate transformers ftfy bitsandbytes natsort safetensors xformers |
In the above, the training script downloaded is named train_dreambooth.py. A conversion script is also downloaded to process the training output. Some packages are installed in the Python environment. To verify it works, you can run these imports in a new cell to make sure no error is triggered:
|
1 2 3 4 5 6 7 8 9 10 11 12 13 |
import json import os from google.colab import files import shutil from natsort import natsorted from glob import glob import torch from torch import autocast from diffusers import StableDiffusionPipeline, DDIMScheduler from IPython.display import display |
Training a Stable Diffusion model is resource-hungry. It is better to leverage some online resources to store the model. The script assumes you signed up for a Hugging Face account and obtained the API tokens. Please provide your access token within the designated field labeled as HUGGINGFACE_TOKEN for the script to work, i.e.,
|
1 2 3 |
!mkdir -p ~/.huggingface HUGGINGFACE_TOKEN = "put your token here" !echo -n "{HUGGINGFACE_TOKEN}" > ~/.huggingface/token |
Let’s specify our base model and output directory where the model gets saved. We’ll pass these variables when launching the script.
|
1 2 3 4 5 |
MODEL_NAME = "runwayml/stable-diffusion-v1-5" OUTPUT_DIR = "/content/stable_diffusion_weights/zwx" # Create output directory !mkdir -p $OUTPUT_DIR |
Now is the most crucial part of getting satisfactory and consistent results from DreamBooth. It’s important to use high-quality images that represent your subject. Note that the model will learn artifacts such as low resolution or motion blur within the training set. Here’s what should be considered while creating the dataset:
- Dataset size: As these models can overfit quickly, it’s better to include 10 to 120 samples of your subject. Crop them and resize them to 512×512 pixels
- Image diversity: Pick consistent samples of what you want exactly, and try including images from different angles. For diversity, you may need to include background scenes of people, landscapes, or animals/objects as well. Also, remove unwanted objects inside (e.g., watermarks, people cut off by the edge). Avoid using images with a plain or transparent background.
Before you upload the images to the Colab notebook, let’s run the following cell:
|
1 2 3 4 5 6 7 8 9 10 11 12 13 14 15 16 17 |
# The concepts_list is a list of concepts/subject, each represented as a dictionary concepts_list = [ { "instance_prompt": "photo of zwx dog", "class_prompt": "photo of a dog", "instance_data_dir": "/content/data/zwx", "class_data_dir": "/content/data/dog" }, ] # Create a directory for each concept according to its instance_data_dir for c in concepts_list: os.makedirs(c["instance_data_dir"], exist_ok=True) #Dump the concepts_list to a JSON file with open("concepts_list.json", "w") as f: json.dump(concepts_list, f, indent=4) |
After running this cell, the path mapped with instance_data_dir above is created as a directory. The images you prepared should be uploaded to the directory above using the File icon on the side panel of Colab notebook.
The instance_prompt is an example. You should update this to how you want to name your images. Using a new token (such as “zwx” above) as a unique identifier is encouraged. But the class_prompt should use only well-understood words to highlight the image.
In this example, we’re fine-tuning Stable Diffusion on Husky dogs, and we have provided 7 instance images. You can try something similar. After this cell, your directory structure may look like the following:
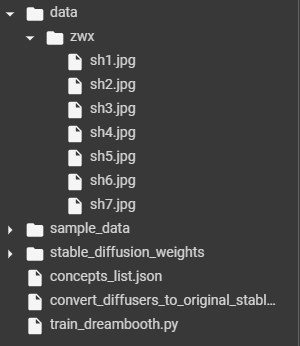
Directory as seen from the side panel of Colab Notebook containing the training images
Now you’re ready to start the training. The following table lists the best flags based on computational requirements. The limiting factor is usually the memory available on the GPU.
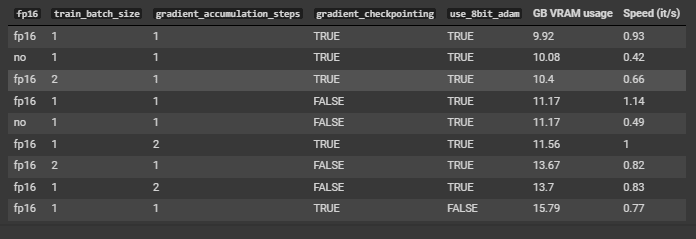
Recommended flags for training
Training is to execute the diffusers-provided training script. Here are some parameters you may consider:
--use_8bit_adamenables full precision and quantization support--train_text_encoderenables text-encoder fine-tuning--with_prior_preservationenables prior preservation loss--prior_loss_weightcontrols the strength of prior preservation
Creating and running the following as a cell on Colab notebook will do the training:
|
1 2 3 4 5 6 7 8 9 10 11 12 13 14 15 16 17 18 19 20 21 22 |
!python3 train_dreambooth.py \ --pretrained_model_name_or_path=$MODEL_NAME \ --pretrained_vae_name_or_path="stabilityai/sd-vae-ft-mse" \ --output_dir=$OUTPUT_DIR \ --revision="fp16" \ --with_prior_preservation --prior_loss_weight=1.0 \ --seed=1337 \ --resolution=512 \ --train_batch_size=1 \ --train_text_encoder \ --mixed_precision="fp16" \ --use_8bit_adam \ --gradient_accumulation_steps=1 \ --learning_rate=1e-6 \ --lr_scheduler="constant" \ --lr_warmup_steps=0 \ --num_class_images=50 \ --sample_batch_size=4 \ --max_train_steps=800 \ --save_interval=10000 \ --save_sample_prompt="photo of zwx dog" \ --concepts_list="concepts_list.json" |
Patiently wait for this script to complete. Then you can run the following to convert it into a format we can use:
|
1 2 3 4 5 6 7 8 9 |
WEIGHTS_DIR = natsorted(glob(OUTPUT_DIR + os.sep + "*"))[-1] ckpt_path = WEIGHTS_DIR + "/model.ckpt" half_arg = "" fp16 = True if fp16: half_arg = "--half" !python convert_diffusers_to_original_stable_diffusion.py --model_path $WEIGHTS_DIR --checkpoint_path $ckpt_path $half_arg print(f"[*] Converted ckpt saved at {ckpt_path}") |
The above will create the file model.ckpt under the directory as assigned to WEIGHTS_DIR (i.e., the latest checkpoint directory). This output file will be compatible with the Stable Diffusion Web UI by Automatic1111. If fp16 is assigned to True, it takes only half the space (i.e., 2GB), which is usually recommended.
Using Your Trained Model
The created model is just like any other Stable Diffusion model weight file. You can load it into the WebUI. You can also load it with your Python code, like the cell as follows:
|
1 2 3 4 5 6 7 8 9 10 11 |
model_path = WEIGHTS_DIR pipe = StableDiffusionPipeline.from_pretrained(model_path, safety_checker=None, torch_dtype=torch.float16 ).to("cuda") pipe.scheduler = DDIMScheduler.from_config(pipe.scheduler.config) pipe.enable_xformers_memory_efficient_attention() g_cuda = torch.Generator(device='cuda') seed = 52362 g_cuda.manual_seed(seed) |
Let’s try with four samples:
|
1 2 3 4 5 6 7 8 9 10 11 12 13 14 15 16 17 18 19 20 21 22 23 24 25 |
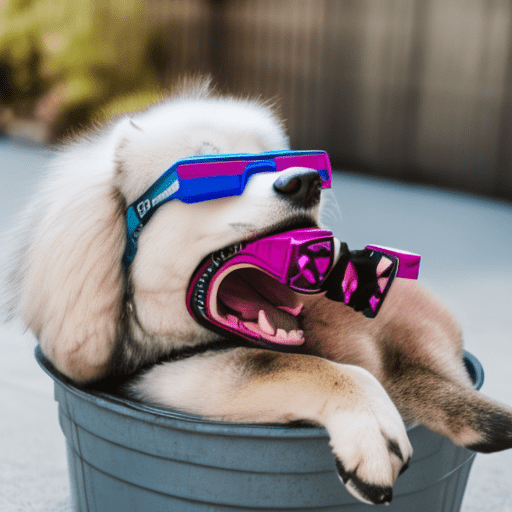
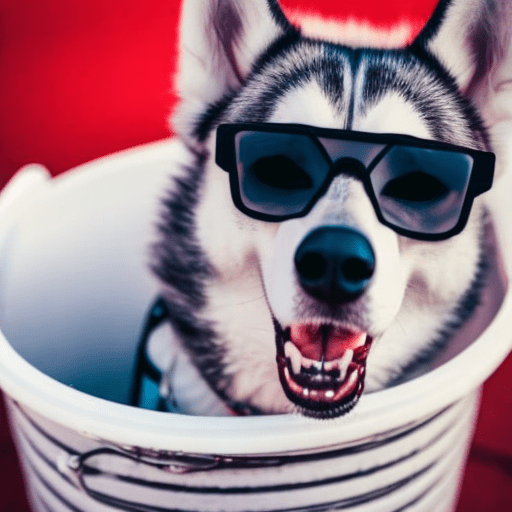
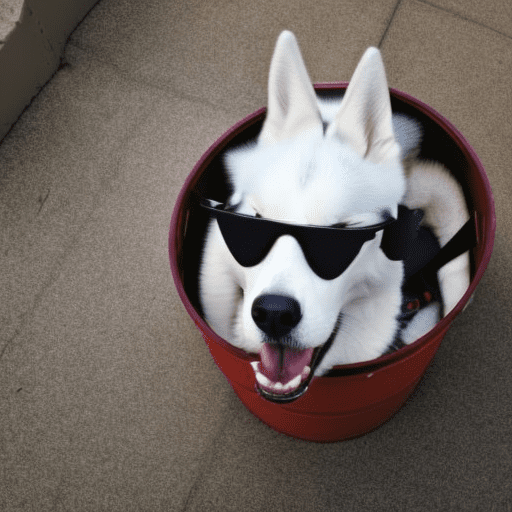
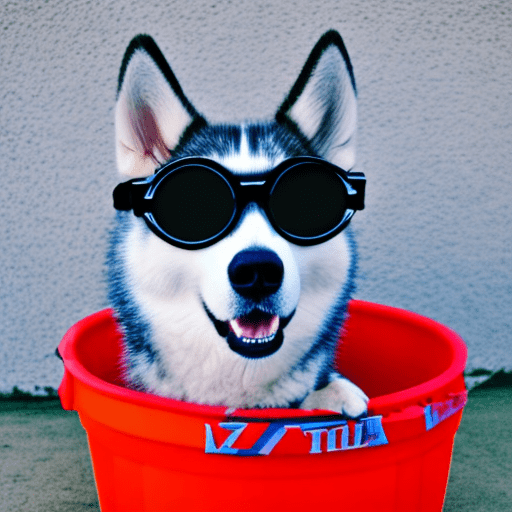
prompt = "photo of zwx dog in a bucket wearing 3d glasses" negative_prompt = "" num_samples = 4 guidance_scale = 7.5 num_inference_steps = 24 height = 512 width = 512 with autocast("cuda"), torch.inference_mode(): images = pipe( prompt, height=height, width=width, negative_prompt=negative_prompt, num_images_per_prompt=num_samples, num_inference_steps=num_inference_steps, guidance_scale=guidance_scale, generator=g_cuda ).images for img in images: display(img) # Free runtime memory exit() |
This is what the generated images look like:
That’s it!
Tips to Use DreamBooth Effectively
If you’re fine-tuning the model for faces, prior preservation is crucial. Faces require harder training as DreamBooth needs more training steps and a lower learning rate for fine-tuning on faces.
A scheduler like DDIM (preferred), PNDM, and LMS Discrete can help mitigate model overfitting. You should try using schedulers when the outputs seem noisy or lack sharpness or details.
In addition to U-Net training, training the text encoder can significantly enhance output quality (especially on faces), but it will cost memory; at least a 24GB GPU may be required. You can also optimize using the above-discussed GPU-efficient techniques.
Further Readings
This section provides more resources on the topic if you want to go deeper.
- LAION-5B dataset: https://laion.ai/blog/laion-5b/
- Countering Language Drift via Visual Grounding, by Lee et al (2019)
- DreamBooth
- DreamBooth training example from diffusers
Summary
Now that you’ve explored DreamBooth, it’s a powerful tool for refining Stable Diffusion models for personalized content. However, it faces challenges like overfitting due to fewer images and language drift. To make the most of DreamBooth, you have also seen a few optimization methods. Remember, success with DreamBooth depends on careful dataset preparation and precise parameter tuning. For deeper insights, refer to the detailed DreamBooth training guide.


No comments yet.