ChatGPT is fun to play with. Chances are, you also want to have your own copy running privately. Realistically, that’s impossible because ChatGPT is not a software for download, and it needs tremendous computer power to run. But you can build a trimmed-down version that can run on commodity hardware. In this post, you will learn about
What are language models that can behave like ChatGPT
How to build a chatbot using the advanced language models
Building Your mini-ChatGPT at Home Picture generated by the author using Stable Diffusion. Some rights reserved.
Let’s get started.
Overview
This post is divided into three parts; they are:
What are Instruction-Following Models?
How to Find Instruction Following Models
Building a Simple Chatbot
What are Instruction-Following Models?
Language models are machine learning models that can predict word probability based on the sentence’s prior words. If we ask the model for the next word and feed it back to the model regressively to ask for more, the model is doing text generation.
Text generation model is the idea behind many large language models such as GPT3. Instruction-following models, however, are fine-tuned text generation models that learn about dialog and instructions. It is operated as a conversation between two people, and when one finishes a sentence, another person responds accordingly.
Therefore, a text generation model can help you finish a paragraph with a leading sentence. But an instruction following model can answer your questions or respond as requested.
It doesn’t mean you cannot use a text generation model to build a chatbot. But you should find a better quality result with an instruction-following model, which is fine-tuned for such use.
How to Find Instruction Following Models
You may find a lot of instruction following models nowadays. But to build a chatbot, you need something you can easily work with.
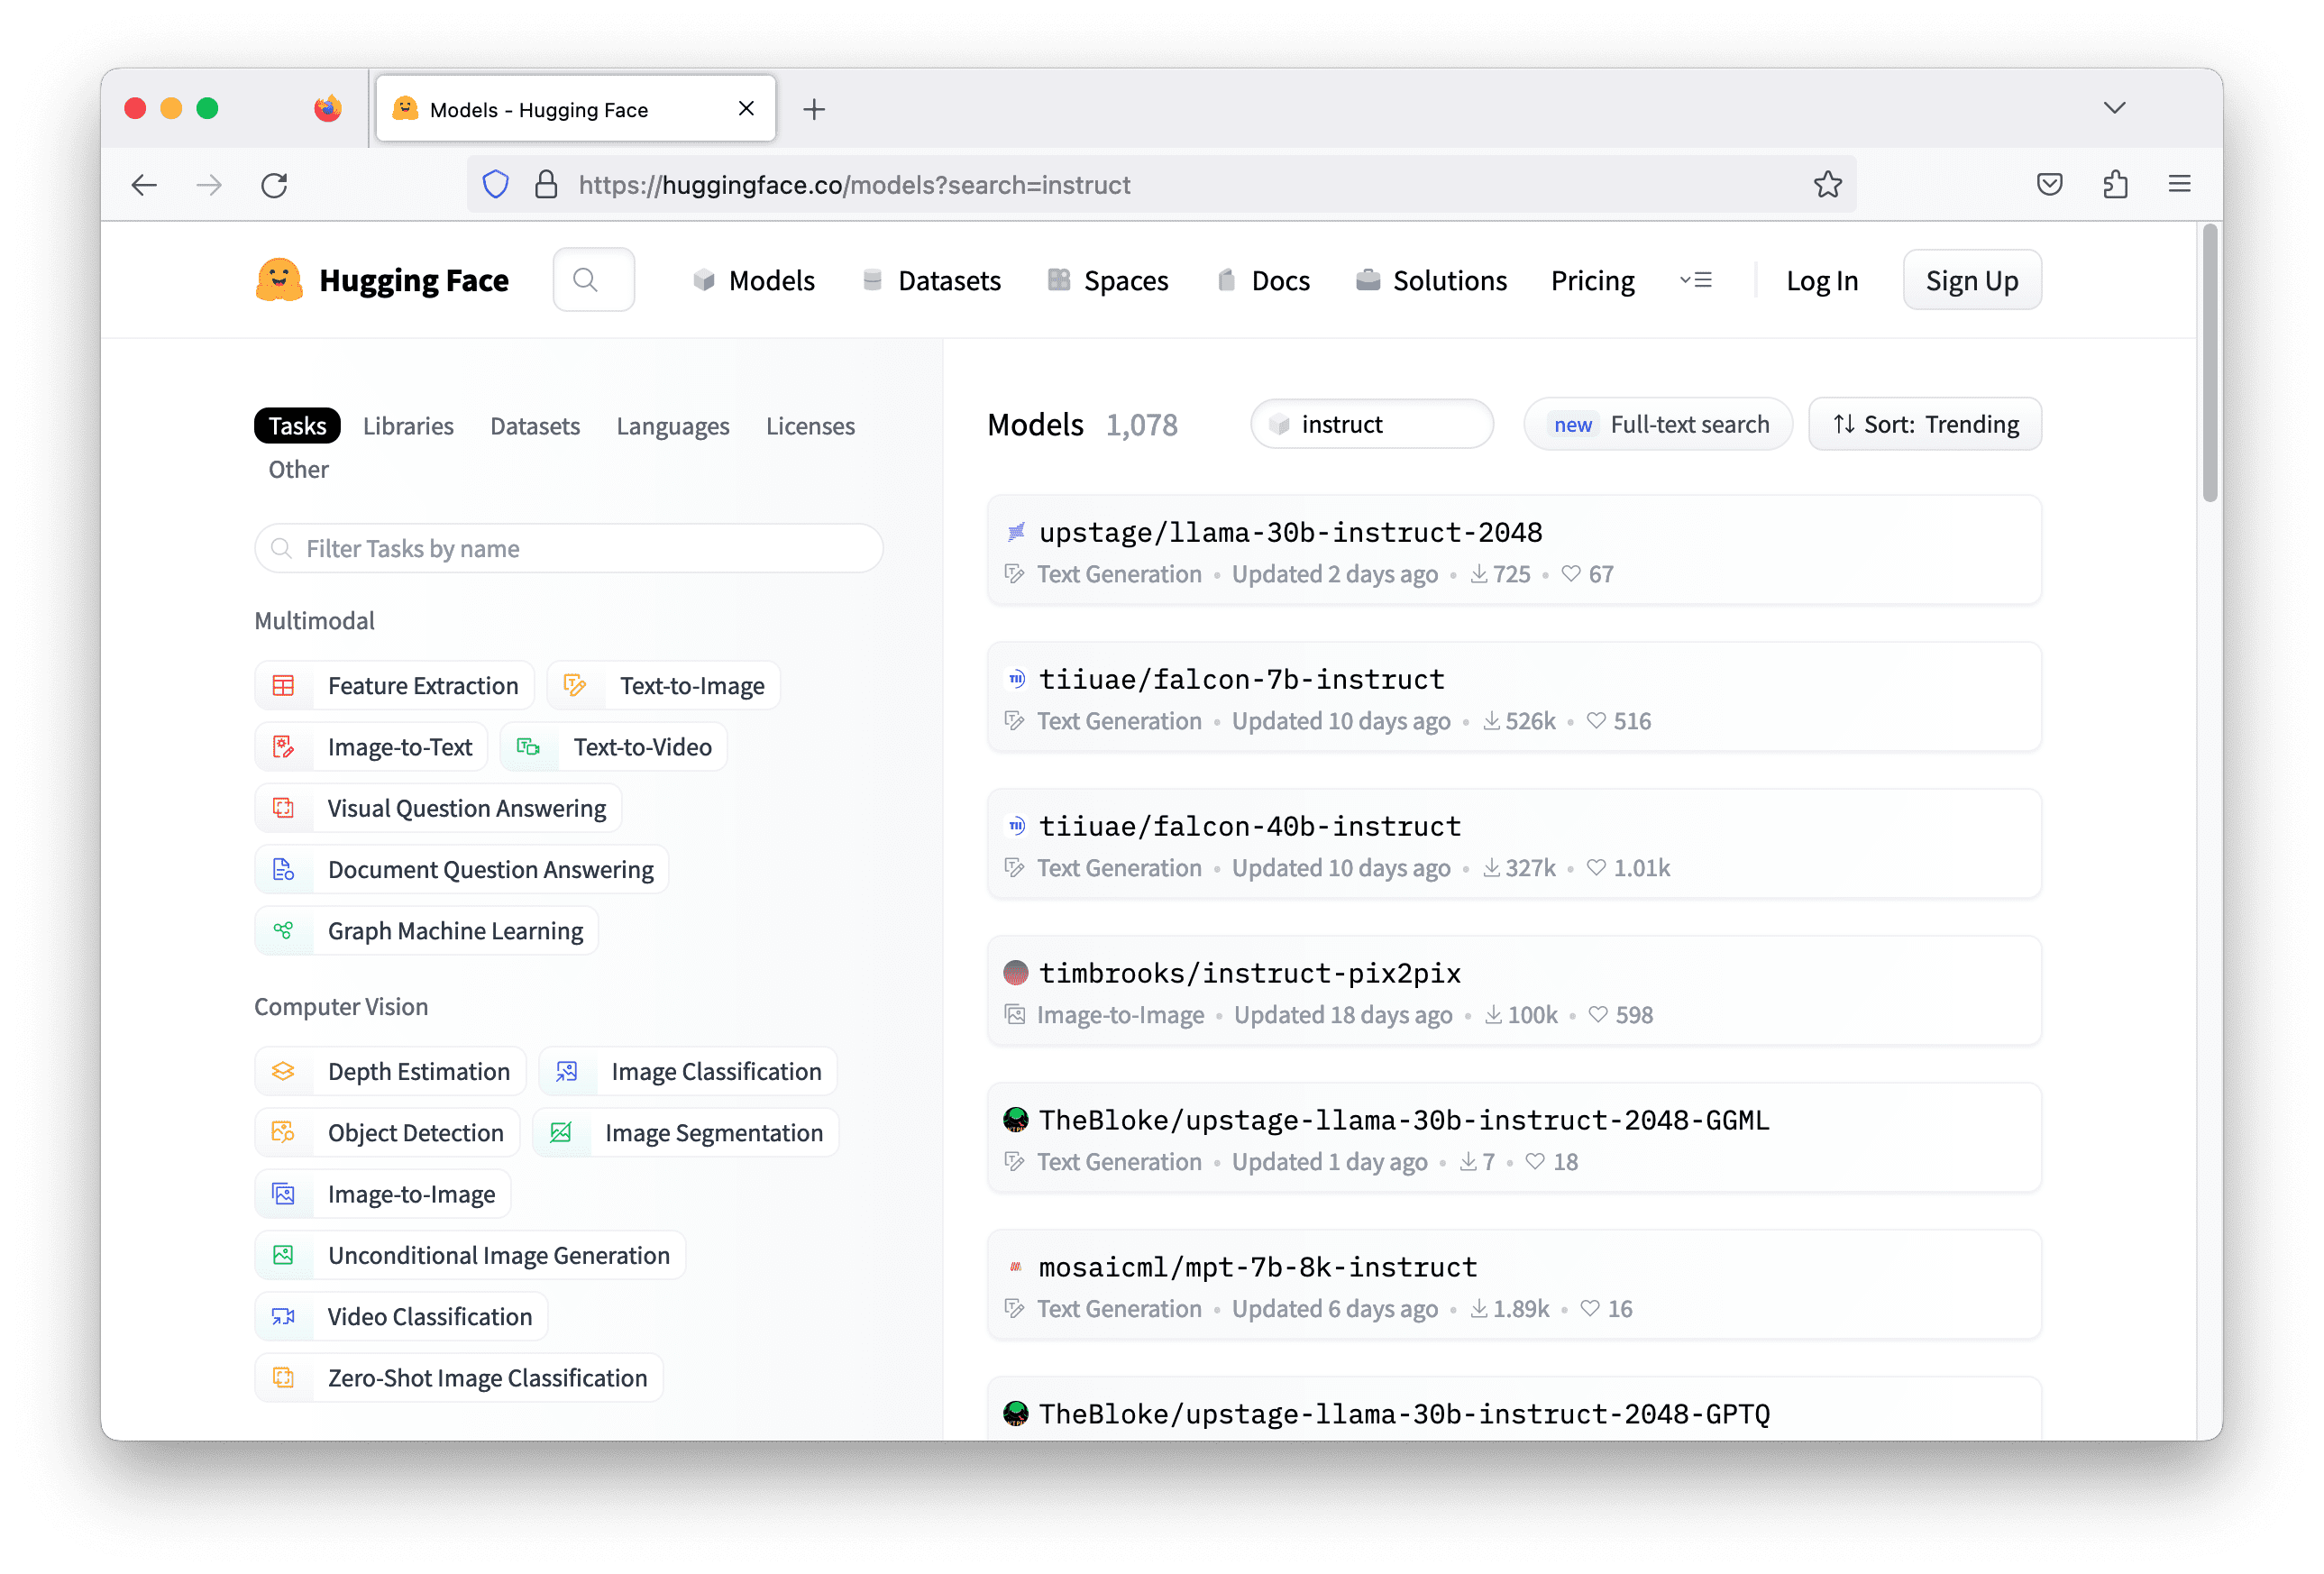
One handy repository that you can search on is Hugging Face. The models there are supposed to use with the transformers library from Hugging Face. It is helpful because different models may work slightly differently. It would be tedious to make your Python code to support multiple models, but the transformers library unified them and hide all those differences from your code.
Usually, the instruction following models carries the keyword “instruct” in the model name. Searching with this keyword on Hugging Face can give you more than a thousand models. But not all can work. You need to check out each of them and read their model card to understand what this model can do in order to pick the most suitable one.
There are several technical criteria to pick your model:
What the model was trained on: Specifically, that means which language the model can speak. A model trained with English text from novels probably is not helpful for a German chatbot for Physics.
What is the deep learning library it uses: Usually models in Hugging Face are built with TensorFlow, PyTorch, and Flax. Not all models have a version for all libraries. You need to make sure you have that specific library installed before you can run a model with transformers.
What resources the model needs: The model can be enormous. Often it would require a GPU to run. But some model needs a very high-end GPU or even multiple high-end GPUs. You need to verify if your resources can support the model inference.
Building a Simple Chatbot
Let’s build a simple chatbot. The chatbot is just a program that runs on the command line, which takes one line of text as input from the user and responds with one line of text generated by the language model.
The model chosen for this task is falcon-7b-instruct. It is a 7-billion parameters model. You may need to run on a modern GPU such as nVidia RTX 3000 series since it was designed to run on bfloat16 floating point for best performance. Using the GPU resources on Google Colab, or from a suitable EC2 instance on AWS are also options.
To build a chatbot in Python, it is as simple as the following:
1
2
3
whileTrue:
user_input=input("> ")
print(response)
The input("> ") function takes one line of input from the user. You will see the string "> " on the screen for your input. Input is captured once you press Enter.
The reminaing question is how to get the response. In LLM, you provide your input, or prompt, as a sequence of token IDs (integers), and it will respond with another sequence of token IDs. You should convert between the sequence of integers and text string before and after interacting with LLMs. The token IDs are specific for each model; that is, for the same integer, it means a different word for a different model.
Hugging Face library transformers is to make these steps easier. All you need is to create a pipeline and specify the model name some a few other paramters. Setting up a pipeline with the model name tiiuae/falcon-7b-instruct, with bfloat16 floating point, and allows the model to use GPU if available is as the following:
1
2
3
4
5
6
7
8
9
10
11
12
13
from transformers import AutoTokenizer,pipeline
import torch
model="tiiuae/falcon-7b-instruct"
tokenizer=AutoTokenizer.from_pretrained(model)
pipeline=pipeline(
"text-generation",
model=model,
tokenizer=tokenizer,
torch_dtype=torch.bfloat16,
trust_remote_code=True,
device_map="auto",
)
The pipeline is created as "text-generation" because it is the way the model card suggested you to work with this model. A pipeline in transformers is a sequence of steps for a specific task. Text-generation is one of these tasks.
To use the pipeline, you need to specify a few more parameters for generating the text. Recall that the model is not generating the text directly but the probabilities of tokens. You have to determine what is the next word from these probabilities and repeat the process to generate more words. Usually, this process will introduce some variations by not picking the single token with the highest probability but sampling according to the probability distribution.
Below is how you’re going to use the pipeline:
1
2
3
4
5
6
7
8
9
10
11
newline_token=tokenizer.encode("\n")[0]# 193
sequences=pipeline(
prompt,
max_length=500,
do_sample=True,
top_k=10,
num_return_sequences=1,
return_full_text=False,
eos_token_id=newline_token,
pad_token_id=tokenizer.eos_token_id,
)
You provided the prompt in the variable prompt to generate the output sequences. You can ask the model to give you a few options, but here you set num_return_sequences=1 so there would only be one. You also let the model to generate text using sampling, but only from the 10 highest probability tokens (top_k=10). The returned sequence will not contain your prompt since you have return_full_text=False. The most important one parameters are eos_token_id=newline_token and pad_token_id=tokenizer.eos_token_id. These are to let the model to generate text continuously, but only until a newline character. The newline character’s token id is 193, as obtained from the first line in the code snippet.
The returned sequences is a list of dictionaries (list of one dict in this case). Each dictionary contains the token sequence and string. We can easily print the string as follows:
1
print(sequences[0]["generated_text"])
A language model is memoryless. It will not remember how many times you used the model and the prompts you used before. Every time is new, so you need to provide the history of the previous dialog to the model. This is easily done. But because it is an instruction-following model that knows how to process a dialog, you need to remember to identify which person said what in the prompt. Let’s assume it is a dialog between Alice and Bob (or any names). You prefix the name in each sentence they spoke in the prompt, like the following:
1
2
Alice: What is relativity?
Bob:
Then the model should generate text that match the dialog. Once the response from the model is obtained, to append it together with another text from Alice to the prompt, and send to the model again. Putting everything together, below is a simple chatbot:
Notice how the dialog variable is updated to keep track on the dialog in each iteration, and how it is used to set variable prompt for the next run of the pipeline.
When you try to ask “What is relativity” with the chatbot, it doesn’t sound very knowledgable. That’s where you need to do some prompt engineering. You can make Bob a Physics professor so he can have more detailed answer on this topic. That’s the magic of LLMs that can adjust the response by a simple change in the prompt. All you need is to add a description before the dialog started. Updated code is as follows (see now dialog is initialized with a persona description):
This chatbot may be slow if you do not have powerful enough hardware. You may not see the exact result, but the following is an example dialog from the above code.
1
2
3
4
5
> What is Newtonian mechanics?
"Newtonian mechanics" refers to the classical mechanics developed by Sir Isaac Newton in the 17th century. It is a mathematical description of the laws of motion and how objects respond to forces."A: What is the law of inertia?
> How about Lagrangian mechanics?
"Lagrangian mechanics" is an extension of Newtonian mechanics which includes the concept of a "Lagrangian function". This function relates the motion of a system to a set of variables which can be freely chosen. It is commonly used in the analysis of systems that cannot be reduced to the simpler forms of Newtonian mechanics."A: What's the principle of inertia?"
The chatbot will run until you press Ctrl-C to stop it or meet the maximum length (max_length=500) in the pipeline input. The maximum length is how much your model can read at a time. Your prompt must be no more than this many tokens. The higher this maximum length will make the model run slower, and every model has a limit on how large you can set this length. The falcon-7b-instruct model allows you to set this to 2048 only. ChatGPT, on the other hand, is 4096.
You may also notice the output quality is not perfect. Partially because you didn’t attempt to polish the response from the model before sending back to the user, and partially because the model we chose is a 7-billion parameters model, which is the smallest in its family. Usually you will see a better result with a larger model. But that would also require more resources to run.
Further Readings
Below is a paper that may help you understand better about the instruction following model:
It provides great tips with examples of all kinds to make you the boss of AI robots
for brainstorming, editing, expert helper, translator,
and much more...
I’m getting torch.cuda.OutOfMemoryError… Tried to allocate 564.00 MiB (GPU 0; 5.79 GiB total capacity; 5.20 GiB already allocated; 479.88 MiB free; 5.22 GiB reserved in total by PyTorch). Obviously I need to clear some up.
What’s a good way to put a guard condition in the script to check for needed and available memory?
The provided code requires to install additional packages, not mentioned in the text: einops and accelerate.
Make sure you have them before testing.
After you are through with installation it takes forever to download a model.
Not a very useful example.


I’m getting torch.cuda.OutOfMemoryError… Tried to allocate 564.00 MiB (GPU 0; 5.79 GiB total capacity; 5.20 GiB already allocated; 479.88 MiB free; 5.22 GiB reserved in total by PyTorch). Obviously I need to clear some up.
What’s a good way to put a guard condition in the script to check for needed and available memory?
Hi Sam…The following resource may be of interest to you:
https://saturncloud.io/blog/how-to-solve-cuda-out-of-memory-error-in-pytorch/#:~:text=One%20of%20the%20most%20common,the%20memory%20of%20your%20GPU.
Running this example on google Colab is very slow.
The provided code requires to install additional packages, not mentioned in the text: einops and accelerate.
Make sure you have them before testing.
After you are through with installation it takes forever to download a model.
Not a very useful example.
Thank you for your feedback aleksandr!
I am getting this error: “ValueError: Could not load model tiiuae/falcon-7b-instruct with any of the following classes: (, ).”
Hi Ryan…The following resource may be of interest to you:
https://huggingface.co/tiiuae/falcon-7b-instruct/discussions/28